8
Building the X Window System
By necessity, you can't do anything with X until it is installed on your system. This chapter tells you how to build and install X.
In This Chapter:
Types of Vendor-supplied X Distributions
Complete or Client-only Distribution?
Installing Multiple X Releases
Do You Have Enough Disk Space?
Creating a Link Tree (Optional)
Changing the tmp Directory Using TMPDIR (Ultrix and HP-UX)
Changing the tmp Directory Using -temp (SunOS)
Shared Library Installation (SunOS)
NFS Installation Without Root Access
Installation Over the Network (rdist)
Installing the termcap or terminfo Definition for xterm
The Platform Configuration File (platform.cf)
Building Programs After X Is Installed
A Quick Tour of Files Used by imake
Undefined Symbols or Functions
8
Building the X Window System
This chapter tells you how to build and install X. If X is already installed, you can skip this chapter unless you want to learn more about what goes on “under the hood.”
If X isn't installed on your system, you have two choices: you can build it yourself or you can purchase pre-built binaries. This chapter begins by telling you what you need to know to make that decision.
If you decide to build X yourself, this chapter tells you how. The amount of work involved in building X depends on the type of installation, the platform you use, and the resources that are available to you (such as disk space, time, tape drive or CD/ROM drive.) You should explore each of these factors before you attempt to build X.
8.1 Installation Issues
First you need to decide what you want to install. This section gives a short description of what types of distributions are available. The easiest installations are described first and without much detail. If your configuration falls under one of these categories, then you can bail out of this chapter early.
If your installation requires more thought (or if you are curious), the remainder of the chapter provides a guide to completing all but the most complicated installations.
8.1.1 Should You Use MIT Source?
The first thing you need to do is to determine whether you want to build X from the MIT sources (“vanilla” or “stock” X11), or whether you'd rather install binaries provided by a vendor.
Using X11 binaries supplied by a vendor has the following advantages:
- X supplied by an OS vendor may be easier to use and may be better integrated with application software than the “stock” MIT X11. Some examples of integrated X distributions would be SGI's IRIX 4.0 environment, SCO Open Desktop and Sun OpenWindows.
- Vendors usually provide a stable release of X. (MIT releases go through many “fixes” before they settle down, because they usually provide new functionality earlier than the vendor-supplied releases.)
- The vendor may add new functionality to the X11 distribution; for example, the vendor may provide support for display PostScript, the Silicon Graphics Graphics Language (GL), special hardware (such as graphics accelerator cards), and multi-processor operating systems.
- Some applications may require vendor-specific features that are unavailable in the stock MIT release of X11. An example of this would be Sun's AnswerBook documentation viewer, which runs only under the Sun OpenWindows server.
- You can call technical support (or send e-mail) if you have a question or complaint. (Whether this leads to a resolution of your problem is another topic altogether.)
- Installation of a vendor-supplied X package is usually a breeze, and often requires little technical knowledge.
- MIT may not provide a server that supports all of the vendor's hardware.
Building and configuring the MIT sources has the following advantages:
- Support for the “stock” X11 distribution is pretty good: patches to serious problems are made publicly available quickly. Anyone with a network connection can pick up a patch to the MIT source via ftp, or get it via e-mail.
- Vendors are sometimes very slow to update their X product. You are likely to tire of fighting problems with your vendor release if you know the problem is fixed or never existed in a newer MIT release. Other X products that you want to use may work only on releases newer than your vendor's. It can be frustrating to be behind in X development because the version of X that came with your system is holding you up.
- You can standardize the X distribution across several platforms by building the MIT version for each platform. A common X11 distribution would greatly simplify a heterogeneous network environment.
- The MIT source code is free.
8.1.2 Types of Vendor-supplied X Distributions
Vendor-supplied X can be further divided into two groups:
- X that comes from the vendor of your operating system
- X that comes from third-party suppliers
For both of these categories, the documentation that comes with the package is your best resource for information on installing their X11 release. Software installation methods tend to be very system-specific and may change significantly between OS releases.
8.1.2.1 X from Your OS Vendor
Some examples of vendor-supplied X11 are OpenWindows from Sun, DECWindows from DEC, and AIXWindows from IBM. X from your OS vendor is probably the easiest to install. In fact, you may not have to install it at all—more and more UNIX platforms are being shipped with the OS and software packages (such as X) already installed, so you might luck out and have everything in place when your system is delivered. You should be able to tell if X11 is pre-installed by looking in the directory /usr/bin/X11 or the directory that your vendor uses (typically /usr/openwin for OpenWindows, /usr/lpp/X11 for AIXWindows, etc). If the directory is not empty, you probably have at least some portion of the software already installed. Some systems have tools to tell you what software is installed. For example, setld –i on Ultrix and versions on IRIX. You could also try starting the window system with xinit (or openwin) to see what happens.
If you need to install an X distribution provided by your OS vendor, the installation procedure for the X package should be similar to that of any other package that is bundled with the operating system. The X package installation should require whatever tool is normally used for installing software on that platform, i.e., setld for Ultrix, inst for IRIX, cdm or extract_un-bundled for SunOS, etc.
The vendor may break the X11 package into separate components: an “execution-only” package that allows you to run X servers and clients, and a “development” environment for compiling new X applications. The development environment includes the X libraries, header files and imake configuration files. (See Appendix E for more information on the components of the standard X distribution.) If you intend to write your own X programs or compile any of the public domain X applications available on the Internet, you should install a full development environment. See Appendix B for information on installing public domain software.
Be aware that some vendors charge extra for the X11 distribution, and others include it in the cost of the operating system. You should ask the salesperson about this before you order your software configuration.
8.1.2.2 X from a Third Party
There are several third-party vendors who provide pre-compiled X11 distributions for some of the more popular platforms. Some vendors are listed in Appendix F and in the comp.windows.x Frequently Asked Questions list.
Third-party X distributions are usually derived from recent MIT releases without adding much functionality. If you are up to the task of building X from the MIT source, you can probably duplicate a third-party distribution for your platform and save some money. However, it may be easier to purchase a third-party X installation than try to figure out what patches, bug fixes, and work-arounds are necessary to build it on your platform. You might also be able to get invaluable technical support from a third-party vendor.
Furthermore, building the MIT distribution is resource-intensive, consuming large amounts of disk space and CPU time. If these resources are in short supply, this may be reason enough to buy a pre-built X distribution.
8.1.3 X Source Code from MIT
A major part of deciding whether to use the MIT source or a pre-built X distribution is how much work it will be to configure the sources and build X yourself. You might say that the amount of work required to build X on your platform falls into one of three categories:
- Easy—MIT X11 for your software and hardware platform is one that is well-tested and commonplace. Relax and enjoy the experience: you may be able to build and install X by typing only a few simple commands and get away with not having to understand the building process at all. (This is pretty amazing considering the size and complexity of the software.) You may need some minor adjustments on your system, but they should not be more difficult than any other tasks you face as a system administrator. Platforms on which your build is likely to be trouble-free are a Sun3 or Sun4 running SunOS 4.1.1, a DEC 3100 running Ultrix 4.2, and an RS/6000 running AIX 3.1. Section 8.3 shows an example of a trouble-free build.
- Some thinking required—You need to find out what magic flags or little fixes are required to get the MIT source compiled and running on your system. This may require some detective skills and an understanding of how the building process takes place. A typical situation that would fall in this category would be building the MIT source on an operating system that is slighter newer or older than the one described in the MIT documentation. Section 8.5 shows some examples of X builds that may require a little thinking.
- You are on your own—Your platform was bought at a garage sale ... the manufacturer went out of business three years ago and you are the only person who bought one ... or your platform is so new that you are the only one who has heard of it. Whichever it is, this chapter addresses only the most minor of the problems you might encounter. This chapter will help you compile the libraries and clients, but your big problem is getting an X server written. Writing an X server on a new machine is quite an undertaking, and is beyond the scope of this book.
Which category do you belong in? Well, the degree to which X from MIT source will work on your system has a lot to do with how popular your platform is. The best way to find out how much work is involved is to read the release notes, which can usually be found in a file called RELNOTES.TXT in either the top-most directory of the MIT source or under the mit/ subdirectory.* In the R5 source tree, a postscript version is available in RELNOTES.PS, and troff source (using ms macros) is in a file called RELNOTES.ms.
The release notes in the R5 source tree list the supported platforms under the section entitled “Building the Release”:
3.  Building the Release

The core distribution (code under the mit directory) has been
built and tested at MIT on the following systems:

AIX 3.1.5, on IBM RS/6000
AT&T Unix System V Release 4 V2, on AT&T WGS6386
A/UX 2.0.1
HP-UX 7.0, on HP9000/s300
IRIX 4.0
Mach 2.5 Version 1.13, on OMRON Luna 88k
NEWS-OS 3.3, on Sony NWS-1850
NEWS-OS 5.0U, on Sony NWS-3710
SunOS 4.1.1, on Sun 3, Sparc 1, and Sparc 2
Ultrix-32 4.2, VAX and RISC
UNICOS 5.1
UTek 4.0
VAX 4.3bsd (with unknown local changes)
 ...
If your platform is listed in the release notes, then you're probably in good shape. If not, you may still be in good shape: the X distribution is frequently ported to new platforms, with the binary distribution made publicly available. The best way to track the progress of the X distribution on your platform is to watch the appropriate Usenet newsgroup, or post a query to either that newsgroup or to comp.windows.x.*
Some examples of useful “ports” that appear outside of the official MIT distribution are the XNeXT distribution for NeXT workstations, the X386 server binary for 386-based UNIX machines, and patches for Sun Solaris 2.0.
8.1.4 Complete or Client-only Distribution?
Before buying an X distribution or investing any time in building one from source, you still have a few more decisions to make.
First, you need to decide whether you want a complete distribution or a client-only distribution. A complete distribution includes a server, clients, libraries, header files, fonts and configuration files. A client-only distribution could include only the clients and, if necessary, shared libraries for dynamically linked executables. If you wanted to compile X programs, you would also need libraries and header files.
Client-only installations make sense for hosts that don't have a bitmapped console display, such as a fileserver, compute server, or NFS server. The X clients are expected to display on remote X servers (for example, X terminals) across a network. Complete distributions make sense for workstations and for development environments.
8.1.5 Installing Multiple X Releases
Next, you should consider whether you want more than one release of the MIT X11 installed at one time. This would come in useful if you intend to test an X application under more than one X release.
For example, you might want to have Sun OpenWindows, MIT R4, and MIT R5 distributions residing on your platform at the same time: you could do this so you can test clients under each environment. Each distribution can have its own directory hierarchy.
As a example of this, OpenWindows could be installed under /usr/openwin, MIT X11R4 under /usr/X11R4, and MIT X11R5 under /usr/X11R5:

Another possibility is that you can run a server from one MIT release with the client distribution from another. You might do this if you are installing a new version of X that doesn't supply a server for your workstation console: you can continue to use the vendor supplied server with updated clients until an updated server is available for your display hardware.
Mixing clients with a server from a different release may have unexpected results. For example, newer X servers have the SHAPE extension, which allows windows to be shapes other than rectangular. If you run the oclock client under a server without this extension, it would appear as a square instead of a circle, as shown in Figure 8-1.

With the SHAPE extension, oclock appears as it should, as shown in Figure 8-2.

8.2 Source Preparation
You can obtain the source code to X from any of the sites listed in Appendix F. The directory structure may vary slightly, but at the top of the source directory should be the mit/ and contrib/ directories. The contents of the mit/ directory are usually referred to as the core distribution. The core software is supported by MIT and is usually included in every X distribution. The contrib/ area is composed of “contributed” software that is not directly supported by MIT. If you have a problem with contrib software, you would typically complain directly to the author of the specific package, instead of to the X Consortium.
Over time, programs are promoted from contrib to core status if they gain MIT support, or demoted from core to contrib if they become obsolete (as uwm was). It is unusual to compile the entire contrib distribution; the typical practice is to compile and install the entire core distribution and then selectively compile just the sections you want from contrib. If you are using a common platform, you will likely be able to survive with only the core software.
When you have obtained the source, there are a few things to do before you can install X:
- Figure out if you have enough disk Space.
- Figure out to what extent your platform is supported.
- Make sure your platform is up to date with OS patches.
- Apply all the patches to the X distribution.
- Create a link tree (optional).
8.2.1 Do You Have Enough Disk Space?
One of the first problems that many run into is the amount of disk space consumed by the source code. On top of that, additional disk space is needed to compile and install the source code.
| Description | Size (in Mbytes) |
| R5 core source | 79 |
| R5 contrib source | 135 |
| Building R5 core | approx. 50-120 |
| Building R5 contrib | 300+ |
| Installing R5 core | 25-60 |
| Installing R5 contrib | 150+ |
The amount of space required for compiling the core distribution varies considerably from operating system to operating system. The type of processor (e.g., CISC or RISC), debugging options and shared libraries will all affect the size of the installation. Read Section 8.4.1 for some ideas on how to reduce the amount of disk space required for compilation and installation.
8.2.2 Is Your Platform Supported?
Before you go anywhere, find out if your platform is one of those supported by the X11 release that you want to build. As suggested in Section 8.1.3, look at the RELNOTES.TXT file in the mit/ directory. If your operating system and platform are listed, you are very likely to be able to produce a working version with very little work. The supported platforms are listed in the section entitled “3. Building the Release”:
 ...
The core distribution (code under the mit directory) has been built and
tested at MIT on the following systems:

 AIX 3.1.5, on IBM RS/6000
 AT&T Unix System V Release 4 V2, on AT&T WGS6386
 A/UX 2.0.1
 HP-UX 7.0, on HP9000/s300
 IRIX 4.0
 ...
If you are unsure of what type of platform and operating system you are running, use one of the following methods to figure it out:
- Check the packaging of the OS distribution software for release and version information.
- The uname command is available on most systems. For example:
% uname -a
SunOS ruby 4.1 2 sun4
This indicates that the host ruby is a Sun4 running SunOS 4.1.
% uname -a
A/UX quartz 2.0.1 SVR2 mc68030
The host quartz is a Macintosh running AUX 2.0.1.
% uname -a
IRIX pebble 4.0.1 11150233 IP6
The host pebble is a Silicon Graphics running IRIX 4.0.1.
- The /etc/motd file is sometimes helpful:
% cat /etc/motd
SunOS Release 4.1.2 (RUBY) #1: Fri May 29 10:55:44 EDT 1992
You may also extract the OS name from the kernel using the strings command:
% strings /vmunix | grep SunOS
SunOS Release 4.1.2 (RUBY) #1: Fri May 29 10:55:44 EDT 1992
- The arch or mach commands are available on some systems to tell you the architecture of the host:
% mach
sparc
% arch
sun4
- Ask someone who knows.
The next question is, does an X server exist for your display hardware? Check the release notes for the supported displays on your platform. The section entitled “Structure of the MIT sources” contains a list of supported servers:
           ...
DECstation 2100/3100 monochrome and color displays DECstation 5000 CX
and MX displays IBM RS/6000 skyway adapter Macintosh monochrome and
color displays MIPS monochrome and color displays
           ...
You need to find out what sort of display hardware you have, and then find out whether it is supported for your platform. If you don't know what type of display is installed on your system, some operating systems provide a command that might help. For example, SunOS has the dmesg command, which reports system diagnostics. Among these diagnostics is a line reporting what sort of display hardware was installed at boot time.
% /etc/dmesg
      ...
cgthree0 at SBus slot 2 0x0 pri 7
      ...
cgthree0 is a color frame buffer. As the boot messages may get lost with time, you could also reboot the system and watch it during the auto-config phase where it looks for each attached device.
The manual pages for the X server should contain descriptions of supported graphics hardware.* They are located in subdirectories of the server source code. A quick way to find them is:
% find mit/server -name ′*.man′ -print
mit/server/ddx/macII/XmacII.man
mit/server/ddx/sun/constype.man
mit/server/ddx/sun/Xsun.man
mit/server/ddx/sun/kbd_mode.man
mit/server/ddx/dec/qvss/Xqvss.man
mit/server/ddx/dec/qdss/Xqdss.man
mit/server/ddx/dec/ws/Xdec.man
mit/server/ddx/mips/Xmips.man
mit/server/ddx/x386/X386.man
 ...
The manual page for Xsun lists the cgthree as a supported display:
/dev/cgthree0
      This color diaplay is available on both the Sun386i
      and SPARCstation 1 platforms.
You may also find some information in README files in the server source directory:
% find mit/server -name README -print
mit/server/ddx/ibm/README
mit/server/ddx/macII/README
mit/server/ddx/sun/README
mit/server/ddx/omron/README
mit/server/ddx/cfb/README
mit/server/ddx/x386/README
mit/server/ddx/x386/cfb.banked/README
The cgthree is mentioned in mit/server/ddx/sun/README:
      ...
Sun/2 bw2 cg2/3/5
Sun/3 bw2 cg2/3/4/5
SPARCstation cg3/6
      ...
From this information, you can determine that the Sun server supports the cgthree frame buffer that you have installed on your system.
If your platform is supported and a server exists for your display hardware, then you're home free.
8.2.3 Applying OS Patches
You should make sure your OS has the latest patches, as the MIT X distribution may rely on a patch being in place in order for it to work properly. This is especially true for security and compiler patches, as X relies on setuid programs and also tends to expose weaknesses in compilers during the build process.
The mechanism for obtaining OS patches varies depending on the vendor, but it usually involves a support contract or calling for technical support. Some vendors make their OS patches available on the Internet or from mail servers.
8.2.4 Applying X Patches
Before continuing with the build, you should verify that you're using the latest version of the MIT source and have all official MIT “fixes,” or patches, applied. Some patches may affect installation or close security holes, so it's always a good idea to install the latest patch.
If you obtained the sources from a reputable location and they appear to be unmodified, try looking at the file mit/bug-report. There should be a line resembling:
R5, patch-level-0
“patch-level-0” indicates that no official patches have yet been applied. The patch-level number is incremented as each patch (or “fix”) is applied.
You should go back to wherever you obtained the MIT source for the available patches. If you got the source from export.lcs.mit.edu, the patches are in the /pub/R5/fixes directory. The contents of this directory are:
fix-01          fix-05          fix-09          fix-13          sunGX.uu
fix-02          fix-06          fix-10          fix-14
fix-03          fix-07          fix-11          fix-15
fix-04          fix-08          fix-12          fix-16
There are 16 patches available for R5 at the time of this writing.*
The fixes are small enough to be sent through mail and are available through a mail archive server. See Section A.3 for information on getting a patch through the mail.
Patches are applied using the patch program. If patch isn't already installed on your system, the source for this program is available in the mit/util/patch directory.
The top of each patch file describes how to use the patch program to install the patch, for example:
 Release 5 Public Patch #1
 MIT X Consortium

This patch comes in two parts: this file, and the file “sunGX.uu”.
(If you obtained this patch via the xstuff mail daemon, and you
do not have “sunGX.uu”, get it with the request “send fixes
sunGX.uu”.)

To apply this patch:

cd to the top of the source tree (to the directory containing the
“mit” and “contrib” subdirectories) and do:
 patch -p -s < ThisFile
Patch will work silently unless an error occurs. You will likely
get two warning messages, which can be ignored:
 mkdir: mit: File exists
 mkdir: mit/hardcopy: File exists
If you want to watch patch do its thing, leave out the “-s”
argument to patch.

Next, from the same top-level directory do:
 uudecode sunGX.uu
 rm -f mit/server/ddx/sun/sunGX.o.dist
 uncompress mit/server/ddx/sun/sunGX.o.dist
        ...
This example assumes you created a directory for patches called fixes in the mit/ directory. Apply the first patch (fix-01) simply by following directions:
% ls mit/fixes
fix-01       fix-05          fix-09          fix-13          sunGX.uu
fix-02       fix-06          fix-10          fix-14
fiX-03       fix-07          fix-11          fix-15
fix-04       fix-08          fix-12          fix-16
% patch -p -s < mit/fixes/fix-01
mkdir: mit: File exists
mkdir: mit/hardcopy: File exists
% uudecode mit/fixes/sunGX.uu
% rm -f mit/server/ddx/sun/sunGX.o.dist
% uncompress mit/server/ddx/sun/sunGX.o.dist
(As mentioned in the instructions, the mkdir errors can be ignored.)
Make sure you follow the directions and pay careful attention to the ordering of the patches. When you have exhausted all the available patches, the “patch-level” number will be incremented to the number of the last patch.
If you get an error message such as:
reversed (or previously applied) patch detected! Assume -R? [y]
then abort the patch program, as it is likely that you are applying the patches in the wrong order or are applying the same patch twice.
Patches to contrib software are applied in a fashion similar to the core patches, but they are organized by specific packages. If you obtain them from the host export.lcs.mit.edu, they are in the directory /pub/R5/contrib-fixes.
8.2.5 Creating a Link Tree (Optional)
One method of managing the X source distribution is to create a “link tree” of the MIT source code. The directory structure is the same as the original MIT distribution, but the files in the directories are symbolic links back to the original files. If the X distribution is built within the link tree, the object files and libraries will reside in the copy, not in the original. Using link trees makes it possible to build any number of different sets of binaries from one set of source code files. This makes it very easy to maintain a group of binaries for different platforms. It also conserves disk space, as the symbolic links will take up less space than a copy of the source files. If you are going to build the distribution only once, however, you may not want to use a link tree, since it complicates the directory structure and uses up disk space when creating links.
Link trees may be the only way to effectively use read-only copies of the X source, such as those mounted from a CD/ROM.
For example, the source area could look like:
% ls -F
mit/          rs_aix31/          sun3_411/
pmax_ul42/    sgi_40/            sun4_411/
The rs_aix31, sun3_411, pmax_ul42, sgi_40, and sun4_411 directories* are link trees that are linked back to the mit directory. MIT supplies a shell script called lndir that creates the tree for you. You can find lndir in the source distribution as mit/util/scripts/lndir.sh.
- Install the lndir program:
# cp mit/util/scripts/lndir.sh /usr/local/bin/lndir
# rehash
- Create a directory for the tree to reside in:
# mkdir sun4_411
- cd into the new directory:
# cd sun4_411
- Run the lndir program, supplying the relative path of the original source tree:
# lndir ../mit
config:
extensions:
include:
PEX:
lib:
xinput:
 ...
When lndir finishes, you will be left with a usable copy of the X source tree.
8.3 Simplest Case Build
If you have confirmed that you have adequate disk space, have applied all the available patches, and are working on a supported platform, then you may be able to install the X core software quickly and painlessly.
This example uses the Sun4 running SunOS 4.1.1, as it is one of the most trouble-free builds. If you want to build X using all default settings, change directories to the top of the distribution (usually mit/) and type:
% make World >& world.log
If you would like to monitor the progress of the build, use the tail program on the log file:
% tail -f world.log
The build will probably take several hours on even the fastest machines.
When the make is complete, check for errors; any build problems should be reported in the file world.log.* Examine the file for the messages “not made because of” or “Error.” You can the grep program to search for the “:”, as it is commonly present in error messages:
% grep “:” world.log
Sun Jun 7 23:12:09 PDT 1992
make: Fatal error: Command failed for target ‘subdirMakefiles’
make: Fatal error: Command failed for target ‘Makefiles’
make: Fatal error: Command failed for target ‘World’
make: Fatal error: Command failed for target ‘World’
If there are no errors, the next step is to install the distribution. In this example, we use the default installation pathnames—see Section 8.5.1.2 for information on how to change the default pathnames.
If you want to install X as an unprivileged user, you will need write permission to /usr/lib, /usr/bin, /usr/include, /usr/man/man3, and /usr/man/mann. It is probably easier to install X as root, instead of touching up permissions after the installation is completed. (The permissions for the installed files are very important to the security of the X distribution.)
Become the superuser:
% su
Password:
Install the distribution:*
# make install >& install.log
Install the manual pages (if desired):
# make install.man >& man.log
If there are no errors at this point, X should be installed and usable. Any remaining administration work would involve customizing the installed files for your site. For example, you may want to configure the X Display Manager. If so, see Chapter 3 for more information.
8.4 Host Problems
There are some problems that can disturb even the default X build. These problems have more to do with the host configuration than with the X installation itself; that is, problems with disk space, shared libraries, or NFS.
8.4.1 Disk Space
There are several stages in the build process that can consume large amounts of disk space.
Optimization options
The -O flag to the C compiler turns on optimization and can generate very large temporary files. These files are usually written to /tmp.
The -g flag to the compiler tells it to include information in the object files to be used by a debugger. This can increase the size of the executable to five or more times the size of an object compiled without the -g flag, depending on the compiler used.
Library creation
The ar command builds libraries and may generate large temporary files, usually written to /tmp. The HasLargeTmp configuration flag controls the location of the temporary file when the library for PEX (the PHIGS Extension to X) is created. If HasLargeTmp is set to YES, the /tmp directory is used; if set to NO, ar will use the current directory to store the temporary file. You can also choose not to build the PEX library by setting the BuildPex flag to NO—see Section 8.5.1 on build flags).
Since most of the temporary files are stored in the /tmp directory, you need to have anywhere from 10 to 20 megabytes free in /tmp. If this is not possible, most compilers and archivers allow alternate directories to be specified. To find out how to redefine which directory to use for temporary files on your system, see the manual pages for the C preprocessor (usually named cpp), the C compiler (usually cc), the ranlib command, and the ar command.*
8.4.1.1 Changing the tmp Directory Using TMPDIR (Ultrix and HP-UX)
On some systems, the ar command checks if the environment variable TMPDIR is set. If so, ar uses the specified directory as an alternate location for temporary files. You might set TMPDIR if you ran out of disk space. For example, if the make produces the following errors:
ar rul libphigs.a archive/ar*.o c_binding/cb*.o cp/cp*.o cp/psl.o
css/
css*.o error/
er*.o input/sin*.o pex-pex*.o util/ut*.o ws/ws*.o ws_type/wstx*.o
ranlib libphigs.a
/usr/bin/ranlib: 13832 Memory fault - core dumped*** Error code 139
*** Error code 1
Stop.
*** Error code 1
Stop.
*** Error code 1
Stop.
The ranlib program has run out of disk space and has died. You can set TMPDIR and start the build process again:
% setenv TMPDIR .
This tells ar to create temporary files in the directory from which the ar command is invoked, instead of in /tmp.
8.4.1.2 Changing the tmp Directory Using -temp (SunOS)
On some systems, the C compiler accepts the -temp= flag to specify an alternate directory for temporary compiler files. The optimizing pass of the compiler will sometimes create large files, causing an error such as:
compiler(iropt) error: write_irfile: No space left on device
*** Error code 1
Stop.
*** Error code 1
Stop.
*** Error code 1
Stop.
Call cc with the -temp= flag to redefine where temporary files are placed:
% cc -O -temp=/mondo -c foo.c
If you want this flag to be used when building the entire X distribution, it will have to be added to the platform configuration file (e.g., sun.cf) for it to show up in every Makefile. See Section 8.5.2 for an example of configuring your platform configuration file to use the -temp= flag.
8.4.2 Shared Library Installation (SunOS)
Under SunOS, the location of shared libraries is stored in a cache file called /etc/ld.so.cache. The cache file needs to be rebuilt whenever a shared library is added to the system. The X distribution adds several shared libraries, and most clients cannot run until the cache is updated. Clients will report an error message such as:
ld.so: libX11.so.5: not found
Running the ldconfig command (as root) should fix this:
# ldconfig
(Rebooting the system would also work, since ldconfig is run from /etc/rc.local at boot time.)
If the X binaries are intended to be NFS-mounted and executed on diskless workstations, you need to repeat the process on each of the remote machines. Since each host has its own private /etc/ld.so.cache file, the ldconfig command has to be run on each of the diskless workstations. To simplify this process, you can use the rdist program, or even use a simple shell script. The following is an example using the C shell:
# foreach I (host1 host2 host3 host4)
? rsh $I ldconfig
? end
(This example depends on each of the remote workstations having the fileserver listed in /.rhosts)
8.4.3 NFS Installation
You may choose to install X on a filesystem that is NFS-mounted from another host. You'll have problems installing X if the NFS-mounted filesystem does not allow root access over the NFS link. For security reasons, it's a bad idea to allow remote root users to write to your filesystem, but you can add root access temporarily to allow you to build X.
For root to be able to write to an NFS-mounted partition, you need an entry for the local system in the /etc/exports file on the remote system.* For example, to give temporary root permission for the /usr directory to the host named rock, you could change the following line in /etc/exports:
/usr -access=rock
to:
/usr -root=rock,access=rock
On systems with the newer version of NFS, run the exportfs command to make this take effect:
rubble# exportfs -v /usr
re-exported /usr
Back on the local host, the installation can proceed from this point as if it was taking place on a local filesystem. Build X on rock:
% make world >& world.log
      ...
When the installation is complete, the entry in /etc/exports should be changed back to what it was and then re-exported with the exportfs command:
rubble# exportfs -v /usr
re-exported /usr
8.4.3.1 NFS Installation Without Root Access
An alternative to giving temporary NFS root access to the remote directory is to install the distribution as an unprivileged user and change the ownership of the files later. The problem with this approach is that it opens the system to attack during the installation, so it should be avoided if possible.
For this example, the ownership of the target directories is changed just long enough for the installation to take place. The permissions are then touched up as root. As in the previous example, the host that has the compiled X source on it is named rock and the host that NFS-mounts the rock partition is named rubble.
- Become the superuser on rubble:
rubble% su
Password:
- Create any directories you need that do not exist:
rubble# mkdir /usr/bin/X11 /usr/lib/X11 /usr/include/X11
- Change ownership of the top level installation directories to your user ID (eap, in this example). Note that someone breaking into your account would also be able modify the system areas while they are writable by you.
rubble# chown eap /usr/bin/X11 /usr/lib/X11 /usr/include/X11
/usr/lib /usr/man/man3 /usr/man/mann
- Now complete the installation under your own account on rock. Install the distribution from the NFS-mounted partition:
rock% make install >& install.log
Install the manpages if you want them:
rock% make install.man >& man.log
- Back on rubble, change the ownership back to root and group wheel:*
rubble# chown -R root.wheel /usr/bin/X11 /usr/lib/X11
/usr/include/X11 /usr/man/man3 /usr/man/mann
The -R flag recursively chowns all files in subdirectories. If the chown command on your system does not support the -R option, you could use the find command instead:
rubble# find /usr/bin/X11 /usr/lib/X11 -exec chown root.wheel {} ; rubble# find /usr/include/X11 -exec chown root.wheel {} ; rubble# find /usr/man/man3 /usr/man/mann -exec chown root.wheel {} ; - Change ownership for only the top-level directory of /usr/lib, as this maintains ownership information on the many non-X11 files within this directory:
rubble# chown root /usr/lib
- Now fix permissions for the xterm and xload clients.
rubble# chmod 4755 /usr/bin/X11/xterm
rubble# chgrp kmem /usr/bin/X11/xload
rubble# chmod 2755 /usr/bin/X11/xload
(xterm needs to be installed setuid root. xload needs to be setgid group kmem, as /dev/kmem is readable only by the kmem group.)
Under SunOS, you will also need to rebuild the shared library cache, as described in Section 8.4.2:
rubble# ldconfig
8.4.3.2 Installation Over the Network (rdist)
A software distribution mechanism such as rdist may also be used to install X, but it will require at least one complete installation to be in place before it can be distributed to other hosts. To use rdist, a “master” copy is created on one host, and then rdist is used to duplicate it on other hosts.
rdist commands can be supplied on the command line or in a command file called a Distfile. A sample Distfile might look like this:
HOSTS = ( rubble )
FILES = ( /usr/lib/lib*X* /usr/lib/libphigs.a /usr/bin/X11
          /usr/lib/X11 /usr/include/X11 /usr/man/mann /usr/man/man3)

${FILES} -> ${HOSTS}
 install ;
 notify root@rubble ;
This Distfile copies an X distribution over to a host named rubble. The notify keyword sends mail describing what files have been installed. This is handy if you run the command regularly to keep the X distribution updated.
The Distfile can executed with the following command line:
source# rdist  -f Distfile
updating rubble
For a network of Sun workstations, you can also use the special command within the Distfile to run the ldconfig command on the remote host whenever a new shared library is copied over:
special /usr/lib/lib*X*.so.* /usr/etc/ldconfig ;
See the manual page for rdist for more information.
8.4.4 Installing the termcap or terminfo Definition for xterm
The xterm program works best with the xterm terminal definition supplied in the mit/clients/xterm directory. If xterm does not work properly, or is missing altogether, you may need to install the terminal definition. For example, the following is an error caused by a missing description for xterm when you log in and your .login script tries to set the terminal type using tset:
% telnet crufty
Trying 140.186.64.3 ...
Connected to crufty.ora.com.
Escape character is ‘^]’.

login: eap
Password:

TERM=(xterm)
Type xterm unknown
TERM=(unknown)
You might also get error messages when you try using your favorite editor:
% vi foo
xterm: Unknown terminal type
I don't know what kind of terminal you are on - all I have is ‘xterm’.
[Using open mode]
“foo” [Read only] 3564 lines, 133099 characters

:q!
% emacs foo
emacs: Terminal type xterm is not defined.
You could use vt102 as a temporary value until you are able to install the xterm entry.
% setenv TERM vt102
The terminal definition for systems using termcap can be installed simply by inserting the contents of the file called mit/clients/xterm/termcap into the /etc/termcap file on your system. It's a good idea to insert the termcap definition before any other definitions, since xterm is likely to be used frequently.
The terminfo definition can be installed by using the terminfo compiler, tic. For example:
# tic mit/clients/xterm/terminfo
(Note that you must be root for this to succeed.)
The terminfo definition is placed in /usr/lib/terminfo/x/xterm.
See the Nutshell Handbook termcap and terminfo (O'Reilly & Associates, 1991) for more information on the termcap and terminfo terminal databases.
8.5 Simple Configuration
If you are not satisfied with the default configuration, you can change some simple configuration parameters, as described in this section. These parameters need to be configured before the build is begun.
The files used to configure the X compilation and installation reside in the directory mit/config. The syntax within these files should look familiar if you have used the C preprocessor (cpp) before. If you are not familiar with C preprocessor syntax, you should still be able to do the right thing by looking at other examples within the configuration files. Section 8.7 gives some more background on imake syntax; for most configurations, you can probably figure it out on your own.
You need to modify two files that will affect the build process: site.def, which defines parameters for your particular site, and a platform-specific file (e.g., sun.cf) which defines parameters for your particular platform.
A list of systems and their corresponding .cf files can be found in the mit/RELNOTES.TXT file, under the section “3.2.1 The vendor.cf file.” Find the appropriate platform.cf file from this table:
 ...
AIX ibm.cf
AOS ibm.cf
AT&T Unix SVR4.2 att.cf
A/UX macII.cf
BSD bsd.cf
ConvexOS convex.cf
DG/UX DGUX.cf
 ...
Before you modify any of these files, make a backup copy. (You should probably choose some extension other than .bak or .orig, as these extensions have special significance to other programs.)
% cd mit/config
% cp sun.cf sun.cf.keep
% cp site.def site.def.keep
You could also use a revision control system, such as RCS or SCCS.
You may also have to give yourself write permission to the files:
% chmod u+w sun.cf site.def
8.5.1 Configuration Parameters
There are many configuration parameters that you can modify. Only a subset of those available are described here, as there are many special-purpose flags. The complete list is in mit/config/README.
8.5.1.1 site.def
The site.def file defines configuration parameters to be used for your entire site. Your site may include more than one type of platform or operating system; the site.def file is consulted regardless of the platform type, whereas the platform.cf file is looked at only when building on a particular platform.
An unmodified site.def looks like this:
#ifdef BeforeVendorCF

/* #define HasGcc YES */

#endif /* BeforeVendorCF */

#ifdef AfterVendorCF

/*
#ifdef ProjectRoot
#undef ProjectRoot
#endif
#define ProjectRoot /usr/X11R5
*/

#endif /* AfterVendorCF */
There are two sections to the site.def file. The first is delimited by the BeforeVendorCF conditional and the second by AfterVendorCF. As you might guess, the first section contains any flags that should be set before the platform.cf file is read, and the second section has flags that should be set afterwards.
(Note that the section containing the ProjectRoot flag is commented out with the /* and */ characters. The ProjectRoot flag is discussed in Section 8.5.1.2.)
A modified site.def might look something like this:
#ifdef BeforeVendorCF

/* #define HasGcc YES */

#endif /* BeforeVendorCF */

#ifdef AfterVendorCF

/*
#ifdef ProjectRoot
#undef ProjectRoot
#endif
#define ProjectRoot /usr/X11R5
*/
#define InstallXdmConfig YES
#define InstallXinitConfig YES
#define InstallFSConfig YES
#define StripInstalledPrograms YES
#define HasXdmAuth YES
#define ExpandManNames YES

#endif /* AfterVendorCF */
(You should consult the version of config/README that comes with your release, as many of the flags are release-specific.)
You might want to modify one or more of the following flags:
InstallXdmConfig
By default, the configuration files for the xdm program are not installed. By setting InstallXdmConfig to YES, the xdm configuration files are installed in /usr/lib/X11/xdm/.
Warning: If you have files in /usr/lib/X11/xdm/ that you have already configured, copy them to a safe place before starting the installation. Enabling this flag will overwrite files that you may have customized.
InstallXinitConfig
By default, the configuration files for the xinit program are not installed. By setting InstallXinitConfig to YES, they will be copied to /usr/lib/X11/xinit/. These files are used by the startx front end to xinit.
(The same warning for InstallXdmConfig applies here as well.)
The font server configuration files are not installed unless this flag is set to YES.
StripInstalledPrograms
Setting this flag to YES will strip binaries as they are installed. The usual reason for doing this is to save disk space: removing the symbol table from the binary will reduce its size. It will be difficult to debug any run-time problem if the programs are stripped, but this is not a concern to most X users.
HasXdmAuth
This flag indicates that the XDMCP library should include DES code. DES, or Data Encryption Standard, is an encryption scheme used in the authorization process. There are restrictions on exporting DES outside the United States. This flag must be on if you want to use the XDM-AUTHORIZATION-1 method of server access control. See Section 4.3 for more information.
ExpandManNames
Some operating systems have restrictions on filename length. To deal with this problem, the manual pages for X library functions have their names shortened to 14 characters. If your operating system does not have this problem, the manual page filename can be expanded to its full name (for example, XTranWCo.3 is expanded to XTranslateCoordinates.3).
HasLargeTmp
This flag indicates that you have enough disk space in /tmp for the ar command to create its temporary file. Setting this parameter to NO instructs ar to use the current directory.
InstallLibManPages
There are two sections of manpages: client manpages and library function manpages. If this flag is set to NO, it prevents the library manual pages from being installed with the make install.man command. This flag is set to YES by default. You might set it to NO if no one at your site intends to program in X and if disk space is low. (The library manpages consume approximately 2 megabytes of disk space.)
8.5.1.2 The ProjectRoot Flag
The ProjectRoot flag defines the “root” directory for the build. It is not used in the example site.def file, but can be easily enabled by removing the C comments surrounding this section:
#ifdef ProjectRoot
#undef ProjectRoot
#endif
#define ProjectRoot /usr/X11R5
If ProjectRoot is already defined, it is first undefined. (The reason for this test is that some of the platform.cf files define ProjectRoot by default. The C preprocessor will complain if a flag is defined twice.)
The typical use of this flag is to install X in a non-standard location. You might do this for one of the following reasons:
- You may need to have more than one release installed at one time. You could have X11R3 under /usr/X11R3, X11R4 under /usr/X11R4, and X11R5 under /usr/X11R5. This may be useful for migrating an application from one release to another. As it is much easier to install R5 in “non-standard” location than previous releases, you may wish keep a pre-R5 release in the default location and move R5.
- The release of X that you are installing does not include a server and you wish to leave the current X installation undisturbed. An example of this would be the SGI Indigo, as no R5 server exists for this platform, but the R5 libraries and clients are useful.
The directory specified in ProjectRoot becomes the root of the new installation, with the normal directories underneath it. If it is set to /usr/X11R5, this would be:

8.5.1.3 The Platform Configuration File (platform.cf)
The platform-specific configuration file contains information specific to a certain platform or type of machine. It changes the default behavior of imake, as imake will make assumptions unless told otherwise.* An example platform.cf file is sun.cf for Sun platforms, or sgi.cf for Silicon Graphics platforms.
There may be other subtypes within the platform. For example, Sun3, Sun4, and Sun386i machines are all described within the sun.cf file. A file of this type should be all you need to add when porting the X distribution to a new platform (other than new server code!).
Even though the platform has been narrowed down to a specific machine, there are still variables that could affect the installation process. These are:
- Operating system version. There are flags to describe the release of the OS you are running. You must change these flags if you are trying to building a version other than the one described in the MIT-supplied release notes.
#define OSName           SunOS 4.1.2
#define OSMajorVersion   4
#define OSMinorVersion   1
Any “features” specific to a release can be handled with conditional statements:
#if OSMajorVersion < 4 || (OSMajorVersion == 4 && OSMinorVersion < 1)
#define BootstrapCFlags   -DNOSTDHDRS
#define StandardDefines   -DNOSTDHDRS
#endif
- Operating system-specific features. There may be common software features missing on your vendor's release. Flags are provided to indicate their presence or absence:
 ...
#define HasVoidSignalReturn          NO
#define SetTtyGroup                  YES
#define UnalignedReferencesAllowed   NO
#define HasBsearch                   NO
 ...
- Build options. There are defaults for building the distribution on the optimal platform (or the one they had handy at MIT).
#define XsunServer         YES         /* has color and mono support */
#define XsunMonoServer     YES         /* monochrome only */
- Hardware options. You may have different graphics hardware or a floating-point chip that requires special treatment. In this example, the Sun3 (mc68000) processor has the mc68881 floating-point chip, but the Sun compiler does not use it by default.
#ifdef mc68000
#define DefaultCCOptions -f68881 -pipe
#else
#define DefaultCCOptions -pipe
#endif
The -f68881 flag is meaningless on the sun4 platform, requiring the test for a sun3 (mc68000) platform.
You may wish to change the following flags in the platform.cf file:
OSName
This is full name of the operating system release. For example:
SunOS 4.1.1
OSMajorVersion
The “major” version number for the OS release (the number in front of the decimal). The version flags should reflect the current system, as they will be tested for later on in the platform.cf file. For example:
#if OSMinorVersion >= 1
#define HasBsearch           YES
#else
#define HasBsearch           NO
#endif
OSMinorVersion
The “minor” version number.
A more precise version number for patch releases of the OS.
BuildServer
This flag controls whether the server should be built along with the rest of the X distribution. It is set to YES if the server exists; if a server doesn't exist for your platform, it is set to NO. You can also set it to NO if you don't want to build a server for some reason—for example, for the IBM RS/6000, the MIT server runs only on the Skyway display adaptor. If you do not have this particular board, you should set the BuildServer flag to NO.
Server Options
Look for any server specific options. This could include monochrome and color versions, as in:
#define XmfbpmaxServer NO
#define XcfbpmaxServer YES
8.5.2 Configuration Example 1
For this example, a Sun with limited available space in /tmp is being used. The -temp= flag is needed to specify an alternate directory for the temporary files from the compiler. See Section 8.4.1.2 for more information on the -temp= flag.
The -temp= flag needs to be supplied on every cc command line used in the X build. This means that it needs to make it into every Makefile used in the X distribution. You can accomplish this by editing the DefaultCCOptions parameter in the sun.cf file. (Being a very system-specific flag, this parameter is specified in the platform.cf file, not in the site.def file.) The README file in the mit/config/ directory describes all of the configuration parameters, including DefaultCCOptions:
DefaultCCOptions default special C compiler options
In sun.cf, DefaultCCOptions is currently specified with the following lines:
#ifdef mc68000
#define DefaultCCOptions -f68881 -pipe
#else
#define DefaultCCOptions -pipe
#endif
(The test for mc68000 is to add the flag for the mc68881 floating-point chip, available only on the sun3 platform.)
If you enough space in the area where you are building X, set the -temp= flag to the current directory (“.”). The C compiler will then use whatever directory it is invoked in for temporary files:
#ifdef mc68000
#define DefaultCCOptions -f68881 -pipe -temp=.
#else
#define DefaultCCOptions -pipe -temp=.
#endif
8.5.3 Configuration Example 2
In this example, the ibm.cf file is modified to overcome a permissions problem in AIX 3.1 on the RS/6000 platform. The problem arises when the make install command is issued. The chown program is executable only by root.* If you want to install X as an unprivileged user, this will cause the /usr/ucb/install program to fail with the following error:
/usr/ucb/install: /bin/chown: cannot execute
The section of interest in the unmodified ibm.cf is the one specific to the RS/6000. (AIX runs on several different platforms, including the PS/2, RT, and 370 systems.) The section we want is surrounded by the test for RsArchitecture:
 ...
#ifdef RsArchitecture
 ...
#define OPERATING_SYSTEM AIX
#define InstallCmd /usr/ucb/install
#include <ibmLib.rules>
#else
 ...
Redefine the InstallCmd parameter to the install.sh shell script that comes with the R5 release in the mit/util/scripts directory (the variable SCRIPTSRC is set to this).
#ifdef RsArchitecture
 ...
#define OPERATING_SYSTEM AIX
#define InstallCmd sh $(SCRIPTSRC)/install.sh.
#include <ibmLib.rules>
#else
Since attempting to run the /bin/chown command will result in an error, the program run by the install.sh script should be redefined to something harmless. All the program definitions are at the top of the install.sh script:
# put in absolute paths if you don't have them in your path; or
#use env.  vars.

mvprog=“${MVPROG:-mv}”
cpprog=“${CPPROG:-cp}”
chmodprog=“${CHMODPROG:-chmod}”
chownprog=“${CHOWNPROG:-chown}”
chgrpprog=“${CHGRPPROG:-chgrp}”
stripprog=“${STRIPPROG:-strip}”
rmprog=“${RMPROG:-rm}”
You can just reset the CHOWNPROG environment variable to the /bin/true script, since all it does is return a good exit status.
% setenv CHOWNPROG /bin/true
The install.sh program should then work when running make install as an unprivileged user:
% make install >& install.log
Since chown hasn't been run on any files, you will have to chown them later as root. See Section 8.4.3.1 for more information on touching up permissions after X is installed.
8.5.4 Configuration Example 3
If you are planning to add new fonts after installation, you may want to create a “local” directory that is always looked for by the X server. If this local directory is built into the X server, users will not have to manually modify the font path on the command line or in their start-up files.
To find the correct flag, take a look at the config/README file:
DefaultFontPath default server font path
To find the current value, search the config/Project.tmpl file:
#define DefaultFontPath $(FONTDIR)/misc/,$(FONTDIR)/Speedo/,
$(FONTDIR)/75dpi/,$(FONTDIR)/100dpi/
To override this definition, put your own version in config/site.def:
#define DefaultFontPath $(FONTDIR)/local,$(FONTDIR)/misc/,
$(FONTDIR)/Speedo/,$(FONTDIR)/75dpi/,$(FONTDIR)/100dpi/
The X server will not start if one of the directories in the default font path is missing a fonts.dir file. The server will fail with the following error:
failed to set default font path ‘/usr/lib/X11/fonts/local,/usr/lib/X11/fo
nts/misc/,/usr/lib/X11/fonts/Speedo/,/usr/lib/X11/fonts/75dpi/,/usr/lib/X
11/fonts/100dpi/’
Fatal server error:
could not open default font ‘fixed’
To prevent this, copy in a least one font into the font directory and run mkfontdir.
# mkdir /usr/lib/X11/fonts/local
# cd /usr/lib/X11/fonts/local
# cp ~eap/home/xtrek.pcf .
# mkfontdir
8.5.5 Configuration Example 4
It's a good idea to keep vendor-supplied software separate from “local” software, such as the MIT distribution. This will make software upgrades easier, as you are much less likely to overwrite local changes if they are confined to a discrete area.
The X distribution is already installed in discrete areas, but the manpages are generally installed directly into /usr/man. You may want to install the manpages in /usr/local/man instead. Most man commands will permit an alternate directory to be specified for searching by setting the MANPATH environment variable:
% setenv MANPATH /usr/man:/usr/local/man
The man command will then search each directory in the order they appear in the MANPATH.
By default, MIT X11 will install program manpages in /usr/man/mann and library manpages in /usr/man/man3. These values are defined in config/Project.tmpl. In this example, the suffix for client manpages is changed from “n” to “1”, and the “root” of the man directory structure is changed from /usr/man to /usr/local/man. These should be specified in the config/site.def file:
#define ManSuffix 1
#define ManDirectoryRoot /usr/local/man
Program manpages will now go in /usr/local/man/man1. Library manpages will go in /usr/local/man/man3, where they are installed by default.
8.5.6 Configuration Example 5
If you know you will not be needing certain features of the distribution, you can suppress their compilation using Boolean flags. The names for most of these flags start with the string “Build”:
% grep Build config/README | grep boolean
       BuildFontServer       boolean for building font server
       BuildFonts            boolean for building pcf fonts
       BuildPex              boolean for building all PEX-related code
       BuildPexClients       boolean for buildiing PEX clients/demos
       BuildPexExt           boolean for building PEX extension
       BuildServer           boolean for building X server
       BuildXInputExt        boolean for building X Input extension
       BuildXInputLib        boolean for building X Input library
These can be turned on or off in the config/site.def file:
#define BuildPex NO
#define BuildXInputExt NO
#define BuildXInputLib NO
First check the config/platform.cf file to see if their default value is changed for your specific platform. Modifying these values can save a lot of compilation time and disk space if you decide that you don't need to build a specific feature.
8.5.7 Other Build Flags
There are a number of compile-time flags that are not clearly documented in the release notes. They may be in a Imakefile or buried in the source code.
8.5.7.1 xterm Build Flags
mit/clients/xterm/Imakefile contains the following comment:
/*
 * add -DWTMP and -DLASTLOG if you want them; make sure that bcopy can
 * handle overlapping copies before using it.
 */
You may want to enable these flags if you want users who log into the system using xterm to be recorded in the wtmp file. They will then appear when the last command is used. Change the following line in mit/clients/xterm/Imakefile from:
MISC_DEFINES = /* -DALLOWLOGFILEEXEC */
to:
MISC_DEFINES = /* -DALLOWLOGFILEEXEC */ -DWTMP -DLASTLOG
8.6 Building Programs After X Is Installed
If you have people at your site who are going to be programming with X, you should supply them with the proper tools to do this. This usually means installing the libraries, header files, and configuration files in a public area in the same manner as other programming environments. Even if you choose non-standard locations for the X distribution, the imake program provides tools programmers can use without worrying about the location of the installed software.
Appendix B shows how to compile an X program after X is already installed.
8.6.1 xmkmf
The xmkmf program is a shell script front end to the imake program, supplied in X11R4 and X11R5. (See Section 8.7 for more information on imake itself.) It can be run in any directory than contains an Imakefile. This could be within a subdirectory of the X distribution source code or a program outside of it:
% xmkmf
mv Makefile Makefile.bak
imake -DUseInstalled -I/usr/lib/X11/config
It first makes a backup copy of any existing Makefile, as it will create a new one with the same name. It then invokes imake with the UseInstalled flag, which tells imake that the X distribution is installed and that it should use the header files and libraries on the system instead of expecting ones to be present in the X source tree. For example, in config/Project.tmpl:
#ifdef UseInstalled
#define PhigsInclude -I$(INCDIR)
#else
#define PhigsInclude -I$(BUILDINCDIR)
#endif
This sequence means “use the system include file area if UseInstalled is defined, otherwise use the include files in the source code for PHIGS.”
If you set ProjectRoot before the build, xmkmf will use the new root directory. For example, if you set ProjectRoot in site.def before installation:
#ifdef ProjectRoot
#undef ProjectRoot
#endif
#define ProjectRoot /usr/X11R5
Running xmkmf would produce:
% xmkmf
mv Makefile Makefile.bak
imake -DUseInstalled -I/usr/X11R5/lib/X11/config
xmkmf uses the -I flag to tell cpp where to look for include files. The include files in this case are the imake configuration files. The default location for installing these files is /usr/lib/X11/config. If you have your own private set of configuration files, you can invoke imake with a different include directory:
% imake -DUseInstalled -I/home/eap/myconfig
In R5, xmkmf also takes an -a flag, which executes the normal make targets automatically:
% xmkmf -a
mv Makefile Makefile.bak
imake -DUseInstalled -I/usr/lib/X11/config
make Makefiles
make includes
make depend
The Makefiles target will recursively build any Makefiles that may be present in subdirectories. The includes and depend targets are used to build a list of dependencies that are appended to the Makefile. These will force recompilation of the target if something related to the program changes elsewhere.
8.6.2 Include Files
Include or “header” files should be found automatically by the preprocessor, as they are stored in standard system directories, such as /usr/include. Note that MIT supplied header files will have the X11 directory already prepended to the name of the include file:
 ...
#include <X11/Shell.h>
 ...
or even a subdirectory within X11:
 ...
#include <X11/Xaw/Box.h>
 ...
cpp will interpret the complete path, for example, as /usr/include/X11/Xaw/Box.h. If you wish to bury the include files in another subdirectory, you will still need to have the last directory named X11, as in /usr/X11R5/include/X11. cpp would then be invoked with -I/usr/X11R5/include. You could also cheat and create a symbolic link from X11 to the include file directory:
# ln -s X11 .
This would keep cpp happy when it looks for the files. It is often desirable to keep the MIT headers separate from the system headers, as this will keep them from being damaged during OS upgrades.
8.6.3 Libraries
The X libraries will usually be installed in /usr/lib, but there are several reasons to install them in an alternate location. In any case, the Makefiles generated by imake should do the right thing if you configured the X distribution this way. Alternate library locations can be specified with the -L option. If you have ProjectRoot set to /usr/X11R5, the X libraries will be in /usr/X11R5/lib.
8.7 More About imake
This section describes the configuration process in more detail and may help if you encountered a problem with your X build.
imake is a project management tool that is used for building the X Window System from source code. This section describes imake in the context of building X11, but imake can be used for any large project that is going to be compiled on more than one type of platform. In particular, it is the tool of choice for public domain X programs that are distributed in source form. See Appendix B for more information on compiling public domain software.
imake uses a combination of make and the C preprocessor (cpp). A basic understanding of each iS required to intelligently configure the X build process.
8.7.1 The make Program
The make program is the default UNIX tool for maintaining source code. It uses a configuration file called Makefile to describe each component of the source distribution, how each should be compiled, and how individual files relate to one another. It saves time and effort by automating common programming tasks. For example, if a header file has been modified, any program that uses it is recompiled, ensuring that everything is up to date.*
The X11 distribution has been ported to many different platforms, with each one requiring its own particular flags and libraries to compile programs. For example, the Sun C compiler may require one set of flags:
cc -c -O -pic
While the MIPS C compiler needs a different set:
cc -O -prototypes -float -cckr -Wf, XNh2000
The usual way to handle this is to put all known options in a Makefile, and rely on the person compiling the program to figure out what options or flags should be enabled.
For example, a well-commented Makefile might read something like the following:
     ...
#  Define the other compilation flags.
#  Add -DBSD4_2 for 4.2bsd systems.
#  Add -DSYSV for System V.
#  Add -DSYSV -D__SVR3 for SCO ODT, ISC Unix 2.2 or before,
#    or any System III Unix, or System V release 3-or-older Unix.
#  Add -DSVR4 (not -DSYSV) for System V release 4.
#  XCFLAGS can be set from the command line.
CFLAGS=-O $(XCFLAGS)
     ...
This approach works fine for simple programs, but make is insufficient for maintaining the large number of libraries and clients that make up the X distribution. The X11 core distribution alone has several hundred Makefiles, and editing each one of these Makefiles by hand would be absurd.
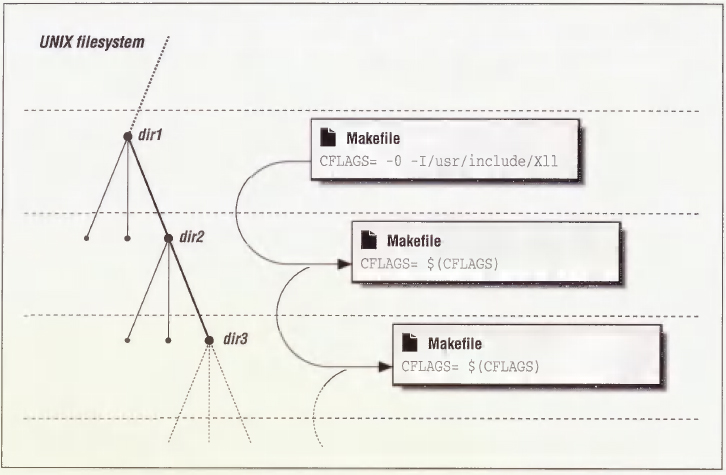
Some large packages, such as TeX, use make's ability to recursively invoke itself in subdirectories. make flags are passed down the directory structure by specifying the flag on the command line, with each Makefile inheriting the flag's value from the previous invocation of make. This is shown in Figure 8-3.
This approach works for flags, but complicated make commands must still be edited by hand in each Makefile.
Thus enters imake. The main function of imake is to “automatically” generate any number of Makefiles from one set of configuration files. It may help to call the imake program a “text filter,” as all it really does is take a set of text files as input and create a text file as output. As input, imake uses a set of files in a configuration directory (such as /usr/lib/X11/config) and a file in the current directory called Imakefile. As output, imake generates a Makefile.
8.7.2 The C Preprocessor
imake relies on the C preprocessor (usually named cpp). cpp provides a macro facility and conditional expressions. If you know how the C preprocessor works, then you have a good chance of understanding of how imake uses cpp syntax.
For a simple example of cpp syntax, examine the following lines:
#ifdef BSD
#define CCOPTS -DBSD
#endif /* BSD */
The #ifdef line, coupled with the #endif line, is an example of a conditional. These lines say that if the BSD variable is defined, then set the CCOPTS variable to “-DBSD.” Similarly, you can use #ifndef to set up a negative conditional. For example:
 ...
#ifndef CppSedMagic
#define CppSedMagic sed -e ‘/^#  *[0-9] [0-9]*  *.*$$/d’
              -e ‘/^XCOMM$$/s//#/’
              -e ‘/^XCOMM[^a-zA-Z0-9_] /s/^XCOMM/#/’
#endif /* CppSedMagic */
 ...
The lines between the #ifndef and #endif are executed only if the specified variable (CppSedMagic) is not currently defined. These lines say that if the CppSedMagic variable is not defined, then define CppSedMagic as instructed.
The second example also shows an example of a macro. Any subsequent occurrence of CppSedMagic is replaced by the multi-line sed expression.
This construction of defining a macro only if it isn't already defined is quite common: cpp will complain if you try to redefine something that is already defined.
8.7.3 Imake Syntax
cpp does not do anything except process text files: it cannot invoke other programs. make can actually do work, but it lacks the ability to test the value of a variable, making it inflexible. What imake does is combine the best features of cpp and make. The real value of imake is that it allows easy creation of Makefiles under changing conditions.
The syntax used by imake is based on syntax used by both cpp and make. When cpp and make syntax are inconsistent with one another (or when different versions of cpp are inconsistent with each other), imake needs to become the arbiter. This is most apparent when it comes to interpreting comments, defining multi-line macros, concatenating macros, and dealing with tabs.
8.7.3.1 Comments in imake
The make program expects comments to be preceded by the “#” character. The problem is that “#” indicates the start of a preprocessor directive (a cpp command) to cpp.
For example, if you had the following make-style comment in a file called testfile:
# All rights reserved.
If you run this file through the cpp program, you'll get an error message:
% /lib/cpp < testfile
# 1 “”
1: undefined control
cpp complains that it does not recognize whatever followed “#” as a valid cpp command.*
You may see C-language style comments in imake configuration files. For example:
/*
 * Concat - concatenates two strings.
 */
The “/**/” construction will work fine, but beware that the comment will be removed by the cpp program and never seen again. The comment will not appear in any imake-generated Makefiles. If you want your comments to appear in any Makefiles, you'll have to use an alternate comment mechanism:
- One way to protect the make comment from cpp is to put a “null” C-style comment in front of it:
/**/# All rights reserved.
cpp strips out the /**/ comments and passes the rest of the line to the Makefile untouched:
% /lib/cpp < testfile
# 1 “”
# All rights reserved.
The make comment now survives its pass through cpp.
Now that ANSI C preprocessors are now becoming common, this can no longer be relied upon, as ANSI C will try to interpret even though it has a C comment in front of it.
- In R5, a cpp-proof comment prefix XCOMM is provided as a convenience. If you put the string XCOMM in front of comment text, imake will do the right thing with it. For example:
XCOMM All rights reserved.
Will generate into the resulting Makefile:
# All rights reserved.
8.7.3.2 Multi-line Macros (@@)
Some of the cpp macros used in the imake configuration files are quite complex and may expand into multi-line make commands later on. The default behavior of cpp is to collapse everything within a macro definition (anything following a #define) into a single line. To protect the macro's line breaks from cpp, the “@@” syntax is used. The imake program will replace all of the “@@” sequences with the newline character, preserving the structure of the make command.
For example, the following multi-line macro appears in an imake configuration file:
#ifndef InstallNonExec
#define    InstallNonExec(file,dest)                    @@
install:: file                                      @@
     $(INSTALL) -c $(INSTDATFLAGS) file $(DESTDIR)dest
#endif /* InstallNonExec */
If this is used in an Imakefile:
InstallNonExec(system.twmrc, $(TWMDIR))
It would be expanded later on into:
install:: system.twmrc
        $(INSTALL) -c $(INSTDATFLAGS) system.twmrc $(DESTDIR)$(TWMDIR)
This is a valid multi-line make command.
If the “@@” marker was not used, it would be squashed into a single line by cpp:
install:: system.twmrc $(INSTALL) -c $ (INSTDATFLAGS) system.twmrc $(DESTDIR)$(TWMDIR)
This will cause strange errors from make:
% make install
make: Warning: Infinite loop: Target ‘install’ depends on itself
make: Fatal error: Don't know how to make target ‘-c’
8.7.3.3 Concatenating Macros
A common trick is to use the null comments “/**/” to concatenate macros or strings within cpp. For example, if you had a file called testfile containing the following:
#define MYTOPDIR /usr/
#define XLIBDIR lib/X11/
#define FONTDIR fonts/
You may want to concatenate these strings into one. If you try concatenating them directly, such as:
MYTOPDIRXLIBDIRFONTDIR
cpp will respond by trying to expand the entire string. Since the string is not defined, it will return the string itself, which is hardly what you want.
% cpp testfile
# 1 “testfile”


MYTOPDIRXLIBDIRFONTDIR
You can get around this with some versions of cpp by separating each component with null comments. The comments prevent the components from being interpreted as a single string. For example:
MYTOPDIR/**/XLIBDIR/**/FONTDIR
With the comments inserted, passing testfile through some versions of cpp yields:
% cpp testfile
# 1 “testfile”

/usr/lib/X11/fonts/
This works great. But the problem with this trick is that ANSI C preprocessors have a different and incompatible syntax for concatenation. Under an ANSI C preprocessor, the preceding example fails to concatenate. The null comments are expanded into white space, which is disastrous in this example:
% acpp testfile
# 1 “testfile”


/usr/ lib/X11/ fonts/
ANSI C uses the “##” sequence for concatenation. For example:
MYTOPDIR##XLIBDIR##FONTDIR
Running this through an ANSI C preprocessor yields the correct value:
% acpp testfile
# 1 “testfile”

/usr/lib/X11/fonts/
To concatenate macros within imake, imake provides the Concat and Concat3 macros which do the right thing depending on what type of preprocessor you use. In this case, since we have 3 arguments, we use Concat3:
Concat3 (MYTOPDIR, XLIBDIR, FONTDIR)
8.7.3.4 Dealing with Tabs
In some versions of cpp, tabs are converted to space characters. The make program, meanwhile, requires tab characters to precede the commands in a make rule. So if a version of cpp that converts tabs to spaces is used on a Makefile, make will bomb out with an error such as:
% make
make: Fatal error in reader: Makefile, line nn: Unexpected end of line seen
The imake program therefore tries to intelligently place the tab characters back in the Makefile after being processed by cpp. If the version of cpp that comes with your system is unsuitable for building the X distribution, the contrib area provides a replacement in contrib/util/cpp.
8.7.4 imake Configuration Files
imake uses a series of configuration files when creating Makefiles for a particular package. First, it uses a series of system-wide imake configuration files, found in the directory /usr/lib/X11/config. In addition, imake looks for a file named Imakefile in the directory it is being invoked in, which defines parameters specific to that particular package.
This discussion will be much easier to follow if you have these files online and available to browse through while reading. If you have the X distribution source code available, look in the directory mit/config. If the distribution is already installed, look in the directory /usr/lib/X11/config.
This looks very complex—it is. However, you should be relieved to know that any changes you make are confined to one file (unless you need to do something more complex, such as add support for a new platform).
The filenames indicate the function of the file in a general manner. Files ending in .tmpl are template files. They are like templates in that they provide a structure that is “generic” and later customized to a specific result. Files ending in .cf are configuration files, used to configure imake for a specific platform. Files ending in .rules contain make rules that describe how make should build programs and what files depend on the others.
One convention to keep in mind while browsing the files is that cpp macros are mixed-case (for example, InstallAppDefaults), and make flags are uppercase (for example, INSTKMEMFLAGS).
8.7.4.1 A Quick Tour of Files Used by imake
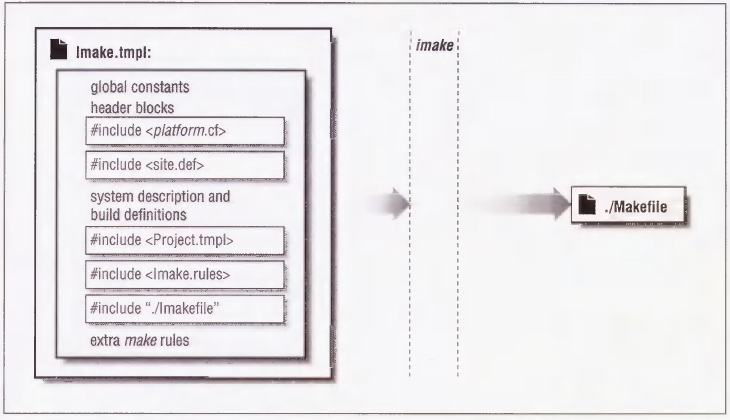
The following is a vastly simplified outline of the files used by imake, in the order in which they are used. Figure 8-4 demonstrates the use of these files.
- Imake.tmpl is fed to cpp and it uses the #include mechanism to incorporate the other files. It provides default values and a template for the generated Makefile.
- platform.cf overrides the default values and configures imake for a specific platform. (An example of a platform.cf file might be sun.cf or ibm.cf.)
- site.def provides another place to override default values, but on a site-wide basis, which could include more than one platform.
- Project.tmpl is where imake is configured for building X11, the “project” in this case. Other imake files should be generic, isolating the X11-specific information to this file.
- Imake.rules contains generic rules for generating components of any build, such as libraries and executables.
- Imakefile is the per-directory file that controls the operation of imake in the current directory.
There are certain platforms that require lots of platform-specific rules (they are usually for building shared libraries). To isolate these cases, there are separate .rules and .tmpl files that are included when a build is performed for the platform. For example, the files ibmLib.rules and ibmLib.tmpl are used by imake on the ibm platform.
8.7.5 Using imake to Build X11
You rarely ever need to run the imake program directly. It is usually run by the Makefile at the top level of the X11 source tree when the make command is used.
The usual thing to do when building X is to type:
% make World
If this fails with an error message such as:
 ...
*** Error code 1
make: Fatal error: Command failed for target ‘subdirMakefiles’
Current working directory /eap/X11R5/src/sun4_412
*** Error code 1
make: Fatal error: Command failed for target ‘Makefiles’
Current working directory /eap/X11R5/src/sun4_412
*** Error code 1
make: Fatal error: Command failed for target ‘World’
Current working directory /eap/X11R5/src/sun4_412
*** Error code 1
make: Fatal error: Command failed for target ‘World’
You will have to figure out what went wrong and correct it. After you have done this, you may be able to save some time by using a target other than World. A target is a specific task within a Makefile. The top-level Makefile has several targets:
Makefiles
This target creates a Makefile in any subdirectory that contains an Imakefile. You should run this anytime you change a configuration option.
clean
This target “cleans” or removes all the object files and libraries from the source tree. You should use this if you fail miserably and want to start over again.
includes
This target creates symbolic links from the current directory to where the include files are stored in the source tree. It should be used before the depend target.
depend
This target generates dependency information for make. A program called makedepend is invoked, which searches all the source files for #include statements and builds a list that is appended to the Makefile. For example:
 ...
Tekproc.o: /usr/include/fcntl.h /usr/include/sys/fcntlcom.h
Tekproc.o: /usr/include/sys/stat.h /usr/include/unistd.h
Tekproc.o: /usr/include/sys/time.h /usr/include/sys/time.h
Tekproc.o: ../.././X11/Xatom.h ../.././X11/cursorfont.h
Tekproc.o: ../.././X11/StringDefs.h ../.././X11/Shell.h
Tekproc.o: ../.././X11/Xmu/CharSet.h /usr/include/stdio.h
 ...
This should be run every time a Makefile is rebuilt.
World
This is the primary target for building the distribution. It runs make with the following targets: Makefiles, clean, include, depend and then with just with the -k option. (Keep in mind that -k tells make to keep running even if there are errors in the build process.) You probably only need to run this the first time you try to build on a new platform, as it will delete any previous effort to build the distribution.
Everything
This is similar to World, but it will only rebuild files that are out of date according the to the make rules. You should use this if you change any of the configuration files, as it will rebuild all the Makefiles. This is also smart to run after applying a patch, as the patch may modify something in the configuration area.
install
This target installs binaries, libraries, include files, and support files. The target will be affected by flags such as InstallAppDefFiles, InstallFSConfig, and InstallXdmConfig.
install.man
This target installs the manual pages. Flags such as ExpandManNames and InstallLibManPages will affect this target.
As you can see in the examples below, targets end in a double colon (::). By using the double colon, make allows the target to appear more than once in the Makefile. For example, there are two install targets in the following Makefile:
 ...
install:: $(PROGNAME).ad
     @if [ -d $(DESTDIR)$(XAPPLOADDIR) ]; then set +x;
     else (set -x; $(MKDIRHIER) $(DESTDIR)$(XAPPLOADDIR)); fi

 ...
install::
     @case ‘${MFLAGS}’ in *[ik]*) set +e;; esac;
     for i in $(SUBDIRS) ;
     do
 ...
Both will be executed when a make install is performed.
A handy option to make is the -n option. The -n option shows all of the expected make output without actually executing the commands, so you can see where files are going to be installed before you actually install them:
% make -n install
install -c    xrn /usr/bin/X11
install -c -m 0444 XRn.ad /usr/lib/X11/app-defaults/XRn
echo “install in . done”
The -n option can avoid unpleasant surprises, such as accidentally overwriting something previously installed.
If you manage to destroy the top level Makefile (mit/Makefile), you can recover:
% cp Makefile.ini Makefile
This gives you a Makefile that can “bootstrap” the build from this point on.
8.8 Porting Hints
Here are some techniques that may be helpful when trying to build the distribution on platforms that are slightly different from the ones described in the MIT release notes.
8.8.1 Undefined Symbols or Functions
You will occasionally get errors when compiling or linking X programs. This is more likely to happen on platforms that are not listed in the release notes, but there will be times when errors occur on the supported platforms. This is especially likely to happen if your platform is slightly newer or older than the one described in the release notes; it is not unusual for vendors to change the location of header files between operating system releases, or to delete support for old devices in new releases. For example, the file pmioctl.h was in the directory /usr/include/machine/ in Ultrix 3.1, but moved to /usr/include/io/tc/ in Ultrix 4.0. The fix is often trivial, though, so don't give up in despair.
8.8.1.1 Missing Header Files
If the compiler dies with an “undefined symbol” or “no declaration” error when compiling C source code, try searching the system header files for the missing symbol:
% find /usr/include -type -f -exec grep symbol /dev/null ‘{}’ ‘;’
  ... any matches will appear here ...
(We grep through /dev/null to trick grep into reporting the name of the file that contained the symbol.)
If you find the symbol in a new location, edit the #include line to reflect the new location.
8.8.1.2 Missing Function Definitions
If the loader dies with an “undefined symbol” error when linking a binary:
ld: Undefined symbol
   _XtUnmanageChild
   _XtOpenDisplay
   _XtCreateApplicationContext
   _XtDispatchEvent
   _XtParent
   _XtToolkitInitialize
     ...
You can make an informed guess that the missing library is the X Toolkit (called with “-lXt”), as the function names start with “Xt”. If the corresponding library is not obvious, try searching the system libraries for the symbol. The nm program can be used to list all the symbols present in a library or object file. The output of nm is very system-specific, but under SunOS it might produce something like the following:
% nm /usr/lib/libc.a
ftime.o:
         U .div
00000000 T _ftime
         U _gettimeofday

nice.o:
         U _errno
         U _getpriority
00000000 T _nice
   ...
The output displays all symbols that are used in the library, with a “U” if the symbol is only referenced, and a “T” if the symbol is defined.
To quickly find the library containing the symbol, automate the search process. For example, if the loader complained that the symbol “dlopen” is undefined, you could search all libraries in /usr/lib with the following csh script:
% foreach I (/usr/lib/lib*)
? echo $I
? nm $I | grep dlopen
? end
As output, you'll get the names of the listed libraries with any matching lines in between:
    ...
/usr/lib/libcurses_p.a
/usr/lib/libdbm.a
/usr/lib/libdl.so.1.0
00000020 T _dlopen
/usr/lib/libf77plot.a
/usr/lib/libg.a
/usr/lib/libkvm.a
    ...
In some versions of nm, there may be options that simplify the search. The SunOS nm has the -o option for printing the library name and the -g option for printing only “global” symbols:
% nm -og  /usr/lib/ lib* | grep dlopen
nm: /usr/lib/lib.b: bad format
/usr/lib/libdl.so.1.0:00000020 T _dlopen
nm: /usr/lib/libm.il: bad format
In this example the script has found the “dlopen” symbol defined in the library /usr/lib/libdl.so.1.0.
Once the new library is found, you can add it to the Imakefile for that directory, or you can add it system-wide in the platform.cf file. If the function is needed for the entire build, it's preferable to enter it into a system-wide file so that all future Makefiles generated by imake or xmkmf will automatically have the library included.
8.8.2 Searching for Preprocessor Symbols
An important feature of cpp is that it can tell other programs what type of platform it is being executed on. cpp provides pre-defined symbols indicating the platform, operating system, byte order, processor type, and type of C compiler. Some of these symbols are shown in the following table.
| Symbol Type | Examples |
| Architecture | mc68k, i386, i8086, iAPX286, sparc |
| OS | uinx, DGUX, M_XENIX, UTS, ultrix, venix, xenix |
| Byte Order | MIPSEB, MIPSEL |
| Type | sun3, sun4, sun386, ns16000, ns32000, mips |
| Compiler | _POSIX_SOURCE, ANSI, _ _STDC_ _, _ANSI_C_SOURCE, _NO_PROTO |
imake uses these symbols to automatically determine what type of platform it is being run on.* So one of the first tasks of porting X to a new platform is to find a unique preprocessor symbol so that imake can determine the type of platform. On some systems the BOOTSTRAPCFLAGS flag will have to be used for this function, but it's worth checking first. The following are hints about where to check:
- The manual pages for the preprocessor and the compiler are the first places you should check. Beware that the names of the compiler programs vary. For example, the C compiler on the IBM RS/6000 is called xlc. There may be several different versions of the compiler available, each with its own behavior. It is not unusual to have an ANSI C and “K&R” C compiler on the same system. There may be more than one version of cpp as well—for example, IRIX has both cpp and acpp. Not surprisingly, some vendors do not list all the predefined flags and you will have to hunt for them.
- See if the compiler or preprocessor has a “verbose” flag, usually -v or -verbose. This flag shows which flags are being passed to the preprocessor (where they are interpreted):
% cc -v  -E foo.c > /dev/null
/lib/cpp -undef -Dunix -Dsun -Dsparc foo.c
From this, you can determine that the flags unix, sun, and sparc are defined by the preprocessor. The -E flag means “run the preprocessor only,” and the output of the preprocessor is discarded into /dev/null.
- If the previous methods fail, it may require a low-tech approach. In most cases, this means the strings program. The strings program reports all printable strings in a binary file:
% strings /lib/cpp
 ...
too many -I options, ignoring %s
cpp internal bug alert, readinit (argv0), argv0=NULL
%s.init
unix
m68k
_SYSV_SOURCE
_BSD_SOURCE
_AUX_SOURCE
/usr/include
/usr/include
%s: %s
  ...
Experience would tell you that the strings clustered around unix are likely suspects for preprocessor symbols. You can test them by running them through the preprocessor and checking to see if they are defined. First, enter into a file the symbols you wish to test:
% cat > foo.c
unix
m68k
_SYSV_SOURCE
_BSD_SOURCE
_AUX_SOURCE
/usr/include
Then run the preprocessor on them:
% cc -E foo.c
# 1 “foo.c”
1
1
1
1
1
/usr/include
Any symbol that evaluated to “1” is being defined by the preprocessor. The “/usr/include” is unchanged, showing that it does not mean anything special to the compiler. (The line starting with the “#” character is a line number inserted by the preprocessor showing its position in the C source file.)
Beware that symbols may not be unique to a platform and BOOTSTRAPCFLAGS may have to be specified after all. For example, both Sequent and Encore define ns32000 on their machines. You would have to specify a unique symbol on the command line for the initial make:
% make World BOOTSTRAPCFLAGS=“-Dumax”
The symbols can be added to the file mit/config/imakemdep.h. Look at the top of the file for directions on how to define new symbols:
/*
 * Step 1:  imake_ccflags
 *     Define any special flags that will be needed to get imake.c to compile.
 *     These will be passed to the compile along with the contents of the
 *     make variable BOOTSTRAPCFLAGS.
 */
Follow the steps described in the file to add information specific to the new platform.
8.9 Related Documentation
You should read the Release Notes before doing anything. The text version is mit/REL-NOTES.TXT and the PostScript version is mit/RELNOTES.PS.
There are several documents that explain imake in more detail. They include:
- The imake manual page (mit/config/imake.man).
- “Configuration Management in the X Window System,” by Jim Fulton. In the source distribution, you can find this in the file mit/doc/config/usenixws/paper.ms.
- “The X User: Demystifying Imake,” by Paul Davey, published in The X Resource, Issue 2, O'Reilly & Associates, Inc., Spring 1992.
- “Using Imake to Configure the X Window System,” by Paul Dubois. Available via anonymous ftp from ftp.primate.wisc.edu in the directory pub/imake-stuff.
The flags used in the configuration process are listed in mit/config/README.
Documentation for porting the X server is contained in the mit/doc/Server and mit/hard-copy/Server directories.
NFS administration is described in Managing NFS and NIS, by Hal Stern (O'Reilly & Associates, 1991).
The make program is described in Managing Projects with make, by Andrew Oram and Steve Talbott (O'Reilly & Associates, 1991).
“The X Administrator: Building X11r5 in Limited Disk Space,” by Adrian Nye, published in The X Resource, Issue 0, O'Reilly & Associates, Inc., Fall 1991.
*Appendix F provides some information on where to find the MIT sources, and Section A.2 provides information on how to use ftp to get a file.
*comp.windows.x also has an e-mail address for those who cannot get news, [email protected].
*If you have the MIT documentation, hardcopy of the server manpages are included in it. They are also in present in the document mit/hardcopy/man/man.PS.Z.
*The sunGX.uu file is a replacement object file for the Sun GX graphics accelerator. The .uu extension indicates that it is a binary file that has been converted to ASCII text by the uuencode program. This makes it possible to send a binary file through the mail. When the sunGX.uu file has been copied to your system, run the uudecode program on it to recreate the binary file.
*The example directory names are borrowed from AFS. They are intended to describe a platform and the version of the operating system. For example, sun4_411 indicates a Sun4 running SunOS 4.1.1.
*Be careful to search the entire file for errors, as it may still have the message “Full build of Release 5 of the X Window System complete.” at the end even if there were problems with the build. This is because the make World target invokes make with the -k option, telling it to ignore non-fatal errors.
*Note that the install process will write to the source area in some cases. One example of this occurs when installing the xterm binary for the Sun platform, as the binary is re-linked to overcome a security problem with Sun shared libraries.
*On some systems, the ranlib command will be just a shell script that calls ar or it will not be present at all. This would be true for systems such as the SGI Iris, DecStation, and MIPS machines which use the MIPS compiler suite.
*If you have an older version of NFS, the /etc/exports entries are simply the filesystem names followed by the hosts which have access. Changes to the file will have an immediate effect. This is in contrast to the current system, which uses the exportfs command to notify the system of changes in the /etc/exports file and supplies different levels of permissions.
*If your version of chown does not support the user.group syntax, use chown for the user and chgrp for the group.
*The imake process would happily construct an Imakefile using a generic system. In fact, if you ever see that the generic.cf has been used by imake, something has gone wrong.
*chown returns an error if run by an unprivileged user on other systems, but on AIX 3.1 the executable has permissions -r-x------, so that it can't be executed by others even long enough to get an error message.
*See the Nutshell Handbook Managing Projects with make (O'Reilly & Associates, 1991) for more information on the make program.
*Even worse, if the first string following the “#” is a valid cpp command (such as #if or #define), cpp will interpret it and generate a useless Makefile.
*Some systems have no unique preprocessor symbols, requiring you to tell imake the type of platform when it is first invoked.