4
Security
Because X runs in a networked environment, it's particularly important that administrators be aware of its security lapses and how to reduce the risks of running X. This chapter discusses security issues as they relate to X.
In This Chapter:
Problems with Host-based Access Control
Access Control with MIT-MAGIC-COOKIE-1
Using MIT-MAGIC-COOKIE-1 with xdm
Using MIT-MAGIC-COOKIE-1 with xinit
The XDM-AUTHORIZATION-1 Mechanism (R5)
Prerequisites for Using SUN-DES-1
Adding Another User with SUN-DES-1
The Console xterm (R4 and Earlier)
Hanging the Server Remotely (R3)
4
Security
X runs in a networked environment. Because of X's design, your workstation is no longer your private preserve but hypothetically can be accessed by any other host on the network. If you are on the Internet, your display may be accessible world-wide. This is the true meaning of the server concept: your display can serve clients on any system, and clients on your system can display on any other screen.
The possibilities for abuse are considerable. When our office was introduced to X11, one of the first things we learned how to do was to play pranks on one another. Call it a “learning experience”—we became familiar with X by sending prank clients to remote servers: xmelt to make someone's screen melt away, xsetroot to put a giant bitmap picture of our boss on someone else's root window, etc. When we got a hold of anything “neat” (e.g., kaleidoscope, a GIF file of Bart Simpson, a bitmap of Bill the Cat), we fired it off to a friend's display to amuse him, and then ran down to his office to see his reaction.
If this scares you, it should. Within our office, among our friends, we had no intention of hurting anyone, and if anyone seemed busy or grouchy we left them alone. But if good intentions were enough, none of us would have passwords for our accounts. Having unlimited access to someone's display leaves a lot of potential for serious damage. Our pranks involved clients that the user could see, be amused (or annoyed) by, and then promptly kill. However, if you can run one client on a display then you can run any other client on that display.
The X Window System design allows any client that successfully connects to the X server to exercise complete control over the display. This means that clients can take over the mouse or the keyboard, send keystrokes to other applications, or even kill the windows associated with other clients.
It is difficult to make X completely secure. However, there are four access control mechanisms, one host-based and three user-based. The host-based scheme involve a system file (/etc/Xn.hosts) and can be controlled using the xhost client. The user-based schemes involve authorization capabilities provided by the xauth program and by the X Display Manager Control Protocol (XDMCP). There is also a “secure keyboard” feature in the xterm terminal emulator that can provide protection against some problems.
4.1 Host-based Access Control
One way of protecting against unauthorized clients is to use host-based access control, shown in Figure 4-1. The way this works for workstations is that, by default, the server running on the local workstation only accepts clients that are running on that workstation. For example, the local display sapphire:0, which runs on the console of the host sapphire, would only accept clients started on sapphire.
For the local display server of a workstation, the list of hosts that can send clients to display on sapphire:0 can be supplemented by adding a hostname to the /etc/Xn.hosts file (where n is the number of the display), or by using the xhost client. Many X terminals also support host-based access control (sometimes called “TCP/IP access control”), with the list of hosts specified on the setup menu or uploaded via remote configuration from the host.

4.1.1 The /etc/Xn.hosts File
The /etc/Xn.hosts file contains a list of systems that are allowed to access local server n. On most workstations, only one server runs at a time, so /etc/X0.hosts is the only file you need to be concerned with. This list of hosts is read by the server at startup time. The /etc/X0.hosts file can be edited so that it contains the list of systems you want to allow access to your server on a regular basis. For example, the file /etc/X0.hosts on the host sapphire might contain the following:
opal.ora.com
sapphire.ora.com
ccavax.camb.com
(The /etc/X0.hosts file is not included in any default configurations of X11, but needs to be created by the system administrator.)
In this example, the local server sapphire:0 can be accessed by the hosts named opal and sapphire in the ora.com domain, and ccavax in the camb.com domain. (Hosts in the current domain do not require the domain name suffix, but it's a good practice to always use fully-qualified domain names, to prevent a machine named opal in another domain from connecting to the server.) If you try sending a client to the sapphire display from a host not on that list, the client will be rejected:
lmui@ruby % hostname
ruby
lmui@ruby % xterm -display sapphire:0
Xlib: connection to “sapphire:0.0” refused by server
Xlib: Client is not authorized to connect to Server
Error: Can't Open display
Note that hardcoding hosts into /etc/Xn.hosts makes sense only for workstations used by a single user, since the list of hosts you want to enable access from is likely to be user-specific. If a workstation is in a public area and is used by many different users, then the host access list is likely to change, and only the administrator should be able to edit /etc/Xn.hosts.
X terminals that support host-based access control have the hostnames manually added to an access control list on the setup menu. See your X terminal's documentation for details.
4.1.2 The xhost Client
To supplement the /etc/Xn.hosts file, the xhost client can be used to give (or deny) systems access to the server interactively. To use the xhost client to add ruby.ora.com to the list of hosts that can display to sapphire:0, you have to run xhost in an xterm window running on sapphire:
lmui@sapphire 87% xhost +ruby.ora.com
ruby added to access control list
The sapphire:0 display will now be able to display clients from ruby in the domain ora.com.
You can only run xhost from a window displaying on the server in question. If you try running xhost from a remote display, you get the error:
xhost: must be on local machine to add or remove hosts.
Specifying a hostname with an optional leading plus sign (+) allows the host to access the server, and specifying a hostname with a leading minus sign (−) prevents a previously allowed host from accessing the server. (Note that removing a host applies only to future requests from clients to the display—it's too late to stop any clients that are already connected.) Multiple hosts can be specified on the same line. Running xhost without any arguments prints the current hosts that are allowed access to your display.
To allow access to the local display from all hosts, enter:
% xhost +
Needless to say, we strongly discourage you from doing this.
You can use the xhost client to enable access from a specific host only long enough to start up clients from that host, and then disable access immediately. For example, a script might do something like this:
xhost +sapphire
rsh sapphire xterm -display reno:0
sleep 15
xhost -sapphire
You can also use the remote host's IP address instead of the hostname.
% xhost +140.186.65.13
The IP address is useful when the remote hostname isn't known to the name server. (The name server translates domain names into IP addresses.) Also, in the rare case when a host is on two different networks and has two different IP addresses, xhost may get confused. You might have to explicitly specify the IP address the host uses on the current network. (The better solution is to fix the problem for good, by re-linking X with updated resolver libraries; but in the interim, using the direct IP address may do the trick.)
If the above description left you in the dark—if you don't know name servers from X servers, and IP addresses are greek to you—consult the Nutshell Handbook TCP/IP Network Administration by Craig Hunt (O'Reilly & Associates, 1992).
4.1.3 Problems with Host-based Access Control
Host-based access control is better than nothing, but it has some basic conceptual problems that make it insufficient for true security. One problem is that, while the primary reason for denying a remote system access to your display is to prevent a person working on the remote system from displaying on your server, this also prevents you from running clients from that remote system on your display. So you have to deny yourself functionality in order to deny it to others.
The main problem with host-based access control, however, is that it's easy to get around. It's a great idea if workstations are really single-user machines, where only the person who actually uses a given host has an account on it. But on today's UNIX networks, you are probably running yellow pages (NIS) to simplify account allocation and file permission issues. On these networks, as long as a prankster has an account on one of the hosts you do allow access from, xhost provides no protection. Any user with an account on your machine (or any other host your server allows access to) can access your display.
On an X terminal, host-based access control makes even less sense. X terminals are dependent on a host to run almost all of its clients. That host is often a compute server used to support several other X terminals as well. So X terminals that support host-based access control generally need to list a host with many other users on it, meaning that all those users can access each others' displays. This is still better than nothing, but definitely not secure.
If you're running Secure RPC, you can use the SUN-DES-1 method of security and use xhost to give access to a particular user in a given domain, such as “xhost [email protected].” This is really the best way to control access to a server, since it is entirely user-based. Not all machines support Secure RPC, however. See Section 4.4 for more information on SUN-DES-1.
4.2 Access Control with MIT-MAGIC-COOKIE-1
With Release 4 of X11, a user-based access control mechanism can be used to supplement or replace host-based access control. User-based access control is built into the XDM Control Protocol (XDMCP), but it can be used independently of xdm. In Section 4.2.3, we show how you can use it with xinit. In addition, it is automatically enabled when the openwin server is started under OpenWindows.
The most common method of user-based access control (and the only one available under R4) is a mechanism known as MIT-MAGIC-COOKIE-1. This scheme might be called permission-based rather than user-based, since it depends on UNIX file permission more than anything.
If both the host and the X server are configured to use MIT-MAGIC-COOKIE-1, then when you log in using xdm, a machine-readable code is put in a file called .Xauthority in your home directory, belonging to you. This is shown in Figure 4-2. This code, called a magic cookie, is also told to the server. The magic cookie code can be thought of as a password known only to the server and to the user who logs in using xdm. Users don't have to actually type the code at any point, they just need to be able to run the programs that manipulate it.
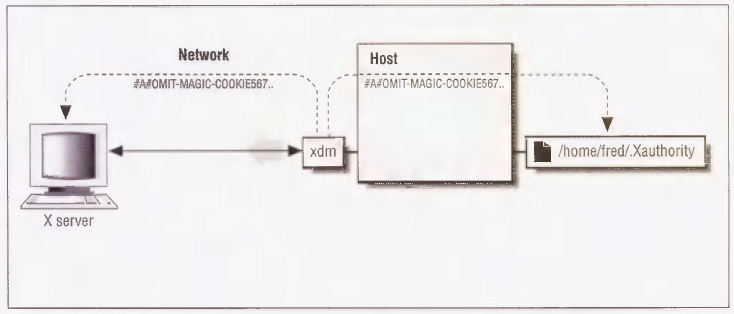
Once the code is established for that X session, a client must present the code before it is allowed to connect to the server. The client gets the code by reading the .Xauthority file in the user's home directory. This file has the permissions “-rw-------”, meaning that it can be read and written only by the owner. The MIT-MAGIC-COOKIE-1 mechanism therefore takes advantage of the fact that all processes started by a user inherit that user's permissions. Figure 4-3 shows a user who does not have access to the code being rejected.
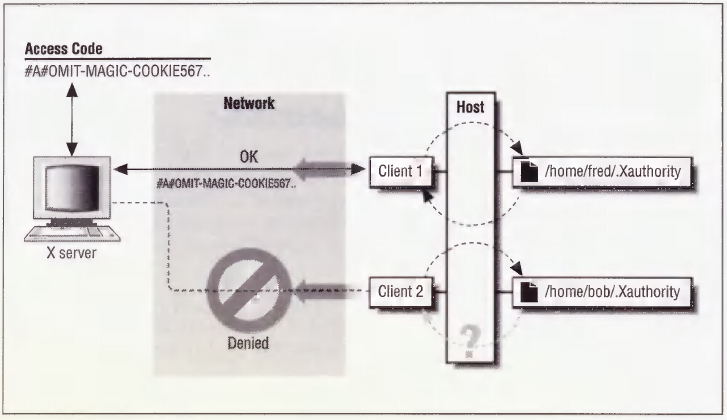
Since this type of access control is based entirely on UNIX file permissions, it is only as secure as the user's account—if you don't have a password, for example, it's totally useless since anyone can log in as you and then do whatever they want to your server.
User-based access control is clearly more secure than host-based access control, but it depends on the server being programmed to take advantage of it. Not all X terminals are capable of using the magic cookie. Furthermore, magic cookie-type access control is tightly bound to the operating system, which is not in the spirit of X.
4.2.1 Using MIT-MAGIC-COOKIE-1 with xdm
In Chapter 3, we discussed the resources for xdm specified in the xdm-config file. In addition to pointers to several special files, the xdm-config file contains these resource specifications:
DisplayManager._0.authorize:    true
DisplayManager*authorize:       false
The first resource specification turns on authorization for the local display. The second one turns the scheme off on all other displays. To turn authorization on for any other servers that are connected to the host, change the second resource definition:
DisplayManager*authorize: true
xdm is probably configured to reread the configuration file on its own (by setting the DisplayManager.autoRescan resource, which is on by default), but if not, you can send xdm a SIGHUP so it will reread its configuration file:
root# kill -HUP ‘cat /usr/lib/X11/xdm/xdm-pid’
In addition to this, some X terminals need to be explicitly configured to use MIT-MAGIC-COOKIE-1. See your X terminal's documentation for more information.
4.2.2 The xauth Program
A problem with user-based access control is that it relies on all your clients having access to the magic cookie. This is reasonable to expect if you run all your clients on the same host or if your home directory is shared (for example, using NFS or AFS) across all the hosts you run clients on. Since all the necessary information is in your $HOME/.Xauthority file, you can access your server from all hosts with the same shared home directory. But what about the situation when you want to run clients from a host that does not have a shared home directory?
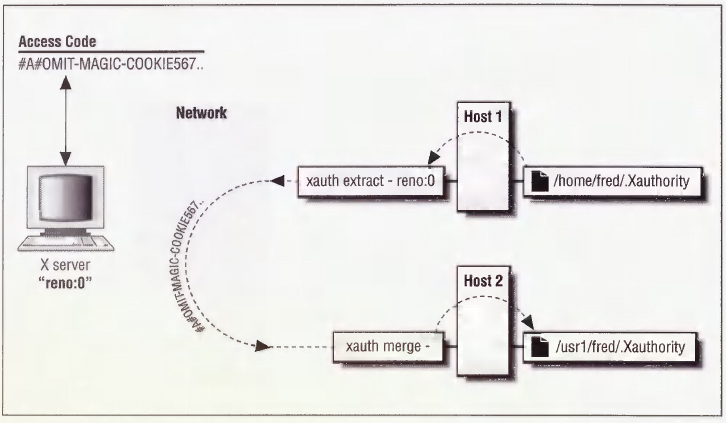
The solution is a program called xauth, used to propagate the magic cookie from one host to another. The most common use for xauth is to extract a user's authorization information for the current display, copy it to another machine, and merge it into the $HOME/.Xauthority file on the remote machine, as shown in Figure 4-4. From a host where the user already has the magic cookie listed, this can be accomplished with the following command line:
% xauth extract - $DISPLAY | rsh remotehost xauth merge -
For example, to share the authorization information for the reno:0 display with your user account on the host ruby, type:
% xauth extract - reno:0 | rsh ruby xauth merge -
The extract function takes the magic cookie from the .Xauthority file in your home directory on reno. Since you may be logged on at several different displays at once, you need to specify which display you want to extract the magic cookie for. In the example above, we want to extract the magic cookie for the local display server, reno:0. By using a dash (-), the magic cookie is written to standard output.
The xrsh Command
If you run remote clients using the xrsh shell script provided in the R5 contrib/clients/xrsh directory, xauth is automatically run to propagate the magic cookie code to the remote machine before the remote client is started. For example:
% xrsh -auth xauth ruby xterm
starts up xterm on the host ruby after first using xauth to transfer the cookie.
If you use host-based access control, xrsh can also give the remote host access to the server. This is the default behavior:
% xrsh -auth xhost ruby xterm
You can also set the XRSH_AUTH_TYPE environment variable to specify which type of authorization you need enabled for the remote host. The default behavior is for xhost authorization.
The xauth merge function accepts magic cookie codes from the specified file—in this case, from standard input. It then merges that information into the $HOME/.Xauthority file on that system.
Since only you have access to the magic cookie for your server, only you can successfully run xauth to send that code to another host.
Particularly picky readers might point out that technically, xauth is not a client program since it never contacts the X server itself, but is simply used to manipulate the .Xauthority file.
Our examples so far have only shown how to use xauth to extract the magic cookie code from a local machine and merge it into a remote one. But it's just as easy to do it the other way around. In the following example, we rlogin to a machine called rock, try to run an xterm window, and when we are rejected we simply copy the magic cookie and try again. Note that as far as the shell is concerned, reno is now the remote machine and rock is the local one, so rsh needs to be called on the xauth extract command.
lmui@reno 79% rlogin rock
Last login: Fri Sep 18 07:27:17 from ruby.ora.com
SunOS Release 4.1.2 (ROCK) #1: Fri Sep 11 17:56:56 PDT 1992
lmui@rock % xterm -display reno:0
Xlib:  connection to “reno:0.0” refused by server
Xlib:  Client is not authorized to connect to Server
Error: Can't open display: reno:0
lmui@rock % rsh reno  xauth extract - reno:0 | xauth merge -
lmui@rock % xterm -display reno:0 &
     (client runs successfully)
It's also possible to copy a code from one host to another from an uninvolved third host, but it's hard to come up with a circumstance in which you'd need to do that.
Note that since xauth depends on using rsh, it requires that you have set up either $HOME/.rhosts or /etc/hosts.equiv on the remote machine to permit the remote shell command. If you get a “Permission denied.” error, it's because your account on the remote system isn't configured to allow remote commands from the local system, not because of any problem with X. See Section 2.3.4.1 for more information.
4.2.3 Using MIT-MAGIC-COOKIE-1 with xinit
Although MIT-MAGIC-COOKIE-1 is designed to be used with XDMCP, you can use the xauth program directly to use the magic cookie with an X session started with xinit.
You have to do some extra work in order to use user-based access control with xinit, however. When using security on the console display server, xdm is nice enough to generate a unique magic cookie code for you, put it in $HOME/.Xauthority, and then start up the X server with the -auth $HOME/.Xauthority option. This tells a R4- or R5-compatible server to look in $HOME/.Xauthority for the magic cookie code that xdm just put there. If you're starting X with xinit, you have to do this work yourself.
The first thing you need to do is to generate a magic cookie code and place it in .Xauthority. To create the magic cookie code, you need to generate a “random” number (or at least one that's hard to guess). If you have perl installed on your system, you can use perl's random number generator, as in the following:
randomkey=‘perl -e ’srand; printf int (rand(10000000000000000))’‘
or (for a more robust script):
randomkey=‘perl -e ‘for (1..10) {
        srand(time+$$+$seed);
        printf(“%4.4lx”, ($seed = int(rand(65536))));
}
print “
”;’’
The Korn shell (ksh) also has a built-in random number generator, so you can do something like:
randomkey=‘ksh -c ‘echo $(( $RANDOM * $RANDOM * 2 ))’’
Using standard UNIX tools, you can start with some number that will be different every time (such as the process ID of the .xserverrc shell, or the output of the date command), and then convert it into something unrecognizable. Just using date (if your date command supports this syntax), you might do something like:
randomkey=‘date +“%y%m%d%H%M%S”’
Using the process ID, you might disguise it by passing it through the bc command:
randomkey=‘echo “{obase=16;$$^3}” | bc’
Whichever method you use, apply the key to xauth to add it to the .Xauthority file:
randomkey=‘your favorite random number generation scheme here’
xauth add ${HOST}/unix:0 . $randomkey
xauth add ${HOST}:0 . $randomkey
The add keyword to xauth tells it to add the given code for the given server into the .Xauthority file. Note that you need two entries: the first adds the key for the server under the IPC name of unix:0, and the second adds the key for the server under the TCP/IP name hostname:0. If you access your server as localhost:0, you might want to add an entry for that too. (See Section 2.3.1 for information on display names.) Note that the screen number that is often found in display names is omitted, since access control for a given server covers all screens for that server.
The lone period (.) in the xauth command line signifies that the default protocol, MIT-MAGIC-COOKIE-1, should be used.
Once you have added the new code to $HOME/.Xauthority, you need to start up the X server using the code. For example:
% xinit -- /usr/bin/X11/X -auth $HOME/.Xauthority
If you'd like xinit to do all of this automatically, you can combine the steps into your .xserverrc file:
#!/bin/sh

# Get hostname
HOST=‘hostname’

# Create new magic cookie key
randomkey=‘perl -e ‘srand; printf int(rand(100000000000000000))’’

# Add new magic cookie key into .Xauthority
xauth add ${HOST}/unix:0 . $randomkey
xauth add ${HOST}:0 . $randomkey

# Start the X server with authorization turned on
exec /usr/bin/X11/X -auth $HOME/.Xauthority
4.2.4 xauth vs. xhost
User-based access control is overridden by host-based access control. For example, if you add the host ruby to the list of hosts that are allowed access to your server, every user on ruby will be able to access your server regardless of whether you use user-based access control as well. For that reason, you generally want to make sure that no hosts are listed on your access control list. If you enable xauth-type user-based access control, you should confirm that host-based access control is set up to restrict access from all hosts.
% xhost
access control enabled, only authorized clients can connect
harry.ora.com
ruby.ora.com
opal.ora.com
As shown above, three hosts are allowed access to your server. That means that any user-based access control you have enabled is close to pointless. If you have hosts specified in the /etc/X0.hosts file, you need to remove hosts from that file. You can also remove hosts you have added to the access control list with xhost + by using xhost -:
To verify that all access from all hosts has been disallowed, call xhost with no arguments:
% xhost
access control enabled, only authorized clients can connect
Now, only clients with access to the magic cookie in $HOME/.Xauthority can connect to your server.
Some X terminals that support the magic cookie scheme also support host-based access control, and allow you to enable or disable it via the setup menu. This can be confusing. You might think that you want to disable host-based access control (since you'll be using user-based access control). However, disabling host-based access control may effectively allow all hosts access to your server, equivalent to doing an xhost +. For these X terminals, you want to enable host-based access control, but make sure that the access control list is empty. To make sure the access control list is empty, you may have to explicitly place an xhost - in your .xsession script for X terminals supporting both host-based and user-based access control.
Access Control and Commercial X Servers
Most X terminals and PC X servers support XDMCP, but that doesn't necessarily mean that they support MIT-MAGIC-COOKIE-1. You should contact the manufacturer or consult the documentation to determine if the server uses the magic cookie. Many servers running on X terminals and PCs also provide their own access control features, mostly host-based access, although some (like MacX) can be configured so that any client requesting access to the server needs to be approved on the display. How this fits into user-based access control is dependent on the manufacturer.
4.3 The XDM-AUTHORIZATION-1 Mechanism (R5)
X11R5 provides two new schemes for display access control: XDM-AUTHORIZATION-1 and SUN-DES-1. These are designed to be used in place of MIT-MAGIC-COOKIE-1, and are more secure than MIT-MAGIC-COOKIE-1 since they encrypt the authorization code as it is transferred across the network.
The XDM-AUTHORIZATION-1 method of access control is similar to MIT-MAGIC-COOKIE-1. The advantage it gives is that it uses DES (Data Encryption Standard) encryption, so it cannot be “snooped” over the network.
Because of export restrictions, xdm is built without the DES encryption code enabled by default, and hence without XDM-AUTHORIZATION-1 support. To be able to support XDM-AUTHORIZATION-1, you need to build xdm with the implementation of DES in mit/lib/Xdmcp/Wraphelp.c.* You should also make sure that the HasXdmAuth build flag is set to YES. See Section A.2 for information on how to ftp a file.
Once you are sure that xdm supports XDM-AUTHORIZATION-1, you can enable it on the local display server by simply redefining the DisplayManager._0.authName resource in the xdm-config file. (By default, the MIT-MAGIC-COOKIE-1 mechanism is used.) The authorize resource must also be turned on.
DisplayManager*authorize:       true
DisplayManager._0.authName:     XDM-AUTHORIZATION-1
Note that we only redefined the authName resource for the local display, :0. At this writing, no X terminals support this mechanism.† The authName resource actually accepts a list of authorization schemes which xdm will use in order, so you could also just set the following global resource:
DisplayManager*authName: XDM-AUTHORIZATION-1 MIT-MAGIC-COOKIE-1
After the xdm-config file is reread by xdm, xdm will use XDM-AUTHORIZATION-1 for the local display server. As with MIT-MAGIC-COOKIE-1, the server is started with the -auth option and the code is placed in the .Xauthority file. In this case, however, the code consists of two parts, a 56-bit encryption key and 64 bits of random data.
Once you log in using xdm and XDM-AUTHORIZATION-1, check that you're using access control properly with xauth list:
eap % xauth list
nugget.west.ora.com:0  XDM-AUTHORIZATION-1 bd4dc546c869a81f00979e36956f6c95
nugget/unix:0  XDM-AUTHORIZATION-1  bd4dc546c869a81f00979e36956f6c95
Note that XDM-AUTHORIZATION-1 is only available for X sessions that are managed by xdm.
4.4 The SUN-DES-1 Mechanism (R5)
The SUN-DES-1 server access control scheme uses the Data Encryption Standard (DES) for encryption of authorization data. This scheme uses Sun's Secure RPC to pass authorization data across the network, and it uses NIS to maintain a database across the network. DES code has export restrictions, so it may not appear on systems outside of the U.S.
Since SUN-DES-1 uses Secure RPC, you need to have Secure RPC installed before you can use it. Secure RPC, in turn, requires NIS (Network Information System).
SUN-DES-1 gives you true user-based access control. Unlike the magic cookie and XDM-AUTHORIZATION schemes, the entire mechanism does not rely on the security of the .Xauthority file. You have to explicitly use the xhost command to add specific users to the list of users who can access your display. This gives you a degree of specificity that is unavailable under the other schemes.
4.4.1 Public Key Encryption
Before you can set yourself up to use SUN-DES-1, you need to understand a little about how Secure RPC works.
Secure RPC is a system that uses both a public key and a private key. It uses a principal to identify an instance of a user. The principal is composed of the word unix combined with a user ID and the name of the current NIS domain:
unix.<uid>@<NIS domain>
If the NIS domain is omitted, the current domain is assumed. If you do not know your user ID, use the ypmatch command:
% ypmatch eap passwd
eap:z7xoeuD8WpyOG:243:100:Eric Pearce:/home/eap:/bin/tcsh
The user ID is the third field of the passwd entry. In this example, our user ID is 243. If you need to learn the NIS domain name, use the domainname command. Note that although the NIS domain may be the same as the Internet domain, they are not related and do not necessarily correspond.
% domainname
west
So in this example, the principal for user eap in the current domain would be:
unix.243@west
Or, since the current domain is the default:
unix.243@
A special case is the principal for root. The principal for root uses the hostname in place of the user ID. For example, on the machine nugget, the principal for root is:
unix.nugget@west
The principal is stored with a public key in the public key database. The public key is truly “public”—take a look at the file /etc/publickey, which is world-readable:
#
# Sun Public Key Database
#
# To add an entry to this file, an administrator should use the NIS command
# “newkey” on the Network Information Services master machine.
#
# Users can also insert their own entries into this file using the chkey
# command. Commenting out the “nobody” entry below disallows this feature,
# and chkey will only allow users to change their existing entry, not create
# a new one.
#
nobody c3d91f44568fbbefada50d336d9bd67b16e7016f987bb607:7675cd9b8753b5db09da
bf12da759c2bd1331c927bb322861fffb54be13f55e9
unix.243@west 348088b7430e213d8a253d2959cecb927b9b26c829c30a43:c6eb324ed85de
e5f47d936f81d4e198504482e9dc415389ebab1848555b38e76
unix.206@west 18ebefb0ee5fdcfa6ea6deab6fef48b0495064ea39f4f86b:6471489f26949
4cabefcc8924f8d26343dd5a89a81bc3e9a6bcfa30cc85604e3
This file contains a list of principals and public keys. It is maintained in the NIS map publickey.byname. You can look at it on NIS clients using ypmatch:
% ypmatch unix.243@west publickey.byname
348088b7430e213d8a253d2959cecb927b9b26c829c30a43:c6eb324ed85dee5f47d936f81d4
e198504482e9dc415389ebab1848555b38e76
Each user of the public key system has an entry in this file.
The SUN-DES-1 scheme generates a private key using the public key and your login password. In order to use the Secure RPC system, you must create a public key at least once. The public key can be created by an unprivileged user using the chkey command, or by root using the newkey command. The private key is generated every time you log in and type your password. If you can log in without typing a password (via .rhosts or /etc/hosts.equiv), you should generate a private key using the keylogin command.
4.4.2 Prerequisites for Using SUN-DES-1
Before you can use SUN-DES-1, you have to meet a series of requirements.
- In recent versions of SunOS, the DES code is not included in the base operating system and must be added by the administrator. If you are not sure if you have the encryption software, try looking for the crypt command. Systems with Secure RPC should have crypt installed:
% which crypt
/bin/crypt
Systems without the DES software do not have crypt installed:
% which  crypt
crypt: Command not found.
If you do not have DES installed, order the “Encryption Kit” from your OS vendor.
- You need to have built the X distribution with the HasSecureRPC flag set to YES. This is the default for the mit/config/sun.cf file:
#define HasSecureRPC YES
- NIS must be installed and running. If you are not sure if NIS is running, try an NIS command. Systems running NIS should return a hostname from the ypwhich command:
% ypwhich
ruby
Systems not running NIS will complain that ypbind isn't running:
% ypwhich
ypwhich: bigbird is not running ypbind
For information on NIS, see Managing NFS and NIS by Hal Stern (O'Reilly & Associates, 1991).
- The private key server, keyserv, must be running. This is usually started at system startup in /etc/rc or /etc/rc.local. Use the ps command to confirm that it is running:
% ps agx | grep keyserv | grep -v grep
   74 ?  IW   0:01 keyserv
- Each user of the Secure RPC system should have a unique public key entry. You can have each user to do this on their own using chkey:
% chkey
Generating new key for unix.243@west.
Password:
Sending key change request to nugget...
Done.
or the system administrator can create public keys for users with the newkey command:
# newkey  -u eap
Adding new key for unix.243@west.
New password:
Retype password:
Please wait for the database to get updated...
Your new key has been successfully stored away.
You can also create a new public key for root on a given host using newkey:
# newkey  -h nugget
Adding new key for unix.nugget.west.ora.com@west.
New password:
Retype password:
Please wait for the database to get updated...
Your new key has been successfully stored away.
- You must propagate the public key information from NIS clients to the NIS master when you add or change a public key on the client. If you are running the rpc.ypupdated daemon, this will be done automatically. To see if the daemon is running:
% ps agx | grep rpc.ypupdated | grep -v grep
   70 ? IW    0:00 /usr/etc/rpc.ypupdated
If you do not run rpc.ypupdated, chkey and newkey will not automatically update the public key map on the NIS master. If you have root permission on the NIS master machine, you can push the NIS map for publickey.byname on the NIS master manually:
# cd /var/yp
# make
It might be easier, however, to just enable rpc.ypupdated. You can make sure it will be enabled at the next reboot by adding it to /etc/rc.local:
if [ -f /usr/etc/rpc.ypupdated -a -d /var/yp/$dname ]; then
       rpc.ypupdated;  echo -n ' ypupdated'
fi
Or you can uncomment it from /etc/inetd.conf:
ypupdated/1 stream rpc/tcp wait root /usr/etc/rpc.ypupdated rpc.ypupdated
and kill -HUP inetd so it will be enabled right away:
# ps agx |  grep inetd | grep -v grep
  197 ? IW    2:24 inetd
# kill -HUP 197
You can use the SUN-DES-1 scheme only after you have an entry for your principal in the NIS master's public key map. This is also true for anybody else that wants to connect to your X server.
4.4.3 Using SUN-DES-1 with xdm
Once you have confirmed that SUN-DES-1 works on your machine, you can set up xdm to use it on the local console display server the same way you set up xdm to use XDM-AUTHORIZATION-1 as shown in Section 4.3.
Make sure that the authorize resource is turned on and then redefine the Display-Manager._0.authName resource for the local display only:
DisplayManager*authorize:      true
DisplayManager._0.authName:    SUN-DES-1
When you next connect, xdm will set up the server for SUN-DES-1. After logging in, check using xhost:
eap % xhost
access control enabled, only authorized clients can connect
eap@ (unix.243@west)
unix.nugget@west
Note that not only are you listed under the xhost list, but so is the principal for root on nugget, unix.nugget@west. The first line indicates the user with user ID 243 can connect to the server from any host within the NIS domain west. The second line indicates that root on nugget can connect. Don't remove the root principal from the xhost listing, since you'll need it if you want to run any setuid clients, such as xterm. See Section 4.4.6 for more information.
If you do an xauth list, you'll see this special root principal listed again:
eap % xauth list
nugget.west.ora.com:0  SUN-DES-1  unix.nugget@west
nugget/unix:0  SUN-DES-1  unix.nugget@west
xdm is run as root, and xdm is responsible for starting the server. Since the server is started as root, root is considered the “owner” of the server.
4.4.4 Using SUN-DES-1 with xinit
As with MIT-MAGIC-COOKIE-1, you need to do a little of the dirty work yourself if you want to use SUN-DES-1 with xinit. First we'll show the procedure by hand, and then we'll show how to automate it using .xinitrc. This example is on a machine with a local display named nugget. User eap has a user ID of 243, and the NIS domain name is west.
- Start with a clean .Xauthority file:
nugget% rm -f .Xauthority
- Create an entry for each type of connection from your host to your server. Use xauth with SUN-DES-1, with the syntax:
xauth add <display> SUN-DES-1 unix. <uid>@<domain>
Give yourself permission to the machine using both its TCP/IP address and its IPC address:
nugget% xauth add nugget:0 SUN-DES-1 unix.243@west
xauth:  creating new authority file /home/eap/.Xauthority
nugget% xauth add nugget/unix:0 SUN-DES-1 unix.243@west
nugget% xauth list
nugget.west.ora.com:0  SUN-DES-1  unix.243@west
nugget/unix:0  SUN-DES-1  unix.243@west
- Start the server with the .Xauthority file just created:
nugget% xinit -- -auth -/.Xauthority
When the server is up and running, check who has access by using the xhost command:
nugget% xhost
access control enabled, only authorized clients can connect
nugget.west.ora.com
localhost
The hosts list has the local machine listed by default, both by its hostname and by localhost. Using the xhost command, you need to give yourself permission to your server. If you want to be able to run xterm clients (or any other setuid clients) from the local host, you also have to give permission to root (see Section 4.4.6 for an explanation of why root needs to be on your access control list). You then need to remove the other entries. The syntax for giving a user permission is:
xhost +username@domain
The domain field can be left empty if it is the current NIS domain. Give both yourself and root permission to access the server. Note that when giving permission to root, you have to use the root principal for that machine (unix.hostname@domain), not root@.
nugget% xhost +eap@ +unix.nugget@west
eap@ (unix.243@west) being added to access control list
unix.nugget@west being added to access control list
Then remove permission from the entire host:
nugget%  xhost -nugget.west.ora.com -localhost
nugget.west.ora.com being removed from access control list
localhost being removed from access control list
This ensures that only user eap in the current NIS domain and root on the host named nugget can connect to your server.
Note that since the .Xauthority file only contains information about the principal that started the server, the SUN-DES-1 security method does not depend on the security of the .Xauthority file. Unlike the MIT-MAGIC-COOKIE-1 and XDM-AUTHORIZATION-1 methods, if other users gain read access to your .Xauthority file, they still can't access your server unless you explicitly grant them access with xhost.
To automate this process, you need to edit your .xinitrc script.
#!/bin/sh

# Get user ID:
uid=‘ypmatch ${USER} passwd.byname | awk -F: '{print $3}’’

# Get hostname:
host=‘hostname’
domain=‘domainname’

# Get principal:
principal=unix.${uid}@${domain}

# Add entries to .Xauthority file:
xauth add ${host}:0 SUN-DES-1 ${principal}
xauth add ${host}/unix:0 SUN-DES-1 $ {principal}

# Add permission to self, remove permission from entire host:
xhost +${USER}@ +unix.${host}@${domain} -${host} -localhost

# Start some clients:
twm &
xterm &
      ...
When you start the server with xinit, this will set up your workstation display and prepare it for SUN-DES-1 use.
Note that a private key is automatically generated only when you log in with your password. If you log in without typing your password, you need to run the keylogin command to generate a new private key:
% keylogin
Password:
You might need to do this if you can remotely log into a machine because of entries in $HOME/.rhosts or /etc/hosts.equiv.
4.4.5 Adding Another User with SUN-DES-1
To allow another user to connect to your host using SUN-DES-1 security, you have to run xhost to give the remote user access, and the remote user also has to run xauth to place an entry for that server in their .Xauthority file.
For this example, user cathyr on the host rock in the NIS domain west wants to connect to the host nugget in the same NIS domain, where user eap is currently running a server.
- User eap has to give cathyr permission to access the server using xhost:
nugget% xhost +cathyr@
cathyr@ (unix.206@west) being added to access control list
nugget% xhost
cathyr@ (unix.206@west)
eap@ (unix.243@west)
unix.nugget@west
- User cathyr has to create an .Xauthority file entry with the server she wants to connect to (nugget) and the principal of the user running the server:
rock% xauth add nugget:0 SUN-DES-1 unix.nugget@west
Note that this means that cathyr needs to know which user is running the server, and she needs to know that user's principal. In this case, the server was started using xdm, so it belongs to root. cathyr therefore needs to add root's principal, not eap's.
- cathyr should now be able to connect to nugget's X server:
ruby% xroach -display nugget.west.ora.com:0 &
Something went wrong if cathyr gets the following error:
Xlib:  connection to “nugget:0.0” refused by server
Xlib:  Client is not authorized to connect to Server
Error: Can't open display: nugget:0
You might want to run X clients from a host in another NIS domain. The first complication is that if you're in another NIS domain, it's harder to find out what principal to use in the xauth command line. If the server was started with xdm, then you can use root's principal; but if the server was started with xinit then you have to do some research.
If cathyr is in the same NIS domain (as in the example above), she can figure out what principal to use with only a little bit of detective work. She can just see who owns /dev/console, and use ypmatch and domainname to figure out that user's principal. If cathyr were in a remote domain, however, she would have to be able to run a remote shell to the local host to get that information:
ruby% rsh nugget ls -l /dev/console
crw--w--w-  1 eap      0,   0 Sep  3 15:56 /dev/console
ruby% rsh  nugget ypmatch eap  passwd
eap:XZ7OEUd8wjYgo:243:100:Eric Pearce:/home/eap:/bin/tcsh
ruby% rsh nugget domainname
west
or she would be dependent on eap to tell her that information.
If you have accounts on machines in different NIS domains, you may want to display clients running on the remote machine to your local server. You need to run xauth (using the local principal) on the host you want to run client on, and you need to add yourself to the xhost list again, using the remote domain name. On the remote machine:
ruby% xauth add nugget:0 SUN-DES-1 unix.nugget@west
And on the local machine running the server:
nugget% xhost  +eap@east
eap@east being added to access control list
Note that when you add a user for a remote domain, xhost doesn't know that user's ID and doesn't repeat it.
4.4.6 xterm and SUN-DES-1
A known problem with using the SUN-DES-1 mechanism and setuid clients (such as xterm) is that setuid clients use the wrong principal. Clients like xterm that are setuid to root try to connect with the root principal:
unix.nugget@west
instead of with the user's principal:
unix.243@
If you start your X session using xdm, the root principal is given access automatically, so an xterm will be able connect to the server. If you start your X session using xinit, however, you need to explicitly add root to your xhost list or you won't be able to run any xterm clients.
Note that this means that if you can run an xterm to your server, so can anyone else on the same host as long as you have the root principal listed in the xhost access list. This also means that if you want to run an xterm client from a remote host, you have to add the root principal for that machine to your xhost list as well.
% xhost +unix.rock@ [email protected]
4.4.7 Troubleshooting SUN-DES-1
The SUN-DES-1 scheme is pretty complicated compared to the other security schemes. There's lots of potential for user errors, especially when creating entries with xauth. The daemons used in the process will also cause problems if they are not set up correctly. Some errors you may encounter are listed here with suggestions on what may have caused them:
- If you use an incorrect password for the user ID:
% keylogin
Generating new key for unix.243@west.
Password:
Invalid password.
- If NIS is not running on the host (in this case, the host is rock):
Sending key change request to rock...
chkey: unable to update NIS database (11): can't communicate with ypserv
rock is down or not running rpc.ypupdated
- If /usr/etc/keyserv is not running, you might get any of the following errors:
Sending key change request to rock...
chkey: unable to update NIS database(7): local resource allocation failure
I couldn't generate a secure RPC authenticator to rock
The keyserver /usr/etc/keyserv must be running.
You may have to keylogin before doing a before doing a chkey.
If you do not have a key, you may need to get a system
administrator to create an initial key for you with newkey.
The system could be loaded, so you might try this again.
or:
auth_create: Bad file number
Error: Can't open display: nugget:0.0
or:
Could not set unix.243@west's secret key
Maybe the keyserver is down?
- If you are running a (pre-R5) version of xauth that does not know about SUN-DES-1:
xauth: (argv):1: key contains odd number of or non-hex characters
- If you are running a (pre-R5) version of xhost that does not know about SUN-DES-1:
access control enabled (only the following hosts are allowed)
<unknown address in family 254>
If you run a mixed environment with R4 programs as well as R5 programs, make sure you have the R5 versions of xauth and xhost in your path before the R4 versions. This applies not only to MIT X11R4 but also any commercial X distributions that are not yet updated to R5.
4.5 xterm and Secure Keyboard
The xterm client has a Secure Keyboard option that you can enable on the xterm Main Menu. (You can access the Main Menu by holding down the CTRL key while pressing the second mouse button.) This feature can be used to prevent others from reading what you type in that window.
By enabling Secure Keyboard, xterm performs a GrabKeyboard() protocol request. Only one client can grab the keyboard at a time, so the Secure Keyboard feature can be enabled only temporarily; however, if you are typing a sensitive document or entering a password in that xterm window, enabling Secure Keyboard ensures that only xterm is receiving input directly from the keyboard. By using Secure Keyboard, you can be sure that no other client can be snooping on what you type.
When you enable Secure Keyboard, the xterm window should reverse its colors. If the colors do not reverse, then xterm was unable to grab the keyboard, and it is very possible that your display is being snooped.
The Secure Keyboard feature provides some protection against a particular kind of snooping, but it has many drawbacks. One drawback, of course, is that it is available only using xterm. Another is that it's a security feature that requires the user's intervention to be enabled—like a seatbelt, it's only as effective as its users make it. Since it grabs the keyboard, it's annoying to use—you have to disable it every time you want to type in another client window. And it doesn't protect against taking screendumps of a display, just against people snooping on keyboard input itself. The big thing it buys you is protection on passwords, since passwords are not copied on the display. But the rest of your display is still up for grabs.
4.6 Other Security Issues
Thus far we've only discussed security issues as far as server access control is concerned. X has many more security issues, which we discuss briefly here.
4.6.1 The Console xterm (R4 and Earlier)
The -C option to xterm gives the user a console window for the host running the xterm client. Prior to X11R5, any user can run an xterm -C regardless of whether they are logged on to the console.* Furthermore, multiple users can each run xterm –C, and the console messages will simply display on whichever console window was opened last. This means that the person on the console display won't receive console messages, and will have no indication that messages are not being shown.
On some systems, a console window which has been diverted to a foreign server may also prevent new login sessions on the console display. When an X server started with xinit shuts down on the console, the login prompt may be diverted to the console xterm window instead of to the console itself.
There is also a possibility that if root is logged in on the console, users running xterm –C can get root permission.
For all these reasons, many systems do not support the -C option to xterm. As an alternative, some systems (such as SCO Open Desktop) have each error message appear in a separate pop-up window on the console. For getting a diverted console window back, the following C program may be of use:
/* This will redirect console input and
   output back to /dev/console.
*/
#include <fcntl.h>
#include <sys/termios.h>
main()
{
    int fd;
    if ((fd = open(“/dev/console”, O_RDWR, 0)) >= 0)
         ioctl (fd, TIOCCONS, 0);
    close(fd);
}
If you suspect that the console has been redirected, try compiling this program and running it as root.
% cc -o console console.c
% su
# ./console
4.6.2 The Console and xdm (R5)
With Release 5 of X11, many of the concerns about console ownership have been solved. In R5, xterm has been adjusted to allow only the owner of /dev/console to start up a console window. Other users are able to run the –C option without receiving an error message, but no console messages will appear in their window. The R5 solution, however, requires a bit of fiddling for workstations configured to use xdm on the console display.
When you start X using xinit, you have to first log into the console using getty and login, so you necessarily own /dev/console. When you log in using xdm, however, you bypass the getty/login mechanisms, so you have to be given ownership of /dev/console explicitly. For that purpose, the default xdm configuration is altered in R5 to define scripts that are run when a user logs in on the console and when the user logs out again. The xdm-config file specifies:
DisplayManager._0.startup:      /usr/lib/X11/xdm/GiveConsole
DisplayManager._0.reset:        /usr/lib/X11/xdm/TakeConsole
(The _0 means that this resource is used only for xdm sessions on the display named :0, i.e., the console display. See Chapter 3 for more information on configuring xdm.)
Both the GiveConsole and TakeConsole scripts are specified as display-specific resources for the local console display. The GiveConsole script is specified with the DisplayManager._0.startup resource, which defines a program that is run when the user has first logged in, but before any other clients are executed. The TakeConsole script is specified with the DisplayManager._0.reset resource, defining a program run after the user logs out but before a new connection is established. Both scripts are executed as root. Although all three files are currently shell scripts, they can be any executable file. (Note that since these scripts are run as root, you should be extremely careful should you choose to edit them.)
The GiveConsole script in the R5 distribution does a simple chown to give the user ownership of /dev/console so that the user might get console messages:
#!/bin/sh
# Assign ownership of the console to the invoking user
#
# By convention, both xconsole and xterm -C check that the
# console is owned by the invoking user and is readable before attaching
# the console output.  This way a random user can invoke xterm -C without
# causing serious grief.
#
chown $USER /dev/console
Similarly, the TakeConsole script returns ownership of /dev/console to root:
#!/bin/sh
# Reassign ownership of the console to root, this should disallow
# assignment of console output to any random users's xterm
#
chmod 622 /dev/console
chown root /dev/console
Together, GiveConsole and TakeConsole ensure that the user running xdm on the local display server can receive console messages.
4.6.3 Hanging the Server Remotely (R3)
In X11 Release 3, there's a bug where the server looks for a small packet from the client before it determines whether or not the client is in the xhost list. The server halts operation until this packet is sent. You can find out if your X server has this problem by running:
% telnet localhost 6000
(6000 is the TCP/IP port used by server 0 on the local host.)
If your X server freezes, then your workstation has this problem. Some servers will time out after 30 seconds, but others will remain blocked until the telnet connection is closed. Note that since this freezes your server, it's better not to try this from a window on your local display!
4.6.4 Reading the Framebuffer (Sun Workstations)
Sun workstations have a special device called a framebuffer, represented by the file /dev/fb. The framebuffer contains the current image on the console. Sun workstations supply commands, called screendump and screenload, for copying the framebuffer to a file and displaying that file, respectively. If someone can log onto your Sun workstation, they can usually read your framebuffer regardless of any X security you have in place. To view the screen on one Sun workstation from another, try:
% rsh host screendump | screenload
From any X server, you can use the public domain xloadimage client:
% rsh host screendump | xloadimage
To prevent this, you could try changing the permissions on the framebuffer (i.e., chmod 600 /dev/fb), but this might break other programs and interfere with the functionality of your workstation. Another possibility might be to make the framebuffer readable by only a special group and have all commands that access it setgid to that group, similar to how permission to /dev/kmem is restricted to the kmem group.
The best solution is to use the file /etc/fbtab to control access to the frame buffer. Uncomment the line that lists the frame buffer:
/dev/console 0600 /dev/fb:/dev/bwone0:/dev/bwtwo0
and log out completely from the system and then log back in. The frame buffer device will now be owned and only readable by you, preventing another user from reading it. As long your account remains secure, your frame buffer should also. See the manual page for fbtab for more information.
4.6.5 Removing Files in /tmp
Another trick for disrupting the server on a workstation is to remove the files in /tmp/.X11-unix. This directory contains a UNIX socket file for each X server running on that workstation.
% ls -l /tmp/.X11-unix
srwxrwxrwx 1 lmui                0 Apr 27 09:46 X0
This file is the socket descriptor used by X to connect to local server :0 via IPC. And by default, everyone has write permission (and thus delete permission) to /tmp/.X11-unix. So another trick for perverse users is to delete the X0 file on someone else's workstation.
% rsh harry rm /tmp/.X11-unix/X0
The workstation will subsequently be unable to use IPC to start local X clients anymore. That is, clients will not be able to connect using the display name unix:0.0 or :0.0, but only via TCP/IP or DECnet.
To protect against the X0 file being deleted, turn on the sticky bit for the /tmp/.X11-unix directory on systems that support that functionality:
root# chmod 1777 /tmp/.X11-unix
This will prevent users from deleting files that belong to other users in that directory.
While you're there, you might want to make sure the sticky bit is set for /tmp itself. But note that setting the sticky bit for /tmp does not set it recursively—you need to explicitly set it for /tmp/.X11-unix as well.
On some versions of SunOS, cron automatically removes files in /tmp, including the .X11-unix/ subdirectory. On those systems, change the cron job to exclude sockets by adding “! -type s” to the find command line.
4.6.6 The Network Design
Despite all the work in keeping others from interfering with your server or snooping on your work, the basic security problem is in the very design of X11: if the client and server are running on different machines, then they necessarily communicate over the network. This means that anyone who knows the X protocol and who knows how to snoop over TCP/IP can follow everything you do over the network, and none of the security mechanisms described in this chapter can prevent them from doing that. The X protocol itself can be encrypted, but not without a substantial loss in efficiency.
Since new clients are started all the time, the magic cookie code itself is being sent over the network repeatedly—so even that can be captured, and the snoop will then have direct access to your display. X11R5 makes DES (Data Encryption Standard) available with both XDM-AUTHORTTY-1 and SUN-DES-1, so that the magic cookie is encrypted across the network; but commercial servers are slow to incorporate DES code, and there are export restrictions on DES that make it unavailable outside of the United States.
Several X vendors have implemented the U.S. Government specification on Compartmented Mode Workstations (CMW), which allows the X workstation to run as a standalone trusted system. On a CMW, for example, each window has its own security label. (See the Nutshell Handbook Computer Security Basics by Deborah Russell (O'Reilly & Associates, 1991) for more information on security labels and trusted systems.) As you would imagine, however, all bets are off on a networked environment. There are trusted networking specifications being worked on (such as MaxSix), but X still has a long way to go before it can be considered secure.
4.7 Related Documentation
“Issues in Building Trusted X Window Systems,” by Jeremy Epstein and Jeffrey Picciotto, published in The X Resource, Issue 0, O'Reilly & Associates, Inc., Fall 1991.
The Xsecurity, xauth, xhost, xterm, fbtab, and xdm manual pages.
“Framework Generic Requirements for X Window System Security, Issue 1,” by Maria Cangelosi and Charles Blauner, published by Bell Communications Research, Inc. (Bellcore), document number FA-STS-001324, July 1992.
For more information on Secure RPC, see Managing NFS and NIS by Hal Stern (O'Reilly & Associates, 1991).
*If this file does not appear in your distribution but you can legally use it, you can get it via ftp from export.lcs.mit.edu. The procedure is a little convoluted; see the file pub/R5/xdm-auth/README for information on how to obtain and incorporate the DES code.
†If the X terminals initiate the connection using XDMCP, they will ignore the authName resource anyway. This resource is only used for X servers that are listed in the Xservers file. When the XDMCP connection is initiated from the server side, xdm uses whatever authorization mechanism the server specifies at initiation.
*For SunOS, you may wish to look at patch 100188-01 that addresses this issue.