
This final chapter in Part II will round out your C# programming foundation by introducing you to concepts and terms associated with object-oriented programming. XNA games and applications, written using C#, are object-oriented so it is essential that you understand concepts like abstraction, encapsulation, inheritance, and polymorphism. You will also learn about classes and their use in the creation of objects. The XNA development environment provides access to numerous classes organized within namespaces. You’ll learn about many of these namespaces and classes. On top of all this, you will learn how to define your own custom classes and to use those classes within your XNA games to create and control objects.
Specifically, you will learn:
About namespaces and the program class
About object-oriented programming concepts and terms
How to define custom classes and to instantiate objects based on those classes
How to provide controlled access to the data stored within objects
How to define structures as an alternative to defining classes
Your XNA games and applications are created by developing C# programs that interact with the user, responding to user input while controlling the movements and interaction of on-screen graphics as well as the playback of sound effects and background music. C# programs are made up of collections of statements. Related statements are grouped together into methods in order to perform specific tasks. A method is a named collection of statements that when called performs a specific task. Methods allow large programs to be organized into manageable sections.
Within your C# programs, methods are grouped within classes. When XNA creates a new game project, it automatically creates an instance of the Game1 class. A class is a construct that is used as a template or blueprint for adding objects to XNA applications. Classes define the data and methods that make up objects. Whenever an instance of a class is instantiated, the methods defined within that class are automatically loaded in memory.
Trick
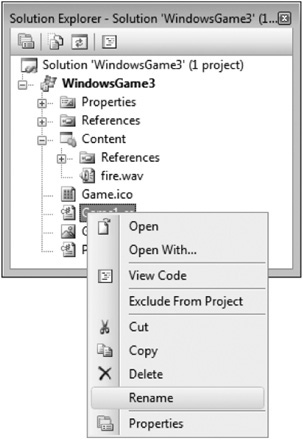
If you want, you can rename the Game1 program to something more meaningful to you, thus making your program code more self-documenting. To do so, locate the Game1.cs entry in Solution Explorer and right-click on it, and then select the Rename option from the content menu that is displayed, as demonstrated in Figure 6.1.
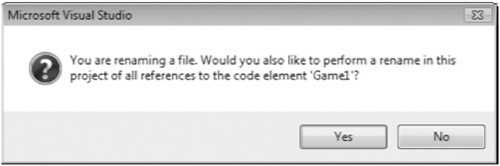
Immediately after you rename Game1.cs, the popup dialog window shown in Figure 6.2 appears, prompting you for permission to rename all references to the file within your program code.
The Game1 class that XNA creates for you is generated within the Program.cs file, as shown here.
using System;

namespace WindowsGame1
{

    static class Program
    {

        static void Main(string[] args)
        {
            using (Game1 game = new Game1())
            {
                   game.Run();
             }
    }
  }
}
The Program.cs file is one of two C# programs created by XNA each time to create a new XNA project. This program’s primary purpose is to create an instance of your XNA game and then run it. A detailed examination of the contents of this program is provided in the sections that follow.
The first statement in the Program.cs file, shown next, is a compiler directive. A compiler directive is an instruction that tells the compiler to do something; in this case, the directive tells the compiler to use the System namespace.
using System;
A namespace, covered in the next section, is a library of class descriptions. In XNA applications, namespaces provide games with access to classes belonging to the .NET Framework. The System namespace contains a collection of base classes required by Windows applications, supporting such things as the definition of commonly used values and data types, program execution, and execution handling.
When you reference a class name within a program in an XNA application, the compiler looks for it in all of the namespaces that are defined within the application until it finds it. Of course, if the class is not found, an error occurs. One advantage of namespaces is that they prevent naming conflicts by allowing similarly named resources in different namespaces to happily coexist.
XNA automatically creates a new namespace for each application you create. This namespace is defined by a code block in the next set of statements in the Program.cs file, as shown here:
namespace WindowsGame1
{

}
Note that by default, XNA assigns the same name to this namespace that you assign to your application. If, however, you do not assign a name to your application, XNA will assign a name of WindowsGameX to it (X represents a numeric value that is automatically incremented each time you create a new unnamed application). All of the classes that you define within your XNA applications will be placed within this namespace (e.g., inside the Game1.cs file).
Hint
By default, the Game1.cs program in every new XNA application contains references to the collection of namespaces shown next. These namespace references are set up with compiler directives established with the using statement.
    using System;
    using System.Collections.Generic;
    using System.Linq;
    using Microsoft.Xna.Framework;
    using Microsoft.Xna.Framework.Audio;
    using Microsoft.Xna.Framework.Content;

    using Microsoft.Xna.Framework.GamerServices;
    using Microsoft.Xna.Framework.Graphics;
    using Microsoft.Xna.Framework.Input;
    using Microsoft.Xna.Framework.Media;
    using Microsoft.Xna.Framework.Net;
    using Microsoft.Xna.Framework.Storage;
The namespaces outlined here provide your XNA applications with access to essential resources needed to create computer games. For example, the Graphics namespace provides your games with access to classes that manipulate graphics. One such class that you will learn how to work with is the Texture2D class, which you’ll use when displaying graphics in your games. Similarly, the Audio class provides access to resources needed to intergrate sound effects and music in your games.
In addition to the namespaces listed above, every new XNA application also contains a namespace that matches the name you assigned to your game. It is within this class that the Initialize(), LoadContent(), UnloadContent(), Update(), and Draw() methods are defined. You create new XNA games by adding your own programming logic to the methods in this class.
The next line in Program.cs defines a class named Program, as shown below. Note the use of the static keyword. When used, this keyword permits a single instance of the class to run. Static classes are always started first, after which the code you added to the Game1.cs program is run.
static class Program
{

}
The rest of the statements that make up the Program.cs program are all located within the Program class.
The Program class’s primary purpose is to create an instance of your XNA game and then to run it. It accomplishes this by calling upon the program’s Main method, which is accomplished through the execution of the Main() method shown here.
static void Main(string[] args)
{

}
The Main() method is of central importance to your XNA applications. Its job is to start game execution.
Hint
Note that the Main() method is set up to accept and process any number of string arguments passed to it. This is denoted through the specification of a parameter named args, which is a list of one or more strings. If you set up your XNA games to start from the Windows command prompt, you can execute them by typing in their names followed by a list of strings, which the game can then process as input. However, most games are not started this way, including those run on the Xbox 360 and Zune. As such, no arguments are passed to the game and this argument is never used.
Within the Program class’s Main() method is an embedded code block created using the using statement. When used in this context, the using statement instructs the program to dispose of an object as soon as it finishes execution. This allows any data belonging to the object to be deleted from memory, freeing up resources for other tasks.
using (Game1 game = new Game1())
{

}
The object being referenced here is named game, which as you can see, is created using the new keyboard. This object is based on the Game1 class, which is defined within the Game1.cs file (unless, of course, you have changed its name).
Hint
As your XNA games execute, a progress known as garbage collection automatically keeps track of and removes unused resources. This helps make your XNA games and other applications run smoothly, by ensuring that resources are not needlessly allocated. To further streamline your XNA applications, you can use the using keyword as previously demonstrated, ensuring that unused resources are immediately made available once they are no longer needed.
The Main() method consists of a single statement to start the execution of your XNA game. This statement, shown next, executes the Game1 class’s Run() method. The Run() method, as its name implies, initiates the execution of the game loop.
game.Run();
The Run() method begins by executing the Initialize() method followed by the LoadContent() method. It then repeatedly executes the Update() and Draw() methods.
At this point, you should have a good overall understanding of how namespaces, classes, and objects work within XNA games and applications. With this understanding now in hand, you are ready to begin tackling more complex programming challenges including learning how to define your own classes and methods.
So far, this book has talked a lot about classes, objects, and methods. The inclusion and manipulation of these resources is done through a programming technique known as object-oriented programming. Whether you realize it or not, you have already been learning the fundamentals of object-oriented programming as you’ve made your way through to this point in the book.
In OOP (object-oriented programming) data and program code are managed together as a single unit in the form of objects. An object is a self-contained entity. Objects store data. Objects also contain methods that serve as an interface for interacting with it. Objects can validate data passed to them and can reject the data if it does not satisfy predefined criteria. Well-defined objects result in more reliable applications.
In OOP, an object is created from a class. Classes serve as templates that outline the data, properties, and methods that make up the objects. OOP helps simplify the coding process. It promotes code reuse by letting you define a class once and then call on it repeatedly to create any number of new objects.
XNA provides access to a huge collection of classes. For example, to enable the playback of an audio sound effect within an XNA application, you’ll need to create or instantiate an object based on the SoundEffect class. This class is made available to your XNA applications through the Microsoft.Xna.Framework.Audio namespace. Remember that a namespace is a collection of related classes. XNA and the .NET Framework provide access to many namespaces filled with classes.
You have been working with many different types of classes throughout this book. For example, one of the first statements in the Game1.cs file is shown next. XNA automatically generates this class definition on your behalf. Within this class code block you will find the Initialize(), LoadContent(), UnloadContent(), Update(), and Draw() methods.
Public Class Game1
{

}
In addition to all of the various classes that XNA makes available to you, Visual C# also permits you to create your own custom classes. To learn how to do so, you must first learn a number of new programming concepts, including:
Abstraction
Encapsulation
Inheritance
Polymorphism
Abstraction is the process of defining a logical representation of a class within program code. This includes defining all the data members, properties, and methods required for the proper operation of the class and the objects derived from it. For example, if you were going to define a class representing a person, you might include height, weight, and age properties as well as methods like talk(), walk(), and sit().
Encapsulation is the process used to outline the base functionality of a class. It provides the ability to interact with objects created based on that class through the properties and methods defined within it. Encapsulation helps simplify things by eliminating the need to understand the inner workings of objects. Consider for example the spriteBatch class, which you have seen used to control the drawing of text to the screen. You do not know what the program code for this class looks like or how it is written and you do not need to. You can’t directly access any of the internal code outlined in the spriteBatch class. All you need to know is what properties and methods are available. How the spriteBatch class is designed is masked from view. As such, encapsulation simplifies program development.
Encapsulation also provides data protection. As such, you can add program code to your classes that processes and verifies any data passed to objects in order to ensure that the data meets certain criteria. If it does not, the data can be rejected.
Inheritance is the process in which one class is derived from another (parent) class. Inheritance allows you to create a class hierarchy. For example, inheritance allows you to define a base class. An example of this would be a class that describes a generic automobile. This would include all of the properties required to describe the characteristics (e.g., 2-door, 4-door, color, etc.) of the automobile as well as all of its basic functionality (move, break, turn, etc.). With inheritance, you could then use this base class as the foundation for creating a new child class, which would inherit all of the properties and methods of its parent class. Further, you can extend the features of the child class by adding additional properties and methods to it.
Polymorphism is a term that describes the ability to define different forms of the same thing. In C#, polymorphism is accomplished using a programming technique known as overloading. With overloading, you define the same method two or more times. Each instance of the method must be assigned a different argument list. For example, overloading allows you to create different versions of the same method, all with the same name but with different combinations of arguments. One instance of the method might be designed to process a single integer argument, whereas another instance of the method might be set up to process two arguments, one integer, and one string.
Classes serve as templates for defining the attributes, properties, and methods of objects. Using abstraction you develop the overall design of a class. Using encapsulation you implement its structure. With inheritance, one class can be used as the basis for another class. Finally, with overloading you can extend methods within your classes in order to allow them to process different sets of arguments.
Objects are instantiated based on classes. A helpful analogy for understanding this concept is to compare the relationship between a class and an object to that of a mold and Jell-O. A mold outlines an overall size and shape. Once poured into a mold and solidified, the new instance of Jell-O (e.g., object) assumes the basic qualities of the mold (e.g., class).
As you have already seen, anytime you create a new XNA game, a new class is created for you named Game1 and you can modify the methods and properties that make up this class. In addition, you can add a new class to an application by inserting its declaration under the existing class definition in the code editor, as shown here:
namespace WindowsGame1
{
    public class Game1 : Microsoft.Xna.Framework.Game
    {

        GraphicsDeviceManager graphics;
        SpriteBatch spriteBatch;

        public Game1()
        {
            graphics = new GraphicsDeviceManager(this);
            Content.RootDirectory = "Content";
        }

        protected override void Initialize()
        {
            base.Initialize();
        }

        protected override void LoadContent()
        {
            spriteBatch = new SpriteBatch(GraphicsDevice);
        }

        protected override void UnloadContent()
        {
        }

        protected override void Update(GameTime gameTime)
        {

            if (GamePad.GetState(PlayerIndex.One).Buttons.Back = =
              ButtonState.Pressed)
                this.Exit();

            base.Update(gameTime);
       }

       protected override void Draw(GameTime gameTime)
       {

           GraphicsDevice.Clear(Color.CornflowerBlue);
           base.Draw(gameTime);
       }
    }

    public class NameMgr
    {
    }
}
In this example, a new class named NameMgr has been defined. At the moment, the class does not have any data members, properties, or methods defined to it. A data member is a variable that is defined within a class. Each object that you instantiate based on the class inherits the class’s variable definitions and can store its own data in its data members. This data is separate and distinct from the data that may be stored in other objects created from that same class.
Ordinarily, data members are hidden from the outside world and used only within the class. However, data members can be made directly accessible from outside the class by preceding their declaration with the Public keyword.
Hint
All class names must be unique within the same namespace. However, by defining classes in different namespaces, you can assign a class a name used within another namespace without causing any errors. Therefore, it is a good programming practice to define all of your classes within unique namespaces, thus ensuring they do not conflict with the names of classes defined elsewhere. XNA helps you do this by automatically creating a new namespace for you in the Game1.cs program. In the previous example, the default name assigned to the namespace was WindowsGame1. As such, to prevent an error from occurring, the NameMgr class must be uniquely named within this namespace.
In the previous example, a new class named NameMgr was defined. However, the class is empty in that it does not specify anything yet. Let’s change this by modifying the class as shown here.
public class NameMgr
{
     private string UserName;
}
Here, a data member has been defined within the class. Class data members are private. By default, a private data member is accessible only to methods within the class where it is defined. Since class members are private by default, you can eliminate the private keyword as shown here, but the result is still the same.
string UserName;
A private data member cannot be accessed from outside the class. If you want, you can make data members publicly available by preceding them with the public keyword, as shown here.
public string Name;
You can also make a data member protected using the protected keyword, as shown here.
protected string Name;
A protected data member is accessible to methods within a class and to methods in child classes but not to objects based on other classes.
Data members can be accessed from outside the class in which they are defined. A data member is not, however, a property of a class. Publicly accessible data members mean that you lose the ability to control access to the data stored in them. Instead of creating public data members, it is better to make them private. You can then control access to the data stored within a class’s data members through properties.
Rather than allow unrestricted access to public data members, you can use properties to control access to data stored within data members. To set up a property in a class, you must declare a data member private and then define a public property that can be used to control access to the value stored in the data member. C# supports the following types of property procedures.
get. Retrieves the value assigned to a property.set. Assigns a value to a property.
The following example demonstrates how to add a property to a class.
public class NameMgr
{
    private string UserName;

    public string Name
    {
        get
        {
             return UserName;
        }
        set
        {

             UserName = value;
         }
    }
}
As you can see, access to the value stored in the UserName data member is made private. As a result, only methods defined within its class can access it. Two procedures are then set up to control access to the value stored in the data member. The first procedure allows the retrieval of the value stored in the data member and the second procedure allows that value to be modified.
In order to use the NameMgr class, you must instantiate an object based on it. This is done using the new keyword, as demonstrated here:
NameMgr x = new NameMgr();
Once instantiated, you can store and retrieve a value using the UserName data member through the class’s Name property. For example, the following statement demonstrates how to store a string value via the Name property.
x.Name = "Bob";
As you can see, the reference to the Name property is made by specifying the name of the object, followed by a period and the property name. When you assign a value to the Name property, the set property procedure executes. The set property procedure is passed an argument made up of the data that was assigned to the Name property. Within the set property procedure, the value of the argument is assigned to the data member (e.g., UserName). Similarly, if you later retrieve the Name property, the value of the data stored in the UserName data member is returned.
A primary advantage of using properties as means of indirectly accessing data members is that you can include programming logic that performs data validation before allowing a data member’s value to be modified.
public class NameMgr
{
    private string UserName;

    public string Name
    {
        get
        {
            return UserName;
        }
        set
        {
           if (value.Length > 0)
           {
                 UserName = value;
           }
        }
    }
}
This new example prevents an empty string from being assigned as the data member’s value.
In addition to data members and properties, you can also add methods to your custom classes. To add a method, all you have to do is add a method definition, as demonstrated here:
public class NameMgr
{
    private string UserName;

    public string Name
    {
        get

        {
           return UserName;
        }
        set
        {
           if (value.Length > 0)
           {
               UserName = value;
           }
        }
    }
    public string GenerateAddress()
    {
       return (UserName + "@yahoo.com");
    }
}
In this example, a method named GenerateAddress() has been modified. This method appends the string “@yahoo.com” to the value stored in the UserName data member and returns it when called. Within your program code, you execute this method just as you do with any other method by specifying the name of its object followed by a period and the method’s name.
As already discussed, Visual C# supports polymorphism through a process referred to as overloading, whereby a method is defined two or more times with different sets of arguments. When you overload a method, as demonstrated below, Visual C# makes sure that the correct method is executed based on the argument list that is specified.
public class NameMgr
{
    private string UserName;

    public string Name
    {
        get
        {
            return UserName;
        }
        set

        {
            if (value.Length > 0)
            {
                UserName = value;
            }
        }
    }
    public string GenerateAddress()
    {
        return (UserName + "@yahoo.com");
    }
    public string GenerateAddress(string input)
    {
        return (input + "@yahoo.com");
    }
}
Here two different versions of the GenerateAddress() method have been defined. The first instance appends the string “@yahoo.com” to the value stored in the UserName data member and returns the result. This version of the Generate-Address() method is executed whenever the GenerateAddress() method is called without any arguments. The second version of the GenerateAddress() method is executed when the method is passed a single string argument. When executed it appends the string “@yahoo.com” to the argument string and returns the result.
The derived class inherits its features from the base class. In addition to inheriting from classes provided to you by Visual C# and the .NET Framework, you can derive new classes from classes that you create. The following example demonstrates how to create a new class named NameMgrTwo using the NameMgr class as the base class.
public class NameMgr
{
    private string UserName;
    public string Name

    {

        get
        {
            return UserName;
        }
        set
        {
            if (value.Length > 0)
            {
                UserName = value;
            }
        }
    }
    public string GenerateAddress()
    {
        return (UserName + "@yahoo.com");
    }
}
public class NameMgrTwo : NameMgr
{
    public string GenerateAddress(string input)
    {
        return (input + "@yahoo.com");
    }
}
The NameMgrTwo class inherits all of the data member’s properties and methods belonging to the NameMgr class and then extends its functionality by adding an additional method (overloading the GenerateAddress() method).
A class is a complex data structure that encapsulates data members, properties, and methods into a simple logical entity. C# also supports an alternate means of encapsulating data known as a structure. Classes are usually used to define complex entities whose data changes during program execution, while structures are usually used to define and manage small collections of related data. For example, in a game like Pong, in which a ball is bounced around the screen, a number of variables are involved in the movement of the ball. To be visible, the ball needs to be represented by a texture and it must be managed using a rectangle. The ball’s location is specified by setting variables that represent its X and Y coordinates. Its speed and direction must be set for both its X and Y coordinates. To set all this up, you might define the following variables as follows:
Texture2D BallTexture;
Rectangle BallRectangle;
Float BallX;
Float BallY;
Float BallSpeedX;
Float BallSpeedY;
Once defined, the program would need to constantly modify the values assigned to these variables in order to control the movement of the ball around the screen. Now, suppose you want to make the game more challenging by putting a second ball into play. You could do this by making a copy of the previous six variables and changing their names as demonstrated here:
Texture2D Ball2Texture;
Rectangle Ball2Rectangle;
Float Ball2X;
Float Ball2Y;
Float Ball2SpeedX;
Float Ball2SpeedY;
Now suppose you decided to add a third or fourth ball. As you can see, each additional ball results in a whole new set of variable declaration statements. A better way of handling this situation is to take advantage of C# structures. A structure is a group of data items that can be referenced by value. Structures make it easier to work in the data that needs to be managed in a coordinated manner, as demonstrated here:
Hint
Variables and objects are passed by reference. This means that if you pass a variable or object to a method and the method makes a change to the variable or object, the variable or object is changed. Structures are passed by value. What this means is that if you pass a structure to a method, a copy of the structure is passed and any changes made to that copy do not impact the structure as it exists outside the method. You can, however, use the ref keyword to override this behavior and pass a structure by reference.
Struct BallStructure
{
    public Texture2d BallTexture;
    public Rectangle BallRectangle;
    public float BallX;

    public float BallY;
    public Float SpeedY;
    public Float SpeedX;
}
Here, a structure has been defined using the Struct keyword. Each of the items defined within the structure is referenced as a field. Once defined, you can use the structure to add additional balls to your game, as shown here:
BallStructure BallRed;
BallStructure BallBlue;
BallStructure BallGreen;
Here three separate balls are created. Once a structure variable is declared, you can access all of the fields within the structure and begin assigning data to them and retrieving data from them. For example, to begin storing data within the BallRed structure variable, all you have to do is use dot notation, as demonstrated here:
BallRed.BallTexture = Content.Load<Texture2D>("Ball");
BallRed.BallRectangle.Width = 20.0f;
BallRed.BallRectangle.Height = 5.0f;
BallRed.BallX = displayWidth / 2;
BallRed.BallY = displayHeight / 2;
BallRed.SpeedY = 10.0f;
BallRed.SpeedX = 10.0f;
Likewise, you can assign data to the BallBlue and BallGreen structures. Structures are commonly used features in many XNA games and you will see more examples of how to work with them later in this book. For now, all you need to understand is that structures let you group related collections of variables and methods together and pass them as a unit for processing, and that they are better suited than classes when defining simple data structures.
In this chapter, you learned about object-oriented programming concepts like abstractions, encapsulation, inheritance, and polymorphism. You learned about namespaces and classes and examined construction of the Game1 class. You also learned how to define and work with your own custom classes. Lastly, you learned how to use structures as an alternative to classes when designing and working with small groups of related data.