
To interact with players, XNA games must be able to collect their input. XNA provides you with everything you need to develop PC and Xbox games that can interact with players using either a keyboard or gamepad controllers. XNA lets you create games on the Zune, using the Zune button and joypad controller. This chapter will identify the XNA classes that support interaction with different game controllers and show you how to work with them.
An overview of the major topics covered in this chapter includes learning how to:
Detect gamepads and react when the player presses buttons
Collect user input using the gamepad thumbpads and the Dpad
Collect user keyboard input
Collect input when your games are played on the Zune
All computer games require a means of interacting with players, whether it is through gamepads, a keyboard, a mouse, or some combination of devices. XNA provides programmers with several classes designed to support interaction with various input devices. These classes include the GamePad, Keyboard, and Mouse classes, which as you can guess, provide access to methods and properties that let you interact with gamepads, keyboard, and the mouse. These classes are all made available through the Microsoft.Xna.Framework.Input namespace.
Input devices are made up of two different types of controls, digital and analog. A digital control is one that reports either of two states (on or off). These states are represented by Boolean values of true or false. For example, the gamepad’s X, Y, B, A, Back, and Start buttons are all digital controls. Likewise, the buttons on a Zune player, mouse, and all of the keys on a keyboard are also digital controls.
Analog controls differ from digital controls in that they report a range of values. Examples of analog controls include the gamepad thumbpads and the movement of the mouse.
Throughout game play, players interact with the game through input devices like the gamepad, mouse, and keyboard. In order to collect player input, the game must poll its controls. Polling is the process of repeatedly querying a game control’s state and processing its data. This is accomplished by placing statements within the application’s update() method that collect and process game state.
Hint
XNA provides access to all input devices, regardless of which platform your games run on. As a result, you can attempt to programmatically access the mouse even when your games run on the Zune or Xbox 360, which do not support either of these devices. However, XNA will not be able to return any data for these devices. Keep this in mind as you develop your games.
As mentioned, XNA supports interaction with various types of devices, varied by platform. Table 7.1 lists all of the major types of controls supported by XNA, showing you which ones are available on which platform.
Table 7.1. Supported Input Devices
Device | Windows | Xbox 360 | Zune |
|---|---|---|---|
Xbox 360 gamepad | Y | Y | Limited |
Mouse | Y | N | N |
Keyboard | Y | Y | N |
You can use a wired USB Xbox 360 gamepad on any computer running Windows XP, Windows Vista, or Windows 7. Simply plug it into an available USB port and
Windows will automatically detect it, load the appropriate software drivers, and install the device. Once installed, your PC-based XNA games can interact in the exact same way that your XNA games do on the Xbox 360. Similarly, you can plug a USB keyboard into an Xbox 360 and it will work with it as well. The Xbox 360 does not, however, support the use of a mouse. Nor does the Zune. XNA maps the Xbox 360 gamepad to the Zune player’s Zune Pad control, resulting in support for a subset of the gamepad’s controls.
Although not all devices are supported by all platforms, the APIs (application programming interfaces) for those devices remain available. Therefore, even though the Zune does not support either a mouse or a keyboard, program code that references these devices does not generate an error, nor can it retrieve any data.
Gamepads are excellent game controllers. Both the Xbox 360 and Windows computers can support as many as four gamepad controllers at a time. The gamepad consists of a collection of analog and digital controls, in the forms of buttons, thumbsticks, and a Dpad. This collection of controls makes the gamepad an excellent controller for playing most types of games.
Hint
Dpad stands for directional pad (sometimes referred to as a joypad) and is a four-point, plus-shaped control that allows for up/down/left/right input.
Figure 7.1 shows the collections of controls provided by a gamepad controller.
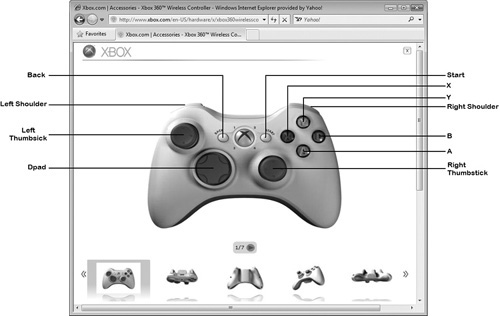
Figure 7.1. The gamepad controller can collect player input via an assortment of buttons, two thumbsticks, and a Dpad.
Hint
To use a gamepad on your Windows XP or Vista computer all you have to do is attach a USB-wired gamepad to one of your computer’s USB connections. In response, Windows will automatically load the drivers needed to let your computer interact with the gamepad.
Once a connection is established to a gamepad, XNA can interact with it in both directions, retrieving data from it and sending instructions to it. Data retrieved from a gamepad includes coordinate data supplied by thumbsticks, as well as state information provided by button presses. Conversely, you can enable the vibration on gamepad controllers in order to provide game feedback to players.
Gamepad data is provided in XNA applications via the GamePadState class. The GamePadState class is used in conjunction with the GamePad class to set up connections to gamepad controllers. The GamePad class has a method called Get-State() which is used to retrieve the state information from a gamepad controller. When called, you must pass the GetState() method a parameter identifying the gamepad being referenced, as demonstrated here:
Hint
XNA can work with as many as four gamepads at a time. You physically can identify a gamepad’s assigned number by examining the position of the green light that is lit up around the gamepad’s power button.
GamePadState gamePadOne = GamePad.GetState(PlayerIndex.One);Once you have retrieved state data for a gamepad, you can use it as input for your XNA game, as demonstrated in the following example.
if(pad1.Buttons.Start == ButtonState.Pressed)
{
    //Do something here
}
Here, a check is made to determine if the player is pressing the gamepad’s Start button.
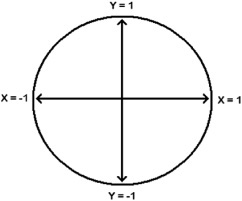
Gamepads have two thumbstick controls, referred to as the left thumbstick and the right thumbstick. As depicted in Figure 7.2, these thumbsticks generate floating-point values in the range of –1 to 1 on both their X and Y coordinates when pressed by the player.
In addition to assisting you in acquiring state data for gamepad buttons, the GamePadState structure also lets you use its ThumbSticks property to retrieve data for both the left and right thumbstick controls. For example, the following statements establish a reference to a gamepad and then retrieve data from the gamepad’s left thumbstick.
GamePadState gamePadOne = GamePad.GetState(PlayerIndex.One);
paddle.X = paddle.X + (5 * gamePadOne.ThumbSticks.Left.X);
The thumbpad data is used in a calculation that adjusts the location of an object named paddle by 5 pixels along the x-axis, as might be done as part of a breakout style game. Note that to reference the left thumbstick, you must specify the object representing the gamepad (gamePadOne) and then using dot notation you must specify the ThumbSticks property, followed by either Left or Right (depending upon which thumbstick you want to work with) and then X, representing the X coordinate.
Hint
Note that in this previous example, the X coordinate value returned from the left thumbstick’s X coordinate is multiplied by 5 (pixels). So, if the player were pushing the thumbstick all the way to the right, X would be equal to 1 and when multiplied by 5 the result would be 5. A value of 5 is then added to the current X coordinate belonging to the paddle object, moving it 5 pixels to the right. If, on the other hand, the player was pressing the thumbstick halfway to the left, a value of .5 would be multiplied by 5, yielding a value of 2.5, which would then be added to the object’s current X coordinate, moving it 2.5 pixels to the left.
Gamepads also have a plus-shaped Dpad control. The GamePadState object’s Dpad property retrieves a structure that contains state data regarding the direction in which the gamepad’s Dpad control is being pressed. The following example demonstrates how to check which direction a gamepad’s Dpad is being pressed.
GamePadState pad1 = GamePad.GetState(PlayerIndex.One);
if(pad1.DPad.Left == ButtonState.Pressed)
{
    //Do something if the Dpad is being pressed left
}
else if (pad1.DPad.Right == ButtonState.Pressed)
{
    //Do something if the Dpad is being pressed right
}
else if (pad1.DPad.Up == ButtonState.Pressed)
{
    //Do something if the Dpad is being pressed up
}
    else if (pad1.DPad.Down == ButtonState.Pressed)
{
    //Do something if the Dpad is being pressed down
}
else
{
    //Do something if the Dpad is not being pressed
}One of the additional benefits of interacting with players using gamepad controllers is that you can communicate both ways. Not only can the gamepad provide your games with player input but your games can in return provide players with feedback in the form of vibration.
Every gamepad has built-in motors that, when activated, vibrate. By turning these motors on and off, your games can let players know when certain events occur. For example, in a car racing game, your game might initiate gamepad vibration in the event the player’s race car begins to drift off the track. In a shoot-up game, you might make a player’s gamepad vibrate to signal when they are shot.
To make a gamepad vibrate, you need to execute the Gamepad class’s SetVibration() method, as demonstrated here:
GamePad.SetVibration(PlayerIndex.One, 1, 1);
Here, the SetVibration() method requires that you pass it three arguments. The first argument must identify the gamepad to be affected, the second argument is a value between 0.0 and 1.0 that controls the vibration to the left motor. The third argument is a value between 0.0 and 1.0 that controls the vibration to the right motor. The lower the value passed in the second and third arguments, the weaker the vibration, and the higher the number, the stronger the vibration effect.
The previous statement makes the gamepad vibrate both its left and right motors at full strength. The following statement on the other hand, vibrates only the left motor (at half strength).
GamePad.SetVibration(PlayerIndex.One, .5, 0);
To be effective, your games need to toggle the vibration effect on and back off at the appropriate times. The following statements demonstrate how to turn off vibration.
GamePad.SetVibration(PlayerIndex.One, 0, 0);
Unless you stop vibrating a gamepad before your games ends, the gamepad will continue to vibrate. Clearly that is not desirable behavior. You must therefore take care to programmatically stop gamepad vibration before allowing your XNA games to terminate their execution. For example, if your game allows the player to terminate its execution by pressing the back button, you might control game termination by adding the following statements to your program.
if (GamePad.GetState(PlayerIndex.One).Buttons.Back == ButtonState.Pressed)
{
    GamePad.SetVibration(PlayerIndex.One, 0, 0);
    this.Exit();
}You can use the keyboard to collect player input on both a Windows computer and the Xbox 360. To use a keyboard on the Xbox 360, simply plug a standard USB keyboard into an open Xbox 360 USB port and within a few moments, Xbox will be ready to work with it. A keyboard is a digital control and is used in games that provide the player with lots of choices that can be selected or disabled at any moment at the click of a button (e.g., key).
Different keyboards have different buttons. For example, some may have keys that control the computer’s volume, while others only support a standard 101-key US key layout or perhaps a 104-key Windows layout.
Keyboard data is provided in XNA applications via the Keyboard class, which is used in conjunction with the KeyboardState structure to retrieve keyboard state data. In addition, keyboard information is made available through the Keys object and the GetPressedKeys array. The Keys object is an enumerated data type. Enumerated data types are types in which a range of name value types are available (e.g., all of the letters, numbers, and special characters available on the keyboard). The GetPressedKeys method retrieves an array made up of a list of all currently depressed keyboard keys.
Trick
One thing not included within this enumeration is uppercase keys. However, by checking to see if the Shift key is being pressed, you can determine a letter’s case.
An example of how to interact with and retrieve keyboard data is provided later in this chapter.
If you are creating XNA games specifically for Microsoft Windows, you have the option of the computer’s mouse as an input source during game play. XNA is capable of reacting to mouse button clicks. Most mice have three digital buttons: a left button, a right button, and a mouse scroll wheel that when clicked serves as a third button. Some mice also support additional buttons on the left and right side of the mouse. The mouse scroll button also doubles as an analog control. The mouse is often used in games where the player needs to be able to select different objects. When moved, the mouse works as an analog device, providing very precise data regarding the location of the mouse pointer within the game window.
A computer mouse reports data in the form of pixels, based on a coordinate system where 0,0 is the upper-left corner of the screen or window. To collect and process mouse input, you must use the Mouse class’s GetState() method to retrieve a MouseState object. You’ll need to repeatedly execute the GetState() method every time the Update() method is executed. The MouseState object provides access to the current position of the mouse pointer.
The mouse pointer’s location is traced via a coordinate system that originates at location 0,0, which is the upper-left corner of the game window. In this coordinate system, introduced in Chapter 5, the X coordinate represents the location of the mouse pointer along the X-axis and the Y coordinate represents the location of the mouse pointer along the Y-axis.
Hint
Pixel stands for picture element. A pixel is the smallest addressable area that can be written to or drawn on the screen or window.
Table 7.2 provides a listing of the different properties exposed through the MouseState object. As you can see, it provides access for up to six mouse buttons, the mouse pointer’s coordinates, and the scroll wheel’s value.
Table 7.2. XNA MouseState Properties
Property | Description |
|---|---|
|
|
|
|
|
|
|
|
|
|
|
|
|
|
|
|
Trick
By default, the mouse pointer is not visible when your XNA games run on Microsoft Windows. However, you set the Game classes IsMouseVisible property to true to override this behavior and make it visible. To do so, all you have to do is add the following statement to the Initialize() method.
protected override void Initialize()
{
    this.IsMouseVisible = true;
    base.Initialize();
}
Of course, you can set IsMouseVisible to false to disable the display of the mouse pointer.
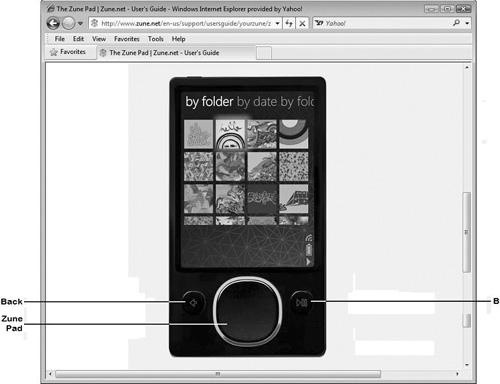
Unlike the personal computer or Xbox, where the range of available controllers varies based on the devices that are attached, the Zune is limited to the digital and analog buttons and controllers that are built into the device. These include two digital button controls (Back and Start/Pause) and a Zune Pad, as shown in Figure 7.3.
XNA maps the Zune player’s controls to gamepad controls, allowing you to interact with them using the GamePad class. Table 7.3 shows how XNA maps out the Zune player’s controls to those of the gamepad.
Table 7.3. Zune Controller Mapping
Zune Control | Gamepad Equivalent |
|---|---|
Back | Back |
Play/Pause | B |
Zune Pad (Button) | A |
Zune Pad (Dpad) | Up, Down, Left, Right |
Zune Pad (Thumbstick) | Left Thumbstick |
As shown in Table 7.3, Zune’s Back button is mapped to the gamepad’s back button and Zune’s Play/Pause button is mapped to the gamepad’s B button. The Zune pad control maps to several different gamepad controls depending on how it is used. When pressed in the center as a button control, the Zune Pad maps to the gamepad’s A button. When pressed on its top, bottom, left, or right sides, the Zune Pad is mapped to the gamepad’s Dpad control. Lastly, any motion over the Zune Pad is mapped to the gamepad’s left thumbstick.
Depending on the types of games you are creating, it is often a good idea to allow the player to control the games in different ways. For example, suppose you created a simple game that you could run on your Windows computer, Xbox 360, and Zune. If the game was complex, you might create a copy of the game for each platform and then customize each copy to support environment-specific controls.
However, if your game was not too complex, you might find it desirable to keep the programming logic for dealing with user interface controls for all three platforms together. As an example, look at the following statements.
GamePadState pad1 = GamePad.GetState(PlayerIndex.One);

if(pad1.Buttons.A == ButtonState.Pressed ||
    pad1.DPad.Down == ButtonState.Pressed ||
    keys.IsKeyDown(Keys.Down))
{
            //Do something
}
Here, logic has been added to allow the game to perform a given action using several different commands. If the game containing these statements ran on Microsoft Windows, the player could press the green A gamepad button, the downward side of the Dpad control, or the down arrow key to perform a given action. An Xbox 360 player could perform the same three actions if a keyboard is installed or just the two gamepad options if a keyboard were not available. A Zune player, on the other hand would be able to initiate that same action by the player pressing on the down side of the Zune Pad.
To bring together all of the information presented in this chapter, you will learn how to create a new XNA application called the InputCollector that demonstrates how to work with the gamepad, mouse, and keyboard. Of course, since the Zune’s controls map to gamepad controls, this example can also be modified to work with Zune players. Figure 7.4 provides a view of the application in action.
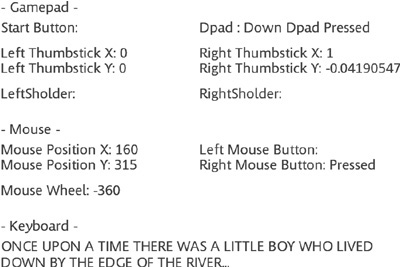
As you can see, the application is organized into three sections, one section for each device type. The data retrieved from the gamepad includes data collected from the controller’s Dpad, left and right thumbsticks, as well as the left and right shoulder controls. Mouse data includes the X and Y coordinate data as well as the status of the mouse’s left and right buttons and wheel input. The Keyboard section displays keyboard data keyed in while the application is running. Of course, if you create a version of this application for the Zune, the only data that will be available is for the Zune controls that map to the gamepad.
In order to create this new application, you will need to perform a number of steps, as outlined here:
Once you have completed all of these steps, you will be able to save and run the application on your computer. Later, in Chapter 11, you will learn how to modify and port your application over to other platforms, including the Zune and Xbox 360.
The first step in creating this new application is to create a new project and then add a SpriteFont to it in order to enable the application to display text. The following procedures outline the steps involved in performing this task.
Click on File > New Project and then select Windows Game (3.1). Name the project InputCollector and then click on OK.
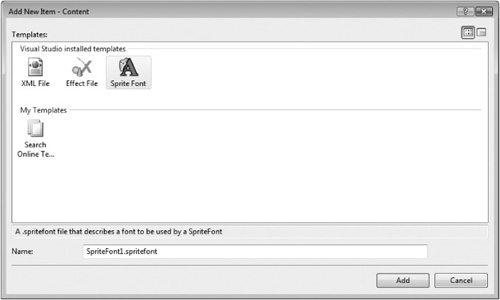
Add a
SpriteFontto the application by going into Solution Explorer, right-clicking on Content, and then clicking on Add > New Item. The Add new Item – Content window appears, as shown in Figure 7.5.Select the
SpriteFonticon and click on Add. XNA will add aSpriteFontnamed SpriteFont1.spritefont to the project.The
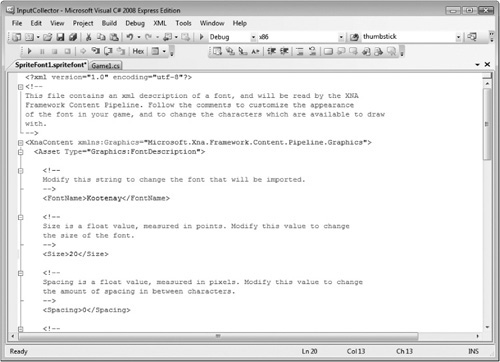
SpriteFontfile is an XML file. Once added, the files are displayed in the code editor. Modify this file by changing its default font size from 14 to 20 (e.g., overtype the value specified in between the<Size>and</Size>tags) as shown in Figure 7.6.Close the SpriteFont1.spritefont file.
Now that you added the
SpriteFontto the application, you need to add the program required to load and use the font within the application. To do so, begin by defining aSpriteFontvariable namedfontas part of the game world data (place the declaration statement at the beginning of the C# program as one of the first statements in theGame1class).public class Game1 : Microsoft.Xna.Framework.Game { GraphicsDeviceManager graphics; SpriteBatch spriteBatch; SpriteFont font; //Declare variable to store font . . .Now that you have defined the
fontvariable, you can use it to set up a reference to theSpriteFontthat you just added to the application. To do so, add the following statements to the beginning of theLoadContent()method.
//Load the font used to display windows text
font = Content.Load<SpriteFont>("SpriteFont1");
Now that you have created your new application and added and configured the use of a SpriteFont, you are ready to begin assembling the program logic required to make your new application work.
The second step in the creation of the InputCollector application is the definition of a number of variables and an array for storing various types of game world (application) data. Game world data is data that is universally accessible throughout the application. To facilitate this, the code statements that make up the game data, shown below, must be placed at the beginning of the application in the game class (but not within any of the class’s methods).
public class Game1 : Microsoft.Xna.Framework.Game
{
    GraphicsDeviceManager graphics;
    SpriteBatch spriteBatch;

    SpriteFont font; //Declare variable to store font
    Color ScreenColor = Color.White; //Define background color

    //Declare variables used to collect and report gamepad data
    String StartMsg = "";
    String DpadMsg = "";
    String LThumbX = "";
    String LThumbY = "";
    String RThumbX = "";
    String RThumbY = "";
    String LShoulder = "";
    String RShoulder = "";

    //Declare variables used to collect and report keyboard data
    String mouseX = "";
    String mouseY = "";
    String LMouse = "";
    String RMouse = "";
    String MouseWheel = "";

    //Declare variable and array used to collect and report mouse data
    String KeyboardText = "";
    Keys[] PrevKeyPresses = new Keys[0];
    .
    .
    .
The game world data used by this application includes the SpriteFont variable, which you have already added to the application, as well as three other different sets of data. The first set is a collection of eight variables that will be used to collect and report gamepad data. Each of these variables is descriptively named, allowing you to identify the type of gamepad input that it will store. The second set of data is a series of five variables that will store data collected from the mouse. Again, each variable’s name identifies the type of data it stores. The third set of data consists of a string variable that will be used to store any keyboard input typed in by the user as well as an array named PrevKeyPresses, which will be used to keep track of user input in order to help the application identify when something new has been keyed in. In addition, a value of Color.White has been assigned to the default ScreenColor variable, defining the application’s background color.
The third step in the development of your new application is to modify the Initialize() method for the purpose of making the mouse pointer visible within the application window when the application runs. By default, XNA hides the mouse pointer. To make it visible, you must set the Game1 class’s IsMouse-Visible property equal to true, as shown here:
protected override void Initialize()
{
    this.IsMouseVisible = true;
    base.Initialize();
}The fourth step in the development of your new application is to add the programming logic that is responsible for interacting with all the computer’s input devices and processing all the input. This programming logic will have to be repeatedly executed in order to capture every thumbstick movement, every button push, every keystroke, and so on. Therefore, this programming logic belongs in the Update() method.
To help keep things simple, you will add the programming code that goes in the Update() method in a series of steps, as outlined here:
Retrieve input device state data.
Manage application termination.
Add program code to capture gamepad input.
Add program code to capture mouse input.
Add program code to capture keyboard input.
Let’s begin by modifying the Update() method to define three variables that will be used to store state data each time the Update() method runs. The data collected will be captured from the gamepad, mouse, and keyboard.
protected override void Update(GameTime gameTime)
{
     //Retrieve gamepad, keyboard and mouse state data
     GamePadState pad1 = GamePad.GetState(PlayerIndex.One);
     KeyboardState keys = Keyboard.GetState();
     MouseState MouseObj = Mouse.GetState();

    // Allows the game to exit
     if(GamePad.GetState(PlayerIndex.One).Buttons.Back ==
       ButtonState.Pressed)
          this.Exit();

     base.Update(gameTime);

}
As you can see, game state data is retrieved using the GetState() method and stored in descriptive variables.
Next, let’s modify the statement in the Update() method that managed game termination. This change will allow the user to respond and terminate application execution in a number of different ways.
// Allows the game to exit
if(GamePad.GetState(PlayerIndex.One).Buttons.Back ==
   ButtonState.Pressed || keys.IsKeyDown(Keys.Escape))
   this.Exit();
As you can see, this statement now allows the game to be terminated by either pressing the gamepad’s Back button or the keyboard’s Escape key.
The next set of statements need to be added to the end of the Update() method and will be used to manage interaction with the various controls that make up the gamepad controller.
//Process gamepad buttons (A, B, X, and Y)
if (pad1.Buttons.A == ButtonState.Pressed) ScreenColor = Color.LightGreen;
if (pad1.Buttons.B == ButtonState.Pressed) ScreenColor = Color.IndianRed;
if (pad1.Buttons.X == ButtonState.Pressed) ScreenColor = Color.LightBlue;
if (pad1.Buttons.Y == ButtonState.Pressed) ScreenColor = Color.Yellow;
These four statements turn the console window’s background color to one of four different colors, depending on whether the gamepad’s A, B, X, or Y button is pressed. Next, add the following statements to the Update() method.
//Process gamepad Start button
if (pad1.Buttons.Start == ButtonState.Pressed) {
   StartMsg = "Pressed";
}
else
{
   StartMsg = "";

}

//Process gamepad DPad input
if (pad1.DPad.Left == ButtonState.Pressed)
{
   DpadMsg = "Left DPad Pressed";
}
   else if (pad1.DPad.Right == ButtonState.Pressed)
{
   DpadMsg = "Right DPad Pressed";
}
   else if (pad1.DPad.Up == ButtonState.Pressed)
{
   DpadMsg = "Up DPad Pressed";
}
   else if (pad1.DPad.Down == ButtonState.Pressed)
{
   DpadMsg = "Down Dpad Pressed";
}
   else
{
   DpadMsg = "";
}
The first set of statements react when the gamepad’s Start button is pressed, assigning a value of "Pressed" to StartMsg. If the Start button is not being pressed, an empty string is assigned to StartMsg. Next, an if statement code block is set up to process Dpad input, assigning different text strings whenever the user presses one of its four sides. Next, add the following statements to the Update() method.
//Process gamepad left and right thumbstick input
LThumbX = pad1.ThumbSticks.Left.X.ToString();
LThumbY = pad1.ThumbSticks.Left.Y.ToString();
RThumbX = pad1.ThumbSticks.Right.X.ToString();
RThumbY = pad1.ThumbSticks.Right.Y.ToString();
These statements capture and process input from the gamepad’s two thumb-sticks. The data supplied by each thumbstick control is converted to a string using the ToString() method. This will allow the data to be displayed when referenced later in the Draw() method. Next, add the following statement to the Update() method.
//Process gamepad left and right shoulder buttons
if (pad1.Buttons.LeftShoulder == ButtonState.Pressed)
{
   LShoulder = "Pressed";
}
else
{
   LShoulder = "";
}
   if (pad1.Buttons.RightShoulder == ButtonState.Pressed)
{
   RShoulder = "Pressed";
}
else
{
   RShoulder = "";
}
As you can see, these statements process input for the gamepad’s right and left shoulder buttons, assigning different text string values to the RShoulder and LShoulder variables depending on whether the buttons are being pressed.
Now it is time to start collecting mouse data. To do so, add the following statements to the Update() method.
//Store mouse pointer coordinates
mouseX = MouseObj.X.ToString();
mouseY = MouseObj.Y.ToString();
These statements retrieve the mouse pointer’s X and Y coordinates within the application window and then convert that data into a string. Next, add the following statements to the Update() method.
//Process left and right mouse buttons
if (MouseObj.LeftButton == ButtonState.Pressed)
{
   LMouse = "Pressed";
}
else
{
   LMouse = "";

}

if (MouseObj.RightButton == ButtonState.Pressed)
{
   RMouse = "Pressed";
}
else
{
   RMouse = "";
}
These statements determine if the left and right mouse buttons have been pressed and display text strings indicating the current state. To capture mouse wheel data, add the following statements to the Update() method.
//Process Mouse wheel data
MouseWheel = MouseObj.ScrollWheelValue.ToString();
Here, mouse wheel data is retrieved using the ScrollWheelValue property, converted to a string value and assigned to a variable named MouseWheel.
Now it’s time to tackle the collection and processing of keyboard input. Specifically, you will add program code designed to intercept key presses, allowing keyboard input to be dynamically displayed on the console window as it’s keyed in. Begin by adding the following statements to the Update() method.
//Define an array and load it with a list of pressed keys
Keys[] CurrentKeys;
CurrentKeys = keys.GetPressedKeys();
Next, an array named CurrentKeys is defined and populated with keyboard data using the GetPressedKeys() method. Next, add the following statements to the end of the Update() method.
//Process keyboard input and store as a string
for (int i = 0; i < CurrentKeys.Length; i++)
{
    bool match = false;
    for (int j = 0; j < PrevKeyPresses.Length; j++)
    {
        if (CurrentKeys[i] == PrevKeyPresses[j])
        {

           match = true;
           break;
        }
    }
    if(match == false)
    {
       switch(CurrentKeys[i])
       {
           case Keys.Space:
               KeyboardText = KeyboardText + " ";
               break;
           case Keys.Enter:
               KeyboardText = KeyboardText + "
";
               break;
           case Keys.OemPeriod:
               KeyboardText = KeyboardText + ".";
               break;
           default:
               KeyboardText = KeyboardText + CurrentKeys[i].ToString();
               break;
        }
    }
}
PrevKeyPresses = CurrentKeys;
Here, a for loop has been set up to process the CurrentKeys array. This loop iterates once for each item in the array. Within the loop, a second for loop is used to iterate through the PrevKeyPresses array. Within this loop, an if statement code block has been set up for the purpose of determining if the current item (character) in the CurrentKeys array is the same as the current item (character) in the PrevKeyPresses array. If a match occurs, the for loop terminates its processing.
If new keyboard input was found (i.e., the user typed in something not previously processed), a switch code bock is executed. The reason behind the switch code block is that some keyboard input requires additional translation before it can be displayed. The first case statement is used to add a blank space to the end of the text string stored in the KeyboardText variable. The second case statement adds the
(newline) characters to the end of the text string whenever the Enter key is pressed. The third case statement adds a period (.) to the end of the text string. The switch code block’s default option assigns any other keyboard input to the end of the text string stored in the KeyboardText variable after converting it to a string. The last statement shown above updates the value of PrevKeyPresses by assigning it the value stored in CurrentKeys.
Hint
As shown in Table 7.4, most keystrokes generate output that you would expect. For example, if the A key is pressed a value of A is generated. However, some keystrokes generate non-intuitive results. For example, if the space key is pressed, a string value of Space is returned instead of a single blank space. The purpose of the switch code block in the Update() method is to convert several keyboard values into a more appropriate format for the application. However, as Table 7.4 shows, there are many unaccounted for keystroke values in the application.
Table 7.4. Keyboard Key Enumerations
Key | Description | Key | Description | Key | Description |
|---|---|---|---|---|---|
A | A key | F21 | F21 key | OemBacklash | Oem angle key |
Add | Add key | F22 | F22 key | OemClear | CLEAR key |
Apps | Applications key | F23 | F23 key | OemCloseBrackets | OEM Close bracket key |
Attn | Attn key | F24 | F24 key | OemComma | Country “,” key |
B | B key | F3 | F3 key | OemCopy | OEM Copy key |
Back | BACKSPACE key | F4 | F4 key | OemEnIW | OEM Enlarge Window key |
BrowserBack | Browser Back key | F5 | F5 key | OemMinus | Country “-” key |
BrowserFavorites | Browser Favorites key | F6 | F6 key | OemOpenBrackets | OEM open bracket key |
BrowserForward | Browser Forward key | F7 | F7 key | OemPeriod | Country “.” key |
BrowserHome | Browser Start/Home key | F8 | F8 key | OEMPipe | OEM pipe key |
BrowserRefresh | Browser Refresh key | F9 | F9 key | OEMPlus | Country “+” key |
BrowserSearch | Browser Search key | G | G key | OEMQuestion | OEM question mark key |
BrowserStop | Browser Stop key | H | H key | OEMQuotes | OEM Quote key |
C | C key | Help | HELP key | OEMSemicolon | OEM Semicolon key |
CapsLock | CAPS LOCK key | Home | HOME key | OEMTilde | Oem tilde key |
ChatPadGreen | Green ChatPad key | I | I key | P | P key |
ChatPadOrange | Orange ChatPad key | ImeConvert | IME Convert key | Pa1 | PA1 key |
Crsel | CrSel key | ImeNoCovert | IME NoConvert key | PageDown | PAGE DOWN key |
D | D key | Insert | INS key | PageUp | PAGE UP key |
D0 | Varying characters | J | J key | Pause | PAUSE key |
D1 | Varying characters | K | K key | Play | PLAY key |
D2 | Varying characters | Kana | Kana key (Japanese) | PRINT key | |
D3 | Varying characters | Kanji | Janji key (Japanese) | PrintScreen | PRINT SCREEN key |
D4 | Varying characters | L | L key | ProcessKey | IME PROCESS key |
D5 | Varying characters | LaunchApplication1 | Start Application 1 | Q | Q key |
D6 | Varying characters | LaunchApplication2 | Start Application 2 | R | R key |
D7 | Varying characters | LaunchMail | Start mail key | Right | RIGHT ARROW key |
D8 | Varying characters | Left | LEFT arrow key | RightAlt | Right ALT key |
D9 | Varying characters | LeftAlt | Left ALT key | RightControl | Right CONTROL key |
Decimal | Decimal key | LeftControl | Left CONTROL key | RightShift | Right SHIFT key |
Delete | DEL key | LeftShift | Left Shift key | RightWindows | Right Windows key |
Divide | Divide key | LeftWindows | Left Windows key | S | S key |
Down | DOWN ARROW key | M | M key | Scroll | SCROLL LOCK key |
E | E key | MediaNextTrack Next Track key | Select | SELECT key | |
End | END key | MediaPlayPause Play/Pause key | SelectMedia | Select media key | |
Enter | ENTER key | MediaPreviousTrack | Previous Track key | Separator | Separator key |
EraseEof | Erase EOF key | MediaStop | Stop key | Sleep | Sleep key |
Escape | ESC key | Multiply | Multiply key | Space | SPACEBAR |
Execute | EXECUTE key | N | N key | Subtract | Subtract key |
Exsel | ExSel key | None | Reserved | T | T key |
F | F key | NumLock | NUM LOCK key | Tab | TAB key |
F1 | F1 key | NumPad0 | 0 key | U | U key |
F10 | F10 key | NumPad1 | 1 key | Up | UP ARROW key |
F11 | F11 key | NumPad2 | 2 key | V | V key |
F12 | F12 key | NumPad3 | 3 key | VolumeDown | Volume Down key |
F13 | F13 key | NumPad4 | 4 key | VolumeMute | Volume Mute key |
F14 | F14 key | NumPad5 | 5 key | VolumeUp | Volume Up key |
F15 | F15 key | NumPad6 | 6 key | W | W key |
F16 | F16 key | NumPad7 | 7 key | X | X key |
F17 | F17 key | NumPad8 | 8 key | Y | Y key |
F18 | F18 key | NumPad9 | 9 key | Z | Z key |
F19 | F19 key | O | O key | Zoom | Zoom key |
F2 | F2 key | Oem8 | Varying characters | ||
F20 | F20 key | OemAuto | OEM Auto key |
The fifth and final step in the creation of the InputCollection application is to modify the Draw() method to provide for the display of gamepad, mouse, and keyboard data. To do so, you will have to define Vector2 objects that specify the coordinate location for all output text, which it organizes and displays in three primary sections on the window console.
protected override void Draw(GameTime gameTime)
{
   GraphicsDevice.Clear(ScreenColor);

   Color Pur = Color.Purple; //Define text color for headings
   Color Blu = Color.Blue;      //Define text color for detailed data

   //Specify the coordinates where console text is to be written
   Vector2 v1 = new Vector2(20, 10);      //Gamepad-----
   Vector2 v2 = new Vector2(20, 50);      //Start Button
   Vector2 v3 = new Vector2(410, 50);    //Dpad
   Vector2 v4 = new Vector2(20, 100);    //Left Thumbstick X
   Vector2 v5 = new Vector2(20, 130);    //Left Thumbstick Y
   Vector2 v6 = new Vector2(410, 100); //Right Thumbstick X
   Vector2 v7 = new Vector2(410, 130); //Right Thumbstick Y
   Vector2 v8 = new Vector2(20, 180);    //Left Shoulder
   Vector2 v9 = new Vector2(410, 180); //Right Shoulder
   Vector2 v10 = new Vector2(20, 250); //Mouse-----
   Vector2 v11 = new Vector2(20, 290); //Mouse X Coordinate
   Vector2 v12 = new Vector2(20, 320); //Mouse Y Coordinate
   Vector2 v13 = new Vector2(410, 290); //Mouse Left Button
   Vector2 v14 = new Vector2(410, 320); //Mouse Right Button
   Vector2 v15 = new Vector2(20, 370); //Mouse Wheel
Vector2 v16 = new Vector2(20, 440); //Keyboard- - - - - - - Vector2 v17 = new Vector2(20, 480); //Typing area spriteBatch.Begin(); spriteBatch.DrawString(font, "- Gamepad -", v1, Pur); spriteBatch.DrawString(font, "Start Button: " + StartMsg, v2, Blu); spriteBatch.DrawString(font, "Dpad : " + DpadMsg, v3, Blu); spriteBatch.DrawString(font, "Left Thumbstick X: " + LThumbX, v4, Blu); spriteBatch.DrawString(font, "Left Thumbstick Y: " + LThumbY, v5, Blu); spriteBatch.DrawString(font, "Right Thumbstick X: " + RThumbX, v6, Blu); spriteBatch.DrawString(font, "Right Thumbstick Y: " + RThumbY, v7, Blu); spriteBatch.DrawString(font, "LeftShoulder: " + LShoulder, v8, Blu); spriteBatch.DrawString(font, "RightShoulder: " + RShoulder, v9, Blu); spriteBatch.DrawString(font, "- Mouse -", v10, Pur); spriteBatch.DrawString(font, "Mouse Position X: " + mouseX, v11, Blu); spriteBatch.DrawString(font, "Mouse Position Y: " + mouseY, v12, Blu); spriteBatch.DrawString(font, "Left Mouse Button: " + LMouse, v13, Blu); spriteBatch.DrawString(font, "Right Mouse Button: " + RMouse, v14, Blu); spriteBatch.DrawString(font, "Mouse Wheel: " + MouseWheel, v15, Blu); spriteBatch.DrawString(font, "- Keyboard -", v16, Pur); spriteBatch.DrawString(font, KeyboardText, v17, Blu); spriteBatch.End(); base.Draw(gameTime); }
As you can see, the first statement in this method sets the application’s window to the background color specified in the ScreenColor variable. Next, two variables named Pur and Blu are defined and assigned a color value. These variables are used in the statements that follow to specify the color of output text.
The next set of statements creates a series of Vector2 objects, assigning them various coordinates on the console window. These Vector2 objects are then used in the final set of statements to display the application’s output on the console window. Output is drawn using the DrawString() method. Each time a new line of text is drawn, the SpriteFont assigned to the font variable is used to specify the text and variable data that is displayed.
Once you have updated the Draw() method, your new application should be ready for execution. Assuming you followed along carefully and did not skip any steps or make any typos, everything should work as expected.
Hint
Don’t forget that the source code for this application is available for download from the book’s companion web page (www.courseptr.com/downloads).
In this chapter, you learned how to work with various input devices including the gamepad, keyboard, and mouse. You also learned how the Zune player’s controls map to gamepad controls, allowing your applications to interact with them using the same program code that works with gamepad controllers. Using the information provided in this chapter, you will be able to develop games that can be played using one or more of the controllers covered in this chapter.