
Welcome to this book’s final chapter. Now that you have learned how to program using C#, as well as the fundamental steps involved in developing games using Microsoft XNA, it is time to address issues involved in deploying your games to Xbox 360 and the Zune player. After all, the ability to create games for a next-generation game console and media player is probably one of the main reasons you are interested in XNA. You will also learn how to submit your XNA games for peer review to the XNA Creators Club Online website, where if they are approved, your games will then be made available for sale on the Xbox Live Marketplace. In addition to all this, this chapter will also discuss how to deal with program errors and how to debug your XNA applications.
An overview of the major topics covered in this chapter includes learning how to:
Customize and deploy your XNA games to Xbox 360 and the Zune player
Create platform-specific games and convert games from one platform to another
Debug your XNA applications using breakpoints and step through program execution
Create exception handlers that can handle specific and general types of runtime errors
Up to this point in the book, the primary focus has been on learning how to develop games and run them on your computer. But it’s XNA’s ability to support game development for Xbox 360 and the Zune player that really make it stand out from other game development frameworks. Until XNA came along, the development of games for media players and game consoles was pretty much the exclusive domain of professional programmers. Now all that has changed. Even better is the fact that Microsoft now provides XNA developers with the opportunity to submit their games for peer review when they become members of the XNA Creators Club. Games that pass the review are made available to the Xbox community via the Xbox Live Marketplace. This provides you with access to a global market of game enthusiasts. How cool is that?
In order to port your XNA games from your computer to your Zune player or Xbox 360, you must establish a connection between them. This is done using the XNA Game Studio Device Center. Instructions for setting up these connections was provided in Chapter 2. Once you have established connections to these devices, assuming you have both, you should see them listed in the XNA Games Studio Device Center window, as demonstrated in Figure 11.1.

The most common approach to developing games for the Xbox 360 and the Zune player is to create your games and get them working correctly on your computer and then to port them over to other platforms, adding platform-specific features and code adjustments. A big reason this approach works so well is that between 95 and 100 percent of your program code will work just fine with no changes required. However, sometimes you will have to make changes or additions to your code. The primary purpose of this chapter is to identify these types of situations and to provide you with guidance on what you will need to do. If you prefer, you may of course start out developing a game for a specific platform without first generating a Windows version.
If you only want to create a game for a specific platform, you can do so by clicking on File > New Project and then selecting either Xbox 360 Game (3.1) or Zune Game (3.1) from the available list of new project templates, as shown in Figure 11.2.

Next, enter a name for the game and then click on OK. In response, XNA will create a new project for you. It will include all of the expected methods (Initialize(), LoadContent(), UnloadContent(), Update() and Draw()). At this point, you can go ahead and begin developing your game.
Hint
There is one small difference between the code that is automatically generated for a Zune game and that of a Windows or Xbox game. Specifically, an extra comment and code statement is included in the Game1 class defined at the beginning of the program file in Zune games, as shown next in bold.
public Game1()
{
    graphics = new GraphicsDeviceManager(this);
    Content.RootDirectory = "Content";

    // Frame rate is 30 fps by default for Zune.
    TargetElapsedTime = TimeSpan.FromSeconds(1 / 30.0);
}
Remember, the Zune player redraws its screen at a default rate of 30 frames per second, not 60 like on Windows and the Xbox 360.
Although you can start out creating a game for a specific platform as just described, a more commonly used approach is to start out creating your game for your computer. Once you have the core of the game developed and have tested and debugged any problems that may have occurred, most XNA developers then create a copy of the game for either Xbox 360 or the Zune player (or both) and then finish up by making any needed platform-specific adjustments to the game.
When you follow this Windows development first approach to game development, you will have a single project to manage as you begin game development, as shown in Figure 11.3.

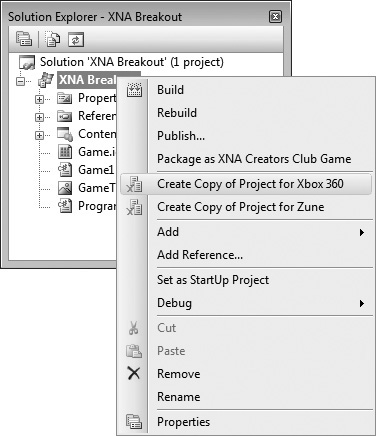
Once you have the game up and running properly on your computer, you can make a copy of it for the desired target platform by right-clicking on the project name in Solution Explorer, as shown in Figure 11.4, and selecting either Create Copy of Project for Xbox 360 or Create Copy of Project for Zune.
Hint
Note that if you began game development by creating a project for either the Xbox 360 or the Zune player, you would see an option to Create Copy of Project for Windows.
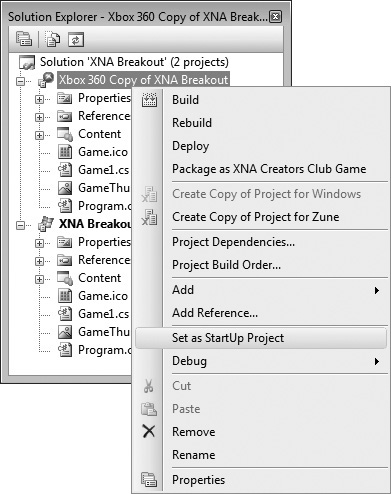
Once done, a second copy of your project will be added to Solution Explorer, as demonstrated in Figure 11.5. The new copy of your game project contains a complete copy of all of the files that make up the original project.

Note that any changes you make to one project are also made to the other project. Therefore, if you create a project for Windows, then make a copy of the project for Xbox 360, and then make a change to the Xbox 360 copy of the project, the changes are made in both the Windows and the Xbox 360 project. You can work around this restriction by embedding platform-specific code statements inside conditional compilation symbols, as discussed later in this chapter.
Also note that when working with multiple projects, only one project at a time can be set as the startup project. This is the project that is compiled and executed when you run your game from within the IDE. To specify which project you want to make the startup project, right-click on the project name and select Set as Startup Project, as demonstrated in Figure 11.6.
Once you have specified which project should be the startup project and are ready to test its execution on the target platform, click on Debug > Start Debug, and XNA will attempt to compile the application. If compilation is successful, it will connect to and install the project on the specified target platform (assuming that you have connected the target device to your computer and that it is powered on and ready to go).
Trap
To connect to and deploy an application to a Zune player, add the device to your computer using the XNA Game Studio Device Center as was explained in Chapter 2. Don’t forget to make sure your Zune player is turned on. To connect and deploy to Xbox 360 you must start the XNA Creators Club software on your Xbox 360 to put the device into connection mode and add the device to your computer using the XNA Game Studio Device Center.
Once deployed, your XNA game will automatically start on the specified target platform. Since the game is installed on the target platform, you can play it whenever you wish. On the Zune you will access it from the Games menu. On the Xbox 360 you will access it by opening the Xbox Game Library.
Okay, so now you know how to create platform-specific applications and how to convert applications from one platform to another. You also know how to deploy your XNA games to Xbox 360 and the Zune player. Now it’s time to consider different platform issues that you need to address to ensure that your games will run just as well on the Xbox 360 and Zune player as they do on your Windows computer.
Hint
If you implement the programming techniques covered in Chapter 10 that address cross-platform management of sprite size and shape, screen overscan, and screen resolution and size, you will significantly reduce the complexity and challenges involved in converting your XNA games from one platform to another.
One primary difference in game support across Windows, Xbox 360, and the Zune player is the management of input. Windows games can use a mouse, a keyboard, and a gamepad controller. Xbox 360’s primary input device is the gamepad. However, if you attach a USB keyboard to it, the Xbox 360 will work with it. If your XNA games make use of the mouse as an input device, you must rework them to use either the keyboard or gamepad instead if you want them to work with the Xbox 360.
To complicate matters further, the Zune player does not support the mouse or keyboard, and although its controls map to the gamepad, it only supports a subset of the gamepad’s controls. To complicate things still further, the way the Zune maps its controls to the gamepad depends on whether you are working with a first- or second-generation player. Specifically, first-generation players respond to Zune pad (Dpad) input, whereas second-generation players respond to both Dpad and left thumbstick input. When processing Zune pad (Dpad) input for either a first- or second-generation Zune player, binary data is received as shown here:
if (GamePad.GetState(PlayerIndex.One).Dpad.Up == ButtonState.Pressed)
{
    //The player wants to move up
}
if (GamePad.GetState(PlayerIndex.One).Dpad.Down == ButtonState.Pressed)
{
    //The player wants to move down
}
if (GamePad.GetState(PlayerIndex.One).Dpad.Left == ButtonState.Pressed)
{
    //The player wants to move left
}
if (GamePad.GetState(PlayerIndex.One).Dpad.Right == ButtonState.Pressed)
{
    //The player wants to move right
}
On the other hand, second-generation Zune players also map Zune pad input to the gamepad’s left thumbstick, providing X and Y coordinate data. As such, you could process Dpad input as shown here:
paddleX = paddleX + (paddleXSpeed * gamePad1.ThumbSticks.Left.X);
paddleY = paddleY + (paddleYSpeed * gamePad1.ThumbSticks.Left.Y);
Hint
Refer to Chapter 7 for additional input on how XNA maps the Zune player’s controls to the gamepad’s controls.
Unlike a Windows computer or an Xbox 360, the Zune player does not support the use of multiple controllers. As such, you must always use PlayerIndex.One when retrieving game input. For example, to determine if the player has pressed the Zune player’s Zune pad control, which maps to the gamepad’s A button, you would execute the following statement.
if (GamePad.GetState(PlayerIndex.One).Buttons.A == ButtonState.Pressed)
{
    //The A button has been pressed
}As you learned in Chapter 9, XNA supports the integration of audio in XNA games through either the Cross-Platform Audio Creation Tool (XACT) or its new API. If you elected to work with XACT and you only create games for Windows or Xbox 360, you are good to go. However, if you later decide to convert your game to the Zune player, you must convert all audio to work with the API.
The API is a simple tool but is sufficient to play both background music and audio effects. As long as you use it in your games, as explained in Chapter 9, you should not have to convert or make any changes to the code statements that manage your game’s audio.
Trick
In addition to playing the audio files that you add to your application’s content pipeline, you can also play songs stored in your Zune player’s media library. To do so, add the following statements to your XNA application.
MediaLibrary zuneLib = new MediaLibrary();
SongCollection songList = zuneLib.Songs;
MediaPlayer.Play(songList);
This example will also work on a Windows computer where a Zune player and the Zune software have been installed.
Another issue that you need to keep in mind when creating cross-platform games is screen size and resolution. In Chapter 10, you were shown an example of how to develop applications that automatically calculate and adjust the size of their graphics based on the width and height of the displays being used by the systems they run on. This developmental approach is highly recommended.
If you elect not to apply this technique in your games, then you will need to address it programmatically within your program code. To do this, you will have to make use of conditional compilation symbols. You will learn about conditional compilation symbols and see an example of how to use them to adjust screen size in the next section.
As has already been noted, XNA allows you to add platform-specific programming logic by embedding code statements within conditional compilation symbols. A conditional compilation symbol is a set of characters that mark a set of code statements that are indented for specific platforms. As such, only statements applicable to a given platform are compiled into a specific platform’s copy of your XNA game.
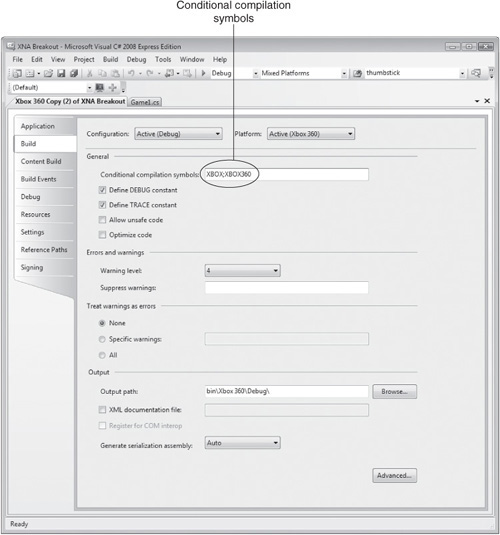
XNA automatically defines default conditional compilation symbols for each platform that you add to your XNA projects. To view the conditional compilation symbols for an Xbox 360 version of a project, click on Project > Xbox 360 Copy of Xxxxxx Properties (where Xxxxxx is the name of the game). In response, the screen shown in Figure 11.7 is opened in the code editor window.
As shown in Figure 11.7, XNA generates two conditional compilation symbols for Xbox 360 that are used to mark platform-specific program code. These symbols are XBOX and XBOX360 respectively. XNA generates a single conditional compilation symbol for both the Zune and Windows. These are the ZUNE and WINDOWS symbols.
The following example demonstrates how to use conditional compilation symbols to adjust an application’s screen size.
#if !ZUNE
    graphics.PreferredBackBufferHeight = 600;
    graphics.PreferredBackBufferWidth = 800;
#else
    graphics.PreferredBackBufferHeight = 320;
    graphics.PreferredBackBufferWidth = 240;
#endif
In this example, a screen size of 600 × 800 is used if the game is compiled for Windows or the Xbox 360 and a screen size of 320 × 240 is used if the game is compiled for execution on the Zune player.
If, after creating an XNA game, you think it is worthy of being made available for sale on the Xbox Live Marketplace, then you need to create an XNA package for the game and submit it to the XNA Creators Club where it will undergo a thorough peer review, and, if it is approved, will be made available for sale on the Xbox Live Marketplace.
Hint
In order to submit games to the XNA Creators Club, you must sign up for the XNA Creators Club Online website and pay for a premium membership. Signing up for the XNA Creators Club and setting up a premium membership was discussed in Chapter 1.
To submit your XNA game, you must package it into a .ccgame file. This package keeps your source code and content private while letting other XNA developers play the game.
To create a .ccgame file for a finished game, begin by creating a Release version of the game. To do so, click on Build > Configuration Manager. This will display the Configuration Manager window shown in Figure 11.8.

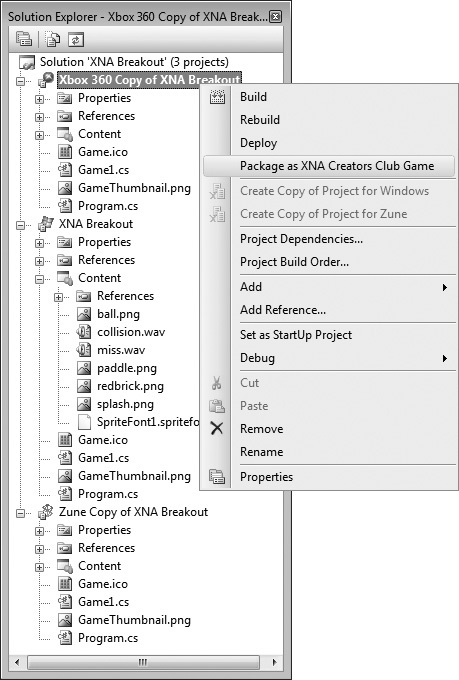
Next, click on the Active solution configuration drop-down list and select the Release option. Make sure the Build check box is selected for the Xbox 360 copy of your game and click on Close. Now compile your game by clicking on the Green Start Debugging button on the IDE toolbar. Next, in Solution Explorer, right-click on the Xbox 360 version of the application and click on the Package as XNA Creators Club Game option, as demonstrated in Figure 11.9.
This will generate a .ccgame file for your game. To locate the file, open Windows Explorer and navigate to the folder where you saved the game. Open that folder and you will see a couple files and another folder. Drill down into the folder.
A number of files and folders should appear. Open the folder named bin and when in this folder drill down into the Xbox 360 folder. Locate the folder named Release and open it. The contents of this folder should resemble those shown in Figure 11.10.
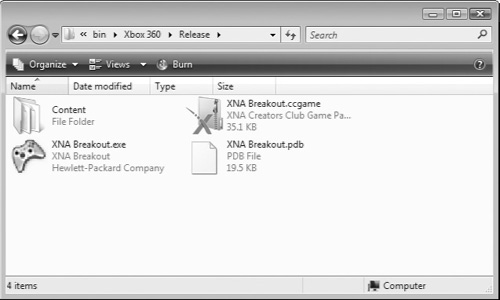
The folder whose name ends with .ccgame is the folder that you will need to submit to the XNA Creators Club Online website. You may want to copy this file to a convenient location, such as your desktop, so that it will be easy to access during the submission process.
Hint
It is essential that the game you are submitting runs perfectly and that it contains no errors. If it does, do not submit it and go back and keep working on it until all errors have been eliminated.
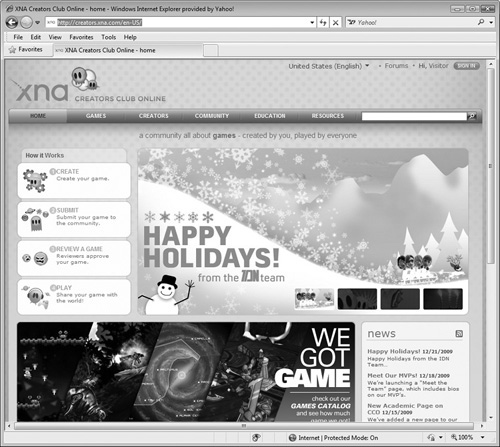
At this point you are ready to begin the submission process. To do so, open your browser and go to http://creators.xna.com/en-US/, as shown in Figure 11.11.
Next, click on Games > Submit Game. Log in using your developers account and password when prompted. The screen shown in Figure 11.12 is then displayed.
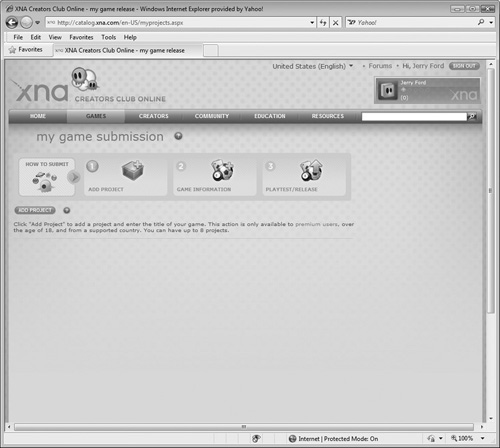
Click on the Add Project button to begin the submission process. The screen shown in Figure 11.13 appears, prompting you to enter a title for your game.
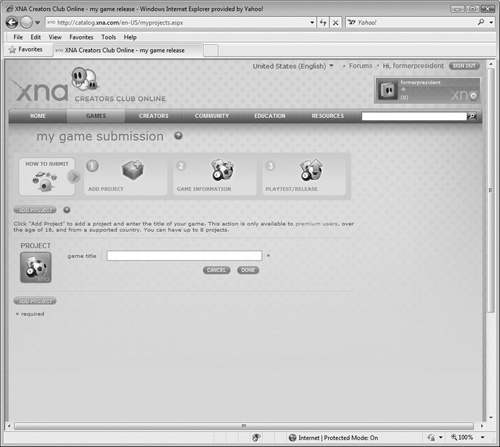
Enter a title for your game in the game title field and when ready click on Done. A new project for your game is then generated and the title you entered is displayed on the screen. To continue, click on the Add Game button. The screen shown in Figure 11.14 is then displayed.

You are prompted to supply various categories of information about your game. Begin by specifying the genre that best matches your game. Then provide a game description and provide the required classification information and supply the required media. The media needed includes things like screen prints of your game. Fill in all the required information and click on the Done button. The screen shown in Figure 11.15 is then displayed.
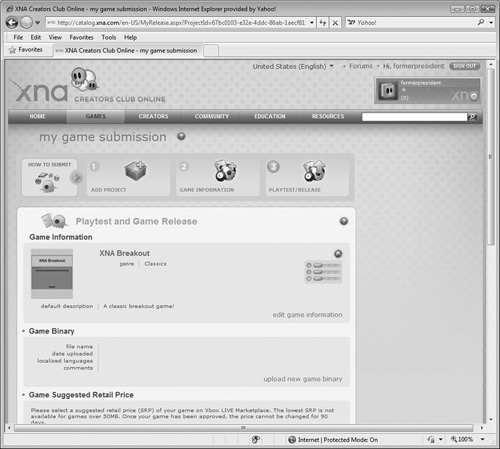
Here you are required to upload your game package by clicking on the upload new game binary link and then the browse link, which displays a window that you can use to locate the .ccgame file on your computer. Once selected, click on the Upload button to upload the file. Scroll down and specify a suggested price for your game and then select the countries to which it should be made available. Enter a few comments in the Forums Comments text field. Lastly, select either Playtest or Release. Selecting Playtest means that your game will be made available for a week to premium members on the XNA CCO website after which time you can make changes to your game based on developer feedback. Selecting Release posts your game and makes it ready for peer review. When done filling out this screen, click on the Submit button to complete the submission process.
If all goes well with the peer review process, your game will be approved and made available on Xbox Live Marketplace. If it fails to pass the peer review, you can return later and resubmit it after making any needed changes and improvements.
As your XNA applications grow more complex, you are going to run into errors. XNA applications are subject to different types of errors that cause games to behave inappropriately. These errors are sometimes referred to as bugs. Your job is to find and remove these bugs.
To minimize the number of errors in your games you should always begin development by taking time to plan the overall design of your application. Then you can begin coding. Once finished, test your games and look for and fix any bugs. Other practices you should follow include:
Providing players with clear instructions
Creating an easy-to-use interface
Using consistent naming schemes for variables, arrays, classes, and methods
Validating user input before accepting it
Anticipating errors and dealing with them programmatically
XNA applications are subject to three basic types of errors. These are syntax errors, logical errors, and runtime errors.
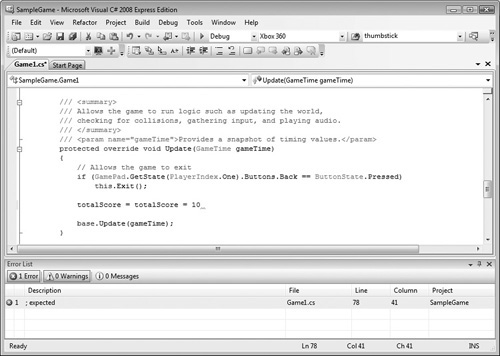
The most common error you will come across is syntax errors. Syntax errors occur when code statements fail to conform to C#’s rules. They often result from typos, such as when you mistype a keyword or omit a required parameter.
The Visual Studio Express IDE highlights syntax errors in your program code by underlining them, as demonstrated in Figure 11.16. This makes them easy to locate and fix. Syntax errors are also visible in the Error List window, as seen at the bottom of Figure 11.16. This window is automatically displayed if you try to run an XNA application with syntax errors. Each error message includes a description of the error and shows the line number of the statement that generated the error. If you double-click on an error, the IDE will locate the statement where it resides.
A logical error is caused by a mistake on your part. For example, suppose you write a statement that adds two numbers together that you really meant to subtract. As far as XNA is concerned everything is okay. However, the output won’t be what you want.
The IDE cannot identify logical errors for you. The best way to prevent them is to take a little extra time to plan and formulate your program logic. Also, make sure you organize your applications into methods and that you limit your methods to specific tasks. Also set aside plenty of time to test.
A third type of error is a runtime error. These errors occur when a statement tries to do something that is impossible. For example, a runtime error will occur if your game performs an illegal operation like dividing a number by zero.
The compiler won’t flag a runtime error. You have to compile your game, run it, and then do something to make the code containing the runtime error execute in order to find it. As such, runtime errors can easily be missed if you do not take the time to test your XNA games, in which case players will be left to discover your runtime errors, which is the last thing any game developer wants to let happen.
If you come across a runtime error when testing an XNA application, you’ll get an error message like the one shown in Figure 11.17. If you fail to find and fix a runtime error during testing, the release version of your game may or may not display an error message when it executes. Instead, it might simply stop responding or even lock up the player’s computer.
Runtime errors can occur if the player provides your game unanticipated input, especially if keyboard input is involved. It is essential that you add logic to your applications that validates user input whenever possible. Unfortunately, there is no way to completely do away with runtime errors. Sometimes hardware fails or networks crash. If your game needs access to these resources, a runtime error will occur. Fortunately, as you will soon learn, you can create exception handlers that can recover from or gracefully respond to unavoidable runtime errors.
The Visual Studio Express IDE has tools that can help you find errors. These tools will allow you to monitor code statements as they execute. You can also examine variable and property values and observe execution flow while your application executes. To work with these tools, you need to run your application in break mode.
Break mode lets you pause application execution in order to examine its status. You can use this capability to track down and locate statements that may be incorrectly setting variable or property values. In break mode you step through program code a line at a time in order to see what methods are being called and to monitor variable and property values.
To configure a breakpoint in your application, locate the line where you want to place it and then click on the left-hand margin of the code editor beside the line. Once set, a circular marker is displayed in the margin. In addition, the specified line of code is highlighted, as demonstrated in Figure 11.18.

You should place breakpoints within your applications at places where you suspect problems. There is no limit to the number of breakpoints you can set. When you run your application execution pauses when a breakpoint is reached. In addition, the breakpoint’s circular marker changes to an arrow, as demonstrated in Figure 11.19.

Trick
Once you have found and fixed your application’s errors and no longer need the breakpoints, you can remove them. All you have to do is click on the circular markers and they’ll go away.
You can gain a lot of insight into the execution of your application by establishing a breakpoint and examining property and variable values. As an example, look at the bottom of Figure 11.19 where you will see that the Locals and Immediate windows are displayed. The Locals window displays values and their type. If you want, you can modify a variable’s value in the Locals window to see what effect this has on the application.
Trick
If the Locals and Immediate windows are not automatically opened, you can display them yourself by clicking on Debug > Windows > Locals and Debug > Windows > Immediate.
You can use the Immediate window to examine any variable, array, or property value. If you look at Figure 11.19, you will see that the value assigned to name-Array[0] was checked entering a question mark followed by the array’s name and the index position of its first item.
Another important debugging feature provided by the IDE is the ability to step through the execution of program statements. This way you can set a breakpoint at a section of code where you suspect an error and then step through the execution of statements that follow the breakpoint a line at a time.
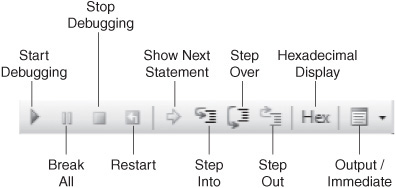
The Visual Studio IDE supports three different ways of stepping through program code, as listed here:
You can switch between these three options as needed when debugging an application. The easiest way to work with these options is to click on their icons located in the IDE’s standard toolbar, as shown in Figure 11.20.
If you find a statement with an error when debugging, the usual thing to do is stop the debugging session and fix the error, after which you can execute the application again to see the result of your changes. However, Visual Studio Express has a feature called Edit and Continue that lets you apply changes to the application when paused at a breakpoint. You can then resume execution to see what effect your change had.
To execute this feature, locate the yellow arrow that identifies the next statement to be executed and place your cursor over it. A transparent arrow will appear. Drag and drop the yellow arrow to a previous location in your program. This way you can resume execution from a previously executed statement. You can now apply your correction and click on the Step Into button to resume execution and see if the change fixed things.
Runtime errors or exceptions occur for all kinds of reasons. Whenever possible, you should design your applications to handle unexpected exceptions without crashing or displaying cryptic error messages that are sure to confound players.
To handle exceptions, you need to locate places in your applications where errors are likely and then develop code to handle the problem. If you create an application that is subject to an error due to player input, you should add code that validates the input before accepting it. There are numerous ways of dealing with exceptions, including:
Providing additional instruction to players
Rewording cryptic error messages
Requesting the player report errors
Apologizing for errors and then closing down the application
C# supports the use of structured exception handlers as a means of preventing exceptions from creating havoc in your applications.
Microsoft’s recommended approach to developing exception handlers is the try…catch…finally code block. It allows you to enclose statements where errors may occur and then to handle them.
To set up a try…catch…finally code block, place statements where you think an exception might occur inside the try block and then add programming logic to handle the exception in the catch block. If more than one exception is possible you can add additional catch blocks, each designed for a different type of exception. You can also include an optional finally block. If included, this block will always execute even if an exception does not occur or even if a catch block executes. The finally block always executes last.
To better understand how to work with the try…catch…finally code block, let’s look at the example shown here:
protected override void Update(GameTime gameTime)
{
// Allows the game to exit
if (GamePad.GetState(PlayerIndex.One).Buttons.Back
== ButtonState.Pressed)
this.Exit();
string[] nameArray = new string[4];
nameArray[0] = "Alexander";
nameArray[1] = "William";
nameArray[2] = "Molly";
nameArray[3] = "Mary";
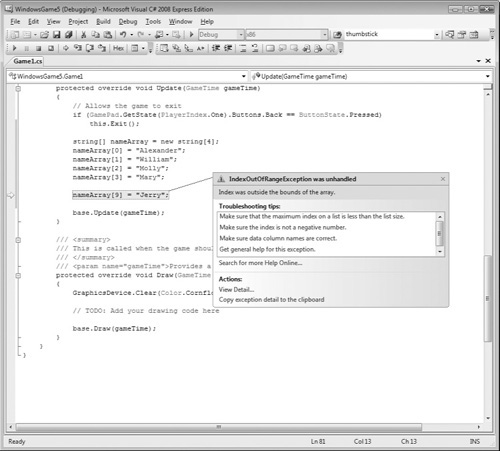
nameArray[9] = "Jerry";
base.Update(gameTime);
}Here an array named nameArray is defined. The array has been defined as being able to store a maximum of five items (e.g., at index positions 0 – 4). However, the last statement shown in bold attempts to access an array element that is outside the range supported by the array, generating an IndexOutOfRangeException runtime error, as shown in Figure 11.21.

The occurrence of this runtime error brings application execution to an immediate halt. Using a try…catch…finally code block, as demonstrated in this next example, you can trap and prevent the error from terminating the application’s execution.
protected override void Update(GameTime gameTime)
{

// Allows the game to exit
if (GamePad.GetState(PlayerIndex.One).Buttons.Back
    == ButtonState.Pressed)
    this.Exit();

string[] nameArray = new string[4];
nameArray[0] = "Alexander";
nameArray[1] = "William";
nameArray[2] = "Molly";
nameArray[3] = "Mary";

try
{
     nameArray[9] = "Jerry";
}

    {

    }
    catch (Exception ex)
    {

    }
    finally
    {

    }

    base.Update(gameTime);
}
Here, the statement that generates the error has been placed inside the try block. A catch block is then added that executes if an IndexOutOfRangeException runtime errors occurs. Note that a variable named ex has been defined. This variable provides access to an Exception object that is automatically generated. The object’s properties contain information about the exception.
A second catch block has been added to handle any other type of exception. The finally block will execute every time the Update() method executes, even if you fix the code statement so that the exception no longer occurs.
Hint
The order of catch blocks is important. If you have more than one catch block, always place more specific catch blocks first, followed by the more general ones because only the first matching catch block gets executed.
Trick
You can view a complete list of exceptions by typing catch in the code editor followed by a variable name and the keyword as, as demonstrated in Figure 11.22. Note that all exception names include the word “Exception” at the end of their name.

In this example, no statements have been placed inside the catch or finally blocks. As a result, no recovery actions are taken as would normally be the case. Instead, the application handles the runtime error by simply ignoring it. Although this example is admittedly simple, it does provide you with a template that you can use as the basis for creating more complicated exception handlers.
Trick
If the likelihood of an exception occurring is relatively high, you should attempt to add new code to the application that programmatically handles the situation. However, if the chance of an error occurring is small but nevertheless still possible, adding an exception handler may be the way to go.
In this chapter you learned about a number of technical issues that you must address in order to deploy your XNA games to the Xbox 360 and the Zune player. This included making sure you provide for controls appropriate for each platform as well as address resolution and screen size issues. You learned how to work with conditional compilation symbols and to create platform-specific applications, as well as to convert your applications from one platform to another. On top of all this you also learned how to debug your XNA application, to set breakpoints, and to step through program execution. Last but not least, this chapter demonstrated how to create execution handlers in order to prevent errors from wreaking havoc on your applications.