
IN THIS CHAPTER
We've already been using Extensible Stylesheet Language Transformations (XSLT) throughout the book to show how XPath works, and in this chapter, we're going to take a closer look at XSLT. After all, XSLT is the major reason most people who use XPath 1.0 use XPath in the first place.
XSLT itself is really part of a larger specification, Extensible Stylesheet Language (XSL). XSLT is the most popular part of XSL, because it lets you work with the data in an XML document and transform it into other formats, including HTML or just plain text. You can also use XSLT to transform XML documents into other XML documents where you've arranged the data in a different way.
XSLT is an W3C specification and has been a recommendation since November 16, 1999. You can find the W3C recommendation for XSLT 1.0, the current version, at www.w3.org/TR/xslt. XSLT 2.0 is in the works, but it's only a working draft at this point (there actually was an XSLT 1.1, but it was not continued after the working draft stage). You can see the current version of the XSLT 2.0 Working Draft at http://www.w3.org/TR/xslt20/.
To use XSLT, you need two documents—an XML document that you want to transform, and an XSLT stylesheet that will direct how the transformation works (note that XSLT stylesheets are also XML documents). And you'll also need an XSLT processor.
We took a look at this process in Chapter 1, but we'll see it in more depth now. We'll start this chapter with our planetary data document, renamed ch05_01.xml so we can use it in this chapter, and an XSLT stylesheet that we first saw in Chapter 1, which you see in ch05_02.xsl in Listing 5.1.
Example 5.1. Transforming XML Data into HTML (ch05_02.xsl)
<?xml version="1.0" encoding="UTF-8"?>
<xsl:stylesheet version="1.1"
xmlns:xsl="http://www.w3.org/1999/XSL/Transform">

    <!-- This template matches all planets elements -->
    <xsl:template match="/planets">
        <HTML>
            <HEAD>
                <TITLE>
                    The Planets Table
                </TITLE>
            </HEAD>
            <BODY>
                <H1>
                    The Planets Table
                </H1>
                <TABLE BORDER="2">
                    <TR>
                        <TD>Name</TD>
                        <TD>Mass</TD>
                        <TD>Radius</TD>
                        <TD>Day</TD>
                    </TR>
                    <xsl:apply-templates/>
                </TABLE>
            </BODY>
        </HTML>
    </xsl:template>

    <xsl:template match="planet">
       <TR>
          <TD><xsl:value-of select="name"/></TD>
          <TD><xsl:apply-templates select="mass"/></TD>
          <TD><xsl:apply-templates select="radius"/></TD>
          <TD><xsl:apply-templates select="day"/></TD>
       </TR>
   </xsl:template>

    <xsl:template match="mass">
        <xsl:value-of select="."/>
        <xsl:text> </xsl:text>
        <xsl:value-of select="@units"/>
    </xsl:template>

    <xsl:template match="radius">
        <xsl:value-of select="."/>
        <xsl:text> </xsl:text>
        <xsl:value-of select="@units"/>
    </xsl:template>

    <xsl:template match="day">
        <xsl:value-of select="."/>
        <xsl:text> </xsl:text>
        <xsl:value-of select="@units"/>
    </xsl:template>

</xsl:stylesheet>
This stylesheet extracts the XML data in ch05_01.xml and formats it into an HTML table. So how do you make this transformation happen?
XSLT transformations can happen in three different places:
In the server. A server program, such as a .NET or JavaServer Page (JSP) program that operates on a Web server, can use XSLT to transform an XML document and send it to the client program, such as a browser.
In the client. A client program, such as an HTML browser, can perform XSLT transformations. For example, Internet Explorer has full XSLT 1.0 support.
With a separate program. You can use standalone programs to perform your own XSLT transformations.
As a client program example, recall that Internet Explorer lets you perform XSLT 1.0 transformations. To make that transformation happen, you have to connect your stylesheet to the XML document to transform. You can do that using an <?xml-stylesheet?> processing instruction like this: <?xml-stylesheet type="text/xsl" href="ch05_02.xsl"?> (note that some other XSLT processors will require this attribute to be type="text/xml", not type="text/xsl"). You can see Internet Explorer–enabled version of our sample XML document in ch05_03.xml (see Listing 5.2), where we're putting the <?xml-stylesheet?> processing instruction to work.
Example 5.2. An XML Document Holding Planetary Data (ch05_03.xml)
<?xml version="1.0" encoding="UTF-8"?>
<?xml-stylesheet type="text/xsl" href="ch05_02.xsl"?>
<planets>

    <planet>
        <name>Mercury</name>
        <mass units="(Earth = 1)">.0553</mass>
        <day units="days">58.65</day>
        <radius units="miles">1516</radius>
        <density units="(Earth = 1)">.983</density>
        <distance units="million miles">43.4</distance><!--At perihelion-->
    </planet>

    <planet>
        <name>Venus</name>
        <mass units="(Earth = 1)">.815</mass>
        <day units="days">116.75</day>
        <radius units="miles">3716</radius>
        <density units="(Earth = 1)">.943</density>
        <distance units="million miles">66.8</distance><!--At perihelion-->
    </planet>

    <planet>
        <name>Earth</name>
        <mass units="(Earth = 1)">1</mass>
        <day units="days">1</day>
        <radius units="miles">2107</radius>
        <density units="(Earth = 1)">1</density>
        <distance units="million miles">128.4</distance><!--At perihelion-->
    </planet>

</planets>
You can see the results in Figure 5.1. Using Internet Explorer like this is the most accessible way to perform XSLT transformations for most people.

You can also use standalone packages to perform XSLT transformations. For example, the Xalan XSLT processor mentioned in Chapter 1 lets you perform XSLT transformations. You can download Xalan at http://xml.apache.org/xalan-j/index.html. Note that you'll need to have Java installed; the current version as of this writing is 1.4, which you can download for free from http://java.sun.com/j2se/1.4/download.html.
Here's how you'd use Xalan to transform ch05_01.xml, using ch05_02.xsl, into a new result document, which we'll call results.html:
%xalan ch05_01.xml ch05_02.xsl results.html
And here's what results.html looks like when you do this (where we've indented the HTML to make it more readable):
<HTML>
    <HEAD>
        <META http-equiv="Content-Type" content="text/html; charset=UTF-8">
        <TITLE>
            The Planets Table
        </TITLE>
    </HEAD>

    <BODY>
        <H1>
            The Planets Table
        </H1>

        <TABLE BORDER="2">
            <TR>
                <TD>Name</TD>
                <TD>Mass</TD>
                <TD>Radius</TD>
                <TD>Day</TD>
            </TR>

            <TR>
                <TD>Mercury</TD>
                <TD>.0553 (Earth = 1)</TD>
                <TD>1516 miles</TD>
                <TD>58.65 days</TD>
            </TR>

            <TR>
                <TD>Venus</TD>
                <TD>.815 (Earth = 1)</TD>
                <TD>3716 miles</TD>
                <TD>116.75 days</TD>
            </TR>

            <TR>
                <TD>Earth</TD>
                <TD>1 (Earth = 1)</TD>
                <TD>2107 miles</TD>
                <TD>1 days</TD>
            </TR>

        </TABLE>
    </BODY>
</HTML>
Another popular XSLT processor that runs with Java is named Saxon, and you can download Saxon for free from http://saxon.sourceforge.net/. As we'll see in this chapter, Saxon can do some things that Xalan can't, such as indent output documents automatically. We're also going to see Saxon at work in the second half of this book, because it's the first XSLT processor to include any support for XPath 2.0 (Saxon is written by Michael Kay, who is on the XPath 2.0 W3C design committee.)
That's how you make XSLT transformations happen. Now let's get more details on how to create stylesheets.
Because XSLT documents are also XML documents, the XSLT 1.0 specification defines a number of elements to let you create stylesheets. XSLT uses XPath to let you specify exactly what data you want to work with in the XML document, and we'll be assigning XPath expressions to the match and select attributes of XSLT elements in this chapter.
As introduced in Chapter 1, XSLT stylesheets begin with an XML declaration and the <xsl:stylesheet> element (note that this is not the <?xsl:stylesheet?> processing instruction you can use in XML documents to connect stylesheets to XML documents). In this element, we associate the xsl namespace with the URI “http://www.w3.org/1999/XSL/Transform”, which is the official namespace for XSLT:
<?xml version="1.0" encoding="UTF-8"?>
<xsl:stylesheet version="1.0" xmlns:xsl="http://www.w3.org/1999/XSL/Transform">
        .
        .
        .
To specify what elements you want to locate and work with, you use the <xsl:template> element to create XSLT templates.
A template uses an XPath expression to match a node or nodes in your XML document and lets you specify what you want to do with the matched data. For example, to match the document element, <planets>, in our XML document, we use this <xsl:template> element:
<?xml version="1.0" encoding="UTF-8"?>
<xsl:stylesheet version="1.0" xmlns:xsl="http://www.w3.org/1999/XSL/Transform">

    <!-- This template matches all planets elements -->
    <xsl:template match="planets">
        .
        .
        .
    </xsl:template>
        .
        .
        .
</xsl:stylesheet>
The XSLT processor will look through the XML document and match the <planets> element to this template. The XSLT processor automatically opens the document, starts at the root node, and searches for templates that match the children of the root node. In this case, that means <xsl:template match="planets"> will match, because <planets> is a child of the root node (but <xsl:template match="planet"> would not match because <planet> is a grandchild of the root node).
The template replaces the node(s) you've matched with the content you specify. In this case, we want to create a new HTML table displaying our planetary data and use the <xsl:apply-templates/> to handle the child elements of the <planets> element:
<?xml version="1.0" encoding="UTF-8"?>
<xsl:stylesheet version="1.1"
xmlns:xsl="http://www.w3.org/1999/XSL/Transform">

    <!-- This template matches all planets elements -->
    <xsl:template match="/planets">
        <HTML>
            <HEAD>
                <TITLE>
                    The Planets Table
                </TITLE>
            </HEAD>
            <BODY>
                <H1>
                    The Planets Table
                </H1>
                <TABLE BORDER="2">
                    <TR>
                        <TD>Name</TD>
                        <TD>Mass</TD>
                        <TD>Radius</TD>
                        <TD>Day</TD>
                    </TR>
                    <xsl:apply-templates/>
                </TABLE>
            </BODY>
        </HTML>
    </xsl:template>
        .
        .
        .
Note in particular that you use the <xsl:apply-templates> element, as we've done here, to indicate that you've got other templates to use on the child nodes of the current node.
In our case, we're using <xsl:apply-templates> to work with the child nodes of the <planets> element, and we'll use a new template to indicate that we want to match <planet> elements like this:
<?xml version="1.0" encoding="UTF-8"?>
<xsl:stylesheet version="1.1"
xmlns:xsl="http://www.w3.org/1999/XSL/Transform">

    <!-- This template matches all planets elements -->
    <xsl:template match="/planets">
        <HTML>
        .
        .
        .
            <xsl:apply-templates/>
        .
        .
        .
        </HTML>
    </xsl:template>

    <xsl:template match="planet">
       <TR>
          <TD><xsl:value-of select="name"/></TD>
          <TD><xsl:apply-templates select="mass"/></TD>
          <TD><xsl:apply-templates select="radius"/></TD>
          <TD><xsl:apply-templates select="day"/></TD>
       </TR>
   </xsl:template>
In this new <planet> template, we're using <xsl:apply-templates> again to work with the child <mass>, <radius>, and <day> elements of the current <planet> element.
Note also that we're using one of the core XSLT elements here, <xsl:value-of>, to extract the value of the <name> element. (Also note that, because <planet> nodes are not direct child nodes of the root node, this new template would never match anything unless we specifically use a <xsl:apply-templates/> element in the <planets> template to invoke it on the child nodes of the <planets> node explicitly.)
The <xsl:value-of> element inserts the text value of the node you specify with the select attribute into the result document. In this case, we're assigning “name” to the select attribute, which inserts the text value of the current <planet> element's <name> element into the result document, which for us means our HTML table.
And that completes the technology we need for the remainder of this stylesheet, because all that's left to do is to create templates for each of the values we want to display and displaying those values and the value of the units attribute like this (more on the <xsl:text> element later in this chapter) :
<xsl:template match="mass">
    <xsl:value-of select="."/>
    <xsl:text> </xsl:text>
    <xsl:value-of select="@units"/>
</xsl:template>

<xsl:template match="radius">
    <xsl:value-of select="."/>
    <xsl:text> </xsl:text>
    <xsl:value-of select="@units"/>
</xsl:template>

<xsl:template match="day">
    <xsl:value-of select="."/>
    <xsl:text> </xsl:text>
    <xsl:value-of select="@units"/>
</xsl:template>
THE MATCH AND SELECT ATTRIBUTES
Although the <xsl:template> element uses the match attribute, <xsl:value-of> and <xsl:apply-templates> use the select attribute. We'll see that there's a significant difference here in a few pages—the XPath expressions you can use with match are far more restricted than the ones you can use with select.
We've already seen most of how this stylesheet works, but here's something to note—the select attribute only selects the first node that matches. What if you have multiple nodes that could match? We'll take a look at that next.
For example, say you have multiple <name> elements for each planet, as you see in ch05_04.xml in Listing 5.3.
Example 5.3. An XML Document with Multiple <name> Elements (ch05_04.xml)
<?xml version="1.0" encoding="UTF-8"?>
<?xml-stylesheet type="text/xsl" href="ch05_02.xsl"?>
<planets>

    <planet>
        <name>Mercury</name>
        <name>The Hottest Planet</name>
        <mass units="(Earth = 1)">.0553</mass>
        <day units="days">58.65</day>
        <radius units="miles">1516</radius>
        <density units="(Earth = 1)">.983</density>
        <distance units="million miles">43.4</distance><!--At perihelion-->
    </planet>

    <planet>
        <name>Venus</name>
        <name>Planet of Love</name>
        <mass units="(Earth = 1)">.815</mass>
        <day units="days">116.75</day>
        <radius units="miles">3716</radius>
        <density units="(Earth = 1)">.943</density>
        <distance units="million miles">66.8</distance><!--At perihelion-->
    </planet>

    <planet>
        <name>Earth</name>
        <name>The Green Planet</name>
        <mass units="(Earth = 1)">1</mass>

        <day units="days">1</day>
        <radius units="miles">2107</radius>
        <density units="(Earth = 1)">1</density>
        <distance units="million miles">128.4</distance><!--At perihelion-->
    </planet>

</planets>
To catch all possible matches, you can use the XSLT <xsl:for-each> element as you see in ch05_05.xsl in Listing 5.4.
Example 5.4. An Example of an XSL Stylesheet with Multiple Matches (ch05_05.xsl)
<?xml version="1.0" encoding="UTF-8"?>
<xsl:stylesheet version="1.0" xmlns:xsl="http://www.w3.org/1999/XSL/Transform">

    <xsl:template match="planets">
        <HTML>
            <xsl:apply-templates/>
        </HTML>
    </xsl:template>

<xsl:template match="planet">
    <xsl:for-each select="name">
        <P>
            <xsl:value-of select="."/>
        </P>
    </xsl:for-each>
        <BR/>
</xsl:template>

</xsl:stylesheet>
This stylesheet will catch all <name> elements, place their values in a <P> element, and add them to the output document like this:
<HTML>

    <P>Mercury</P>
    <P>The Hottest Planet</P>
    <BR>

    <P>Venus</P>
    <P>Planet of Love</P>
    <BR>

    <P>Earth</P>
    <P>The Green Planet</P>
    <BR>

</HTML>
As you can see, <xsl:for-each> is designed to let you handle node-sets that contain multiple nodes. At this point, then, we've been able to handle some of the XSLT basics. Two of the most important aspects are the match attribute in the <xsl:template> element and the select attribute in the <xsl:value-of> element. Much of being able to work with XSLT involves knowing what values you can assign to these attributes. You can assign XPath expressions to both of these attributes, but there are restrictions on what XPath expressions you can use with the match attribute. We'll take a look at the match attribute first, followed by the select attribute.
There are two different XSLT attributes that you assign XPath expressions to—the match and the select attributes. You can use the match attribute with the <xsl:template> element, and the select attribute can be used in the <xsl:apply-templates>, <xsl:value-of>, <xsl:for-each>, <xsl:copy-of>, and <xsl:sort> XSLT elements.
The match attribute is restricted to using the current node or direct child nodes. In other words, you can only use the self and the child axes—just those two—with the match attribute. So in XSLT, match=axis::node-test[predicate] is legal only if axis is the self or the child axis. This restriction was made to make implementing XSLT processors easier.
There are no restrictions on the XPath expressions you can assign to the select attribute. This attribute can be used in the <xsl:apply-templates>, <xsl:value-of>, <xsl:for-each>, <xsl:copy-of>, and <xsl:sort> XSLT elements, and we'll see most of these elements in this chapter.
It's often useful to be able to simply copy nodes from the input document to the output document without making any changes, and we'll take a look at how that works here, with examples. There are two elements that you can use to copy nodes in XSLT—<xsl:copy> and <xsl:copy-of>.
The <xsl:copy> element lets you copy a node from the source tree to the output tree. Note that this is a shallow copy, however, which means that it does not copy any of the node's descendants. No attributes of elements are copied either.
<XSL:COPY> AND ROOT NODES
Using <xsl:copy> actually does nothing when used on the root node, because the root of the output document is created automatically.
This element can contain a template body, which is used only when the node to copy is a root node or an element.
You can see an example in ch05_06.xsl in Listing 5.5—all this example does is to copy all elements from the source document to the result document, using <xsl:copy>.
Example 5.5. An XSLT Stylesheet That Copies Elements (ch05_06.xsl)
<?xml version="1.0" encoding="UTF-8"?>
<xsl:stylesheet version="1.1"
xmlns:xsl="http://www.w3.org/1999/XSL/Transform">
    <xsl:output method="xml"/>

    <xsl:template match="*">
        <xsl:copy>
            <xsl:apply-templates/>
        </xsl:copy>
    </xsl:template>
</xsl:stylesheet>
However, note that <xsl:copy> does not copy attributes, so here's the result when we use this stylesheet on ch05_01.xml:
<?xml version="1.0" encoding="UTF-8"?>
<planets>

    <planet>
        <name>Mercury</name>
        <mass>.0553</mass>
        <day>58.65</day>
        <radius>1516</radius>
        <density>.983</density>
        <distance>43.4</distance>
    </planet>

    <planet>
        <name>Venus</name>
        <mass>.815</mass>
        <day>116.75</day>
        <radius>3716</radius>
        <density>.943</density>
        <distance>66.8</distance>
    </planet>

    <planet>
        <name>Earth</name>
        <mass>1</mass>
        <day>1</day>
        <radius>2107</radius>
        <density>1</density>
        <distance>128.4</distance>
    </planet>

</planets>
You can also copy attributes if you find a way to apply <xsl:copy> to each of an element's attributes. That can be done, for example, with <xsl:for-each>, as you see in ch05_07.xsl in Listing 5.6.
Example 5.6. An XSLT Stylesheet That Copies Elements and Attributes (ch05_07.xsl)
<?xml version="1.0" encoding="UTF-8"?>
<xsl:stylesheet version="1.1"
xmlns:xsl="http://www.w3.org/1999/XSL/Transform">
    <xsl:output method="xml"/>

    <xsl:template match="*">
        <xsl:copy>
            <xsl:for-each select="@*">
                <xsl:copy/>
            </xsl:for-each>
            <xsl:apply-templates/>
        </xsl:copy>
    </xsl:template>
</xsl:stylesheet>
Here's the result—note that this time, the attributes are intact:
<?xml version="1.0" encoding="UTF-8"?>
<planets>

    <planet>
        <name>Mercury</name>
        <mass units="(Earth = 1)">.0553</mass>
        <day units="days">58.65</day>
        <radius units="miles">1516</radius>
        <density units="(Earth = 1)">.983</density>
        <distance units="million miles">43.4</distance>
    </planet>

    <planet>
        <name>Venus</name>
        <mass units="(Earth = 1)">.815</mass>
        <day units="days">116.75</day>
        <radius units="miles">3716</radius>
        <density units="(Earth = 1)">.943</density>
        <distance units="million miles">66.8</distance>
    </planet>

    <planet>
        <name>Earth</name>
        <mass units="(Earth = 1)">1</mass>
        <day units="days">1</day>
        <radius units="miles">2107</radius>
        <density units="(Earth = 1)">1</density>
        <distance units="million miles">128.4</distance>
    </planet>

</planets>
However, there's an easier way of making sure that you copy all the children, attributes, and other descendants of nodes—you can use <xsl:copy-of> instead of <xsl:copy>.
The <xsl:copy-of> element lets you make a deep copy of nodes, which means that the node and all its attributes and descendants are copied. This element has one attribute, select, which is mandatory and specifies the node or node-set you want copied. This element is empty, and takes no content.
Here's an example showing how this works; in this case, we'll just replace the <xsl:for-each> element in the preceding example with an <xsl:copy-of> element that specifically selects all attributes of the context element to copy. You can see what this looks like in ch05_08.xsl in Listing 5.7.
Example 5.7. An XSLT Stylesheet That Copies Elements and Attributes (ch05_08.xsl)
<?xml version="1.0" encoding="UTF-8"?>
<xsl:stylesheet version="1.1"
xmlns:xsl="http://www.w3.org/1999/XSL/Transform">
    <xsl:output method="xml"/>

    <xsl:template match="*">
        <xsl:copy>
            <xsl:copy-of select="@*"/>
            <xsl:apply-templates/>
        </xsl:copy>
    </xsl:template>

</xsl:stylesheet>
This works as the example in the previous section did, copying all elements and attributes. In fact, we don't need to modify the previous example at all—we can simply use <xsl:copy-of> to copy the entire document by matching the root node and copying all descendants of that node like this:
<?xml version="1.0" encoding="UTF-8"?>
<xsl:stylesheet version="1.1"
xmlns:xsl="http://www.w3.org/1999/XSL/Transform">
    <xsl:output method="xml"/>

    <xsl:template match="/">
        <xsl:copy-of select="*"/>
    </xsl:template>
</xsl:stylesheet>
You can also use <xsl:copy-of> to copy particular nodes and their descendants instead of matching the wildcard “*”. For example, this rule copies all <density> elements and their descendants:
<xsl:template match="density">
    <xsl:copy-of select="."/>
</xsl:template>
You could even be tricky and replace the <density> element with a <mass> element like this when you perform the copy:
<xsl:template match="density">
   <xsl:copy-of select="mass"/>
</xsl:template>
Handling spaces is always something of an involved topic in XSLT. Inserting a single space, “ “, isn't difficult if you use the <xsl:text> element, which you use to insert text directly into the output document. This element only has one attribute: disable-output-escaping. Set this attribute to “yes” to make sure characters like < and > are output literally rather than as < and >. The default is “no”.
This element can only contain a text node. Here's an example where we're using <xsl:text> to insert a space between an element value and the element's units:
<xsl:template match="mass">
    <xsl:value-of select="."/>
    <xsl:text> </xsl:text>
    <xsl:value-of select="@units"/>
</xsl:template>
Using <xsl:text> explicitly like this lets you insert whitespace into the output document—otherwise, the XSLT processor would delete extra whitespace like this by default. You can use this element to insert any text in the output document, not just whitespace, but because non-whitespace text is usually copied by default, this element is often used to handle whitespace.
Formally speaking, whitespace nodes are text nodes that only contain whitespace (that is, spaces, carriage returns, line feeds, and tabs). These nodes are copied by default when they come from the source document. However, you can also have whitespace nodes in your stylesheets as well, as here:
<xsl:template match="planets">
    <xsl:copy>
        <xsl:apply-templates select="planet"/>
    </xsl:copy>
</xsl:template>
Here, we're using spaces to indent the stylesheet elements, as well as carriage returns, to spread things out. Pure whitespace nodes like these are not copied from the stylesheet to the output document.
Note, however, that the whitespace in this <TITLE> element in the source document will be copied to the output, because it's not a pure whitespace node (it also contains the text “My Summer Vacation”):
<xsl:template match="/data">
    <HTML>
        <HEAD>
            <TITLE>
                My Summer Vacation
            </TITLE>
            .
            .
            .
If you want to eliminate whitespace, you could use empty <xsl:text> elements so the remaining whitespace becomes pure whitespace nodes, like this:
<xsl:template match="/data">
    <HTML>
        <HEAD>
            <TITLE>
                <xsl:text/>My Summer Vacation<xsl:text/>
            </TITLE>
            .
            .
            .
Pure whitespace nodes are not copied from the stylesheet to the output document unless it's inside an <xsl:text> element, or an enclosing element has the xml:space attribute set to “preserve”.
On the other hand, by default, XSLT 1.0 preserves whitespace text nodes in the source document and copies them to the result document. That what's happening in the example of copying stylesheets that we've already seen:
<?xml version="1.0" encoding="UTF-8"?>
<xsl:stylesheet version="1.1"
xmlns:xsl="http://www.w3.org/1999/XSL/Transform">
    <xsl:output method="xml"/>
    <xsl:template match="*">
        <xsl:copy>
            <xsl:apply-templates/>
        </xsl:copy>
    </xsl:template>
</xsl:stylesheet>
When you apply this stylesheet to ch05_01.xml, all the whitespace we've used in ch05_01.xml is copied over to the result document as well:
<?xml version="1.0" encoding="UTF-8"?>
<planets>

    <planet>
        <name>Mercury</name>
        <mass units="(Earth = 1)">.0553</mass>
        <day units="days">58.65</day>
        <radius units="miles">1516</radius>
        <density units="(Earth = 1)">.983</density>
        <distance units="million miles">43.4</distance><!--At perihelion-->
    </planet>
        .
        .
        .
However, there are times you want to remove the whitespace used to format input documents, and you can do that with the <xsl:strip-space> element. There is only one attribute for this element: elements, which is mandatory and which specifies elements to strip the whitespace from. You set this attribute to a whitespace-separated list of names or names with wildcards. This element contains no content.
You can see an example that strips all whitespace nodes from ch05_01.xml using <xsl:strip-space elements="*"/> in ch05_09.xsl in Listing 5.8.
Example 5.8. An XSLT Stylesheet That Copies Elements and Attributes (ch05_09.xsl)
<?xml version="1.0" encoding="UTF-8"?>
<xsl:stylesheet version="1.1"
xmlns:xsl="http://www.w3.org/1999/XSL/Transform">
    <xsl:strip-space elements="*"/>
    <xsl:output method="xml"/>
    <xsl:template match="*">
        <xsl:copy>
            <xsl:apply-templates/>
        </xsl:copy>
    </xsl:template>
</xsl:stylesheet>
Here's the result document you get when you apply this stylesheet to ch05_01.xml—note that all whitespace has been stripped out, including all carriage returns (a few had to be added to fit this result on the page—the actual result is just one long string):
<?xml version="1.0" encoding="UTF-8"?>
<planets><planet><name>Mercury</name><mass>.0553</mass><day>58.65</day><radius>
1516</radius><density>.983</density><distance>43.4</distance></planet><planet>
<name>Venus</name><mass>.815</mass><day>116.75</day><radius>3716</radius>
<density>.943</density><distance>66.8</distance></planet><planet><name>Earth
</name><mass>1</mass><day>1</day><radius>2107</radius><density>1</density>
<distance>128.4</distance></planet></planets>
On the other hand, you might not want to remove all the whitespace nodes throughout a document, and you can use the <xsl:preserve-space> element to indicate which elements you want to preserve whitespace nodes in. This element has the same attribute as <xsl:strip-space>, elements.
What this means is that if you've used <xsl:strip-space>, you can still indicate what element or elements you want whitespace nodes preserved in by setting the elements attribute in <xsl:preserve-space> to a list of elements like this:
<?xml version="1.0" encoding="UTF-8"?>
<xsl:stylesheet version="1.1"
xmlns:xsl="http://www.w3.org/1999/XSL/Transform">
    <xsl:strip-space elements="*"/>
    <xsl:preserve-space elements="name distance"/>
    <xsl:output method="xml"/>
    <xsl:template match="*">
        <xsl:copy>
            <xsl:apply-templates/>
        </xsl:copy>
    </xsl:template>
</xsl:stylesheet>
PRESERVING WHITESPACE BY DEFAULT
Using <xsl:preserve-space> is actually the default for all elements in XSLT—in other words, whitespace is preserved from the input document.
There's also an easy way to work with whitespace if you just want to indent the result document. The <xsl:output> element supports an attribute called indent, which you can set to “yes” or “no”, and indicates to the XSLT processor whether you want the result document indented.
Often, indenting the result document doesn't matter very much, because that document is targeted to an application that doesn't care about indenting, such as a browser. But there are times when you'd like to view the result document as straight text, and in such cases, indenting that document can help.
How an XSLT processor uses the indent attribute varies by processor, because it's not specified by W3C. Say, for example, that you have a version of ch05_01.xml without any indentation at all, which appears in ch05_10.xml in Listing 5.9.
Example 5.9. An XML Document with No Indentation (ch05_10.xml)
<?xml version="1.0" encoding="UTF-8"?>
<?xml-stylesheet type="text/xml" href="planets.xsl"?>
<planets>

<planet>
<name>Mercury</name>
<mass units="(Earth = 1)">.0553</mass>
<day units="days">58.65</day>
<radius units="miles">1516</radius>
<density units="(Earth = 1)">.983</density>
<distance units="million miles">43.4</distance><!--At perihelion-->
</planet>

<planet>
<name>Venus</name>
<mass units="(Earth = 1)">.815</mass>
<day units="days">116.75</day>
<radius units="miles">3716</radius>
<density units="(Earth = 1)">.943</density>
<distance units="million miles">66.8</distance><!--At perihelion-->
</planet>

<planet>
<name>Earth</name>
<mass units="(Earth = 1)">1</mass>
<day units="days">1</day>
<radius units="miles">2107</radius>
<density units="(Earth = 1)">1</density>
<distance units="million miles">128.4</distance><!--At perihelion-->
</planet>

</planets>
To indent this document, you can use an XSLT processor that supports the <xsl:output indent="yes"/> element. A stylesheet that uses this element appears in ch05_11.xsl in Listing 5.10.
Example 5.10. Using <xsl:output indent="yes"/> (ch05_11.xsl)
<?xml version="1.0" encoding="UTF-8"?>
<xsl:stylesheet version="1.1"
xmlns:xsl="http://www.w3.org/1999/XSL/Transform">
    <xsl:output indent="yes"/>

    <xsl:template match="/planets">
<HTML>
<HEAD>
<TITLE>
          The Planets Table
      </TITLE>
</HEAD>
<BODY>
<H1>
          The Planets Table
      </H1>
<TABLE BORDER="2">
<TD>Name</TD>
<TD>Mass</TD>
<TD>Radius</TD>
<TD>Day</TD>
<xsl:apply-templates/>
</TABLE>
</BODY>
</HTML>
</xsl:template>

<xsl:template match="planet">
<TR>
<TD><xsl:value-of select="name"/></TD>
<TD><xsl:value-of select="mass"/></TD>
<TD><xsl:value-of select="radius"/></TD>
<TD><xsl:value-of select="day"/></TD>
</TR>
</xsl:template>

</xsl:stylesheet>
Xalan doesn't indent documents this way, but the Saxon XSLT processor will. Here's the result using Saxon, indented as we wanted:
<HTML>
   <HEAD>
      <meta http-equiv="Content-Type" content="text/html; charset=utf-8">

      <TITLE>
         The Planets Table

      </TITLE>
   </HEAD>
   <BODY>
      <H1>
         The Planets Table

      </H1>
      <TABLE BORDER="2">
         <TD>Name</TD>
         <TD>Mass</TD>
         <TD>Radius</TD>
         <TD>Day</TD>


         <TR>
            <TD>Mercury</TD>
            <TD>.0553</TD>
            <TD>1516</TD>
            <TD>58.65</TD>
         </TR>


         <TR>
            <TD>Venus</TD>
            <TD>.815</TD>
            <TD>3716</TD>
            <TD>116.75</TD>
         </TR>


         <TR>
            <TD>Earth</TD>
            <TD>1</TD>
            <TD>2107</TD>
            <TD>1</TD>
         </TR>


      </TABLE>
   </BODY>
</HTML>
As you can see, handling whitespace takes a little bit of thought in XSLT, but it's easier if you know what's going on.
People often use XSLT to work with the data in XML documents without resorting to programming, but in fact, you can do a bit of programming using XSLT when you use the <xsl:if> and <xsl:choose> elements. We'll take a look at these XSLT elements next.
The <xsl:if> element lets you make choices. To use this element, you assign its test attribute a value that evaluates to a Boolean value of true or false. If it evaluates to true, the enclosed XSLT elements are also evaluated, but they are not evaluated if test evaluates to false.
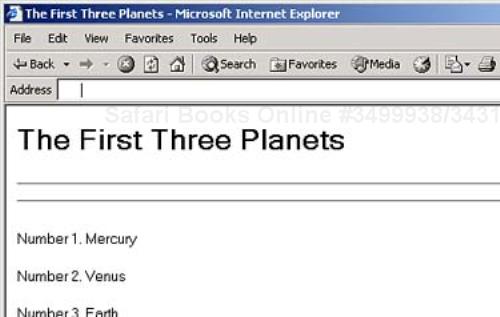
Let's take a look at an example. In this case, we'll list the three planets in ch05_01.xml, and use <xsl:if> to add two horizontal rule elements (<HR) both above and below this list to offset the list visually. You can see how this works, using the position function to determine the top and bottom of the list, in ch05_12.xsl in Listing 5.11.
Example 5.11. Using <xsl:if> (ch05_12.xsl)
<?xml version="1.0" encoding="UTF-8"?>
<xsl:stylesheet version="1.0" xmlns:xsl="http://www.w3.org/1999/XSL/Transform">

    <xsl:template match="planets">
        <HTML>
            <HEAD>
                <TITLE>
                    The First Three Planets
                </TITLE>
            </HEAD>
            <BODY>
                <H1>
                    The First Three Planets
                </H1>
                <xsl:apply-templates select="planet"/>
            </BODY>
        </HTML>
    </xsl:template>

    <xsl:template match="planet">
        <xsl:if test="position() = 1"><HR/><HR/></xsl:if>
        <P>
            Number <xsl:value-of select="position()"/>. <xsl:value-of select="name"/>
        </P>
        <xsl:if test="position() = last()"><HR/><HR/></xsl:if>
    </xsl:template>

</xsl:stylesheet>
Here's what you get when you use this new stylesheet—note the two <HR> elements before and after the list of planets:
<HTML>
    <HEAD>
        <TITLE>
            The First Three Planets
        </TITLE>
    </HEAD>

    <BODY>
        <H1>
            The First Three Planets
        </H1>
        <HR>
        <HR>
        <P>Number 1. Mercury</P>
        <P>Number 2. Venus</P>
        <P>Number 3. Earth</P>
        <HR>
        <HR>
    </BODY>
</HTML>
You can see what this looks like in Figure 5.2.
Besides <xsl:if>, you can also use <xsl:choose> to make decisions. This element lets you compare a test value against several possibilities.
For example, say that we want to color-code the planet names—Mercury in red, Venus in white, and Earth in green. You can handle these possibilities with <xsl:choose>. Inside this element, you use the <xsl:when> element, setting the test attribute in those elements to the Boolean expression you want to test. For example, Mercury is first in the list, so we can display it in red this way:
<xsl:template match="planet">
    <xsl:choose>
        <xsl:when test="name = 'Mercury'">
            <P>
                <FONT COLOR="RED"><B>
                    <xsl:value-of select="name"/>
                </B></FONT>
            </P>
        </xsl:when>
    .
    .
    .
We can handle the other two planets using other <xsl:when> elements in the same <xsl:choose>, as you see in ch05_13.xsl in Listing 5.12. Note also that at the end of the group of <xsl:when> element, there's an (optional) <xsl:otherwise> element—if none of the <xsl:when> elements match their test conditions, the <xsl:otherwise> element is chosen.
Example 5.12. Using <xsl:choose> (ch05_13.xsl)
<?xml version="1.0" encoding="UTF-8"?>
<xsl:stylesheet version="1.0" xmlns:xsl="http://www.w3.org/1999/XSL/Transform">

    <xsl:template match="planets">
        <HTML>
            <HEAD>
                <TITLE>
                    Color Coding the Planets
                </TITLE>
            </HEAD>

            <BODY BGCOLOR="PINK">
                <H1>
                    Color Coding the Planets
                </H1>
                <xsl:apply-templates select="planet"/>
            </BODY>
        </HTML>
    </xsl:template>

    <xsl:template match="planet">
        <xsl:choose>
            <xsl:when test="name = 'Mercury'">
                <P>
                    <FONT COLOR="RED"><B>
                        <xsl:value-of select="name"/>
                    </B></FONT>
                </P>
            </xsl:when>
            <xsl:when test="name = 'Venus'">
                <P>
                    <FONT COLOR="WHITE"><B>
                        <xsl:value-of select="name"/>
                    </B></FONT>
                </P>
            </xsl:when>
            <xsl:when test="name = 'Earth'">
                <P>
                    <FONT COLOR="GREEN"><B>
                        <xsl:value-of select="name"/>
                    </B></FONT>
                </P>
            </xsl:when>
            <xsl:otherwise>
                 <P>
                     <xsl:value-of select="."/>
                 </P>
            </xsl:otherwise>
        </xsl:choose>
    </xsl:template>

</xsl:stylesheet>
Here's what you get when you use this stylesheet on our planetary XML document, ch05_01.xml (note that we're setting the background color to pink to make sure that even the white text we'll be displaying stands out):
<HTML>
    <HEAD>
        <TITLE>
            Color Coding the Planets
        </TITLE>
    </HEAD>

    <BODY BGCOLOR="PINK">
        <H1>
            Color Coding the Planets
        </H1>
        <P>
            <FONT COLOR="RED"><B>Mercury</B></FONT>
        </P>

        <P>
            <FONT COLOR="WHITE"><B>Venus</B></FONT>
        </P>

        <P>
            <FONT COLOR="GREEN"><B>Earth</B></FONT>
        </P>
    </BODY>
</HTML>
You can see what this result document looks like in Figure 5.3 in glorious black and white (to see the actual colors for yourself, use ch05_13.xsl on ch05_01.xml and open the result in a browser).

Another important XSLT topic concerns the default template rules that XSLT uses, and that's coming up next.
XSLT has default rules for each kind of node, which are put into effect if you don't explicitly give a rule for the node. Here are those rules:
Attribute nodes—. Copy the attribute value to the result document. But copy it as text, not as an attribute.
Comment nodes—. Do no XSLT processing, which means that nothing is copied.
Processing instruction nodes—. Do no XSLT processing, which means that nothing is copied.
Namespace nodes—. Do no XSLT processing, which means that nothing is copied.
Of these, the most important default rule applies to elements, and can be expressed like this:
<xsl:template match="*">
    <xsl:apply-templates/>
</xsl:template>
As you can see, this rule simply makes sure that every element is processed with <xsl:apply-templates/> if you don't supply some other rule. It's important to realize that if you do supply another rule, that new rule overrides the corresponding default rule.
The default rule for text nodes can be expressed like this, where the text of the text node is added to the output document:
<xsl:template match="text()">
    <xsl:value-of select="."/>
</xsl:template>
In addition, the same kind of default rule applies to attributes, which are added to the output document with a default rule like this:
<xsl:template match="@*">
    <xsl:value-of select="."/>
</xsl:template>
In addition, by default, processing instructions are not inserted in the output document. That means their default rule can be expressed simply like this:
<xsl:template match="processing-instruction()"/>
Comments aren't copied over by default either, so their default rule can be expressed this way:
<xsl:template match="comment()"/>
Now that you know these default rules, it shouldn't surprise you that if you don't supply any rules at all, all the parsed character data (PCDATA in XML terms) in the input document is inserted in the output document by default.
For example, here's what an XSLT stylesheet with no explicit rules looks like:
<?xml version="1.0" encoding="UTF-8"?>
<xsl:stylesheet version="1.1" xmlns:xsl="http://www.w3.org/1999/XSL/Transform">
</xsl:stylesheet>
Here's what you get when you apply this stylesheet to ch05_01.xml (note that the default rule for attributes has not been applied, because they are not considered children of other nodes):
<?xml version="1.0" encoding="UTF-8"?>

    Mercury
    .0553
    58.65
    1516
    .983
    43.4

    Venus
    .815
    116.75
    3716
    .943
    66.8

    Earth
    1
    1
    2107
    1
    128.4
Knowing the default rules is important; if you see this kind of result from your XSLT stylesheets and you're not expecting it, you now know what's causing the problem—the default rules are being applied. If you don't want text stripped from the source document and inserted into the output document in this way, supply an empty rule (one that just matches a node or node-set but doesn't do anything else) or rules to override the applicable default rule or rules. If a rule for a node is empty, the content of the matched node will not be copied to the output document. In this way, you can remove content from the source document when you write the output document.
Here's another useful XSLT element—you can use the <xsl:message> element to make the XSLT processor display a message, and, optionally, end processing a stylesheet. The <xsl:message> element has one attribute: terminate, which is optional. You set this attribute to “yes” to terminate processing. The default is “no”.
Here's an example. In this case, we'll terminate XSLT processing when the XSLT processor tries to transform a <radius> element in ch05_01.xml, displaying the message “Sorry, planetary radius data is restricted.” You can see how this works in ch05_14.xsl in Listing 5.13.
Example 5.13. Using <xsl:choose> (ch05_14.xsl)
<?xml version="1.0" encoding="UTF-8"?>
<xsl:stylesheet version="1.1"
xmlns:xsl="http://www.w3.org/1999/XSL/Transform">

    <xsl:template match="/planets">
        <HTML>
            <HEAD>
                <TITLE>
                    The Planets Table
                </TITLE>
            </HEAD>
            <BODY>
                <H1>
                    The Planets Table
                </H1>
                <TABLE BORDER="2">
                    <TD>Name</TD>
                    <TD>Mass</TD>
                    <TD>Radius</TD>
                    <TD>Day</TD>
                    <xsl:apply-templates/>
                </TABLE>
            </BODY>
        </HTML>
    </xsl:template>

    <xsl:template match="planet">
       <TR>
          <TD><xsl:value-of select="name"/></TD>
          <TD><xsl:apply-templates select="mass"/></TD>
          <TD><xsl:apply-templates select="radius"/></TD>
          <TD><xsl:apply-templates select="day"/></TD>
       </TR>
   </xsl:template>

    <xsl:template match="mass">
        <xsl:value-of select="."/>
        <xsl:text> </xsl:text>
        <xsl:value-of select="@units"/>
    </xsl:template>

    <xsl:template match="radius">
        <xsl:message terminate="yes">
            Sorry, planetary radius data is restricted.
        </xsl:message terminate="yes">
    </xsl:template>

    <xsl:template match="day">
        <xsl:value-of select="."/>
        <xsl:text> </xsl:text>
        <xsl:value-of select="@units"/>
    </xsl:template>

</xsl:stylesheet>
Here's what you see when you use this stylesheet—the XSLT processor will display this message and quit (note that not all XSLT processors will honor the terminate attribute):
Sorry, planetary radius data is restricted.
For the most part, we've been creating HTML documents from XML documents with XSLT. You might have noticed that the output documents are HTML, not XML, even though we haven't explicitly told the XSLT processor to make them HTML. That's because there is a special default rule here—if the document node of the output document is <HTML>, XSLT processors are supposed to treat the output document as HTML.
On the other hand, you can specifically specify the type of output document you want, using the XSLT <xsl:output> element. Here are the options:
XML—. This is the default. Makes the output documents start with an<?xml?>declaration.HTML—. Makes the output document standard HTML 4.0, without an XML declaration.Text—. Makes the output document simple text.
To select one of these, you set the <xsl:output> element's method attribute to “xml”, “html”, or “text”. Say that you want to create a plain text document—in that case, you can use this <xsl:output> element:
<xsl:output method = "text"/>
You can also use the media-type attribute of <xsl:output> to specify the MIME type of the output document yourself. Here's how that might look, where we're creating a rich text format (RTF) document:
<xsl:output media-type="text/rtf"/>
Besides the method and media-type attributes, there are some other additional useful <xsl:output> attributes that let you control the output document:
encoding—. Indicates the value of the XML declaration'sencodingattribute.indent—. Indicates if the XSLT processor should indent the output (many won't, even if you ask). Set to “yes” or “no”.omit-xml-declaration—. Indicates if the processor should omit the XML declaration. Set to “yes” or “no”.standalone—. Indicates the value for the XML declaration'sstandaloneattribute. Set to “yes” or “no”.version—. Indicates the value for the XML declaration'sversionattribute.doctype-systemanddoctype-publiclet you specify an external DTD for XML documents. For example,<xsl:output doctype-system = "planets.dtd"/>produces<!DOCTYPE planets SYSTEM "planets.dtd">.
That finishes our discussion of XSLT in this chapter. There's more that you can do with XSLT than we could cover in this chapter, such as sorting your output results using <xsl:sort> or creating new elements with <xsl:element> and so on—if you're interested, track down a good XSLT book.
You use XSLT to manipulate, extract, and format data from XML documents. Using XSLT, you don't have to resort to creating your own XML processors. XSLT itself is a specification of W3C, and has been a recommendation since November 16, 1999. You can find the W3C recommendation for XSLT 1.0 at www.w3.org/TR/xslt.
XSLT has its own syntax, and this chapter's work was dedicated to learning that syntax. You use that syntax in XSLT stylesheets, which starts with an XML declaration and the element
<xsl:stylesheet version="1.0" xmlns:xsl="http://www.w3.org/1999/XSL/Transform">.XSLT stylesheets are made up of templates that match the nodes you want to work with. As we saw in this chapter, you use the
matchattribute in the<xsl:template>element to match nodes. You can also select the value of nodes using the<xsl:value-of>element, setting the select attribute to the XPath expression you want to use. The<xsl:for-each>element lets you work with multiple nodes. This element will let you loop over multiple nodes in a node-set.There are two different XSLT attributes you use in XSLT elements and can assign XPath expressions to—the
matchand theselectattributes. Specifically, thematchattribute appears in the<xsl:template>element, and theselectattribute appears in the<xsl:apply-templates>,<xsl:value-of>,<xsl:for-each>,<xsl:copy-of>, and<xsl:sort>XSLT elements. Thematchattribute can only handle theselforchildaxis (although XPath expressions in the predicate can use any axis), and there is no restriction on the XPath expressions you can assign to theselectattribute.You can use the
<xsl:copy>element to make a shallow copy of nodes, and the<xsl:copy-of>element lets you create deep copies. And the<xsl:if>and<xsl:choose>elements let you make choices in your XSLT stylesheets.Handling whitespace in XSLT and understanding the default XSLT rules are important if you want to create your own templates. In particular, it's important to realize that if you don't provide any rule to the contrary, the parsed character data in the source document will be inserted into the result document.