
IN THIS CHAPTER
The main purpose of XPath is to make it easy to work with the data in an XML document. XPath lets you address specific parts of XML documents.
Let's begin with an example to demonstrate the reason to use XPath. Say, for example, that you have an XML document, ch01_01.xml, that stores information about various planets in three <planet> elements, as you see in Listing 1.1.
Example 1.1. A Sample XML Document (ch01_01.xml)
<?xml version="1.0" encoding="UTF-8"?>
<?xml-stylesheet type="text/xsl" href="ch01_02.xsl"?>
<planets>

    <planet>
        <name>Mercury</name>
        <mass units="(Earth = 1)">.0553</mass>
        <day units="days">58.65</day>
        <radius units="miles">1516</radius>
        <density units="(Earth = 1)">.983</density>
        <distance units="million miles">43.4</distance><!--At perihelion-->
    </planet>

    <planet>
        <name>Venus</name>
        <mass units="(Earth = 1)">.815</mass>
        <day units="days">116.75</day>
        <radius units="miles">3716</radius>
        <density units="(Earth = 1)">.943</density>
        <distance units="million miles">66.8</distance><!--At perihelion-->
    </planet>

    <planet>
        <name>Earth</name>
        <mass units="(Earth = 1)">1</mass>
        <day units="days">1</day>
        <radius units="miles">2107</radius>
        <density units="(Earth = 1)">1</density>
        <distance units="million miles">128.4</distance><!--At perihelion-->
    </planet>

</planets>
Now say that you want to extract the names of the three planets here—Mercury, Venus, and Earth—from this XML document. Each of these names is buried deep in the document, stored as text in the <name> elements. How can you access them?
This is where XPath comes in. To do what it does, XPath uses a non-XML syntax that the creators of XPath, the World Wide Web Consortium (W3C), call “compact.” As we'll see, if you don't know XPath, that syntax can be more than compact—it can be impenetrable. But when you know XPath, you'll be able to access any part of any XML document.
XPath doesn't work by itself—it was meant to be embedded in other languages and applications. XPath was originally developed for use with Extensible Stylesheet Language Transformations (XSLT), and in fact, XSLT can do the work we want—recovering the data we're after—using XPath. XPath points out the data to use, and XSLT actually grabs and uses that data, so they're natural to use together.
Because XPath is used so often with XSLT, we'll get an introduction to XSLT later in this chapter, and we'll see a more in-depth treatment of XSLT with XPath in Chapter 5. For now, what's important to know is that the way you select the data you want in an XML document is by using an XPath expression, and that you can put such expressions to work in XSLT stylesheets. Using an XSLT processor, you can apply XSLT stylesheets to XML documents and so access the data you want.
To get to the data we want in ch01_01.xml, we'll start by accessing the <planets> element in the XSLT stylesheet, matching that element with the XPath expression planets. Then we'll match each <planet> element inside the <planets> element with the XPath expression planet, and finally, we'll extract the name of each planet from each <planet> element's <name> element, using the XPath expression name. You can see what it looks like in the XSLT stylesheet in Listing 1.2 (don't worry about the XSLT details at this point; we'll see how to construct XSLT stylesheets like this one later in the chapter and in depth in Chapter 5).
Example 1.2. A Sample XSLT Document (ch01_02.xsl)
<?xml version="1.0" encoding="UTF-8"?>
<xsl:stylesheet version="1.0" xmlns:xsl="http://www.w3.org/1999/XSL/Transform">

    <xsl:template match="planets">
        <HTML>
            <xsl:apply-templates/>
        </HTML>
    </xsl:template>

    <xsl:template match="planet">
        <P>
            <xsl:value-of select="name"/>
        </P>
    </xsl:template>

</xsl:stylesheet>
Open this example—that is, navigate to ch01_01.xml—in Microsoft Internet Explorer to see it at work. You can see the results in Figure 1.1.

As you see in the figure, the XSLT processor in Internet Explorer has used our XSLT stylesheet—which uses XPath—to retrieve the data we wanted from our XML document: the names of the three planets. Even though the details may not be clear yet, you can begin to see in this example the part that XPath plays in letting you access specific parts of XML documents. As you see, XPath is central to XSLT, because it gives you the ability to select the data you want in an XML document.
This example has given us a quick look at the kind of thing that XPath can do for you. Now it's time to get more systematic and take a look at the whole XPath picture in overview.
XPath was created by the World Wide Web Consortium, W3C (www.w3.org), the same group that created XML and standardized HTML. W3C has three main levels for their specifications:
Working drafts, which are works in progress and still subject to much change
Candidate recommendations, which are the step before a specification becomes a recommendation
Recommendations, which are the final versions of specifications
XPath 1.0 is in recommendation status, and XPath 2.0 is in working draft status as of this writing. You can find the official XPath 1.0 Web page at http://www.w3.org/TR/xpath. Here's what W3C has to say about XPath 1.0:
XPath is the result of an effort to provide a common syntax and semantics for functionality shared between XSL Transformations (XSLT) and XPointer. The primary purpose of XPath is to address parts of an XML document. In support of this primary purpose, it also provides basic facilities for manipulation of strings, numbers and booleans. XPath uses a compact, non-XML syntax to facilitate use of XPath within URIs and XML attribute values. XPath operates on the abstract, logical structure of an XML document, rather than its surface syntax. XPath gets its name from its use of a path notation as in URLs for navigating through the hierarchical structure of an XML document.
In addition to its use for addressing, XPath is also designed so that it has a natural subset that can be used for matching (testing whether or not a node matches a pattern); this use of XPath is described in [the XSLT specification].
The whole XPath story began with XSLT. XSLT itself was the result of trying to fill a long-standing need—letting people format and work with the data in general markup documents. W3C's efforts here stretch back quite a way, back to its original Document Style Semantics and Specification Language (DSSSL) specification. DSSSL was originally intended to work with Standardized General Markup Language (SGML), the ancestor of both HTML and XML, and to let you style SGML documents for presentation. However, SGML never became very popular, although its descendants like HTML and XML did.
In the XML branch of the family, W3C concentrated on its Extensible Stylesheet Language (XSL) to let users format XML in a general way, much as a word processor might. However, XSL by itself was so complex that it never really caught on either—today, software giants like Microsoft use Cascading Style Sheets (CSS) to format XML (Microsoft has said publicly that it considers the future of XSL in question).
However, one part of XSL did actually catch on—Extensible Stylesheet Language Transformations (XSLT). XSLT doesn't worry so much about formatting XML as giving you easy access to the data in an XML document and transforming it into another kind of document—HTML is the most common, where you display the data in an XML document in HTML format. But you can also use XSLT to transform XML documents into other XML documents that might have different organization (reorganizing an XML database's records from storing purchase data by customer to using records organized by product ID, for example) or additional data (such as computing the average score for each of a set of student's records). You can also use XSLT to transform XML into plain text, or even rich text format (RTF) files or JavaScript files—in fact, just about any kind of files you want.
In this way, XSLT presents an extraordinarily powerful way of handling your XML data without resorting to a lot of programming involving XML parsers and Java or C++. All you have to do, as we've already seen, is to create an XSLT stylesheet and let an XSLT processor (like the one in Internet Explorer) do the rest. For that reason, XSLT became popular, and eventually split off from the XSL specification. And when W3C started creating XSLT 1.0, they quickly realized that giving people access to the data in XML documents using simple path expressions was such a great idea that XPath 1.0 was born.
XPath 1.0 is the version that's most supported today, and we're going to spend the first half of the book on it. XPath 1.0 was central to XSLT 1.0—in fact, the two specifications became W3C recommendations on the same day (November 16, 1999). Originally a part of the XSLT specification, XPath broke out and became its own specification when W3C realized that many XML specifications needed a way to access the parts of XML documents.
As its own specification, however, XPath 1.0 could be used by many XML-related specifications, not confined to use with XSLT alone (if you've worked with XML, you know that many of the specifications are related). That's how XPath was intended to be used—in a host language or specification of some sort, not simply on its own (although we'll see some tools later in this chapter that do use XPath by itself).
Today, XPath is essential to other XML-related specifications, such as XPointer, which lets you select and refer to fragments of XML documents as well as XQuery, which is all about addressing the data, treating that data as you would a standard database. We'll take a look at those two specifications and how XPath works with them, in this book.
The new version of XPath is version 2.0, and you can see the W3C specification for it at http://www.w3.org/TR/xpath20/. There's not a lot of software support for XPath 2.0 yet. This new version is considerably more involved than XPath 1.0—and that growth is an indication of the importance of XPath. We'll be covering XPath 2.0 in the second half of this book.
XPath 2.0 is tied not just to XSLT (which is now also in version 2.0), but the new XQuery specification (XQuery is all about treating XML documents as you would treat a database file)—the XSLT and XQuery groups at W3C are jointly responsible for XPath 2.0, and W3C says that XPath 2.0 and XQuery 1.0 are “generated from a common source.” (In fact, XQuery 1.0 is an extension of XPath 2.0.)
That gives us the historical background—now it's time to get some of the basic details about XPath itself, giving us the foundation we'll need in the coming chapters.
XPath's primary purpose is to address parts of an XML document. To do that, XPath uses its own, non-XML, syntax. XPath operates on the abstract, logical structure of an XML document, and this logical structure is known as the data model, as we'll see in the next chapter. XPath reduces an XML document to a tree of XML nodes, as we're going to see in detail in Chapter 2, and that's what it actually works with. A node is an individual data item in an XML document—elements can be nodes, XML processing instructions can be nodes, element attributes can be nodes, the text in an element is a text node, XML comments are comment nodes, and so on. The root node is the very beginning of the document, before anything else (before any XML elements, processing instructions, or anything else).
To work with the nodes in an XML document, you use XPath expressions, which are the primary construct in XPath. An XPath expression is a term or group of terms that XPath can evaluate to produce a result.
Probably the most important type of XPath expression is the location path, and for many people, this is what XPath is all about, because you use a location path to select a set of nodes (which may contain just a single node). Using a location path, you can tell XPath exactly what data you want to extract from an XML document.
How do location paths work? As we're going to see in Chapter 3, location paths are much like the standard file directory paths that you're already familiar with. For example, you might store data on stocks for April 2004 in a directory with this path if you're using Windows:
2004aprilstocksdata
or this path if you're using Unix:
/2004/april/stocks/data
That's much how a location path works. A location path consists of one or more location steps, separated by / or //. You use successive steps—separated by /—to get to the data you want, just as you use successive directories in a file path to narrow down the location of a file. Starting the whole location path with a / means that you're starting from the root node (the very beginning of the document, before anything else), and working from that point.
As we're going to see in Chapter 3, a location step, in turn, is made up of an axis, a node test, and zero or more predicates.
Here's an example. In the location step child::planet[position() = 5], child is the name of the axis (which you follow with ::), planet is the node test, and [position() = 5] is a predicate. In this case, the child axis selects child nodes of the node you start from. The node test, planet, will match <planet> elements. And the predicate consists of an XPath function, position, that must return a value of 5 to make the predicate true. Putting all that together, then, this location step selects the fifth <planet> child element.
You create location paths with one or more location steps, such as /child::planet[position() = 5]/child::name, which starts at the root node and selects all the <name> elements that are children of the fifth <planet> child element in the document.
The evaluation of each location step in a location path starts at its context node. The idea of a context node is an important one, because as you navigate deep into an XML document, each successive location step starts from a different location, which XPath calls the location step's context node. In the present example, / makes the context node the document's root node for the next location step, which is child::planet[position() = 5]. That location step in turn makes the context node the fifth <planet> child element for the next location step, which is child::name. The thing to remember is that the evaluation of each location step starts from its context node.
Here are a number of location path examples to get us started—we're going to see how to create these in detail over the next three chapters, so don't try to memorize any of these now. But it's worth taking a look at these examples in overview:
child::planetreturns the<planet>element children of the context node.child::*returns all element children (*only matches elements) of the context node.child::text()returns all text node children of the context node.child::node()returns all the children of the context node, no matter what their node type is.attribute::unitsreturns theunitsattribute of the context node.child::name/descendant::planetreturns the<planet>element descendants of the child<name>elements of the context node.child::*/child::planetreturns all<planet>grandchildren of the context node./returns the root node (that is, the parent of the document element).child::planet[position() = 3]returns the third<planet>child of the context node.child::planet[position() = last()]returns the last<planet>child of the context node.
As you can see, some of this syntax is pretty involved, and a little lengthy to type. However, there is an abbreviated form of XPath syntax, as we're going to see in Chapter 3.
We've already put XPath to work in Internet Explorer in an example at the beginning of this chapter. That example used XSLT to extract the names of the three planets in ch01_01.xml, as you saw in Figure 1.1. XSLT is a big use of XPath (and we're going to take a look at some basic XSLT next so that we can use it with XPath throughout the book), but some software packages let you use XPath directly.
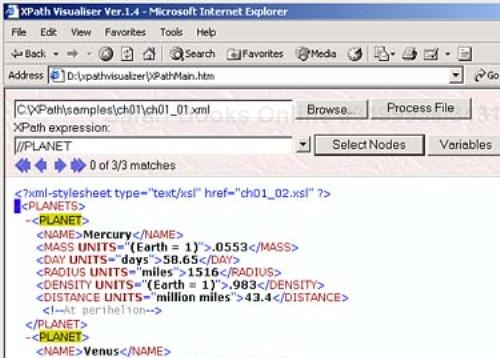
The XPath Visualiser by Dimitre Novachev is a great tool that lets you see which nodes an XPath expression would select in an XML document. You can get the XPath Visualiser for free at http://www.vbxml.com/xpathvisualizer/.
After unzipping the download file, you use Internet Explorer to navigate to XPathMain.htm, opening this XPath tool as you see in Figure 1.2. You can use the Browse button in this tool to load an XML document, and enter the XPath expression you want to test into the “XPath Expression” box. In this example, we'll use our XML document ch01_01.xml that holds information about various planets, and test out the XPath expression //planet, which should find all the <planet> elements in this document. As you can see when you click the Select Nodes button, XPath Visualiser does indeed find all <planet> elements, as shown in Figure 1.2.
XPath Visualiser is a great tool that we'll see throughout our discussion of XPath 1.0.
The Interactive Expression Builder is an online tool that lets you test your XPath expressions, and you'll find it at http://www.develop.com/books/essentialxml/samples/xpath-builder/default.htm. You can see this tool at work in Figure 1.3.

As with the XPath Visualiser, you can enter the XPath expression you want to test into the Interactive Expression Builder. The problem here is that you can't use the Interactive Expression Builder to load any but the sample document you see in Figure 1.3 (there is a text field for loading other documents at the very bottom of this page, but it only generates JavaScript errors).
Still, if you're comfortable using the sample XML document that comes loaded into the Interactive Expression Builder, you can test your XPath expressions using that document, as you see in Figure 1.3, where we're selecting all <LineItem> elements.
The Microsoft .NET initiative uses a great deal of XML behind the scenes, and there's some XPath support built into .NET. You can see a few XPath .NET examples online at http://samples.gotdotnet.com/quickstart/howto. The current URL for the XPath examples is http://samples.gotdotnet.com/quickstart/howto/doc/xml/overviewofxml.aspx (if that URL has been changed by the time you read this, go to http://samples.gotdotnet.com/quickstart/howto and search for XML examples).
There are two .NET XPath examples at this site, and they both use this XML file, books.xml:
<?xml version="1.0" ?>
<!--  This file represents a fragment of a book store inventory database -->
<bookstore>
    <book genre="autobiography" publicationdate="1981" ISBN="1-861003-11-0">
        <title>The Autobiography of Benjamin Franklin</title>
        <author>
            <first-name>Benjamin</first-name>
            <last-name>Franklin</last-name>
        </author>
        <price>8.99</price>
    </book>
    <book genre="novel" publicationdate="1967" ISBN="0-201-63361-2">
        <title>The Confidence Man</title>
        <author>
           <first-name>Herman</first-name>
            <last-name>Melville</last-name>
        </author>
        <price>11.99</price>
    </book>
    <book genre="philosophy" publicationdate="1991" ISBN="1-861001-57-6">
        <title>The Gorgias</title>
        <author>
            <name>Plato</name>
        </author>
        <price>9.99</price>
    </book>
</bookstore>
To run the examples, click the “Query XML with an XPath Expression” and “Navigate with XPathNavigator” links under the heading “XPath and XSL Transformations” on the left of the page at http://samples.gotdotnet.com/quickstart/howto/doc/xml/overviewofxml.aspx. You can see the first example, which queries books.xml with XPath, at work in Figure 1.4 (its full URL is http://samples.gotdotnet.com/quickstart/howto/samples/Xml/QueryXmlDocumentXPath/VB/QueryXmlDocumentXPath.aspx).

When you click the Run button, the example applies various XPath expressions to books.xml, as you can see in the results in Figure 1.4.
Besides .NET, a number of XPath tools are available that are Java-based. To use these tools, you'll need to have Java installed; the current version as of this writing is 1.4, which you can download for free from http://java.sun.com/j2se/1.4/download.html. You'll also find installation instructions in the download.
A useful Java XPath tool is the XPath Explorer, XPE, from Purple Technologies. You can get this tool for free from http://sourceforge.net/project/showfiles.php?group_id=54719&release_id=98894. XPE comes as a Java Archive (JAR) file, and you start it at the command prompt as follows. (This example assumes that the Java program java.exe, which is in the Java installation's bin directory, is in your system's path and that xpe.jar is in the current directory). Here we'll use the command-line prompt % to stand for either the Windows command-line prompt in a DOS window or the Unix command-line prompt:
%java -jar xpe.jar
You can enter the URL of the XML file to work with in XPE, as you see in Figure 1.5. For example, to load our ch01_01.xml file into XPE, you'd use a file URL something like file:/c:/xpath/samples/ch01/ch01_01.xml in Windows.
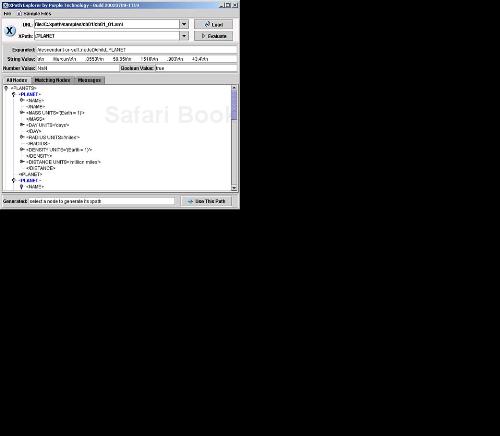
Now you can enter the XPath expression you want to use, as you see in Figure 1.5, where we're executing the expression //planet on ch01_01.xml. XPE will show you the results immediately, as you can see in the figure.
The XPath Tester is another Java tool for use with XPath, and you can get it for free at http://www.fivesight.com/downloads/xpathtester.asp. To start the XPath Tester, you use this command line (assuming java.exe is in your system's path and xpathtester_1_4_saxon.jar is in the current directory):
%java -jar xpathtester_1_4_saxon.jar
The XPath Tester displays a File Open dialog that lets you select the XML document to work with and then opens that document as you see in Figure 1.6.
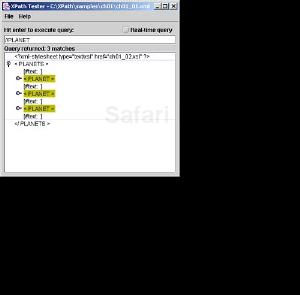
Now you can enter the XPath expression you want to execute and press Enter to execute it, as you see in Figure 1.6. When you do, the XPath Tester will display the results, as you see in the figure.
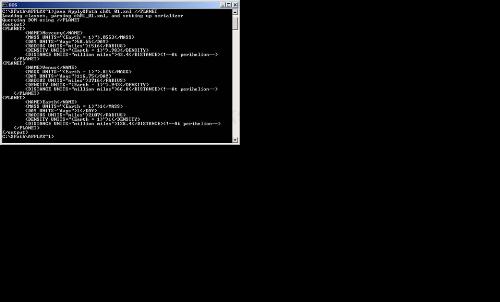
Another Java tool you can use to evaluate XPath expressions is a sample application that comes with the Xalan XSLT processor created by the Apache group. You can download Xalan at http://xml.apache.org/xalan-j/index.html.
The name of this example is ApplyXPath, and it's in the Java Archive file xalansamples.jar that comes with Xalan. We'll use this JAR file by first setting the Java classpath variable, which tells Java where to look for applications to run, to xalansamples.jar. Next, you can run the ApplyXPath application, passing it the name of the XML file to use and the XPath expression to evaluate, like this:
%set classpath=xalansamples.jar
%java ApplyXPath ch01_01.xml //planet
You can see the results in Figure 1.7, where you see that the application displays the elements matching the XPath expression we're testing.
We're not going to expect that you know Java or .NET in this book. But if you do happen to know Java, you can take a look at the source code for the ApplyXPath example to see how to use XPath in Java. For example, here's some Java code that applies the XPath expression //planet to ch01_01.xml, adapted from the ApplyXPath sample application—this code isn't difficult, and it shows the Java classes you use to work with XPath:
InputSource in = new InputSource(new FileInputStream("ch01_01.xml"));
DocumentBuilderFactory dfactory = DocumentBuilderFactory.newInstance();
Document doc = dfactory.newDocumentBuilder().parse(in);
Transformer serializer = TransformerFactory.newInstance().newTransformer();
NodeIterator nl = XPathAPI.selectNodeIterator(doc, "//planet");

Node n;
while ((n = nl.nextNode())!= null)
{
    if (isTextNode(n)) {
        StringBuffer sb = new StringBuffer(n.getNodeValue());
        for (Node nn = n.getNextSibling(); isTextNode(nn);
            nn = nn.getNextSibling())
        {
            sb.append(nn.getNodeValue());
        }
        System.out.print(sb);
}
Besides the ones we've taken a look at, there are other XPath tools out there as well, such as the popular XML editor, XML Spy, which also includes an XPath tool. You can get XML Spy at http://www.xmlspy.com/download.html.
For many people, the whole idea behind XPath is to be able to use XSLT, so we'll take a look at XSLT in overview now. XSLT and XPath are natural to use together, and we'll see quite a few XSLT examples in this book. For that reason, we'll take a look at enough XSLT here to get started. You won't have to know how XSLT works in detail—you'll just have to know how things work in overview, and what XSLT templates do. We'll see XSLT examples that use XPath in Chapters 3 and 4. And Chapter 5 is dedicated to XSLT and XPath.
For more information, you can find
The W3C XSLT 1.0 recommendation at http://www.w3.org/TR/xslt
The current XSLT 2.0 specification at http://www.w3.org/TR/xslt20/
XSLT centers around the stylesheets that XSLT processors (such as the one in Internet Explorer) can use to transform XML documents into HTML, other XML documents, plain text, and so on. You can assign XPath expressions to the match and select attributes in XSLT elements—but note that while the select attribute can handle any XPath expression, the match attribute can only handle XPath expressions that use the child or attribute axes.
As you might expect, XSLT stylesheets must be well-formed XML documents, so you start a stylesheet with the XML declaration. Next, you use a <stylesheet> element; by convention, XSLT stylesheets use the namespace xsl, which is “http://www.w3.org/1999/XSL/Transform”. You must also include the version attribute in the <stylesheet> element; here, we'll use version 1.0:
<?xml version="1.0"?>
<xsl:stylesheet version="1.0" xmlns:xsl="http://www.w3.org/1999/XSL/Transform">
    .
    .
    .
That's how you start an XSLT stylesheet. To work with specific nodes in an XML document, XSLT is a programming language that uses templates. When you match or select nodes, a template tells the XSLT processor how to transform the node for output. For example, say that you want to replace the root node with a whole new HTML document. You can start by creating a template with the <xsl:template> element, setting the match attribute to the XPath expression for the root node, "/":
<?xml version="1.0"?>
<xsl:stylesheet version="1.0" xmlns:xsl="http://www.w3.org/1999/XSL/Transform">

    <xsl:template match="/">
    .
    .
    .
    </xsl:template>

</xsl:stylesheet>
When the root node is matched, the template is applied to that node. In this example, we'll replace the root node with an HTML document, so we'll just include that HTML document directly as the content of the <xsl:template> element, as you see in Listing 1.3.
Example 1.3. A Sample XSLT Document That Replaces the Root Node (ch01_03.xsl)
<?xml version="1.0"?>
<xsl:stylesheet version="1.0" xmlns:xsl="http://www.w3.org/1999/XSL/Transform">

    <xsl:template match="/">
        <HTML>
            <HEAD>
                <TITLE>
                    A Transformation Example
                </TITLE>
            </HEAD>
            <BODY>
                This entire document has been replaced!.
            </BODY>
        </HTML>
    </xsl:template>

</xsl:stylesheet>
And that's all it takes; by using the <xsl:template> element, we've set up a rule in the stylesheet. When the XSLT processor reads the document, the first node it sees is the root node. This rule matches that root node, so the XSLT processor replaces it with the HTML document, producing this result:
<HTML>
    <HEAD>
        <TITLE>
            A trivial transformation
        </TITLE>
    </HEAD>
    <BODY>
        This transformation has replaced
        the entire document.
    </BODY>
</HTML>
That's our first, rudimentary transformation. All we've done is to replace the entire document with another one. But of course, that's just the beginning of the power you have using XSLT and XPath.
The template used in the preceding section only applied to one node—the root node, and performed a trivial action, replacing the entire XML document with an HTML document. However, you can also apply templates to the children of a node that you've matched, and you do that with the <xsl:apply-templates> element.
For example, say that you want to convert ch01_01.xml to HTML. The document element in that document is <planets>, so we can match that element with a template, setting the match attribute to the name of the element we want to match, and then replace the <planets> element with an <HTML> element, like this:
<?xml version="1.0"?>
<xsl:stylesheet version="1.0" xmlns:xsl="http://www.w3.org/1999/XSL/Transform">

    <xsl:template match="planets">
        <HTML>
    .
    .
    .
        </HTML>
    </xsl:template>
    .
    .
    .
</xsl:stylesheet>
But what about the children of the <planets> element? To make sure they are transformed correctly, you use the <xsl:apply-templates> element this way:
<?xml version="1.0"?>
<xsl:stylesheet version="1.0" xmlns:xsl="http://www.w3.org/1999/XSL/Transform">


    <xsl:template match="planets">
        <HTML>
            <xsl:apply-templates/>
        </HTML>
    </xsl:template>
    .
    .
    .
</xsl:stylesheet>
Now you can provide templates for the child nodes. In this case, we'll just replace each of the three <planet> elements with some text, which we place directly into the template for the <planet> element as you see in Listing 1.4.
Example 1.4. A Sample XSLT Document That Replaces <planet> Elements with Text (ch01_04.xsl)
<?xml version="1.0"?>
<xsl:stylesheet version="1.0" xmlns:xsl="http://www.w3.org/1999/XSL/Transform">

    <xsl:template match="planets">
        <HTML>
            <xsl:apply-templates/>
        </HTML>
  </xsl:template>

    <xsl:template match="planet">
        <P>
            Placeholder text for planet data...
        </P>
    </xsl:template>

</xsl:stylesheet>
And that's it—now the <planets> element is replaced by an <HTML> element, and the <planet> elements are also replaced:
<HTML>
    <P>
        Placeholder text for planet data...
    </P>

    <P>
        Placeholder text for planet data...
    </P>

    <P>
        Placeholder text for planet data...
    </P>
</HTML>
You can see that this transformation works, but it's still less than useful; all we've done is to replace the <planet> elements with some text. What if we wanted to access some of the data in the <planet> element? For example, say that we wanted to place the text from the <name> element in each <planet> element in the output document:
<planet>
    <name>Mercury</name>
    <mass units="(Earth = 1)">.0553</mass>
    <day units="days">58.65</day>
    <radius units="miles">1516</radius>
    <density units="(Earth = 1)">.983</density>
    <distance units="million miles">43.4</distance><!--At perihelion-->
</planet>
To gain access to this kind of data, you can use the select attribute of the <xsl:value-of> element.
In this example, we'll extract the name of each planet and insert that name into the output document. To get the name of each planet, we'll use the <xsl:value-of> element in a template targeted at the <planet> element, and select the <name> element with the select attribute as you can see in Listing 1.5.
Example 1.5. A Sample XSLT Document That Uses the Names of <planet> Elements (ch01_05.xsl)
<?xml version="1.0"?>
<xsl:stylesheet version="1.0" xmlns:xsl="http://www.w3.org/1999/XSL/Transform">

    <xsl:template match="planets">
        <HTML>
            <UL>
            <LI><xsl:apply-templates/></LI>
            </UL>
        </HTML>
    </xsl:template>

    <xsl:template match="planet">
        <xsl:value-of select="name"/>
    </xsl:template>

</xsl:stylesheet>
Applying the stylesheet ch01_05.xsl, the <xsl:value-of select="name"/> element directs the XSLT processor to insert the name of each planet into the output document, and so the results look like this:
<HTML>
    <UL>
        <LI>Mercury</LI>
        <LI>Venus</LI>
        <LI>Earth</LI>
    </UL>
</HTML>
How do you run XSLT examples like this? You might not think you have an XSLT processor handy, but you do if you have Internet Explorer. To connect an XSLT stylesheet to an XML document in Internet Explorer, you use the href attribute of a <?xml-stylesheet?> XML processing instruction as you see in ch01_06.xml (Listing 1.6). In that example, we're connecting our sample XML document to the XSLT stylesheet ch01_05.xsl.
Example 1.6. A Sample XML Document for Internet Explorer (ch01_06.xml)
<?xml version="1.0"?>
<?xml-stylesheet type="text/xsl" href="ch01_05.xsl"?>
<planets>

    <planet>
        <name>Mercury</name>
        <mass units="(Earth = 1)">.0553</mass>
        <day units="days">58.65</day>
        <radius units="miles">1516</radius>
        <density units="(Earth = 1)">.983</density>
        <distance units="million miles">43.4</distance><!--At perihelion-->
    </planet>

    <planet>
        <name>Venus</name>
        <mass units="(Earth = 1)">.815</mass>
        <day units="days">116.75</day>
        <radius units="miles">3716</radius>
        <density units="(Earth = 1)">.943</density>
        <distance units="million miles">66.8</distance><!--At perihelion-->
    </planet>

    <planet>
        <name>Earth</name>
        <mass units="(Earth = 1)">1</mass>
        <day units="days">1</day>
        <radius units="miles">2107</radius>
        <density units="(Earth = 1)">1</density>
        <distance units="million miles">128.4</distance><!--At perihelion-->
    </planet>

</planets>
And that's all it takes—now you can run XSLT examples using XPath in Internet Explorer.
What if you wanted to use XSLT and XPath to display not only the value of each of the <name>, <mass>, and <radius> elements, but also the units for each value, such as “miles” for the <radius> element? We can recover the units from each element by getting the value of the units attribute of that element—you can see what we're aiming for in Figure 1.8, where the results are displayed in an HTML table.

To create this result, we've got to use more than just the <xsl:value-of select="name"/> type of elements we've been using up to now, because we want to display the units for each measurement as well. We can start by creating the HTML for the table you see in Figure 1.8, matching the <planets> element and applying templates for the children of this element:
<xsl:template match="/planets">
    <HTML>
        <HEAD>
            <TITLE>
                The Planets Table
            </TITLE>
        </HEAD>
        <BODY>
            <H1>
                The Planets Table
            </H1>
            <TABLE BORDER="2">
                <TR>
                    <TD>Name</TD>
                    <TD>Mass</TD>
                    <TD>Radius</TD>
                    <TD>Day</TD>
                </TR>
                <xsl:apply-templates/>
            </TABLE>
        </BODY>
    </HTML>
</xsl:template>
Next, we match each <planet> element and invoke a new template on each element that has units we need to display:
 <xsl:template match="planet">
    <TR>
       <TD><xsl:value-of select="name"/></TD>
       <TD><xsl:apply-templates select="mass"/></TD>
       <TD><xsl:apply-templates select="radius"/></TD>
       <TD><xsl:apply-templates select="day"/></TD>
    </TR>
</xsl:template>
In each of these additional templates, such as the one for the <mass> element, we want to get both the value of the element and its units. To refer to the current element, we can use ".", which refers to the context node:
<xsl:template match="mass">
    <xsl:value-of select="."/>
    .
    .
    .
</xsl:template>
This recovers the value of the current element. Next, we insert a space, using the <xsl:text> element like this:
<xsl:template match="mass">
    <xsl:value-of select="."/>
    <xsl:text> </xsl:text>
    .
    .
    .
</xsl:template>
Finally, we get the value of the units attribute for the <mass> element, which displays the units for the element's value (the <xsl:text> element lets us insert whitespace as needed here—more on that in Chapter 5) :
<xsl:template match="mass">
    <xsl:value-of select="."/>
    <xsl:text> </xsl:text>
    <xsl:value-of select="@units"/>
</xsl:template>
And that's all it takes—you can see the final XSLT stylesheet, ch01_07.xsl, in Listing 1.7.
Example 1.7. Accessing Attributes in a Stylesheet (ch01_07.xsl)
<?xml version="1.0"?>
<xsl:stylesheet version="1.1"
xmlns:xsl="http://www.w3.org/1999/XSL/Transform">

    <!-- This template matches all planets elements -->
    <xsl:template match="/planets">
        <HTML>
            <HEAD>
                <TITLE>
                    The Planets Table
                </TITLE>
            </HEAD>
            <BODY>
                <H1>
                    The Planets Table
                </H1>
                <TABLE BORDER="2">
                    <TR>
                        <TD>Name</TD>
                        <TD>Mass</TD>
                        <TD>Radius</TD>
                        <TD>Day</TD>
                    </TR>
                    <xsl:apply-templates/>
                </TABLE>
            </BODY>
        </HTML>
    </xsl:template>

    <xsl:template match="planet">
       <TR>
          <TD><xsl:value-of select="name"/></TD>
          <TD><xsl:apply-templates select="mass"/></TD>
          <TD><xsl:apply-templates select="radius"/></TD>
          <TD><xsl:apply-templates select="day"/></TD>
       </TR>
   </xsl:template>

    <xsl:template match="mass">
        <xsl:value-of select="."/>
        <xsl:text> </xsl:text>
        <xsl:value-of select="@units"/>
    </xsl:template>

    <xsl:template match="radius">
        <xsl:value-of select="."/>
        <xsl:text> </xsl:text>
        <xsl:value-of select="@units"/>
    </xsl:template>

    <xsl:template match="day">
        <xsl:value-of select="."/>
        <xsl:text> </xsl:text>
        <xsl:value-of select="@units"/>
    </xsl:template>

</xsl:stylesheet>
And you can see the results in Figure 1.8. That covers the XSLT in overview that we'll use for our XPath example—you won't need an in-depth knowledge of XSLT here, but an acquaintance will help because our XPath examples will sometimes use XSLT.
Besides XSLT, XPath is very popular in W3C's XQuery specification. In fact, XQuery contains XPath as a proper sublanguage—all of XPath is contained in XQuery. They are more integrally linked than XPath and XSLT, because you could replace XPath in XSLT with another language and XSLT would still work, but XQuery itself may be thought of as an extension of XPath. XQuery lets you work with XML documents, treating them as databases. You can find information on XQuery at http://www.w3.org/XML/Query.
A lot of XQuery's data-accessing power is considered very important by W3C, which is why much of it is being incorporated into XPath 2.0. (We'll see how XPath and XQuery work together in Chapter 6.) Here's an example where we'll take a look at all books published by Sams since 1990, as stored in a database named books.xml. Here's what the XQuery query might look like:
<books>
{
    for $book in doc("http://www.starpowder.com/books.xml")
    where $book/publisher = "Sams" and $book/@year > 1990
    return
        <book year={$book/@year}>
        {$book/title}
        </book>
}
</books>
In this case, $book stands for the root node of books.xml, and you can create XPath expressions using $book such as $book/publisher, which stands for the value of child <publisher> elements, or $book/@year, which stands for the value of year attributes. Here's what the results of this query might look like:
<books>
    <book year="1990">
        <title>Title 1</title>
    </book>
    <book year="1991">
        <title>Title 2</title>
    </book>
        .
        .
        .
</books>
Another use for XPath is with the XPointer and XLink specifications. XLinks specify how one document links to another document, and XPointers specify locations inside a document. We'll see both of these in Chapter 6, but it's worth getting an overview now.
The XLink specification is a W3C recommendation, released on June 27, 2001. You can find the most current version of this recommendation at www.w3.org/TR/xlink. You use XLinks to link one document to another. Here's an example to give you an idea what an XLink looks like; unlike HTML hyperlinks, any element can be a link in XML. You specify that an element is a link with the attribute xlink:type like this, where we're creating a simple XLink:
<MOVIE_REVIEW xmlns:xlink = "http://www.w3.org/1999/xlink"
    xlink:type = "simple"
    xlink:show = "new"
    xlink:href = "http://www.starpowdermovies.com/reviews.xml">
    Mr. Blandings Builds His Dream House
</MOVIE_REVIEW>
In this case, we're creating a simple XLink, which is much like an HTML hyperlink, by setting the xlink:type attribute to "simple". We're also setting the xlink:show attribute to "new", which means that XLink-aware software should open the linked-to document in a new window or other display context, and setting the xlink:href attribute to the URI of the new document (which can be quite general and need not be in the URL form we've used here).
XLinks let you link to a particular document, but you often need to be more precise than that. XPointers let you point to specific locations inside a document—without having to modify that document by embedding special tags or markers. To point to a specific location in a document, the XPointer specification builds on the XPath specification. XPointers are in the W3C Working Draft stage, and you can learn more about them at www.w3.org/TR/xptr-framework/.
How do you add an XPointer to a document's URI to specify a specific location in a document? You can append # (following the HTML usage for URLs that specify link targets) and then xpointer(), placing the XPath expression you want to use in the parentheses. Here's an example:
<MOVIE_REVIEW xmlns:xlink = "http://www.w3.org/1999/xlink"
    xlink:type = "simple"
    xlink:show = "new"
    xlink:href = "http://www.starpowdermovies.com/reviews.xml#xpointer(/child::*[126])">
    Mr. Blandings Builds His Dream House
</MOVIE_REVIEW>
As you can see, XPath is central to a number of XML specifications. We'll see how XPath is used in these specifications in more detail, and with examples, later in the book.
Before finishing this chapter, it's worth noting that a great number of XPath resources are available online. Here's a starter set listing the applicable W3C specifications:
http://www.w3.org/TR/xpath—. The XPath 1.0 specification
http://www.w3.org/TR/xpath20/—. The XPath 2.0 specification
http://www.w3.org/TR/query-datamodel/—. The XPath 2.0 data model
http://www.w3.org/TR/xquery-operators/—. The XPath 2.0 functions and operators specification
http://www.w3.org/TR/xslt20/—. The XSLT 2.0 specification
http://www.w3.org/TR/xquery/—. The XQuery specification
http://www.w3.org/TR/REC-xml—. The XML 1.0 specification
http://www.w3.org/TR/xslt—. The XSLT 1.0 specification
Plenty of XPath tutorials are out there online, too—here are a few:
http://www.w3schools.com/xpath/default.asp—. The W3Schools tutorial, fairly comprehensive
http://www.zvon.org/xxl/XPathTutorial/General/examples.html—. A tutorial by Miloslav Nic and Jiri Jirat
http://www.developer.com/xml/article.php/1156211 Developer.com's XPath tutorial—. A good tutorial, but just an overview
A number of XPath quick reference pages are also available on the Internet—here's a starter list:
www.mulberrytech.com/quickref/XSLTquickref.pdf—. An XPath reference in PDF format
http://www.vbxml.com/xsl/xpathref.asp—. A good XPath reference
http://www.finetuning.com/xpathfaq.html—. An XPath Frequently Asked Questions (FAQ) list in HTML format
http://www.mulberrytech.com/quickref/—. Another good XPath quick reference
And, as we've already seen, there are a number of XPath tools out there, free and ready to download. Here's a list of their URLs:
http://www.fivesight.com/downloads/xpathtester.asp—. The XPath tester
http://www.vbxml.com/xpathvisualizer/—. The XPath Visualiser
http://www.logilab.org/xpathvis/—. Logilab's XPath Visualizer (spelled with a “z”—not the same as the XPath Visualiser)
http://sourceforge.net/project/showfiles.php?group_id=54719&release_id=98894—. The XPath Explorer
http://www.xmlspy.com/download.html—. An XPath tool for XML Spy
Here are the crucial concepts for this chapter:
XPath expressions can be evaluated to create a result.
Location steps indicate a single step in a location path.
Location paths are used to locate data and return node-sets.
Axes let you specify how you want a location step to locate data.
Predicates are optional parts of location steps that let you be more specific about the data you want.
Nodes are the fundamental building blocks of XML documents.
Root nodes are the topmost nodes in documents.
A context node is the current node that is being processed.