
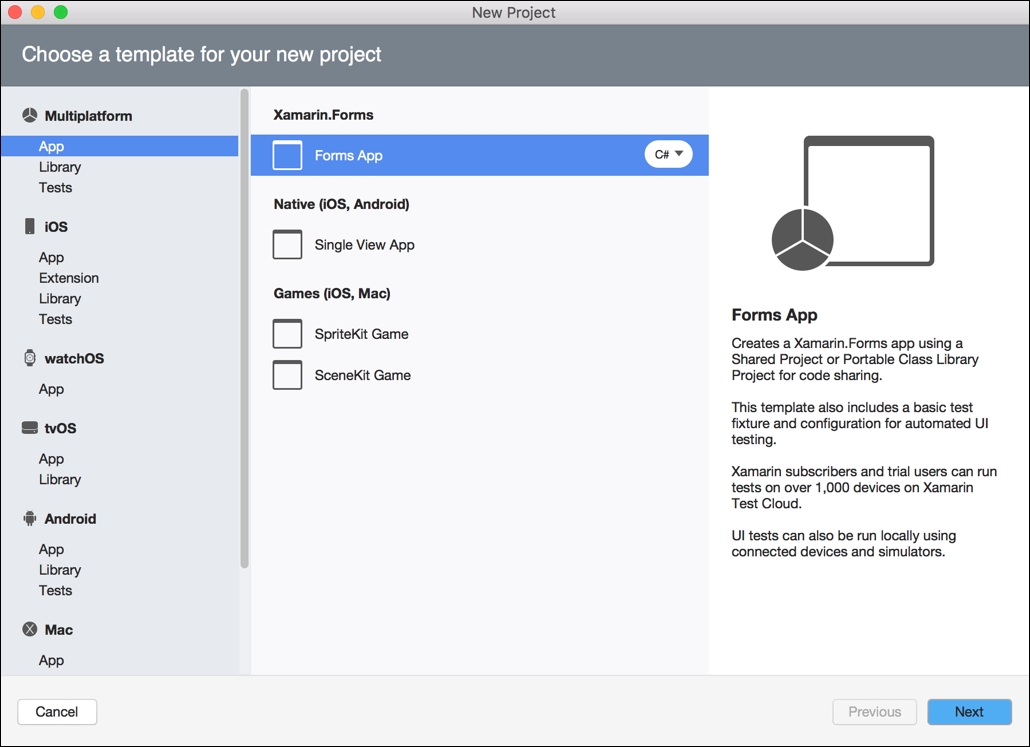
In Xamarin Studio, let's start by setting up the platform projects. Go to File | New Solution and select a Xamarin.Forms app from the cross-platform menu on the left:
Once the project is created, you will see both an iOS and Android project created along with a PCL.
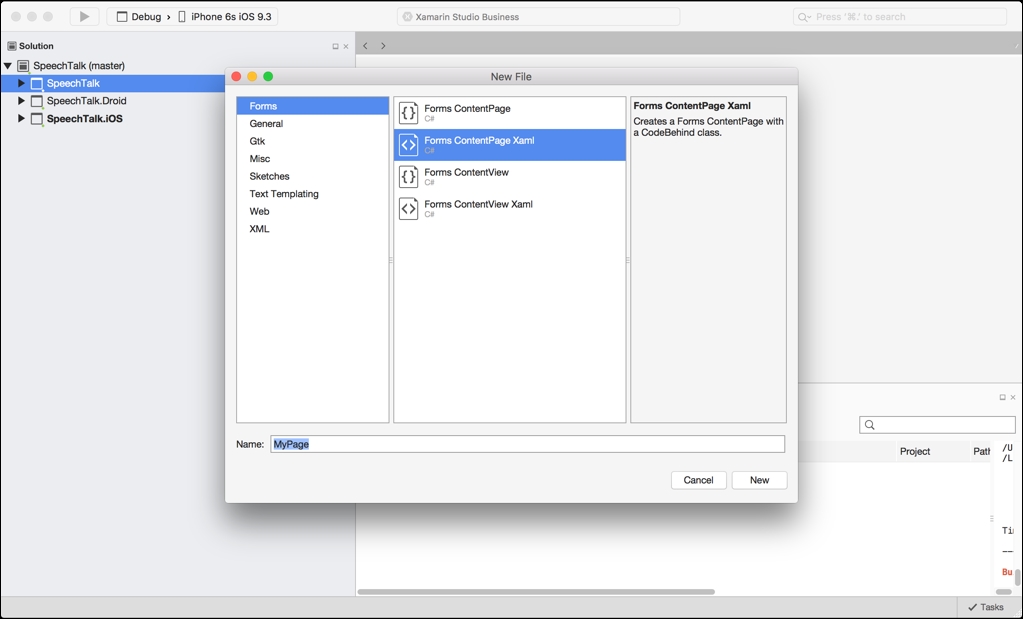
Let's create our first ContentPage in XAML, right-click on the PCL, create a new XAML ContentPage, and call it MainPage:
Xamarin.Forms provides the option to build user interfaces entirely in C#, but it is recommended you stick with XAML because it is a very powerful markup language. The code required for a XAML sheet is much smaller than a user interface in C#.
We also want to create a new folder called Pages and add MainPage to this folder.
Our first element on the page is a Grid. A Grid separates a layout by rows and columns based upon the entire size of the screen. Rows work from top to bottom and columns work from left to right; copy the following into the MainPage.xaml sheet:
<?xml version="1.0" encoding="UTF-8"?>
<ContentPage xmlns="http://xamarin.com/schemas/2014/forms"
    xmlns:x="http://schemas.microsoft.com/winfx/2009/xaml"
    x:Class="SpeechTalk.Pages.MainPage">

    <ContentPage.Content>

    <Grid x:Name="Grid" RowSpacing="0" Padding="10, 10, 10, 10" >
        <Grid.RowDefinitions>
            <RowDefinition Height="Auto"/>
            <RowDefinition Height="Auto"/>
            <RowDefinition Height="Auto"/>
        </Grid.RowDefinitions>

        <Grid.ColumnDefinitions>
            <ColumnDefinition Width="*"/>
        </Grid.ColumnDefinitions>

    </Grid>

    </ContentPage.Content>

</ContentPage>
At the top we have an XML description tag exactly like Android, which specifies an encoding and a version. We have the declaration of a ContentPage with the XML namespace specification attribute xmlns. We then specify the class name and add the ContentPage.Content tags, where we will create the page layout. All these XML tags are generated automatically; the only change we made was the namespace of the class:
x:Class="SpeechTalk.Pages.MainPage"
The Grid inserted between the ContentPage.Content tags has three rows and three columns. Each row definition is assigned Auto, meaning the height of the row is based on the element assigned to it. Since we have three rows assigned with Auto, the Grid will only fill the height of the contained elements (similar to the wrap_content flag in android). The Grid will take up the entire width of the page as its one column definition is set to "*", meaning it will stretch one column to the entire width of the page. We have our basic page layout, so let's leave it there and move back into the project structure.
In SpeechTalk.PCL, we have a file called SpeechTalk.cs; we should rename this App.cs to match the class name. In the App.cs, this is the application starting point. In the constructor of the application class, you will see a MainPage property automatically set like so:
public App ()
        {
            // The root page of your application
            MainPage = new ContentPage {
                Content = new StackLayout {
                    VerticalOptions = LayoutOptions.Center,
                    Children = {
                        new Label {
                            XAlign = TextAlignment.Center,
                            Text = "Welcome to Xamarin Forms!"
                        }
                    }
                }
            };
        }
When the project is created, we automatically receive an App class with the MainPage property set to a new ContentPage. The preceding code block is an example of an interface built entirely via c-sharp. We want to replace this with an instantiation of our MainPage, and set this new object to the MainPage property of the App class.
Here is the updated constructor:
public App ()
        {
            MainPage = new MainPage ();
        }
It's much cleaner, you can already see how messy the code would look like if we were to build complex user interfaces in C#.