This chapter will explain how to set up login authentication and authorization. Logging in is a fundamental step to protect our application and you will learn how to reach these goals from scratch, using the web management free extension that is broadly available on the Internet.
We will cover the following topics in this chapter:
- Creating a user login:
- For example: creating login form to access
- Configure a user authorization
- For example: creating an access control filter to authorize
- Role Based Access Control (RBAC)
- For example: configuring RBAC to set permissions for users
- Mixing Access Control Filter (ACF) and RBAC
- For example: managing users' roles to access rooms, reservations, and customers
The first step will be creating an authenticated access to our app using a database table to manage users and associate it to the Yii user component, through a user model that extends IdentityInterface. We will provide an example of how to use it: building a login form to authenticate the user.
The next step will be to control what actions a user can perform, using ACF and RBAC. We will follow some examples using ACF and RBAC, and in the latter case we will build a complete authorization manager from scratch.
The application's security starts with two well distinguished phases of the same user login: authentication and authorization.
The first one, authentication, is the process of verifying a user's identity, usually using a username and password, or email and password, process. Authentication is completed when the user has been recognized and their state has been preserved for further requests.
The second one, authorization, is the process of verifying that the user has the permission to execute a specific action.
Note
Since http requests are stateless, we need to preserve the login status, which means that there is no data context sharing among them. This limit is solved by sessions, mainly files where the web server stores the data. A filename is used as a session identifier and passed to the browser through a cookie or URL parameter of links contained in the HTML response. In this way, the browser keeps the session active by sending the session identifier to the web server through a cookie or a parameter in the request URL, and the web server knows which file contains the session data.
A database table can be used instead of files with the same functionalities.
Yii2 implements authentication through the yiiwebUser component, which manages the user authentication status and also contains a reference to the identityClass that represents the concrete object that we are referring to.
An identityClass class should implement five methods:
findIdentity(): This method looks for an instance of an identity class using the ID provided as parameter. It is commonly used when we need to keep the login status via a session.findIdentityByAccessToken(): This one looks for an instance of the identity class using the access token provided by the parameter. It is commonly used when we need to authenticate using a single secret token.getId(): This one returns the ID of the identity instance.getAuthKey(): This method returns the key used to verify the cookie-based login when the login has been completed using a cookie sent by the browser (when Remember me is checked during the login).validateAuthKey(): This method verifies that the providedauthKeypassed as a parameter is correct (in the cookie-based login).
Often the identityClass class corresponds to a record of the User database table. For this reason, usually the identityClass class implements IdentityInterface and extends ActiveRecord.
It is now time to implement authentication. The first thing to do is to configure yiiwebUser components and its identityClass. Open the basic/config/web.php file and add the user property to components if it does not already exist:
    'components' => [
        …
        …
        'user' => [
            'identityClass' => 'appmodelsUser',
        ],
    ],
Next, we have to create a database table where we store the users' records:
CREATE TABLE `user` (
 `id` int(11) NOT NULL AUTO_INCREMENT,
 `username` varchar(255) NOT NULL,
 `auth_key` varchar(32) NOT NULL,
 `password_hash` varchar(255) NOT NULL,
 `access_token` varchar(100) DEFAULT NULL,
 PRIMARY KEY (`id`)
) ENGINE=InnoDB DEFAULT CHARSET=utf8
Finally, let's update the basic/models/User class that handles the login status by implementing IdentityInterface and connect it to the user table of database. This is a common implementation for basic/models/User:
<?php
namespace appmodels;

use Yii;
use yiiaseNotSupportedException;
use yiidbActiveRecord;
use yiiwebIdentityInterface;

class User extends ActiveRecord implements IdentityInterface
{
    public static function tableName()
    {
        return 'user';
    }

    public static function findIdentity($id)
    {
        return static::findOne(['id' => $id]);
    }

    public static function findIdentityByAccessToken($token, $type = null)
    {
        return static::findOne(['access_token' => $token]);
    }

    public static function findByUsername($username)
    {
        return static::findOne(['username' => $username]);
    }

    public function getId()
    {
        return $this->getPrimaryKey();
    }

    public function getAuthKey()
    {
        return $this->auth_key;
    }

    public function validateAuthKey($authKey)
    {
        return $this->getAuthKey() === $authKey;
    }

    public function validatePassword($password)
    {
        return Yii::$app->security->validatePassword($password, $this->password_hash);
    }

    public function setPassword($password)
    {
        $this->password_hash = Yii::$app->security->generatePasswordHash($password);
    }

    public function generateAuthKey()
    {
        $this->auth_key = Yii::$app->security->generateRandomString();
    }

}
Note
If our application also uses a cookie-based authentication, we need to fill in the auth_key field too, as this will be passed to the client in the http response. It is convenient to populate the auth_key field automatically when a new user is inserted by overriding the beforeSave() method in the appmodelsUser model:
    public function beforeSave($insert)
    {
        if (parent::beforeSave($insert)) {
            if ($this->isNewRecord) {
                $this->auth_key = Yii::$app->security->generateRandomString();
            }
            return true;
        }
        return false;
    }
User components provide methods to log in, log out, and access the identityClass, and they verify the effectiveness of the user authentication.
To verify whether the user is well authenticated, use the following:
// whether the current user is a guest (not authenticated)
$isGuest = Yii::$app->user->isGuest;
When a user is authenticated and we have an instance of the appmodelsUser model, we could complete the authentication by calling:
// find a user identity with the specified username.
// note that you may want to check the password if needed
$userModel = User::findOne(['username' => $username]);

// logs in the user
Yii::$app->user->login($userModel);
Then, when we need to access the identity class:
// access to identity class that it is equivalent to $userModel
$identity = Yii::$app->user->identity;
Finally, to log the user out:
Yii::$app->user->logout();
In this example, we will create a login form and complete the user authentication. To proceed it is necessary to create a user database table from a SQL query, as described in the previous paragraph.
To add a user, just insert a new record in the user table, with foo as the username and foopassword as the password:
INSERT INTO `user` (
`username` ,
`password_hash` ,
)
VALUES (
'foo',
'$2a$12$hL0rmIMjxhLqI.xr7jD1FugNWEgZNh62HuJj5.y34XBUfBWB4cppW'
);
Then, create a new controller named MyAuthentication in basic/controllers/MyAuthenticationController.php and ensure it contains two actions: actionLogin and actionLogout.
The actionLogin method gets the username and password data from $_POST and uses an $error variable to pass an error description to the view. If the username and password data is filled in, the user will be found in the database table and the inserted password will be validated, and after that the user will be logged in.
Finally, actionLogout simply logs the user out from the session and redirects the browser to the login page:
<?php

namespace appcontrollers;

use Yii;
use yiiwebController;

use appmodelsUser;


class MyAuthenticationController extends Controller
{
    public function actionLogin()
    {
        $error = null;

        $username = Yii::$app->request->post('username', null);
        $password = Yii::$app->request->post('password', null);

        $user = User::findOne(['username' => $username]);

        if(($username!=null)&&($password!=null))
        {
            if($user != null)
            {
                if($user->validatePassword($password))
                {
                    Yii::$app->user->login($user);
                }
                else {
                    $error = 'Password validation failed!';
                }
            }
            else
            {
                $error = 'User not found';
            }
        }

        return $this->render('login', ['error' => $error]);
    }
    public function actionLogout()
    {
        Yii::$app->user->logout();
        return $this->redirect(['login']);
    }

}
Now, create the view with this content in basic/views/my-authentication/login.php. Before a user can log in, a form with the username and password to be filled in will be displayed. When the username and password match an entry in the user database table, a confirmation message and a logout button will be displayed:
<?php
use yiiootstrapActiveForm;
use yiihelpersHtml;
use yiiootstrapAlert;
?>

<?php
if($error != null) {
    echo Alert::widget([ 'options' => [ 'class' => 'alert-danger' ], 'body' => $error ]);
}
?>

<?php if(Yii::$app->user->isGuest) { ?>

    <?php ActiveForm::begin(); ?>

    <div class="form-group">
    <?php echo Html::label('Username', 'username'); ?>
    <?php echo Html::textInput('username', '', ['class' => 'form-control']); ?>
    </div>

    <div class="form-group">
    <?php echo Html::label('Password', 'password'); ?>
    <?php echo Html::passwordInput('password', '', ['class' => 'form-control']); ?>
    </div>

    <?php echo Html::submitButton('Login', ['class' => 'btn btn-primary']); ?>

    <?php ActiveForm::end(); ?>

<?php } else { ?>

    <h2>You are authenticated!</h2>
    <br /><br />
    <?php echo Html::a('Logout',  ['my-authentication/logout'], ['class' => 'btn btn-warning']); ?>

<?php } ?>
Test it by pointing the browser to http://hostname/basic/web/my-authentication/login and after filling out the form with foo as the username and foopassword as the password, this should be displayed:
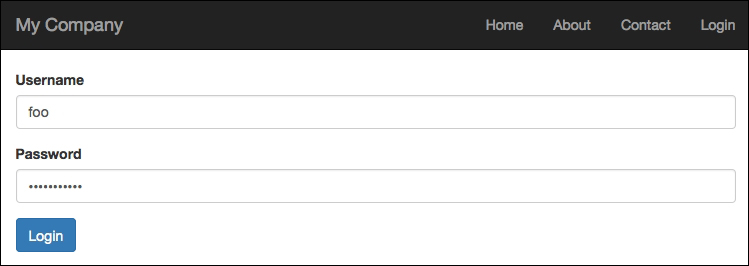
Login form to access
After clicking on the Login button, you should see:
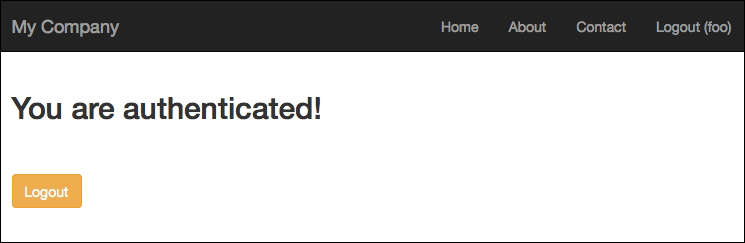
Successful authentication
This method does not provide error handling for the fields, because we are not using a model to create form fields. If we had created a form model with username and password fields, we could have added rules validation to this model and seen input error handling (such as missing field value, wrong field length, and so on). Fortunately, Yii2 has a login form model ready to use in basic/models/LoginForm.php.
If we had wanted to use this model, we would have created a new action named actionLoginWithForm in MyAuthenticationController that handles login fields through the model instead of parameters from $_POST:
    public function actionLoginWithModel()
    {
        $error = null;

        $model = new appmodelsLoginForm();
        if ($model->load(Yii::$app->request->post())) {
            if(($model->validate())&&($model->user != null))
            {
                Yii::$app->user->login($model->user);
            }
            else
            {
                $error = 'Username/Password error';
            }
        }

        return $this->render('login-with-model', ['model' => $model, 'error' => $error]);
    }
This is the content of basic/views/my-authentication/login-with-model.php:
<?php
use yiiootstrapActiveForm;
use yiihelpersHtml;
use yiiootstrapAlert;
?>

<?php
if($error != null) {
    echo Alert::widget([ 'options' => [ 'class' => 'alert-danger' ], 'body' => $error ]);
}
?>
<?php if(Yii::$app->user->isGuest) { ?>

    <?php $form = ActiveForm::begin([
        'id' => 'login-form',
    ]); ?>

    <?= $form->field($model, 'username') ?>

    <?= $form->field($model, 'password')->passwordInput() ?>

    <div class="form-group">
        <?= Html::submitButton('Login', ['class' => 'btn btn-primary', 'name' => 'login-button']) ?>
    </div>

    <?php ActiveForm::end(); ?>

<?php } else { ?>
    <h2>You are authenticated!</h2>
    <br /><br />
    <?php echo Html::a('Logout',  ['my-authentication/logout'], ['class' => 'btn btn-warning']); ?>
<?php } ?>
We can look at the output by pointing our browser to http://hostname/basic/web/my-authentication/login-with-model.
If we try to submit the form without filling out all the fields, we will immediately get errors because they are activated by the form client-side validation:

Login error using the model
We can customize the LoginForm model class as we want if standard behavior is not enough for our purposes.