Yii has two methods to authorize users: ACF and RBAC.
The first one, ACF, is used in applications that require a minimal and simple access control. Basically, its behavior is based on five parameters:
allow: This parameter specifies whether this is an allow or deny rule; possible values areallowordenyactions: This parameter specifies which actions this rule matches, and they are declared using an array of stringroles: This parameter specifies which user roles this rule matches; possible values are?' and@, which mean respectively guest user and authenticated userips: This parameter specifies which client IP address this rule matches; the IP address that can contain*as a wildcardverbs: This parameter specifies which verb (request method) this rules matches
By default, if no rule matches, access will be denied.
ACF is enabled by overwriting the behaviors() method of Controller and populating its access property with the content of some (or every one) of the preceding parameters.
    public function behaviors()
    {
        return [
            'access' => [
                'class' => AccessControl::className(),
                'only' => ['login', 'logout', 'signup', 'index'],
                'rules' => [
                    [
                        'allow' => true,
                        'actions' => ['login', 'signup', 'index'],
                        'roles' => ['?'],
                    ],
                    [
                        'allow' => true,
                        'actions' => ['logout'],
                        'roles' => ['@'],
                    ],
                ],
            ],
        ];
    }
In this example, the login, logout, signup, and index actions are enabled for guest users (all users) and the logout action is enabled only for authenticated ones.
ACF has many other parameters that can be defined, such as controllers , to define which controllers this rule matches (if it is empty, this means all controllers); matchCallback whose value is a PHP callable function called to verify whether this rule can be applied or not; and finally denyCallback, whose value is a PHP callable function used when this rule will deny access.
When a rule is denied, there are two different behaviors according to the role of the user. If a guest is denied, a denied rule will call the yiiwebUser::loginRequired() method to redirect the user's browser to the login page; if the user is authenticated, it will throw a yiiwebForbiddenHttpException exception.
This behavior can be customized using the denyCallback property mentioned earlier, and by defining the correct callable PHP function.
Obviously, any detail about the logged in user is not considered by this type of authorization. During configuration in the behaviors() method, in fact, no detail about the user ever appears (for example, role). So we cannot define more precisely which conditions a user can execute or not a controller action.
ACF suggests only if we have to limit access to an authenticated user, without needing some other details to allow the controller action to be executed.
But in all those cases in which it is enough to limit access based on the condition that the user is logged in or not, it is the best approach. In the REST API with limited access (where only the authenticated users are able to make calls), ACF is probably the best solution.
Now let's look at how to create an ACF to authorize the user to display or not display the page content.
We have two actions: actionPrivatePage and actionPublicPage. The first one is accessible only from an authenticated user and the second one is publically accessible.
In MyAuthenticationController.php, let's add the behaviors() method with the following content:
    public function behaviors()
    {
        return [
            'access' => [
                'class' => AccessControl::className(),
                'only' => ['public-page', 'private-page'],
                'rules' => [
                    [
                        'allow' => true,
                        'actions' => ['public-page'],
                        'roles' => ['?'],
                    ],
                    [
                        'allow' => true,
                        'actions' => ['private-page'],
                        'roles' => ['@'],

                    ],
                ],

                // Callable function when user is denied
                'denyCallback' => function($rule, $data) {
                        $this->redirect(['login']);
                }
            ],
        ];
    }
This method applies an ACF to only two actions, actionPublicPage and actionPrivatePage (based only on the property value) and restricts access for private pages that specify the roles as @.
Then, we added the denyCallback property to indicate how the behavior should appear when access is denied to the user. In this case, we set it so that the user should be redirected to the login action of MyAuthenticationController.
RBAC is the right choice when we need more granularity of authorization controls.
RBAC involves two parts:
- The first one is to build up the RBAC authorization data
- The second one is to use the authorization data to perform further access controls
We'll start now by building up the RBAC authorization data. RBAC can be initialized in two ways: through PhpManager, instancing the yii
bacPhpManager component that will store RBAC data in the @app/rbac folder, and through DbManager, instancing the yii
bacDbManager component, which will use four database tables to store its data.
We need to configure the authManager application component in the main configuration file using one of the authorization managers, yii
bacPhpManager or yii
bacDbManager.
The following code shows how to configure authManager in basic/config/web.php using the yii
bacPhpManager class:
return [
    // ...
    'components' => [
        'authManager' => [
            'class' => 'yii
bacPhpManager',
        ],
        // ...
    ],
];
The following code shows how to configure authManager in basic/config/web.php using the yii
bacDbManager class:
return [
    // ...
    'components' => [
        'authManager' => [
            'class' => 'yii
bacDbManager,
        ],
        // ...
    ],
];
Both these methods are based on three objects: permissions, roles, and rules. The permissions method represents actions that can be controlled; roles are a set of permissions to which the target can be enabled or less; and rules are extra validations that will be executed when a permission is checked. Finally, permissions or roles can be assigned to users and identified by the IdentityInterface::getId() value of the Yii::$app->user component.
When access permissions do not change, we could create a console command to launch in case, or once, permissions are changed. However, we will not discuss that now as you will see the console command in-depth in the next chapters.
Instead, we will write permissions using a fake action to only execute permissions, roles, and assignments settings.
In basic/controllers/MyAuthenticationController.php, add this action named actionInitializeAuthorizations:
    public function actionInitializeAuthorizations()
    {
        $auth = Yii::$app->authManager;

        // Reset all
        $auth->removeAll();

        // add "createReservation" permission
        $permCreateReservation = $auth->createPermission('createReservation');
        $permCreateReservation->description = 'Create a reservation';
        $auth->add($permCreateReservation);

        // add "updatePost" permission
        $permUpdateReservation = $auth->createPermission('updateReservation');
        $permUpdateReservation->description = 'Update reservation';
        $auth->add($permUpdateReservation);

        // add "operator" role and give this role the "createReservation" permission
        $roleOperator = $auth->createRole('operator');
        $auth->add($roleOperator);
        $auth->addChild($roleOperator, $permCreateReservation);

        // add "admin" role and give this role the "updateReservation" permission
        // as well as the permissions of the "operator" role
        $roleAdmin = $auth->createRole('admin');
        $auth->add($roleAdmin);
        $auth->addChild($roleAdmin, $permUpdateReservation);
        $auth->addChild($roleAdmin, $roleOperator);

        // Assign roles to users. 1 and 2 are IDs returned by IdentityInterface::getId()
        // usually implemented in your User model.
        $auth->assign($roleOperator, 2);
        $auth->assign($roleAdmin, 1);
}In order to start this action from the beginning, two permissions and two roles are created, then the createReservation permission is added as a child to the operator role and the updateReservation permission is added as a child to the admin role, together to the operator role.
If we check the createReservation permission for the user with the roleOperator role, it will be successfully confirmed. The same happens if we check the user with adminOperator. But when we check the updateReservation permission on the user with the roleOperator role, it will be denied since that permission is not assigned to that specific role.
Now let's point our browser to http://hostname/basic/my-authentication/initialize-authorizations in order to launch the permissions creation.
The content of files created through this action in the basic/rbac folder are simply arrays. This is the content of the items.php file:
<?php
return [
    'createReservation' => [
        'type' => 2,
        'description' => 'Create a reservation',
    ],
    'updateReservation' => [
        'type' => 2,
        'description' => 'Update reservation',
    ],
    'operator' => [
        'type' => 1,
        'children' => [
            'createReservation',
        ],
    ],
    'admin' => [
        'type' => 1,
        'children' => [
            'updateReservation',
            'operator',
        ],
    ],
];
This is the content of assignments.php:
<?php
return [
    2 => [
        'operator',
    ],
    1 => [
        'admin',
    ],
];
Finally, to check the user authorization, it is enough to call the yiiwebUser::can() method:
if (Yii::$app->user->can()) {
    // create reservation permission is enabled to current user
}In this example, we will create a user permissions management system from scratch, based on RBAC. We will create a new controller named AuthorizationManagerController in basic/controllers/AuthorizationManagerController.php that will display all the users and all the available permissions and roles from the database. This example is based on the user database table already used in the previous paragraphs.
Let's take a look at its structure again:
CREATE TABLE `user` (
 `id` int(11) NOT NULL AUTO_INCREMENT,
 `username` varchar(255) COLLATE utf8_unicode_ci NOT NULL,
 `auth_key` varchar(32) COLLATE utf8_unicode_ci NOT NULL,
 `password_hash` varchar(255) COLLATE utf8_unicode_ci NOT NULL,
 `access_token` varchar(100) COLLATE utf8_unicode_ci DEFAULT NULL,
 PRIMARY KEY (`id`)
)
We will truncate the database table and insert these records, five items, to be used in the next examples:
TRUNCATE user;

INSERT INTO `user` (`id`, `username`, `auth_key`, `password_hash`, `access_token`) VALUES
(1, 'foo', '', '$2a$12$hL0rmIMjxhLqI.xr7jD1FugNWEgZNh62HuJj5.y34XBUfBWB4cppW', NULL),
(2, 'userA', '', '$2a$12$hL0rmIMjxhLqI.xr7jD1FugNWEgZNh62HuJj5.y34XBUfBWB4cppW', NULL),
(3, 'userB', '', '$2a$12$hL0rmIMjxhLqI.xr7jD1FugNWEgZNh62HuJj5.y34XBUfBWB4cppW', NULL),
(4, 'userC', '', '$2a$12$hL0rmIMjxhLqI.xr7jD1FugNWEgZNh62HuJj5.y34XBUfBWB4cppW', NULL),
(5, 'admin', '', '$2a$12$hL0rmIMjxhLqI.xr7jD1FugNWEgZNh62HuJj5.y34XBUfBWB4cppW', NULL);
Now that we have data to work with, we can pass to write code.
The first method to create in this controller is initializeAuthorizations(), which has to initialize all the available authorizations in the system:
    <?php

namespace appcontrollers;

use Yii;
use yiiwebController;
use yiifiltersAccessControl;
use appmodelsUser;
use appmodelsLoginForm;

class MyAuthenticationController extends Controller
{

public function initializeAuthorizations()
    {
        $auth = Yii::$app->authManager;

        $permissions = [
            'createReservation' => array('desc' => 'Create a reservation'),
            'updateReservation' => array('desc' => 'Update reservation'),
            'deleteReservation' => array('desc' => 'Delete reservation'),

            'createRoom' => array('desc' => 'Create a room'),
            'updateRoom' => array('desc' => 'Update room'),
            'deleteRoom' => array('desc' => 'Delete room'),

            'createCustomer' => array('desc' => 'Create a customer'),
            'updateCustomer' => array('desc' => 'Update customer'),
            'deleteCustomer' => array('desc' => 'Delete customer'),
        ];

        $roles = [
            'operator' => array('createReservation', 'createRoom', 'createCustomer'),
        ];

        // Add all permissions
        foreach($permissions as $keyP=>$valueP)
        {
            $p = $auth->createPermission($keyP);
            $p->description = $valueP['desc'];
            $auth->add($p);

            // add "operator" role and give this role the "createReservation" permission
            $r = $auth->createRole('role_'.$keyP);
            $r->description = $valueP['desc'];
            $auth->add($r);
            if( false == $auth->hasChild($r, $p)) $auth->addChild($r, $p);
        }

        // Add all roles
        foreach($roles as $keyR=>$valueR)
        {
            $r = $auth->createRole($keyR);
            $r->description = $keyR;
            $auth->add($r);

            foreach($valueR as $permissionName)
            {
             if( false == $auth->hasChild($r, $auth->getPermission($permissionName))) $auth->addChild($r, $auth->getPermission($permissionName));
            }

        }

        // Add all permissions to admin role
        $r = $auth->createRole('admin');
        $r->description = 'admin';
        $auth->add($r);
        foreach($permissions as $keyP=>$valueP)
        {
            if( false == $auth->hasChild($r, $auth->getPermission($permissionName))) $auth->addChild($r, $auth->getPermission($keyP));
        }
    }
}
At the top of this method, we created a permissions and roles list, then we assigned them to the Yii authorization component. Take care to ensure that, after calling this method for the first time, you check whether any children already exist by calling the hasChild method on every addChild() insert attempt.
Next, we can create actionIndex(), which launches the previous initialize authorizations, getting all the users and populating an array with all the permissions assigned to every user. This is the content of the actionIndex() method:
    public function actionIndex()
    {
        $auth = Yii::$app->authManager;

        // Initialize authorizations
        $this->initializeAuthorizations();

        // Get all users
        $users = User::find()->all();

        // Initialize data
        $rolesAvailable = $auth->getRoles();
        $rolesNamesByUser = [];

        // For each user, fill $rolesNames with name of roles assigned to user
        foreach($users as $user)
        {
            $rolesNames = [];

            $roles = $auth->getRolesByUser($user->id);
            foreach($roles as $r)
            {
                $rolesNames[] = $r->name;
            }

            $rolesNamesByUser[$user->id] = $rolesNames;
        }

        return $this->render('index', ['users' => $users, 'rolesAvailable' => $rolesAvailable, 'rolesNamesByUser' => $rolesNamesByUser]);
    }
Follow the content of the index action view in basic/views/authorization-manager/index.php:
<?php
use yiihelpersHtml;
?>

<table class="table">
    <tr>
        <td>User</td>
        <?php foreach($rolesAvailable as $r) { ?>
            <td><?php echo $r->description ?></td>
        <?php } ?>
    </tr>

    <?php foreach($users as $u) { ?>
        <tr>
            <td><?php echo $u->username ?></td>

            <?php foreach($rolesAvailable as $r) { ?>
                <td align="center">
                <?php if(in_array($r->name, $rolesNamesByUser[$u->id])) { ?>
                  <?php echo Html::a('Yes', ['remove-role', 'userId' => $u->id, 'roleName' => $r->name]); ?>
                <?php } else { ?>
                    <?php echo Html::a('No', ['add-role', 'userId' => $u->id, 'roleName' => $r->name]); ?>
                <?php } ?>
                </td>
            <?php } ?>
        </tr>
    <?php } ?>

</table>
This loops for each user's content of the $rolesAvailable array. To see this output, point your browser to http://hostname/basic/web/authorization-manager/index:
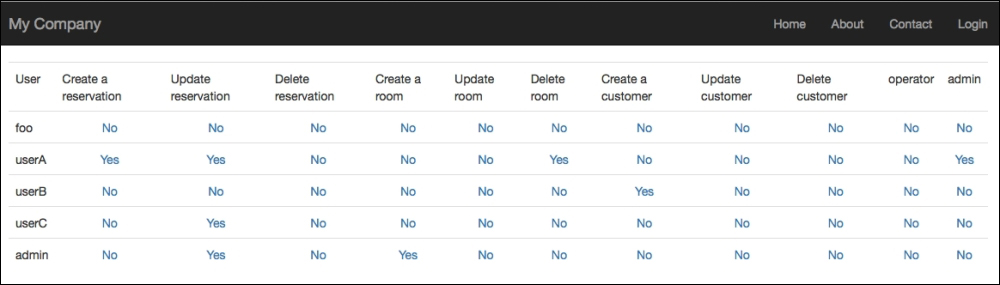
Users/Permissions table
Every permission status is a link to the actions of adding a role or removing a role (depending on the current status).
Now we must create the last two actions: add a role and revoke a role to the user:
    public function actionAddRole($userId, $roleName)
    {
        $auth = Yii::$app->authManager;

        $auth->assign($auth->getRole($roleName), $userId);

        return $this->redirect(['index']);
    }

    public function actionRemoveRole($userId, $roleName)
    {
        $auth = Yii::$app->authManager;

        $auth->revoke($auth->getRole($roleName), $userId);

        return $this->redirect(['index']);
    }