
9. Uploading Videos to YouTube
Okay. You've decided what type of video you want to create. You've made the video and converted it to the proper format. Now it's time to take the final step and upload the video to YouTube.
Read on to learn how.
Uploading Videos from Your Computer
Most YouTubers upload videos that are stored on their PC's hard disk. YouTube makes this kind of PC-based upload extremely easy.
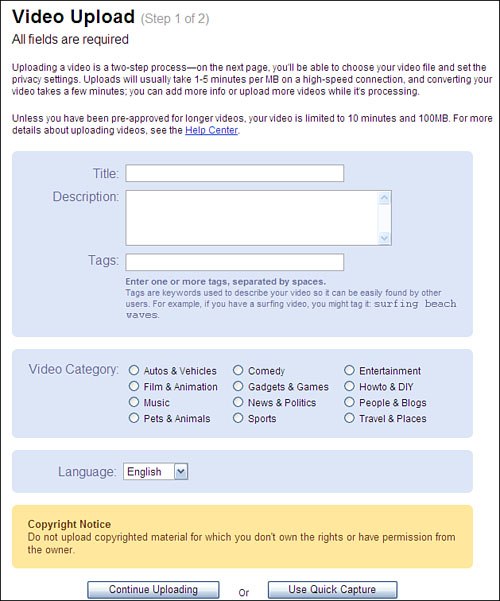
Assuming that your video is in a YouTube-approved format, is less than 10 minutes long, and the file is smaller than 100MB, you're ready to upload. You start by clicking the Upload Videos link in the top right-hand corner of any YouTube page. This displays the Video Upload page shown in Figure 9.1. You now have a little paperwork to do.
Figure 9.1. Getting ready to upload your video to YouTube.
Learn more about the best video formats for YouTube videos in Chapter 8, "Creating Videos 4 YouTube."
First enter a title for your video. Make sure it's descriptive without being overly long. Next enter a description for the video; this can (and should) be longer and more complete.
Then enter one or more tags for the video, separating each tag by a space. Tags are keywords people use when searching; use as many tags as necessary to capture all possible search words.
Now scroll down and select a category for the video, as well as the language that the video is in. Click the Continue Uploading button when you're ready to proceed.
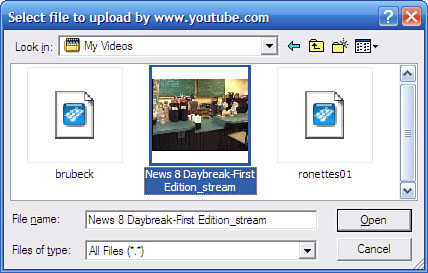
Step two of the video upload process, shown in Figure 9.2, is where you specify the file to upload. Click the Browse button to open the Select File to Upload dialog box, shown in Figure 9.3. Navigate to and select the file you want and then click Open. This loads the filename into the File box on the Video Upload page.
Figure 9.2. Step two of the video upload process.
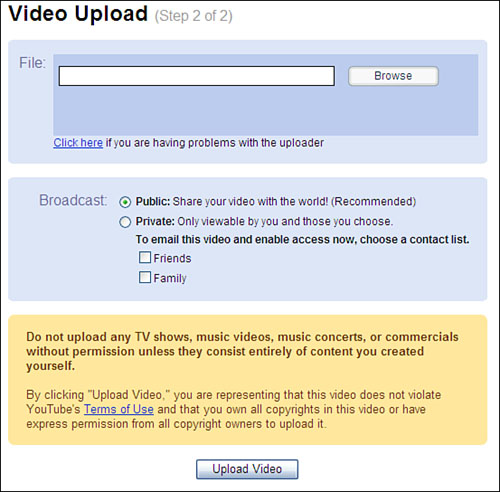
Figure 9.3. Selecting a video to upload.
Next, select whether you want the video to be public or private. A public video can be viewed by any YouTube user; a private video can be viewed only by selected friends and family.
Use the private option when you're sharing home videos with friends and family, or if you have a real estate walk-through to show to selected clients.
All that done, the final step is to click the Upload Video button. YouTube finds the video on your hard disk and starts uploading it; the progress is shown on the Video Upload page.
After the video is uploaded, YouTube displays the Edit My Videos page. This is where you can fine-tune the listing for your video. In particular, you'll want to make the following edits, as appropriate:
- In the Video Details section, shown in Figure 9.4, make any necessary changes to the title, description, and tags.
Figure 9.4. Editing video details.

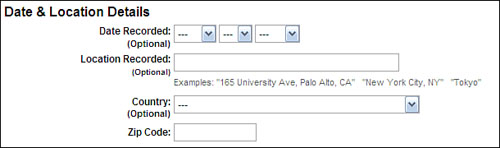
- In the Date & Location Details section, shown in Figure 9.5, enter the date the video was recorded and where it was recorded (location, country, and Zip code).
Figure 9.5. Entering date and location details.
- In the Sharing section, shown in Figure 9.6, note the URL for the video, as well as the HTML to be used for embedding the video, and then check whether the video is public or private; whether you want the link to the video emailed to people on your Friends or Family lists; whether you want to allow comments (with or without your approval); whether you want to allow video responses (with or without your approval); whether you want to let viewers rate your video; and whether you want to allow external sites to embed your video.
Figure 9.6. Selecting video sharing options.

Click the Update Video Info button when you're finished editing.
To view your video, click the My Videos link on any YouTube page and then click the thumbnail for your new video. Note that videos you uploaded are not immediately available for viewing on YouTube; they must first be processed and approved by the site, which can take anywhere from a few minutes to a few hours.
Uploading Videos from Your Webcam
If you have a webcam video camera connected to your PC, you have two ways of uploading webcam videos to YouTube.
First, you can save your webcam videos as you do normally and then upload those videos via YouTube's normal video upload process. Or, if you like, you can upload videos as you shoot them, "live" from your webcam.
When you use Quick Capture to upload "live" webcam videos to YouTube, you don't have the opportunity to edit those videos; whatever you record is what gets shown on YouTube, warts and all.
This second method of uploading webcam videos utilizes YouTube's Quick Capture feature. Here's how it works.
With your webcam connected and running, click the Upload Videos link on any YouTube page. When the Video Upload page appears, scroll to the bottom of the page and click the Use Quick Capture button.
This displays the Quick Capture page, shown in Figure 9.7. If you see an Adobe Flash Player Settings window, click the Allow button and then pull down the list boxes at the top of the Record Video window to select your webcam video and audio options; you should now see the picture from your webcam in the Record Video window.
Figure 9.7. Recording a "live" webcam video with Quick Capture.

Next, enter the necessary information about the video (title, description, tags, category, and language) and then click the Record button to start your recording. When you're finished with the recording, click the Done button.
YouTube automatically uploads the video to the site and displays the Edit Information page. Enter or edit information as necessary, and let YouTube process the video for viewing.
If you don't like what you just recorded, click the Re-Record button for a do-over.
Uploading Videos from Your Mobile Phone
Finally, if your mobile phone has a built-in video camera, you can upload videos directly from your cell phone without first copying them to your PC. All you have to do is set up YouTube's mobile upload options and then email your videos to the YouTube site.
To configure YouTube for your mobile phone, click the My Account link at the top of any YouTube page. When your My Account page appears, scroll down to the Account Settings section and click the Mobile Upload Profiles link. When the next page appears, as shown in Figure 9.8, click the Create Mobile Profile button.
Figure 9.8. Getting ready to create a new mobile upload profile.

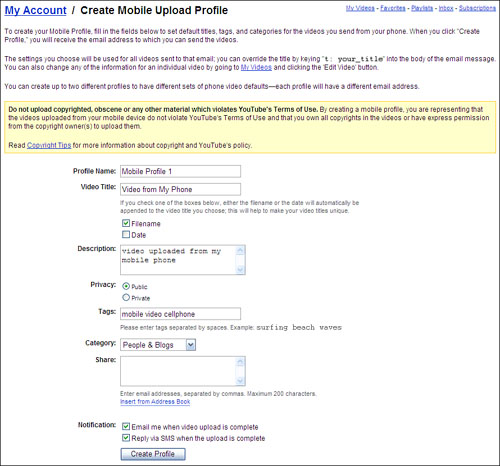
When the Create Mobile Upload Profile page appears, as shown in Figure 9.9, supply the necessary information—the profile name, video title, whether you want the filename or date appended to the video title, a short description of the profile, whether your mobile videos should be public or private, tags for your mobile videos, a category for your videos, whom you want to share them with, and how you want to be notified when the upload is complete. Click the Create Profile button, and your profile is created.
Figure 9.9. Creating a profile for uploading mobile videos.
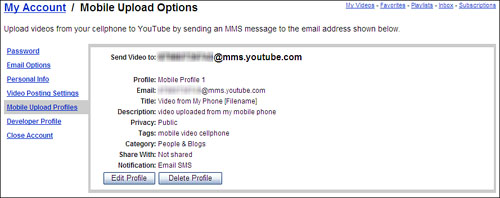
As you can see in Figure 9.10, your profile includes the email address to which you should send your mobile videos, typically a series of numbers @mms.youtube.com. Note this address and enter it into your mobile phone's address book.
Figure 9.10. Your new mobile upload video—email your mobile phone videos to the email address listed here.
To upload a video from your mobile phone, simply email the video to this address. You'll be notified via email or text message when YouTube has received the email and begun processing the video; you can then go to YouTube's website and edit specific information about the newly uploaded video.