Chapter 11: Maintaining Your Zabbix Setup
Like any good piece of software, Zabbix needs to be maintained in order to keep working over the years. A lot of users have been running their setups since the days of Zabbix 2.0. It's perfectly viable to do this if you bring the right knowledge of Zabbix to the equation.
In this chapter, I am going to show you how to do some of the most important parts of Zabbix maintenance to make sure you can keep your setup available and running smoothly. We are going to cover creating maintenance periods, how to make backups, how to upgrade Zabbix and various Zabbix components, and how to do some performance maintenance.
We'll cover these in the following recipes:
- Setting Zabbix maintenance periods
- Backing up your Zabbix setup
- Upgrading the Zabbix backend from older PHP versions to PHP 7.2 or higher
- Upgrading a Zabbix database from older MariaDB versions to MariaDB 10.5
- Upgrading your Zabbix setup
- Maintaining Zabbix performance over time
Technical requirements
We are going to need several important servers for these recipes. First of all, we are going to need a running Zabbix 6 server for which to set up maintenance periods and do performance tuning.
We will need one of the following servers:
- A CentOS 8 server running Zabbix server 5, a PHP version before 7.4, and a MariaDB version before 10.6
- An Ubuntu 18.04 or 20.04 server running Zabbix server 5.0, a PHP version before 7.4, and a MariaDB version before 10.6
I will call this server lar-book-zbx5, which you can run with a distribution of your choice.
If you do not have any prior experience with Zabbix, this chapter may prove a good challenge, as we are going to go into the more advanced Zabbix processes in depth.
Setting Zabbix maintenance periods
When we are working on our Zabbix server or on other hosts, it's super useful to set up maintenance periods in the Zabbix frontend. With maintenance periods we can make sure that our Zabbix users don't get alerts going off because of our maintenance. Let's see how we can schedule maintenance periods in this recipe.
Getting ready
All we are going to need in this recipe is our Zabbix server, for which I'll use lar-book-centos. The server will need at least some hosts and host groups to create maintenance periods for. Furthermore, we'll need to know how to navigate the Zabbix frontend.
How to do it…
- Let's get started with this recipe by logging in to our frontend and navigating to Configuration | Maintenance.
- We are going to click on the blue Create maintenance period button in the top-right corner.
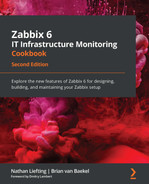
- This will bring us to the next page, where we can set up our maintenance period. On the first tab, Maintenance, fill in the following:
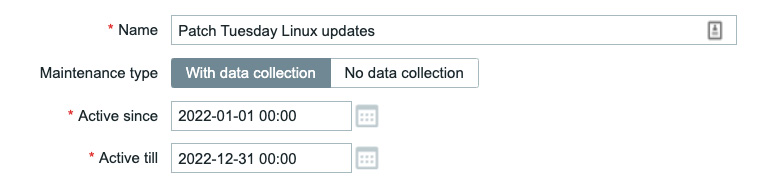
Figure 11.1 – Zabbix Configuration | Maintenance, create maintenance page, Patch Tuesday
- Now, at the Periods part, we'll create a new maintenance period. We need to click on the underlined Add text.
- This will bring us to a pop-up window where we can set the maintenance period. We need to fill in the following information:
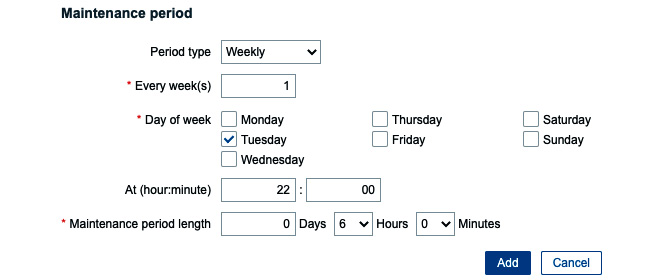
Figure 11.2 – Zabbix Configuration | Maintenance, create maintenance period window, Patch Tuesday
- Now click the blue Add button to continue. You should now see that our maintenance period is filled in:

Figure 11.3 – Zabbix Configuration | Maintenance, create maintenance period page, Patch Tuesday
- Now click on the Hosts and groups tab to fill out what hosts will be affected by the maintenance.
- Next to Host groups, click on the Select button and select the host group Linux servers. Our page should look like this:
Figure 11.4 – Zabbix Configuration | Maintenance, add hosts to maintenance page, Patch Tuesday
- Now click on the blue Add button at the bottom of the page to finish creating the maintenance period. This will bring us back to our Maintenance periods page, where we should see that our maintenance window has been created.
How it works…
When configuring actions in Zabbix, we tell Zabbix to do a certain defined operation when a trigger is fired. Maintenance periods work by suppressing these Zabbix operations for the time period defined in the maintenance period. We do this to make sure that no Zabbix users are notified of any problems going on as maintenance is being done on a host. Of course, it's a good idea to only use this during the time that we are actually working on the hosts in question.
In the case of this recipe, we've created a recurring maintenance period for the entire year, 2022. Let's say the organization we're working for has a lot of Linux hosts that need to be patched weekly. We set up the maintenance period to recur weekly every Tuesday between 22:00 and 04:00.
Now keep in mind that after December 31, 2022, Zabbix will stop this maintenance period as it won't be active any longer. We have two time/date values to bear in mind when setting up scheduled maintenance. The Active since/Active till time/date value of the maintenance period and the period's time/date value of the maintenance period. This allows us to create more flexible periods and recurring ones like we just did.
Also, take note that this maintenance period is With data collection. We can also create a maintenance period with the option of No data collection. When we use the With data collection option, we will keep collecting data but won't send any problems to Zabbix Users. If we want to stop collecting the data, simply select the No data collection option.
Lastly, keep in mind that Zabbix calculates a new maintenance period every minute on 0 seconds. If you create a maintenance period in the very near future or on the exact minute, you might have to wait a bit for it to take effect.
Backing up your Zabbix setup
Before working on any Zabbix setup, it is vital to make a backup of everything important. In this recipe, I will take you through some of the most important steps you should always take before doing maintenance on your Zabbix setup.
Getting ready
We are going to need our Zabbix server, for which I'll use lar-book-centos. Make sure to get the CLI to the server ready, as this whole recipe will use the Linux CLI.
How to do it…
- Let's start by logging in to our Zabbix server via the Linux CLI and create some new directories that we are going to use for our Zabbix backups. Preferably, this directory would be on another partition:
mkdir /opt/zbx-backup/
mkdir /opt/zbx-backup/database/
mkdir /opt/zbx-backup/zbx-config/
mkdir /opt/zbx-backup/web-config/
mkdir /opt/zbx-backup/shared/
mkdir /opt/zbx-backup/shared/zabbix/
mkdir /opt/zbx-backup/shared/doc/
- It's important to back up all of our Zabbix configuration data, which is located at /etc/zabbix/. We can manually copy the data from our current folder to our new backup folder by issuing the following command:
cp -r /etc/zabbix/ /opt/zbx-backup/zbx-config/
- Now, let's do the same for our httpd configuration:
cp /etc/httpd/conf.d/zabbix.conf /opt/zbx-backup/web-config/
Important Note
Please note that if you are using NGINX or Apache2 on a Debian-based system, your web configuration location might be different. Adjust your command accordingly.
- It's also important to keep our Zabbix PHP files and binaries backed up. We can do that using the following commands:
cp -r /usr/share/zabbix/ /opt/zbx-backup/shared/zabbix/
cp -r /usr/share/doc/zabbix-* /opt/zbx-backup/shared/doc/
- We could also create a cronjob to automatically compress and back up these files for us every day at 00:00. Simply issue the following command:
crontab -e
- And add the following information:
0 0 * * * tar -zcvf /opt/zbx-backup/zbx-config/zabbix.tar.gz /etc/zabbix/ >/dev/null 2>&1
0 0 * * * tar -zcvf /opt/zbx-backup/web-config/zabbix-web.tar.gz /etc/httpd/conf.d/zabbix.conf >/dev/null 2>&1
0 0 * * * tar -zcvf /opt/zbx-backup/shared/zabbix/zabbix_
usr_share.tar.gz /usr/share/zabbix/ >/dev/null 2>&1
0 0 * * * tar -zcvf /opt/zbx-backup/shared/doc/zabbix_usr_share_doc.tar.gz /usr/share/doc/ >/dev/null 2>&1
- These are all of the most important files we need to back up from our Zabbix stack. Let's move on to our database. We could now additionally use a rotation tool such as logrotate to manage our files.
- Backing up our database is quite easy. We can simply use the built-in tools provided by MySQL and PostgreSQL. Issue the following command for your respective database:
For MySQL databases:
mysqldump --add-drop-table --add-locks --extended-insert --single-transaction --quick -u zabbixuser -p zabbixdb > /opt/zbx-backup/database/backup_zabbixDB_<DATE>.sql
For PostgreSQL databases:
pg_dump zabbixdb > /opt/zbx-backup/database/backup_ zabbixDB_<DATE>.bak
Important Note
For MySQL databases, there are also tools like ExtraBackup and for Postgres we could use PGBarman. It's never a bad idea to look into tools like this to create the backups for your system, but the built-in examples provided here can prove to be just as useful.
- Make sure to add the right location, as the database dump will be quite large if the database itself is large. Preferably, dump to another disk/partition or even better, another machine.
- We can also do this with a cronjob by issuing the following command:
crontab -e
- Then for MySQL, add the following line where -u is the username, -p is the password, and the database name is zabbix. This is the command for MySQL:
* * * * 6 mysqldump -u'zabbixuser' -p'password' zabbixdb > /opt/zbx-backup/database/backup_zabbixDB.sql
- If you want to back up a PostgreSQL database with a cronjob, we will need to create a file in our user's home directory:
vim ~/.pgpass
- We add the following to this file, where zabbixuser is the username and zabbixdb is the database name:
#hostname:port:database:username:password
localhost:5432:zabbixuser:zabbixdb:password
- Then we can add a cronjob for PostgreSQL as follows:
* * * * 6 pg_dump --no-password -U zabbixuser zabbixdb >
/opt/zbx-backup/database/backup_zabbixDB_date.bak
- We can also add a cronjob to only keep a certain number of days' worth of backups. Issue the following command:
crontab -e
- Then add the following line, where +60 is the number of days you want to keep backups for:
* * * * 6 find /opt/zbx-backup/database/-mtime +60 -type f -delete
- That concludes our demonstration of backing up our Zabbix components the easy way.
How it works…
A Zabbix setup consists of several components. We have the Zabbix frontend, Zabbix server, and Zabbix database. These components in this setup require different pieces of software to run on, as shown in the following diagram:
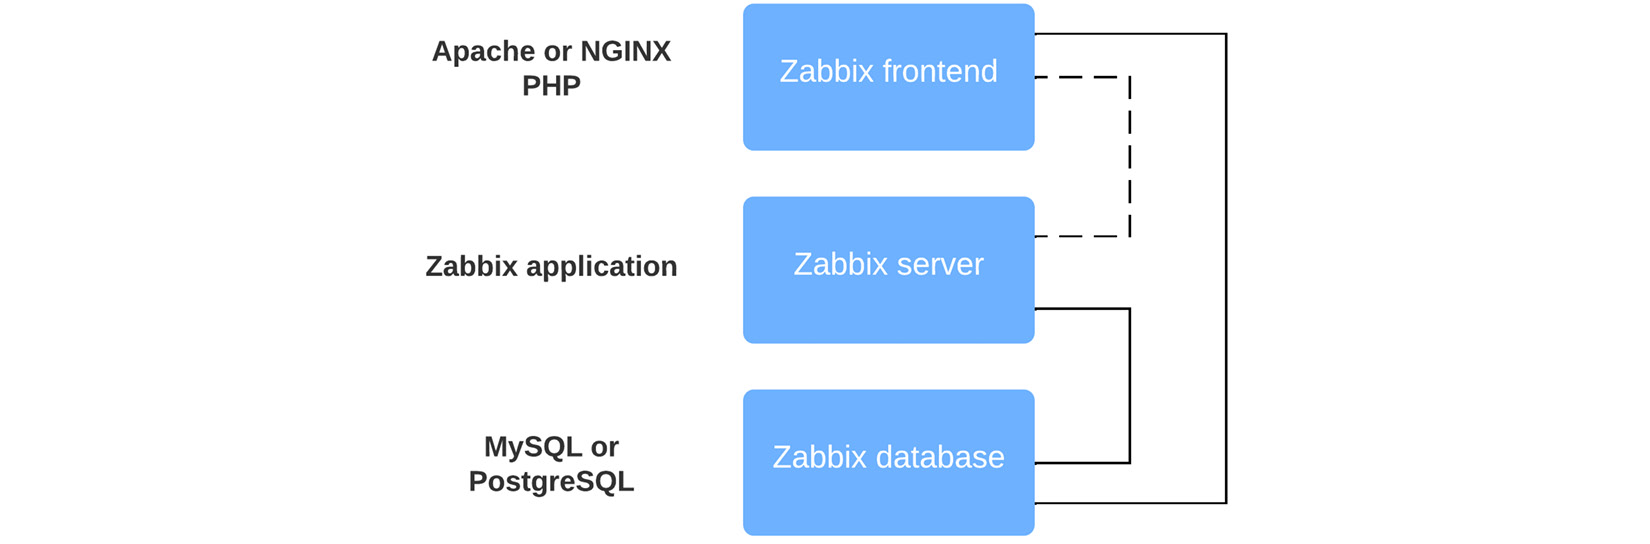
Figure 11.5 – Zabbix key components setup diagram
Looking at the preceding diagram, we can see that our Zabbix frontend runs on a web engine such as Apache or NGINX. We also need PHP to run our Zabbix web pages. This means that we have to back up two components:
- The web engine: Apache, NGINX, or another
- PHP
The Zabbix server is a proprietary application designed by Zabbix, so we only need to back up one thing here:
- The Zabbix server config files
Then last, but definitely not least, we need to make a backup of our database. The most common databases used are MySQL and PostgreSQL, so we only need to do one thing for this:
- Create a dump of the Zabbix database.
There's more…
Backing up your Zabbix setup like this is one thing, but of course, it's not everything. Make sure you have the correct backups of your Linux system, using snapshots and other technologies.
When you follow standard backup implementations, you should be prepared against any unforeseen circumstances with your Zabbix setup.
Optionally upgrading the Zabbix backend from PHP 7.2 to PHP 7.4
RHEL7, Ubuntu 16.04, and Debian 9 (Stretch) are no longer supported by Zabbix, thus our upgrade recipe no longer includes any information about the upgrade path from PHP versions before 7.2 to version 7.2 or higher. All the newer Linux versions already ship with PHP7.2 or higher, which means that when we are upgrading a Zabbix setup from Zabbix version 5 to Zabbix 6, we can upgrade immediately.
The PHP requirement for Zabbix 6 is the same as it was for Zabbix 5, meaning that as long as we are running PHP 7.2 or higher, we can run the latest Zabbix 6 release. Nevertheless, I like to work in a "future-proofing" kind of way, so in this recipe, we will go over how to upgrade PHP 7.2 to 7.4.
Getting ready
For this recipe, we will need our server installed with a RHEL8-based system, which will be running Zabbix server 5 with PHP version 7.2.
Another possibility is that you have a server running a Debian-based distribution like Ubuntu 18.04, Debian 10, or a newer version of those Linux distributions. These also include PHP version 7.2 or higher by default.
I will call either server lar-book-zbx5 throughout this recipe.
Lastly, make sure to take backups of your system and read the release notes for the new version you're installing.
How to do it…
This recipe is split into two different sections, one for RHEL8-based systems and another for Ubuntu systems. We will start by going through the steps for RHEL8.
RHEL8-based systems
If you are already running PHP version 7.2 on a RHEL8-based system, the upgrade process is a bit simpler. Let's check out how we can upgrade our server lar-book-zbx5 in this case.
- First, always verify what PHP version we are running with the following command:
php-fpm --version
- If the version is older than 7.4, we can continue with the next step. We'll execute the following:
dnf module list php
- This will show us something like the following screenshot:

Figure 11.6 – RHEL8 DNF Module list for PHP
- If your screen looks about the same, with 7.2 or 7.3 being the default PHP module, reset your already available PHP modules:
dnf module reset php
- Make sure to answer with Y. Then we will enable the latest PHP version with the following command:
dnf module enable php:7.4
- Answer with Y again to enable PHP 7.4 and then we can upgrade our PHP version by using the dnf update command.
- Answer Y again and your PHP version will now be running the latest PHP 7.4 version.
These steps have been tested on both a CentOS 8 and Rocky Linux RHEL system, so they should work with any RHEL8-based system either in Stream or when it's a full rebuilt.
Ubuntu systems
- Let's start by adding the PPA repository to our host with the following command:
apt install software-properties-common
add-apt-repository ppa:ondrej/php
- Now update the repositories with the following command:
apt update
- On some installations, the key of the repository might not be available, so you might see an error reading key is not available. You can fix this with the following command, where PUB_KEY_HERE is the key shown in the error:
apt-key adv --keyserver keyserver.ubuntu.com --recv- keys PUB_KEY_HERE
- Now we can install PHP version 7.4 with the following command:
apt install -y php7.4 php7.4-fpm php7.4-mysql php7.4-bcmath php-7.4-mbstring php-7.4-gd php-7.4-xml
- That's it, the version of PHP should now be the one we want. Check the version of PHP with the following command:
php --version
How it works…
Because Zabbix server 6 requires us to install PHP version 7.2 or higher, we do not need to upgrade the PHP version first. It's the same requirement we already had for Zabbix 5. If you are still running RHEL7, Ubuntu 16.04, or Debian 9 (Stretch), then you will need to upgrade your Linux system first. Zabbix 6 has dropped support for these older Linux versions in favor of installation simplicity in terms of package management.
Now, it is still possible to run Zabbix on older Linux versions by building from packages, but it is not recommended.
In this recipe, we did do an upgrade from PHP 7.2 (or 7.3) to PHP 7.4, which is the latest supported stable version at the time of writing. Doing this upgrade will not break our current Zabbix server installation, as PHP is backward-compatible. As mentioned, this is an optional upgrade as PHP 7.2 is enough to run Zabbix 6, but it is always good to run the latest stable release of software to make sure that you are ready for the future.
Now that we have upgraded PHP, we are ready to move on to upgrading the Zabbix database engine.
Upgrading a Zabbix database from older MariaDB versions to MariaDB 10.6
For our Zabbix 6 installation, we are going to need MariaDB 10.5 or a newer supported version, so, it is a good idea to keep your database version up to date. MariaDB regularly makes improvements to how MySQL handles certain aspects of performance.
This recipe details how to upgrade MariaDB to the latest stable version, which is MariaDB 10.6 at the time of writing.
Getting ready
For this recipe, we will need our server which we called lar-book-zbx5. At this point, the server is running a RHEL8-based distribution.
Another option is that you have a server running a Debian-based distribution like Ubuntu 18.04, Debian 10, or a newer version of those Linux distributions. We will be upgrading the MariaDB instance on this server to version 10.6.
If you've followed the Optionally upgrading the Zabbix backend from PHP 7.2 to PHP 7.4 recipe, your server will now be running PHP version 7.4. If not, it's a good idea to follow that recipe first.
Also, make sure to take backups of your system and read the release notes for the new version you're installing.
How to do it…
- First things first, let's log in to our Linux host CLI to check out our versions. Issue the following commands:
For Zabbix server:
zabbix_server --version
For PHP:
php-fpm --version
For MariaDB:
mysql --version
- After verifying our versions match the versions mentioned in the Getting ready section of this recipe, let's move on to upgrade our version of MariaDB.
RHEL-based systems
- On our RHEL-based server, the first thing we'll do after checking the versions is to stop our MariaDB server:
systemctl stop mariadb
- Now set up a repository file for MariaDB with the following command:
vim /etc/yum.repos.d/MariaDB.repo
- We will add the following code to this new file. Make sure to add the correct architecture after baseurl if using anything other than amd64:
# MariaDB 10.6 CentOS repository list
# http://downloads.mariadb.org/mariadb/repositories/
[mariadb]
name = MariaDB
baseurl = http://yum.mariadb.org/10.6/rhel8-amd64
gpgkey=https://yum.mariadb.org/RPM-GPG-KEY-MariaDB
gpgcheck=1
- Now upgrade your MariaDB server with the following command:
dnf install MariaDB-client MariaDB-server
- Restart the MariaDB service with the following command:
systemctl start mariadb
- That's it, MariaDB should now be upgraded to the intended version. Check the version again with the following command to make sure:
mysql --version
Ubuntu systems
- On our Ubuntu server, the first thing we'll do after checking the versions is to stop our MariaDB server:
systemctl stop mariadb
- We can use the MariaDB repository setup script to update to the right repository. Execute the following command:
curl -sS https://downloads.mariadb.com/MariaDB/mariadb_ repo_setup | bash
- This will add the latest MariaDB package to the /etc/apt/sources.list.d/mariadb.list file. To see if it is on version 10.6, check it with the following command:
vim /etc/apt/sources.list.d/mariadb.list
- The file should look like the following code block. If it doesn't look right, edit it to match. Make sure to add the correct architecture on the deb lines if using anything other than amd64:
# MariaDB Server
# To use a different major version of the server, or to pin to a specific minor version, change URI below.
deb [arch=amd64] http://downloads.mariadb.com/MariaDB/
mariadb-10.6/repo/ubuntu focal main
# MariaDB MaxScale
# To use the latest stable release of MaxScale, use
"latest" as the version
# To use the latest beta (or stable if no current beta)
release of MaxScale, use "beta" as the version
deb [arch=amd64] http://downloads.mariadb.com/MaxScale/
latest/ubuntu focal main
# MariaDB Tools
deb [arch=amd64] http://downloads.mariadb.com/Tools/ubuntu focal main
- We need to remove our old MariaDB packages with the following command:
apt remove --purge mariadb-server mariadb-client zabbix-server-mysql
- Now upgrade the MariaDB server version with the following command:
apt install mariadb-server mariadb-client zabbix-server-mysql
- Restart MariaDB with the following command:
systemctl restart mariadb-server
- Then issue the upgrade command:
mariadb-upgrade
- That's it, MariaDB should now be upgraded to the correct version. Check the version again with the following command:
mysql --version
How it works…
Now, while it might not be a requirement, it is a smart idea to upgrade your database version regularly. New versions of your database engine might include improvements to stability and performance, both of which could improve your Zabbix server greatly.
Do keep the release notes and bug reports on your scope though. MariaDB 10.6 is, at the time of writing, the newest version on the market. You might want to stick back one or two releases as these are still in support and have been running in production for a while already. After all, nobody likes unforeseen issues such as bugs.
For Zabbix 6, we do need to install at least MariaDB 10.5 or a newer supported version though, so keep that in mind.
There's more...
If you really cannot upgrade to MariaDB version 10.5 or, if you are running another database, the supported version for that one, then there's a new Zabbix feature. Zabbix 6 now allows us to run unsupported database versions. When we edit the Zabbix server configuration files at /etc/zabbix/zabbix_server.conf, we can add the following parameter:
AllowUnsupportedDBVersions=1
This will allow you to run an older version of your database, but keep in mind that it is not recommended to do so. Check out the current Zabbix LTS installation requirements here:
https://www.zabbix.com/documentation/current/en/manual/installation/requirements
Upgrading your Zabbix setup
As we've seen throughout the book already, Zabbix 6 offers a great deal of cool new features. Zabbix 6.0 is a Long-Term Support (LTS) release, so just like 4.0 and 5.0, you will receive long-term support for it. Let's see how we can upgrade a Zabbix server from version 5.0 to version 6.0.
Getting ready
For this recipe, we will need our server called lar-book-zbx5. At this point, your server will be running either a RHEL8-based Linux distribution or a Debian-based distribution like Ubuntu 18.04, Debian 10, or newer versions of those distributions.
If you've followed the Optionally upgrading the Zabbix backend from PHP 7.2 to PHP 7.4 recipe, your server will now be running PHP version 7.4. If not, it's a good option to follow that recipe first.
If you've followed the Upgrading a Zabbix database from older MariaDB versions to MariaDB 10.5 recipe, it will now be running MariaDB version 10.5. If not, it's wise to follow that recipe first.
Also, make sure to take backups of your system and read the release notes for the new version you're installing.
How to do it…
First things first, let's log in to our Linux host CLI to check out our software versions:
- Issue the following commands to check the software versions respectively:
For Zabbix server:
zabbix_server --version
For PHP:
php-fpm --version
For MariaDB:
mysql --version
- After verifying our versions match the versions mentioned in the Getting ready section of this recipe, let's move on to upgrade our Zabbix server.
RHEL-based systems
First, we will start with upgrading the Zabbix server on a RHEL-based system:
- Let's stop our Zabbix server components with the following command:
systemctl stop zabbix-server zabbix-agent2
- On our server, let's issue the following command to add the new Zabbix 6.0 repository:
rpm -Uvh https://repo.zabbix.com/zabbix/6.0/rhel/8/ x86_64/zabbix-release-6.0-1.el8noarch.rpm
- Run the following command to clean the repositories:
dnf clean all
- Now upgrade the Zabbix setup with the following command:
dnf upgrade zabbix-server-mysql zabbix-web-mysql zabbix-agent2
- Additionally, install the Zabbix Apache configuration:
dnf install zabbix-apache-conf
- Start the Zabbix components with the following command:
systemctl restart zabbix-server zabbix-agent
- When we check if the server is running, it should say Active (running) when we issue the following command:
systemctl status zabbix-server
- If not, we check the logs with the following command, so we can see what is happening:
tail -f /var/log/zabbix/zabbix_server.log
- Check the log file for any notable errors and if you find any, fix them before continuing.
- If we start the server again, this error should be gone and the Zabbix server should keep running:
systemctl restart zabbix-server
- Then, upgrade the Apache frontend configuration with the following commands:
dnf clean all
dnf install zabbix-apache-conf
- Do not forget to update the time zone of the php-fpm module with the following command:
vim /etc/php-fpm.d/zabbix.conf
- Now restart the Zabbix components with the following command:
systemctl restart httpd php-fpm zabbix-server mariadb
- Now everything should be working as expected and we should see the new Zabbix 6 frontend, as shown in the following screenshot:
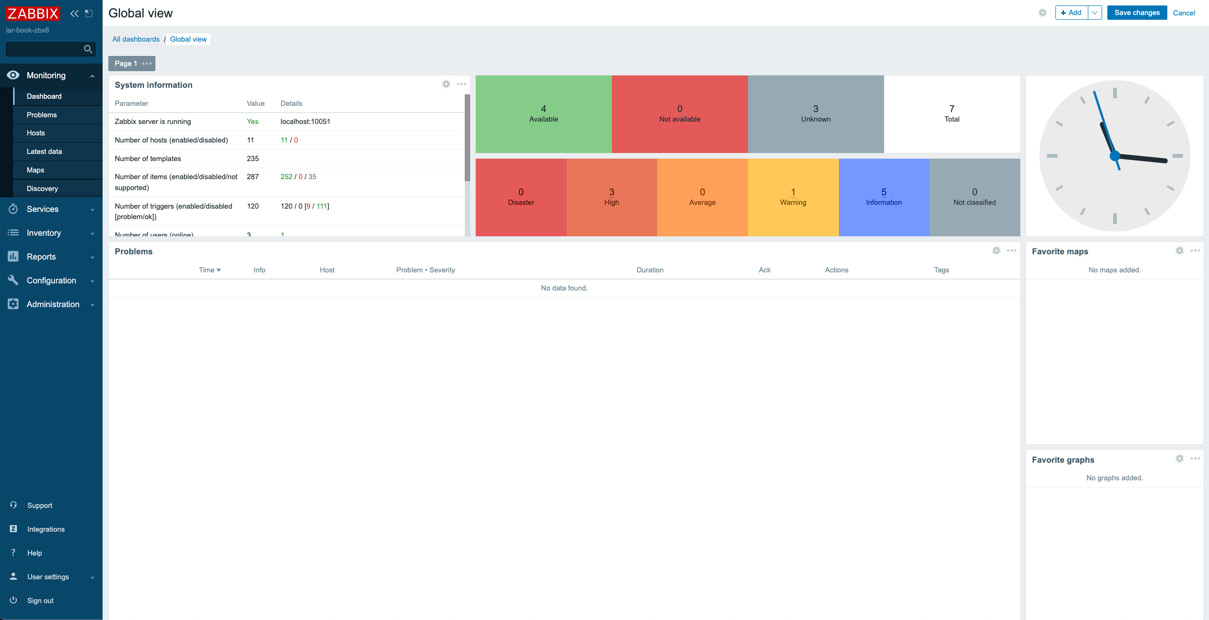
Figure 11.7 – Zabbix 6 frontend after the CentOS upgrade
Ubuntu systems
- First, let's stop our Zabbix server components with the following command:
systemctl stop zabbix-server zabbix-agent2
- Now add the new repository for Zabbix 6 on Ubuntu with the following commands:
wget https://repo.zabbix.com/zabbix/6.0/ubuntu/pool/ main/z/zabbix-release/zabbix-release_6.0-1+ubuntu20.04_all.deb
dpkg -i zabbix-release_6.0-1+ubuntu20.04_all.deb
Important Note
Always check zabbix.com/download to get the right repository for your systems. In the example, I used the Ubuntu repository. Switch this out for the right repository for your system.
- Update the repository information with the following command:
apt update
- Now upgrade the Zabbix server components with the following command:
apt install –only-upgrade zabbix-server-mysql zabbix-frontend-php zabbix-agent2
- Make sure to not overwrite your Zabbix server configuration. If you do overwrite your configuration file, you can restore it from the backup taken in the Backup up your Zabbix setup recipe.
- Then install the new Zabbix Apache configuration with the following command:
apt install zabbix-frontend-php
- Restart the Zabbix server components with the following command and you should be done:
systemctl restart zabbix-server httpd zabbix-agent2
- We check the logs with the following command so we can see what is happening:
tail -f /var/log/zabbix/zabbix_server.log
- Check the log file for any notable errors and if you find any, fix them before continuing.
- If we start the server again, this error should be gone and the Zabbix server should keep running:
systemctl restart zabbix-server
- This should conclude the upgrade process, and if we go to the frontend, we should see the new Zabbix 6 frontend:
Figure 11.8 – Zabbix 6 frontend after the Ubuntu upgrade
How it works…
Upgrading Zabbix can be an easy task when we are running the latest version of Linux. When we are running older versions of software though, we might run into some issues.
The recipe we've just followed shows us the upgrade process for a Zabbix 5 instance resulting in a setup running Zabbix 6, along with the most common issues we might run into.
Important Note
While upgrading, make sure to keep an eye on your zabbix_server.log file, as this file will tell you if something is wrong during the upgrade process.
We already had a PHP version higher than 7.2 as this was the requirement for Zabbix 5, making the upgrade process to Zabbix 6 quite straightforward. For the database though, Zabbix introduced some new requirements, for example, requiring MariaDB 10.5 or a newer supported version for your Zabbix setup.
Now that you've upgraded all the components, you should be ready to work with Zabbix 6 and your setup will be future-proof for a while – of course, until Zabbix 7 comes out, when we might see some new requirements come along.
See also
Make sure to check out the Zabbix documentation for the versions you are upgrading from and to. Zabbix always includes detailed descriptions of the requirements and processes to make it as easy as possible for you to upgrade. Check out the right documentation for your version at:
https://www.zabbix.com/documentation/current/en/manual/installation/upgrade
Maintaining Zabbix performance over time
It's important to make sure that your Zabbix setup keeps performing well over time. There are several key components that are important to keep your Zabbix setup performing optimally. Let's see how to work on some of these components and keep your Zabbix setup running smoothly.
Getting ready
All we are going to need for this recipe is a Zabbix 6 server configured with either a MySQL or PostgreSQL database backend.
How to do it…
We will go through three of the main problems people face whilst maintaining Zabbix server performance. First things first, let's look at the Zabbix processes and how to edit them.
Zabbix processes
A regular problem people face is a Zabbix process being too busy. Let's log in to our Zabbix frontend and check out how this problem might look.
First, let's start by logging in to our Zabbix server frontend and check out some messages:
- When we navigate to Monitoring | Dashboard and then select the default dashboard Global view, we might see something like this:

Figure 11.09 – Zabbix problem from our Zabbix server, discoverer processes 75% busy
- Then we navigate to Monitoring | Hosts and click on Latest data for the Zabbix server host (in my case, called lar-book-centos). This will take us to the latest data for our host.
- For the filters, type discoverer in the Name field, then click on Graph. This will show you the following graph:

Figure 11.10 – Zabbix server discoverer graph, Utilization of discoverer data collector in %
This graph is at 100% almost all the time, which explains why we see the problem shown in Figure 11.10 on our dashboard.
- Let's log in to the Linux CLI of our Zabbix server to edit this process.
- Edit the following file on your Zabbix server:
vim /etc/zabbix/zabbix_server.conf
- Now, if we want to give our Zabbix server's discoverer process more room, we need to edit the correct parameter. Scroll down until you see the following:

Figure 11.11 – Zabbix server configuration file, StartDiscoverers default
- Now add a new line under this and add the following line:
StartDiscoverers=2
- If your file now looks like the following screenshot, you can save and exit the file:

Figure 11.12 – Zabbix server configuration file, StartDiscoverers 2
- For the changes to take effect, we will need to restart the Zabbix server with the following command:
systemctl restart zabbix-server
- Now if we go back to our Zabbix frontend, we should still be at our graph so we can see the following:
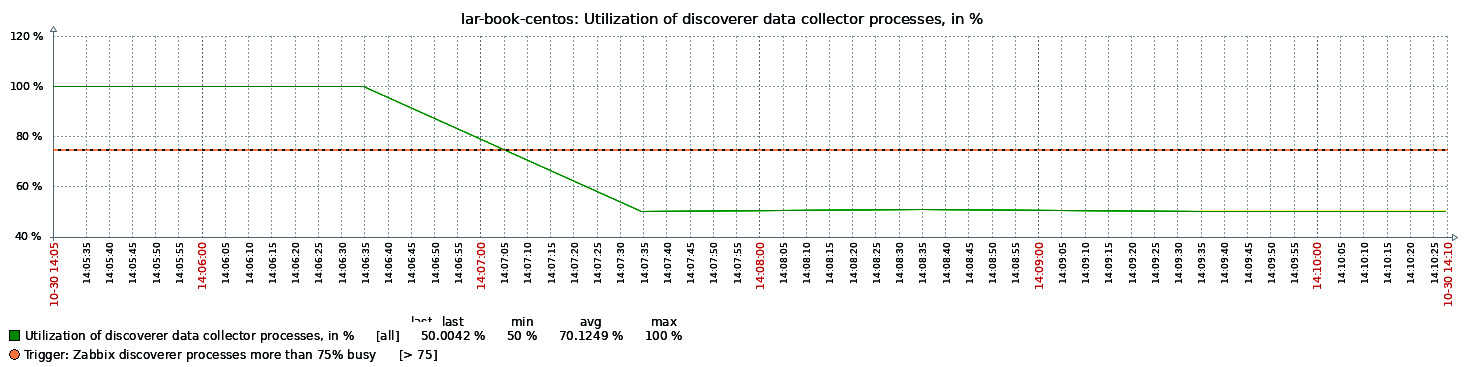
Figure 11.13 – Zabbix server discoverer graph
The utilization of our discoverer process has gone down, which means our problem won't show up anymore. That's how we edit Zabbix server processes.
Zabbix housekeeper
Another very common problem people face is the Zabbix housekeeper process being too busy. Let's log in to our Zabbix frontend and check out the problem:
- When we navigate to Monitoring | Dashboard and then select the default dashboard Global view, we might see something like this:

Figure 11.14 – Zabbix problem for Zabbix housekeeper
- Similar to editing any Zabbix process, we can also edit the Zabbix housekeeper process. Let's log in to the Linux CLI of our Zabbix server to edit our process.
- Edit the following file on your Zabbix server:
vim /etc/zabbix/zabbix_server.conf
- Now, if we want to edit this process, we need to edit the correct parameters. Scroll down until you see the following:
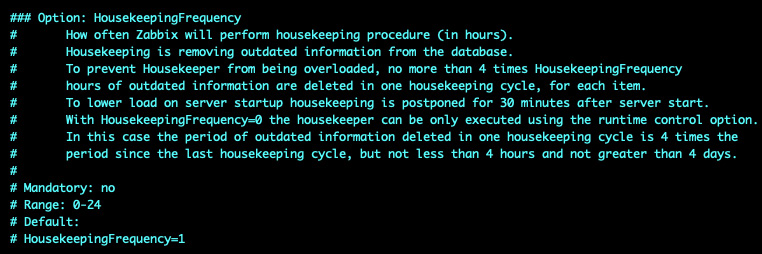
Figure 11.15 – Zabbix configuration file, HousekeepingFrequency 1
- This is our first housekeeper parameter. Let's edit this parameter by adding the following line under this block:
HousekeepingFrequency=2
Important Note
Making the interval longer is not going to solve your issue; at most, you are delaying the inevitable. It is only recommended to change this setting to make it till the next maintenance window and it should be avoided as much as possible.
- Now scroll down until you see the following:

Figure 11.16 – Zabbix configuration file, HousekeepingDelete 5000
- The preceding screenshot shows our second housekeeper parameter. Let's edit this parameter by adding the following line under this code block:
MaxHousekeeperDelete=20000
- For the changes to take effect, we will need to restart the Zabbix server with the following command:
systemctl restart zabbix-server
Tuning a MySQL database
- Let's see how we can tune a MySQL database with ease. First off, let's go to the following link in our browser: https://github.com/major/MySQLTuner- perl.
- This link brings us to an open source GitHub project started by Major Hayden. Be sure to follow the repository and do all you can to help out. Let's download the script from the GitHub repository or simply use the following command:
wget https://raw.githubusercontent.com/major/ MySQLTuner-perl/master/mysqltuner.pl
- Now we can execute this script with the following command:
perl mysqltuner.pl
- This will bring us to a prompt for our MySQL database credentials. Fill them out and continue:

Figure 11.17 – MySQL tuner script execution
- Now, the script will output a lot of information that you will need to read carefully, but the most important part is at the end – everything after Variables to adjust:
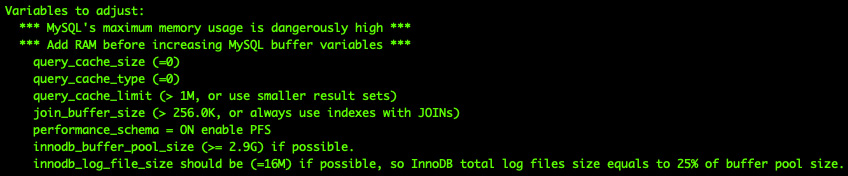
Figure 11.18 – MySQL tuner script output
Important Note
DO NOT simply copy over the output from this script. The script is simply giving us an indicator of what might be tuned in our MySQL settings. Always look up the settings suggested and read about the best practices for those settings.
- We can edit these variables in the MySQL my.cnf file. In my case, I edit it with the following command:
vim /etc/my.cnf.d/server.cnf
- Now, you simply edit or add the variables that are suggested in the script and then restart your MySQL server:
systemctl restart mariadb
How it works…
We've just done three of the main performance tweaks we can do for a Zabbix server, but there's a lot more to do. Let's take a look at what we've just edited, consider why we've edited it, and find out whether it's really that simple.
Zabbix processes
Zabbix processes are a big part of your Zabbix server setup and must be edited with care. In this recipe, we've only just edited the discoverer process on a small installation. This problem was easy as the server had more than enough resources to account for another process running.
Now if we look at the following diagram, we can see the situation as it was before we added a new discoverer process:
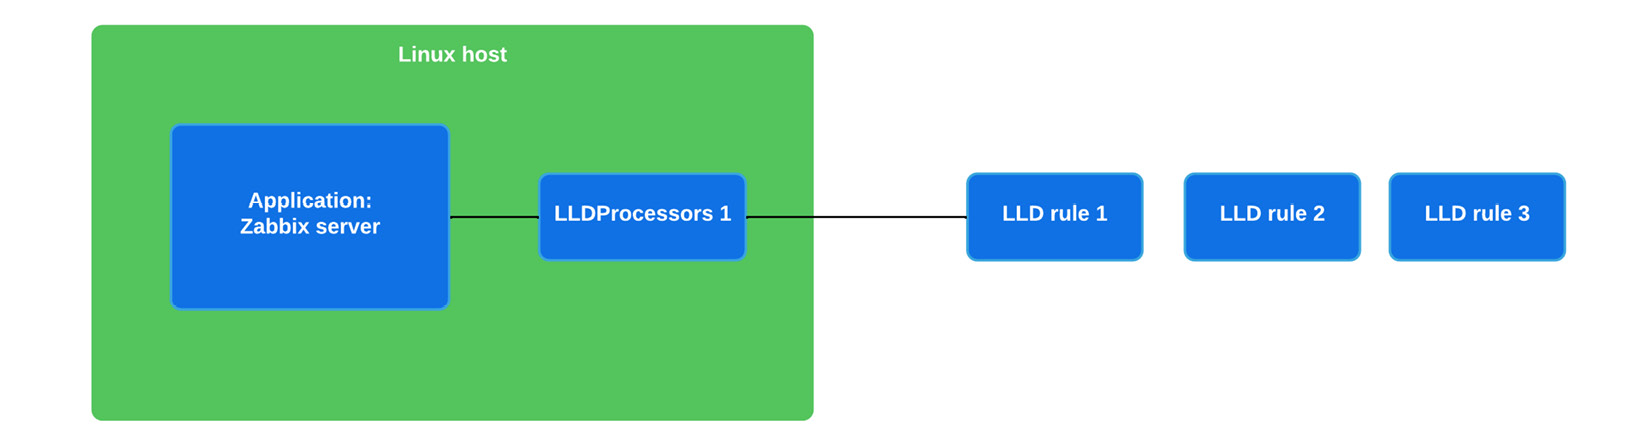
Figure 11.19 – Zabbix server single-process setup diagram
We can see our Linux host running our Zabbix server application and we can see our LLDProcessors 1 process discovering LLD rule 1. LLD rule 2 and LLD rule 3 are queueing up as one LLDProcessor subprocess can only handle one rule at a time.
As we've seen that this is apparently too heavy for our system, we have added another LLDProcessor:

Figure 11.20 – Zabbix server multiple-process setup diagram
Our new setup will balance the load to a certain extent. It's only possible for a discovery rule to be handled by a single discoverer process. This means that if we have multiple discovery rules, we can add discoverers like this to make sure there are enough resources available per discovery rule. It works the same for the other processes – more processes mean better distributions of tasks.
However, there are several things to be careful of here. First of all, not all issues can be solved by simply throwing more resources at them. Some Zabbix setups are configured poorly, where there's something in the configuration making our processes unnecessarily busy. If we deal with the poor configuration aspect, we can take away the high load, thus we need fewer processes.
The second thing I'd like to stress is that we can keep adding processes to our Zabbix server configuration – within limits. Before we reach those limits though, you are definitely going to reach the roof of what our Linux host hardware is capable of. Make sure you have enough RAM and CPU power to actually run all these processes or use Zabbix proxies for offloading.
Zabbix housekeeper
Now for the housekeeper, a very important process for Zabbix administrators that haven't set up MySQL partitioning or PostgreSQL TimescaleDB partitioning yet. The Zabbix housekeeper process is a process that connects to our database and then drops information line by line that has expired. You might think, how do you mean expired? Well, we can set limits in the Zabbix server for how long an item should be kept in the database.
If we look at Administration | General and then use the drop-down menu to go to Housekeeping, part of what we will see is shown in the following screenshot:
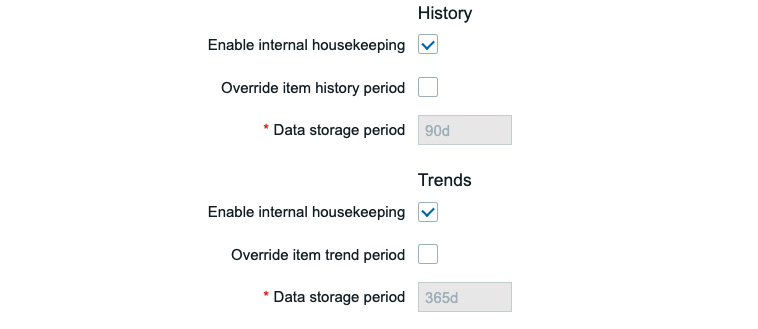
Figure 11.21 – Zabbix server history and trends housekeeping setup
These are our global History and Trends housekeeping parameters. This defines how long an item's data should be kept in our database. If we look at an item on a template or host, we can also see these parameters:

Figure 11.22 – Zabbix item history and trends housekeeping parameters
These settings override the global settings so you can tweak the housekeeper further. That's how the housekeeper keeps your database in check.
But now, let's look at the tweaks we made in our Zabbix server configuration file, the first of which is HousekeepingFrequency. Housekeeping frequency is how often the housekeeper process is started. We've lowered this from every hour to every two hours. Now you might think that's worse, but it doesn't have to be. A lot of the time, we see that housekeeping is not done after one hour and then it just keeps going on and on.
We also changed the MaxHousekeeperDelete parameter, which is something completely different. This determines how many database rows our Zabbix housekeeper is allowed to delete in each run. The default settings determined that every hour, we can delete 5,000 database rows. With our new settings, we can now delete 20,000 database rows every two hours.
How does this change anything at all? Well, it might not. It completely depends on your setup. Tweaking the Zabbix housekeeper is different for every setup, and you will have to determine your optimum settings for yourself. Try to balance what you see in your graphs with the two settings we've discussed here to see how well you can optimize it.
However, at one point, your Zabbix setup might grow big enough and Zabbix housekeeping won't be able to keep up. This is when you'll need to look at MySQL partitioning or PostgreSQL TimescaleDB. There's no predefined point where the Zabbix housekeeper won't be able to keep up, so it is smarter to just start with MySQL partitioning or PostgreSQL TimescaleDB right from the start. After all, any setup might grow larger than expected, right?
Tuning a MySQL database
Now for tuning your MySQL database with the mysqltuner.pl script. This script does a lot in the background, but we can summarize it as follows: it looks at what the current utilization of your MySQL database is, and then outputs what it thinks the correct tuning variables would be.
Do not take the script output as a given, as with Zabbix housekeeping, there is no way to give you a definitive setup for your database. Databases are simply more complicated than just doing some tweaks and being done with it.
The script will definitely help you tweak your MySQL database to an extent, especially for smaller setups. But make sure to extend your knowledge by reading blogs, guides, and books about databases regularly.
There's more…
We went over how to tune a MySQL database, but we didn't go over how to tune a PostgreSQL instance. There's a wide variety of options out there to do this, so for more on that I recommend checking out the PostgreSQL wiki at https://wiki.postgresql.org/wiki/Performance_Optimization. There are different varieties and different preferences at play here. Make sure to check them all out well and pick the one that works the best for you.