
Chapter 5: Building Your Own Structured Templates
It's time to start with one of the most important tasks in Zabbix: building structured templates. A good Zabbix setup relies heavily on templating, and there is a huge difference between a good and a bad template. So, if you're new to Zabbix or you haven't started building your own templates yet, then pay close attention to this chapter.
In this chapter, we will go over how to set up your templates, and how to fill them with the right items and triggers. Also, it is important to make use of macros and Low-Level Discovery (LLD) in the right way. After following these recipes, you will be more than ready to build solid Zabbix templates with the right format, and even LLD.
In this chapter, we'll cover the following recipes:
- Creating your Zabbix template
- Setting up template-level tags
- Creating template items
- Creating template triggers
- Setting up different kinds of macros
- Using LLD on templates
- Nesting Zabbix templates
Technical requirements
We will need our Zabbix server from Chapter 4, Working with Triggers and Alerts, to monitor our Simple Network Management Protocol (SNMP) host. For the SNMP host, we can use the host we set up in the Working with SNMP monitoring recipe in Chapter 3, Setting Up Zabbix Monitoring.
Creating your Zabbix template
In this recipe, we will start with the basics of creating a Zabbix template. We will go over the structure of Zabbix templating and why we need to pay attention to certain aspects of templating.
Getting ready
All you will need in this recipe is your Zabbix server.
How to do it…
Now, let's get started with building our structured Zabbix template:
- Open your Zabbix frontend and navigate to Configuration | Templates.
- On this page, click the Create template button in the top-right corner. This will lead you to the following page:
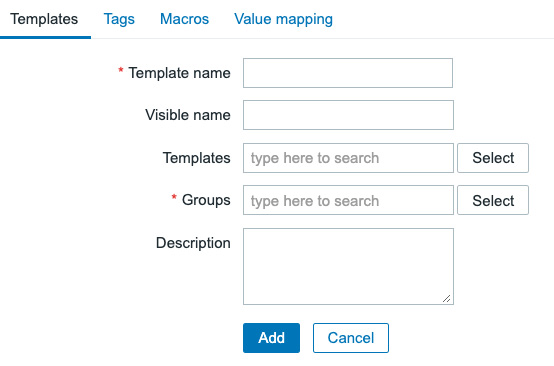
Figure 5.1 – The create template page, empty
At this point, we are going to need to name our template and assign a group to it. We will be creating an SNMP template to monitor a Linux host. I'll be using SNMP in the example to show how the templates are structured.
Important Note
Use SNMP to monitor network equipment, custom equipment supporting SNMP, and more. SNMP is very versatile and easy to understand, and is implemented by a lot of hardware manufacturers. For Linux hosts, I'd still recommend the very powerful Zabbix agent, which we covered in the Setting up Zabbix agent monitoring recipe in Chapter 3, Setting Up Zabbix Monitoring.
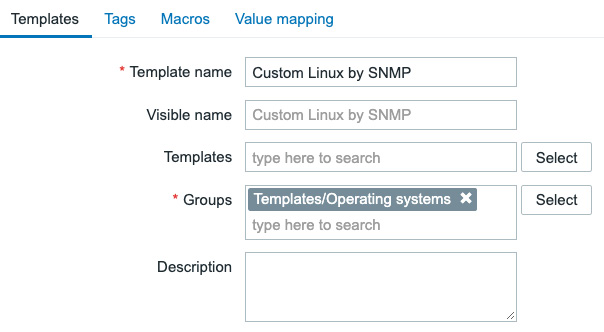
Figure 5.2 – The create template page filled with information for the SNMP template
We will not link any Templates, Tags, and Macros yet, but we'll address some of these functionalities later. That's all there is to creating our template, but there's nothing in it besides a name, group, and description so far.
How it works…
There's not a lot of work involved in creating our first template—it's quite straightforward. What we need to keep in mind is the right naming convention here.
Now, you might think to yourself: Why is naming a template so important? Well, we are going to create a lot of templates when working with Zabbix. For example, this is a small part of the list of out-of-the-box templates:
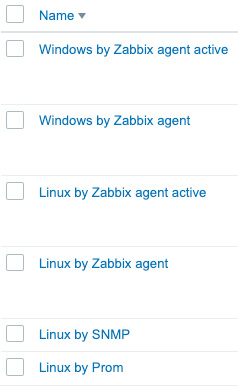
Figure 5.3 – Some out-of-the-box templates
As you can see, this is already a large list, and all of these templates are following a singular straightforward naming convention. Looking at the name of the template we have just built ourselves and, for example, the built-in Apache template, they follow the same convention. Breaking down the convention, it looks like this:
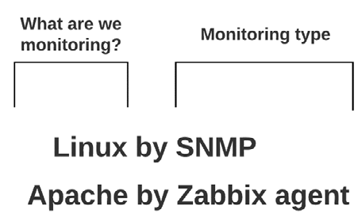
Figure 5.4 – Template naming convention explanation
Looking at the list and comparing it to the naming convention we went over in Figure 5.4, we can see the following pattern:
- What are we monitoring?: (Linux) We name the template—in this case, we'll call it Linux because the OS we monitor will be Linux.
- Monitoring type: (by SNMP) We will add our data collection method at the end of the template as we might monitor the Linux OS in other ways besides SNMP, like the Zabbix agent.
Adhering to the guidelines in this naming convention and thus using the correct template names is our first step in creating the correct structure for our template. This makes it easy to find out which templates we want to use on which hosts.
In our case, we've also added a short custom prefix to make sure we can distinguish our template from others already created in the Zabbix setup. Normally we can omit this prefix, but for the book it's useful. Alternatively, you could prefix or suffix your template names with a company name to not overwrite the default templates.
There's more…
When building templates, adhere to the Zabbix guidelines. That's what we will do in this book as well, combined with our experience in creating templates. If you want to learn more about Zabbix templating guidelines, check the following URL: https://www.zabbix.com/documentation/guidelines/en/thosts.
Setting up template-level tags
Our next step in setting up our Zabbix template is setting up template-level tags. Tags on a template level are used to give every single event (problem) created on a host by this template a tag. The tag is then used to filter events in things like dashboards, actions, and the Monitoring | Problems view.
Getting ready
To get started with this recipe, you will need a Zabbix server and a template on that server, preferably our template created in the previous recipe.
How to do it…
Creating template-level tags is a way to make sure that only events created by a certain template will get a configured tag. To get started, the first thing you will need to do is navigate to the template and follow these steps:
- Go to Configuration | Templates and click on our template, called Custom Linux by SNMP.
- Here, you will click the Tags tab at the top of the form and you'll be taken to this tab:
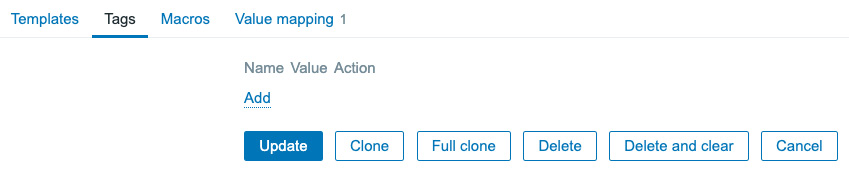
Figure 5.5 – Zabbix Tags tab for the SNMP template
Now, the first thing we can do is create a tag, OS:Linux, to make sure we know all events from this template will be Linux-related.
- Start creating tags by clicking the dotted-underlined Add button and filling out Name as class. Then, in the Value field, we fill in os.
- Click the small Add button and fill in the Name for the second tag as target. Then, in the Value field, we fill in linux. It will look like this.
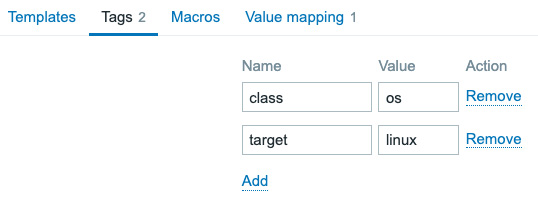
Figure 5.6 – Zabbix Tags tab filled out for the SNMP template
How it works…
Now, there's a lot more to creating tags than it might seem at first through following this recipe. Tags play a key part in keeping your Zabbix environment structured. You will use the template-level tags to filter in a lot of places like the Monitoring | Problems window, and with a lot of events created by one host, they will create readability by making problems easy to filter.
For example, once we have configured some triggers later in this recipe when checking the Monitoring | Problems page for our host, we could see something like the following:

Figure 5.7 – Example Monitoring | Problems page for host lar-book-agent_snmp
As you can see the problem we are looking at here is displaying the tags target:linux and class:os at the end of the page. The event was tagged with the template-level tag and we can now see that it will always carry that tag, allowing us to filter.
This gives us loads of opportunities, because we aren't limited to template-level tags. We also have host-level tags, item-level tags, and trigger-level tags. We could tag everything from a template with target:linux and class:os or even tag a specific trigger with something like department:architecture.
We could then, for example, create an action that sends out everything Linux-related to a certain Linux engineering email address or Teams/Slack channel based on the class:linux tag, but only send specific problems with a trigger-level tag like department:architecture to a more specific email address or Teams/Slack channel.
For more information regarding the tag policy starting from Zabbix 6, check out the following link:
https://blog.zabbix.com/tags-in-zabbix-6-0-lts-usage-subfilters-and-guidelines/19565/
See also
In this chapter, the recipe titled Using LLD on templates will also explain tag prototypes, where we will create tags automatically based on the LLD settings. Tag prototypes are the recommended way of working with tags when creating discovery and are amazing for keeping templates structured. More about that later.
Creating template items
Let's get started with finally creating some real template items because, in the end, items are what it is all about in Zabbix. Without items, we don't have data, and without data, we do not have anything to work with in our monitoring system.
Getting ready
Now, moving along, we are going to need our Zabbix server and a host that we can monitor with SNMP. In Chapter 3, Setting Up Zabbix Monitoring, we monitored a host with SNMP, so we can use this host again. We'll also use the Zabbix template from the previous recipes.
How to do it…
- First of all, let's log in to our Zabbix server command-line interface (CLI) and enter snmpwalk, with the following command:
snmpwalk -v3 -l authPriv -u snmpv3user -a SHA -A "my_authpass" -x AES -X "my_privpass" 10.16.16.153 .1
Make sure to change the IP address 10.16.16.153 to your own correct value. We will receive an answer such as this:
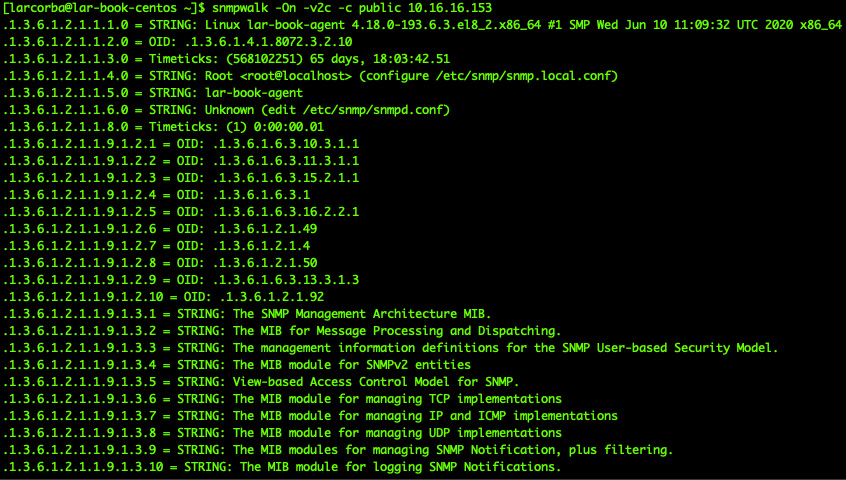
Figure 5.8 – snmpwalk reply
Now, let's capture our hostname in our template first, as it is an important item to have. When working with SNMP, I always like to work with untranslated SNMP Object Identifiers (OIDs). For our hostname, this is .1.3.6.1.2.1.1.5.0.
- If we have an Management Information Base (MIB), we can translate this OID to make sure it is actually the system name. Enter the following command at the Zabbix server CLI:
snmptranslate .1.3.6.1.2.1.1.5.0
Which will return the following reply:
Figure 5.9 – snmptranslate reply
Tip
Using -On in your SNMP command makes sure that we are receiving the OIDs instead of the MIB translation. If we want to work the other way around, we can omit the -On in our command and snmptranslate the translated OID.
- Now that we know how to get our hostname, add this to our template. Navigate to Configuration | Templates and select our Custom Linux by SNMP template.
- Here, we will go to Items. In the upper-right corner, select Create item to create the following item:

Figure 5.10 – Item for sysName SNMP OID
- Make sure to also add an item-level tag. These are important for grouping and filtering items. Click the Tags tab and add the following:
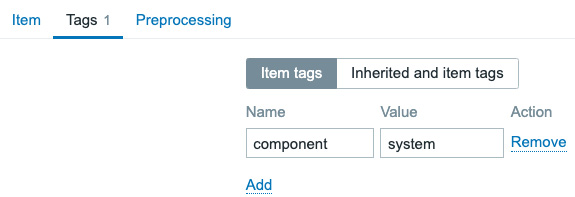
Figure 5.11 – Item for sysName SNMP OID, Tags tab
Now that we have our first item, let's create a host as well and assign this template to that host.
- Navigate to Configuration | Hosts and click Create host in the top-right corner. Create a host with the following settings.

Figure 5.12 – New host with our self-created template
- Don't forget to add the macros to our new host before clicking the Add button. Click on Macros and fill in the following information:
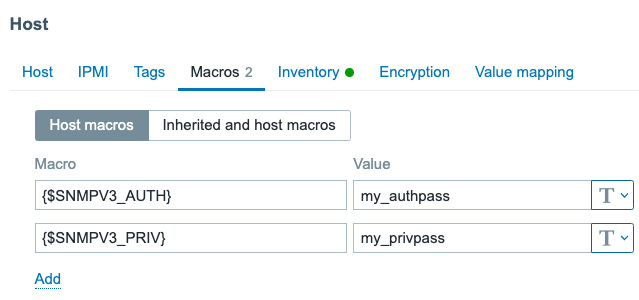
Figure 5.13 – Add macros tab on a host
- Now, you can click the Add button, and our new host will be monitored.
How it works…
When we create items such as this on our template when assigning the template to our hosts, the item will also be created on the host. The great thing about this is that we can assign a template to multiple hosts, meaning we only have to configure the item on the template level once, instead of creating the item on every single host. For instance, our newly created host will show the following latest data:

Figure 5.14 – Monitoring | Latest data for our new host
The value for this item will then be different for all your monitored hosts, depending on the value received by that host.
Important Note
When creating an SNMP item, keep the following in mind. The Item SNMP OID always contains the non-translated OID. This is to make sure that we do not actually need MIB files for our templates to work.
Furthermore, the item key will be based on the translated OID. In our case, the translated OID was sysName, which we then turned into the sysName item key. These are general rules that we should all abide by when creating our templates, to make sure they are structured the same for everyone.
See also
To learn more about Zabbix and SNMP OIDs/MIBs, check out this awesome blog post by Zabbix's head of customer support, Dmitry Lambert:
https://blog.zabbix.com/zabbix-snmp-what-you-need-to-know-and-how-to-configure-it/10345/#snmp-oid
Creating template triggers
Now, creating templated triggers works in about the same way as creating templated items or normal triggers. Let's go over the process, to see how we do it and how to keep it structured.
Getting ready
We will need the Zabbix server and the host from the previous recipe for this recipe.
How to do it…
We have configured one item on our template so far, so let's create a trigger for this item.
- Navigate to Configuration | Templates in our Zabbix frontend and select our Custom Linux by SNMP template.
- Now, click Triggers and then Create Trigger in the top-right corner. This will take us to the next page, where we will enter the following information:
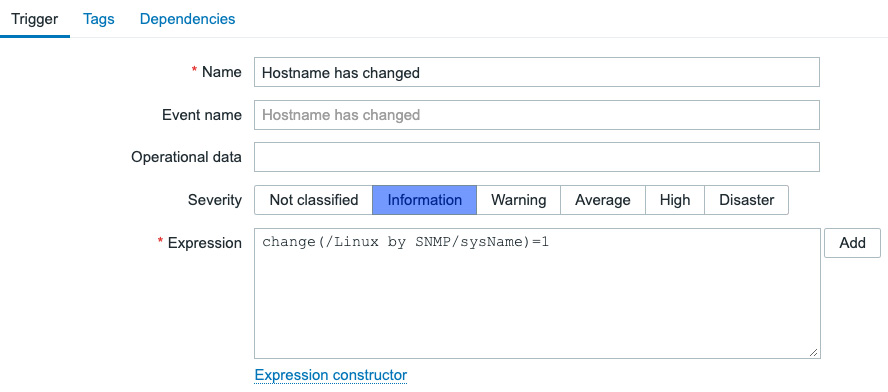
Figure 5.15 – Create trigger window for the SNMP template
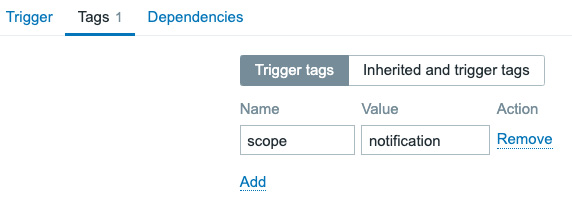
Figure 5.16 – Create trigger window for the SNMP template – tag
- Last, but not least, let's edit the hostname on our host to see if the trigger is working correctly. Change the hostname entry by executing the following command on the Linux host CLI:
hostnamectl set-hostname lar-book-agent-t
- Then, make sure the changes take effect by executing the following command:
exec bash
systemctl restart snmpd
How it works…
When editing the template, the created trigger will immediately be added to our host named lar-book-templated_snmp. This is because when we edited the template, the host was already configured with this template. When we have changed the hostname, the trigger can immediately be triggered after the item is polled again:

Figure 5.17 – Hostname has changed trigger for host lar-book-templated_snmp
Because we used the change function in our trigger, the second time we poll this item the problem will automatically go away again. In our case, this will happen after 30 minutes.
Important Note
Like a lot of other Zabbix users, I always liked to use the {HOST.NAME} macro in trigger names, but according to Zabbix guidelines, this isn't recommended. If you prefer this you can still use it, but it's a lot more useful to use the Host fields throughout the Zabbix frontend and the built-in macros for notifications. This will keep trigger names short and won't show us redundant information.
Setting up different kinds of macros
Now, when we are working with templates, a very efficient way to make your templates more useful is through the use of macros. In this recipe, we'll discover how to use macros to do this.
Getting ready
We are going to need our Zabbix server and our SNMP-monitored host from the previous recipes. We'll also need our Zabbix template, as created in the previous recipe.
How to do it…
Now, let's start with creating some macros on a template level. We'll be making two different types of macros.
Defining a user macro
- Now, let's start this recipe off by defining a user macro on our template. Navigate to Configuration | Templates and click our Custom Linux by SNMP template.
- Here, we will go to Macros and fill in the following fields:
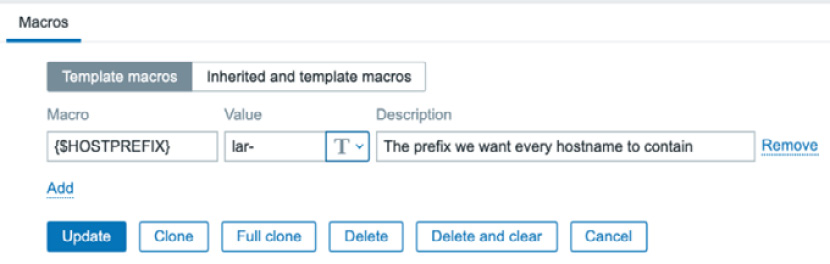
Figure 5.18 – Template-level macros
- Click on Update, and let's move to Trigger to define a new trigger:

Figure 5.19 – Trigger creation window for the SNMP template
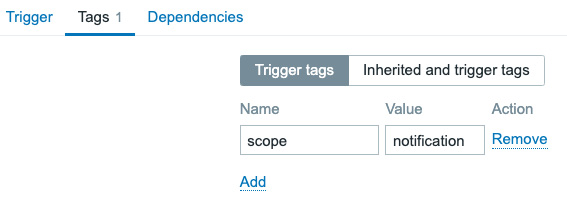
Figure 5.20 – Trigger creation window for the SNMP template – tag
- Now, change the hostname entry by executing the following command on the host CLI:
hostnamectl set-hostname dev-book-agent
- Then, make sure the changes take effect by executing the following command:
exec bash
systemctl restart snmpd
- Our trigger should fire, as shown in the following screenshot.

Figure 5.21 – Trigger created problem for hostname prefix on host lar-book-templated_snmp
Defining a built-in macro
- Now, let's work on defining a built-in macro on our template. Navigate to Configuration | Templates and click on our Custom Linux by SNMP template.
- Now, click Triggers, and in the top-right corner, click on Create trigger. Create a trigger with the following settings:
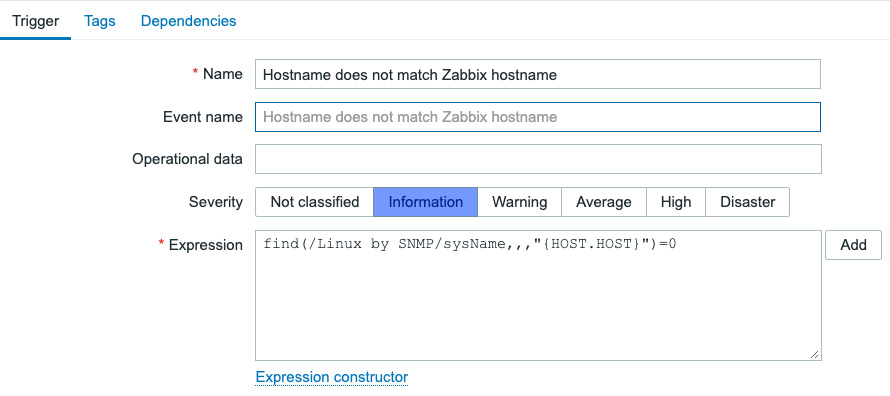
Figure 5.22 – Trigger creation window for hostname match
- Let's also add the trigger tag:

Figure 5.23 – Trigger creation window for the SNMP template – tag

Figure 5.24 – Trigger created problem Hostname does not match
How it works…
There are three types of macros: built-in, user, and LLD. All of these macros can be used on templates, but also directly on hosts. Macros are powerful for creating unique values in places that would otherwise contain static information.
Let's discover how they work in this How it works… section.
How a user macro works
Now, because we want all of our hosts on this template to contain lar as a prefix, we create a user macro on a template level. This way, the user macro that will be used on every host with this template will be the same.
We then define our user macro in our trigger to use the value, which is lar- in this case. We can reuse this user macro in other triggers, items, and more. The great thing is that defining a user macro on a template level isn't the end of our possibilities. We can override template-level user macros by defining a host-level user macro. So, if we want a single host to contain a different prefix, we simply use that to override the template-level macro, like this:
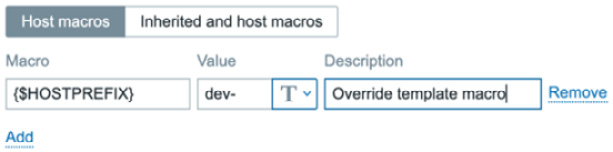
Figure 5.25 – Host-level macros page
If we then look at the inherited and host-level macros screen on our host, we will see the following:

Figure 5.26 – Inherited and host-level macros page
We see the effective value now would be dev-, not lar-, which is exactly what we would be expecting to happen here.
How a built-in macro works
Now, a built-in macro comes from a predefined list of macros, defined by Zabbix. They are used to get Zabbix elements and put them in items, triggers, and more. This means that our built-in macro used in this case already contains a value.
In this case, we used {HOST.HOST}, which is the hostname we defined on our Zabbix host, like this:
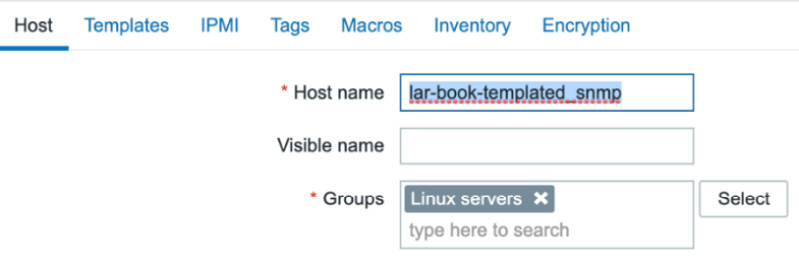
Figure 5.27 – Zabbix host configuration page for host lar-book-templated_snmp
For every single host, this built-in macro would be different as our Host name value will be unique. This means that our trigger, although defined on a template level, will always be unique as well. This method is a very powerful way to use built-in macros in triggers, as we'll pull information from Zabbix directly into Zabbix again.
There's more…
A complete list of supported (built-in) macros can be found here:
https://www.zabbix.com/documentation/current/en/manual/appendix/macros/supported_by_location
This list will be updated by Zabbix, just as with every good Zabbix documentation page. This way, you can always use this page as a reference for up-to-date (built-in) macros for building your Zabbix elements.
Using LLD on templates
Now, let's get started on my favorite part of template creation: LLD. I think this is one of the most powerful and most used parts of Zabbix.
Getting ready
To get ready for this recipe, you will need your Zabbix server, the SNMP-monitored host from the previous recipes, and our template from the previous recipe.
Working knowledge of the SNMP tree structure is also recommended. So, make sure to read the Working with SNMP monitoring recipe in Chapter 3, Setting Up Zabbix Monitoring, thoroughly.
How to do it…
- Let's get started by navigating to Configuration | Templates and selecting our Custom Linux by SNMP template.
Important Note
First, we will add a value mapping, which we'll use for multiple item prototypes. Keep in mind, value mappings in Zabbix 6 are no longer global, but template- or host-specific. This is to make sure that the templates and hosts (once exported) are even more independent from the global Zabbix settings, starting with Zabbix 6.
- Click on the Value mapping tab and the dotted Add button. Add the following.
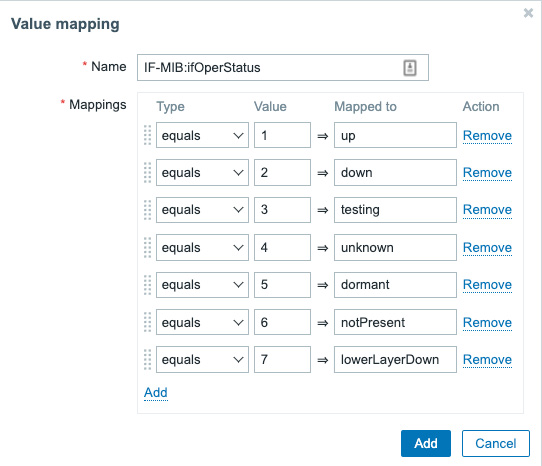
Figure 5.28 – Zabbix add Value mapping page
- Make sure to save this change by clicking the blue Add button and then the blue Update button.
- Now, go back to the template and go to Discovery rules, and in the top-right corner, click Create discovery rule. This will lead you to the LLD creation page:
Figure 5.29 – Zabbix LLD creation page, empty
Now, we will be making a discovery rule to discover our interfaces on the Linux host. The Linux SNMP tree for interfaces is at OID .1.3.6.1.2.1.2.
Important Note
Make sure that Linux net-snmp is configured correctly in the /etc/ snmp/snmpd.conf file. It's important to change the view in this file to show everything from .1 and up, like this: view systemview included .1
- Now, let's continue with creating our LLD rule by adding the following to our LLD creation page:
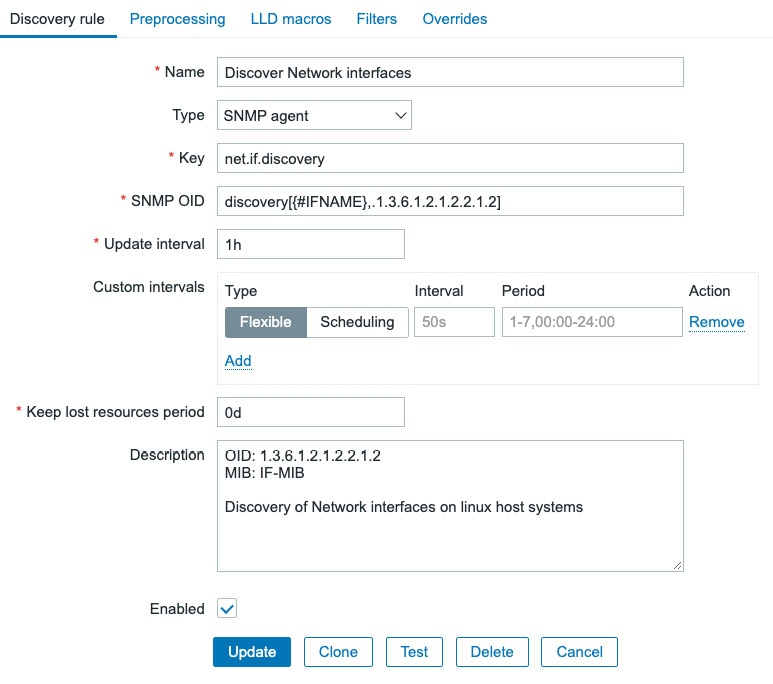
Figure 5.30 – Zabbix LLD creation page filled with our information for network interface discovery
- After clicking the Add button, we can navigate back to our template at Configuration | Templates and click Custom Linux by SNMP.
Important Note
We define a Keep lost resources period of 0 days; we do this because this is a test template. This option is used by LLD to remove created resources (like items and triggers) if they are no longer present on our monitored host. Using 0 days can lead to lost resources because we might get a resource back within a set amount of time, so make sure to adjust this value to your production environment's standard.
- Go to Discovery rules and click our newly created rule, Discover Network interfaces.
- Now, we will go to Item prototypes and click Create item prototype in the top-right corner. This will take us to the Item prototype creation screen, as shown in the following screenshot:
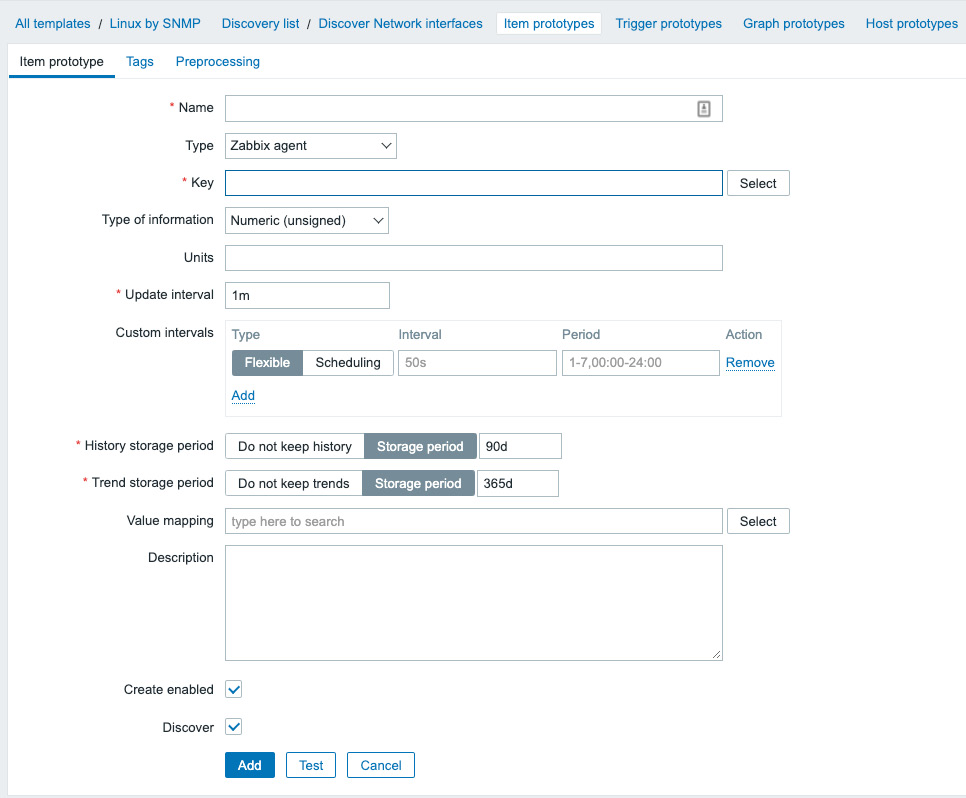
Figure 5.31 – Zabbix LLD Item prototype creation page, empty
Here, we will create our first prototype for creating items from LLD. This means we have to fill it with the information we want our items to contain.
- Let's start by filling in an item prototype for the interface operational status, like this:

Figure 5.32 – Zabbix LLD item prototype creation page filled with our information for interface operational status
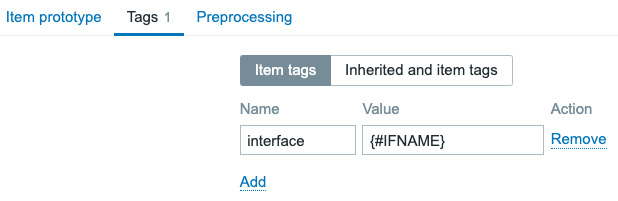
Figure 5.33 – Zabbix LLD item prototype tag creation tab
Tip
In the next step, we'll create an item that is very similar to the item we just created. It's super useful to use the Clone button instead of filling in the entire form from scratch again.
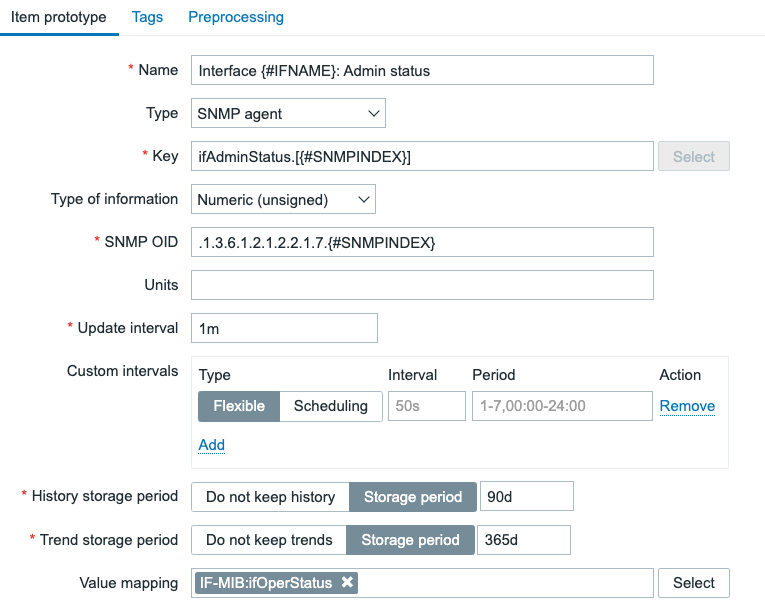
Figure 5.34 – Zabbix LLD item prototype creation page filled with our information for interface admin status
- Do not forget the Tags tab:
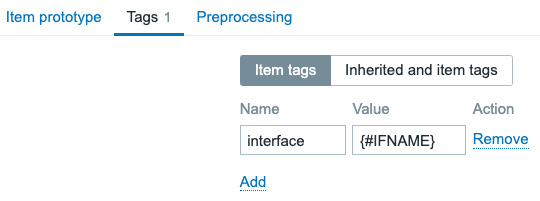
Figure 5.35 – Zabbix LLD item 2 prototype tag creation tab
- Now, move over to the Trigger prototype page and click the Create trigger prototype button in the top-right corner, and create the following trigger:
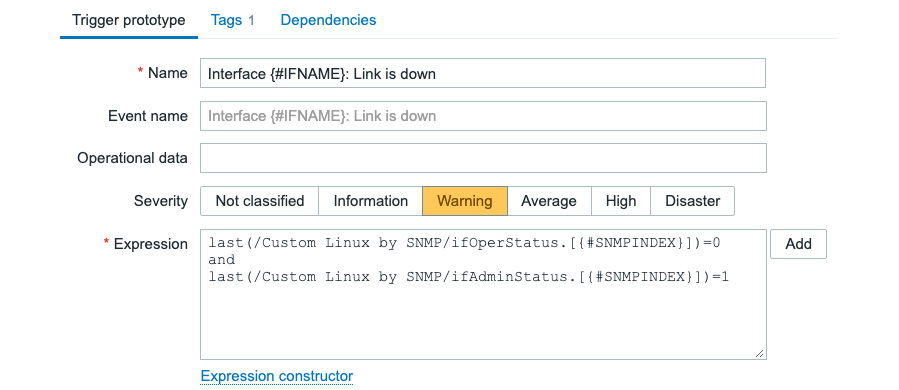
Figure 5.36 – Zabbix LLD trigger prototype creation page filled with our information for interface link status
- Last, but not least, add the trigger tag:
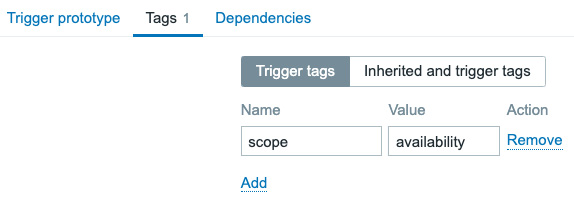
Figure 5.37 – Zabbix LLD trigger prototype creation page Tags tab
How it works…
Now, LLD is quite an extensive topic in Zabbix, but by following the steps in this recipe you should be able to build almost every form of LLD there is to configure in Zabbix. First of all, let's look at how the discovery works.
In the discovery rule, we just configured the following:

Figure 5.38 – Zabbix LLD discovery key and OID for key net.if.discovery
What we are basically saying here is for every interface after OID .1.3.6.1.2.1.2.2.1.2, fill the {#IFNAME} LLD macro. In our case, this would be the following OIDs:
.1.3.6.1.2.1.2.2.1.2.1 = STRING: lo
.1.3.6.1.2.1.2.2.1.2.2 = STRING: ens192
So, we are saving these for use in our prototypes. Now, when we look at what we did to our Operational status prototype, this all comes together:
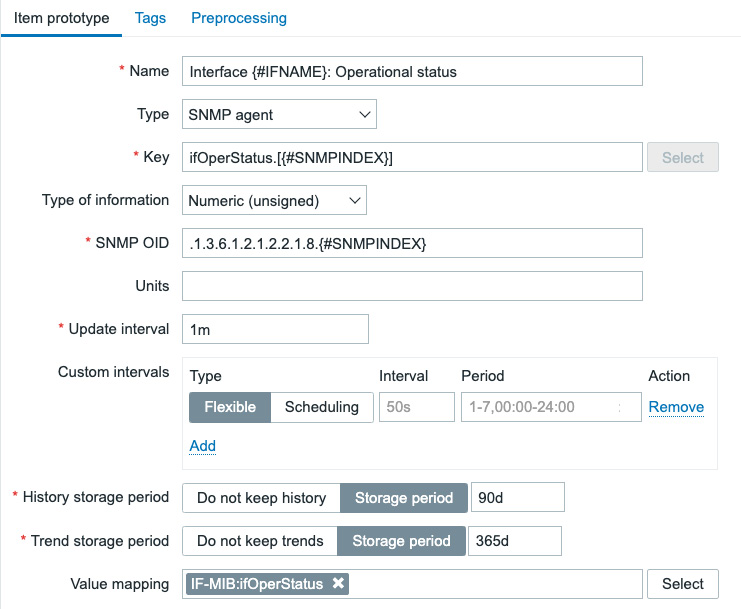
Figure 5.39 – Zabbix LLD item prototype name, type, key, and OID
We are telling our item prototype to create an item for every single {#IFNAME} value using the key defined plus the {#SNMPINDEX} LLD macro. The SNMPINDEX is the last number of our SNMP poll. In this case, we would see the following:
.1.3.6.1.2.1.2.2.1.8.1 = INTEGER: up(1)
.1.3.6.1.2.1.2.2.1.8.2 = INTEGER: up(1)
For all the vendors in the world, there's a set of predefined SNMP rules they need to abide by. Our first interface entry when polling .1.3.6.1.2.1.2.2.1.2 was the .1 SNMPINDEX with the value lo. This means that when polling .1.3.6.1.2.1.2.2.1.8, the .1 SNMPINDEX here should still contain a value for lo.
Zabbix LLD will now create an item with the name Interface lo: Operational status, which will poll the SNMP OID:
.1.3.6.1.2.1.2.2.1.8.1 = INTEGER: up(1)
It will also create an item with the name Interface ens192: Operational status, which will poll the SNMP OID:
.1.3.6.1.2.1.2.2.1.8.2 = INTEGER: up(1)
The created items will then look like this:
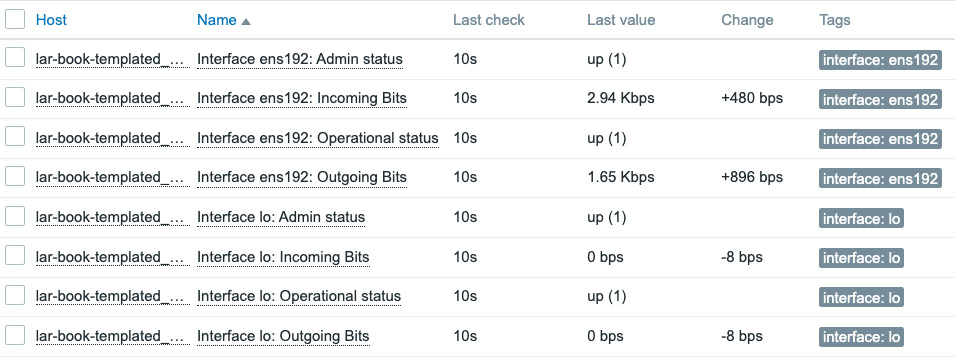
Figure 5.40 – Zabbix latest data screen for our SNMP-monitored host
Besides creating these LLD items, we also created an LLD trigger prototype. This works in the same manner as item prototypes. If we check our host triggers, we can see two created triggers:

Figure 5.41 – Our SNMP-monitored host triggers
These triggers have been created in the same manner as the items and are then filled with the correct items for triggering on:
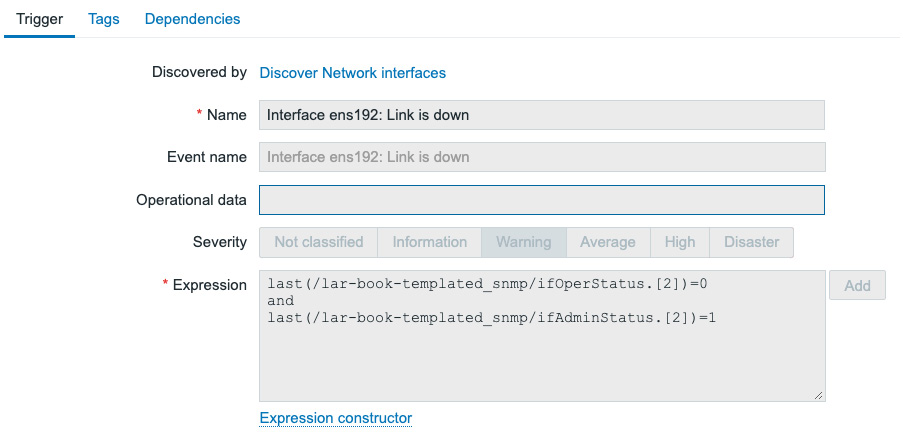
Figure 5.42 – Our SNMP-monitored host trigger for ens192
We can see that for the interface operation status we have an SNMPINDEX of 2, and for the Interface ens192: Admin status item as well. Our trigger will now trigger when the operation status is 0 (down) and our admin status is 1 (up).
A neat trigger, to make sure we only have a problem when the admin status is up; after all, we want our interface down when we configure it to be admin down.
Tip
It's possible to use discovery filters to only add the interfaces that have admin status up to our monitoring. This way, we keep our required Zabbix server performance lower and our data cleaner. Consider using discovery filters for use cases such as this.
See also
Discovery is an extensive subject and takes a while to master. It's something that can be used like we did in this chapter with SNMP, but also with the Zabbix agent, and for a lot of other use cases. Once you start working with Zabbix discovery and you keep it structured, that's when you'll start building the best templates you've seen yet.
Check out the following link for the Zabbix LLD documentation:
https://www.zabbix.com/documentation/current/en/manual/discovery/low_level_discovery
Nesting Zabbix templates
Now, using a simple template per device or group of devices is one way to create Zabbix templates, but it isn't the only way. We can also use nested templates to break pieces of them apart and put them back together in the highest template in the nest.
In this recipe, we'll go over how to configure this and why.
Getting ready
We are going to need our Zabbix server, our SNMP-monitored host, and the template we created in the previous recipe.
How to do it…
- Let's start by navigating to our Configuration | Templates page and clicking the Create template button in the top-right corner.
- We are going to create a new template for monitoring the uptime of our SNMP host. Input the following information:
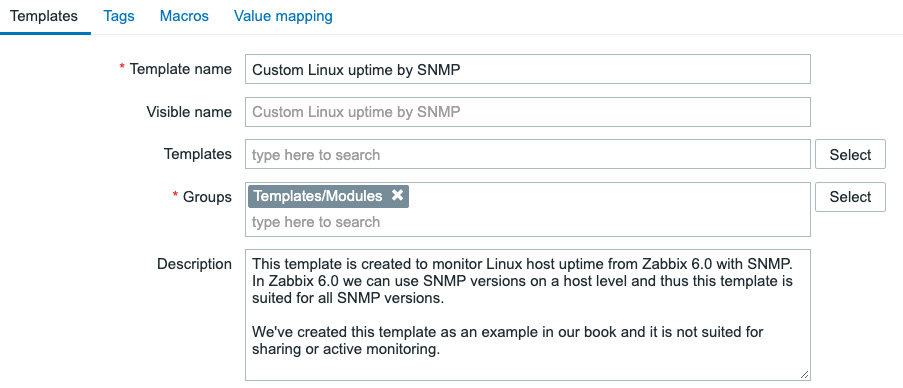
Figure 5.43 – New template creation page for uptime with SNMP
- Next, we are going to click the Add button and click our Custom Linux uptime by SNMP template name. This will take us to our template edit screen.
- Click on Items and Create item in the top-right corner. We will create an example item here, like this:
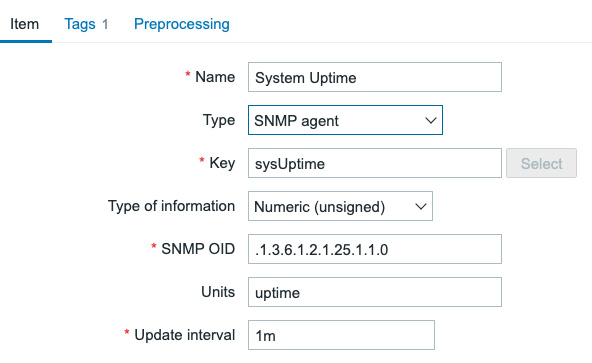
Figure 5.44 – New item on the template creation page, System Uptime
- Do not forget to add a tag as shown in the screenshot by going to the Tags tab:
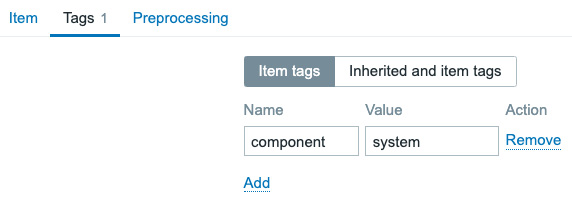
Figure 5.45 – New item on the template creation page, System Uptime, Tags tab
- Make sure to click the blue Add button to finish adding this item.
- Now, let's navigate to our original template by going back to the Configuration | Templates page and clicking Custom Linux by SNMP.
- On this page, link a template to the current template by adding it in the Templates entry field, like this:
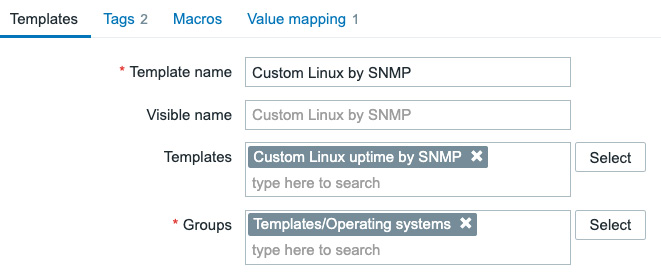
Figure 5.46 – Template link page for master SNMP template
- Click on the blue Update button to finish linking the template.
- Last, but not least, navigate to Configuration | Hosts, click our lar-book- templated_snmp SNMP-monitored host, and check out the Items page if the item is present:

Figure 5.47 – Our Hosts | Items page for host lar-book-templated_snmp
The item is present, and it shows it's actually from another template. That's all there is to do to actually link a template—easy to work with but harder to keep it structured. Let's see how this works.
How it works…
Now, nesting templates work with a simple tree structure, just like this:
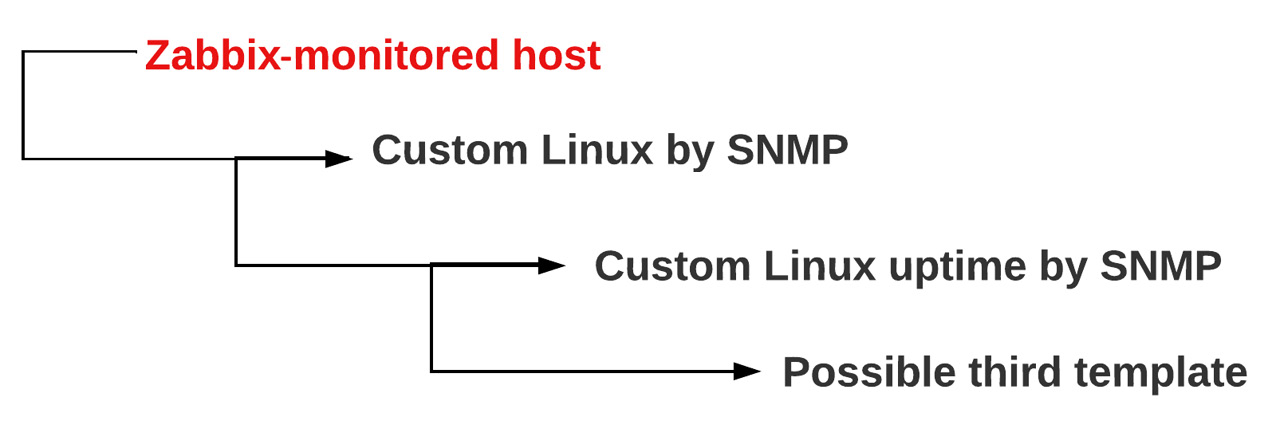
Figure 5.48 – Template nesting tree structure
So, we have our Zabbix-monitored host, which in turn has Custom Linux by SNMP linked as the only template. Now, because we have a nested template on Custom Linux by SNMP (which is, of course, Custom Linux uptime by SNMP), the items on that template will also be linked to our Zabbix-monitored host.
We can use this for a great deal of cases—one of my favorites is for networking equipment. If we have a Juniper EX (or Cisco Catalyst) and a Juniper QFX (or Cisco Nexus) series switch, both series of switches use the same SNMP discovery for interfaces. So, we can create a template for interfaces and nest this in the main template of the EX or QFX series, which do use different SNMP OIDs for other values.
This way, we don't have to write the same discovery rules, items, graphs, and everything else on a template a hundred times. We can simply do it once and nest the template neatly.