
CHAPTER 5
XNA Fundamental Game
Programming Concepts
In the previous chapter, you learned about all things Zune, from handling input to playing music. Now that you have a functional Zune game under your belt, it's time to address some of the fundamental concepts that underlie game programming in general.
There are at least two approaches to writing games in XNA. The first is the approach we followed in Chapter 4 to create the OutBreak game. This approach is also known as quick-and-dirty or maverick, and it generally works fine for a small project. However, if you are working on a larger-scale project, you will need to be more vigilant about writing good, solid, object-oriented code. By doing so, you will make less work for yourself in the long run. A game like OutBreak in its current state can quickly snowball into something nearly impossible to navigate and maintain, although it did serve its purpose as a final chapter example. This brings us to the other approach to game writing: the more traditional, structured method. This approach calls upon the great features of C#, XNA, and Visual Studio to factor code in an intelligent manner.
One of the surprising aspects about running XNA on the Zune is that it runs extremely fast for managed code. You have plenty of room to use your favorite things like generic collections, multilevel inheritance, and even .NET Language Integrated Query (LINQ) to get the job done faster.
Knowing that we have plenty of horsepower available to us in Zune games means we can further abstract and encapsulate various elements of the game. We can factor out the big pieces of the game architecturally, and work on them in a manner separate from the game itself, decoupling a lot of commonly used game features from specific game logic. Examples of such elements are game state management, game objects (or components), and stand-alone logic libraries (a physics engine, for example). Factoring these elements into their own cohesive units provides the added benefit of being able to unit test critical game logic without deployment, also covered in this chapter.
We begin this chapter with a primer on 2D mathematics and its application in XNA, which you must understand at a working level in order to be effective with your math-related game logic.
Math in Two Dimensions
I was one of those stubborn kids who always said that math, especially trigonometry, was useless and had no application in real life. Four-function calculators were all I would ever need to get by. However, in a world of interest rates, statistics, trends, and spreadsheets, having that extra knowledge never actually hurt me. Of course, I went on to minor in math in college to complement computer science. I'm quite glad I did, because the disappointing truth is that math is everywhere, and we simply have to deal with it. Whether you are a math nut or a math-not, this section should be read with the spirit of the conquest of knowledge. I promise, math really is important.
If you are reading this book with an eventual goal of entering into a professional role as a game developer, I must also assure you that any job in that field requires a solid understanding of math. Whether you're coding a game engine, artificial intelligence, game play, or designing levels, a certain level of math acumen is required in order to avoid months of on-the-job training.
With that said, let's take a look at how math operates in two dimensions. We'll start with the bare basics and move from there rather quickly.
The Cartesian Coordinate System
In 1637, French mathematician Rene´ Descartes published a treatise known as Discourse on Method, which outlined his idea for a system of axes that could be used to represent a point in space. Anyone who has taken middle-school geometry should be familiar with Figure 5-1.

Figure 5-1. An example of a Cartesian plane
Figure 5-1 is an example of what came to be known as a Cartesian plane, named after Descartes. A plane is a conceptual area in space. A two-dimensional plane extends infinitely in two perpendicular directions (or axes) and has no depth.
The horizontal axis is called the x axis, and the vertical axis is called the y axis. The point at which the x and y axes intersect is known as the origin. Note that in the graphic, the x value is more positive to the right and more negative to the left. The y value is more positive downward and more negative upward. Any point on this plane is notated by its x and y components, such as (0, 1) or (−5, 12). The point at the origin is (0, 0).
The Roman numerals represent quadrants of the plane. In quadrant I, the x value is always greater than or equal to zero, and the y value is always less than or equal to zero. A bright student at one of my XNA sessions pointed out that developing games in XNA is like working in quadrant IV, which is a good way to think about it. However, in XNA, the y value is always positive (or zero) and increases downward. This is contrary to what you have probably learned in the past. If you were to draw an object at (1, 1), you would be naturally inclined to think "right one unit and up one unit." However, since the y axis is flipped, (1, 1) actually means "right one unit and down one unit." On the Zune, one unit is equivalent to one pixel. Figure 5-2 shows how the coordinate system of the Zune works.

Figure 5-2. The Zune coordinate system
In Figure 5-2, the drawable game area ranges on the x axis from 0 to 240 and on the y axis from 0 to 320. (Remember that the Zune screen resolution is 240 × 320 pixels.) You could feasibly draw something at any 2D point in space, but it won't be visible unless it's within this range. If you have a 16 × 16 graphic that you draw at (0, −8), only half of the graphic will be drawn on the screen, because XNA positions the graphic by its upper-left corner. For example, if you were to draw a circle graphic halfway off the top of the screen, you would see something like Figure 5-3.

Figure 5-3. A circle drawn slightly off-screen is still partially drawn.
Understanding the coordinate system and how it works makes life a lot easier. The following are the main things to understand:
- The top left of the screen is (0, 0).
- X is the horizontal axis and increases to the right.
- Y is the vertical axis and increases downward.
- The drawable game area is 240 pixels wide by 320 pixels high.
Points and Vectors
A point is referred to by its x and y coordinates on a Cartesian plane. For example, (0, 0) is the point at the origin. On the Zune, the point (239, 319) would be the point at the bottom right of the screen. In code, however, the Point class is almost never used. This is because vectors provide the same functionality that you would seek in a point. You can store a point as a vector, which gives you the ability to add it to other "true" vectors.
A vector is a mathematical element that has an x value and a y value. These values are called components. The main thing that distinguishes a vector from a point is that a vector is generally used to indicate a direction. Vectors also have a property called magnitude (or length), which is a measure of how "big" the vector is. When you think of a vector in terms of a point's location relative to the origin, this is called a bound vector. When you are more concerned with the direction and magnitude of a vector (to denote direction or force, for example), this is called a free vector.
Vectors are denoted in the same way as points. For example, Figure 5-4 shows the vector ![]() = (2, 3).
= (2, 3).

Figure 5-4. A vector on a Cartesian plane
Note A free vector can be translated anywhere on the plane without having its value change. The free vector (2, 3) is always the same vector, whether it starts at the origin or some other arbitrary point, and it is equivalent to the bound vector (2, 3), which refers specifically to the vector originating at (0, 0) and connecting (2, 3).
Vector Magnitude (Length)
In the case of Figure 5-4, ![]() is a vector with x component 2 and y component 3. To figure out the magnitude of the vector, you can use the distance formula to find the distance between the point (2, 3) and the origin (0, 0). More concisely, the formula for the magnitude of a vector
is a vector with x component 2 and y component 3. To figure out the magnitude of the vector, you can use the distance formula to find the distance between the point (2, 3) and the origin (0, 0). More concisely, the formula for the magnitude of a vector ![]() is as follows:
is as follows:
Specifically, our vector would have a length of about 3.6 units (the square root of 4 + 9). In code, however, you can access the magnitude in a much simpler way:
Vector2 myVector = new Vector2(2, 3);

int length = myVector.Length;
Unit Vectors
A unit vector is any vector with length 1. Unit vectors are frequently used to indicate direction only; they have no scale. The XNA Framework provides UnitX and UnitY properties statically on the Vector2 class, which you can use to get quick access to these vectors. Any vector can be converted to a unit vector by dividing it by its own length, a process called normalization. Normalized vectors are used in other, more advanced computations, such as vector reflection.
Adding Vectors
Vectors are also commonly added together. Remember that a vector can be moved anywhere on the plane without changing its value. This is because vectors indicate direction and magnitude, and have nothing to do with physical location. However, in XNA, points on the screen are also stored as vectors. It's convenient to do so because vectors have x and y components, and it becomes much easier to add other "true" vectors to these point vectors. In effect, adding a vector used as a direction to a vector just being used as a position will result in that object's position changing.
Adding two vectors is done by adding their components together. The result of this computation is a new vector called the resultant vector. (Really, any operation that results in a new vector calls the result of the operation the resultant vector). Let's assume you have two vectors: our original vector ![]() = (2, 3) and a new vector
= (2, 3) and a new vector ![]() = (4, 2). Adding these vectors together results in a resultant vector
= (4, 2). Adding these vectors together results in a resultant vector ![]() = (6, 5). This is illustrated in Figure 5-5. Count the units of each vector to see how the lengths are added together.
= (6, 5). This is illustrated in Figure 5-5. Count the units of each vector to see how the lengths are added together.

Figure 5-5. Adding two vectors together
In code, the Vector2 class provides a static method called Add that performs this computation for you. You saw this in the OutBreak game we created in Chapter 4, where the ball position was updated by adding the ball direction vector with each call to Update.
The length of a vector can be used to indicate strength, speed, or other terms that essentially resolve to the word magnitude. Imagine you have a tossing game where wind is a factor. You could have two vectors: the vector representing the current direction of the object you're tossing, and another vector representing the wind. When you add these two together in any Update iteration, you will have a new vector that you can apply to the object's current position. The longer the wind vector is, the stronger the effect. You'll see an implementation of this very concept in Exercise 5-1, coming up shortly.
Multiplication
Multiplication is not to be confused with the dot-product operation (discussed next). With regard to vectors, multiplication refers to multiplying each component of a vector by the same scalar value. An example of scalar multiplication is 2(x, y) = (2x, 2y). Scalar multiplication has the singular effect of increasing the magnitude of the vector without changing the direction, as shown in Figure 5-6.
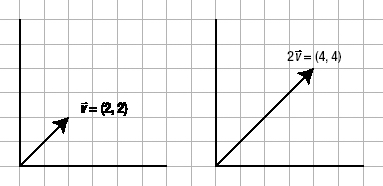
Figure 5-6. A vector multiplied by a scalar value
Dot Product
Unlike scalar multiplication, the dot product multiplies the components of two vectors together. For example, if you dotted (a, b) and (c, d) together, you would end up with a new vector (ac, bd).
The dot product is useful in many different vector operations, but probably the most familiar example that uses the dot-product operation is reflecting a vector about some other vector.
Reflection
In a game like Pong, or the OutBreak game from Chapter 4, you can accomplish reflection of a vector simply by negating one of the components. If the ball hits the paddle, multiply the x component of the vector by −1 to change its direction. But what if you could rotate those paddles? Would it still make sense for the ball to bounce as if the surface were straight? Not really.
XNA includes the Vector2.Reflect method, which takes an initial vector and a unit vector, and returns a new vector. This new vector is the initial vector reflected in the direction of the unit vector. Pong is a good example of when this is useful. If the ball hits the paddle, you use the UnitX vector in the operation to send it back to the other paddle (assuming your paddles are on the left and right of the screen).
So how does that math work? It's a little complicated. Let's put it in terms of a game object bouncing off some imaginary line represented as a vector.
Let V be the vector that represents the incoming object's direction.
Let B be the vector you're bouncing off.
Let N be the normalized version of B (length of 1).
Let R be the result of the reflection.
The formula for R is as follows: R= 2 * (V · N) – V. Remember the order of the operators. This calculation can be achieved first by normalizing the bounce vector, and then dotting the result of that with V. Scalar multiply that result by 2, and then subtract V from the whole business once again. The result looks like Figure 5-7.

Figure 5-7. A vector V reflected off another vector B produces the result, R.
In this case, the vector V has a value of (3, 2). The vector B is some vector with an x component of zero (this is a free vector, so its actual position does not matter). N, or B normalized, is equal to (0, 1).
To calculate the resultant vector R, we can use the formula R= 2 * (V · N) − V. Let's start with the inner operation of V dot N (V · N) = (3, 2) · (0, 1) = (3 × (0, 2) × 1) = (0, 2).
Next, we multiply (0, 2) by the scalar value 2, which gives us (0, 4).
Finally, we subtract the original vector V from this value to obtain R. R = (0, 4) − (3, 2) = (0 − 3, 4 − 2) = (−3, 2).
You can see this is correct by looking at the graph. The free vector R moves left three units and up two units. This operation works with any vector.
This is much easier to accomplish in code than it is on paper, so here are some concrete examples of scenarios where you might need to use reflection:
- Reflecting in the x direction (about the y axis):
Vector2 newDirection = Vector2.Reflect(directionVector, Vector2.UnitX);
- Reflecting in the y direction (about the x axis):
Vector2 newDirection = Vector2.Reflect(directionVector, Vector2.UnitY);
- Reflecting in the direction of some other vector V:
Vector2 normal = Vector2.Normalize(V);

Vector2 result = Vector2.Reflect(directionVector, normal);
There are many other operations that the Vector2 class provides so that you don't need to dig deep into the math, but it's useful to know what's happening. It's particularly important to understand why vectors are used both as points (bound vectors) and to represent forces (free vectors). It's also important to be able to visualize them.
Besides the use of vectors, there are other math-related things that you will encounter in nearly every game regardless of the platform. One of those things is trigonometry.
Trigonometric Functions
Trigonometry is something we should have all learned in grade school. In case you missed out, here is a very fast crash course. If needed, more information and learning is just a search away on the Great Wide Internet.
Trigonometry refers to the measurement of triangles. If you take any point on the screen and draw a vector from it, the result can be expressed as a triangle. The direct line from the point to the end of the vector is called the hypotenuse. If you draw a line in the x direction equal to the x component of the vector, you get an imaginary side called the adjacent side. If you connect the remaining points, you get a side completely opposite of the initial point called the opposite side.
This imaginary triangle is also described by an angle, usually the angle between the hypotenuse and the adjacent side. This angle is normally described by the Greek letter theta (θ).
Three primary trig functions that you can use to find out more about any given triangle are sine, cosine, and tangent. These functions are defined as follows, using the length of the sides in the equations:
sin (θ) = opposite/hypotenuse
cos (θ) = adjacent /hypotenuse
tan (θ) = opposite/adjacent
You can also use the inverses of these functions to get the angle of the triangle in question. Each uses the same sides as the regular functions, but instead of calculating a ratio, they use that ratio to calculate the angle. For example, to find the angle of a triangle using inverse sine, you would use the inverse sine function:
The inverse trig functions become especially useful when you want to find the angle from one point to another. All you need to do is use the length of the vector and the vector's components. Usually, the opposite side is the vector's y component. The hypotenuse is the vector's magnitude. The adjacent side is the vector's x component.
In code, these inverse functions are referred to by their more formal names of arcsine, arccosine, and arctangent. The Math class in the .NET Framework provides Asin, Acos, and Atan methods to calculate angles given vector components. These methods return a double value that represents the angle in radians, and they also take a double as input. To determine an angle from a vector in code, you could use something like this:
double angleRadians = Math.Asin((double)(vector.Y / vector.Length));
Note Degrees are rarely, if ever, used in XNA. Radians are the preferred unit of measure for angles.
Finally, you may want to derive some vector based solely on an angle. In this case, the y component is represented by the sine of the angle, and the x component is equal to the cosine of the angle. In code, it looks like this:
Vector2 fromAngle = new Vector2((float)Math.Sin(angle), (float)Math.

Cos(angleRadians));
Using Math in Your Games
With the general math review out of the way, let's go over some specific calculations that are commonly used in developing Zune games.
Positioning Screen Objects and Dividing by Two
When you draw a texture on the screen, using some bound vector V to represent a point, the top left of the graphic will be drawn at V. This is okay in some situations, but most modern games have quite a bit of centering and distribution that combine to create an aligned effect. Most of this is accomplished simply by dividing vector components by two. Division by two is used a lot in graphical applications to achieve centering. Here, you will learn why.
Centering Textures on the Screen
The approach for centering objects is really straightforward once you understand why you need to divide things in half. We'll start with the simplest example of centering an object in the middle of the screen.
If you were to use the zero vector to draw some object on the screen, it would appear with the top-left corner of the object at (0, 0). The code looks like this:
spriteBatch.Draw(texObject, Vector2.Zero, Color.White)
The result would look like Figure 5-8.

Figure 5-8. Drawing an object at (0, 0)
Now let's try to center this object. The first thing to do is to get the width and height of the screen. These can be dereferenced from the GraphicsDevice object:
int screenWidth = GraphicsDevice.Viewport.Width;

int screenHeight = GraphicsDevice.Viewport.Height;
In just about every case, on the Zune, screenWidth will be 240 and screenHeight will be 320. To get the position at the center of the screen, you must divide the width and height by 2. This will give you a point halfway across and halfway down the screen. A new vector representing the center of the screen can be defined like this:
Vector2 screenCenter = new Vector2(screenWidth / 2, screenHeight / 2);
If you were to draw the object at screenCenter instead of Vector2.Zero, it would look like Figure 5-9.

Figure 5-9. Drawing an object at the screen center (120, 160)
Okay, it's close to the center, but not quite. Because the texture is drawn from the upper-left corner and not the center of the object, you need to find the center of the object and take that into account. This is done in the same way that you found the center of the screen.
Looking at Figure 5-9, you can see that the object should be moved to the left by exactly half of the object's width, and moved up by exactly half of the object's height. What you are really doing is figuring out where the top-left corner of the object should be drawn so that the object appears centered. Arithmetically, you can figure this out in code:
int xPosition = screenCenter.X - (objectTexture.Width / 2);

int yPosition = screenCenter.Y - (objectTexture.Height / 2);

spriteBatch.Draw(objectTexture, new Vector2(xPosition, yPosition));
This code takes the absolute screen center and offsets it in the x and y directions dynamically based on the dimensions of the graphic itself. The result is shown in Figure 5-10.

Figure 5-10. An object perfectly centered in the middle of the screen
The same code can be used to center an object with respect to any point on the screen. You would just replace screenCenter with the Vector2 object that you want to use as the new center of the object to draw. Listing 5-1 shows a small method you can use to obtain a new Vector2 for any texture object you want to draw at a given point.
Listing 5-1. A Utility Method for Centering Texture Objects.
public Vector2 GetCenterOffset(Texture2D graphic, Vector2 centerPoint)

{

    int x = centerPoint.X - (graphic.Width / 2);

    int y = centerPoint.Y - (graphic.Height / 2);

    return new Vector2(x, y);

}
The recommended option for centering objects on the screen is to use an overload of the Draw method that includes an origin parameter. Specifying the origin is essentially the same thing as moving the reference point of the object from the top left to some new position. The only problem is that this overload of Draw contains a lot of other stuff you might not ordinarily need to use. Listing 5-2 uses this overload and draws an object centered at (100, 100).
Listing 5-2. Using an Overload of the Draw Method with an Origin Parameter.
int originX = objectTexture.Width / 2;

int originY = objectTexture.Height / 2;

Vector2 objectOrigin = new Vector2(originX, originY);

Vector2 drawPosition = new Vector2(100, 100);


spriteBatch.Draw(objectTexture, drawPosition, Color.White,

    0.0f, objectOrigin, 1.0f, SpriteEffects.None, 0.5f);
The first three arguments of this version of Draw are the same as the most simple overload, setting a texture, position, and color. The second line of the method contains arguments for other drawing options:
0.0f: The rotation, which you can use to rotate the object as it is drawn.objectOrigin: The object origin vector that you calculated to find the center of the object.1.0f: A scale factor of typefloat, which you can use to enlarge or shrink the texture (1.0fmeans no change; it is multiplicative).SpriteEffects.None: TheSpriteEffectsenumeration allows you to flip the texture horizontally or vertically.0.5f: The layer depth, which is useful when you are trying to force objects to appear below or above other objects drawn in the sameSpriteBatch. This is afloatvalue between0.0fand1.0f, with1.0fbeing the topmost layer.
Determining whether to precalculate the new position with the object center or use the extended overload of Draw with the origin is a matter of style. In any case, you will likely still need to perform some calculations, unless you calculate and store all of your object origins beforehand and reuse them.
Of course, a shorter way to accomplish the same thing while eliminating all those extra arguments would be to just subtract the object origin vector from the vector where the object is drawn. This results in a new vector at the correct point, like this:
spriteBatch.Draw(objectTexture, drawPosition - objectOrigin, Color.White);
Again, we subtract the origin because, to center the object, we need to reduce x by half the width and reduce y by half the height. Since the origin vector is computed as (half the width, half the height), we can simply subtract the origin vector from the draw position to center the object.
Centering Text
Similar to textures, text drawn at a specific point starts with the upper-left corner of the text at that point. Centering text is a common requirement, and the MeasureString method of the SpriteFont class helps you accomplish this task. MeasureString returns a Vector2 object with x and y components that indicate the width and height of a block of specified text. You can divide this vector by two to get its center point, and then use it as the origin in DrawString.
Caution When working with multiple lines of text (with carriage return/new line sequences in them), the method shown in Listing 5-3 will result in the text being left-justified. The entire left-justified block of text will be centered. You need to center lines individually if you want each line to appear centered.
Listing 5-3 contains code that will allow you to draw text centered at some point, textPosition. This code would run in the Draw method with an active SpriteBatch.
Listing 5-3. Centering Text Using a Longer DrawString Overload.
string sampleText = "Centered Text";

Vector2 textOrigin = myFont.MeasureString(sampleText) / 2;

spriteBatch.DrawString(myFont, sampleText, textPosition, Color.White,

    0.0f, textOrigin, 1.0f, SpriteEffects.None, 0.5f);
The mystery arguments are the same as the ones for the Draw method in Listing 5-2, described in the previous section. This is an easy way to center text using the origin, although the shorter way to do it is using the inline vector subtraction method shown after Listing 5-2:
spriteBatch.DrawString(myFont, sampleText, textPosition - textOrigin, Color.White);
In some cases, you might not want to center the text vertically. You might want to have the top of the text aligned with a certain point. This is especially useful when you are looking at a user interface mockup that says "draw the text here." You know you want to center it horizontally, but you want the top of the text to be aligned with some point. In that case, don't halve the entire vector returned by MeasureString; halve only the x component. Listing 5-4 shows how to center text horizontally, but have the top of the text starting at the point provided.
Listing 5-4. Centering Text Horizontally, but Aligning the Top Where the Text Will Be Drawn.
Vector2 textOrigin = myFont.MeasureString(sampleText);

textOrigin.X /= 2;
Note In C#, the /= operator divides the left side of the expression by the right side and assigns the result back to the left side. This is the same as writing textOrigin.X = textOrigin.X / 2. Other similar operators exist, such as *=, +=, and -=.
Locating Sides of Objects
If you know the position and size of an object, you can use those properties to determine where the sides of the objects are. While there may be transparent areas of any given texture, it is most computationally efficient to consider the sides of the object to be equal to the rectangular texture size.
Finding these sides results in a bounding box, which represents the boundaries of the image. A bounding box is illustrated in Figure 5-11.
Figure 5-11. A transparent object with an imaginary bounding box surrounding it
The bounding box is always the same width and height of the texture itself. Since Texture2D objects expose these properties, you can use them to calculate a bounding box very easily given the coordinate of the top-left corner (also the object's on-screen position).
Creating a bounding box is a simple way to get access to all four sides of the object. However, sometimes you want to conserve resources by looking at only one side. For example, in the OutBreak game, we constrain the movement of the paddle so that it cannot move beyond the visible area of the screen. To do this, we use if statements with simple Boolean expressions such as these:
if (paddlePosition.X > 0)

{

    // Move the paddle left

    paddlePosition.X -= paddleSpeed;

}


if (paddlePosition.X + paddleTexture.Width < screenWidth)

{

    // Move the paddle right

    paddlePosition.X += paddleSpeed;

}
These statements are checking that a certain point is not out of bounds of the screen. The left side is easy, since the paddlePosition vector references the top-left corner. If the top-left corner has an x coordinate of greater than zero, it's okay to move it farther to the left until it butts up to the wall.
Checking the right side of the paddle is only slightly more complicated. Again, since the paddlePosition vector references the top left, you need to add the entire width of the object to figure out where the right side is. Look at that line again:
if (paddlePosition.X + paddleTexture.Width < screenWidth)
That Boolean expression adds the width of the object to its current position to determine the x coordinate of the right side. If the right side's x coordinate is less than the screen's width, there is still room to move it to the right.
Determining the boundaries of an object is also useful for the most basic form of collision detection. This form of collision detection uses bounding box rectangles.
Creating Bounding Boxes
Creating a bounding box for an object is very simple and has several applications. You need to know only three things to create a bounding box:
- The object's position
- The object's width
- The object's height
Bounding boxes are used to determine an imaginary rectangle around the object as it is currently displayed on the screen. The Microsoft.Xna.Framework.Rectangle class is most commonly used to store a bounding box.
To create a bounding box given an object's position and the Texture2D object for that object, you can use the following code:
Rectangle boundingBox = new Rectangle(position.X, position.Y,

    texture.Width, texture.Height);
Tip It's more efficient to only instantiate one bounding box (for each object needed) and update its properties as they change, rather than instantiating a new one with every tick of the Update method.
Detecting Collisions with Bounding Boxes
The easiest way to figure out if two objects collide is to create two bounding boxes and use the Intersect method of the Rectangle class. If Intersect returns true, the objects collide. Otherwise, they do not. Let's see what this looks like in code:
Rectangle projectileBox;

Rectangle enemyBox;


projectileBox = new Rectangle(projectile.X, projectile.Y,

    projectileTex.Width, projectileTex.Height);


enemyBox = new Rectangle(enemy.X, enemy.Y, enemyTex.Width, enemyTex.Height);


if (enemyBox.Intersects(projectileBox))

{

    // The projectile hit the enemy

    // decrement enemy health, etc.

}
This is the simplest form of collision detection and performs the best (unless you are checking only one dimension, such as only the x axis, which can be done in one line of code using Boolean expressions). We'll cover more complicated forms of collision detection later in the chapter.
Emulating Physics
On the Zune, it's best to keep complex calculations to a minimum. Most commercially available physics engines eat a ton of processing, although there are a few available specifically for XNA games. If your game requires advanced physics, you will probably want to reuse an available physics engine, rather than undertake the daunting task of creating your own.
There are quite a few things you can do to achieve the look and feel of physics while implementing only one simple concept: acceleration. Acceleration, mathematically speaking, is the rate at which an object's velocity (or speed) changes. The gravitational constant, G, is defined as −9.8 meters per second per second, or −9.8 m/s2. This means that an object falling towards the earth falls 9.8 seconds faster each second than it did the previous second.
Using Acceleration
Acceleration can be applied not only to gravity, but also to the concept of easing. Easing means that an object gradually moves from one speed to another. This is a visually pleasing effect. For example, if you wanted a button or other user interface element to move smoothly into place, you would use a formula with acceleration to achieve the effect of easing.
Easing in means that the object starts very slow and speeds up as it nears its destination. Easing out means that the object starts very quickly and slows down as it reaches its final point. Mathematically, the difference between these two is just acceleration versus deceleration.
Consider this simple formula to make an object fall at a constant speed. Such logic might appear in the Update method:
object.Y = object.Y + fixedFallDistance;
If you wanted to make the object accelerate or decelerate, however, you would need to maintain separate variables to hold these values. In code, you can update an object's velocity by adding the product of the acceleration value and the elapsed time:
velocity += acceleration * time;
Likewise, you can then use the velocity to update the position:
position += velocity * time;
In practice, the data types of position, acceleration, and velocity are all Vector2. An object can accelerate in either direction. An object can also move in either direction. Pragmatically speaking, it's much easier to do the math with all vector objects.
In addition, the time variable here is retrieved using gameTime.ElapsedGameTime.TotalSeconds and casting that value to a float. Doing so allows you the convenience of working in terms of seconds, as well as the ability to draw smoothly even if the game is not running in a fixed-step game loop.
Using Interpolation
Interpolation allows you to specify two vectors and a weighted value to calculate a new vector that lies somewhere in between those two vectors. This is extremely useful when building fly-in type animations for user interfaces, because by design, you know where the animation should start and end and how much time it should take.
The XNA Framework provides two methods for interpolation. The first is called lerp, which is short for linear interpolation. The code to perform a linear interpolation between two vectors looks like this:
Vector2 result = Vector2.Lerp(vector1, vector2, weight);
If you were to graph the response of the Lerp function, you would get a straight line between the two points. Assume you have two vectors, A and B, which are 10 pixels apart. Let A = (0, 0) and B = (10, 0). If you were to call Lerp with a weight value of 0.7f, you would get a new vector R = (7, 0). This example would look like this in code:
Vector2 a = new Vector2(0, 0);

Vector2 b = new Vector2(10, 0);

Vector2 result = Vector2.Lerp(a, b, 0.7f); // will return a new Vector2 (7, 0)
The other option the XNA Framework provides for interpolation is called smooth step. Smooth step behaves the same as the Lerp function, but it uses a cubic equation instead of a linear equation. The result is a function you can use to create an animation that eases in and eases out.
EXERCISE 5-1. AN ACCELERATING BALL
In this quick example, you will see how to use the current elapsed game time to cause an object to move with acceleration. We'll build a PC game so that you can see the results quickly. The code for this example can be found in the Examples/Chapter 5/Exercise 1 folder.
- In Visual Studio, create a new Windows Game project called
AccelerationSample. - Add the file
greenball.pngto theContentproject from the Chapter 5/Artworkfolder. - Declare the following private member variables to the
Game1class inGame1.cs:
Texture2D greenBallTex;

bool ballIsFalling;


Vector2 acceleration;

Vector2 velocity;

Vector2 initialPosition;

Vector2 ballPosition;
- Add the following code to the game's
Initializemethod. This code initializes the position, initial velocity, initial position, and acceleration values.
protected override void Initialize()

{

    acceleration = new Vector2(0f, 15f);

    velocity = Vector2.Zero;

    initialPosition = Vector2.Zero;

    ballPosition = initialPosition;

    ballIsFalling = false;


    base.Initialize();

}
- Load the
greenball.pngfile into its correspondingTexture2Dobject in theLoadContentmethod:
protected override void LoadContent()

{

    // Create a new SpriteBatch, which can be used to draw textures.

    spriteBatch = new SpriteBatch(GraphicsDevice);


    greenBallTex = Content.Load<Texture2D>("greenball");

}
- Add the following code to the game's
Updatemethod. This code starts the acceleration or resets the position, depending on which key you press. If the ball is falling, it updates the ball's position using the acceleration formula shown earlier in the chapter. Note that acceleration is defined as "pixels per second per second," since we are normalizing our time variable to be in seconds.
protected override void Update(GameTime gameTime)

{

    float time;

    KeyboardState kbState = Keyboard.GetState();


    // Check for 'Enter'. This makes the ball start falling.

    if (kbState.IsKeyDown(Keys.Enter) && ballIsFalling == false)

    {

        ballIsFalling = true;

    }


    // Check for 'R' (for Reset). Resets the ball position

    if (kbState.IsKeyDown(Keys.R) && ballIsFalling == true)

    {

        ballIsFalling = false;

        ballPosition = Vector2.Zero;

        velocity = Vector2.Zero;

    }


    // Calculate the falling ball's position.

    if (ballIsFalling)

    {

        time = (float)gameTime.TotalGameTime.TotalSeconds;

            velocity += acceleration * time;

            ballPosition += velocity * time;

    }


    base.Update(gameTime);

}
Note the bolded code in this listing. This is the code that updates the velocity and position based on the elapsed time.
- Draw the ball on the screen, using the following code in the
Drawmethod.
protected override void Draw(GameTime gameTime)

{

    GraphicsDevice.Clear(Color.White);


    spriteBatch.Begin();

    spriteBatch.Draw(greenBallTex, ballPosition, Color.White);

    spriteBatch.End();


    base.Draw(gameTime);


}
- Test the code by pressing F5. Press Enter on the keyboard to make the ball fall. Press R to reset the ball to its original position. Note the smooth movement as the ball gradually increases speed. You should see something similar to Figure 5-12.
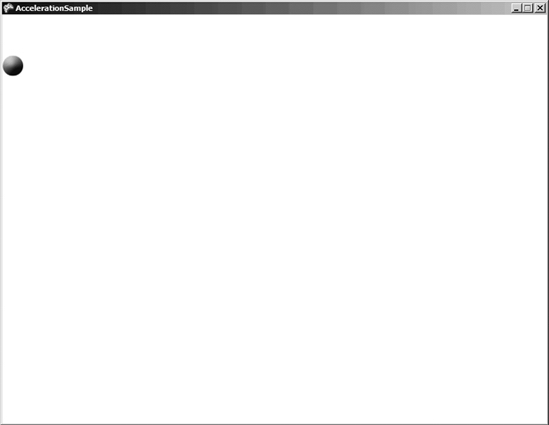
Figure 5-12. Exercise 5-1 in action, with an accelerating ball
This concludes Exercise 5-1. Keep this code handy to modify in the next example.
Using Other Time-Dependent Functions
Using the elapsed time in your variables lends itself nicely to the use of other built-in functions that take a time variable. Oscillating functions such as sine and cosine are good examples. Even as the value of time increases infinitely, the result of sine and cosine passing in time is always between −1 and 1. An interesting use of the sine function would be to create a pulsating effect, where text or a sprite is drawn with a scale factor that is calculated with the sine function.
The result of sine and cosine can be altered in two ways:
Amplitude You multiply the result of the sine wave by some scalar value to increase (or decrease) the final result. This effectively increases the range. If you have an amplitude of 2.0, the range will widen from −2.0 to +2.0.
Period The period specifies how frequently the function oscillates. The shorter the period, the faster the oscillations. You can specify a period by multiplying the value passed to the function by some scalar value, such as
sin(2.0 * time). In this function, the period would be doubled.
The only difference between sine and cosine is that sin(0) is 0, whereas cos(0) is 1. In other words, the sine function starts at zero and the cosine function starts at its maximum amplitude. Both functions oscillate in the same pattern from there on.
A generic sine (or cosine) function looks like this: y = Asin(pt) + b. In this equation, A represents the amplitude, p represents the period, and b represents some vertical shift value. If you set b to zero, the sine function will oscillate around the center point zero. If you change the value of b, all of the outputs are shifted by that value. In some cases, you may want to ensure that you always have a positive value, so you could add two to any basic sine wave to shift the range of the function from (−1, 1) to (1, 3). You can also constrain the output of sine and cosine to only positive (or zero) values by using the Math.Abs (absolute value) function.
Let's implement a simple pulsing effect using a sine wave. This example uses the code from Example 5-1. In this example, we'll use a longer overload of the spriteBatch.Draw method than we have used in previous examples:
spriteBatch.Draw(greenBallTex, pulsingBallPosition, null, glowColor,

    1.0f, pulsingBallOrigin, pulseScale, SpriteEffects.None, 0.5f);
The following parameters are passed in:
greenBallTex: TheTexture2Dobject to draw.pulsingBallPosition: TheVector2object defined earlier; the middle of the screen.null: An optional parameter used to specify a source rectangle. Specifyingnulldraws the entire texture.glowColor: The color defined in theUpdatemethod, which changes in an oscillating manner with time.1.0f: The rotation, which we are not modifying.pulsingBallOrigin: The originVector2calculated earlier. This centers the ball on thepulsingBallPositionpoint.pulseScale: The scale factor calculated using the sine function in theUpdatemethod.SpriteEffects.None: The sprite is not flipped horizontally or vertically.0.5f: The layer depth of the sprite. It can be used to alter the z-order (or layering) of sprites. Any value between 0 and 1 will work.
EXERCISE 5-2. A PULSATING EFFECT USING THE SINE FUNCTION
We'll keep the acceleration code in place from Exercise 5-1, since this example shows a minor addition to the math. In this example, we'll draw another ball right in the middle of the screen and have it pulsate.
The pulsating effect combines two elements. The first is the size; we will use the sine function to generate a scale factor, which we will use in the Draw method. The second is a color value, which we use to tint the sprite.
When a sprite is drawn without any tint, it is passed the color Color.White, which is 100% red, green, and blue. To tint a sprite red, we keep the 100% red element of the color and decrease both blue and green by the same factor.
Much of the math code works only with some specific data type, such as double. These values must be cast to work properly with our float variables.
- Start with the code for Exercise 5-1 (found in
Examples/Chapter 5/Exercise 1). Add the following private member variables:
Vector2 pulsingBallPosition;

Vector2 pulsingBallOrigin;

float pulseScale;

float redGlowAmount;

Color glowColor;
- Add the following code to the
Initializemethod to set up these new variables:
pulseScale = 1.0f;

glowColor = Color.White;
- Because some of the position variables depend on the ball's texture object being loaded, we must initialize some of these values after that object has been loaded in
LoadContent. This code finds the center of the screen and the center of the ball object (to be used as the texture origin). Add the following lines to initialize other variables in theLoadContentmethod (aftergreenBallTexhas been loaded):
pulsingBallPosition = new Vector2(

    GraphicsDevice.Viewport.Width / 2,

    GraphicsDevice.Viewport.Height / 2);


pulsingBallOrigin = new Vector2(

    greenBallTex.Width / 2,

    greenBallTex.Height / 2);
- In the
Updatemethod, find theifstatement that checks if the ball is falling. Modify that block with the bold code in the following snippet:
// Calculate the falling ball's position.

if (ballIsFalling)

{

    time = (float)gameTime.TotalGameTime.Subtract(fallStartTime).

TotalMilliseconds;

    time /= 1000.0f;


    ballPosition.Y = (initialVelocity * time) +

        initialPosition.Y +

        (0.5f * acceleration * time * time);


    // Update the pulse scale

    pulseScale = (float)Math.Abs(Math.Sin(5.0f * time)) + 1.0f;


    // Get the pulse color

    redGlowAmount = 1.0f - (float)Math.Abs(Math.Sin(5.0f * time));

    glowColor = new Color(1.0f, redGlowAmount, redGlowAmount);

}
The added code uses sine functions with a period of 5.0. Because absolute value is used, the pulse scale varies from 0 to 1. The value 1.0 is added, so the effective range of the pulse scale is from 1.0 to 2.0. The
redGlowAmountvariable is used to determine how much of the other colors should be mixed in with red to create the red glow effect. The value of the sine wave (with the same period of 5) is subtracted from 1, and this new value is passed in to a newColorconstructor with full red and some equal fraction of the other colors. The result is a color that increases in red intensity as the sine function reaches a peak (because the other colors are closer to 0) and is closer to white when the sine function is close to 0 (because all colors are 100%). - Add the code in the
Drawmethod to draw another ball in the middle of the screen with the current scale factor and glow color:
protected override void Draw(GameTime gameTime)

{

    GraphicsDevice.Clear(Color.White);


    spriteBatch.Begin();

    spriteBatch.Draw(greenBallTex, ballPosition, Color.White);

    spriteBatch.Draw(greenBallTex, pulsingBallPosition, null, glowColor,

        1.0f, pulsingBallOrigin, pulseScale, SpriteEffects.None, 0.5f);

    spriteBatch.End();


    base.Draw(gameTime);

}
The bolded call to
spriteBatch.Drawis the longer overload of the method, as explained in the text preceding this exercise. - Press F5 to run the game. Use the same controls as in Exercise 5-1. Press Enter to make the ball fall and cause the center ball to start pulsating. Press R to reset. When the ball is falling, you should see something similar to Figure 5-13.
Figure 5-13. Using periodic functions to create a pulsing effect
Understanding a bit of trigonometry and physics is important to creating a game that behaves somewhat naturally. You could take this knowledge and apply it to your games, either by using some of the built-in XNA helper functions (check the MathHelper class) or by rolling some of it into a special library for your games.
Next, you will learn about some different ways of achieving collision detection and when to use each of the described methods.
Collision Detection Revisited
Earlier in the chapter, you learned that the most basic form of collision detection is performed by testing whether two bounding boxes intersect. This type of collision detection is called simple collision detection. In some cases, you may find that simple collision detection creates too many false positives, depending on the complexity of your sprite. In such cases, you could look at the more processor-intensive per-pixel collision detection method.
Simple Collision Detection
As described earlier in the chapter, simple collision detection involves drawing imaginary rectangles around screen objects and determining if they intersect. If they intersect, a collision has occurred. In code, such collision detection looks like Listing 5-5.
Listing 5-5. Simple Rectangle-Based Collision Detection.
private bool CollisionDetected(Vector2 aPosition, Texture2D aTexture, Vector2

    bPosition, Texture2D bTexture)

{

    Rectangle boundingBoxA = new Rectangle(aPosition.X, aPosition.Y, aTexture.Width,

        aTexture.Height);


    Rectangle boundingBoxB = new Rectangle(bPosition.X, bPosition.Y, bTexture.Width,

        bTexture.Height);


    return boundingBoxA.Intersects(boundingBoxB);

}
This code creates two rectangles: one for each object. The box has the size of the object and is positioned at the same place as the object. With this logic, a collision would look like Figure 5-14.

Figure 5-14. A collision as identified by simple collision detection
Note that because the object has a transparent background, the interesting parts of the graphics are not actually colliding. This is one example where simple collision detection can give you false positives. However, it remains the most computationally efficient way of detecting collisions from any angle.
Per-Pixel Collision Detection
A more accurate way to detect collisions is to compare each nontransparent pixel of both objects and determine whether any of these pixels exist at the same location. Per-pixel collision detection requires a more complicated algorithm, and using this method will likely slow down your game substantially. The smaller the textures are, the better it works, because smaller textures result in smaller iterations of each loop.
Caution The use of per-pixel collision detection is extremely expensive, especially on a device with limited processor bandwidth, like the Zune. It will likely slow down your game. In most cases, simple rectangle-based collision detection is preferred. You can support both by checking for a bounding box collision first. If the simple collision is true, then you can perform per-pixel collision detection to gain a more precise result. This frees up processor cycles when there is no simple collision.
In (mostly) plain English, per-pixel collision detection works like this:
- Construct one-dimensional arrays of colors that represent the texture data.
Color[] greenBallData = new Color[greenBallTex.Width * greenBallTex.Height];
- After the textures are loaded, populate the color arrays using the
GetDatamethod of the appropriateTexture2Dobject.
greenBallTex.GetData(greenBallData);
- With each update, create bounding boxes for each of the objects you want to check. Determine the area in which these objects intersect, which can be done using the static
Rectangle.Intersectmethod. Then loop through every pixel in the intersection area and get each object's color value at that point. Check the alpha value. If both pixels here are not completely invisible, then a collision has happened.
Listing 5-6 shows an example of a collision detection algorithm that works with prepopulated texture data for two different objects: a green ball and a more graphical ball called "other ball." Some variables here are defined out of scope, such as the position variables, but they are included in this snippet because they are self-describing.
Listing 5-6. A Simple Per-Pixel Collision Detection Algorithm.
private bool CheckPerPixelCollision()

{

    // Get bounding rectangles for each object

    Rectangle greenBoundingBox = new Rectangle((int)greenBallPos.X,

        (int)greenBallPos.Y, greenBallTex.Width, greenBallTex.Height);


    Rectangle otherBoundingBox = new Rectangle((int)otherBallPos.X,

        (int)otherBallPos.Y, otherBallTex.Width, otherBallTex.Height);


    // Determine the rectangle of intersection and

    // dereference its properties for performance.

    Rectangle collisionRegion = Rectangle.Intersect(greenBoundingBox,

        otherBoundingBox);


    int left = collisionRegion.Left;

    int right = collisionRegion.Right;


    int top = collisionRegion.Top;

    int bottom = collisionRegion.Bottom;


    Color greenBallCurrentColor, otherBallCurrentColor;

    int greenBallColorIndex, otherBallColorIndex;


    // Loop horizontally through the collision region.

    for (int row = top; row < bottom; row++)

    {

        for (int column = left; column < right; column++)

        {

            greenBallColorIndex = GetColorIndex(greenBoundingBox, row, column);

            otherBallColorIndex = GetColorIndex(otherBoundingBox, row, column);


            greenBallCurrentColor = greenBallColorData[greenBallColorIndex];

            otherBallCurrentColor = otherBallColorData[otherBallColorIndex];


            if (greenBallCurrentColor.A != 0 && otherBallCurrentColor.A != 0)

                return true;

        }

    }


    return false;

}
To see how this algorithm works in a game, let's run through a quick example.
EXERCISE 5-3. PER-PIXEL COLLISION DETECTION
This exercise has two goals. The first is to demonstrate how to implement per-pixel collision detection between two predefined objects. The second is to show you how poorly this algorithm, even in a modestly optimized state, runs on the Zune, so that you are discouraged from attempting to use it unless it is absolutely necessary. The code for this example can be found in the Examples/Chapter 5/Exercise 3 folder.
- In Visual Studio, create a new Windows Game project (I called mine
PerPixelCollisionSample). - Create a Zune copy of the game.
- Add
greenball.pngandotherball.pngfrom theChapter 5/Artworkfolder to theContentproject. - Add a new sprite font to the
Contentproject, and call itNormal.spritefont. - Add the
InputStateclass from Chapter 4 to the project. Change the namespace to that of your project. I added some properties to the class to determine if a particular direction button is pressed down (not a new button press). These properties areLeftIsDown, RightIsDown, DownIsDown, andUpIsDown. Those last two names are slightly confusing, but these properties refer to the current button or key state for those directions. - Declare the following private variables in the
Game1class inGame1.cs. TheColorarrays will hold all of the color data for a given texture in a one-dimensional fashion.
Texture2D greenBallTex, otherBallTex;

SpriteFont normalFont;

InputState input;


string statusText = "";


Vector2 greenBallPos, otherBallPos;

Color[] greenBallColorData;

Color[] otherBallColorData;
- Add the following code to the
Initializemethod to set up positioning and set the screen size:
protected override void Initialize()

{

    greenBallPos = new Vector2(100, 100);

    otherBallPos = new Vector2(150, 150);

    input = new InputState();


    graphics.PreferredBackBufferWidth = 240;

    graphics.PreferredBackBufferHeight = 320;

    graphics.ApplyChanges();


    base.Initialize();

}
- In the
LoadContentmethod, load the textures and font, and populate theColorarrays:
protected override void LoadContent()

{

    // Create a new SpriteBatch, which can be used to draw textures.

    spriteBatch = new SpriteBatch(GraphicsDevice);


    // Load graphical assets

    greenBallTex = Content.Load<Texture2D>("greenball");

    otherBallTex = Content.Load<Texture2D>("otherball");

    normalFont = Content.Load <SpriteFont>("Normal");


    // Allocate memory for the color data arrays

    greenBallColorData = new Color[greenBallTex.Width * greenBallTex.Height];

    otherBallColorData = new Color[otherBallTex.Width * otherBallTex.Height];


    // Populate the color data arrays

    greenBallTex.GetData(greenBallColorData);

    otherBallTex.GetData(otherBallColorData);

}
- Add a new private method to the class called
GetColorIndex. This method takes in a rectangle that represents the collision region, a row, and a column. The method uses this information generate an index value that is used in theColorarray. For example, if you have a 3 × 3 intersection region, and you want the pixel in the second row, third column, this code would return an index of 5 (remember we are working with zero-based arrays).
/// <summary>

/// Takes a bounding box, row, and column and creates a one-dimensional index.

/// </summary>

private int GetColorIndex(Rectangle boundingBox, int row, int column)

{

    int index = 0;


    // How many rows down is the pixel?

    index += (row - boundingBox.Top) * boundingBox.Width;


    // How far from the left is the pixel?

    index += column - boundingBox.Left;


    return index;

}
This method is used directly by the collision detection algorithm. You don't need to worry about this method returning a negative index; even if it does, the
forloop in which it is used is structured in such a way that only positive index values will be used. - Copy the code from Listing 5-6 and add that private method (
CheckPerPixelCollision) to your class. (The code in Listing 5-6 is meant specifically for this exercise.) - In the
Updatemethod, update the input state object and check for input to move the "other ball" object around on the screen. Also update the status text based on the result of the collision detection algorithm.
protected override void Update(GameTime gameTime)

{

    input.Update();

    if (input.BackPressed)

        this.Exit();


    // Move the Other ball (face) based on user input.

    if (input.LeftIsDown)

        otherBallPos.X -= 2.0f;

    if (input.RightIsDown)

        otherBallPos.X += 2.0f;

    if (input.UpIsDown)

        otherBallPos.Y -= 2.0f;

    if (input.DownIsDown)

        otherBallPos.Y += 2.0f;


    if (CheckPerPixelCollision() == true)

        statusText = "<YES> Collision detected!";

    else

        statusText = "<NO> No collision detected.";


    base.Update(gameTime);

}
- In the
Drawmethod, draw the two ball objects and the status text:
protected override void Draw(GameTime gameTime)

{

    GraphicsDevice.Clear(Color.CornflowerBlue);


    spriteBatch.Begin();

    spriteBatch.Draw(greenBallTex, greenBallPos, Color.White);

    spriteBatch.Draw(otherBallTex, otherBallPos, Color.White);

    spriteBatch.DrawString(normalFont, statusText, Vector2.Zero, Color.White);

    spriteBatch.End();


    base.Draw(gameTime);

}
- Test the Windows version of the game. Move the ball around with the arrow keys. Pay special attention to the fact that this likely runs on your computer without any performance hit (it certainly does on my quad-core Intel machine). Notice what happens to the status text when a direct collision is detected. Even though the bounding boxes technically intersect, a collision is not made unless it's supposed to look that way. Figure 5-15 illustrates the objects in such proximity that would cause a collision using simple collision detection. Figure 5-16 illustrates the objects in an actual collision.

Figure 5-15. Two objects positioned very closely, but not a true collision. This would register as a collision using simple bounding box collision detection.
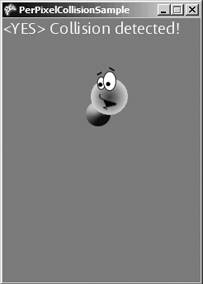
Figure 5-16. Per-pixel collision detection in action
- Deploy this same code to a Zune device. Use the directional pad buttons to move the character around the screen. Note the slight lag in the movement. This is due to the complexity of the algorithm. Now imagine this algorithm checking more than two predefined textures, or trying to operate peacefully with other, equally complex game logic!
This exercise showed you how to implement per-pixel collision detection, but it also probably dissuaded you from trying to use it on the Zune, due to the incredible performance hit. It's rare that you want to check collision detection between only two objects. Consider the OutBreak game we built in the previous chapter. It checks collisions with up to 40 different objects. Imagine running the same code in a foreach loop!
Per-pixel collision detection is powerful, and it can be tempting to use it for some limited situations. However, for most applications, simple collision detection is far more practical and performs better. It's also unlikely that the user will notice you're not using per-pixel collision detection, especially on a small screen like that of the Zune. Unless you absolutely need this type of collision detection, save those CPU cycles for more interesting game logic.
Simple Game State Management
Before we delve into the magical world of components, I will briefly cover what I like to call "simple" game state management. For games that have only two or three game states, this is the easiest way to identify and manage what state your game is in. More advanced game and screen management is discussed in the next chapter.
Game state generally refers to what your game is doing at any given time, described by one word. Example game states are Start, Playing, and GameOver. The easiest way to use such game states is to create an enumeration in the same class file as your main game, outside the class, like so:
public enum GameState

{

    Start,


    Playing,

    GameOver

}
This enumeration is checked mainly in the game's Update and Draw methods. Normally, switch statements are used to determine the current game state, and that causes Update and Draw to behave differently for each case. For example, the only message a game in the Start state would watch for is a button press to start the game. When the game is in the Playing state, the more complex game logic is run instead. Likewise, in the Draw method, a game in the Start or GameOver states would likely draw some different background graphic on screen. Perhaps the GameOver state would also require a score to be drawn.
In any case, a GameState object is usually created and accessed throughout the game, whether to check the game state or to transition it to a new state. In the game's private member variable section, you would create a variable to represent the game state:
GameState gameState;
The initial game state would be set in the game's Initialize method:
protected override void Initialize()

{

    gameState = GameState.Start;

    base.Initialize();

}
In the game's Update method, the code behaves differently for each game state by way of a simple switch statement (this is sample code, not part of a larger game):
protected override void Update(GameTime gameTime)

{

    switch (this.gameState)

    {

        case GameState.Start:

            if (input.MiddleButtonPressed)

            {

                gameState = GameState.Playing;

            }

            break;


        case GameState.Playing:

            // All of the main game's update logic goes here, e.g...

            HandleInput();

            CheckCollisions();

            UpdateSounds();

            break;


        case GameState.GameOver:

            finalScoreText = score;

            if (input.MiddleButtonPressed) // start over

            {


                gameState = GameState.Start;

            }

            break;

    }


    base.Update(gameTime);

}
Likewise, the Draw method will behave differently for each game state, as in the following example:
protected override void Draw(GameTime gameTime)

{

    GraphicsDevice.Clear(Color.Black);

    spriteBatch.Begin();


    switch (this.gameState)

    {

        case GameState.Start:

            spriteBatch.Draw(startBackground, Vector2.Zero, Color.White);

            break;


        case GameState.Playing:

            // Draw all the game objects, text, etc.

            spriteBatch.Draw(playingBackground, Vector2.Zero, Color.White);

            spriteBatch.Draw(ballTexture, ballPosition, Color.White);

            spriteBatch.Draw(paddleTexture, leftPaddlePos, Color.White);

            spriteBatch.Draw(paddleTexture, rightPaddlePs, Color.White);

            spriteBatch.DrawString(font, scoreString, Vector2.Zero, Color.White);

            break;


        case GameState.GameOver:

            spriteBatch.Draw(gameOverBackground, Vector2.Zero, Color.White);

            break;

    }


    spriteBatch.End();


    base.Draw(gameTime);

}
This simple form of game state management is fairly easy to read and understand. You'll see a more detailed example of simple game state management in the Monkey Feeder game we will build at the end of this chapter.
However, with the addition of more game states and more advanced requirements, such as screen transitions and complex state transfer logic, a more robust system is needed. You'll learn about advanced game state management techniques in the next chapter.
Using Components
With all of this chapter's math studies under your belt, I feel it's time to lead you toward things that can reduce your development time. Game components fit that description. They allow you to apply good object-oriented design principles to entities in your game. You can take advantage of the XNA Framework's ability to automatically update and draw components that you add to your game.
The beauty of components lies in the fact that you can create an entirely separate class with update and draw logic, removing the need to put everything in Game1.cs (or whatever you name your main game class file). Components allow you to think of objects as whole entities, rather than a loosely coupled collection of textures, positions, speeds, states, and so on.
Components can be of two types:
Drawable: These game components are generally used for single objects, like a gun, tank, ball, projectile, and so on. Drawable game components inherit from the
DrawableGameComponentclass, which provides overridable methods such asLoadContent, Initialize, Update, andDraw. Drawable game components expose everything nondrawableGameComponentinstances do, with the added feature of being able to draw themselves and load their own content independently of the main game'sLoadContentmethod. To specify whether a drawable game component should be drawn, you can set itsIsVisibleproperty totrueorfalse.Nondrawable These game components are often used to encapsulate specific logic, such as input handling, collision detection, and so on. Nondrawable game components are useful for any scenario where you need game logic that is constantly updated and tied to the main game loop. They are automatically initialized and updated at the appropriate times when you add them to the main game's
Componentsproperty. Nondrawable game components inherit from theGameComponentclass and provide the same overridable methods as drawable components, with the exception ofDraw.
Game components are manually instantiated and added to the game's Components property. When added to this collection, each object is automatically notified when the object needs to be updated and drawn (and also when the object should be initialized, or when content should be loaded). This allows you to leverage all of the XNA Framework capabilities for individual objects, affording you the luxury of having a "mini-game" within each component.
Note The game is told to notify its components via the base calls in the game's standard XNA methods, such as base.Update(gameTime). If you remove these calls, your components will not be notified by the main game loop, so be sure to leave those default lines in the game code.
Since these components are automatically drawn and updated, you may want to restrict whether an object should be updated or drawn. Components also expose properties such as Visible and Enabled, which allow you to control when a game component should draw or update itself.
Using components is a smart way to start writing your games. It keeps most of the hairy logic out of the main game and allows you to write relevant, cohesive code on a per-object basis. It also helps you to think in practical, object-oriented terms—each object is a game entity that operates independently of the rest of the game. This allows you to keep all of your true game logic in the Game class.
Furthermore, since drawable game components expose a LoadContent method, you can avoid having to use the main game's LoadContent to load all of your game's content at once. This lets you keep references to Texture2D objects in the entity class, rather than in the main game—again, leading to cleaner code.
Once you begin developing with game components, you'll see that this is the best path to take.
In the next exercise, we will make a component out of our InputState class. This time, we'll also implement the touchpad, with comparable behavior on Windows using the mouse cursor.
EXERCISE 5-4. THE INPUTSTATE CLASS AS A GAME COMPONENT
In this example, you will learn how to use a nondrawable game component to make game development a lot simpler. This exercise uses a modified version of the InputState class, which we will now componentize for future use in other games.
The input handler object does not need to be drawable. This component will inherit from GameComponent, which provides an Update method we will use to get the new game pad state.
The code for this exercise can be found in the Examples/Chapter 5/Exercise 4 folder. Note that in the text here, the method and class header comments have been removed from the listings to conserve space, but the downloadable code is fully commented.
This is a componentized, reusable version of the InputState class we have been working with. It's been substantially refactored throughout the course of this book, so that you can apply your new understanding of components in a way that makes sense. Going forward, this is probably the best version of the class to use.
This version of InputState also supports the touchpad. On Windows, the touchpad behavior is activated by holding the left mouse button and using the mouse to move. The result is a Vector2D that mirrors the behavior of the touchpad on the Zune (which is mapped to the LeftThumbstick control in the GamePadState class). The resulting vector is between -1.0f and 1.0f, and starts at the center of the window in Windows games. On the Zune, the vector represents the touch distance from the center of the pad.
- In Visual Studio, create a new Windows Game Library project by selecting File
 New Project. Call it
 InputHandler. - Rename
Class1.cstoInputState.cs. - Open
InputState.cs. Remove the generated code and replace all of it with this stub:
using System;

using Microsoft.Xna.Framework;

using Microsoft.Xna.Framework.Input;

using Microsoft.Xna.Framework.Graphics;


namespace InputHandler

{


    public class InputState : GameComponent

    {


    }

}
Note the inheritance from
GameComponent. This gives us access to all of the nondrawable game component methods, includingInitializeandUpdate. - Add the following private members to the class. These variables hold the previous and current states for both the keyboard and the Zune.
#region Private Fields


private GamePadState CurrentGamePadState;

private GamePadState LastGamePadState;

private KeyboardState CurrentKeyboardState;

private KeyboardState LastKeyboardState;


// Touch vector fields, and Windows support

private MouseState mouseState;

private Vector2 windowCenter;

private Vector2 windowSize;

private Vector2 touchVector;


#endregion
- Add a constructor to the class, and initialize the input states declared earlier as shown. Note that the constructor must take a
Gameargument. This is so the component knows whichGameclass it is assigned to and can access that game's properties. ThemouseStatevariable is ignored on the Zune.
#region Constructor(s)


public InputState(Game game)

    : base(game)

{

    currentGamePadState = new GamePadState();

    lastGamePadState = new GamePadState();

    currentKeyboardState = new KeyboardState();

    lastKeyboardState = new KeyboardState();

    mouseState = new MouseState();

}


#endregion
- Create some public utility methods. These determine the status of various buttons and will work whether the game is running on Zune or Windows. There are four methods in total: two for the Zune and two for the keyboard. For each input device, there is one method that checks to see if a button or key is a new press, or if the button is currently down.
#region Public Utility Methods


public bool IsNewButtonPress(Buttons button)

{

    return (currentGamePadState.IsButtonDown(button) &&

        lastGamePadState.IsButtonUp(button));

}


public bool IsNewKeyPress(Keys key)

{

    return (currentKeyboardState.IsKeyDown(key) &&

        lastKeyboardState.IsKeyUp(key));

}


public bool IsButtonDown(Buttons button)

{

    return currentGamePadState.IsButtonDown(button);

}


public bool IsKeyDown(Keys key)

{

    return currentKeyboardState.IsKeyDown(key);

}


#endregion
- Create a section for overridden methods. These methods are implementations of the
GameComponentbase class methods. We will be overridingInitializeandUpdate. - Add the code for
Initialize. The only reason this method needs to be called is for the Windows emulation of the touchpad, which requires knowledge of the screen size (accessed via the game'sViewportclass). The contained code must execute inInitializerather than the component's constructor, because the component will have no knowledge of the graphics device until the parent game'sInitializemethod has been called. This method will then be called once automatically by the game loop.
public override void Initialize()

{

    Viewport windowViewport = Game.GraphicsDevice.Viewport;

    windowSize = new Vector2(windowViewport.Width, windowViewport.Height);

    windowCenter = windowSize / 2;

    touchVector = Vector2.Zero;


    base.Initialize();

}
- Add the following code for
Update, which updates the state of the mouse, keyboard, and Zune pad simultaneously (remember that mouse and keyboard are ignored on the Zune). The game loop will call this method automatically when the component is added to the game. This method also calculates the mouse's distance from the center of the screen and divides it by the center coordinates. This converts the mouse position to a vector identical to what would be returned by the Zune's touchpad, where each coordinate is between −1.0 and 1.0. Note how the y coordinate is negated. This is because theLeftThumbstickvector has a y component that is negative in the up direction and positive downward. The negation is done for consistency between the two platforms. Also note that touch emulation for Windows is active only when the left mouse button is down.
public override void Update(GameTime gameTime)

{

    // Set the previous input states to the current state.

    lastGamePadState = currentGamePadState;

    lastKeyboardState = currentKeyboardState;


    // Retrieve the current input states.

    currentGamePadState = GamePad.GetState(PlayerIndex.One);

    currentKeyboardState = Keyboard.GetState();

    mouseState = Mouse.GetState();


    // If the mouse button is down, activate "touch" on windows

    if (mouseState.LeftButton == ButtonState.Pressed)

    {

        touchVector.X = (mouseState.X - windowCenter.X) / windowCenter.X;

        touchVector.Y = -(mouseState.Y - windowCenter.Y) / windowCenter.Y;

    }

    else

        touchVector = Vector2.Zero;


    base.Update(gameTime);

}
- Add a
Propertiesregion. These properties mainly serve to give you a shortcut. You can name these properties by the actions they represent. For example.NewDownPressshould mean that the user either pressed Down on the Zune directional pad or the Down arrow key. You can create as many properties as you like and name them how you wish. This is where the class offers flexibility. Alternatively, you can create a new class that inherits from this one and define more properties specific to the game at hand. - Add the properties, as follows. The first property returns either the touchpad vector (
LeftThumbstick) on the Zune or the touch vector as calculated by the mouse position if on Windows. This is the only place where we need to differentiate platforms, so this property uses conditional preprocessor directives. The other properties check for a combination of the Zune buttons and the keyboard.
#region Properties


public Vector2 TouchVector

{

    get

    {

        #if ZUNE


        return currentGamePadState.ThumbSticks.Left;


        #endif


        #if WINDOWS


        return touchVector;


        #endif

    }

}


public bool MiddleButtonPressed

{

    get

    {

        return IsNewButtonPress(Buttons.A) ||

            IsNewKeyPress(Keys.Enter);

    }

}


public bool NewPlayPress

{

    get

    {

        return IsNewButtonPress(Buttons.B) ||

            IsNewKeyPress(Keys.Space);

    }

}


public bool NewBackPress

{

    get

    {

        return IsNewButtonPress(Buttons.Back)

            IsNewKeyPress(Keys.Escape);

    }

}


public bool NewUpPress

{

    get

    {

        return IsNewButtonPress(Buttons.DPadUp) ||

            IsNewKeyPress(Keys.Up);

    }

}


public bool NewDownPress

{

    get

    {

        return IsNewButtonPress(Buttons.DPadDown) ||

            IsNewKeyPress(Keys.Down);

    }

}


public bool NewRightPress

{

    get

    {

        return IsNewButtonPress(Buttons.DPadRight) ||

            IsNewKeyPress(Keys.Right);

    }

}


public bool NewLeftPress

{

    get

    {

        return IsNewButtonPress(Buttons.DPadLeft) ||

            IsNewKeyPress(Keys.Left);

    }

}


public bool UpPressed

{

    get

    {

        return IsButtonDown(Buttons.DPadUp) ||

            IsKeyDown(Keys.Up);

    }

}


public bool DownPressed

{

    get

    {

        return IsButtonDown(Buttons.DPadDown) ||

            IsKeyDown(Keys.Down);

    }

}


public bool RightPressed

{

    get

    {

        return IsButtonDown(Buttons.DPadRight) ||

            IsKeyDown(Keys.Right);

    }

}


public bool LeftPressed

{

    get

    {

        return IsButtonDown(Buttons.DPadLeft) ||

            IsKeyDown(Keys.Left);

    }

}


#endregion
- Compile the code and correct any typographical errors. Now you can reference this full-featured, componentized library in other projects.
There are a couple of ways to reuse this class. The first is to build the project and reference the dynamic link library (DLL) output from the Debug or Release folder. The second is to keep the project somewhere safe and add it as a project reference to any future projects. You'll see how to reuse this in the Monkey Feeder game example.
You may be wondering how to disable a GameComponent, in the event that its logic is useless for the current game state (or some similar condition). As you will see in the next example, local instances to these components are usually kept in the game class itself. Since objects deriving from GameComponent take on several inherited properties, your component will have a few things available that you didn't code yourself. In particular, your new component has a property called Enabled, which you can set to false to prevent it from running its Update method.
Tip To stop a custom game component from updating, set its Enabled property to false.
Bringing It All Together with Monkey Feeder
The final example in this chapter brings together nearly of the concepts explored up to this point. The game we will build uses simple game state management, animation, simple collision detection, trig functions, texture scaling and rotation, touchpad input, and realistic (though simple) 2D vector physics. How can we possibly cram all of this into one game without it becoming bloated and unmanageable? By using game components, of course! This game uses both drawable and nondrawable game components.
Years ago, there was a highly addictive game on the Web (built in Flash) whose main objective was simply to toss wads of paper into a trash can. Though the game took place indoors, there was a wind factor, which added quite a bit of difficulty, because you had to estimate the angle at which to toss the paper to compensate for the wind force. The object of the game was to sink as many paper wads consecutively as possible.
In our rendition of the game, we'll be throwing bananas to a monkey on the beach. The touchpad can be used to put "spin" on the banana mid-flight to slightly alter the path. This brings me to the (ingenious) name of the game: Monkey Feeder. To give you an idea of what we're building, Figure 5-17 shows Monkey Feeder's game over screen.

Figure 5-17. The Monkey Feeder game
Note This example creates a unique sprite batch per component and draws it. This is certainly not the most optimal approach, but advanced sprite batch techniques have not yet been covered (they are covered in Chapter 6). To avoid confusing you any more than is necessary, we will keep it very simple in this game by using one sprite batch per component. In games where you have only a handful of sprite batches going, you will likely not notice a performance hit, but it is far more acceptable to use a shared sprite batch solution, as discussed in Chapter 6. Consolidating draw operations into one sprite batch object is one of the first things you can do to improve performance, and should really be done as a best practice rather than as an optimization.
Configuring the Solution, Projects, Folders, and Assets
As usual, our first steps are to create and set up the project.
- In Visual Studio. create a new Zune Game project. Call it
MonkeyFeeder. - Add an existing project to the solution. Browse to the
InputHandlerproject we made in Exercise 5-4. - Create a copy of this project for Zune.
- Add a reference to the
MonkeyFeederproject. Choose the Zune copy of theInputHandlerproject from the Projects tab. - Create a copy of the
MonkeyFeedergame for Windows. - Add a reference to the original
InputHandlerproject to the Windows version of the game. - Working in the Zune
MonkeyFeederproject, create two subfolders underContent:TexturesandFonts. - Right-click the
Texturesfolder and add the following files from theExamples/Chapter 5/Artworkfolder:arrow.pngbanana.pngbeachbg.pnggameover.pngmonkeysheet.pngstartscreen.pngwater.png
- Right-click the
Fontsfolder and add a new sprite font calledSmall.spritefontto this new folder. Change the properties so that it is 10pt Bold Kootenay. - Copy the file
GameThumbnail.pngfrom theExamples/Chapter 5/Artworkfolder. Paste it into theMonkeyFeederfolder to overwrite the default one. - Right-click the
MonkeyFeederproject and add a new folder. Call itComponents. This is where we will store our future game components. - Rename
Game1.cstoMonkeyFeederGame.cs. Your Solution Explorer window should look like Figure 5-18.

Figure 5-18. The MonkeyFeeder solution, properly configured to begin coding
Creating the Components
The game contains five drawable game components and one nondrawable game component (input handler). We will build the drawable components next so they can be used in the game. The five components are as follows:
- Water: This component draws a moving waterline on the right side of the beach.
- Toss Arrow: This is the visual component that is used to determine the angle at which bananas are thrown.
- Wind Needle: This component indicates a random wind speed and direction and exposes those values.
- Monkey: This is an animated monkey that runs through a sprite sheet animation and exposes a bounding box to make collision detection easier. The bounding box is shrunk to make the game more challenging.
- Banana: This is a projectile object whose direction is impacted by other factors in the game, including touch input (which turns the banana green).
Let's begin with the Water component.
Creating the Water Component
I decided that because this game is set on the beach outside a lush jungle, I wanted to create an effect of water lapping up on the shore. Not being artistically inclined, I did what anyone would do: I used a periodic trig function to dynamically position a transparent graphic, which gives the illusion of moving water!
This component implements the Math.Sin function, as described earlier in the chapter.
- Right-click the
Componentsfolder in the solution and add a new class. Call itWater.cs.
Note For future reference, you can also choose Add New Item from the context menu and select Game Component, but it defaults to a nondrawable game component. The approach we use here is easier to explain.
- Modify the namespaces being used (you only need three):
using System;

using Microsoft.Xna.Framework;

using Microsoft.Xna.Framework.Graphics;
- Make the Water component inherit from the
DrawableGameComponentclass:
public class Water : DrawableGameComponent
- Add a new region for
Fieldsand add the following fields to that region:
#region Fields


private SpriteBatch spriteBatch;

private Vector2 position;

private Texture2D waterTex;


#endregion
- Add a new region for the constructor (
Constructor(s)) and add the default constructor, which uses an instance of the game.
#region Constructor(s)


public Water(Game game)

    : base(game)

{


}


#endregion
- Add a new region called
Overridden GameComponent Methods. - You can use IntelliSense to automatically implement various methods. If you just type the word
over, a list of overridable methods pops up. Use the arrow keys to select theInitializemethod, and implement it within theOverridden GameComponent Methodsregion:
public override void Initialize()

{

    position = Vector2.Zero;

    base.Initialize();

}
- Override the
Updatemethod next. This method alters the position of the water texture based on a sine function with an amplitude of 10 and a period of 1/1000. An absolute value is used so that negative values from the sine function are converted to positive ones.
public override void Update(GameTime gameTime)

{

    // Use a sine wave with an amplitude of 10

    position.X = 10.0f * (float)Math.Abs(

        Math.Sin(gameTime.TotalGameTime.TotalSeconds));


    base.Update(gameTime);

}
- Override the
LoadContentmethod, which initializes the sprite batch and the texture for the component.
protected override void LoadContent()

{

    spriteBatch = new SpriteBatch(GraphicsDevice);

    waterTex = Game.Content.Load<Texture2D>("Textures/water");

    base.LoadContent();

}
- Finally, override the
Drawmethod.
public override void Draw(GameTime gameTime)

{

    spriteBatch.Begin();

    spriteBatch.Draw(waterTex, position, Color.White);

    spriteBatch.End();

    base.Draw(gameTime);

}
- When this component is added to the game (and is enabled and visible), the water texture will be drawn according to the game time.
Creating the Toss Arrow Component
The next component to implement is a needle that bounces back and forth and is used to visually define a launch direction for bananas. We'll call it the Toss Arrow component.
- Follow the same steps taken for the Water component: add a new class to the
Componentsfolder, use the same three namespaces, and inherit fromDrawableGameComponent. - Add a
Fieldsregion to the new component and add the following fields:
#region Fields


// Graphics

private SpriteBatch spriteBatch;

private Texture2D arrowTex;


// Position and rotation

private float rotation;

private Vector2 position;

private Vector2 origin;

private int rotationDirection = 1;


private bool isMoving = true;


#endregion
- Add a region called
Constants. These values can be changed to tweak the response of the needle. Add the following constants to the region:
#region Constants


const float rotationSpeed = 0.05f;

const float maxRotation = 1.0f;

const float minRotation = −1.0f;


#endregion
- Add a region called
Properties. In this region is a single property that calculates a vector (with correct y orientation) that represents the direction the needle is pointing. This uses the sine and cosine formula mentioned earlier in the chapter to create a new vector object from rotation.
#region Properties


public Vector2 Vector

{

    get

    {

        double angle = (double)rotation;

        return new Vector2(

            (float)Math.Sin(angle),

            -(float)Math.Cos(angle)

            );

    }

}


#endregion
- Add a region for the constructor and add the default component constructor that uses a
Gameinstance:
#region Constructor(s)


public TossArrow(Game game)

    : base(game)

{


}


#endregion
- Create a region called
Public Methods. These methods allow the component to be controlled from other classes (namely the main game class). These methods are used to reset and pause the movement of the arrow.
#region Public Methods


public void Reset()

{

    isMoving = true;

    rotation = 0.0f;

    rotationDirection = 1;

}


public void Pause()

{

    isMoving = false;

}


#endregion
- Create a region for
Overridden GameComponent Methodsand add the code for our four standard game loop methods. See the comments in the code for more information.
#region Overridden GameComponent Methods


public override void Initialize()

{

    // Initialize the default position (as calculated by

    // looking at the graphic in a graphics program)

    position = new Vector2(120, 320);

    rotation = 0.0f;


    base.Initialize();


}


protected override void LoadContent()

{


    // Create sprite batch, load texture, calculate origin

    spriteBatch = new SpriteBatch(GraphicsDevice);

    arrowTex = Game.Content.Load<Texture2D>("Textures/arrow");

    origin = new Vector2(arrowTex.Width / 2, arrowTex.Height / 2);


    base.LoadContent();

}


public override void Update(GameTime gameTime)

{

    if (isMoving)

    {

        // Flip the direction of the rotation if it's at either extreme

        if (rotation >= maxRotation)

            rotationDirection = −1;


        if (rotation <= minRotation)

            rotationDirection = 1;


        // Update rotation

        rotation += (rotationSpeed * rotationDirection);

    }


    base.Update(gameTime);

}


public override void Draw(GameTime gameTime)

{

    spriteBatch.Begin();

    spriteBatch.Draw(arrowTex, position, null, Color.White,

        rotation, origin, 0.2f, SpriteEffects.None, 0.5f);

    spriteBatch.End();


    base.Draw(gameTime);

}

#endregion
- When enabled and visible, this component draws a needle and provides access to the direction that vector is pointing via its
Vectorproperty.
Creating the Wind Needle Component
The Wind Needle component uses the same texture (although scaled down by a constant factor) and most of the same logic as the Toss Arrow component, but this component is randomized with each turn and does not move. It also has a wind speed property, which affects how strong the force of the wind is on the path of the banana.
- Follow the same steps for the previous components: add a new class called
WindNeedle.csto theComponentsfolder, add the same three namespaces, and inherit fromDrawableGameComponent. - Add a
Fieldsregion and add the following fields:
#region Fields


// Graphics

private SpriteFont smallFont;

private Texture2D needleTex;

private SpriteBatch spriteBatch;


// Position and rotation

private float rotation;

private Vector2 direction;

private Vector2 position;

private Vector2 origin;


// Wind speed

private int windStrength;

private string windStrengthText;


// Wind speed text position and origin

private Vector2 strengthTextPos;

private Vector2 strengthTextOrigin;


Random rnd;


#endregion
- Add a
Constantsregion for the minimum and maximum wind speed, and a scale factor for the needle texture:
#region Constants


const int windMax = 16;

const int windMin = 0;

const float windFactor = 0.03f;

const float drawScale = 0.1f;


#endregion
- Add the empty constructor for the class.
#region Constructor(s)


public WindNeedle(Game game)

    : base(game)

{


}


#endregion
- Add a
Propertiesregion. TheVectorproperty returns a scaled-out vector in the direction of the arrow. TheWindStrengthproperty just exposes the internal variable.
#region Properties


public Vector2 Vector

{

    get

    {

        // Gets a scaled ratio of the wind strength to its maximum strength

        float windScale = windFactor * ((float)windStrength / (float)windMax);

        return Vector2.Multiply(direction, windScale);

    }

}


public int WindStrength

{

    get

    {

        return windStrength;

    }

}


#endregion
- Add a region for
Public Methods. In this region is a method calledRandomize, which is used to randomize the wind's speed and direction. The direction is limited to a 180-degree (pi) range from 0 to pi. Because of the orientation of the needle (rotated 90 degrees counterclockwise), we need to subtract 90 degrees (pi / 2) to obtain the correct direction. The direction vector is calculated from the rotation in the same way that the Toss Arrow component does it, using sine for the x component and negative cosine for the y component. The wind direction is then normalized.
#region Public Methods


public void Randomize()

{

    // Randomize 180 degrees (pi) and shift

    // 90 degrees counterclockwise (pi/2)

    rotation = ((float)rnd.NextDouble() * MathHelper.Pi) -

        MathHelper.PiOver2;


    // Calculate the vector direction using sin/cos and normalize

    // to get a unit vector of length 1

    direction.X = (float)Math.Sin(rotation);


    direction.Y = -(float)Math.Cos(rotation);

    direction.Normalize();


    // Randomize wind strength

    windStrength = rnd.Next(windMin, windMax);

    windStrengthText = windStrength + " MPH";

}


#endregion
- Create a region for
Overridden GameComponent Methodsand implement logic for the four basic XNA game loop methods. See the comments in the code for more information about what's happening in this component.
#region Overridden GameComponent Methods


public override void Initialize()

{

    // I found these coordinates manually in graphics editor

    position = new Vector2(31, 289);

    strengthTextPos = new Vector2(31, 300);

    rnd = new Random();

    Randomize();


    base.Initialize();

}


protected override void LoadContent()

{

    // Create sprite batch, load content, calculate origin

    spriteBatch = new SpriteBatch(GraphicsDevice);


    needleTex = Game.Content.Load<Texture2D>("Textures/arrow");

    smallFont = Game.Content.Load<SpriteFont>("Fonts/Small");


    origin = new Vector2(needleTex.Width / 2, needleTex.Height / 2);


    base.LoadContent();

}


public override void Update(GameTime gameTime)

{

    // Update the text origin for centering horizontally

    strengthTextOrigin.X = smallFont.MeasureString(windStrengthText).X / 2;

    base.Update(gameTime);

}


public override void Draw(GameTime gameTime)

{

    spriteBatch.Begin();


   // Draw the needle with a red tint

    spriteBatch.Draw(needleTex, position, null, Color.Red,

        rotation, origin, drawScale, SpriteEffects.None, 0.5f);


    // Draw the strength text (e.g. "10 MPH")

    spriteBatch.DrawString(smallFont, windStrengthText, strengthTextPos,

        Color.Black, 0.0f, strengthTextOrigin, 1.0f, SpriteEffects.None,

0.5f);


    spriteBatch.End();

    base.Draw(gameTime);

}


#endregion
When enabled and visible, this component displays a needle indicating a random wind direction and speed, and provides access to those values in a vector form that we can use in other parts of the game.
Creating the Monkey Component
There is nothing particularly special about the Monkey component. It runs a simple animation and exposes a bounding box for collision detection logic (which is slightly smaller than the actual bounds of the monkey graphic).
- As for all the previous components, add a new class called
Monkeyto theComponentsdirectory, add the same three namespaces, and inherit fromDrawableGameComponent. - Add the
Fieldsregion:
#region Fields


// Sprite batch and texture

SpriteBatch spriteBatch;

Texture2D monkeyTex;


// Position/bounding box

Vector2 position;

Vector2 origin;

Rectangle boundingBox;


// Animation specific fields

Rectangle sourceRectangle;

int currentFrame;

const int numFrames = 5;


const double animIntervalSeconds = 0.05f;

double currentInterval = 0.0f;


#endregion
- Add the blank constructor:
#region Constructor(s)


public Monkey(Game game)

    : base(game)

{


}


#endregion
- Expose the bounding box as a property in the
Propertiesregion:
#region Properties


public Rectangle BoundingBox

{

    get

    {

        return boundingBox;

    }

}


#endregion
- Add a region called
Utility Methods. This region contains one method,UpdateSourceRect, which is used to update the source rectangle for the animation based on the current frame.
#region Utility Methods


private void UpdateSourceRectangle()

{

    // Offset X by frame size * frame number

    sourceRectangle.X = currentFrame * (monkeyTex.Width / numFrames);


    sourceRectangle.Y = 0;

    sourceRectangle.Width = monkeyTex.Width / numFrames;

    sourceRectangle.Height = monkeyTex.Height;

}


#endregion
- Add a region called
Overridden GameComponent Methods. We'll walk through these methods step by step, since they are slightly more complicated. - Override the
Initializemethod. This sets up the bounding box and the animation variables.
public override void Initialize()

{

    // Initialize variables

    boundingBox = new Rectangle();

       sourceRectangle = new Rectangle();

    currentFrame = 0;

    base.Initialize();

}
- Override the
LoadContentmethod. This loads the content for the monkey, calculates its position and origin, creates (and shrinks) the bounding box, and updates the source rectangle (since we know the texture size now).
protected override void LoadContent()

{

    // Create sprite batch and load textures

    spriteBatch = new SpriteBatch(GraphicsDevice);

    monkeyTex = Game.Content.Load<Texture2D>("Textures/monkeysheet");


    // Calculate origin and position (Dependent on texture size)

    origin = new Vector2((monkeyTex.Width / numFrames) / 2,

        monkeyTex.Height / 2);


    // Move the monkey down 5 pixels so he's not right at the top of the

    // screen.

    position = new Vector2(120, monkeyTex.Height / 2 + 5);


    UpdateSourceRectangle();


    // Set up bounding box

    boundingBox.X = (int)(position.X);

    boundingBox.Y = (int)(position.Y);

    boundingBox.Width = monkeyTex.Width / numFrames;

    boundingBox.Height = monkeyTex.Height;


    // Shrink the targetable area (bounding box) of the

    // monkey by 20px on each side

    // This makes hitting the monkey more challenging.

    boundingBox.Inflate(-20, −20);


    base.LoadContent();

}
- Override the
Updatemethod. This is used only to animate the monkey.
public override void Update(GameTime gameTime)

{

    // Check to see if the frame needs to be advanced.

    currentInterval += gameTime.TotalGameTime.TotalSeconds;

    if (currentInterval > animIntervalSeconds)

    {

        currentFrame++;


        // Loop if last frame

        if (currentFrame > numFrames - 1)

            currentFrame = 0;


        UpdateSourceRectangle();

        currentInterval = 0.0f;

    }


    base.Update(gameTime);

}
- Finally, override the
Drawmethod. This draws the monkey using the current source rectangle to get the current frame, with no rotation and a scale factor of 1.0 (original size).
public override void Draw(GameTime gameTime)

{

    spriteBatch.Begin();


    // Draw using current source rectangle.

    spriteBatch.Draw(monkeyTex, position, sourceRectangle, Color.White,

        0.0f, origin, 1.0f, SpriteEffects.None, 0.5f);


    spriteBatch.End();

    base.Draw(gameTime);

}
When enabled and visible, the Monkey component will draw an animated monkey and expose a bounding box property that can be used for collision detection.
Creating the Banana Component
The Banana component is by far the most influential component in the game play for Monkey Feeder. It draws a banana on screen, but also exposes methods so that it can be told to throw itself given a certain initial direction and wind speed. The banana's trajectory can also be adjusted in mid-flight using the touch capabilities of the Zune. When the touchpad is in use, the banana is tinted green so the users know they are affecting the input.
- As with all the other components, add a new class to the
Componentsfolder calledMonkeyProjectile.cs. Add the same three namespaces and inherit fromDrawableGameComponent. - Add a region called
Fields, and add the following fields to the class:
#region Private Fields


// Graphics

private SpriteBatch spriteBatch;

private Texture2D bananaTex;


// Position, direction, bounding box and origin

private Vector2 tossDirection;

private Vector2 windDirection;

private Vector2 initialPosition;

private Vector2 position;

private Vector2 origin;

private Vector2 adjustmentVector;

private Rectangle boundingBox;


// Rotation and scale factors for the texture

private float rotation;

private float scale;


// Used to tell if the banana's been thrown

private bool isThrown;


#endregion
- Add a region called
Constantswith the following constant definitions. Again, these can be tweaked to alter game play in whatever way you wish.
#region Constants


// How fast the banana rotates.

const float rotationSpeed = 0.5f;


// How much of an impact use of the touch pad

// has on the direction of the banana.

const float touchFactor = 0.03f;


// How quickly the banana scales down.

const float scaleRate = −0.005f;


// How quickly the banana moves.

const float bananaSpeed = 5.0f;


#endregion
- Add the blank constructor in its own region.
#region Constructor(s)


public BananaProjectile(Game game)

    : base(game)

{


}


#endregion
- Add a region for
Propertiesand add the following two properties. The first gives you access to the bounding box that surrounds the object. The second allows the program to know whether the banana is in flight.
#region Properties


public Rectangle BoundingBox

{

    get

    {

        return boundingBox;

    }

}


public bool Thrown

{

    get

    {

        return isThrown;

    }

}


#endregion
- Add a region called
Public Methodsand add the following three methods to that region. These allow other classes to control the banana externally. TheTossmethod accepts an initial direction (from the toss arrow) and a wind vector (from the wind meter). TheResetmethod returns the banana to its initial position at the bottom of the screen and resets its rotation and scale. TheAdjustmethod is used when touch input is engaged, and modifies the adjustment vector.
#region Public Methods


public void Toss(Vector2 toss, Vector2 wind)

{

    tossDirection = toss;

    windDirection = wind;

    position = initialPosition;


    isThrown = true;

    rotation = 0.0f;

}


public void Reset()

{

    position = initialPosition;

    isThrown = false;

    rotation = 0.0f;

    scale = 1.0f;

}


public void Adjust(Vector2 touchVector)

{

    adjustmentVector = touchVector;

}


#endregion
- Add a region for
Overridden GameComponent Methods. Because these methods are a little more complex, we'll walk through each of them. - Override the
Initializemethod with the method shown. It sets up the initial position for the banana and instantiates or assigns values to the other private variables.
public override void Initialize()

{

    initialPosition = new Vector2(120, 300);

    boundingBox = new Rectangle();

    adjustmentVector = Vector2.Zero;


    Reset();


    base.Initialize();

}
- Override the
LoadContentmethod with the following method. This method loads the banana texture and calculates the bounding box and origin for the banana.
protected override void LoadContent()

{

    // Create the sprite batch & load content

    spriteBatch = new SpriteBatch(GraphicsDevice);

    bananaTex = Game.Content.Load<Texture2D>("Textures/banana");


    // Set up the bounding box, now that we know the

    // texture size.

    boundingBox.X = (int)position.X;

    boundingBox.Y = (int)position.Y;


    boundingBox.Width = bananaTex.Width;

    boundingBox.Height = bananaTex.Height;


    // Set the origin for the texture.

    origin = new Vector2(bananaTex.Width / 2, bananaTex.Height / 2);


    base.LoadContent();

}
- Override the
Updatemethod. This method modifies the current direction of the banana, taking into account its base (initial) direction plus the effects of the wind and adjustment vectors. It also modifies the bounding box to reflect the banana's current position on the screen.
public override void Update(GameTime gameTime)

{

    if (isThrown)

    {

        // Update the direction of the banana with the wind factor

        tossDirection += windDirection;


        // Adjust with touch, if any

        tossDirection.X += adjustmentVector.X * touchFactor;


        // Multiply by the scalar speed value

        position += tossDirection * bananaSpeed;


        // Rotate & scale

        rotation += rotationSpeed;

        scale += scaleRate;

    }


    // Update bounding box position. Width and height

    // do not need to be updated.

    boundingBox.X = (int)(position.X);

    boundingBox.Y = (int)(position.Y);


    base.Update(gameTime);

}
- Lastly, override the
Drawmethod. This method determines whether touch is activated and modifies the tint color to green if so. Then it draws the banana at its current position using the current rotation and scale factors.
public override void Draw(GameTime gameTime)

{

    // Tint the banana green if touch is being used.

    Color tintColor = Color.White;


    if (adjustmentVector != Vector2.Zero && isThrown == true)

        tintColor = Color.Green;


    spriteBatch.Begin();

    spriteBatch.Draw(bananaTex, position, null, tintColor,

        rotation, origin, scale, SpriteEffects.None, 0.5f);

    spriteBatch.End();

    base.Draw(gameTime);

}
At this point, all of your components are built! You should have five drawable components in the Components folder, as shown in Figure 5-19. Compile the code and correct any typos or other errors.

Figure 5-19. Monkey Feeder is almost done! All the game's components are ready to go.
The last step is to bring all these components together with a little simple game state management. In this game, there is still a small amount of game logic in place in the main code file, which serves as the "driver" for the game (changing game states, checking collisions, and handling input).
Putting the Components Together
At this point, all of your components should compile together happily. If you had issues compiling them, be sure to check out the Chapter 5/Exercise 5 source code.
Now we'll begin integrating all of these components with some simple game state management.
- Open the main game's class file,
MonkeyFeederGame.cs. - Add the following two
usingdirectives to the bottom of the existing list so that you can use the input handler and all the components you just built:
using InputHandler;

using MonkeyFeeder.Components;
- Directly above where the
MonkeyFeederGameclass begins (within theMonkeyFeedernamespace), add the following game state enumeration, which defines the available game states for this game:
public enum GameState

{

    Start,

    Playing,

    GameOver

}
- Move down to the
MonkeyFeederGameclass. Find the declared sprite batch and graphics device variables and move them into a new region calledFields. Add the remaining fields to this region:
#region Fields


// Default fields

GraphicsDeviceManager graphics;

SpriteBatch spriteBatch;


// Content

Texture2D startTex;

Texture2D beachTex;

Texture2D gameOverTex;

SpriteFont smallFont;


// Game components

InputState input;

Water waterComponent;

TossArrow tossArrow;

WindNeedle windNeedle;

Monkey monkey;

BananaProjectile banana;


GameState gameState;


// Score related variables

private int score;

string finalScoreText;


private Vector2 scoreTextPosition;

private Vector2 gameOverScorePos;


#endregion
- Put the constructor in its own region and add the code following the line where
TargetElapsedTimeis assigned. This code instantiates the game components and then adds them to the game'sComponentscollection so they will be automatically notified of game events.
#region Constructor(s)


/// <summary>

/// Creates a new instance of the MonkeyFeederGame class and

/// adds game components to it.

/// </summary>

public MonkeyFeederGame()

{

    graphics = new GraphicsDeviceManager(this);

    Content.RootDirectory = "Content";


    // Frame rate is 30 fps by default for Zune.

    TargetElapsedTime = TimeSpan.FromSeconds(1 / 30.0);


    // Add components

    input = new InputState(this);

    waterComponent = new Water(this);

    tossArrow = new TossArrow(this);

    windNeedle = new WindNeedle(this);

    monkey = new Monkey(this);

    banana = new BananaProjectile(this);


    // Make sure to add drawable components

    // in the order you want them drawn.

    Components.Add(input);

    Components.Add(waterComponent);

    Components.Add(tossArrow);

    Components.Add(windNeedle);

    Components.Add(monkey);

    Components.Add(banana);

}


#endregion
- Put
Initialize, LoadContent, Update, andDrawin a new region calledOverridden XNA Methods. You can also delete the overriddenUnloadContentmethod, which is not used in this game. We'll come back to the methods in this region in a moment. - Add a new region called
Utility Methods. This region contains a single method,SetGameState, which causes the game to transition to the specified state. The local variableenableComponentsis used to enable or disable all game components at once in this method, which is useful since two game states require that the components be invisible. Theswitchstatement at the top of the method also gives you an opportunity to reset any values or perform other pretransition logic. Add this method:
#region Utility Methods


private void SetGameState(GameState state)

{

    // Enable or disable all the drawable components

    // using this variable.

    bool enableComponents = false;


    switch (state)

    {

        case GameState.Start:

            enableComponents = false;

            break;

        case GameState.Playing:

            enableComponents = true;

            score = 0;

            banana.Reset();

            tossArrow.Reset();

            windNeedle.Randomize();

            break;

        case GameState.GameOver:

            enableComponents = false;

            break;

    }


    // Apply enable/disable to the Enabled and Visible properties

    // of all the DrawableGameComponents in the game.

    waterComponent.Enabled = waterComponent.Visible = enableComponents;

    windNeedle.Enabled = windNeedle.Visible = enableComponents;

    tossArrow.Enabled = tossArrow.Visible = enableComponents;

    monkey.Enabled = monkey.Visible = enableComponents;

    banana.Enabled = banana.Visible = enableComponents;


    // Set the game state.

    gameState = state;

}


#endregion
- Now, working within the
Overridden XNA Methodsregion, change the code in theInitializemethod to the following method. This sets up the back buffer and screen size, and also adds some extra compatibility for the Windows version of this game by forcing the window size to match the buffer and showing the mouse cursor. This is also where most of the local variables are initialized.
protected override void Initialize()

{

    // Set up graphics device, show mouse cursor on Windows

    graphics.PreferredBackBufferWidth = 240;

    graphics.PreferredBackBufferHeight = 320;

    graphics.ApplyChanges();

#if WINDOWS

    IsMouseVisible = true;

#endif

    // Initialize game state to Start

    SetGameState(GameState.Start);


    // Set up placement vectors

    scoreTextPosition = new Vector2(10, 10);

    gameOverScorePos = new Vector2(10, 100);


    // Init remaining fields

    score = 0;

    finalScoreText = "";


    base.Initialize();

}
- Modify the
LoadContentmethod next. This method just loads the content required for the game to run without adding any of its components, like the screen backgrounds and the font.
protected override void LoadContent()

{

    // Create a new SpriteBatch, which can be used to draw textures.

    spriteBatch = new SpriteBatch(GraphicsDevice);


    // Load in textures and fonts used in the main game loop.

    beachTex = Content.Load<Texture2D>("Textures/beachbg");

    startTex = Content.Load<Texture2D>("Textures/startscreen");

    gameOverTex = Content.Load<Texture2D>("Textures/gameover");

    smallFont = Content.Load<SpriteFont>("Fonts/Small");

}
Note When loading the same asset in multiple places, such as component-based games where the font is needed in more than one place, the asset is not actually reloaded. The XNA content loader just returns the reference to the existing asset.
- The
Updatemethod is to be modified next. This is probably the longest method you've seen so far in the book, but remember that it is broken up by game state. I'll explain how the logic works after the listing.
protected override void Update(GameTime gameTime)

{

    // Allows the game to exit

    if (input.NewBackPress)

        this.Exit();


    // Determine what to do based on the game state

    switch (gameState)

    {

        case GameState.Start:

            // Wait for a button press to transition to Playing

            if (input.NewPlayPress || input.MiddleButtonPressed)

            {

                SetGameState(GameState.Playing);

            }

            break;

        case GameState.GameOver:

            // Display some cheeky text

            finalScoreText = "You fed the monkey " + score + " time";

            finalScoreText += score != 1 ? "s." : ".";


            if (score == 0)

                finalScoreText += "
Monkey still hungry.";

            else if (score < 5)

                finalScoreText += "
Why tease monkey?";

            else if (score < 15)

                finalScoreText += "
Mmm, thank you.";

            else if (score < 25)

                finalScoreText += "
You do good!";

            else if (score < 50)

                finalScoreText += "
Wow! Monkey stuffed!";

            else if (score < 75)

                finalScoreText += "
Wicked Sick!";

            else

                finalScoreText += "
NO MORE! I BEG!";


            // Wait for a button press to transition back to Start

            if (input.NewPlayPress || input.MiddleButtonPressed)

            {

                SetGameState(GameState.Start);

            }

            break;


        case GameState.Playing:

            // Apply touch pad to banana's trajectory and check collisions

            if (banana.Thrown)

            {

                banana.Adjust(input.TouchVector);


                // Monkey fed

                if (banana.BoundingBox.Intersects(monkey.BoundingBox))

                {

                    score++;

                    banana.Reset();

                    tossArrow.Reset();

                    windNeedle.Randomize();

                }


                // Banana completely missed - game over!

                if (banana.BoundingBox.Right < 0

                    || banana.BoundingBox.Left > 320

                    || banana.BoundingBox.Bottom < 0)

                {

                    SetGameState(GameState.GameOver);

                }

            }


            else

            {

                // Toss the banana

                if (input.NewPlayPress)

                {

                    tossArrow.Pause();

                    banana.Toss(tossArrow.Vector, windNeedle.Vector);

                }

            }

            break;

    }


    base.Update(gameTime);

}
In the
Startstate, the game just waits for the Play button to be pressed. In theGameOverstate, the score message (with some cheeky commentary added) is updated and the game waits for input to transition back toStart.The core of the game is in the
Playingstate. If the banana is thrown, the banana's direction is modified with the touch vector. Then any collisions are detected (note how easy collision detection is when components expose bounding boxes). If the banana hits the monkey, the score is incremented and the game board is reset. If the banana hits some other boundary, the game transitions to theGameOverstate. If the banana is not yet thrown, the game waits for user input to throw it and calls theTossmethod on the banana to pass in the applicable vectors. - Like the
Updatemethod, theDrawmethod behaves differently depending on the current game state. Its code is a little bit simpler. Change theDrawmethod as shown, adding the required code:
protected override void Draw(GameTime gameTime)

{

    GraphicsDevice.Clear(Color.Black);


    spriteBatch.Begin();


    // Determine what to draw based on the game state.

    switch (gameState)

    {

        case GameState.Start:

            // Just draw the background

            spriteBatch.Draw(startTex, Vector2.Zero, Color.White);

            break;

        case GameState.Playing:

            // Draw the background and the score text.

            // The components draw themselves.

            spriteBatch.Draw(beachTex, Vector2.Zero, Color.White);

            spriteBatch.DrawString(smallFont, "Score: " + score.ToString(),

                scoreTextPosition, Color.Black);

            break;

        case GameState.GameOver:

            // Draw the background and score text.

            spriteBatch.Draw(gameOverTex, Vector2.Zero, Color.White);

            spriteBatch.DrawString(smallFont, finalScoreText,

                gameOverScorePos, Color.White);

            break;

    }


    spriteBatch.End();


    base.Draw(gameTime);

}
And, believe it or not, we're finished! Well, almost. There is one last thing to do to ensure the game is nice and tidy.
Setting Game Properties to Appear More Professional
Up until now, if you browse games on your Zune and find yours, it has the same name as your solution file and offers no description. This is not cool.
To fix this, expand the Properties node under the MonkeyFeeder project in the Solution Explorer, and open AssemblyInfo.cs. Change each of those assembly properties (aside from the GUID, of course) to better describe the product. Spaces are allowed.
Finally, make sure that you have replaced GameThumbnail.png with something a little more interesting, such as the graphic provided in the Examples/Chapter 5/Artwork folder.
Build, Run, Copious Celebration
Now is the time to reap the fruits of your labor. We'll test the game both on the Zune and Windows, with Windows being the first up to the plate.
- Set the Windows copy of
MonkeyFeederas the startup project, and press F5 to run it, as shown in Figure 5-20.
Figure 5-20. Monkey Feeder starting up on the PC
- Use Enter as Play, the spacebar as the middle button, and Escape as Back. Press Enter (Play) to begin play.
- Wait for the appropriate angle, and press Enter to launch a banana, as shown in Figure 5-21. If you're way off, try holding down the left mouse button and moving to the left or right of the center to guide the banana. The closer the mouse is to the edge of the screen, the more pronounced the adjustment will be. Notice how the banana turns green.
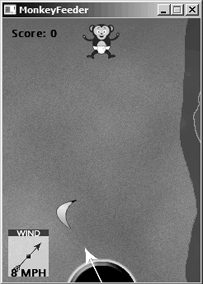
Figure 5-21. Monkey Feeder in action on the PC
- Play constantly. Try to beat your own high score. Try to score 75 consecutive bananas! But wait, we still need to test on the Zune.
- Stop debugging and open the XNA Game Studio Device Center. Set the plugged-in Zune (assuming you have one) as the default device. Right-click the
MonkeyFeederproject (original project for the Zune) and set it as the startup project. Press F5 to deploy and start it. - Use the on-screen commands. Use the Play button to fire a banana, as shown in Figure 5-22. Use the touchpad (left or right) to affect the direction of a launched banana. Show it off to your friends.
Note If you are using a first-generation Zune, you won't be able to use the touch features of the program.

Figure 5-22. Monkey Feeder on the Zune with touch activated
Suggested Extensions
There are a few things that were not implemented in this version of Monkey Feeder. You could try implementing the guide to support playing music from the Zune's playlist—after all, how else will your players get through a ten-hour marathon of Monkey Feeder hoping to score Wicked Sick?
You could also support sound effects, difficulty levels with new backgrounds, better animations, and more to expand this simple game. The beauty is that since so much of the game is componentized, you can make several changes without opening a whole can of worms!
Cleaning Up for Deployment
In building Monkey Feeder, you updated the AssemblyInfo.cs file to better describe your game. I think it's appropriate to offer some more information on that topic.
When you deploy a game to the Zune without changing any of the assembly information, it shows up in the games list with no description and Microsoft copyrights. The title is the same as the DLL built by Visual Studio, which is usually the same as the solution file. It also usually sports the same default, blue thumbnail image. Here are some tips to make your game appear more professional and take it from development mode to consumer mode.
Making Changes in AssemblyInfo.cs
Any project in the Solution Explorer has a node beneath it called Properties. This node usually contains a file called AssemblyInfo.cs. This file contains some general attributes that you can change, as in this snippet from Monkey Feeder's AssemblyInfo.cs:
// General Information about an assembly is controlled through the following

// set of attributes. Change these attribute values to modify the information

// associated with an assembly.

[assembly: AssemblyTitle("MonkeyFeeder")]

[assembly: AssemblyProduct("MonkeyFeeder")]

[assembly: AssemblyDescription("")]

[assembly: AssemblyCompany("Microsoft")]

[assembly: AssemblyCopyright("Copyright © Microsoft 2008")]

[assembly: AssemblyTrademark("")]

[assembly: AssemblyCulture("")]
Simply changing these fields will make a big difference in what players see when your game is on their Zune. For example, adding the space to change "MonkeyFeeder" to "Monkey Feeder" can make your game seem much less "programmery." Changing the empty description to something like "Feed the monkey" adds character and more information about the game. Changing the company, copyright, and trademark can be useful if you are publishing a game and need to include legal terms. Finally, the assembly culture is a way to define a language and region, such as EN-US, EN-UK, EN-CA, FR-CA, and so on.
Changing the Thumbnail
The thumbnail is a user's first impression of your game. If you have a professionally made thumbnail as opposed to the default one, it can make users want to play it (especially if it looks shiny).
Even if you don't have a professional artist in your back pocket, it's still a good idea to replace the game thumbnail. Here's all you need to do:
- Open
GameThumbnail.pngfrom your project in your favorite graphics editor. - Delete everything in it, leaving a transparent background.
- Paste in your new icon. Adjust size and colors as necessary.
- Flatten (if necessary) and save.
The new game icon will now appear in the game list on the Zune.
Note When you change your Zune game's thumbnail, the thumbnail is not automatically set as the application icon for the Windows game. To use the icon for the Windows game, you need to create an .ico version of the icon and set it as the default icon in the Windows game's project properties.
Taking these steps will help to polish a finished game. They are not much work, and they pay off from a user experience perspective!
Check Your Knowledge
Wow, what an action-packed chapter! Test your knowledge with the following quick ten-question quiz.
- What are unit vectors normally used for?
- How can you create a vector knowing only an angle?
- What method of the
SpriteFontclass allows you to find the width and height of a block of text? - What method allows you to check if two bounding boxes collide?
- What are the main pros and cons of per-pixel collision detection?
- What kind of data type is simple game state management structured around?
- What makes a
DrawableGameComponentdifferent from aGameComponent? How are they related? - How do you make a drawable game component invisible and disabled?
- Which file can you edit to change the game's externally visible properties, such as its title and description?
- What is the standard unit of measure for angles in XNA?
Summary
With two real games under your belt—OutBreak and Monkey Feeder—you are well on your way to becoming a Zune game development guru.
In this chapter, you got a crash course in 2D mathematics critical to game development in general. You learned about some fundamental XNA concepts such as game state management, collision detection, and deployment considerations. Finally, you learned how to harness the power of game components to code smarter and more efficiently.
In the next chapter, you'll learn some tips, tricks, and advanced techniques that will help you take your skills to the next level.