
CHAPTER 4
Developing for the Zune
In the previous chapters, you have learned a lot about the various aspects of developing games using XNA Game Studio. You have also learned about the content pipeline, which is a critical component of the XNA platform. Until now, all of the code examples have been for the PC. In this chapter, that changes. Now we will build games specifically for the Zune device.
If you don't have a Zune yet, don't worry! You will also learn how to create copies of your Zune project for the PC and arrange the project so that it compiles differently based on the target platform.
First, you need to understand the work flow of Zune game development. Because there is currently no emulator for the Zune device, you will need to get used to waiting a little longer each time you run or debug the application on the device. Other caveats exist, as you'll learn in this chapter.
In the course of mastering the work flow of development for the Zune, you will build a small test "game" that operates on both the Zune and the PC. At the end of the chapter, using those concepts, you will build a more complicated game called OutBreak, which will be your first Zune project worthy of being called a game!
Deploying to the Zune
The deployment process is very straightforward and simple. To deploy a Zune game project to the Zune device, the following conditions must be met:
- The firmware on the Zune must be up-to-date and compatible with the version of XNA Game Studio you are running.
- The Zune must be connected via USB to the computer.
- The connected Zune must be set as the default Zune in the XNA Game Studio Device Center tool.
- The Zune client software (for synchronizing movies, music, and so on) cannot be running, and no other processes can be synchronizing to the Zune.
Before continuing with this chapter, make sure you have set up your development environment, which includes Visual Studio 2008 or Visual C# 2008 Express or later and XNA Game Studio 3.0 or later. Chapter 1 covers downloading and installing Visual Studio and XNA Game Studio.
Note You can download the latest version of XNA Game Studio from the XNA Creators Club web site (http://creators.xna.com). If you have a previous version of XNA Game Studio installed, including any community technology preview (CTP) versions, you must first uninstall those products before installing the new one.
Updating Your Zune's Firmware
The Zune firmware update process is done through the Zune client software, available at http://www.zune.net. At the time of this writing, the appropriate configuration is Zune firmware version 3.0 and XNA Game Studio 3.0.
Caution XNA Game Studio 3.0 supports development on 64-bit platforms for the Zune. If you are running a 64-bit operating system, you must download the 64-bit version of the Zune software to install the proper drivers for the device.
To verify the Zune's firmware version and to update it if necessary, plug in your Zune device after installing the Zune client software and click the Settings button in the upper-right corner of the screen, as shown in Figure 4-1.
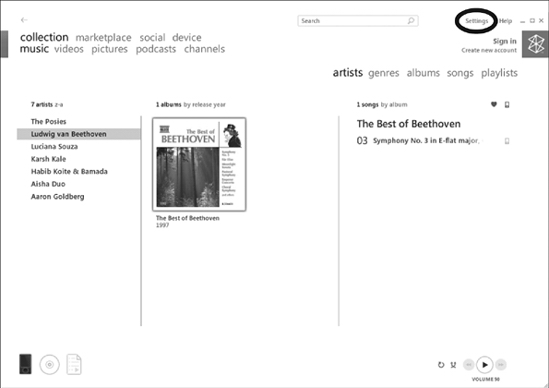
Figure 4-1. Click the Settings button on the Zune screen to check your Zune's firmware version.
From the Settings screen, click the Device tab. On the left side of that tab, click Device Update. If your firmware is up-to-date, you will see a screen similar to Figure 4-2. If your device firmware is not up-to-date, you will see an Update button, which you can click to start the firmware update process. When this process completes, your Zune will be ready for game development.

Figure 4-2. The Device Update screen shows the status of your Zune's firmware.
Caution If you are using multiple Zunes, ensure that each of them has the latest firmware installed before attempting to use them in the development process.
Registering Your Zune with Visual Studio
To allow Visual Studio to deploy to your Zune, all you need to do is launch XNA Game Studio Device Center and add the device. This process is identical to that of adding an Xbox 360 console to Device Center.
XNA Game Studio Device Center is a utility that allows you to manage the devices to which you want to deploy. Zune development with XNA, unlike Xbox 360, does not require a Creators Club membership, so the procedure is straightforward.
To register your device with Device Center, follow these steps:
- Select Tools
 Launch XNA Game Studio Device Center to launch the utility, as shown in Figure 4-3.
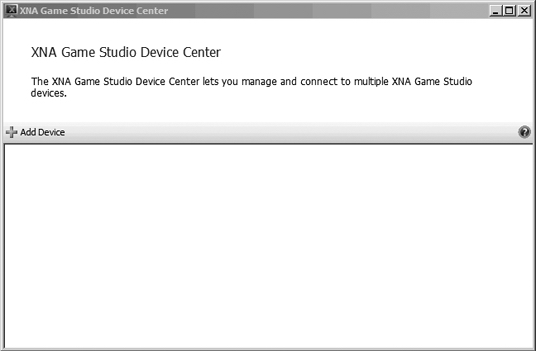
Figure 4-3. XNA Game Studio Device Center
- Connect your device with the Zune USB cable.
Tip You can connect multiple Zunes to different USB ports on your computer and add them to XNA Game Studio Device Center.
- In the Device Center, click the Add Device button. The XNA Game Studio Devices dialog box appears, as shown in Figure 4-4.

Figure 4-4. The XNA Game Studio Devices dialog box
- Click the Zune icon. Your connected device should appear, as shown in Figure 4-5. If it does not, ensure that the device is not currently synchronizing or updating its firmware. You can try closing the Zune client to stop it from synchronizing.

Figure 4-5. The Select Your Zune dialog box when two Zunes are connected to the computer
- Select the Zune device you want to add and click Next. Visual Studio will now test its connectivity with the Zune, and you will briefly see the dialog box shown in Figure 4-6.

Figure 4-6. Testing connectivity between Visual Studio and the Zune
- When the connectivity test completes, you will see a dialog box indicating that the connection was successful, as shown in Figure 4-7. If you have more than one Zune in Device Center, you will have the option to set the newly added one as the default device (the one to which Visual Studio will deploy your game). If this is the only device you've added, it will be set as the default device automatically.
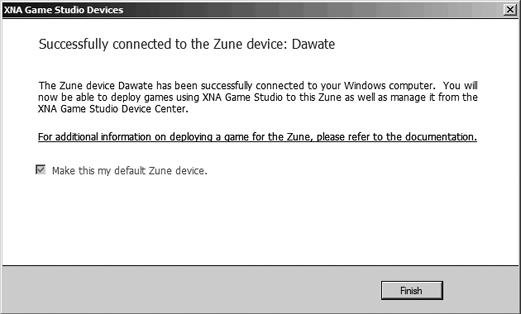
Figure 4-7. The Zune device has been added successfully.
- Click Finish. You will see a list of devices in XNA Game Studio Device Center, as shown in Figure 4-8. The device with the green check mark icon is the one to which Visual Studio will deploy (the default device). There can be only one default device at a time, which means you cannot deploy to multiple Zunes at once.

Figure 4-8. XNA Game Studio Device Center with two Zunes added and one set as the default, which is where games will be deployed
At this time, your Zune is registered with XNA Game Studio Device Center. When you plug it in next time, it will be available for you to use; you don't need to repeat this process.
If you later want to remove a Zune device from Device Center, all you need to do is right-click the device in Device Center and select Remove, as shown Figure 4-9. After confirmation, the Zune will be unregistered. You will need to add it again later if you wish to use it again.
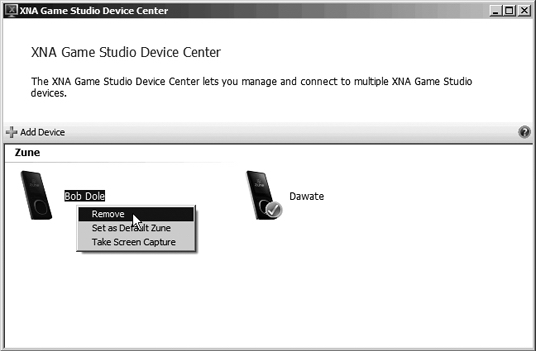
Figure 4-9. Removing a Zune from Device Center
Tip A great feature that has been added in XNA Game Studio 3.0 is the ability to take a screen capture from a Zune that is running a game. While the game is running, simply right-click the Zune in XNA Game Studio Device Center and click Take Screen Capture. The result will be a PNG file at 240 by 320 pixels. See Figure 4-12, at the end of the following exercise, for an example.
What's a programming book without the requisite Hello World example? In this short exercise, you will create a Zune game that displays some text on the screen. You will confirm that your configuration is ready to rock, and you will also see how to deploy a game to the Zune.
- Connect your Zune to your computer and launch Visual Studio.
- Launch Device Center by selecting Tools Launch XNA Game Studio Device Center. Check that the connected Zune is set as the default. (For an example, see Figure 4-8, shown earlier, where the Zune named Dawate is set to the default.) Then close Device Center.
- In Visual Studio, create a new project by selecting File New Project.
- In the left pane of the New Project dialog box, choose XNA Game Studio 3.0 from the Visual C# project types node. In the right pane, choose Zune Game (3.0). Choose a location for the project (or use the default), and type
HelloZuneas the project name, as shown in Figure 4-10. Click OK.

Figure 4-10. Creating the HelloZune project
- To add a new sprite font to the project, right-click the
Contentnode in the Solution Explorer and choose Add New Item. Select the Sprite Font template and name it Tahoma(or another font name that you know exists on your computer), as shown in Figure 4-11. You don't need to include the.spritefontextension; it will be added automatically. Click Add.

Figure 4-11. Adding a sprite font
- Open
Game1.cs. Immediately after the declaration of thespriteBatchvariable and before theGame1constructor, declare aSpriteFontvariable to reference the font you just added, as follows:
SpriteFont tahomaFont; - In the
LoadContentmethod, replace the// TODO:line with the code to load the font from the content pipeline:
tahomaFont = Content.Load<SpriteFont>("Tahoma"); - In the
Drawmethod, replace the// TODO:line with the code to draw some text on the screen using the default sprite batch. This code draws the text "Hello Zune" in black Tahoma at point (0, 0) (Vector2.Zero):
spriteBatch.Begin();

spriteBatch.DrawString(tahomaFont, "Hello Zune", Vector2.Zero, Color.Black);

spriteBatch.End(); - Press F5 to run the game in debugging mode. This will catch any exceptions and allow the game to exit gracefully without a hard reboot of the device. If this is the first game you've deployed to your Zune, the XNA Framework components will be deployed first, followed by your game and its compiled assets. Look at your device during deployment to see which files are being copied.
- When deployment is complete, the game will run, and you will see a static screen on the Zune, as shown in Figure 4-12. Congratulations! Your first Zune application is a success.

Figure 4-12. The Hello Zune game in action
- In Visual Studio, click the Stop Debugging button (or press Shift+F5) to stop the game. The Zune will return to the XNA Game Studio Connect screen, and Visual Studio will exit debugging mode.
This simple "game" has shown you the basics of creating and deploying a very basic XNA game to your Zune device. Later in this chapter, in the "Your First Real Zune Game: OutBreak" section, you will create a slightly more complicated game with movement, game logic, input, and more.
Debugging, Running, and Rebooting
What is the practical difference between running with and without debugging, and why does the Zune reboot itself after your game exits?
The Zune reboot behavior is by design, and exists mainly to clean up resources and reload the firmware so that no leaks or possible exploits exist. You may notice that the games that come with the Zune 3.0 firmware do not reboot after exiting them. This is because they are signed by Microsoft and trusted by the firmware. There is currently no way to reproduce this behavior when creating your own game; the Zune will always reboot itself when your game exits.
Of course, a constantly rebooting Zune device can be a hindrance to the game-development process, when you are frequently testing code. Thankfully, when you run with debugging, the Zune will exit gracefully to the XNA Game Studio Connect screen, without rebooting fully.
Running with Debugging
As you've seen, when you are ready to deploy and test a game, or you can run it with debugging simply by pressing F5. You can also click the Debug icon in Visual Studio (it looks like a play icon).
For most purposes, running with debugging is preferred, because it is considerably more practical and provides more value to you during the development stage. Running with debugging has the following benefits:
- You can step into code that is executing on the Zune device itself.
- You can set breakpoints, watches, and use all the features of the Visual Studio debugger that you might use for any other application.
- When you stop debugging (by clicking the Stop Debugging button in Visual Studio or by pressing Shift+F5), the Zune does not reboot itself, so you can redeploy quickly and easily.
The drawbacks to running with debugging are as follows:
- Because debugging symbols are loaded and more information is being exchanged between the Zune and the PC, performance can be significantly slower.
- Problems related to networking can arise. If you are trying to test network connectivity, you should run without debugging so that all Zunes in the session run with relatively the same performance. Additionally, if you stop at a breakpoint, the program will block (wait for your input to the debugger), and it will stop receiving network packets.
- You may experience inconsistent program behavior. The game may run slower, faster, or just differently, depending on what the debugger is doing. To gauge your game's real performance, run without debugging.
Running Without Debugging
Depending on your needs at the time, you may prefer to run without the overhead of the debugger. Running without debugging has the advantage of providing truer, more consistent performance. Because there is no debugger overhead, you will have the maximum possible headroom available to run the game.
Running without debugging has the following drawbacks:
- You do not have the ability to step in and try to hunt down the source of erratic behavior.
- You lose control over the flow of execution.
- You cannot use watches, breakpoints, or other useful features of the debugger.
Tip You can prevent the Zune software from launching when a device is initially plugged in by selecting Settings ![]() Device
Device ![]() Sync Options in the Zune software and clearing the check box titled "Start the Zune software when I connect a device."
Sync Options in the Zune software and clearing the check box titled "Start the Zune software when I connect a device."
Creating Windows Versions of Zune Games
Suppose that you're developing a Zune game and make a minor change that doesn't really warrant a full deployment to the Zune—you know it will work, and you don't want to wait on the deployment process. For example, perhaps you want to test some new colors or change some text. You might wish there was a parallel Windows version of this game that you could use just to check that the game still runs after these minor changes. Thankfully, XNA Game Studio provides an automated way to do this.
The Create a Copy option, available from the project's context menu in the Solution Explorer, creates a new project file that references the same source code and content as the original project. This way, any changes you make are reflected in the output of either project. The next exercise demonstrates how to create a copy of a Zune game for Windows, using the Hello Zune game we created in Exercise 4-1.
Tip The Create a Copy option can be used to create copies of your game to and from PC, Xbox, and Zune projects. This means that if you start with a Windows project, you can create a Zune copy of it later this way.
EXERCISE 4-2. A WINDOWS COPY OF HELLO ZUNE
Creating a Windows copy of a Zune game is easy. In this example, we'll use the HelloZune project we created in Exercise 4-1.
- In Visual Studio, open the
HelloZuneproject . - In the Solution Explorer, right-click the project (not the solution) and choose Create Copy of Project for Windows, as shown in Figure 4-13.
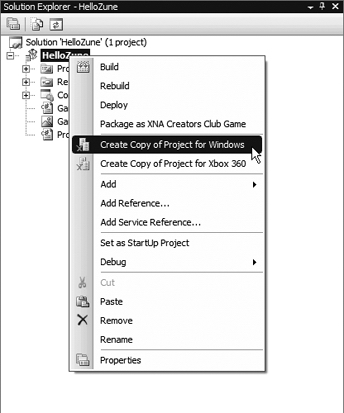
Figure 4-13. Creating a copy of the project for Windows
- Notice the new project created in the Solution Explorer called
Windows Copy of HelloZune, as shown in Figure 4-14. OpenGame1.cs, and you will see that it contains the code we wrote in Exercise 4-1; this is the exact same file.

Figure 4-14. The Zune project and the Windows copy in the Solution Explorer
- To run the PC version of the game, right-click the
Windows Copy of HelloZuneproject in the Solution Explorer and select Set as Startup Project. - Press F5 to run the project with the debugger. Notice that the game is still deployed to the Zune, but it does not launch on the device. Instead, you see the game run on your PC. It looks like Figure 4-15.
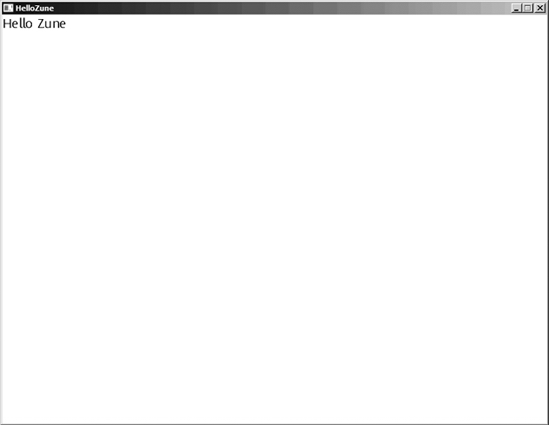
Figure 4-15. Hello Zune running on the PC
Zune Specifications and Optimization
Now that we have some simple elements of the game development work flow established, it's time to learn more about this very cool device and how to create games that perform well on it.
Reviewing the Core Zune Specifications
Current iterations of the Zune, both flash-based and hard-drive-based, share the following system specifications:
- 400 MHz processor
- 64MB of memory (16MB available for XNA games)
- 240 × 320 screen
- 16-bit color with 8-bit alpha channel
- Wi-Fi
- Touch-sensitive Zune pad input
- Windows Embedded operating system
- .NET Compact Framework
The two major areas of note in this list are the processor speed and RAM. While these specs appear to be limiting at first glance, the computing capability of the Zune is actually quite powerful compared to similar devices on the market at this time. The XNA Framework is incredibly efficient, although there is an inaccurate perception that managed code runs noticeably slower than unmanaged code.
Writing Performant Code for the Zune
Although the XNA Framework is great at optimizing and running complicated code, you should still make it part of your active mindset to write "performant" code (a term borrowed from a .NET architect friend of mine named Glen Jones).
Realistically, it is safe and perfectly fine to use things like generic collections and foreach loops, although these elements of programming have much faster alternatives. For example, working with arrays will always be faster than working with generic collections. Usually, for loops are faster than foreach loops.
Writing performant code is about balance. Don't be afraid to harness the power of the Zune; too much consideration for performance can end up costing you a lot of time. I suggest that you start with what you are comfortable coding. If a generic collection suits your needs, use one. Later, during the optimization stages of development, take a scalpel to your control flow and data types to determine where you are taking the biggest performance hit, and work backward in layers of abstraction.
Be careful not to pass enormous constant value types around all the time. I had one experience in mobile application development where the previous team had megabytes worth of constant values being passed around in nearly every function call. This would bring the application to its knees just a few layers into the call stack.
In general, you should write modular, cohesive code; use libraries; and adopt smart design patterns, which is a topic for another book. Optimization is important but not crucial in the opening phases of game development, so don't worry about it until it becomes a problem (especially since you are developing for the exact same hardware per user).
Here are a few pointers for improving performance on the Zune from the get-go:
Dereference frequently used variables: Let's say you are frequently accessing a game object's property in a block of code; for example,
battleship.Guns[0].AmmunitionCount. You can dereference this easily into an integer like this:
int firstGunAmmo = battleship.Guns[0].AmmunitionCount;
Dereference this variable at the beginning of the code block, and use
firstGunAmmofor the remaining calculations, instead of repeating the longer line of code. This makes your code more readable, and it also means that the property is retrieved only once. This reduces the number of calculations.Use textures whose width and height are a power of 2: Most professional games use textures that have dimensions that are powers of 2, such as 4 × 4, 16 × 16, 32 × 16, and so on. Textures not fitting this format will still be drawn, of course, but it is computationally more expensive to rotate them due to anti-aliasing.
Be smart about content loading: Loading content on the Zune is one of the most computationally expensive operations you can perform. Loading all the content up-front, at the game's start, will eliminate the stalls and freezes associated with on-demand content loading. However, when done correctly, on-demand content loading can actually work in your favor. For example, if you have a level-based game where each level requires a substantial quantity of asset data to be loaded, adding the new assets between levels (and showing a loading screen at that time) could improve your game's overall performance, since assets will not be loaded until they are needed.
Handling Input on the Zune
Input handling on the Zune device can be slightly confusing. The part of the XNA Framework that allows you to access the state of the buttons and touchpad is the same that you would use for an Xbox 360 controller; there is currently no specific Zune input state class. The Zune controls are referenced in code by their analogs on the Xbox 360 controller.
Note On first-generation Zunes, there is no touch-sensitive pad. There is only a click wheel that works like a directional pad. This means that you should always support directional pad input, and support touch sensitivity as an added feature that can be disabled or enabled (if your game calls for it).
Accessing the Zune Pad
The Zune pad is a large, touch-sensitive area on the Zune. It operates exactly like a thumbstick on the Xbox 360 controller.
First, you should be aware of a couple of interesting caveats to the Zune pad's use that can cause frustration:
- Make sure the device is not locked when you try to use the input. On the upper-left area of the device is a sliding switch, which can be used to prevent any input on the device. If this switch is engaged, you may be wondering why your game isn't working.
- The Zune pad is not a multitouch device. It expects that only one finger is touching it at a given time. Trying to manipulate it with two fingers can result in strange behavior.
In code, the Zune pad is accessed like the Xbox 360's left thumbstick, and it outputs a 2D vector. The magnitude of this vector is always between zero and one, and the origin of the vector is in the center of the touchpad. Think of it as a simple 2D Cartesian coordinate plane, as illustrated in Figure 4-16.
In Figure 4-16, you see that the center of the Zune pad is at (0, 0). The x and y values can run anywhere from −1 to 1. The arrow shown in the figure is a vector representative of a touch at the absolute upper-right corner of the Zune pad, which translates in code to a Vector2 object equivalent to <1, 1>.
The value sent by the Zune pad changes based on where you touch it. Because the component values of a Vector2 object are of type float, the vector returned can look something like <-0.084, .587>. Because these values are always between −1 and 1, you can use the output of the Zune pad as ratios to modify other values using multiplication.

Figure 4-16. How the Zune pad input control works
For example, in the next exercise, we will add the following code to Game1.cs:
Texture2D characterTex;

SpriteFont normalFont;

Vector2 characterPosition = new Vector2(120, 160);

string displayText = "";

Vector2 displayTextPosition = new Vector2(5, 270);

const float sensitivity = 3.0f;
The characterPosition value will be updated in the Update method, based on the value of the Zune pad, and used later in the Draw method. It is initialized to a hard-coded Vector2 representing the center of the screen. Remember that the screen is 240 pixels wide by 320 pixels high. These values are simply those values divided by two.
The sensitivity variable is used to determine how far the character will move per unit on the Zune pad. You can modify this value to see the results. Increasing it causes the character to move more, while decreasing it causes the character to move less.
The Update method will include code to use the Zune pad input, as follows:
GamePadState inputState = GamePad.GetState(PlayerIndex.One);

Vector2 zunePadValue = inputState.ThumbSticks.Left;

zunePadValue.Y = -zunePadValue.Y;

characterPosition = characterPosition + (sensitivity * zunePadValue);

displayText = "Zune Pad:
" + zunePadValue.ToString();
This code first gets the state of the Zune inputs using GamePad.GetState. (Note that, technically, only one player is active on the Zune at a time, so you should always use PlayerIndex.One). The value of the left thumbstick is then retrieved and stored in the zunePadValue variable. Remember that the Zune pad state is retrieved using the left thumbstick value, because that is how it is mapped in the framework.
Notice the line that negates the Y component of the zunePadValue variable. The XNA coordinate system has y increasing as it goes downward, whereas a positive y value from the Zune pad indicates that it was pressed upward. Failing to negate this value gives an "inverted y axis" kind of feel, and is less intuitive in 2D games than it might be in 3D games.
The code then updates the character position variable. It uses the current character position as a base, and adds to that the vector returned by the Zune pad state multiplied by the sensitivity variable. Thus, if the character is currently at (0, 0) and the Zune pad is pressed at (0.5, 0.5), the new value of the character position will be (0, 0) + 2.0(0.5, −0.5) = (0, 0) + (1, −1) = (1, −1). This works because the user is touching the Zune pad above and to the right of center. Intuitively, the user would expect the on-screen object to move up and to the right. You can see that this calculation fulfills that assumption by moving the character from (0, 0) to (1, −1). Remember that in XNA, when the y coordinate is negative, that means up, not down.
In the next exercise, you will gain some practical insight into how this works.
EXERCISE 4-3. ZUNE PAD INPUT HANDLING
In this example, you will see how the Zune pad can be used to control on-screen elements in a smooth, responsive manner. You will be modifying a position value and drawing a texture at that position. You can follow along with the source code provided in Chapter 4 /Exercise 3/ZunePadExample. We'll be picking up the pace a bit in this exercise, because I assume you have followed the previous exercises and now have experience creating simple Zune Game projects in Visual Studio.
- In Visual Studio, create a new Zune Game project called
ZunePadExample. - In the
Contentproject, add the assetcharacter.pngfrom theChapter 4 /Exercise 3/Artworkfolder. - Add a new sprite font called
Normalto theContentproject. This is what we will use to view the value returned by the Zune pad. The default font face for XNA games is called Kootenay, which is a royalty-free font included with XNA Game Studio. - Open
Game1.cs. Above the constructor, where the private variables are declared, add the following lines of code (which were discussed in the text preceding this exercise):
Texture2D characterTex;

SpriteFont normalFont;

Vector2 characterPosition = new Vector2(120, 160);

string displayText = "";

Vector2 displayTextPosition = new Vector2(5, 270);

const float sensitivity = 3.0f;
- Locate the
LoadContentmethod and add the following two lines in place of theTODOcomment to initialize the game content:
characterTex = Content.Load<Texture2D>("character");

normalFont = Content.Load<SpriteFont>("Normal"); - Locate the
Updatemethod and add the following lines that access the Zune pad, in place of theTODOcomment (this code was also discussed in the text before this exercise):
GamePadState inputState = GamePad.GetState(PlayerIndex.One);
Vector2 zunePadValue = inputState.ThumbSticks.Left;
zunePadValue.Y = -zunePadValue.Y;
characterPosition = characterPosition + (sensitivity * zunePadValue);
displayText = "Zune Pad: " + zunePadValue.ToString(); - Locate the
Drawmethod and add the following lines that draw the character and the text on the screen, again, in place of theTODOcomment:
spriteBatch.Begin();

spriteBatch.Draw(characterTex, characterPosition, Color.White);

spriteBatch.DrawString(normalFont, displayText, displayTextPosition,

    Color.Black);

spriteBatch.End(); - Press F5 to run the game. You should see the character on the screen, as shown in Figure 4-17.
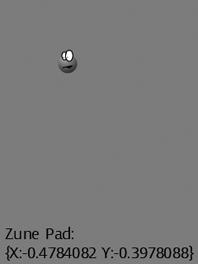
Figure 4-17. The Zune pad example in action
As you play around with your game, observe that the closer to the center of the pad you touch, the slower the character moves around the screen. The closer to the edge you press, the faster it moves. Be careful not to lose your character someplace off-screen, because there are no constraints in place to prevent it from going outside the play area. (Note that you could implement constraints easily by checking the position in an if statement before updating the character position in the Update method.)
Accessing the Directional Click Buttons
Older Zunes do not have a touchpad. They just have a four-directional click wheel with a center button. Newer Zunes with the touchpad are clickable as well. It is always a good idea to support the directional click buttons in case the end user doesn't have the touchpad. The games that come with the Zune 3.0 firmware, such as Hexic and Texas Hold 'em, have an option to disable touch. Disabling touch essentially causes the input subsystem to ignore touch and use only the directional click buttons.
The directional click buttons are used like normal controller buttons in XNA. They are accessed in code in the same way as the DPad collection of buttons for the Xbox 360. The following code snippet shows an example of how the DPad buttons are used:
GamePadState inputState = GamePad.GetState(PlayerIndex.One);

bool isUpPressed = inputState.DPad.Up == ButtonState.Pressed;

bool isDownPressed = inputState.DPad.Down == ButtonState.Pressed;

bool isLeftPressed = inputState.DPad.Left == ButtonState.Pressed;

bool isRightPressed = inputState.DPad.Right == ButtonState.Pressed;
The four Boolean variables defined here will indicate if the button is currently being pressed.
One thing to watch out for is the problem of multiple presses. Since the Update method is called many times per second (and this is usually where you handle input), you can't effectively compare the button state to ButtonState.Pressed as a trigger. Depending on how long the user holds down the button, you might have tens or hundreds of triggers, figuratively shooting far more bullets than you intend. After we take a look at accessing other buttons, we will build an input subsystem that checks for a new button press, rather than simply polling the button state.
Accessing Other Buttons
Because the Zune is a device with a very small form factor and an extremely limited number of inputs, we've already covered the majority of available input devices (the Zune pad and the directional click buttons). There are only three means of input left, and they are all buttons.
"But wait, I see only two other buttons," you say? Perhaps you forgot that you can actually press down the Zune pad. This is usually associated with the primary input activity for most games, covering actions such as fire, OK, select item, and so on. On the Xbox controller, the primary input (when it's not one of the triggers) is usually the A button, so naturally, pressing the Zune pad down is the same as pressing the A button (which is the same as pressing the middle button on first-generation Zunes).
The button marked with the play/pause icon is mapped to B, and the button marked with a back arrow is mapped to the Back button (which has a similar icon in the Xbox 360 controller).
All of these buttons can be accessed through the GamePadState's Buttons collection and compared to the ButtonState enumeration values to determine if they are being pressed.
Table 4-1 lists each of the available controls on the Zune, how they map to Xbox 360 controls, and how they are used in code in the XNA Framework.
Table 4-1. Zune Control Mapping
| Zune Control | Xbox 360 Control | Associated GamePadState Property | Output Type |
| Zune pad | Left thumbstick | ThumbSticks.Left |
Vector2 |
| Click wheel | Directional pad | DPad |
Group of ButtonStates |
| Center button | A | Buttons.A |
ButtonState |
| Play/Pause | B | Buttons.B |
ButtonState |
| Back | Back | Buttons.Back |
ButtonState |
Using an Input Handler Class for Zune and Windows Games
In this section, you will learn how to separate input handling from your main game logic in a way that both Windows and Zune games can use. This way, you can use the same input class library for Windows and Zune games, without needing to modify code for different versions of the same game.
The input handler class saves you a lot of time because it handles both keyboard and Zune pad input. If you are running the game on Windows, you can use either the keyboard or an attached Xbox 360 controller. If you are running the same code on the Zune, keyboard input will be ignored (since there is no keyboard on the Zune). The extraneous code does not present a problem, since the XNA Framework will safely ignore it, but you can use compiler directives to split out the platform-specific code if it really bothers you.
Another great feature of this input handler class is that it is extensible. You can always extend this class for a new game and add different properties suited to whatever game you are building. Additionally, this class provides support for "new" button presses. Earlier, I mentioned the problem of polling buttons for their pressed state and how that can result in many actions being triggered. Using this library, you can quickly and easily determine if a button was pressed, rather than checking to see if the button is down.
We'll look at two versions of the input handler: one that is specific to the Zune and does not include keyboard handling, and one that does handle keyboard input, so it can support Windows games as well as Zune games.
A Zune-Specific Input Handler
Listing 4-1 shows the Zune-specific version of the input handler, in which the implementation of InputState does not deal with keyboard input.
Note This code is based on the input handler class included with most of the samples on the XNA Creators Club web site, including the Game State Management sample, which you can find at http://creators.xna.com/en-us/samples/gamestatemanagement.
Listing 4-1. Input State Handling, Centralized and Abstracted, for the Zune
using System;

using System.Collections.Generic;

using System.Text;

using Microsoft.Xna.Framework;

using Microsoft.Xna.Framework.Input;


namespace InputHandler

{

    /// <summary>

    /// Helper for reading input from gamepad. This class tracks both

    /// the current and previous state of the Zune Pad and provides some

    /// properties to abstract specific presses.

    /// </summary>

    public class InputState

    {

        #region Fields


        public GamePadState CurrentGamePadState;

        public GamePadState LastGamePadState;


        #endregion


        #region Initialization


        /// <summary>

        /// Constructs a new input state.

        /// </summary>

        public InputState()

        {

            CurrentGamePadState = new GamePadState();

            LastGamePadState = new GamePadState();

        }


        #endregion


        #region Properties


        /// <summary>

        /// Checks for a Middle Button press (A by default)

        /// </summary>

        public bool MiddleButtonPressed

        {

            get

            {

                return IsNewButtonPress(Buttons.A);

            }

        }


        /// <summary>

        /// Checks for a press of Up (DPadUp by default)

        /// </summary>

        public bool UpPressed

        {

            get

            {

                return IsNewButtonPress(Buttons.DPadUp);

            }

        }


        /// <summary>

        /// Checks for a press of Down (DPadDown by default)

        /// </summary>

        public bool DownPressed

        {

            get

            {

                return IsNewButtonPress(Buttons.DPadDown);

            }

        }


        /// <summary>

        /// Checks for a press of Right (DPadRight by default)

        /// </summary>

        public bool RightPressed

        {

            get

            {

                return IsNewButtonPress(Buttons.DPadRight);

            }

        }


        /// <summary>

        /// Checks for a press of Left (DPadLeft by default)

        /// </summary>

        public bool LeftPressed

        {

            get

            {

                return IsNewButtonPress(Buttons.DPadLeft);

            }

        }


        /// <summary>

        /// Checks for a press of the Play button (B by default)

        /// </summary>

        public bool PlayPressed

        {

            get

            {

                return IsNewButtonPress(Buttons.B);

            }

        }


        /// <summary>

        /// Checks for a press of the Back button

        /// </summary>

        public bool BackPressed

        {

            get

            {

                return IsNewButtonPress(Buttons.Back);

            }

        }


        #endregion


        #region Methods


        /// <summary>

        /// Reads the latest state of the gamepad.

        /// </summary>

        public void Update()

        {

            LastGamePadState = CurrentGamePadState;

            CurrentGamePadState = GamePad.GetState(PlayerIndex.One);

        }


        /// <summary>

        /// Checks if a button was newly pressed during this update.

        /// </summary>

        /// <param name="button">The button to check</param>

        /// <returns>True if the button is down; false otherwise</returns>

        public bool IsNewButtonPress(Buttons button)

        {

            return (CurrentGamePadState.IsButtonDown(button) &&

                    LastGamePadState.IsButtonUp(button));

        }


        /// <summary>

        /// Checks if a button is pressed down.

        /// </summary>

        /// <param name="button">The button to check</param>

        /// <returns>True if the button is down; false otherwise</returns>

        public bool IsButtonDown(Buttons button)

        {

            return CurrentGamePadState.IsButtonDown(button);

        }


        #endregion

    }

}
This input handler has three methods—IsButtonDown, IsNewButtonPress, and Update— which make up the most important part of this class. The method IsButtonDown is not directly used in determining button presses, but it is useful for whatever program may be consuming it.
The magic happens in the IsNewButtonPress method:
/// <summary>

/// Checks if a button was newly pressed during this update.

/// </summary>

/// <param name="button">The button to check</param>

/// <returns>True if the button is down; false otherwise</returns>

public bool IsNewButtonPress(Buttons button)

{

    return (CurrentGamePadState.IsButtonDown(button) &&

        LastGamePadState.IsButtonUp(button));

}
The InputState class maintains two copies of a GamePadState variable. The first copy, CurrentGamePadState, stores the state of the Zune's input. The current value stored here is updated every time the Update method of this class is called. The second, LastGamePadState, gives access to the buttons' state before the most recent update. By comparing the two game pad states, we can determine whether a button was pressed—that is to say, that the button was previously up and is now down. In the IsNewButtonPress method, you can see how this logic comes into play. The Boolean expression returned in this method gives a true or false indication of whether the button in question was previously up, but is now down. The IsNewButtonPress forms the foundation of the C# properties defined further up in the class, which are named according to specific controls. Let's take the MiddleButtonPressed property as an example:
/// <summary>

/// Checks for a Middle Button press (A by default)

/// </summary>

public bool MiddleButtonPressed

{

    get

    {

        return IsNewButtonPress(Buttons.A);

    }

}
This property has a simple getter that returns a call to IsNewButtonPress with the specified button. The power of this simplistic design lies in the fact that you can add as many properties as you like, and that you can change which buttons map to the named controls just by changing the button checked in the argument to IsNewButtonPress. You can extend this class and define your own properties, which enables you to reuse the class over and over. Imagine you have a game where the middle button should cause a projectile to fire. You might define a new property like this:
/// <summary>

/// Checks to see if the user pressed Fire.

/// </summary>

public bool Fire

{

    get

    {

        return IsNewButtonPress(Buttons.A);

    }

}
This tells the game that a press of A means fire. Perhaps later you want to change Fire to mean the user pressed B. To do that, you would just change the code of this property to check Buttons.B instead.
Furthermore, since the same buttons are often used differently given other situations, you can add new properties that reference the same button to take advantage of this flexibility. Pressing the middle button could also indicate a selection of an on-screen element, but you wouldn't want to code this using the word Fire; that could become very unreadable. All you would need to do is add a new property:
/// <summary>

/// Checks for a menu selection.

/// </summary>

public bool Select

{

    get

    {

        return IsNewButtonPress(Buttons.A);

    }

}
To ensure that the InputState class always has the latest values, the Update method is employed. This method should be called as one of the first few line items of the game's Update method. This way, whenever the game is updated, the input state is updated also. The input state class's Update method performs only one major task: it sets the last input state to the current one, and then retrieves the current input state using GamePad.GetState.
How can this code be ported to support Windows as well? Technically, Windows games are supported by this code, but you would need to connect an Xbox 360 controller to deliver any input to the game. A better idea is to add keyboard support.
An Input Handler for Zune and Windows Games
Listing 4-2 shows a version of the input handler in Listing 4-1 that supports keyboard input. Note the emphasized lines, which have been added in this revision.
Listing 4-2. An Input Handler Class That Handles Both Windows and Zune Input
using System;

using System.Collections.Generic;

using System.Text;

using Microsoft.Xna.Framework;

using Microsoft.Xna.Framework.Input;


namespace InputHandler

{

    /// <summary>

    /// Helper for reading input from gamepad. This class tracks both

    /// the current and previous state of the Zune Pad and the keyboard,

    /// and provides some properties to abstract specific presses.

    /// </summary>

    public class InputState

    {

        #region Fields


        public GamePadState CurrentGamePadState;

        public GamePadState LastGamePadState;

        public KeyboardState CurrentKeyboardState;

        public KeyboardState LastKeyboardState;


        #endregion


        #region Initialization


        /// <summary>

        /// Constructs a new input state.

        /// </summary>

        public InputState()

        {

            CurrentGamePadState = new GamePadState();

            LastGamePadState = new GamePadState();

            CurrentKeyboardState = new KeyboardState();

            LastKeyboardState = new KeyboardState();

        }


        #endregion


        #region Properties


        /// <summary>

        /// Checks for a Middle Button press (A by default)

        /// </summary>

        public bool MiddleButtonPressed

        {

            get

            {

                return IsNewButtonPress(Buttons.A) ||

                    IsNewKeyPress(Keys.LeftControl);

            }

        }


        /// <summary>

        /// Checks for a press of Up (DPadUp by default)

        /// </summary>

        public bool UpPressed

        {

            get

            {

                return IsNewButtonPress(Buttons.DPadUp) ||

                    IsNewKeyPress(Keys.Up);

            }

        }


        /// <summary>

        /// Checks for a press of Down (DPadDown by default)

        /// </summary>

        public bool DownPressed

        {

            get

            {

                return IsNewButtonPress(Buttons.DPadDown) ||

                    IsNewKeyPress(Keys.Down);

            }

        }


        /// <summary>

        /// Checks for a press of Right (DPadRight by default)

        /// </summary>

        public bool RightPressed

        {

            get

            {

                return IsNewButtonPress(Buttons.DPadRight) ||

                    IsNewKeyPress(Keys.Right);

            }

        }


        /// <summary>

        /// Checks for a press of Left (DPadLeft by default)

        /// </summary>

        public bool LeftPressed

        {

            get

            {

                return IsNewButtonPress(Buttons.DPadLeft) ||

                    IsNewKeyPress(Keys.Left);

            }

        }


        /// <summary>

        /// Checks for a press of the Play button (B by default)

        /// </summary>

        public bool PlayPressed

        {

            get

            {

                return IsNewButtonPress(Buttons.B) ||

                    IsNewKeyPress(Keys.LeftAlt);

            }

        }


        /// <summary>

        /// Checks for a press of the Back button

        /// </summary>

        public bool BackPressed

        {

            get

            {

                return IsNewButtonPress(Buttons.Back) ||

                    IsNewKeyPress(Keys.Back);

            }

        }

        #endregion


        #region Methods


        /// <summary>

        /// Reads the latest state of the gamepad and the keyboard.

        /// </summary>

        public void Update()

        {

            LastGamePadState = CurrentGamePadState;

            CurrentGamePadState = GamePad.GetState(PlayerIndex.One);

            LastKeyboardState = CurrentKeyboardState;

            CurrentKeyboardState = Keyboard.GetState();

        }


        /// <summary>

        /// Checks if a button was newly pressed during this update.

        /// </summary>

        /// <param name="button">The button to check</param>

        /// <returns>True if the button is down; false otherwise</returns>

        public bool IsNewButtonPress(Buttons button)

        {

            return (CurrentGamePadState.IsButtonDown(button) &&

                LastGamePadState.IsButtonUp(button));

        }


        /// <summary>

        /// Checks if a key was newly pressed during this update.

        /// </summary>

        /// <param name="button">The key to check</param>

        /// <returns>True if the key is down; false otherwise</returns>

        public bool IsNewKeyPress(Keys key)

        {

            return (CurrentKeyboardState.IsKeyDown(key) &&

                LastKeyboardState.IsKeyUp(key));

        }


        /// <summary>

        /// Checks if a button is pressed down.

        /// </summary>

        /// <param name="button">The button to check</param>

        /// <returns>True if the button is down; false otherwise</returns>

        public bool IsButtonDown(Buttons button)

        {

            return CurrentGamePadState.IsButtonDown(button);

        }

        /// <summary>

        /// Checks if a key is pressed down.

        /// </summary>

        /// <param name="button">The key to check</param>

        /// <returns>True if the key is down; false otherwise</returns>

        public bool IsKeyDown(Keys key)

        {

            return CurrentKeyboardState.IsKeyDown(key);

        }


        #endregion

    }

}
Notice the addition of the IsNewKeyPress method. This does the same thing as IsNewButtonPress, except it works with keys instead of buttons. Two new KeyboardState variables have been added, and they are used in exactly the same way as their GamePadState counterparts.
Now turn your attention to the properties. In addition to checking for button presses, the code is also checking for the possibility of a key press. The OR (||) operator is used here, because the user could technically use one or the other. If AND (&&) were used, the Zune would never fire any inputs, because keys do not exist (therefore are never pressed) on the Zune device. However, at runtime, the Zune will operate happily even with the keyboard code in there. This is partly because both KeyboardState variables are initialized to a new KeyboardState and never change from that value.
You can take the code from Listing 4-2 and create a new game library project with it if you wish.
Let's run through a quick exercise using the code from Listing 4-2 to handle input in a clean and efficient manner. In Exercise 4-4, you will use the InputState class in a simple game that runs on both the Zune and Windows.
EXERCISE 4-4. A ZUNE APP WITH WINDOWS COMPATIBILITY
In this exercise, you will learn to use the InputState class to build a simple game that changes colors of the screen based on which button is pressed (either on the Zune or Windows). In this application, we will change the game screen color like so: Down = black, Up = red, Right = green, and Left = blue.
- In Visual Studio, create a new Zune game project called
InputStateTestGame. - Add a new class called
InputStateto the project and add the code from Listing 4-2, except you don't need the statements to useSystem.Collections.GenericandSystem.Text, and the namespace should beInputStateTestGame. So, the class should begin as follows:
using System;

using Microsoft.Xna.Framework;

using Microsoft.Xna.Framework.Input;


namespace InputStateTestGame

{

    /// <summary>

... - Add a new sprite font to the class, called
Normal.spritefont. - Add the following lines to the variable declarations section of
Game1.cs, just after the declaration of thespriteBatchvariable:
SpriteFont arialFont;

InputState inputState = new InputState();

Color backgroundColor = Color.DarkGray; - Find the
LoadContentmethod and load the Arial sprite font:
arialFont = Content.Load<SpriteFont>("Normal"); - Create a new private method called
HandleInputin theGame1.csfile, below theDrawmethod. This class handles changing the background color based on which button was pressed. Note the effective utilization of theInputStateclass, and how easy it is to get input, regardless of whether it's a Zune or Windows implementation.
private void HandleInput()

{

    if (inputState.DownPressed)

        backgroundColor = Color.Black;


    if (inputState.UpPressed)

        backgroundColor = Color.DarkRed;


    if (inputState.RightPressed)

        backgroundColor = Color.DarkGreen;


    if (inputState.LeftPressed)

        backgroundColor = Color.DarkBlue;

}
- Find the
Updatemethod in theGame1.csfile and add the following lines to update the input state class and handle the input. Add this code in place of theTODOcomment.
inputState.Update();

HandleInput(); - Find the
Drawmethod in theGame1.csfile and locate the method that clears the device. ReplaceColor.CornflowerBluewithbackgroundColor. The modified line should look like this:
graphics.GraphicsDevice.Clear(backgroundColor); - Add some helper text. In place of the
TODOcomment in theDrawmethod, add the following lines to draw the text:
string helperText = "Up: Red
" +

    "Down: Black
" +

    "Right: Green
" +

    "Left: Blue
";


spriteBatch.Begin();

spriteBatch.DrawString(normalFont, helperText, Vector2.Zero, Color.White);

spriteBatch.End();
The carriage return/new line sequence,
- Create a Windows copy of this Zune game by right-clicking the
InputStateTestGameproject in the Solution Explorer and choosing Create Copy of Project for Windows. - Test the game on both the Zune and in Windows by alternately setting the Zune and Windows projects as the startup project. On the Zune, the output looks like Figure 4-18. On Windows, the output looks like Figure 4-19.

Figure 4-18. The color-changing application on the Zune after pressing Down to change the screen to black

Figure 4-19. The color-changing application on Windows after pressing the left arrow key to change the screen to blue (although the screenshot is in grayscale)
As you've seen, handling input on the Zune and adding support for Windows is easy with our InputState class. It's a good idea to take this code and put it in a usable library of useful code for Zune games, which you can include in any other games you create. This is one example of many reusable components we will be creating throughout the course of the book.
Playing Music in Zune Games
While we are slowly turning the Zune into a mobile gaming platform, that was not its original intent. The Zune is, and will remain, a music player. After all, that's what it was designed to be from the very beginning, and that's what it does best!
When a Zune game is launched, it executes under the .NET Framework in "developer mode." Your game and its actions exist only for the duration that it runs. Zune games have limited access to the local file system. They cannot access the firmware or do anything outside the protected bubble in which they execute. This protection is by design, and is what causes the Zune to reboot after a game exits. Rebooting the Zune causes it to reload its firmware and start anew, eliminating memory leaks, orphan threads, and other things that can create problems.
Developer mode exists mainly to protect the contents of the Zune from the crazy things developers can do. As a result, Zune games can play only those songs that are not restricted by a DRM system.
Let's take a look at some of the components involved in playing music in Zune games.
Using Media Player Component Classes
Three major components of the XNA Framework allow you to play music: the Song, MediaLibrary, and MediaPlayer classes. These classes reside in the Microsoft.Xna.Framework.Media namespace, so don't forget to add this namespace to your list of using directives.
The Song Class
The Song class gives you access to a lot of useful data for a particular song. You can access common song attributes, such as the album name, artist, track number, track name, duration, genre, and more. It also has an IsProtected attribute, which allows you to check for DRM protection before attempting to play a song.
Songs are usually acquired by indexing into the collection of songs available on an instance of the MediaLibrary class, like so:
Song firstSong = mediaLibrary.Songs[0];
The MediaLibrary Class
The MediaLibrary class gives you access to the library of music on the Zune. There are useful properties available on instances of the MediaLibrary class that allow you to get music by album, genre, artist, or even playlist. The Songs property gives you a collection of all the songs on the Zune.
Creating a new instance of the MediaLibrary class is very easy. The default constructor of this class takes no arguments, so all you need to do on the Zune is instantiate a simple variable like so:
MediaLibrary library = new MediaLibrary();
The other constructor takes a MediaSource argument, which is useful on PC or Xbox games where you want to use Windows Media Connect libraries or libraries on the local file system.
Note To enumerate available media sources on other platforms (PC or Xbox 360), you can use MediaSource.GetAvailableMediaSources(). This method returns a list of available media sources on the device or computer.
The MediaLibrary class also allows you to access pictures on the device in an easy way. Instances of the MediaLibrary class have a property called Pictures. Indexing into this collection returns a Picture object, which in turn has a method called GetTexture. GetTexture returns a Texture2D object, which you can draw on the screen to create an interesting, personalized experience. Likewise, the Album object has a method called GetAlbumArt, which you can use to get a Texture2D object representing the album art.
The MediaLibrary class is very comprehensive, and these are just a few examples of the unique behaviors you can achieve with it.
The MediaPlayer Class
You cannot create your own instance of the static MediaPlayer class. You can use only a handful of static methods to control which song is playing. This actually saves you some code in the long run. The code to play a song (held in a Song object) is straightforward:
MediaPlayer.Play(song);
You can also use this method to play a SongCollection object, a special collection of songs that can be obtained in a number of ways. Usually, the Songs property of certain objects in a MediaLibrary is of type SongCollection, so you could also use code like this to play an entire artist catalog:
MediaPlayer.Play(mediaLibrary.Artists[artist_index].Songs);
Other useful static methods of the MediaPlayer class include Stop, Pause, Resume, MoveNext, MovePrevious, and GetVisualizationData. There are also some static properties that you can use to inquire about or alter the current state of the media player, such as Volume, PlayPosition, IsMuted, IsVisualizationEnabled, IsShuffled, IsRepeating, and State. The State property can be one of three values as defined in the MediaState enumeration: Playing, Paused, or Stopped.
Note By default, accessing MediaLibrary.Songs gives you a collection of all songs on the Zune sorted alphabetically by track name. You can achieve some randomization by telling MediaPlayer to play this entire collection and then setting MediaPlayer.IsShuffled to true. However, if you use MoveNext and MovePrevious, you must watch out for DRM-protected files.
You can set the volume of the media player by assigning a value between 0.0 and 1.0 to MediaPlayer.Volume. This value is logarithmic and represents a decibel value, so 0.5 is not really half as loud as 1.0; instead 0.5 is nearly inaudible. It's also important to note that the overall volume you hear is controlled by the Zune's master volume, which you cannot access through code unless you use the Guide class to show the built-in Zune menu, as described next. In effect, altering MediaPlayer.Volume will result in a volume less than or equal to the Zune master volume, so it's really useful only when you want to decrease (or reset) the volume.
Note Even when MediaPlayer.Volume is set to maximum (1.0f), it is still distinctly quieter than the maximum volume when the Zune is just playing songs. It is about half as loud.
Using the Guide
Another option for playing music is to use the built-in guide menu. On the Xbox 360, the guide is the menu that pops up when you press the Xbox logo button. That interface allows you to sign in to profiles, play music, and so on. Like the Xbox guide, the Zune guide can be hooked into via XNA. It brings up a Zune-specific menu for altering volume, playing music, and more. It's a very quick and convenient way to add music functionality to your game without needing to create a custom music browser.
The guide can be shown by calling Guide.Show(). Note that there is no guide interface for PC games, so you can't compile code for dual Windows/Zune projects unless you use conditional preprocessor directives, like this:
#if ZUNE

Guide.Show();

#endif
Your game will continue running its Update loop while the guide is shown. To prevent this, you can put your entire Update loop in an if statement that references the Guide.IsVisible property (which will not compile under Windows):
// in the Update method

if (Guide.IsVisible == false)

{

    // do all your updates

}
This is a quick and effective way to pause your game if the guide is shown.
There are some drawbacks to using the guide:
- The guide, being part of the Zune firmware, allows you to browse and attempt to play any and all music (including protected tracks). There is no API functionality (yet) in the XNA Framework to prevent a user from trying to play a protected track using the guide. If a user tries to play a protected track via the guide, no feedback will be given via the guide user interface to indicate that the track is protected and cannot be played. In the community technology preview (CTP) version, attempting to do this will throw an uncatchable exception.
- When the guide is displayed, it has a transparent background that can make it difficult to read, unless you black out your screen before showing the guide or use a preprocessor directive in the
Drawmethod to clear to black when the guide is shown. - When the guide is first shown, the track is automatically paused. You can see the play/pause icon in the lower right of the Zune when you bring up the guide, but it can be unclear to the user as to why the track stopped when the guide was shown. (This is unfortunate, but the overall convenience of the guide interface actually makes it quite an innocuous detail.)
Note The guide itself will not show up in screenshots taken from the XNA Game Studio Device Center.
If time allows, it is preferable to write and use your own audio/music engine, rather than use the guide.
Putting It Together
As an example of using these main components for playing music, we'll build a simple media player application for the Zune. In the exercise, we'll first declare some variables in the Game1 class to represent the core things we need for the music player:
input: An instance of ourInputStateclass, making it easier for us to capture inputalbumArtTex: A reference to the current album artnoArtTex: The default texture when there is no album art or no song is playingalbumArtPosition: A point on the screen where the album art will be drawncurrentSongIndex: The index in the media library of the song currently being playedregularTextandboldText: Strings drawn on the screen in their respective fontsboldTextPositionandregularTextPosition: Points where these strings are drawnfontandboldFont: Differently sized and styled versions of the Kootenay font
We'll add a RefreshAlbumArt method to handle drawing the album art on the Zune screen, as shown in Listing 4-3.
Listing 4-3. The RefreshAlbumArt Method
private void RefreshAlbumArt()

{

    if (MediaPlayer.State == MediaState.Playing ||

        MediaPlayer.State == MediaState.Paused)

    {

        Song currentSong = MediaPlayer.Queue.ActiveSong;

        if (currentSong.Album.HasArt)

        {

            albumArtTex = currentSong.Album.GetAlbumArt(this.Services);

        }

        else

            albumArtTex = noArtTex;

    }

    else

    {

        albumArtTex = noArtTex;

    }


    albumArtPosition = new Vector2(120 - albumArtTex.Width / 2, 100);

}
The RefreshAlbumArt method is responsible for setting the Texture2D object drawn on screen. If the currently playing song has album art, the Texture2D representing that art is extracted using the Album.GetAlbumArt method (passing in the Game class's Services property). Then, based on the art obtained, the position to draw the art is modified so that it is centered horizontally.
In the Update method, we'll add some input handling that advances tracks, updates the album art, and updates the status text for the currently playing song, as shown in Listing 4-4.
Listing 4-4. Update Method for the Media Player Example
protected override void Update(GameTime gameTime)

{

    // Allows the game to exit

    if (GamePad.GetState(PlayerIndex.One).Buttons.Back == ButtonState.Pressed)

        this.Exit();


    input.Update();

    if (input.PlayPressed)

    {

        switch (MediaPlayer.State)

        {

            case MediaState.Paused:

                MediaPlayer.Resume();

                break;

            case MediaState.Playing:

                MediaPlayer.Pause();

                break;

            case MediaState.Stopped:

                PlayNextSong();

                break;

        }

    }


    if (input.RightPressed)

    {

        PlayNextSong();

    }


    if (input.LeftPressed)

    {

        PlayPreviousSong();

    }


    switch (MediaPlayer.State)

    {

        case MediaState.Stopped:

            boldText = "Stopped";

            regularText = "Press Play to play a song.";

            break;

        case MediaState.Playing:

            Song currentSong = MediaPlayer.Queue.ActiveSong;


            boldText = "Artist: " + currentSong.Artist.Name +

                "
Album: " + currentSong.Album.Name;


            regularText = currentSong.Name;

            break;

        case MediaState.Paused:

            boldText = "Paused";

            regularText = "";

            break;

    }


    base.Update(gameTime);

}
First, the input engine is updated. Without calling input.Update, the game will never know when any buttons are pressed. Then we check to see if Play, Right, or Left are pressed and act accordingly. The Play button behaves differently depending on the state of the media player. If no media is playing, it starts playing the current song. If media is currently playing, it pauses the media player. If the media player is paused, pressing Play will resume from the current track. Pressing Right causes the track to advance using the PlayNextSong method, shown in Listing 4-5. Pressing Left causes the track to move back using the PlayPreviousSong method, also shown in Listing 4-5.
After handling input, we must update the text displayed on the screen to match what is playing. Again, this is dependent on the state of the media player. If the player is stopped, we simply offer a directive to press Play. If media is playing, we set the bold text and regular text to the artist, album, and track name. If the media is paused, we simply display "Paused" on the screen.
Listing 4-5. The PlayNextSong and PlayPreviousSong Methods
private void PlayNextSong()

{

    for (int songIndex = currentSongIndex + 1; songIndex <=

        mediaLibrary.Songs.Count; songIndex++)

    {

        if (songIndex >= mediaLibrary.Songs.Count)

            songIndex = 0;


        if (mediaLibrary.Songs[songIndex].IsProtected == false)

        {

            currentSongIndex = songIndex;

            MediaPlayer.Play(mediaLibrary.Songs[currentSongIndex]);

            break;

        }

    }

    RefreshAlbumArt();

}


private void PlayPreviousSong()

{

    for (int songIndex = currentSongIndex - 1; songIndex >= −1; songIndex--)

    {

        if (songIndex<0)

            songIndex = mediaLibrary.Songs.Count - 1;


        if (mediaLibrary.Songs[songIndex].IsProtected == false)

        {

            currentSongIndex = songIndex;

            MediaPlayer.Play(mediaLibrary.Songs[currentSongIndex]);

            break;

        }

    }

    RefreshAlbumArt();

}
The PlayNextSong and PlayPreviousSong methods are very similar in structure. The purpose of the for loops is to obtain the next available unprotected track; it will keep looking until it finds one. When an unprotected track is found, the MediaPlayer plays it. In both methods, the album art is automatically refreshed by the call to RefreshAlbumArt.
Note You can also use MediaPlayer.MoveNext() and MediaPlayer.MovePrevious() to advance the current track in the song collection. However, currently, if the next song in the queue is DRM-protected, this method will throw an exception. The purpose of the custom PlayNextSong and PlayPreviousSong methods is to provide checks for DRM protection so no attempt to play a protected song is made. It is safe to use the built-in methods if the MediaPlayer is playing a SongCollection that does not contain any protected tracks.
In the Draw method, we will clear the screen to black, draw the status text blocks, and draw the album art, as shown in Listing 4-6.
Listing 4-6. Draw Method for the Media Player Example
protected override void Draw(GameTime gameTime)

{

    graphics.GraphicsDevice.Clear(Color.Black);


    spriteBatch.Begin();

    try

    {

        spriteBatch.Draw(albumArtTex, albumArtPosition, Color.White);

        spriteBatch.DrawString(fontBold, boldText, boldTextPosition,

            Color.White);

        spriteBatch.DrawString(font, regularText, regularTextPosition,

            Color.White);

    }

    catch

    {


    }


    spriteBatch.End();


    base.Draw(gameTime);

}
The try-catch block is used because some track names, artist names, and album names may contain special characters that are not compiled by the content pipeline. The DrawString method draws a string of text character by character, so when an undrawable character is encountered, an exception will be thrown, and you will see a partial string of text. You can modify which characters are compiled into the sprite font by opening the .spritefont file and looking for the CharacterRegions tag. In that code, you can modify the Start and End elements to ensure all possible special characters are included in the sprite font. See if you can arrive at a more elegant solution than the try-catch approach.
Also notice that the albumArtTex object is drawn first. This ensures that the text will be displayed over the album art. If there is no album art, albumArtTex has been set to the default "no album art" texture by the RefreshAlbumArt method, so this is safe.
Now let's put this together into a media player.
EXERCISE 4-5. A SIMPLE MEDIA PLAYER
The Zune firmware sports a world-class music player with a lot of great features. So, why build another one? This exercise will help you understand how the main media components of the XNA Framework work together to make a basic music player. In turn, this understanding will prove valuable when you want to implement music in your games.
- In Visual Studio, create a new Zune Game project called
SimpleMusicPlayer. The sample code can be found in theExercises/Chapter 4 /Example 5folder. - Add two new sprite fonts (use the royalty-free Kootenay font) to the
Contentproject. Call oneKootenayand change its font size to10. Call the otherKootenayBold, change its font size to10, and change its style toBold. This can be done by editing the associated.spritefontfiles. - Add the
NoArt.pngfile to theContentproject from theExamples/Chapter 4 /Exercise 5/Artworkfolder. - Bring our old friend, the
InputStateclass from earlier in the chapter (Listing 4-1), into the mix. You can do this by right-clicking the project, choosing Add Existing Item, and navigating to theExamples/Chapter 4 /Exercise 4/InputHandlerfolder. Since you are copying code rather than using a game library, don't forget to change the namespace inInputState.cstoSimpleMusicPlayer. If you've created your own library for input handling already, then you are ahead of the game (in a good way). Just add a reference to your own library and be sure to include the namespace. - Declare the following variables (described earlier) in
Game1.cswhere the variables are declared:
MediaLibrary mediaLibrary;

InputState input;

Texture2D albumArtTex, noArtTex;

Vector2 albumArtPosition;

int currentSongIndex = −1;

string regularText, boldText;

Vector2 boldTextPosition, regularTextPosition;

SpriteFont font, fontBold; - In the
Initializemethod, initialize the media library and current song. The vectors are initialized to points on the screen that look good placement-wise. The volume is set to the maximum (1.0f).
protected override void Initialize()

{

    input = new InputState();

    mediaLibrary = new MediaLibrary();

    MediaPlayer.Volume = 1.0f;

    regularText = "";

    boldText = "";

    boldTextPosition = new Vector2(5, 5);

    regularTextPosition = new Vector2(5, 35);


    base.Initialize();

} - In the
LoadContentmethod, load the two sprite fonts and the default "no album art" texture. Then callRefreshAlbumArt().
protected override void LoadContent()

{

    // Create a new SpriteBatch, which can be used to draw textures.

    spriteBatch = new SpriteBatch(GraphicsDevice);


    font = Content.Load<SpriteFont>("Kootenay");

    fontBold = Content.Load<SpriteFont>("KootenayBold");

    noArtTex = Content.Load<Texture2D>("NoArt");

    albumArtTex = noArtTex;

    RefreshAlbumArt();

} - Add the
RefreshAlbumArtprivate method shown in Listing 4-3. - Find the
UnloadContentmethod and tell theMediaPlayerto stop playing. When the game exits, you want the audio to stop, especially if you are debugging and the Zune doesn't reboot.
protected override void UnloadContent()

{

    MediaPlayer.Stop();

} - Find the
Updatemethod and modify it so it looks like Listing 4-4. - Implement the
PlayNextSongandPlayPreviousSongprivate methods shown in Listing 4-5. - Find the
Drawmethod and modify it so it looks like Listing 4-6. - Ensure the connected Zune is set as the default in XNA Game Studio Device Center. Then press F5 to run with debugging.
- Press the Play button to start playing tracks. You should see something similar to Figure 4-20.

Figure 4-20. The SimpleMusicPlayer application running. The song in this screenshot harkens back to my college days. I played drums in a band called Morningside. We had no album art, and this song was called simply 7. I love it because it opens with a wicked drum solo.
Your First Real Zune Game: OutBreak
We're going to shift gears a bit now and work on the very first full-fledged Zune game of the book, called OutBreak. OutBreak will roll together a lot of the techniques covered thus far, resulting in a game you will actually enjoy playing. You will learn a few new techniques to spice up your graphics as well.
In this example, you'll see the guide menu used to provide musical accompaniment. Simple game state management is also addressed, along with some other new concepts such as collision detection and text centering.
OutBreak is a paddle game, where the object is to clear the board of all the visible blocks. By block, I mean the object the player is trying to strike with the ball.
Before writing any code, let's take a look at some basic design elements that will lead us to implementing the game logic.
Designing OutBreak
During one interview a few years ago for a C# position, I was asked whether my coding style was maverick or meticulous. At the time, I wasn't sure what was meant by the question. Now I know that mavericks sit down and code, with little or no design planning, figuring things out as they go. Meticulous coders are structured almost to the point of refusing to write code until they have a signed-off design document. For the purposes of this example, we'll find some middle ground between the two and outline some basic rules that our game must follow.
The Rules
The general rules of this implementation of OutBreak are simple:
- A grid of blocks is displayed in some pattern at the top of the screen.
- The ball is initially traveling away from the paddle.
- The ball and paddle are recentered after each round.
- A score multiplier is used to reward knocking out multiple blocks with one paddle strike.
- The score multiplier increases with each block struck before hitting a wall or the paddle.
- The score multiplier resets to 1 when the ball hits the paddle or a wall.
- The player has a certain number of chances, or "lives," to clear all the blocks.
You could alter these rules a little to suit your wishes without changing too much code. No numbers are directly specified (for example, the maximum number of lives), because these are defined in code as constants.
Game States
The mechanism for dealing with game state is very simple: we use an enumeration to manipulate the state, and we check the game state at various times using a switch statement. We define four possible game states for the game:
Intro: The first screen of the game appears, as shown in Figure 4-21.
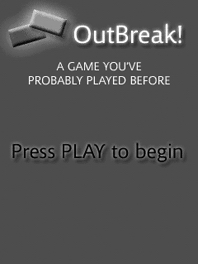
Figure 4-21. OutBreak in the Intro state
Ready: A countdown screen appears between rounds, as shown in Figure 4-22.

Figure 4-22. OutBreak in the Ready state
Playing: The game is active, as shown in Figure 4-23.
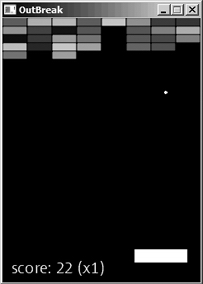
Figure 4-23. OutBreak in the Playing state
GameOver: The game has ended, as shown in Figure 4-24.

Figure 4-24. OutBreak in the GameOver state
These four game states compose everything you'll see in the game. The next step is to figure out how to transition between these states. Figure 4-25 shows a traditional state diagram that will help you determine when to move between these game states. Each circle is a game state, and the arrows flowing between them represent the conditions that must be met for the game to transition to another state.
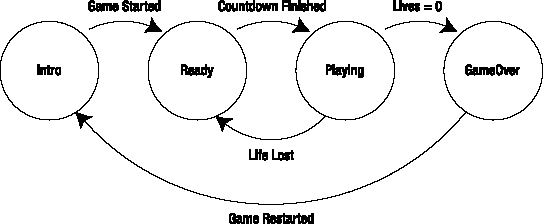
Figure 4-25. States and transitions for the OutBreak game
Figure 4-25 shows that the game state flow is very simple. The game displays the intro screen first. Then the game alternates between the countdown and playing screens, until the player has lost all her lives. When there are no lives left, the game moves to the GameOver state. The player can then restart the game by pressing a button, which changes the game state back to Intro, and the state flow resumes from the Intro state.
Creating OutBreak
Are you ready to write your very first real, playable Zune game? This example incorporates a lot of what you have already learned. Some important concepts demonstrated here are usage of the media player (via the guide), collision detection, drawing game objects, handling input, randomization, writing clean code using regions and classes, and maintaining a parallel copy of the game for Windows.
The structure of the Game1.cs file in this game has been modified slightly from the standard layout of what's included by default in an XNA game. I made extensive use of regions to separate code clearly, and I trimmed out some of the unused namespaces. Reading through this example should closely resemble your thought process while building the game, although you will likely see some code you don't understand yet. This is where the use of regions comes in handy. Regions are just ways of grouping code together; they aren't compiled, and are there for your convenience as a programmer. They provide easy reference to portions of code and help keep your code organized.
By the end of this chapter, you'll have a functioning game that runs on both Zune and Windows. If at any time you feel you are lost or don't have the correct code, check the supplied source code in the Examples/Chapter 4 /Exercise 6/OutBreak folder.
Setting Up the Project
To get started, set up your project as follows:
- In Visual Studio, create a new Zune Game project called
OutBreak. - Right-click the OutBreak project in the Solution Explorer and choose Create Copy of Project for Windows. Make sure the Windows project is set as the default startup project.
- Open
Game1.csand arrange it into regions. The rest of this example will refer to certain areas of the code by region name, so that you are adding and modifying code in the correct places. Create regions as follows:- Take the existing methods and enclose them in a region called
XNA Methods. - Enclose the two private fields (
spriteBatchandGraphics) in a region calledPrivate Fields. - Enclose the
Game1constructor in a region calledConstructor(s). - Collapse these new regions and add four new ones:
Public Enumerations, Public Constants, Helper Methods, andGame State Transitions.
When collapsed, your code should look like Figure 4-26.

Figure 4-26. The overall structure of the OutBreak Game1.cs file
Tip Use
#region Region Nameto mark the start of a region, and mark the end with#endregion. You can also select a block of code (of any size), right-click the selection, choose Surround With, then#region, which will automatically stick the selected code in a new region. - Take the existing methods and enclose them in a region called
- Refer to Figure 4-26 to make sure you are using all the namespaces needed for this example and nothing more:
using System;

using System.Collections.Generic;

using Microsoft.Xna.Framework;

using Microsoft.Xna.Framework.Content;

using Microsoft.Xna.Framework.GamerServices;

using Microsoft.Xna.Framework.Graphics;

using Microsoft.Xna.Framework.Input; - Add the required textures to the game's
Contentproject by right-clicking it and choosing Add Existing Item. Navigate to theExamples/Chapter 4 /Exercise 6/Artworkfolder and add all six files in that folder:ball.png, paddle.png, block.png, gameover.png, outbreak_background.png, andoutbreak_bg_dark.png. - Add a new sprite font to the
Contentproject. Call itNormal.spritefont. This sprite font should be Kootenay, size 14. At this point, your Solution Explorer window should look like Figure 4-27.
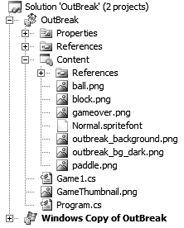
Figure 4-27. The project structure of the OutBreak game
Customizing the Input State Class
Once again, we'll use the InputState class we built earlier in the chapter. Add the InputState.cs file from Exercise 4-4 to the project. Change the namespace in this file to OutBreak. Add or modify the following properties to support our specific input actions in the InputState.cs file, as shown in Listing 4-7.
Listing 4-7. Input Handler Class for OutBreak (InputState.cs)
/// <summary>

/// Checks for a Middle Button press (A by default)

/// </summary>

public bool MiddleButtonPressed

{

    get

    {

        return IsNewButtonPress(Buttons.A) ||

            IsNewKeyPress(Keys.Space) || IsNewKeyPress(Keys.Enter);

    }

}


/// <summary>

/// Checks to see if Left is down.

/// </summary>

public bool LeftIsDown

{

    get

    {

        return IsButtonDown(Buttons.DPadLeft) ||

            IsKeyDown(Keys.Left);

    }

}


/// <summary>

/// Checks to see if Right is down.

/// </summary>

public bool RightIsDown

{

    get

    {

        return IsButtonDown(Buttons.DPadRight) ||

            IsKeyDown(Keys.Right);

    }

}


/// <summary>

/// Checks for a press of the Play button (B by default)

/// </summary>

public bool PlayPressed

{

    get

    {

        return IsNewButtonPress(Buttons.B) ||

            IsNewKeyPress(Keys.Enter) || IsNewKeyPress(Keys.Space);

    }

}
These four properties support proper input from the Zune and the keyboard, providing a consistent and intuitive user experience, regardless of the platform. The Enter key or spacebar on the keyboard equate to pressing Play or the middle button on the Zune in this particular game. The left and right arrow keys will correspond to directional pad Left and Right. We added the two properties because we want to check the current state of the button so that the paddle moves smoothly, rather than just on a new key or button press.
Creating a Class for Block Objects
Next, we will create a game object class to represent a single block in the game. The block has only a few properties: color, position, and visibility. This class is more or less the same as a struct, as it just has some basic properties and a constructor to populate them. The next chapter will cover game component objects in great detail, but for now, let's keep it simple. Add a new class file to the project called Block.cs and fill it with the code shown in Listing 4-8.
Listing 4-8. The Block Class for OutBreak (Block.cs)
using System;

using Microsoft.Xna.Framework;

using Microsoft.Xna.Framework.Graphics;


namespace OutBreak

{

    public class Block

    {

        public Vector2 Position;

        public Color Color;

        public bool IsVisible;


        public Block(Vector2 position, Color color, bool visible)

        {

            Position = position;

            Color = color;

            IsVisible = visible;

        }

    }

}
Defining Enumerations
Enumerations are important and useful, because they are readable and easily accessible using IntelliSense. This game has two enumerations: one for the game state and one that you can use to determine which type of game element the ball struck last. Add the two enumerations shown in Listing 4-9 in the Enumerations region you defined earlier in the Game1.cs file, outside the Game1 class.
Listing 4-9. Enumerations for OutBreak (in Game1.cs)
public enum LastObjectBounced

{

    Paddle,

    Top,

    Wall,

    Right,

    Block,

    None

}


public enum GameState

{

    Intro,

    Ready,

    Playing,

    GameOver

}
The reason we have a LastObjectBounced enumeration is that sometimes, in paddle games, the ball can get "stuck" inside a paddle or other game object due to collision detection if it doesn't know what it hit last. Our collision detection logic, which you will see later, reverses the direction of the ball based on its collision status with some other object. Knowing that the ball hit a block last, for example, allows us to ensure the vector is reversed again if the ball still collides with the same object, even after having its direction changed.
The game uses a vector to indicate the direction of the ball. That vector is added to the ball's current position to update its location on the screen. As a result, the game logic moves the ball in increments of greater than 1 pixel, so the ball could feasibly land inside a block or paddle, rather than hitting its border precisely. Since we just flip the direction vector using the Vector2.Reflect method, the ball could still be inside that game object, and on the next update, it would reverse direction again because the collision is still true. The LastObjectBounced enumeration allows us to check for new collisions and ignore ones that could produce this behavior.
The GameState enumeration defines our four game states, outlined during the design phase of the game.
Defining Private Fields
We will use quite a few private fields to make this game work correctly. Private fields are member variables that are used to store shared data beyond the scope of method calls, such as the score, object positions, and more. Expand the Private Fields region in the Game1 class and modify its contents to look like Listing 4-10.
Listing 4-10. Private Fields for OutBreak (in Game1.cs)
// Default XNA fields

private GraphicsDeviceManager graphics;

private SpriteBatch spriteBatch;


// Game element textures

private Texture2D blockTex, paddleTex, ballTex;


// Background textures

private Texture2D introBackgroundTex, darkBackgroundTex, gameOverTex;


// Font

private SpriteFont normalFont;


// Gameplay objects

private List<Block> blocks;

private InputState input;

private GameState gameState;

private LastObjectBounced lastObjectBounced;

private TimeSpan screenTimer;


// Gameplay helper variables

private int paddleSpeed;

private int score;

private int numLives;

private int scoreMultiplier;

private bool isPaused;


// Game math objects

Vector2 initialBallDirection;

Vector2 ballDirection;

Vector2 ballPosition;

Vector2 paddlePosition;


// Text display position vectors

Vector2 textReadyLivesPosition;

Vector2 textCountdownPosition;

Vector2 textFinalScorePosition;

Vector2 textPlayingScorePosition;
The fields are organized by their general purpose. The default XNA fields are the ones provided by default. The Texture2D objects declare our drawable textures, and the SpriteFont object represents our font.
The game-play objects include a linear list of Block objects, the current game state, an instance of the input state class, the last collision object, and a TimeSpan object used to determine when the countdown screen (Ready state) is shown. The screenTimer object lets us count down on the countdown screen.
The game-play helper variables are value types that represent simple numbers and Boolean values, such as the score, the current number of lives, and whether the game is paused by invoking the guide menu.
The math objects are all Vector2 objects that we can use to calculate the current position and direction of moving game objects, such as the paddle and ball.
Finally, the Vector2 objects at the bottom are initialized to specific point locations where text is drawn on the screen. These variables are included to reduce hard-coding.
Setting Up Constant Values
Constant values are included to ensure that you have only one place to go to modify certain aspects of the game that should not change. That place is the Public Constants region. Expand that region and add the code shown in Listing 4-11.
Listing 4-11. Constant Values for OutBreak (in Game1.cs)
// Gameplay constants

public const int MAX_LIVES = 3;

public const int BASE_SCORE = 2;

public const int SCREEN_DISPLAY_TIME = 3;

public const int PADDLE_SPEED = 4;

public const int PADDLE_Y = 280;

public const int BALL_Y = 270;

public const int BLOCK_WIDTH = 30;

public const int BLOCK_HEIGHT = 10;
These constants can be changed at design time to modify the associated game-play elements. The suggested values here happen to work well for the game. SCREEN_DISPLAY_TIME is a value in seconds that determines how long the countdown screen is shown before moving into the Playing state.
Initializing the Game
The constructor doesn't need to change, so we can leave that region alone. Expand the XNA Methods region and find the Initialize method. As you learned early in the book, this is where you set up any values that need to be initialized before the game runs. Modify the Initialize method so it looks like Listing 4-12.
Listing 4-12. Initialize Method for OutBreak (XNA Methods Region in Game1.cs)
protected override void Initialize()

{

    // Set the screen and buffer size

    graphics.PreferredBackBufferWidth = 240;

    graphics.PreferredBackBufferHeight = 320;

    graphics.ApplyChanges();


    // Initialize game objects

    input = new InputState();

    screenTimer = new TimeSpan();

    blocks = new List<Block>();

    isPaused = false;

    initialBallDirection = new Vector2(0.5f, −7.0f);

    paddleSpeed = PADDLE_SPEED;


    // Initialize the screen element positions

    textReadyLivesPosition = new Vector2(10, 160);

    textCountdownPosition = new Vector2(10, 220);

    textFinalScorePosition = new Vector2(120, 250);

    textPlayingScorePosition = new Vector2(10, 295);


    base.Initialize();

}
The first three lines set the viewport width and height to the Zune screen dimensions of 240 by 320 and apply those changes. This forces the back buffer to these dimensions, and it also sets the Windows game's window size.
The next block of code instantiates the game objects. The initialBallDirection vector is copied to the ballDirection vector every time a new round starts; this is the default trajectory of the ball. With each update, it moves 0.5 pixel to the right and 7 pixels up, as we have defined it.
The final block of code sets up points that represent locations on the screen for text to be drawn.
Implementing Game State Transitions
The methods in Listing 4-13 are used by other methods in the game logic to transition the game correctly to other states. These methods do more than just altering the value of the gameState variable: they reset other values, rebuild collections, and so forth, depending on the state to which the game is transitioning. Near the bottom of the code, find the Game State Transitions region, expand it, and add the methods shown in Listing 4-13.
Listing 4-13. Game State Transition Methods for OutBreak (in Game1.cs)
private void MoveToIntroState()

{

    score = 0;

    scoreMultiplier = 1;

    numLives = MAX_LIVES;

    ballDirection = initialBallDirection;

    lastObjectBounced = LastObjectBounced.Paddle;

    ResetBlocks();

    ResetPositions();


    gameState = GameState.Intro;

}


private void MoveToReadyState(GameTime gameTime)

{

    screenTimer = gameTime.TotalGameTime;

    scoreMultiplier = 1;

    ResetPositions();

    gameState = GameState.Ready;

}


private void MoveToPlayingState()

{

    ResetPositions();

    gameState = GameState.Playing;

}


private void MoveToGameOverState()

{

    gameState = GameState.GameOver;

}


private void MoveToLevelComplete()

{

    gameState = GameState.GameOver;

}
These methods work as follows:
MoveToIntroState: Resets the game entirely. The score, lives count, multiplier, directions, last collision object, game object positions, and collection of blocks are all reset to default values here. This method could theoretically be called at any time during the game to start completely afresh.MoveToReadyState: Accepts aGameTimeargument because it is time-sensitive. It needs to know when it was invoked so that the countdown can begin from the current time. It also resets the game object positions and the score multiplier.MoveToPlayingState: Occurs between the countdown screen and the playing screen. To be safe, this method resets game object positions before transitioning.MoveToGameOverState: Changes the game state toGameOver.MoveToLevelComplete: Same asMoveToGameOverState, although it is really just a stub to provide future support for a game that has more than one level. This method is called when there are no more blocks on the screen.
Implementing Reset Helper Methods
In the game state transitions code, we called two methods that haven't appeared in our code yet: ResetBlocks and ResetPositions. These are helper methods that take care of resetting more complicated elements in the game. Find the Helper Methods region and add the two methods shown in Listing 4-14.
Listing 4-14. Helper Methods for OutBreak (in Game1.cs)
private void ResetBlocks()

{

    // Random RGB color values

    Random rnd = new Random();

    float red, green, blue;

    Color randomColor;


    int numRows = 5;

    int numColumns = 8;


    int x = 0;

    int y = 0;


    blocks.Clear();

    for (int row = 0; row<numRows; row++)

    {

        for (int col = 0; col<numColumns; col++)

        {

            red = (float)rnd.NextDouble();

            green = (float)rnd.NextDouble();

            blue = (float)rnd.NextDouble();

            randomColor = new Color(red, green, blue);


            blocks.Add(new Block(new Vector2(x, y), randomColor, true));


            x += BLOCK_WIDTH;

        }

        x = 0;

        y += BLOCK_HEIGHT;

    }

}


private void ResetPositions()

{

    try

    {

        // Put the paddle and ball in the middle of the screen.

        int screenWidth = GraphicsDevice.Viewport.Width;

        paddlePosition = new Vector2(screenWidth / 2 - paddleTex.Width / 2,

            PADDLE_Y);

        ballPosition = new Vector2(screenWidth / 2 - ballTex.Width / 2, BALL_Y);

        ballDirection = initialBallDirection;

    }

    catch

    {

        throw new Exception("Don't call ResetPositions until after

            the content is loaded.");

    }

}
The ResetBlocks method clears out the block list and runs a nested for loop for an 8×5 grid of blocks. In this loop, a brand-new color and position are assigned to the block. This is an example of a classic row/cell type of algorithm most people learn in introductory programming classes.
The ResetPositions method is interesting because it dynamically positions elements on the screen based on the size of the texture supplied. Centering objects is accomplished by taking half the screen width and subtracting half the texture width. This method affects only the position of the paddle and the ball. Because this method is dependent on the textures being loaded, the method cannot be used correctly until after LoadContent loads the textures. Speaking of the LoadContent method, let's take a look at that next.
Loading the Game Content
Expand the XNA Methods region and find the LoadContent method. Add the code shown in Listing 4-15 to initialize textures and fonts.
Listing 4-15. LoadContent Method for OutBreak (XNA Methods Region in Game1.cs)
protected override void LoadContent()

{

    // Create a new SpriteBatch, which can be used to draw textures.

    spriteBatch = new SpriteBatch(GraphicsDevice);


    blockTex = Content.Load<Texture2D>("block");

    paddleTex = Content.Load<Texture2D>("paddle");

    ballTex = Content.Load<Texture2D>("ball");

    introBackgroundTex = Content.Load<Texture2D>("outbreak_background");

    darkBackgroundTex = Content.Load<Texture2D>("outbreak_bg_dark");

    gameOverTex = Content.Load<Texture2D>("gameover");

    normalFont = Content.Load<SpriteFont>("Normal");


    // Move to the New Game state.

    // Requires that the textures be loaded so we can center objects.

    MoveToIntroState();

}
This is standard content loader code, with the addition of the call to MoveToIntroState. It would seem that we should call that method in the Initialize method, but it makes more sense (and is required) to call it here, because the textures must be loaded in order to dynamically position the ball and paddle based on their size. This is the last chance to call such methods before the game loop starts running.
Handling Input
Having the InputState class certainly reduces the amount of code we need to write, but we are creating a real game at this point. As such, it makes sense to have a method dedicated to handling the input. First of all, the input instance of the InputState class must be updated directly from the game's Update method. After that, we can call the HandleInput method. Find the Helper Methods region and add the method shown in Listing 4-16 to handle various types of input.
Listing 4-16. HandleInput Method for OutBreak (Helper Methods Region in Game1.cs)
private void HandleInput(GameTime gameTime)

{

    switch (gameState)

    {

        case GameState.Intro:

            // Wait for the play button to be pressed

            if (input.PlayPressed)

            {

                MoveToReadyState(gameTime);

            }

            break;

        case GameState.Playing:

            // Check Left

            if (input.LeftIsDown)

            {

                // Check boundary to the left

                if (paddlePosition.X > 0)

                    paddlePosition.X -= paddleSpeed;

            }


            // Check Right

            if (input.RightIsDown)

            {

                if (paddlePosition.X < GraphicsDevice.Viewport.Width -

                    paddleTex.Width)

                    paddlePosition.X += paddleSpeed;

            }


            // Bring up the Guide

            #if ZUNE

            if (input.PlayPressed)

            {

                Guide.Show();

            }

            #endif


            break;

        case GameState.GameOver:

            if (input.MiddleButtonPressed || input.PlayPressed)

                MoveToIntroState();

            break;

        default:

            break;

    }

}
This is your first real exposure to referencing the game state. Input should behave differently based on the current game state. For example, there's no point handling Left and Right input if the game is just sitting idly on the intro screen. To accomplish this, we have a switch statement that looks at the value of gameState.
On the intro screen, we only care if the user presses Play, which transitions the game to the Ready state.
When playing the game (in the Playing state), we want to handle three types of input: pressing Left, pressing Right, or pressing the Play button. When checking if Left is down, we move the paddle left only if it's not already all the way to the left, which we determine by comparing the paddle position's X component to the left boundary (zero). When checking if Right is down, we move the paddle to the right only if the current paddle's position (plus the entire width of the paddle) is less than the right boundary (the screen width). This keeps the paddle constrained equally on both sides of the playing area. When Play is pressed, the guide menu appears. Note the use of conditional preprocessor directives here. Guide.Show will not compile in the Windows version of the game, so we wrap this bit of code in #if ZUNE.
Note The XNA, ZUNE, and WINDOWS build constants are predefined for you in XNA game projects.
Finally, in the GameOver state, pressing the middle button or Play will result in the game resetting to the Intro state. No other game states require input to be handled, but it's easy to support it by adding another case label.
Handling Collisions
In this game, we will use an incredibly simple method of checking for collisions. This method just checks to see if one rectangle intersects another. A bounding box is a rectangle around an object that represents its borders. The bounding boxes are set up and then checked to see if they intersect. If they do, some action is taken, depending on which objects are colliding.
Collision detection is really the meat of the game, as it drives most of the decisions made, such as win or lose, success or failure, life or death, and so on. As such, HandleCollisions is a rather beefy method. Find the Helper Methods region and add the HandleCollisions method shown in Listing 4-17.
Listing 4-17. HandleCollisions Method for OutBreak (Helper Methods Region in Game1.cs)
private void HandleCollisions(GameTime gameTime)

{

    Rectangle ballBoundingBox = new Rectangle((int)ballPosition.X,

        (int)ballPosition.Y, ballTex.Width, ballTex.Height);


    Rectangle blockBoundingBox = new Rectangle();


    Rectangle paddleBoundingBox = new Rectangle((int)paddlePosition.X,

        (int)paddlePosition.Y, paddleTex.Width, paddleTex.Height);


    float ballCenterX = 0.0f;

    float paddleCenterX = 0.0f;

    float distance = 0.0f;

    float ratio = 0.0f;


    // Check collisions with blocks

    foreach (Block block in blocks)

    {

        blockBoundingBox.X = (int)block.Position.X;

        blockBoundingBox.Y = (int)block.Position.Y;

        blockBoundingBox.Width = BLOCK_WIDTH;

        blockBoundingBox.Height = BLOCK_HEIGHT;

        if (block.IsVisible)

        {

            if (ballBoundingBox.Intersects(blockBoundingBox))

            {

                // The ball hit a block - increment score

                block.IsVisible = false;

                if (lastObjectBounced == LastObjectBounced.Block)

                    scoreMultiplier *= 2;


                score += BASE_SCORE * scoreMultiplier;


                // Do a quick search to see if there are any blocks left

                bool allBlocksGone = true;

                foreach (Block b in blocks)

                {

                    if (b.IsVisible)

                    {

                        allBlocksGone = false;

                        break;

                    }

                }


                if (allBlocksGone)

                {

                   MoveToLevelComplete();

                }

                else

                {

                    // Reflect in Y direction

                    ballDirection = Vector2.Reflect(ballDirection,

                        Vector2.UnitY);

                    lastObjectBounced = LastObjectBounced.Block;

                }

            }

        }

    }


    // Check collisions with the paddle

    if (ballBoundingBox.Intersects(paddleBoundingBox))

    {

        if (lastObjectBounced != LastObjectBounced.Paddle)

        {

            // Bounce the direction vector in the Y direction

            ballDirection = Vector2.Reflect(ballDirection, Vector2.UnitY);


            // Determine how far from the center of the paddle the ball hit

            ballCenterX = ballPosition.X + (float)(ballTex.Width / 2.0f);


            paddleCenterX = paddlePosition.X + (float)(paddleTex.Width / 2.0f);

            distance = ballCenterX - paddleCenterX;

            ratio = distance / (paddleTex.Width / 2);


            ballDirection.X = ballDirection.X + (ratio * 2);

            scoreMultiplier = 1;


            lastObjectBounced = LastObjectBounced.Paddle;

        }

    }


    // Check left & right collisions

    if (ballPosition.X <= 0 ||

        ballPosition.X >= GraphicsDevice.Viewport.Width - ballTex.Width)

    {

        if (lastObjectBounced != LastObjectBounced.Wall)

        {

            // Bounce the direction vector in the X direction

            ballDirection = Vector2.Reflect(ballDirection, Vector2.UnitX);

            lastObjectBounced = LastObjectBounced.Wall;

        }

    }


    // Check top collision (screen boundary)

    if (ballPosition.Y <= 0)

    {

        if (lastObjectBounced != LastObjectBounced.Top)

        {

            ballDirection = Vector2.Reflect(ballDirection, Vector2.UnitY);

            lastObjectBounced = LastObjectBounced.Top;

            scoreMultiplier = 1;

        }

    }


    // Check bottom collision (player loses a life)

    if (ballPosition.Y >= GraphicsDevice.Viewport.Height)

    {

        numLives--;

        if (numLives<1)

            MoveToGameOverState();

        else

        {

            MoveToReadyState(gameTime);

        }

    }

}
As you can see, this method is quite complicated, so we'll break it down so that it makes more sense. The next chapter will discuss collision detection in greater detail, so the explanation here is brief.
The first three lines of the method set up the bounding boxes for the objects we want to check for collisions: the ball, the paddle, and a block. The next four float variables are used when the ball hits the paddle to determine how far from the center of the paddle the ball hit. This allows the code to slightly alter the ball's direction based on where it struck the paddle.
Next is a foreach loop that loops through all the Block objects to determine which of them collide with the ball. This loop does a couple of things. If the ball collides with the current Block, that Block is made invisible and the score is updated. If no blocks are left, the level is completed. Otherwise, the ball's direction vector is flipped, and the lastObjectBounced variable is set to LastObjectBounced.Block. This foreach loop handles collisions between the ball and all Block objects.
After the foreach loop are four if statements that check other collisions:
- The first
ifstatement checks for a collision between the paddle and the ball. If the ball and paddle collide, the ball direction vector is flipped in the y direction, and then has some modification applied to the vector'sXcomponent based on where the ball landed. Doing this adds a special dynamic to the game that is very intuitive for the player. If you want to "slow down" or "speed up" the ball, you can do this by positioning the paddle differently. - The second
ifstatement checks for left and right wall collisions. If the ball hits the left or right wall, the ball's direction vector is flipped in the x direction. - The third
ifstatement checks to see if the ball has hit the top of the screen. If so, the vector is flipped in the y direction without assigning any points. - The final
ifstatement checks to see if the ball has hit the bottom of the screen without touching the paddle. In this case, a life is lost and the game transitions to theReadystate. If there are no lives left, the game transitions to theGameOverstate.
Putting It Together: The Update Method
All of the methods we need are in place to get the game updating correctly. Expand the XNA Methods region, find the Update method, and modify it to look like Listing 4-18.
Listing 4-18. Update Method for OutBreak (XNA Methods Region in Game1.cs)
protected override void Update(GameTime gameTime)

{

    // Allows the game to exit

    if (GamePad.GetState(PlayerIndex.One).Buttons.Back == ButtonState.Pressed)

        this.Exit();


    #if ZUNE

    isPaused = Guide.IsVisible;

    #endif

    if (!isPaused)

    {

        input.Update();

        HandleInput(gameTime);


        switch (gameState)

        {

            case GameState.Intro:

                // No processing for this game state

                break;

            case GameState.Ready:

                if (gameTime.TotalGameTime.Subtract(screenTimer).Seconds >=

                    SCREEN_DISPLAY_TIME)

                    gameState = GameState.Playing;

                break;

            case GameState.Playing:

                HandleCollisions(gameTime);

                ballPosition = Vector2.Add(ballPosition, ballDirection);

                break;

        }

    }


    base.Update(gameTime);

}
The first thing you notice here is another conditional preprocessor directive to update the value of the isPaused variable based on the visibility of the guide. The reason this depends on the platform is that the guide does not exist for Windows games. On Windows, isPaused will always be false, because there is no code to alter it. On the Zune, however, this value determines two things: whether the game updates during game play and what is drawn behind the guide in the Draw method.
Accordingly, the meat of the logic is wrapped in an if statement so that it executes only when the game is not paused. Without this bit of code, the game will continue to run in the background while the guide is displayed, which would not be a good thing.
If the game should be updating (meaning it's not paused), then the input engine is explicitly updated and the input is handled via a call to HandleInput. Then the game processing for each game state comes into play. In the Ready state, the timer is updated; if a number of seconds equal to SCREEN_DISPLAY_TIME has elapsed, the game transitions into the Playing state. During the Playing state, collisions are handled, and the ball's position is added to its direction vector to move it on the screen.
Notice how compact the Update method is. We extracted most of the core game logic into different methods so that this one stays neat and tidy, in case you need to add more game states or other engines to update.
Putting It Together: The Draw Method
The final piece of this exercise is the Draw method, which is responsible for drawing the game elements at their most recent locations. There is not, and there should not be, any game-play logic in this method. Expand the XNA Methods region, find the Draw method, and alter it to look like Listing 4-19.
Listing 4-19. Draw Method for OutBreak (XNA Methods Region in Game1.cs)
protected override void Draw(GameTime gameTime)

{

    graphics.GraphicsDevice.Clear(Color.Black);


    spriteBatch.Begin();


    switch (gameState)

    {

        case GameState.Intro:

            spriteBatch.Draw(introBackgroundTex, Vector2.Zero, Color.White);

            break;


        case GameState.Ready:

            spriteBatch.Draw(darkBackgroundTex, Vector2.Zero, Color.White);


            spriteBatch.DrawString(normalFont,

                "Lives: " + numLives + "
Score: " + score,

                textReadyLivesPosition, Color.White);


            int remainingSeconds = SCREEN_DISPLAY_TIME -

                (gameTime.TotalGameTime.Seconds - screenTimer.Seconds) + 1;


            spriteBatch.DrawString(normalFont,

                "Get Ready... " + remainingSeconds,

                textCountdownPosition, Color.White);


            break;


        case GameState.Playing:

            if (!isPaused)

            {

                spriteBatch.Draw(paddleTex, paddlePosition, Color.White);

                spriteBatch.Draw(ballTex, ballPosition, Color.White);


                foreach (Block block in blocks)

                {

                    if (block.IsVisible)

                        spriteBatch.Draw(blockTex, block.Position, block.Color);

                }


                spriteBatch.DrawString(normalFont,

                    "score: " + score + " (x" + scoreMultiplier + ")",

                     textPlayingScorePosition, Color.White);

            }

            break;


        case GameState.GameOver:

            spriteBatch.Draw(gameOverTex, Vector2.Zero, Color.White);


            string scoreText = "Your Score: " + score;

            Vector2 textOrigin = normalFont.MeasureString(scoreText) / 2;


            spriteBatch.DrawString(normalFont, scoreText,

                textFinalScorePosition, Color.White, 0.0f, textOrigin, 1.0f,

                SpriteEffects.None, 0.5f);

            break;

    }


    spriteBatch.End();


    base.Draw(gameTime);

}
The Draw method is sensitive to the current game state. The game state determines exactly what is drawn on the screen. In any case, the screen is always cleared to black.
In the Intro state, the intro graphic is drawn—nothing too fancy is happening here.
In the Ready state, the darker background is drawn, followed by two text elements. The first element contains the current score and number of remaining lives. The second text element is the countdown text, which looks like "Get Ready ...x," where x is the number of seconds remaining until the round starts.
In the Playing state, the paddle and ball are drawn. Then all of the blocks are drawn, but only if that block is visible. The score is displayed in real time at the bottom of the screen.
Finally, in the GameOver state, the "Game Over" graphic is drawn, along with the score. The score is centered using the MeasureString method, which we will discuss further in the next chapter. Notice that the code to draw the score text uses a different method signature for DrawString than you have seen so far. This allows us to specify the text origin as well as the position.
After the switch statement, the sprite batch is closed, and the entire screen is rendered to the device.
Testing OutBreak
Whew! All of the code is now in place for the game. You should have a good understanding of the design behind OutBreak and the purpose of each of the methods. Now, let's take it for a test drive.
First, test it on the PC. Right-click the Windows copy project and choose Set as Startup Project. It doesn't matter which Zune you have set for deployment; if deployment fails, the Windows game can still launch. Rebuild the solution and correct any compilation errors that arise. If you have trouble, compare your code with the complete sample code provided for this game. Press F5 to run the game.
The Enter and spacebar keys are used for play, as well as the middle button press, as we defined in the InputState class. Use the left and right arrow keys to move the paddle. Test the game play on your PC and enjoy.
Next, test it on your Zune. Right-click the Zune project and choose Set as Startup Project. Ensure you have the correct Zune set as the default device in XNA Game Studio Device Center. Press F5 to deploy and run the game. Use the Zune directional pad to move the paddle to the right and left. During game play, press the Play button to bring up the guide, and notice how the game pauses.
Congratulations—you have just built your first Zune game that also runs on Windows!
Check Your Knowledge
The following questions will help you apply what you've learned in this chapter to your own games. The answers are supplied in Appendix C.
- How do you access XNA Game Studio Device Center?
- How can you take a screenshot of a game running on the Zune?
- Why would you want to run a Zune game without debugging?
- What size textures are optimal for the Zune?
- How does the Zune pad map to the
GamePadStateenumeration? - How do you ensure that Zune-specific code doesn't get compiled into the Windows version of the game assembly?
- Which method do you need to call to force a Windows game to match the preferred back buffer width and height?
- Which class is used to play, pause, and stop music and control the volume?
- What is an alternative to writing your own music browser and player?
- What kind of object does
GetAlbumArtreturn?
Summary
By now, you should be feeling very confident about writing games for your Zune. This chapter took you through several different exercises that demonstrated how to handle input, play music, debug, and create Windows copies of Zune games. You were even introduced to collision detection, vector math, simple game state management, and more.
In the next chapter, you will learn how to make Zune game development an even easier experience using advanced game state management, game components, and different types of collision detection.