
CHAPTER 3
Game Content
The cornerstone of a good-looking game on any platform is the content. Sure, you could create an entirely text-based game for the Zune, but we're in the twenty-first century now! Of course, 30 years from now, when you pick up this book and read it for nostalgic reasons, you might have something to say about this formerly cutting-edge technology.
A game without interesting content in this day and age is like a song without music. The images your players see, the music they hear, the sound effects you play, and even the fonts they read can have an impact on their overall experience. Even if it's on a subconscious level, content can make a huge difference in a user's mental evaluation of your game.
Content is inextricably linked in many ways to the user interface. How many times have you played a game for the PC or a console and noticed that the game just didn't feel or look right? How did that impact your personal impression of the game?
In this chapter, you will learn about content—what it is, how to get it into your game, how to use it effectively, and more.
What Is Content?
The word content can mean a lot of things in different contexts. In the context of XNA, content refers to the artwork, music, sounds, fonts, textures, animations, models, effects, and other audio or visual elements that give your game that unique character.
These content elements are individually known as assets. Components and other dynamic elements, which are generally executed at runtime, are not commonly classified as assets. Therefore, they fall into a different category from content (usually effects). The exception to this is the effect type, which allows you to create a custom rendering effect for an object on the Xbox 360 and PC platforms. Such effects are imported to and processed by the XNA content pipeline (discussed in detail later in this chapter), as any other asset would be.
The following are some asset types that are commonly used in XNA games:
- Image files
- WAV and MP3 files (used primarily on the Zune)
- XACT audio packages (PC and Xbox 360 only)
- 3D models (PC and Xbox 360 only)
- Font files
- Effects files (PC and Xbox 360 only)
- XML files (sometimes used as a lightweight database or storage medium on the Zune)
Note On the Zune, only 2D graphical elements are supported. This means that Zune games cannot have 3D models or viewports in them.
These assets are really all you need to build a full-featured game for the Zune. It all comes down to manipulating pretty graphics on the screen and playing sounds, and these content types provide you with everything you need to do that.
Now let's take a closer look at each of these content types.
Types of Content
You can use many different kinds of content to spice up your game. Your choices on the Zune are only slightly limited by the Zune's hardware. Specifically, the Zune (at the time of this writing) does not have a graphics acceleration chip or advanced sound capabilities, meaning you cannot use 3D graphics or 3D sound.
Here, we'll look at adding images, audio, fonts, effects, and XML data to XNA games designed to play on the Zune.
Note The Zune does not support the rendering of 3D models, but they are an important part of XNA games on other platforms. File formats for models include X, FBX, XSI, and others. Many of these file formats are supported by default. 3D models are usually created by professional 3D modeling tools such as Autodesk 3ds Max, Autodesk AutoCAD, NewTek LightWave, Blender, Autodesk Softimage XSI, and the free Softimage XSI Mod Tool, which has built-in XNA integration for PC and Xbox 360 games.
Images
Images are perhaps the most common type of content asset that you will create (or have created for you) in the process of developing any game. Much of what you will see in this book is what I like to call "programmer art," which is a slightly derogatory term for art produced by people who are not artists. Individuals fitting the programmer archetype often hack out scrap art, which they intend to refine later, only to find that same scrap art living on in final versions of the game.
A truly successful game endeavor will have the programmer focused on programming, with an artist or two creating professional art assets. If you are one of the blessed few who have above-average art skills combined with well-refined programming acumen, consider yourself very lucky. Not only are you set up perfectly to produce your own XNA games largely by yourself, but a person with your skill set is in very high demand across the game industry!
What Images Are Used For
As previously mentioned, images really are the cornerstone of a player's interaction with your game. In your games, you can use images for the following applications:
- Game background
- Layering items in a user interface
- User interface elements (buttons, skins, and so on)
- Sprites (2D textures drawn on the screen to represent a game object)
- Animations
All images are really the same—a digital representation of some graphic—but how you use them in your game can vary greatly.
In Zune terms, you will almost always be working with the Texture2D object. Texture2D represents, well, a two-dimensional texture.
Supported Image File Types
The XNA Framework supports several different image file formats. Some are better than others for different purposes. Each of these file formats can be used to populate a Texture2D object. Generally speaking, the PNG format is preferred for new graphics. PNG graphics look nice, have excellent transparency support, and are easily created by most digital art programs.
The following image file types are supported:
PNG: The Portable Network Graphics (PNG) format has been around since the 1990s, and has lately become very popular for lossless graphics that require transparency. Many XNA game developers prefer PNG images because of their small file size, transparency features, and very efficient lossless compression. PNG graphics are still raster images, so scaling them up will lead to some pixelation. The graphics used in the examples in this book are in PNG or JPEG format.
JPG and JPEG: The JPEG Interchange Format, created by the Joint Photographic Experts Group in 1992, is most commonly used today to store photographs taken by digital cameras. JPEG images are compressed with some image quality loss, and transparency is not supported. If you have a JPEG image that you wish to use in your game as a background or similar graphic, the XNA content pipeline will have no problems importing it. However, this format is not preferred for sprites or other objects that may scale or require transparency.
BMP: Bitmap files are raw, uncompressed image files. The format has been around since the early days of Windows and OS/2. The color palettes in bitmap files are very limited, and the file sizes of most bitmaps are huge compared to other file formats. It's hard to make a bitmap image look good, so any bitmap assets you have should be converted to PNG and touched up before including them in your game.
DIB: A device-independent bitmap (DIB) is another extension for the BMP format.
DDS: The DirectDraw Surface (DDS) format is specific to DirectX technology and is commonly used in games that utilize DirectX. These files sport a transparency channel, just as PNG files do. If you are familiar with DirectX content types and know how to create DDS images, this format will work just fine for you in XNA.
HDR: The High Dynamic Range (HDR) file format is generally used by professional photographers to support a higher level of image contrast. High-end photo-editing programs such as Adobe Photoshop CS2 and CS3 support HDR images.
PFM: PFM files are portable bitmap files that can be created and read using Adobe's Creative Suite.
PPM: Portable Pixel Map (PPM) files are portable bitmap files used by tools such as Adobe Creative Suite and ULead PhotoImpact.
TGA: The TGA (or TARGA) file format, like DDS, has been used in many games throughout the years to store textures. TGA is rather antiquated compared to PNG. TGA does support transparency, but its color depth is limited compared to that of PNG. As with the DDS format, if you have assets in this format that you wish to use, the XNA content pipeline will process them for you without any problems.
How to Create Images
Many programs allow you to create graphical assets in the appropriate file formats. Most artists will use a tool like Adobe Illustrator or Adobe Photoshop to create PNG or TGA files requiring transparency. JPEG files can be created by just about any imaging program, including Microsoft Paint. The free tool Paint.NET, based on the .NET Framework, can also create most of these files, including transparent PNGs. DDS files are created exclusively by the DirectX libraries, by the DirectX Texture Tool.
We will be using Paint.NET in a few examples to create some low-grade "programmer art." Adobe Illustrator and Adobe Photoshop, while likely candidates for real-world use, are cost-prohibitive—we are trying to "keep it free" in this book!
A WORD ABOUT TRANSPARENCY
Before the glorious advent of alpha channels in graphics, the effect of transparency was achieved much like the green- and blue-screen effects of modern filmography. The transparent area of the graphic was filled with a specific color, such as pure green. Then, at runtime, pixels of that color were simply not drawn. Anything drawn to the graphics device before the "transparent" graphic appeared to be under it.
Thanks to file formats such as PNG and TGA, art can be conceived with transparency from the very beginning, eliminating the need to specify transparent areas or colors. Especially with PNG graphics, areas of an image can be fully transparent, slightly transparent, or opaque. This means that you can apply a drop-shadow effect in an image, for example, and see that effect seamlessly, regardless of what is behind it.
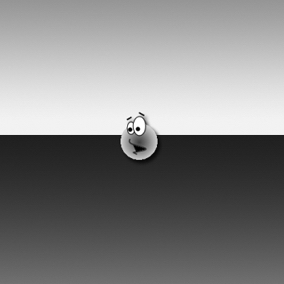
Let's look at some graphics that illustrate the concept of transparency (although since they are not in color, it may be difficult for you to discern some differences). First up is a sprite with no transparency drawn on a background. Notice the ugly white box surrounding the sprite.
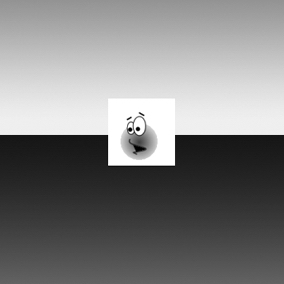
The following shows the same sprite saved with an alpha channel as the background. Notice how smooth it is.
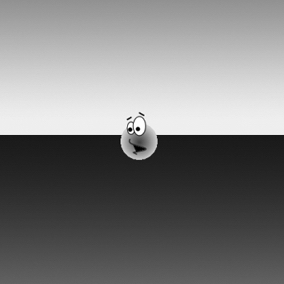
Finally, take a look at the same sprite with a drop shadow prerendered in the graphics program. Notice that the drop shadow is not baked onto any particular background color; the transparency gradient is accurate no matter what is beneath it.
Transparency is defined in the image-editing software used to create the asset. In order to ensure that all sprites in the sprite batch are blending together correctly using the textures' alpha channels, you need to modify but one line of code. Enabling alpha blending in XNA is easy. When you start drawing to a SpriteBatch object, you should use this overload of the Begin method:
spriteBatch.Begin(SpriteBlendMode.AlphaBlend);
This ensures that all the sprites drawn in this batch will have their alpha channels properly utilized, and transparency will work perfectly. Life is much easier thanks to these more advanced image file formats and the XNA Framework.
Animated Sprites
Animated sprites have a texture associated with them called a sprite sheet (also referred to as a character sheet, animation sheet, or other similar terms). Sprite sheets can be visually divided into a grid, usually one row with several columns. Each of these cells in the grid is one frame of a particular animation.
Figure 3-1 shows an example of a sprite sheet. This sprite sheet is a single image file that contains a simple "jump" animation for a stick figure.
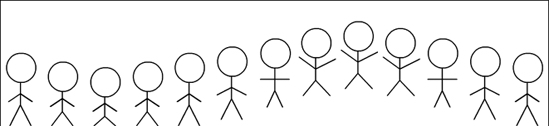
Figure 3-1. An example of a sprite sheet
The image in Figure 3-1 can be logically divided into subimages, just by looking at it. This sprite sheet was created with the assumption that the stick figure occupies a space 40 pixels wide by 120 pixels high. Each of the visual columns, shown in Figure 3-2, is 40 by 120 pixels. As you can see, this sprite sheet has 13 frames in its animation. Of course, you wouldn't draw this entire texture to the screen at once, or you would see Figure 3-1 in your game.
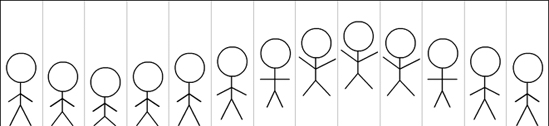
Figure 3-2. A sprite sheet visually divided into 13 frames
When you draw a sprite, you have an option to specify a source rectangle and a destination rectangle. The source rectangle is the area of the sprite you would like to draw. The destination rectangle is the area of the screen to which you would like to draw.
In Figure 3-3, you see that the third frame is visually highlighted. If you were drawing the third frame of the animation, this is the portion of the texture that would be drawn.
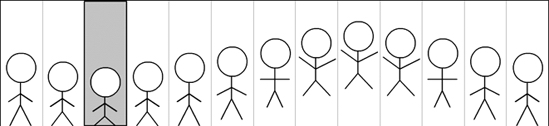
Figure 3-3. The third frame of the sprite sheet is shown.
It's easy to develop a quick animation utility to loop through the frames of these sprites. This is done by determining which frame to draw, and then calculating the source rectangle to grab from the sprite. Since every frame is the same width and height, you can calculate the source rectangle easily using code similar to this:
Rectangle sourceRect = new Rectangle(

   frameIndex * width, 0, width, height);
I mentioned earlier that this particular sprite is composed of frames that are 40 pixels wide by 120 pixels high. The total image width is 13 frames × 40 pixels = 520 pixels wide. In the construction of a new rectangle, you must specify the x and y position of the top-left corner, the width, and the height of the rectangle.
The only variable in this case is the first argument: the x position of the top-left corner. The y position of the top-left corner will always be zero; the width of the rectangle will always be equal to width; the height of the rectangle will always be equal to height. Multiplying frameIndex by the width obtains the x position of the current frame. At frame 0, the x position will be 0. At frame 3, as shown in Figure 3-3, the x position would be 40 × 3, or 120. The resulting rectangle for frame 3 is drawn at (120, 0) and has the specified width and height.
These concepts lay the groundwork for creating animated sprites. There is currently no functionality built in to the XNA Framework for animated sprites, so you must write your own. In the example at the end of this chapter, we'll create a basic animated sprite class that you can use in your own games.
Image File Considerations for Zune
While, technically, you can use any supported image type in your Zune game, you should be aware of some best practices for using images on this platform:
Use a resolution of 240 by 320: The Zune display has a resolution of 240 pixels by 320 pixels. Therefore, to avoid unnatural scaling of backgrounds and other full-screen sprites, you should condense these to a resolution of 240 by 320. It's also extremely useful to draft out your user interface on a 240 by 320 canvas in your art program. That way, you can ensure that your game objects fit into this limited space in a visually appealing way.
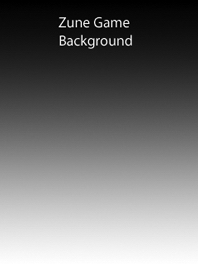
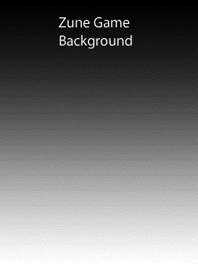
Avoid large gradients: The Zune display supports up to 65,536 colors (16-bit color). If you are using images with 32-bit color, they will be properly loaded, but downsampled at runtime to 16 bits with an 8-bit alpha channel. It's a good idea to avoid using large gradients in your artwork, as the downsampling will probably produce some unsightly banding in the gradient. Figure 3-4 shows an example of a background you might create with 32-bit color. Figure 3-5 shows what this same image might look like when rendered in 16-bit color on the Zune device, illustrating the unsightly banding effect.
 |
 |
|
| Figure 3-4. A 32-bit color background image for the Zune | Figure 3-5. The background image in Figure 3-4 rendered on the Zune in 16-bit color |
Audio
Like graphics, audio can make a big difference in a player's gaming experience. Think about your favorite first-person shooter game, where hearing footsteps behind you is crucial to survival, or a game like Chess, where you need an auditory indication that time is running out. Audio augments and enhances the game-playing experience.
That said, you should understand an important insight into the role of audio in a Zune game. On PC and Xbox games, the likelihood of the player having muted audio or no audio at all is relatively inconsequential. It is expected that these gamers have speakers, and the majority of them expect to hear professional sound in the game. Playing a soundless game on the Xbox 360 can be eerily lonesome. The caveat with Zunes is that they have no internal speaker; everything is transmitted through the headphones or some external speaker connected to the headphone jack. Therefore, there could be many situations in which a player decides to play your game without audio, in a setting where headphone use may not be appropriate or possible. This means that the likelihood of Zune gamers playing with no sound is substantially higher than that of gamers using other devices. A possible work-around for this scenario is the inclusion of a "silent mode" in your game, where audio cues are instead delivered as more prominent visual cues.
The Zune is first and foremost a music player. In any case, audio is important and should not be ignored just because some users may not always wear their headphones. Consider all those folks on long flights who need all the sound they can get! The value of the environment that effective sound adds to a game is undeniable.
What Audio Is Used For
Audio is used for three basic purposes:
- Audio provides consistent sound during the game. This can be background music or ambient noise.
- Sound effects can and should be used to indicate actions that transpire in your game, such as a collision, an object spawning, the firing of a projectile, or as a supplement to an animation sequence.
- The use of audio can be effective to draw the user's attention to a specific activity or required input, such as the appearance of a window that demands confirmation, a change in turns, or the end of the game.
Supported Audio File Types
In PC and Xbox games, all of the audio used in the entire game is usually stored in one or more packages in the XACT Audio Project (XAP) format. An XAP file is created by the XACT program. XACT is included with XNA Game Studio and also in the DirectX Software Development Kit (SDK).
XACT is extremely powerful for managing nearly every aspect of a game's soundscape, but it is geared more toward the development of 3D audio and full-audio packages. XACT is also a very complicated tool to begin learning; it's really a full-fledged development environment for sounds.
The Zune device currently does not support the components of the DirectX audio subsystem required for an XACT project. This is good news for Zune developers who are more interested in putting together a working game than spending untold hours learning XACT and tweaking audio projects. For this reason, we'll leave XACT alone in this book (aside from the background information) and move on to things we can use.
On the Zune, you have three options for playing audio:
WAV: The good old-fashioned WAV file is the stalwart champion of the
SoundEffectclass. Any standard WAV file can be loaded and played on demand as a sound effect. Try to keep file size down when creating WAV files. Storage is limited on the Zune, so you don't want several hundred megabytes of WAV-formatted sound effects encroaching on your music library's territory. Keep sound effects short, and don't save them at unnecessarily high quality. The less data your game needs to load, the faster it will start.
Caution WAV files can be very large. Loading them in an on-demand fashion can cause your game to run very slowly as it reads the file into memory.
MP3: MP3 files can be loaded into the content pipeline and played using the
SongandMediaPlayerclasses. If you are loading a file from memory, there will be a short delay before the MP3 sound is played for the first time (after that, it is cached and will play instantly). This makes the MP3 format ideal for your custom game music, and not so ideal for sound effects. If the MP3 is protected by Digital Rights Management (DRM), it cannot be played.User's media library: Songs from the user's media library that are not protected by DRM can be played at any time during the game using the
MediaLibrary, MediaPlayer, andSongclasses provided by the XNA Framework.
How to Create Audio Files
Audio files can be created by all kinds of programs, such as the basic Windows Sound Recorder, the open source Audacity, and of course, more powerful tool sets such as Adobe Audition. You can create your own audio files and save them as WAV files (for sound effects) or create custom music.
Note The creative process of making sound effects is called foley in the entertainment and gaming industries.
Fonts
Just about any game needs to display dynamic text on the screen at some point. You can avoid using fonts altogether by baking text into images, but having the ability to write a string to the screen is a useful and necessary tenet of game development.
In the first version of XNA Game Studio, there was no direct support for fonts. If you wanted to draw a string to the screen, you had to selectively draw areas of a large texture that had nearly every character of the font in it. The inclusion of rasterized fonts was such an obvious feature request that the XNA team implemented the SpriteFont object in the XNA Game Studio version 1.1 refresh release.
Any font that is installed on your development machine can be used in an XNA game. When the game is compiled, the font is converted to a packaged format that can be deployed to your destination platform (including the Zune). This means that any font you use will always be packaged with your game, eliminating the need for users to have specific fonts installed. In the case of the Zune, there is no real font infrastructure as there is on Windows, so this packaging is not only helpful, but necessary.
Adding font support to your game is as easy as adding a new sprite font item to your Content project. The name you specify when adding this item should map to the name of the font, such as Arial, Tahoma, or Gill Sans MT. The .spritefont file itself is actually an XML description of the font. This file includes the font name, font size, and the sets of characters to include in the packaged font.
If your game requires that the same font be drawn at drastically different sizes, it's a good practice to include two different sprite font items in the Content project. Text drawn with the font is eventually rasterized as a sprite (hence the name sprite font), so an 8-point font scaled up to 14 points will look pixelated and unpleasant. A difference of one or two points might not be noticeable to the eye, however.
Effects
The surfaces of 3D models usually have properties that define how the graphics card should shade them. These properties are applied by runtime effects called shaders. Shaders for DirectX are written in a language called High Level Shading Language (HLSL), usually in effects files with the .fx extension. Shaders define how the surface absorbs and reflects light from the surrounding light sources in the scene.
Because the Zune has no graphics hardware to support shaders of any kind, effects of this type won't work. Shaders also depend on lighting in a three-dimensional space, which the Zune cannot yet comprehend.
Instead of effect files written in a shader language like HLSL, effects applied to 2D sprites on the Zune are often accomplished using runtime components that are added to the game. Such components can give sprites particle systems, glows, shadows, and more. Components will be described in detail in Chapter 5.
XML Data
XML is a structured data format that is composed of text. XML is a powerful way of storing custom data. You can use this data to initialize strings, sprite positions, and other items that you would just feel bad about hard-coding. When used as content, XML is a one-way affair: you can only load it. If you need a solution to store data back to the Zune device, you should use XNA's storage capabilities, which you will learn about in Chapter 6.
When you add a new XML document to your Content folder, the default XML in that document looks like this:
<?xml version="1.0" encoding="utf-8" ?>

<XnaContent>

  <!-- TODO: replace this Asset with your own XML asset data. -->

  <Asset Type="System.String"></Asset>

</XnaContent>
The nodes in XnaContent allow you to define values that you can load into memory objects. The default asset, a String, is an example of a simple data type that you can initialize using XML.
In some cases, you may wish to use an XML document that is not formatted as shown in the previous example. The default XML format can be used directly in the XNA content pipeline. If you have XML that does not match this format, or schema, you need to write a custom importer and processor to parse the XML and populate your objects. Custom importers and processors are discussed later in this chapter.
The XNA Content Pipeline
When the XNA team members set out to develop an everyman's game development tool, they wanted to streamline as many of the aspects of game development as possible. They did this by creating a full-featured framework, including a lot of boilerplate code in project templates, and providing a powerful content engine that allows game developers to use their own content-creation tools. This section details the complex but crucial content pipeline.
What the Content Pipeline Provides
The content pipeline makes life easier for developers in a number of ways. It builds all of your game assets at compile time into an XNA-specific format, called XNB, without requiring you to do any extra work. The content pipeline is extensible; you can add to the wide number of supported asset types to handle proprietary file formats or data structures. It already supports quite a variety of commonly used file types, as discussed earlier in this chapter.
Possibly the most compelling aspect of the content pipeline is that it separates content creation from processing. Artists, sound designers and other asset creators can use the tools they are most comfortable with to create the assets. You, the developer, are responsible only for including these files in your project and loading them at runtime. No special processing is necessary on your part, unless you are dealing with a format that the content pipeline does not natively support.
While the underlying mechanism of the content pipeline is complex, the relationship that both developers and designers have with it is very simple. This simplicity makes it easy to bring content into your game and work with it freely, without the need to understand how it all works.
Content Pipeline Architecture
Due to the aforementioned simplicity of interacting with the content pipeline, you may never need to understand how the content pipeline works. However, if you want to support a new file format or create your own, it's useful to understand what goes on under the hood of the content pipeline.
In simple terms, the content pipeline imports content files, processes them, and outputs them as part of your game during compile time. When Visual Studio begins its build process, the content pipeline also builds its assets. The content pipeline's build process is fully integrated with Visual Studio, so any errors raised in the process of building content are output to the Errors window in the same way as any other solution build item. Content assets are integrated with the build system the moment they are added to your solution.
The content pipeline makes it possible for an asset to be converted from the format it was created in to part of the game's binary package. This transformation is shown in Figure 3-6.
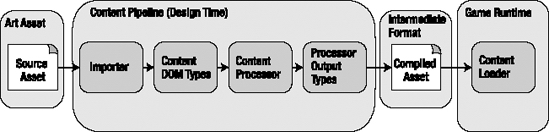
Figure 3-6. The flow of the content pipeline's build process
As you can see in Figure 3-6, the content pipeline takes an asset through several stages, from raw asset to XNA content object. In doing so, four main components are called upon by the content pipeline: the importer, processor, compiler, and loader.
Content Importer
An importer is used to bring an asset into the content pipeline at compile time before processing it. XNA Game Studio supplies importers for well-known file types. With a Zune, you will likely work the most with the WAV, MP3, Texture, and Sprite Font Description content importers. All of these content importers are supplied for you.
Content Processor
After the asset is imported by a content importer, it will be processed by a corresponding content processor. Content processors usually have the same name as their respective importers (such as Texture – XNA Framework). Most asset types, after being imported, can be found in the standard Content Document Object Model (DOM). The Content DOM makes processing imported assets very easy and generic, so it can support many different types without needing to change the high-level process. If you are working with a format not found in the Content DOM, you must write your own processor that includes functionality for reading and writing that format.
The job of the content processor is to take the imported asset and transform it to a managed object, such as Texture2D, SpriteFont, SoundEffect, and others.
Content Compiler
After the content processor converts your assets into managed objects, these objects are built into a binary format that is highly optimized for the XNA Framework. These binary content objects, which have the extension .xnb, are very specific to the XNA Framework and are not intended to be used by any other program.
The content compiler creates a ready-to-load game asset that has a specific name. Later, when calling Content.Load, you will notice that attempting to supply the file extension to the Load method will result in a runtime exception stating the asset could not be found. Because all assets are compiled down to the XNB format, you must load the asset by its name, which is not the same as its original file name.
At this point in the process, your game asset has been transformed from its original format to the compact binary format supported by the content pipeline. It is now ready to be loaded at runtime by the content loader.
Content Loader
The content loader is activated at runtime when you call Content.Load to bring in an asset from the content pipeline. Content.Load is a generic method that returns the asset as a specific managed data type, such as Texture2D or SpriteFont. You can call Content.Load multiple times for the same asset, but it will be truly "loaded" only once. For performance reasons, the content pipeline smartly avoids loading the same asset more than once, and will return the existing asset on subsequent attempts to load it.
The Content.Load method is usually called once per asset in the LoadContent method of your Game class. You can load content outside this method, but you need a reference to the game's ContentManager object. You may also experience a dip or halt in performance due to the hard disk activity associated with loading a brand-new asset into the ContentManager. When loading an asset, you should specify the original file name minus the file extension, including the relative path to the content project in which it resides.
Content Stages
As you've seen, the content pipeline takes an asset through several stages. As an example, let's look at the life of a typical content asset—a background image—as seen by the XNA Framework.
- An artist creates an image in PNG format called
background.png. The developer adds this file to the XNA game'sContentproject. - At compile time,
background.pngis imported into the content pipeline. - The image is processed by the Texture content processor as a supported type found in the Content DOM.
- A managed object is created for the
backgroundasset, which is now known asbackground, notbackground.png. - The image is written to a binary format and saved as
background.xnb. - At runtime, the
backgroundasset is loaded by the content loader and copied to aTexture2Dvariable using a line of code similar to this one:
myBackgroundTexture = Content.Load<Texture2D>("background");
- The
Texture2DobjectmyBackgroundTextureis drawn by aSpriteBatchobject in the game'sDrawmethod.
Loading Content at Runtime
The easiest way to load content at runtime is by using Content.Load in the game's LoadContent method. Content.Load is a generic method, which means its return type can vary based on what you specify. A typical call to Content.Load looks like this:
objectType managedObject = Content.Load<objectType>("asset_path");
managedObject is an object of type objectType, and asset_path is the name of the asset, including the relative path to the Content project. Calling Content.Load not only loads the asset into the content pipeline, but also returns a reference to the loaded object for you to use.
Following are some examples of how to load commonly used asset types.
Images (Textures)
Textures are loaded using the following syntax:
Texture2D backgroundTexture = Content.Load<Texture2D>("Textures/background");
Texture2D is the type of the object (a managed type from the Microsoft.Xna.Framework.Content namespace) that provides access to the texture's width, height, and other texture-specific properties. This line of code will retrieve a Texture2D asset generated from the file at Content/Textures/background.png (or whatever the originating file format is).
Sprite Fonts
Sprite fonts are loaded using the following syntax:
SpriteFont tahomaFont = Content.Load<SpriteFont>("Fonts/tahoma");
The SpriteFont class gives you access to a few useful properties about the font, such as font spacing and line spacing, as well as a very useful method called MeasureString, which you can use to center text.
Sound Effects
Sound effects, new to XNA Framework 3.0, are loaded using the following syntax:
SoundEffect boomEffect = Content.Load<SoundEffect>("Sounds/boom");
The SoundEffect class gives you access to some useful properties about the sound effect, such as its name and duration, as well as the Play method, which you can call to play the sound effect.
In any case, all content that you can possibly load follows the same pattern. You need to specify only the asset type, the relative path to the content folder (without the file extension), and the object into which you want to load the asset. The extensibility of the content pipeline also makes it such that any custom content types you create, such as an animation, can be loaded into the pipeline in the same manner, as long as you have the content importer and processor readily available.
Now, it's time to try out the content pipeline for yourself and see how truly easy it is to get started building a game with custom content!
Custom Importers and Processors
To make your life easier or to support formats not already provided by the Content DOM, you can create custom importers and processors that plug in to the extensible content pipeline. Parameterized processors allow you to specify additional information to the content processor at design time, making the processor more flexible for your use in the game.
Writing a custom content pipeline object is something you probably won't need to do very often. Nonetheless, the ability to do so puts a very powerful tool at your disposal. This chapter's exercise takes you through the process of developing a custom, parameterized content type for a 2D animation based on a sprite sheet. This allows you to select any PNG file in your content folder and assign an animation interval and total number of horizontal frames to it using the Properties window. It saves a tremendous amount of time for using any animations that loop continuously. You can extend this code later to include play, stop, and pause functionality, if you wish.
Before getting into the actual step-by-step procedure, let's review the code that our custom content processor will use.
The Content Type Class
First, we will create the SimpleAnimation class, as shown in Listing 3-1. This is the top-level type you would use in your game, much like a Texture2D or SpriteFont. This class contains information about the animation, such as the number of frames, the animation speed, and a Texture2D object that is embedded into the class during the content processing phase. It also contains Update and Draw methods, which you can call from the main game loop to automatically advance the frames. In Chapter 5, you will learn how this class could be a DrawableGameComponent and draw itself automatically.
Listing 3-1 shows the SimpleAnimation class. Each method and public property is commented for your convenience, and the #region markers are used to allow for better readability while coding.
Listing 3-1. The SimpleAnimation Class.
using System;

using Microsoft.Xna.Framework.Graphics;

using Microsoft.Xna.Framework;


namespace SimpleAnimationExtension

{

    /// <summary>

    /// This class represents an animated texture that plays continuously.

    /// </summary>

    public class SimpleAnimation

    {

        #region Private Fields


        private int _numFrames;

        private int _animationSpeed;

        private Texture2D _texture;

        private int _currentFrameIndex;

        private Rectangle _sourceRect;

        private TimeSpan _lastFrameUpdate;


        #endregion


        #region Public Properties


        /// <summary>

        /// Gets the number of frames in this animation.

        /// </summary>

        public int FrameCount

        {

            get

            {

                return _numFrames;

            }

        }


        /// <summary>

        /// Gets the speed of the animation in milliseconds. This is the

        /// rate at which the animation changes frames.

        /// </summary>

        public int AnimationSpeed

        {

            get

            {

                return _animationSpeed;

            }

        }


        #endregion


        #region Constructor(s)


        /// <summary>

        /// This method constructs a new SimpleAnimation object. It is

        /// called by the content processor.

        /// </summary>

        /// <param name="texture">The Texture2D object to associate with

        /// this animation.</param>

        /// <param name="numFrames">The number of frames in the

        /// animation.</param>

        /// <param name="animationSpeed">The animation speed, in

        /// milliseconds.</param>

        public SimpleAnimation(Texture2D texture, int numFrames,

            int animationSpeed)

        {

            _texture = texture;

            _numFrames = numFrames;

            _animationSpeed = animationSpeed;

            _currentFrameIndex = 0;

            _lastFrameUpdate = TimeSpan.Zero;


            _sourceRect = new Rectangle();

            UpdateSourceRect();

        }


        #endregion


        #region Public Methods


        /// <summary>

        /// This method should be called with each game update. It

        /// determines how much time has passed since the last update

        /// and updates the frame accordingly.


        /// </summary>

        /// <param name="gameTime"></param>

        public void Update(GameTime gameTime)

        {

            // Check to see if we need to advance the frame

            double timeDiff = gameTime.TotalGameTime.Subtract(

                _lastFrameUpdate).TotalMilliseconds;


            if (timeDiff >= (double)_animationSpeed)

            {

                _currentFrameIndex ++;

                if (_currentFrameIndex >= _numFrames) // loop back over

                    _currentFrameIndex = 0;


                _lastFrameUpdate = gameTime.TotalGameTime;

            }

        }


        /// <summary>

        /// This method draws the texture to a SpriteBatch object using

        /// the current source rectangle.

        /// </summary>

        /// <param name="spriteBatch">The SpriteBatch object

        /// to draw to.</param>

        /// <param name="position">The position where you want to draw

        /// the object.</param>

        public void Draw(SpriteBatch spriteBatch, Vector2 position)

        {

            UpdateSourceRect();

            spriteBatch.Draw(_texture, position, _sourceRect, Color.White);

        }


        #endregion


        #region Private Methods


        /// <summary>

        /// Determines the source rectangle for the texture

        /// based on the current frame.

        /// </summary>

        private void UpdateSourceRect()

        {

            int width = _texture.Width / _numFrames;

            int height = _texture.Height;

            int frameOffset = _currentFrameIndex * width;


            _sourceRect.X = frameOffset;

            _sourceRect.Y = 0;

            _sourceRect.Width = width;

            _sourceRect.Height = height;

        }


        #endregion

    }

}
The SimpleAnimation class is quite straightforward. It has a constructor, a couple of public properties, two public methods, and a private helper method. The constructor initializes the class by setting the appropriate member variables equal to the arguments passed to it. The Texture2D object comes from the content processor. The animation speed and number of frames are passed from the designer to the processor and again to this constructor by the content loader. The constructor is also responsible for initializing the time the frame was last updated, as well as the source rectangle used to draw a fragment of the texture.
Of the private variables used in this class, only two are exposed as properties:AnimationSpeed and FrameCount. The current frame index is used to determine which frame is currently being displayed. The last update timestamp references the time of the last update (if the animation hasn't played yet, it's simply zero). The source rectangle is a simple rectangle that defines an area of the sprite sheet to draw based on the current frame index. Finally, the Texture2D object is a local copy of the asset generated by the content loader.
The Intermediate Content and Reader Classes
During the processing phase, a special class must be used to contain the intermediate data that the content processor needs. The TextureProcessor, for example, uses a type called TextureContent to process image files. Our content processor will hijack this data type and utilize the TextureProcessor to create our own SimpleAnimation type. This will be the SimpleAnimationContent class, shown in Listing 3-2.
Listing 3-2. The SimpleAnimationContent Class, Along with Its Reader Type.
using System;

using Microsoft.Xna.Framework.Content.Pipeline;

using Microsoft.Xna.Framework.Content.Pipeline.Graphics;

using Microsoft.Xna.Framework.Content;

using Microsoft.Xna.Framework.Graphics;


namespace SimpleAnimationExtension

{

    /// <summary>

    /// Contains a texture object and custom properties.

    /// </summary>

    public class SimpleAnimationContent

    {

        public int FrameCount;


        public int AnimationInterval;

        public TextureContent TextureData;


        public SimpleAnimationContent(TextureContent data, int frameCount,

            int animationInterval)

        {

            TextureData = data;

            FrameCount = frameCount;

            AnimationInterval = animationInterval;

        }

    }


    /// <summary>

    /// Implements the reader for this content type.

    /// </summary>

    public class SimpleAnimationContentReader : ContentTypeReader

    {

        public SimpleAnimationContentReader()

            : base(typeof(SimpleAnimationContent))

        {


        }


        protected override object Read(ContentReader input,

            object existingInstance)

        {

            int animationInterval = input.ReadInt32();

            int frameCount = input.ReadInt32();

            Texture2D texture = input.ReadObject<Texture2D>();


            return new SimpleAnimation(texture, frameCount, animationInterval);

        }

    }

}
This file contains two classes. The first, SimpleAnimationContent, represents the intermediate type that the content processor deals with. It is unique and necessary because it contains a reference to the texture data—just as the usual Texture content processor would—plus, it attaches two custom properties to the binary file format. This class is serialized into the XNB format at compile time by the SimpleAnimationContentWriter class (shown next), cementing the texture data along with the custom properties we've defined.
The other class in this file, SimpleAnimationContentReader, reads an object of type SimpleAnimationContent at load time and returns a usable SimpleAnimation object. It does this by overriding the Read method and sequentially reading in certain data types. The order here is important, because it must match the order in which the values were written by the writer class.
The Writer Class
The writer class is invoked by the content processor to serialize the intermediate object, SimpleAnimationContent. Listing 3-3 shows the code for SimpleAnimationContentWriter.cs.
Listing 3-3. The SimpleAnimationContentWriter Class.
using System;

using System.Collections.Generic;

using Microsoft.Xna.Framework;

using Microsoft.Xna.Framework.Graphics;

using Microsoft.Xna.Framework.Content.Pipeline;

using Microsoft.Xna.Framework.Content.Pipeline.Graphics;

using Microsoft.Xna.Framework.Content.Pipeline.Processors;

using Microsoft.Xna.Framework.Content.Pipeline.Serialization.Compiler;


namespace SimpleAnimationExtension

{

    /// <summary>

    /// This class will be instantiated by the XNA Framework Content Pipeline

    /// to write the specified data type into binary .xnb format.

    ///

    /// This should be part of a Content Pipeline Extension Library project.

    /// </summary>

    [ContentTypeWriter]

    public class SimpleAnimationContentWriter :

        ContentTypeWriter<SimpleAnimationContent>

    {

        protected override void Write(ContentWriter output,

            SimpleAnimationContent value)

        {

            output.Write(value.AnimationInterval);

            output.Write(value.FrameCount);

            output.WriteObject(value.TextureData);

        }


        public override string GetRuntimeReader(TargetPlatform targetPlatform)

        {

            // TODO: change this to the name of your ContentTypeReader

            // class which will be used to load this data.

            return typeof(SimpleAnimationContentReader).AssemblyQualifiedName;

        }

    }

}
By default, this class has only two methods. The first is the overridden Write method, which writes a SimpleAnimationContent object to a ContentWriter object. Again, note the order in which the properties are written to the content writer. The write order must match the read order in the Read method of the SimpleAnimationContentReader object in Listing 3-2. In this case, the animation interval is written first, followed by the frame count, and finally, the texture data. The order chosen is arbitrary, but it must be consistent between the reader and writer to avoid exceptions.
With the reader and writer in place, our next step will be to bring it all together using the final piece of the puzzle: the content processor itself.
The Content Processor Class
By default, your project will already contain a content processor class, called ContentProcessor1.cs. For our example, we will rename that file to SimpleAnimationProcessor.cs, as shown in Listing 3-4.
Note You can also add a new content processor by right-clicking the project and choosing Add ![]() New Item
New Item ![]() Content Processor.
Content Processor.
Listing 3-4. The SimpleAnimationProcessor Class.
using System;

using System.ComponentModel;

using System.Collections.Generic;

using Microsoft.Xna.Framework;

using Microsoft.Xna.Framework.Graphics;

using Microsoft.Xna.Framework.Content.Pipeline;

using Microsoft.Xna.Framework.Content.Pipeline.Graphics;

using Microsoft.Xna.Framework.Content.Pipeline.Processors;


namespace SimpleAnimationExtension

{

    /// <summary>

    /// This class will be instantiated by the XNA Framework Content Pipeline

    /// to apply custom processing to content data, converting an object of

    /// type TInput to TOutput. The input and output types may be the same if

    /// the processor wishes to alter data without changing its type.

    ///

    /// This should be part of a Content Pipeline Extension Library project.

    ///

    /// </summary>

    [ContentProcessor(DisplayName = "Simple Animation Processor")]

    public class SimpleAnimationProcessor :

        ContentProcessor<TextureContent, SimpleAnimationContent>

    {

        private int _numFrames;

        private int _animationInterval;


        [DisplayName("Frame Count")]

        [Description("The number of animation frames in the texture.")]

        public int FrameCount

        {

            get { return _numFrames; }

            set { _numFrames = value; }

        }


        [DisplayName("Animation Speed")]

        [Description("The speed of the animation in milliseconds.")]

        [DefaultValue("100")]

        public int AnimationInterval

        {

            get { return _animationInterval; }

            set { _animationInterval = value; }

        }


        public override SimpleAnimationContent Process(TextureContent input,

            ContentProcessorContext context)

        {

            return new SimpleAnimationContent(input, _numFrames,

                 animationInterval);

        }

    }

}
The first thing to notice is the using section. A reference to System.ComponentModel has been added. This is to add support for the items in square brackets above each public property. These attributes will show up in the Properties window at design time, allowing you to modify the values before they are passed to the content processor. This is what makes a content processor parameterized.
Aside from the properties (which have getters and setters), there is one method in this class, called Process. This method is overridden from the base class (ContentProcessor) and performs one simple task: it creates a new SimpleAnimationContent object using the TextureContent input and the parameters provided by the developer at design time.
Also notice the data types provided in the class declaration:
public class SimpleAnimationProcessor :

        ContentProcessor<TextureContent, SimpleAnimationContent>
This class inherits from the base ContentProcessor, which is a generic class. The first type is the input, and the second is the output. At this point, it becomes clear that this content processor's job is to turn TextureContent into SimpleAnimationContent by passing along the texture data, collecting parameters from the designer, and using all of this information to construct a SimpleAnimationContent class.
Also note that the class itself has an attribute in square brackets called DisplayName. This value will appear in the Properties window at design time to provide the developer with a friendly name for the content processor. Similarly, the attributes on the processor's properties (DisplayName and Description) are used to make life easier for the person using this processor. The other attribute you see used is DefaultValue, which sets the default value of a particular parameter to something reasonable.
Now that you've seen the main classes that will make up our custom content processor, let's actually create it.
EXERCISE 3-1. A PARAMETERIZED CONTENT PROCESSOR FOR ANIMATIONS
In this example, you will learn how to create the components necessary to build a new content type called SimpleAnimation. SimpleAnimation contains all the logic needed to update and draw an animation based on the parameters you supply to it at design time, saving you from needing to build a custom animation class for animations that loop continuously.
This example shows you how to build a custom content processor that allows you to define any PNG file as a type that can be processed as a SimpleAnimation object. All you need to do is provide the animation speed (in milliseconds) and the number of frames in the animation at design time, and the class will take care of continuously animating itself.
This is a class that you can easily extend to add your own functionality, such as animations that stop, play partial frames, or anything you may require for your game's needs.
- In Visual Studio 2008, create a new project by selecting File
 New Project.
 - From the XNA Game Studio project types, choose Content Pipeline Extension Library. Enter
SimpleAnimationExtensionfor the name, as shown in Figure 3-7. Click OK.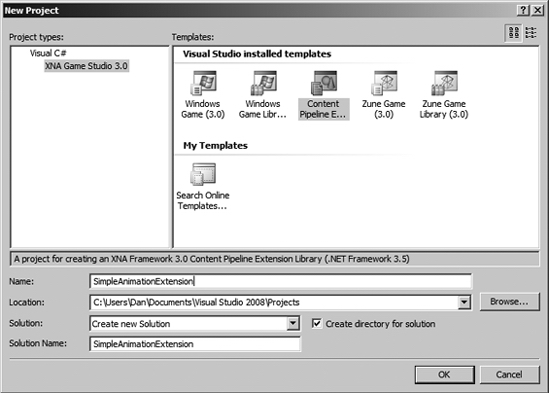
Figure 3-7. Creating the SimpleAnimationExtension project
- Right-click the
SimpleAnimationExtensionproject and choose Add Class. Name the class SimpleAnimation.cs, and then click OK. - Add the code for the
SimpleAnimationclass shown earlier in Listing 3-1. - Add a new file to the project by right-clicking the
SimpleAnimationExtensionproject and choosing Add Class. Name the class SimpleAnimationContent, and then click OK. - Add the code for
SimpleAnimationContent.csshown earlier in Listing 3-2. - Right-click the
SimpleAnimationExtensionproject and choose Add New Item. Choose the Content Type Writer file type and name it SimpleAnimationContentWriter. Click OK. - Add the code for
SimpleAnimationContentWriter.csshown earlier in Listing 3-3. - Right-click the
ContentProcessor1.csin the project and rename this file toSimpleAnimationProcessor.cs. This should automatically change the class name for you.Now, you should have a single project with four files:
SimpleAnimationContent.cs, SimpleAnimation.cs, SimpleAnimationContentWriter.cs, andSimpleAnimationProcessor.cs. This is everything you need in the content pipeline extension project, so our work here is done. While I mentioned earlier that this is for PNG files, that restriction has not been explicitly placed on the processor. You could technically use any file type recognized by the standard texture importer. - Compile the project and correct any errors.
Now, let's create a test project to see how it works. This is the part of the exercise where you see how all of the hard work of creating a custom content type really pays off.
- Right-click the
SimpleAnimationExtensionsolution (not the project) and choose Add New Project. Choose Windows Game from the project types and type TestingAnimationas the project name. Click OK. A new game project is added to the solution. - Right-click the
TestingAnimationproject and choose Set as Startup Project. This will ensure that this test game runs when you debug or run without debugging. - Right-click the References node in the
TestingAnimationproject and add a new project reference toSimpleAnimationExtension. This gives you access to theSimpleAnimationdata type, which you will need when loading content. - Right-click the References node in the
Contentfolder of theTestingAnimationproject and add a new project reference toSimpleAnimationExtension. This gives you access to the content processor you created as part of the content pipeline extension. You will immediately have access to the new content processor. The game project and the content subproject should now both have references toSimpleAnimationExtension. - Create a subfolder in the
Contentfolder calledAnimations. - Right-click the
Animationsfolder and choose Add Existing Item. Browse to Examples/Chapter 3/Artworkand addjump.pngfrom the folder. This is a simple sprite sheet for a jumping character, as shown in Figure 3-8.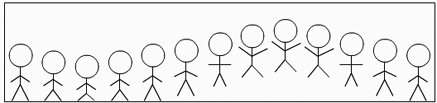
Figure 3-8. The sprite sheet for a jumping character, jump.png
- The project should look like Figure 3-9 in the Solution Explorer. Expand the
Animationsfolder and selectjump.png.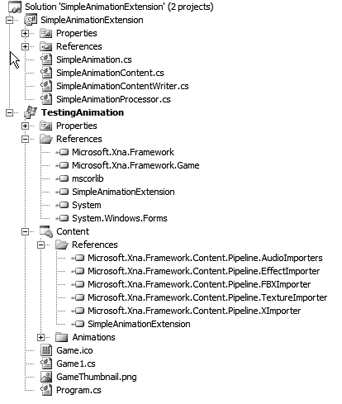
Figure 3-9. The Solution Explorer view of the project
- In the Properties window, note that you can modify the content importer and processor. Leave the importer as the default (Texture – XNA Framework). Expand the Content Processor node and select Simple Animation Processor from the list.
- Notice how the parameters you defined in the extension show up in the property sheet. For Animation Speed, type 50. There are 13 frames in the sprite sheet, so type 13 for the Frame Count value. The properties for
jump.pngshould look like Figure 3-10.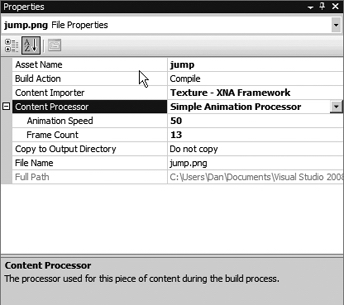
Figure 3-10. Setting properties for the animation asset
Let's write some code to utilize this animation. You'll be pleased with how simple this is.
- Open
Game1.cs, the file created for you in your new Windows Game project. Add the following line to theusingstatements:
using SimpleAnimationExtension;
- Where the
GraphicsDeviceManagerandSpriteBatchvariables are declared at the beginning of the class, declare a newSimpleAnimationobject, like so:
SimpleAnimation _animation;
- In the
LoadContentmethod, add the following line after the sprite batch is instantiated:
_animation = Content.Load<SimpleAnimation>("Animations/jump");
- In the
Updatemethod, add the following line before the call tobase.Update:
_animation.Update(gameTime);
- In the
Drawmethod, add the following code after the graphics device is cleared and before the call tobase.Draw:
spriteBatch.Begin();

_animation.Draw(spriteBatch, new Vector2(100, 100));

spriteBatch.End();
- Press F5 to run the game with debugging. Observe the jumping character on your screen!
By creating a custom content type and implementing a new processor, you have a way to add custom behaviors and properties to a plain texture. In this example, all of the animation logic has been delegated to the SimpleAnimation class, and all you need to do is use your own content processor to take advantage of it! We added only seven lines of code to the stock XNA game to utilize simple sprite animation techniques. Now, you see the power of custom content types.
Check Your Knowledge
The following questions will help you apply what you've learned in this chapter to your own games. The answers are supplied in Appendix C.
- What is the most practical file type for textures that make use of alpha blending?
- Why are 3D asset types, such as 3D models, not supported on the Zune?
- What does a
.spritefontfile contain? - The
SoundEffectclass can play both WAV and MP3 files. True or false? - Which component of the content pipeline transforms a compiled asset to a managed object at runtime?
- What is the Zune's screen resolution?
- What is the Zune display's color depth?
- Which element of the content pipeline provides a model for commonly used asset types?
- What type of asset can be used for configuration or special text-based data?
- Why must you omit the file extension of an asset when loading it at runtime?
Summary
This chapter gave you an in-depth look into how content works in XNA games. You learned about the various types of content, restrictions and considerations specific to the Zune device, in-depth information about the content pipeline, and even built your own content type with a custom, parameterized content processor.
In the next chapter, you will learn how to develop for the Zune device, including some best practices for deployment and debugging. You'll get a quick primer in some often-used 2D trigonometry and math, and apply it to your very first Zune game: OutBreak.