Part VII
iMovie
So… got any home videos?
iMovie is the perfect application to take your precious moving moments and give them the look of a Hollywood release. This program includes all the basic tools you need to begin learning how to edit video. Plus, this program also includes quite a few advanced features that will keep you learning and growing until you are well down the path of becoming the next great director!
Chapter 13
Lights…Camera…Themes…iMovie Workspaces!
Before I delve into the movie-creation process, there are several terms that are used in this program that you should understand and know how they apply to iMovie.
IMOVIE GLOSSARY
FPS: This stands for frames per second. Each frame consists of one static recorded image. A sequence of these images or frames makes you feel the sense of motion. The number of these static images recorded in a second is called the frame rate. The video camera that you use will determine how many frames per second it will record. Also, when you first create a movie, you are asked to define an ending frame rate. Thirty is the default for most users, but you can choose 24 for a more cinematic feel.
TRAILER: A trailer is short video that contains key elements of a larger movie to help promote the longer movie. It's a preview, like you see at the movies.
TRANSITIONS: To make the segue between film clips more smooth, you can add animations to go-between clips. iMovie allows you to adjust the default settings of these animations or “transitions” to achieve the desired effect.
AUDIO WAVEFORMS: iMovie separates your audio data from your video data. These audio files, or “waveforms,” can then be edited in iMovie.
STORYBOARD: It is good practice to map out how you want your film to flow. A storyboard is a guideline as to the order in which your clips will appear in your film. A storyboard assistant is part of the trailer-creation process.
TIMELINE: A movie clip is comprised of a series of frames. These frames then take a second to be displayed. The iMovie Timeline allows you to carefully edit your clips, effects, and transitions so that everything appears for just the amount of time you want it to.
EVENT: These are the video clips imported into iMovie.
PROJECT: This is main working area of iMovie. All elements—such as event clips, animations, and photos—are combined into one comprehensive project file.
Theme Selection
When you first start iMovie, you are presented with a few different options: you can begin from scratch, choose one of several themes provided by iMovie, or select a really cool trailer-style movie (new to this version).
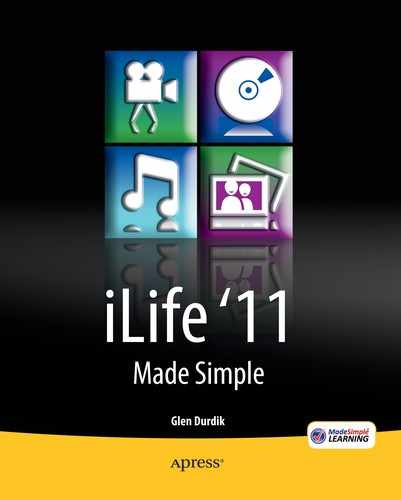
When you select New Project… from the File menu, you see the screen shown in Figure 13–1. The left side of this window is broken down into two segments. The top section provides you the option to start from scratch (No Theme) or the choice of seven preset themes: Photo Album, Bulletin Board, Comic Book, Scrapbook, Filmstrip, News, or Sports. Each theme has unique characteristics. From creating movies that look like digital photo albums to creating videos of your child's soccer game that look like television sports programs, iMovie has a theme for all your needs. The bottom section of the screen provides you a group of trailer options to choose from (discussed in the following section).
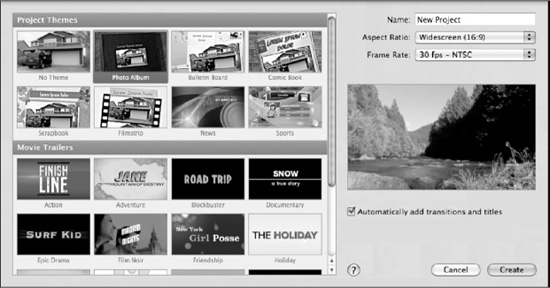
Figure 13–1. Creating a new project in iMovie
To the right of the theme choices, you must complete the following fields:
- Enter a name next to Name: (if you don't want it to be named New Project).
- Set the aspect ratio next to Aspect Ratio: You can choose from Widescreen or Standard. If you want your movie to play on a rectangular television, as most new televisions are, choose Widescreen. It is the default.
Set the frame rate next to Frame Rate:. The default is 30 fps. You can also choose 25 fps for PAL televisions. These are not used in the United States, but if you want your movie to be seen in another country that does use the PAL system, choose this setting. Finally, you can choose 24 fps—Cinema. This will give your movie a motion-picture look and feel.
You can preview each theme just below these settings. In Figure 13–1, the Photo Album theme is selected and a short video preview of the elements it includes will be played in this screen. In this example, I took a picture of the video when it is showing a picture of a stream.
Below this window is an option to automatically add transitions and titles. If you want the movie-making process to be more automated this is a good option. Click Create ![]() to start the process rolling…
to start the process rolling…
Creating a Trailer from Your Video Clips in a Flash
The latest version of iMovie allows you to create an amazing trailer out of your video clips. Figure 13–2 shows the various trailer themes: Action, Adventure, Blockbuster, Documentary, Epic Drama, Film Noir, Friendship, Holiday, Love Story, Pets, Romantic Comedy, Sports, Spy, Supernatural, or Travel. That pretty much covers all the genres!
Figure 13–2. Available trailer themes
To create a trailer, follow these steps:
- For best results, a lot of clips provides the best final project. It is recommended to have at least 15-20 short clips to add to the Trailer.
- Choose your trailer theme. The Preview section will display a sample of each theme.
- Name the trailer and set the other preferences as discussed previously.
- Click Create
 to start the process rolling.
 - Fill out all of the information requested in the Outline section. The top of this section is shown in Figure 13–3. The fields you have to fill out are Movie Name, Release Date, Cast (star's name and gender), Studio Info (be creative), and Credits. Notice that there is a Preview window next to these fields. Any change you make will be reflected in this window.

- Fill in the blanks for all the empty spaces in the storyboard. The Storyboard screen is shown in Figure 13–4. Designing a trailer via the Storyboard tab makes the flow of the trailer come to life and each theme's Storyboard is created to help you create the best “promo” from your work. Please notice that iMovie uses pictures to indicate what type of clip would look best in each section of the trailer. In Figure 13–4, it asks for a video of a person, then a landscape, and then a person again. For the trailer theme I am demonstrating, there are 22 slots to fill in. It sounds like a lot of work, I know, but trust me: it's worth the time and effort. iMovie highlights the sections to be filled out with a yellow outline.
- Drag the section of video that you want to add and iMovie automatically adds the video. iMovie then moves on to the next section, which is again highlighted. Repeat until all slots are filled. The clips you can use are found in your Event—Preview window. This workspace and all other iMovie workspaces are discussed next in this chapter.
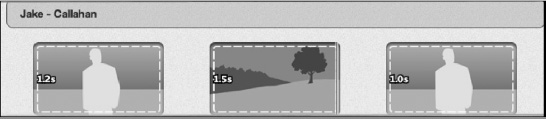
Figure 13–4. Creating your trailer storyboard
- Fill in your shot list. This might be easier to fill in than the storyboard. The shot list groups all type of shots into their own sections. In Figure 13–5, we see that it grouped all Action clips into one section. It is easier to use, I believe, because you plan how many of each type of shot you will need.

- Click the Full Screen Preview button
 or preview the video in the Preview window by clicking on
  . These two buttons are located at the top right of the Project window.
 - After everything is set, go to the File menu and select Finalize Project. Then go out to dinner. This is going to take a long, long time. I will cover the menu options in more detail in Chapter 15: “Calling the Shots with the iMovie Menus.”
You have now seen how to start the movie-creation process and create a complete trailer. Now I will go over what makes creating movies in iMovie so simple to do. There are a lot elements, but as you will see, they are easy to use and give you a lot of functionality to play with.
iMovie Workspaces
The iMovie workspace is the heart of the program. Each section plays a key role in creating your project. Over the following pages, I will cover all of the different workspaces—the defaults and the ones opened via an iMovie tool. Figure 13–6 is a breakdown of the major elements found in the iMovie workspace.
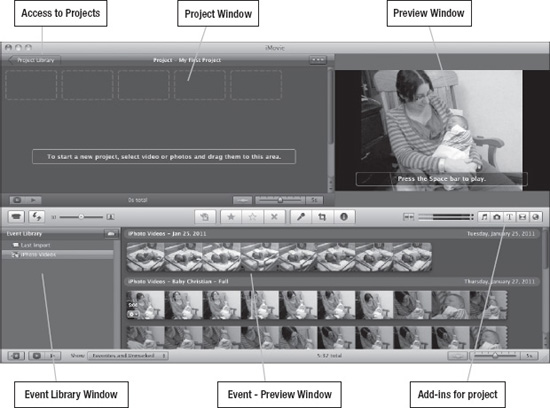
Figure 13–6. Major elements of the iMovie workspace
Project Window
This section is where all of your video editing takes place. In Figure 13–1, I had not yet added any movie clips into my new project. Notice that, inside the Project window shown in Figure 13–6, it tells me to drag any video or photos into this screen to get started.
NOTE: I could not get videos from my hard drive to automatically drag into the Project window. You must import the movies via the Import Movies command from the File menu. This places the clip into the Event Library, not the Project window.
To add clips to the Project window, highlight the section of a video you want from the Event—Preview window and the section is then designated by a rectangular border. Moving this border to the left or right will determine how many frames and the amount of time you want to import. This is shown in Figure 13–7. Either drag the selected clip into the Project window or just click on the Add to Project button ![]() located between the Project window and the Event—Preview window.
located between the Project window and the Event—Preview window.
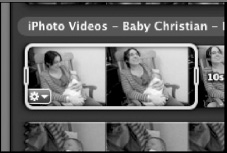
Figure 13–7. Selecting a section of video that you want to add to the Project window from the Event - Preview window
Other Elements Around the Project Window Workspace
There are quite a few other options found around this workspace, from previewing your project clip and showing the audio portion of your video to changing the size of the video snapshot. These items are described here:
![]() On the bottom of the Project workspace, right in the middle, is a clock displaying how long your video runs.
On the bottom of the Project workspace, right in the middle, is a clock displaying how long your video runs.
![]() This button at the very top right-hand corner toggles between two timelines. One is single row and the second is multiple rows. Multiple rows cuts the timeline into sections going down your workspace instead of across your screen.
This button at the very top right-hand corner toggles between two timelines. One is single row and the second is multiple rows. Multiple rows cuts the timeline into sections going down your workspace instead of across your screen.
![]() This starts the action in the timeline. A red bar moves along the timeline and indicates which location in the clip is currently playing.
This starts the action in the timeline. A red bar moves along the timeline and indicates which location in the clip is currently playing.
![]() This previews the movie in full-screen mode.
This previews the movie in full-screen mode.
![]() This button shows or hides the audio waveforms. It makes the different elements more pronounced in your project.
This button shows or hides the audio waveforms. It makes the different elements more pronounced in your project.
![]() This changes the number of thumbnails displayed in the Project window. Slide it to the right to see more thumbnails and slide it to the left to see fewer.
This changes the number of thumbnails displayed in the Project window. Slide it to the right to see more thumbnails and slide it to the left to see fewer.
![]() This buttons allows you to switch the default locations of the Project window and Events. This is useful if you are creating a long video, as the bottom section (Event Library and Event—Preview window) is longer than the top section. This is because the Preview window takes up part of the top section of the iMovie workspace.
This buttons allows you to switch the default locations of the Project window and Events. This is useful if you are creating a long video, as the bottom section (Event Library and Event—Preview window) is longer than the top section. This is because the Preview window takes up part of the top section of the iMovie workspace.
![]() This slider allows you to increase the size or decrease the size of the video snapshots in your project.
This slider allows you to increase the size or decrease the size of the video snapshots in your project.
Access to Projects—Project Library
By clicking on the Projects Library button at the very top of your Project window, you bring up a sidebar showing all of your projects. This is shown in Figure 13–8. Notice that it gives a visual preview of the project, the name(s) of your projects, the length of the project in minutes and seconds, and finally, tells you when your project was last modified. Highlight the project you want to use and click on the Edit Project button found in the upper left-hand corner of this window.
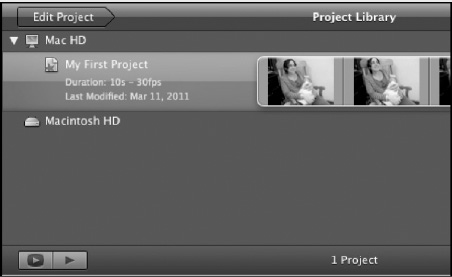
Figure 13–8. Project Library window
Preview Window
This is a small window that shows the results of all your editing. To start a preview in this window only, click on the black triangle pointing to right ![]() found at the bottom of the project window.
found at the bottom of the project window.
If you want to preview the end result in a full screen environment, click on the grey arrow pointing to right surrounded by a black oval ![]() . The Crop tool options
. The Crop tool options ![]() only shows up in the Preview window. The options available with the tool are found in the next chapter as some items are more advanced then material covered in this introductory chapter.
only shows up in the Preview window. The options available with the tool are found in the next chapter as some items are more advanced then material covered in this introductory chapter.
Event Library Window
This window shows all of the videos imported in iPhoto. If you import the movie via the File ![]() Import Video command, the video will appear inside this window below the year it was made. By default, it is called New Event. If you double-click on the title, you can rename it. This is recommended if you are going to add many videos into iMovie. This screen is shown in Figure 13–9.
Import Video command, the video will appear inside this window below the year it was made. By default, it is called New Event. If you double-click on the title, you can rename it. This is recommended if you are going to add many videos into iMovie. This screen is shown in Figure 13–9.
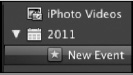
Figure 13–9. Adding a video via the File ![]() Import command
Import command
At the bottom right of this workspace are three important buttons. The first two deal with previewing your clips and the third allows you to hide or show this window.
![]() This Preview button in the Preview window is also found at the bottom of the Event Library window. However, this previews all of your clips in the Event—Preview window.
This Preview button in the Preview window is also found at the bottom of the Event Library window. However, this previews all of your clips in the Event—Preview window.
If you want to preview the end result in a full-screen environment, click on the grey arrow surrounded by a black oval ![]() .
.
![]() This button hides or displays the Event Library window.
This button hides or displays the Event Library window.
Event—Preview Window
In the example shown in Figure 13–1, the videos in this section are from iPhoto. iPhoto does not perform video editing, but it is a good place to store videos, because other iLife applications can see them in it. If you have already added videos into iPhoto, the screen shown in Figure 13–10 will appear. iMovie creates thumbnails or “snapshots” at various moments of your videos. This screen is just telling you that iMovie will create these snapshots for all of your videos in iPhoto.
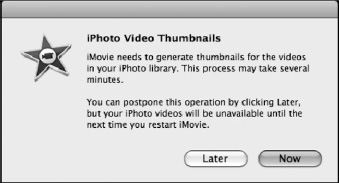
Figure 13–10. Creating thumbnails for all of your videos found in your iPhoto library
Figure 13–11 shows a sample of the Event—Preview window. In this example, I have two different iPhoto elements: Jan 25, 2011 and Baby Christian—Full.

Figure 13–11. Example of videos in the Event—Preview window
Knowing Which clips from the Event—Preview window are in Your Project
After you have added the section you want to the Project window, you will see an orange line at the bottom of the clip (see Figure 13–12). (Note that in the screenshot this line appears black.)

Figure 13–12. Example of the orange line signifying that the clip is your Project window
iMovie makes it easy to organize your clips and to highlight which segments in a clip you are sure to use or not to use. This is all done by the Show: option.
![]() This option is located on the left side of the screen at the bottom of the Event—Preview window. By default, it shows your Favorites and Unmarked. If you click on Favorites, you can choose from the following:
This option is located on the left side of the screen at the bottom of the Event—Preview window. By default, it shows your Favorites and Unmarked. If you click on Favorites, you can choose from the following:
- Favorites and Unmarked: This shows all of your favorite and unmarked clips, except for rejected clips.
- Favorites Only: This shows only the clips you chose as favorites. This is very useful if you have hours of video and only small sections are worthy of adding to your final project. When you choose this option, only your favorites will appear in the Event—Preview window.
- All Clips: This shows every second of every video in every event you added. This is useful if you want to see everything.
- Rejected Clips: This only shows the clips you selected and marked as Rejected. This is useful, as it allows seeing the items again; they are not deleted, they are just not shown. These clips are also included if you select the All Clips option.
![]() This information bar is shown at the bottom of the Event—Preview window. It contains the following four items:
This information bar is shown at the bottom of the Event—Preview window. It contains the following four items:
- Time of all media in this window: In the previous example, the total time of all my clips is 5:37. That is five minutes and 37 seconds.
- View Audio Waveforms
 : This displays a graphical representation of the audio found in your clips.
 - Frames Per Thumbnail
 : This changes the amount of frames that are previewed in your workspace.
  This corner handle is new, but I mentioned it in previous chapters. You use it to make your complete iMovie environment larger or smaller by clicking and holding your mouse on its handle.
Marking/Unmarking Clips As Favorites or Rejecting a Clip
Marking clips makes editing your project much easier—especially if you have a lot of video clips. You can highlight favorites you know you want to use or reject video that just did not cut it.
![]() Highlight the section of the video that you want to mark as a favorite. Click on the black star button located below the Project window. A green line at the top of the clip will appear in your video signifying what portion is a favorite. This is shown in Figure 13–13 (although in the screenshot the line appears black).
Highlight the section of the video that you want to mark as a favorite. Click on the black star button located below the Project window. A green line at the top of the clip will appear in your video signifying what portion is a favorite. This is shown in Figure 13–13 (although in the screenshot the line appears black).
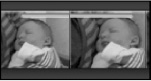
Figure 13–13. The green line that appears showing sections selected as favorites
![]() This button—a grey star—deselects a segment as a favorite. You do not have to select the exact beginning and exact ending—just highlight the area around the favorite.
This button—a grey star—deselects a segment as a favorite. You do not have to select the exact beginning and exact ending—just highlight the area around the favorite.
![]() Want to make a ton of video that you don't presently need disappear from the screen? Highlight the sections that are not needed and click on this button. Then make sure that you choose Favorites and Unmarked or just Favorites next to Show:. Two or three hours of unwanted video will be gone from your screen. This is very useful as you use more and more videos for your projects. A red line at the top of the clip signifies the unwanted clip if you choose an option that shows rejected clips. This is shown in Figure 13–14.
Want to make a ton of video that you don't presently need disappear from the screen? Highlight the sections that are not needed and click on this button. Then make sure that you choose Favorites and Unmarked or just Favorites next to Show:. Two or three hours of unwanted video will be gone from your screen. This is very useful as you use more and more videos for your projects. A red line at the top of the clip signifies the unwanted clip if you choose an option that shows rejected clips. This is shown in Figure 13–14.

Figure 13–14. Example of the red line that appears showing what video is rejected
Add-ins for your Movies
There are five items in this section of the iMovie workspace: Music and Sound Effects, Photo Browser, Title Browser, Transition Browser, and last - Maps, Background and Animatics. I will cover each over the following pages.
- Music and Sound Effects
 is shown Figure 13–15.
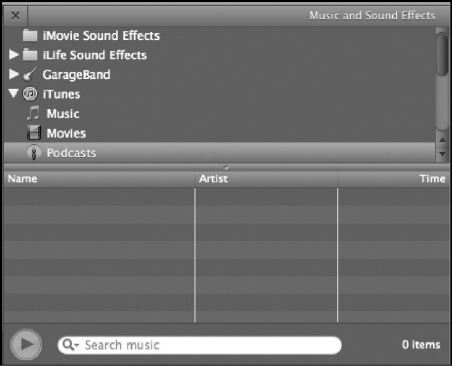
Figure 13–15. Music and Sound Effects add-in
To add an item, drag it to the location you want in the Project window. This is shown in Figure 13–16.
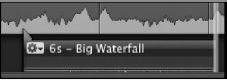
Figure 13–16. Example of a sound effect being added to your movie
Please notice that I added the sound effect Big Waterfall and that it lasts for six seconds (6s). It was originally longer. To edit the length of sound effects, click on the end of the clip and drag it to the length of your choice.
- The Photo Browser
 is shown Figure 13–17.
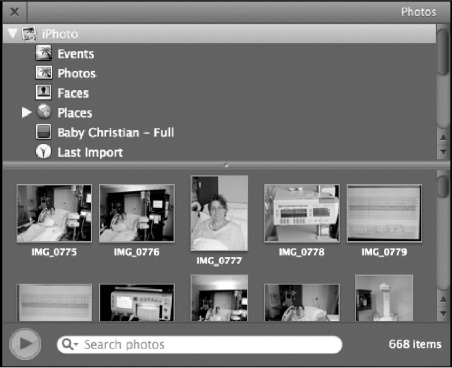
Figure 13–17. Photo Browser add-in
With this tool, you can add photos to your movie. It contains your iPhoto library, MobileMe galleries, and Facebook galleries. As with audio, drag the selected item to the location of your choice. In Figure 13–18, I inserted a photo into my movie clip. It is a picture of a flower on a window. Please notice that iMovie separated it from the video by placing a wide gap between the photo and video clips.
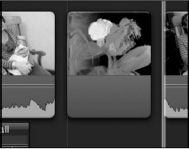
Figure 13–18. Example of a photo inserted between two video clips
- The Title Browser
 is Figure 13–19.
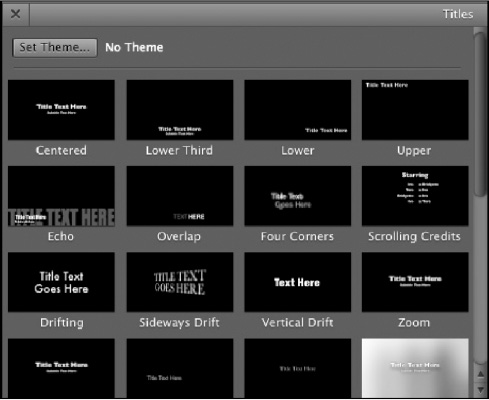
Figure 13–19. Title Browser add-in
You can add a title anywhere in your video. Just drag a selected theme to the location of your choice. You have 32 options to choose from. I have to say it again: explore the options and have fun trying each one.
- The Transition Browser
 is shown in Figure 13–20.
You can add transitions between elements in your movie. You can fade to black between two scenes, for example. Again, you can add transitions anywhere you like. You have 24 to choose from. As you can see by now, adding elements is pretty easy…choosing the best element for the job is the hard part, and that's up to you.

Figure 13–20. Transition Browser add-in
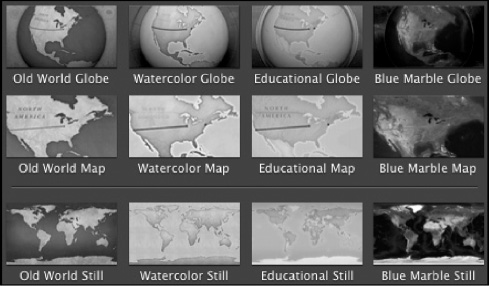
Maps, Background, and Animatics
 also includes Globes. These are useful as elements behind titles. They allow you to provide stunning animation or an appropriate graphic to go behind an otherwise boring title page in your movie.
 - Globes and Maps: You can choose between eight animated objects or four stills (see Figure 13–21).
- Backgrounds: Curtain, Organic, Blobs, and Underwater are animated backgrounds. You also have the choice of 12 colored stills (see Figure 13–22).
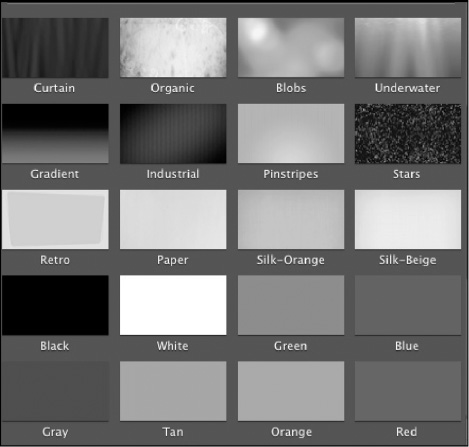
Figure 13–22. Available backgrounds
- Animatics: These simply allow you to plan your final video by adding a sample representation of a person, group, or animal to be replaced later by the actual item—a specific person group or animal (see Figure 13–23). Consider it a digital placeholder.
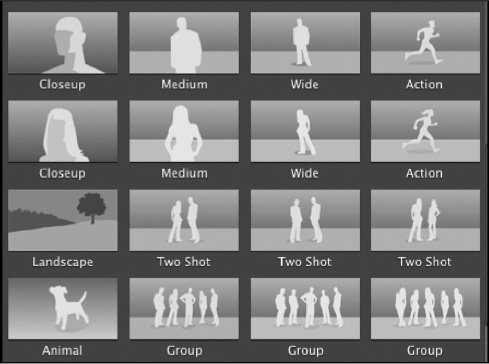
Figure 13–23. Animatics add-ins
That about covers the major elements of all of the iMovie workspaces. Now, I want to cover a couple of items not yet mentioned: the Camera button, and the Voiceover button. More advanced features will be covered in Chapter 14: “The Inspector, Ken Burns, the Gear Button, and Other Useful Advanced Tools of iMovie.”
Importing Live Video or Accessing a Video Camera
![]() The Camera Import button allows you to use your built-iniSight camera (all newer Macs and Apple laptops have one at the top center section of your unit). This button is located in the middle of your workspace—at the far left.
The Camera Import button allows you to use your built-iniSight camera (all newer Macs and Apple laptops have one at the top center section of your unit). This button is located in the middle of your workspace—at the far left.
To insert a video from an iSight camera, follow these steps:
- Click the Camera Import button
 .
. - You will then see the screen shown in Figure 13–24.

Figure 13–24. Initial video capture screen of iMovie
Please notice the following items on the screen:
- Video Size: You can change the video size from the default of 640 × 480 to 1024 × 576 via the dropdown menu next to Video Size. This is located toward the middle at the bottom of this screen.
- There is a large timeframe counter directly below your video being shot. This will start at zero and increase as the video is being recorded. Please also notice the tiny letters REC and the red dot are two other visual clues that you are actually recording video. An example of video being captured is shown in Figure 13–25.

Figure 13–25. Example of timeframe counter while recording, and the Stop button
- Capture…: Click on this to start the recording process.
- Stop (shown in Figure 13–25: This will cease the video recording.
- Done: This closes the video capture screen.
- Camera: The default is your built-in camera. If you attach an external camera, that camera will become a choice in dropdown menu next to Camera.
- Click Capture…: This will bring up the screen shown in Figure 13–26.

Figure 13–26. Capture options available recording video via an iSight camera or external camera
Fill in the following fields:
- Save to: This is where your Mac will save the imported video. Notice that it also gives the amount of free space available (movie files can be massive) to save your movie and the amount of time this space gives you (226 hours and 38 min, in this example).
- Add to existing Event: This will add the newly recorded video to an event you already created in iMovie. If you have more than one event, click on the event name shown and choose it from the pop-up menu.
- Create new Event: This will create a brand new event. You can name the event next to this option and decide if you want to split days into new events.
- After import analyze for: Choose from Stabilization (default), Stabilization and People, or just People. Notice that it is not on by default and that import times will increase if selected.
- After you made your choices, click on Capture
 to begin the actual recording.
 - Click on Stop
 to end the recording process.
Adding a Voiceover to Your Video
Follow these two simple steps process to add a voiceover:
- Click on the Voiceover button
 found in the middle of your screen.
 - Click on the frame in the video (in the Project window) where you want the voiceover to begin. A message telling you to get ready appears in the Preview window. There is a three-second timer—a numeric countdown and three beeps. After the beep, start your voiceover. The screen shown in Figure 13–27 appears. Notice the red section over the video and the word Recording while you are recording. That's it.
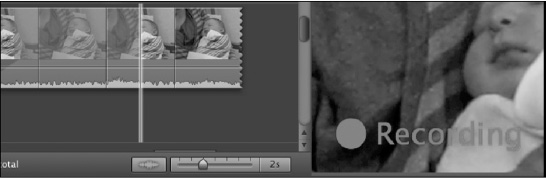
Figure 13–27. Example of visual cues showing you are recording a voiceover
To stop recording, click the spacebar on your keyboard.
Figure 13–28 shows the options you need to select from before you record.
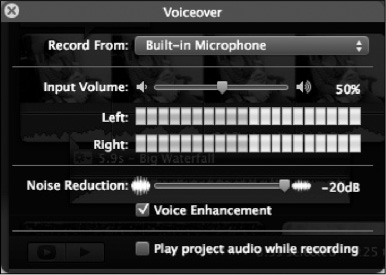
Figure 13–28. Audio options for adding a voiceover
- Record From: This can be your built-in microphone or an external device.
- Input Volume: Depending on where or what you are recording, you might have to adjust the input volume in order to get a higher quality voiceover.
- Left: / Right: This shows you the volume for the left and right side.
- Noise Reduction: If you have the Voice Enhancement checkbox checked (the default), this will enhance voice recordings. You can adjust the enhancement by sliding the grey object in the slider next to Noise Reduction to the left or right.
- Play project audio while recording: Check the box next to this option if you want the audio previously added or found in your clip to play when you record your voiceover.
Sharing Your Movie
You have many options for sharing your work with iMovie, all of which are found in the Share menu. This is covered in detail in Chapter 15: “Calling the Shots with the iMovie Menus.”
Summary
I started this chapter by explaining that you can create movies or trailers either by using presets or by starting from scratch. I then moved on to introduce the key workspaces and several supporting buttons around these workspaces. This chapter was a good overview to get you started exploring this powerful and easy to use program. As you will see in coming chapters, iMovie has a plethora of advanced features to help you turn your home movies into professional quality films.