Chapter 14
iMovie Advanced Features: The Inspector, Ken Burns Effect, and More
In the previous chapter, I discussed the various workspaces of iMovie and the tools that support each. That was a good starting point from which we will now delve deeper into the more complex built-in features of iMovie, such as the Inspector, Ken Burns Effect, Gear button, and other tools. Becoming a master editor can take some time. iMovie has the features you need, but be patient while learning all that it available to edit your project. It will be worth it. Spielberg started small as well! Let's start with the Inspector tool.
The Inspector

The Inspector tool can be accessed two ways. The first is to click on the Inspector button located in the middle of the screen, just below the Preview window. The second way is to access it via the Gear button.
![]()
That's right: the Inspector and Gear tool do almost the same thing. The Gear button includes the Inspector features plus other items, like the Cropping & rotation option or the Precision Editor, depending when you access it. The Gear button appears on the left side of any clip you click on. Toward the end of this chapter, I will go over the other functions of the Gear tool.
The Inspector tool has three sections: Clip, Video, and Audio. In the following sections, I will cover these three tabs, followed by the options included within each.
Clip Tab of the Inspector Button
The Clip section is shown in Figure 14–1. As you can see, this one little tab contains many options that can be applied to your clip. These options include adding video or audio effects or using advanced tools to change the video image or enhancing the audio. This little button does quite a lot!
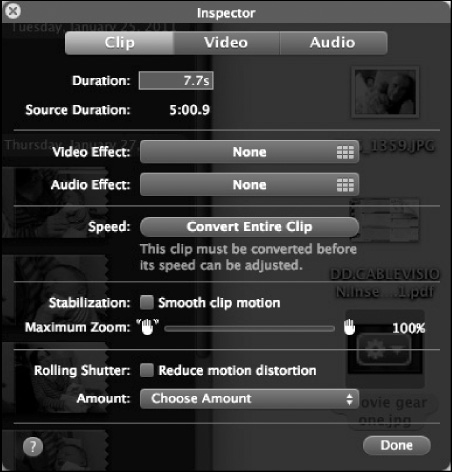
Figure 14–1. Inspector tool–the Clip tab
Duration
This shows how long the clip is going to play. You can adjust this by changing the time next to word Duration. In Figure 14–1, the duration is 7.7 seconds.
Source Duration
This displays the length of the total of all the clips found in the Event—Preview window. In Figure 14–1, the total length of the source was 5 minutes and .9 seconds.
Video Effect
You can add 20 different video effects to a highlighted video segment: None, Flipped, Raster, Cartoon, Aged Film, Film Grain, Hard Light, Day Into Night, Glow, Dream, Romantic, Vignette, Bleach Bypass, Old World, Heat Wave, Sci-Fi, Black & White, Sepia, Negative, or X-Ray. A small example of each is shown in Figure 14–2. A sample of the effect is shown in the Preview window when you drag the red timeline indicator over the effect in the effect preview window. The effect only shows up in the Preview. However, a small “I” appears ![]() at the far left of the Project window when you move the red timeline indicator across the project. This is only way besides watching a preview do you know an effect has been applied.
at the far left of the Project window when you move the red timeline indicator across the project. This is only way besides watching a preview do you know an effect has been applied.
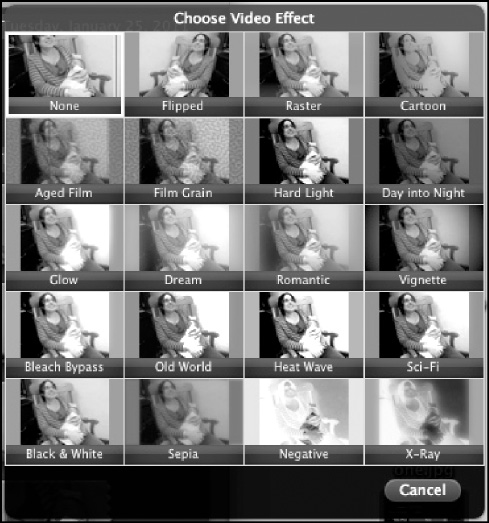
Figure 14–2. The 20 video effects that can be applied to your video clips
Audio Effect
Not only can you apply amazing video enhancements to your project, you can also modify the sound. You have 20 choices to choose from. They are: None, Muffled, Robot, Cosmic, Echo, Telephone, Shortwave Radio, Multi-tune, Small Room, Medium Room, Large Room, Cathedral, Pitch Down(1–4), and Pitch Up (1-4). In Figure 14–3, we see all these choices and a nifty little picture showing what each effect does.

Figure 14–3. The 20 audio effects that can be applied to your video clips
Once again, I encourage you to explore all the options. You are only limited by your imagination…(and time you have to experiment).
Speed
You can speed up or slow down the speed of your clip or even play it in reverse. In Figure 14–1, we see that we first must convert this clip for this tool to be applied. After it has been coverted, the screen in Figure 14–4 then appears inside the Inspector window.

Figure 14–4. Speed options found in the Clip tab of the Inspector button. (Clip has been converted.)
Move the slider toward the turtle (left) to slow it down, or toward the Rabbit (right) to speed it up. To the left of the Rabbit is an indicator of the change being applied (400 x for increased speed, or 50% for slower speed for example). Below that is the amount of time the clip is now (2.0s in this example). It would increase if you slow it down and decrease if you speed it up. A small Turtle or Rabbit icon will appear on the far left of the clip in the Project window if this is applied.
Stabilization
This is a technique to help you remove unwanted shaking that occurred during the filming of your clips. A red squiggly line will appear in the clip if this is applied.
![]()
Maximum Zoom
This allows you to zoom in or zoom out on the video clip.
Rolling Shutter
If the box next to Reduce motion distortion is unchecked, you also reduce the shaking of video taken. There is a drop-down menu below this check box. It determines how the correction is going to applied. The choices are None, Low, Medium, High, and Extra High. Apple recommends Medium for most consumer camcorders and Extra High for flip-type camcorders or video taken from a phone.
Done
Click on this after you have made (or not made) any changes.
Video Tab of the Inspector Button
The Video tab (see Figure 14–5) is another reason I love iMovie and iLife. With it, an amazing project can be done in no time (with a little background supplied by this manual) or taken to perfection by giving the user tools to really customize and enhance everything in the project.
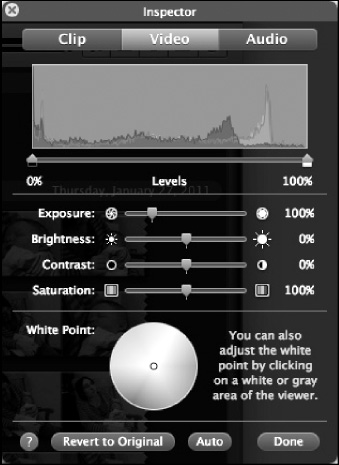
Figure 14–5. Video tab of the Inspector button
The Video tab is not for the general, casual user, but it might come in handy some day. The first item is a visual graph. This graph helps you determine and change, if you wish, the black and white in your clip. To adjust this, move the slider labeled Levels to the left increase black and to the right to increase white in your clip. If you apply a video adjustment, a little star icon ![]() will appear on the far left of the selected clip in the Project window.
will appear on the far left of the selected clip in the Project window.
The next section, you are given the following four variables to adjust via a slider:
- Exposure: Changes the shadows and highlights. Moving the slider to the right intensifies the highlights.
- Brightness: Changes the overall light level. Moving the slider to the right makes the image lighter.
- Contrast: Changes the relative contrast of light and dark tones. Moving the slider to the right makes edges between light and dark areas more robust.
- Saturation: Changes the color intensity. Dragging the slider to the right makes the colors deeper and dragging the slider all the way to the left makes the image black and white.
TIP: If you turn on Advanced tools in the General tab of the Preferences… window found in the iMovie menu, you are given three more choices. These are shown in Figure 14–6. Moving the sliders to the right makes each selected color more intense.
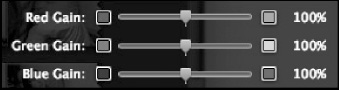
Figure 14–6. Additional items to modify if you turned on Advanced tools
Other options include:
- White Point: This is the other way of changing the colors in your project. This is done by changing the color white (called the white balance). You can either click on different spots inside the circle
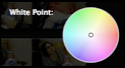 to effect a change or by clicking on a white or grey area in the Preview window, which also resets the white point.
 - Purple Question Mark (bottom Left of window): This brings up the help section for this window from the iMovie help tool.
- Revert to Original: Don't like the changes you made? Click on this button and all changes made are cancelled.
- Auto: This also brings it back to the way iMovie originally displayed your clip.
- Done: Click on this after you have made (or not made) any changes.
Audio Tab of the Inspector Button
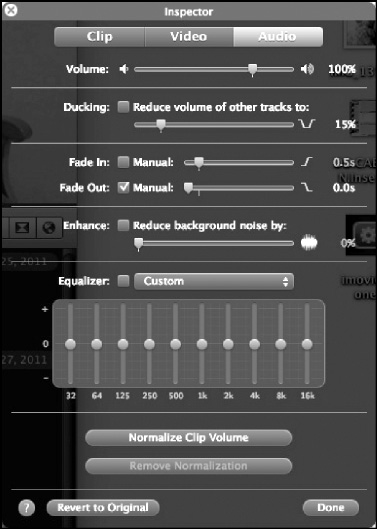
Figure 14–7. Audio tab of the Inspector button
- Volume: This determines the overall sound volume of your clip. It is adjusted by a slider. The default is 100%.
- Ducking: Ducking allows you to reduce the volume of other audio items in your project. To turn it on, you must check the box next to Reduce volume of other tracks to:. The default is 15%, but it can as high at 100% (no other sounds).
- Fade In: This is off by default. It allows you to gradually add the selected sound item into your clip. Click the check box next to manual and then select the time frame for the Fade IN. The default is .5 seconds. It is adjusted by moving a slider control to the left and right.
- Fade Out: This is the opposite of Fade In. This determines how the sound selected ends in your selected clip. It is also off by default. You can also adjust it with a slider.
- Enhance: This item attempts to make your primary audio in your clip (usually voices) by reducing background noise. To adjust this, you must check the box next to Reduce background noise by:. You adjust this setting by moving a slider to the left (down to 0%) or up to no background noise (100%).
- Equalizer: This allows you to customize certain audio frequencies to one of several sets included. It is off by default. You can choose Custom or one of the following, shown in Figure 14–8.
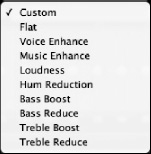
Figure 14–8. Available equalizer settings
- Normalize Clip Volume / Remove Normalization:. When you click on the Normalize Clip Volume button, iMovie calculates the volume change required to make the loudest part of the selected clip to its maximum listening volumes without causing distortion. All other audio is then adjusted to match this calculated level.
- Purple Question Mark (bottom Left of window): This brings up the help section for this window from the iMovie help tool.
- Revert to Original: Don&t like the changes you made? Click on this button and all changes made are cancelled.
- Done: Click on this after you have made (or not made) any changes.
Ken Burns Effect
The Ken Burns Effect is a simple but stunning addition to your video. This effect is named after Ken Burns, who is a director and producer of documentary films. His projects were innovative in the way they showed archival material. One of his effects in these films became so famous they named it after him. It can be applied to basically any item you add to your project. I personally think it looks the best on photos only. It allows you to pan and zoom around a selected object.
The steps to add a Ken Burns Effect are as follows:
- Click on the Crop button
 . This is located just below the Preview window (toward the left.)
 - All other actions take place within the Preview window. Your Preview screen will now look like Figure 14–9.
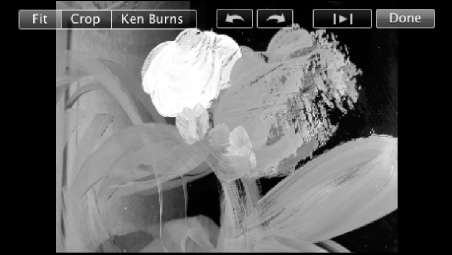
Figure 14–9. Preview window after clicking on the Crop button
- Click on the words Ken Burns. You will then be given the screen shown in Figure 14–10.
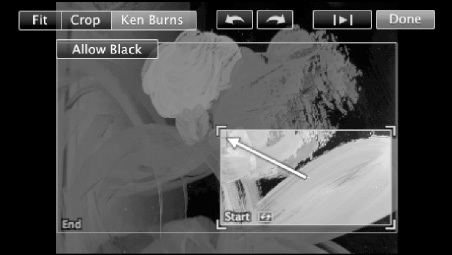
Figure 14–10. Applying the Ken Burns effect
You have three decisions to make.
- The first is to decide what the starting screen of the event will be. In Figure 14–10, we see the Start area highlighted in green. The arrow pointing to a red X is the center of the image. It might be hard to see, but there are two arrows next to Start in this window. If you click on this button, the Start and End screens are reversed.
- Second, what will the ending screen look like? After you have selected the beginning area, in green, select the ending area, which is in red. Notice that the red area in the example is much larger than the starting (green) area. This means that the photo will first appear centered around the highlighted green area and pan out slowly to the final ending screen highlighted in red. To move either area, move your cursor over the area you want to move and you will see a small hand icon. Click and hold down the mouse button until you find the place you want. If you want to resize either area, you could either click on the four corners and drag it smaller or larger diagonally or click on one the sides to make it taller/shorter or wider/narrower.
- The third option is Allow Black. This allows or disallows black borders on the cropped objects in this screen. It is on by default. If you click on it, Disallow Black will appear on your screen and the available screen real estate is much larger, as the black area around you item is now included.
- Click on the Preview button
 inside the Preview window to test out the results.
 - Click on the Fit icon
 to disable the Ken Burns Effect you just set. The Fit icon makes sure that all of the media in the Preview window will be visible in your final movie. The Ken Burns Effect will take your photo or video and potentially cut off the edges of the item the effect is being applied to.
 - Click on Done
 to apply the effect.
NOTE: You can only adjust the size of the start and end screens to a certain degree. The Ken Burns Effect requires that they be a within certain limits to make the effect look as advertised.
Cropping an Object via the Preview Window
Click on the Crop button ![]() This is located just below the Preview window (toward the left). All other actions take place within the Preview window. Your Preview screen will now look like Figure 14–9.
This is located just below the Preview window (toward the left). All other actions take place within the Preview window. Your Preview screen will now look like Figure 14–9.
- Click on the word Crop
 inside the Preview window. It is on the top left hand side of the window. You are then presented with the screen shown in Figure 14–11.
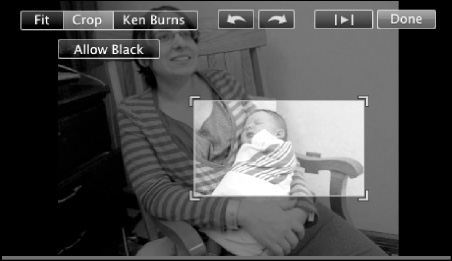
Figure 14–11. Example of the Crop tool of the Crop button being used
- Whatever is inside the green box shown in Figure 14–11 will be shown in the final project. All other sections will not be shown. You can expand or decrease this area to your liking. As with the Ken Burns Effect, you can only modify to a set minimal and a set maximum area. Also, the option to Allow Black is available at the top left of the screen. This expands your workspace as you can now add the black area around the media you are currently working on.
- Click on the Preview button
 inside the Preview window to test out the results.
 - Click on the Fit icon
 to disable the crop area you just set.
 - Click on Done
 to apply the effect.
Rotating Your Media
You can rotate any item via the Crop tool. In the Preview window, you can rotate your selected item 90 degrees counter-clockwise by clicking on the arrow pointing to the left ![]() . You can rotate your item 90 degrees clockwise by clicking on the arrow pointing to the right
. You can rotate your item 90 degrees clockwise by clicking on the arrow pointing to the right![]() . These arrows are located just about the middle at the top of the Preview window. Click on Done
. These arrows are located just about the middle at the top of the Preview window. Click on Done ![]() to apply the change.
to apply the change.
Gear Button
![]() The Gear tool gives you access to the three Inspector tabs and the Cropping and Rotation tools just discussed. It also gives you access to other more advanced workspaces, such as Precision Editor and Clip Trimmer. I will cover each new workspace next. The key thing to remember is that the Gear options change depending on which object you are working on; a movie, background, or photo. Let's start with a movie.
The Gear tool gives you access to the three Inspector tabs and the Cropping and Rotation tools just discussed. It also gives you access to other more advanced workspaces, such as Precision Editor and Clip Trimmer. I will cover each new workspace next. The key thing to remember is that the Gear options change depending on which object you are working on; a movie, background, or photo. Let's start with a movie.
If you select a clip and click on the Gear button (far left of the object's timeline) you are presented with the screen shown in Figure 14–12.
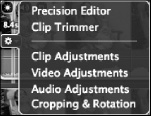
Figure 14–12. Example of the options available using the Gear tool on a movie clip
First, notice that the Inspector tabs (Clip, Video, and Audio) and Cropping & Rotation can be accessed here and are located at the bottom of this tool, as well as access to two new workspaces on top (Precision Editor and Clip Trimmer).
Precision Editor: Video Clips
The Precision editor is a powerful tool to help make it easier to modify the points at which one clip transitions into the next object in your project. It can be applied to different elements, such as video clips and transitions.
You can trim or extend frames at the end of one or the beginning of the next object. While using this editor, you can see the clips at either side of the transition, and also see and work with the unused frames of both clips. It allows you to reposition and trim other elements in your project, such as transition animation added between clips, audio elements, titles, voiceovers, and the like. The Precision editor takes over the space normally occupied by the Event Library and Event—Preview windows. This makes removing unwanted video before or after your selected clip a lot easier.
Figure 14–13 shows an example of the Precision editor with additional items turned on. To access the add-ons and have them visible, the icons are shown at the top right of the workspace. The line between the two clips is designated by narrow blue line. The shaded areas are frames you are not using.
To change the location where the transition begins and ends after the transition point, click on the clip you want to change. You will then see a small hand. While the mouse button is held, move the clip to the left or right until you reach the new point of transition. If you move the timeframe at top, you change the transition before the transition. If you move the timeframe at the bottom, you change the transition after the transition point.
To reposition the actual transition point, click on the small blue dot between the top and bottom timeframes.
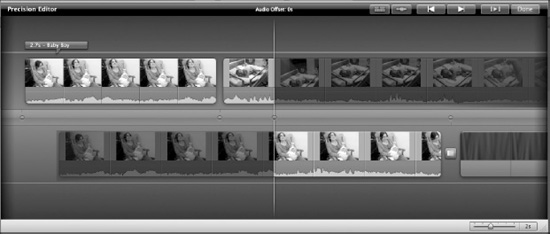
Figure 14–13. The Precision Editor window
![]() When this button is chosen (turns blue), the editor will show all the extras in your project. In the example shown in Figure 14–13, I have one additional item—the title, “Baby Boy.”
When this button is chosen (turns blue), the editor will show all the extras in your project. In the example shown in Figure 14–13, I have one additional item—the title, “Baby Boy.”
![]() When this button is chosen (turns blue), the editor will show or hide audio waveforms.
When this button is chosen (turns blue), the editor will show or hide audio waveforms.
![]() This button will bring you to the previous edit in your project.
This button will bring you to the previous edit in your project.
![]() This button will bring you to the Next edit in your project.
This button will bring you to the Next edit in your project.
![]() This button will play the current edit in the preview window.
This button will play the current edit in the preview window.
![]() Click on this button to close the Precision editor and return to the normal workspace environment.
Click on this button to close the Precision editor and return to the normal workspace environment.
Clip Trimmer: Video Clips
In the example shown in Figure 14–14, we see a large video clip with a small section highlighted with a border. The area in yellow is the section of the video in your project. You can change the starting and ending points of the clip by just clicking then holding your mouse button on edge of the beginning or ending section. Drag it one way to increase or another to decrease the size of the clip. You can also change the whole clip and keep the same amount of time by click and holding your mouse button in the yellow section and then moving the entire yellow area to its new better location.

Figure 14–14. Clip trimmer (videos only)
Precision Editor: Transitions
You can also access the Precision editor for transitions between project elements. This is also done by clicking on the Gear button, but this Gear button appears inside the transition clip in your project. This workspace is shown in Figure 14–15. You can adjust the length of the transition by moving the horizontal blues lines in either direction. If you move the left-hand line further to left or move the right-hand line to the right, the transition time will increase. Please note that you can only increase the time of the transition to a set maximum as the actual transition you use can be only set within a certain set of times. As with the precision editor for movies, the grey areas in this workspace represent frames not being utilized.
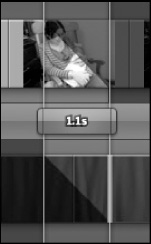
Figure 14–15. Example of the Precision editor for transitions
Transition Inspector Window
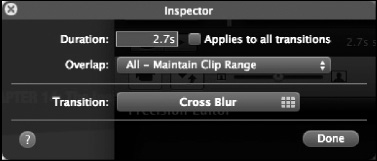
Figure 14–16. Inspector window accessed via the Transition adjustment feature of the Gear button
You are given several options to customize. They are as follows:
- Duration: Set how long the transition is going to be.
- Applies to all Transitions(check Box): If you want to apply a new time to all of your transitions at once, check this box.
- Overlap: It is set to All—Maintain Clip Range. It can also be set to Half—Maintain Project Duration.
- Transition: Here you can select any one of the available transitions found in iMovie.
The Gear button applies to other items as well. This includes backgrounds, photos, and audio. The options available for each item is different. Following is a summary of each.
- Gear button options available for Backgrounds:
- Precision Editor: Same workspace environment as other elements. Move the Small blue dot in the middle of the screen to the new duration.
- Clip Adjustments: Here you can set the duration and choose a new background.
- Cropping & Rotation: This brings up all of the tools discussed earlier in the chapter with regards to the Crop tool.
- Gear button options available for Photos:
- Precision Editor: Same workspace environment as other elements. Move the small blue dot in the middle of the screen to the new duration.
- Clip Adjustments: Here you can clip duration and apply it to all stills in your project and add or change a video effect. You also have access to Video Inspector via a second tab.
- Video Adjustments: This brings you directly to the VideoInspector tool.
- Cropping, Ken Burns & Rotation: Same features as discussed earlier in this chapter.
- Gear button options available for Audio:
- Clip Adjustments: This brings up a specialized workspace to customize the audio. This is shown in Figure 14–17. It contains all of the elements previously discussed except for the musical note in middle top of the screen. This allows you to add“beat markers” to help to match the audio to the video. Move your mouse over the musical note icon, hold down the mouse button, and drag your cursor to the location you want to add a marker. An example of a beat marker is shown here.
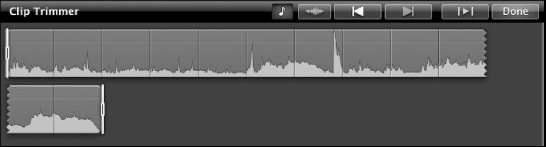
Figure 14–17. Clip Adjustment workspace for audio
- Clip Adjustments: This brings up the Audio and Clip tabs of the Inspector tool.
- Audio Adjustments: This brings you directly to the Audio tab of the Inspector tool.
- Clip Adjustments: This brings up a specialized workspace to customize the audio. This is shown in Figure 14–17. It contains all of the elements previously discussed except for the musical note in middle top of the screen. This allows you to add“beat markers” to help to match the audio to the video. Move your mouse over the musical note icon, hold down the mouse button, and drag your cursor to the location you want to add a marker. An example of a beat marker is shown here.
That's it for the new workspaces: the Crop tool, the Ken Burns Effect, and the great Gear tool. A lot of options…don&t you agree?
Even More Advanced Features Await You
You actually have a lot more to chose from if you activate the Advanced tools. If you go to the iMovie menu and choose Preferences from the dropdown menu, you can activate via a check box these tools. Here is a brief run-down of what it added to the iMovie experience:
- Add video to the end of a project just by selecting it in the Event browser.
- Mark video as “favorite,” “rejected,” or “unmarked” just by selecting it.
- Tag and filter your video with keywords.
This is done by the magnifying glass icon
 now found next to the Preview button under the Event Library window. Figure 14–18 shows the new workspace that appears. It shows up between the Event Library workspace and the Event–Preview window workspace.
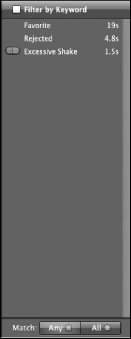
Figure 14–18. Filter by Keyword window, available when Advanced tools is activated
To add a keyword, you must first click on the little key icon
 , which is located just left to the Voiceover button
 . If you click on it, you will see the screen shown in Figure 14–19.
You can click on one of the preset names (Indoor, Outdoor, Landscape, and so on) or add your own by clicking your mouse inside the box that states New Keyword. After you have made your selection, click on Add
 . You are also given the option to remove a keyword already applied by clicking on Remove
 in this window.
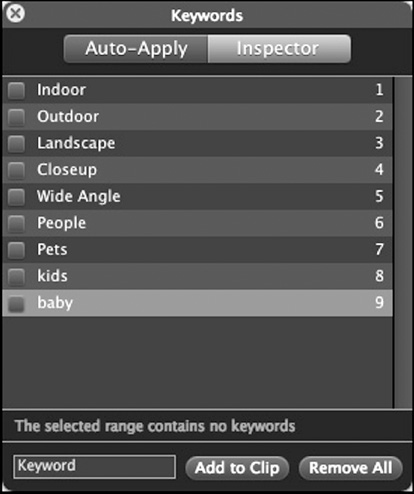
Figure 14–19. Adding a keyword to a selected object in your Project
- Easily replace a clip in your project with an equal length of video from a selected Event clip.
- Add chapter markers and comments to your movie projects. These two icons now appear inside the Project window at the top right-hand corner. Commments
 and Chapter Markers
 are added by clicking and holding your mouse on either icon and then dragging your mouse to the spot in your timeline where you want the new element.
NOTE: Chapter Markers are highly useful if you transfer your project to iDVD to create a DVD. With these markers, you can have users “jump” to any marker in your video while viewing your DVD, just like with the commercial DVDs.
- Add cutaway, picture-in-picture, and split-screen (side-by-side) clips.
- Cutaway: This is a clip that you paste on top of another—usually to show two different sides of a single event. Cutaway clips are great for covering parts of unwanted frames, because it covers an equal portion of the video clip you added it to. This means that the entire duration of the final clip doesn&t change.
To add a cutaway, select a video clip from the Event—Preview window and drag it over the clip you want it added to. You will then see a white (+) symbol inside a green circle. Release the mouse button at the location you want to add the cutaway. You will then see a window with a ton of choices. This is seen in Figure 14–20.
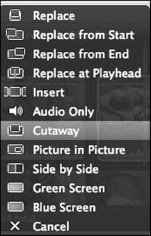
Figure 14–20. New Insert menu when Advanced tools are turned on. Select Cutaway to add the cutaway segment.
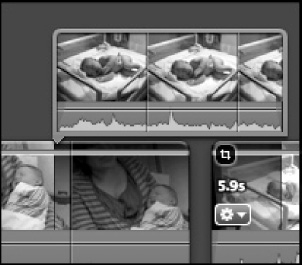
This is the new Insert menu. Remember in the last chapter that this menu just had a few choices. Your timeline will now look like Figure 14–21. the Cutaway section is above the original clip and the greyed out areas in the old section is the portion that now will not be seen.
- Picture in Picture: This is also part of the new Insert menu. Basically, follow the same procedure as with a cutaway, but select Picture in Picture from the Insert menu instead. In Figure 14–22, you see the Preview window after I have added a second video to be seen at the same time. You can click and hold the mouse button on any of the white corners to make the second embedded or Second video smaller or larger. This added video can also be moved in your workspace. Figure 14–23 shows what the timeline looks like in the Project window with a Picture in Picture inserted. Please notice that is just on top of the original timeline; no frames have been removed in this process.
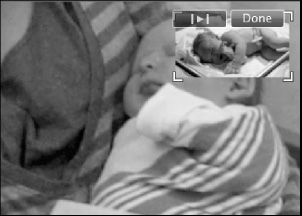
Figure 14–22. Preview window showing newly added second video embedded in a video clip
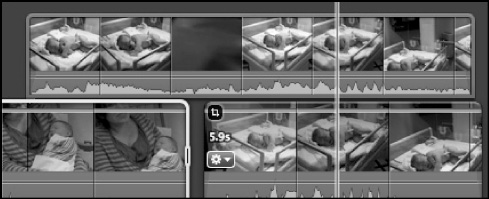
Figure 14–23. Timeline after Picture in Picture's second video has been added
- Side by Side: As with the first two new insert features, you select the video segment you want to add by dragging to the point in the Project window you wish to apply the Side by Side effect. Then select Side by Side from the new Insert menu. Your newly added clip will appear on top of the original clip in the Project window. No frames will be removed. In Figure 14–24, we see the Preview window with the two video clip playing at the same time–next to each other. I think this really cool. Then again, I think everything Apple makes is really cool.
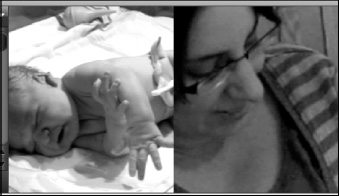
Figure 14–24. Preview window showing two video clips playing side by side
- Cutaway: This is a clip that you paste on top of another—usually to show two different sides of a single event. Cutaway clips are great for covering parts of unwanted frames, because it covers an equal portion of the video clip you added it to. This means that the entire duration of the final clip doesn&t change.
- Green-screen or Blue-screen effects: You can use these effects to superimpose video over other video segments or one of iMovies backgrounds. The people or object in the clip must be shot with a green or blue background behind them—nothing else in your video. This option is also available via the newly expanded Insert menu. When the original Superman movie came out years and years ago, this then-groundbreaking technique was used for all of the flying scenes.
New Replace Options in New Insert Menu
When you activate the Advanced tools in iMovie, you are also given three new “replace” commands in the Insert Menu: Replace from Start, Replace from End, and Replace at Playhead (see Figure 14–25).
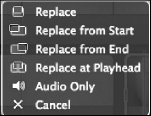
Figure 14–25. New Replace options in new Insert menu.
Using the Right-Hand Mouse Button in iMovie
In iMovie, if you right-click on an object, you are presented with a lot choices. All of the options are available via different tools or menus. The right-click just brings a lot them together in one big menu. Figure 14–26 shows the result of right-clicking on a video segment in the Project window. The right-click menu is available in many Macintosh programs, but iMovie gives you a lot more options via this step then other applications do.
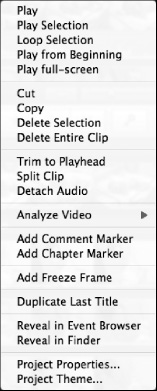
Figure 14–26. Right-clicking on a video segment in the Project window.
Summary
The last two chapters should have you well on the way to creating Hollywood's latest blockbuster, and with the skills you've learned you can even make the trailer for it, too. From the simple act of adding video to the Project Window to recording voiceovers to enhance your video, iMovie does not disappoint. There is one piece missing, the menus of iMovie, the coverage of which is coming up in chapter 15 and will conclude this iMovie trilogy. Grab some popcorn and have fun with your new favorite video editing software!