
1. When iTunes Is Enough
Contrary to what a lot of people may want you to think, you don’t always need a specialized tool to manage iOS devices. When you have simple needs, all you require is iTunes. Sometimes, simple is good.
Limitations of iTunes
Of course, the downside of simple is that it’s simple. Managing iOS devices with iTunes means that you’re accepting a set of limitations over what you can manage and how you do so.
First, you have to use iTunes via USB. There’s no option for over-the-air (OTA) configuration. Second, most of your control will come from the device itself, so the management process is fairly manual.
Realistically, an iTunes-only configuration is for the small office/home office (SOHO), or for the “small” end of small-to-medium business (SMB) markets. Still, it’s great for small numbers of devices, or when people are using their personal devices for company purposes. If you have to configure a lot of devices, or you need more control, iTunes won’t work so well.
A security risk is always involved when using personal devices for company data. People leave companies and may not remember to wipe company data from their devices. Because every company is different with different needs, this is not a question I can answer for you in some generic way or with a clever bon mot. You’ll want to seriously consider the kinds of data that users will store before you permit the use of personal devices.
Managing with iTunes
So let’s look at what you can get out of iTunes. In a nutshell, there’s not a whole lot. The iTunes settings for iOS devices don’t really revolve around limiting access, but rather managing how you use the devices. For example, in the device summary settings in Figure 1.1, you can see that the management options are pretty basic.
Figure 1.1. Device summary settings
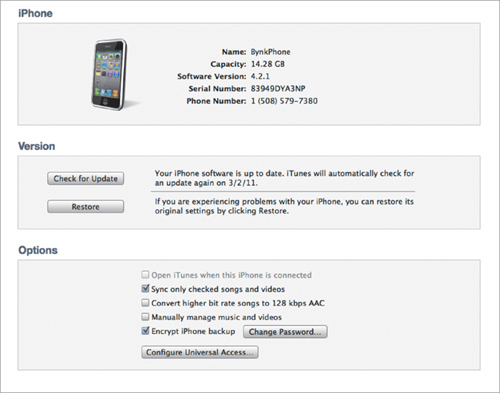
I recommend that you encrypt the backups for devices used with business data. iTunes offers handy, but not exactly high-end, management, and you have to set this up on the computer, not the device. (Oddly, this is where the general tediousness of using iOS devices with multiple computers works in your favor by discouraging users from modifying your setup. Trying to match settings between a home Mac and a work Mac—or even more bizarre, iTunes on Windows and iTunes on a Mac—is enough work that most people just won’t bother.)
iTunes’ application “management” settings are even more basic, to the point of not really being what many would think of as “management.” They’re not really intended to restrict your access to applications, or even control whether you can or cannot add applications to the device. Instead, they’re really just there to help you set up how apps are laid out on the device, whether a specific app should be synced, and whether new apps should automatically be synced. That’s it.
That’s not to say that iTunes’ settings are useless for device management. For example, if you’ve ever tried to manually set up email accounts on an iOS device, you know that it’s not the most pleasant experience. The iOS is rather insistent about not letting you skip any verification steps, no matter that you just want to enter the info and move on. iTunes provides an easy way to avoid a lot of this pain.
On the computer that will sync with the iOS device, set up all your email accounts, calendars accounts, and contacts in the iTunes Info sections (Figure 1.2 and Figure 1.3).
Figure 1.2. Contact and calendar settings
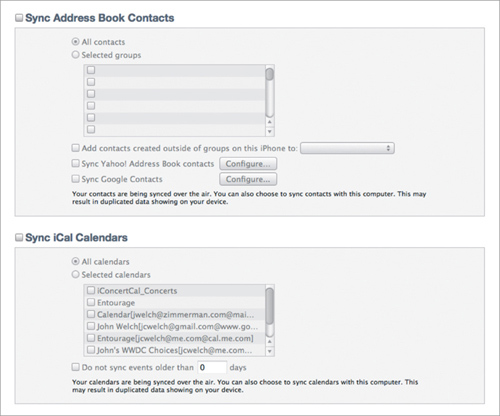
Figure 1.3. Mail and other settings

Then, sync the device. Voila! All your account setup is done. Once that’s done, you’ll want to kill email sync within iTunes because the device will now handle that sync for you. However, you’ll still need to manually sync calendars and contacts.
One more point about email. If you or your employees are going to check email from computers and iOS devices, you really, really want to use IMAP standards for email, and not POP. IMAP is designed for this kind of use, POP is not. Yes, POP has that “leave it all on the server” setting; however, just like putting a big spoiler on your Civic does not turn it into a Porsche 917, leaving POP email on the server does not turn it into IMAP.
If you’re using CalDAV for calendaring or CardDAV/LDAP for contacts, you won’t need to sync manually. However, you won’t be able to use iTunes to sync those apps, not even to set them up. For whatever reason, Apple does not to allow you to sync CardDAV accounts. You can sync a CalDAV account via iTunes, but it won’t create a CalDAV account on your Mac the way Mail creates accounts.
The IMAP standard includes a lot of features that work well on devices such as the iPhone and the iPad, and POP does not. Accessing the same email account from multiple places is what IMAP was designed for, and using it will make your life much easier.
I’m not saying that iTunes is completely useless for restricting/controlling what can be done with iOS devices. It’s not, but we need to keep in mind that iTunes’ definition of “management” is simply different from ours. In the iTunes Parental controls (Figure 1.4), for example, you can do a few things to keep people out of mischief.
Figure 1.4. iTunes parental controls
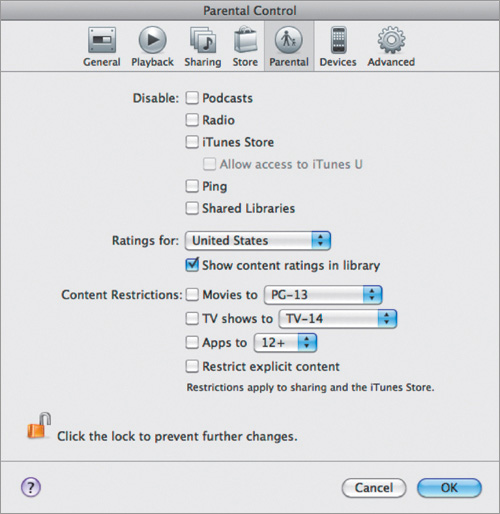
You can disable access to podcasts, the iTunes Store, Ping, and you can set content restrictions. However, these limits are for iTunes, not iOS devices. It just happens that when you use iTunes to sync/manage the devices, this has some happy side effects. For example, if you can’t install apps or podcasts in iTunes, it’s a bit hard to install them on say, an iPad. But that’s not really an awesome way to do things. Luckily for us, we have an alternative method to use here: the device settings.
Using Device Settings
iTunes does not offer many ways to limit the iOS device features that a user can access. However, the iOS devices themselves do offer some limits, as we’ll see. Remember that this is a manual process that you’ll have to repeat on every device . . . manually. In other words, this method is not going to scale well at all. But, again, for a SOHO/small company, it’s an easy-to-use, easy-to-understand solution that comes free with every iOS device.
To get to the restriction settings, go into Settings > General > Restrictions. As you can see in the Figures 1.5, 1.6, and 1.7, you have a lot more control over what someone can and cannot do on the device. (The figures are for an iPhone, but the differences between the various devices are so small as to not be worth showing each device’s settings separately.)
Figure 1.5. Device application controls on an iPhone
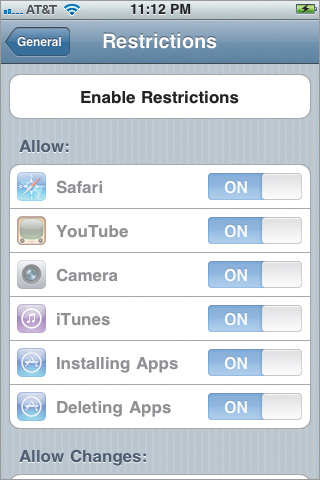
Figure 1.6. Location, accounts, and content controls on an iPhone
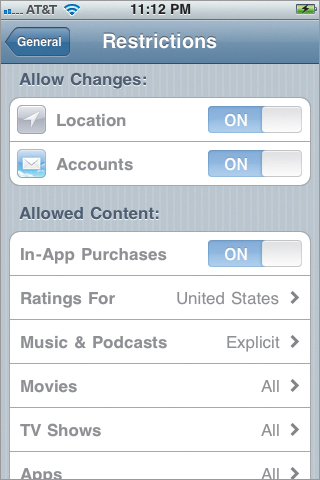
Figure 1.7. Content and game center controls on an iPhone
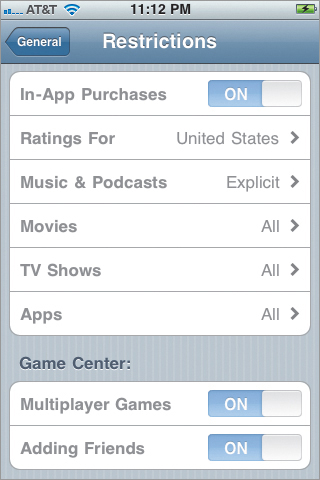
For most companies, you won’t care about most of these settings. (Really, is there a reason to disable Safari?) However, if you want to maintain control of what apps are installed or deleted, you can do that here. You can also prevent changes in email accounts, disable camera usage, manage in-app purchases, and disable some of the Game Center features.
Enabling these restrictions requires you to enter a four-number passcode. Assuming you avoid the obvious ones (1234, 3333, and so on), you can set up the restrictions with a fair bit of confidence that they won’t be bypassed. Yes, there are ways to bypass these restrictions, and most are not all that difficult. It’s almost impossible to lock down a device like this so that it cannot be unlocked. But, for most people, between iTunes and the on-device settings, you should be just fine.
Wrapping Up
Using iTunes and the on-device settings is not a solution you’ll want to use for large numbers of iOS devices. But for a small number of devices with simple needs, these controls work quite well. You can simplify the setup process and have some relatively detailed control over what you allow your users to do with their iOS devices. It’s not fancy, but it is functional, and that counts.