
7. Adding Profiles to Devices
So you’ve created profiles in every way possible. You have scripts and XML files, along with configuration profiles that fit every possible iOS device and user need. What could possibly be left? Oh, that’s right: actually getting the profile from the iPhone Configuration Utility (iPCU) onto the device. In this chapter, you’ll learn about two methods: tethered installation and email.
Using a Tethered Profile Installation
The tethered profile installation method is the simplest. Plug an iOS device into a computer running the iPCU. Wait until the device shows up in the Sidebar. Select the device, click the Configuration Profiles tab, find and select the profile you want to install, and click Install (Figure 7.1). When you’re done, you’ll see the standard Install Profile screen on your device (Figure 7.2).
Figure 7.1. iPCU with iPad attached, ready to install a profile
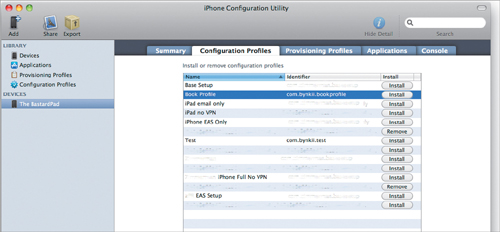
Figure 7.2. Install Profile screen on an iPad
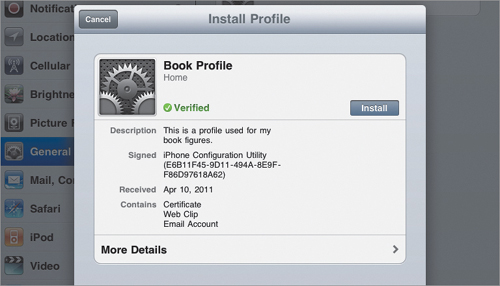
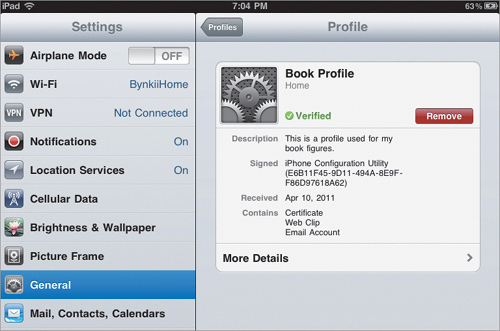
On the device, tap Install to install the profile. You can uninstall the profile on the device itself, or by using the iPCU. To remove the profile from the device, go into Settings, General, and Profiles. Tap the profile you want to remove and then tap Remove (Figure 7.3).
Figure 7.3. Installed profile with Remove button on an iPad
To remove the profile using the iPCU, plug the device in to a computer and select it. In the iPCU, click the Configuration Profiles tab, select the installed profile, and then click Remove.
Tethering is simple, fast, and intuitive. It’s also secure because the only way to install a profile via tethering is to establish a physical connection between the device and the computer running iPCU.
Tethering is also more flexible than you might think. Usually, the “tethering” suggests some poor IT sap sitting in a room with a stack of iOS devices swapping them in and out while wondering if he should have accepted that management job at the local fast food joint. But with a bit of imagination, you can avoid this scenario (and the burger-flipping thing, too).
First, keep in mind that you don’t need a particularly fast computer to install profiles. Can it run Mac OS X v10.6 or even a vaguely new version of Windows? (I’m not kidding about “vaguely”—iPCU supports XP SP3.) If so, it’s good enough to run the iPCU.
So, let’s say you’ve issued a big bunch of new iOS devices, and you want to get their users in and out as fast as possible. Here’s one option: Set up some cheapie Windows boxes or older Mac Minis as kiosks running only the iPCU. Attach a Dock Connector cable to the kiosk. Put up some nice signage explaining the few steps required to install the company profile. Place these kiosks around the company in appropriate places. Congratulations, you have self-service configuration kiosks!
I wouldn’t do this on a permanent basis. But if I had very little time to process a shipload of iOS devices, and I had the extra CPUs sitting around, it’s not a bad solution. More importantly, it means you don’t have to install everything yourself.
Installing with Email
Email is the other installation method that the iPCU directly supports. It’s also pretty simple.
In the iPCU, select the profile you want to send, and click the Share button on the toolbar; or from the File menu, choose Share via Email.
You’ll be asked if and how you want to sign the profile. You can choose not to sign the profile, to sign the profile, or to sign and encrypt the profile to a specific device you’ve attached at least once to the iPCU. Note that if you encrypt to a device, the iPCU will create one profile per device in Mail on Mac or Outlook in Windows (Figure 7.4).
Figure 7.4. The Share Configuration Profile sheet in the iPCU

If you select multiple devices, however, the iPCU will create just one email containing all of those profiles. I’m not really sure about the logic here. If I’m setting up multiple devices, it seems logical that each device is owned by a different person. With that in mind, I think that iPCU should create multiple email messages, one per profile. Evidently, Apple disagrees.
Oh, and yes, you’ll be using Mail or Outlook—at least on Mac OS X because Mail is hardcoded here. Even if you’re not using Mail as your default email application, you will be using it to send iPCU profiles.
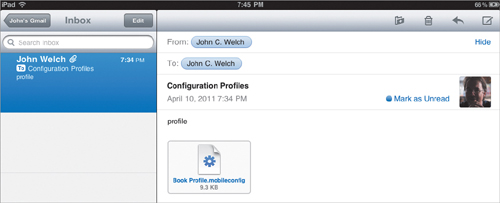
On the iOS device, you’ll receive an email message with the configuration profile as an attachment (Figure 7.5). Tap the attachment, and you’ll see the standard Install Profile screen on the device, and everything installs as normal.
Figure 7.5. Email message with configuration profile as attachment
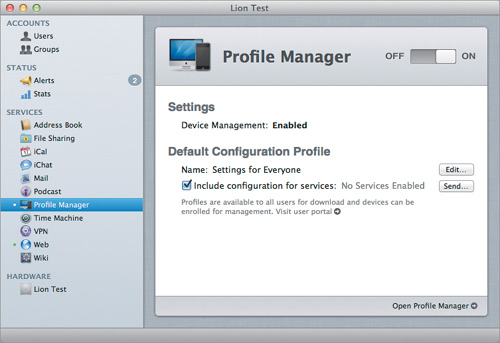
If you’re running Mac OS X Server 10.7, then you don’t need the iPhone Configuration Utility. You’ll use Profile Manager, but perhaps not in the most obvious of ways. First, open up Server.app, select Profile Manager, and click the link to open the Profile Manager web page (Figure 7.6). Log into the Profile Manager page and go to the Devices Section.
Figure 7.6. Profile Manager in Server.app
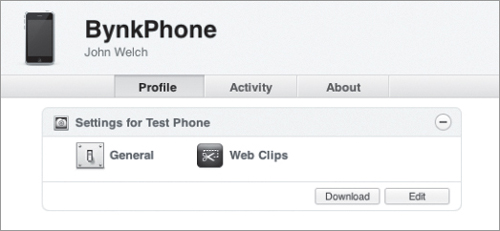
Now, because you want to email the profile to the device, you can’t use some of the other options Mac OS X Server 10.7 gives you. You also have to create the profile before you email it. To do that, at the bottom of the column where devices show up, click the + button and select Add Placeholder (Figure 7.7). This will let you create a dummy profile for that specific device that you can then set up and download. Because this profile is device-specific, you’ll need to provide some identifying information, such as the serial number, UDID, etc. Once that’s done, you’ll get a dummy profile that you can then configure as needed. When you’re finished, click the Download button (Figure 7.8) and you’ll get a .mobileconfig file you can email to the user. Note that this creates a signed profile in many cases, so editing it directly via some other method may cause problems.
Figure 7.7. Adding a placeholder for a device in the Profile Manager web UI
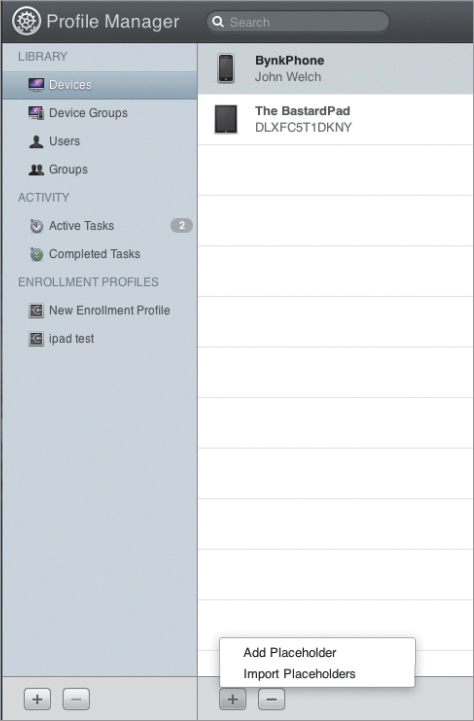
Figure 7.8. Download button for a device profile
The email distribution method is handy, it uses a ubiquitous distribution mechanism, and it can be somewhat secure. However, when distributing profiles to new devices, it has one rather large air gap: How do you send a profile with email account configuration info via email to a device that doesn’t yet have an email account set up on it?
Webmail is your friend here. On an iPad, this works fairly well because you have a nice big screen. On an iPhone, you may have some unhappy, squinting users—particularly if your webmail provider is overly clever with its “mobile” version. Still, even on small screens, webmail is definitely usable.
I use this distribution method almost exclusively for people who have problems with bad cell phone coverage, or when dealing with a Wi-Fi provider who’s just a little too clever with the ports they’re blocking. Even if they’re blocking IMAP/POP, almost no one blocks HTTP/HTTPS, so the nigh-ubiquitous Gmail can be a lifesaver. (On a lark, I tried, unsuccessfully, to use both Dropbox and iDisk as ways to distribute profiles. Evidently, neither of them is set up for this sort of thing. That’s a bit of a shame, because a company Dropbox account could be a neat distribution center.)
Wrapping Up
What about using over-the-air (OTA)? I know, I know. You’re not asking about email, you’re asking about “real” OTA. That’s coming in the next few chapters. In fact, Chapter 8 discusses some quick and dirty (and not terribly complicated) methods for setting up OTA profile distribution.