
4. Creating Configuration Profiles
This is the “big” chapter for the iPhone Configuration Utility (iPCU), and for anyone who needs to perform extensive/advanced management of iOS devices. Configuration profiles are XML files that control the behavior of your iOS devices, restrict or allow specific features, and set up functions such as email and calendars. Once created, configuration profiles can be distributed via USB, email, or a web page.
You can also encrypt and sign a profile to restrict the devices it can be applied to, and password-protect it so that it cannot be removed short of wiping all the data on the device. Configuration profiles can be long and complicated, or kept simple and used only to point a device at a Mobile Device Management server that can push the desired settings to the devices.
Using General Settings
When you’re creating a configuration profile, the iPCU might have you thinking that the General settings are the only mandatory settings. That’s not exactly correct. You need General plus at least one additional setting. This is logical because it doesn’t make sense to have a configuration that has only the General section because the General section doesn’t really do anything in terms of configuring your iOS device. It’s just there to identify the profile.
But, if you aren’t expecting that behavior, and you’re testing a profile, it could be annoying when the device refuses to install a profile with only the General settings configured.
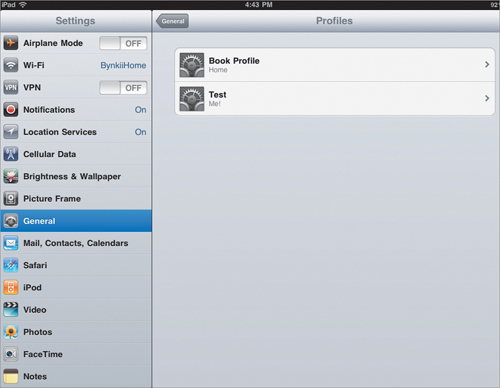
The General settings are concerned only with the profile identity security (Figure 4.1). As such, the number of settings here is pretty small. You can set the name of the profile, which is what users see when they go into the General settings on the device and select Profiles (Figure 4.2). That’s not a misprint by the way; you can have multiple profiles on a single device. If you choose to have multiple profiles, however, please watch your settings. Choosing conflicting settings would be . . . bad.
Figure 4.1. General settings for identity security
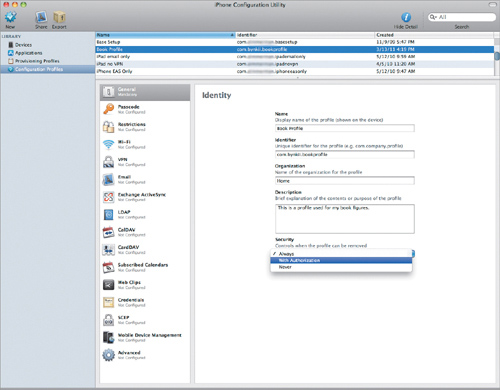
Figure 4.2. General settings on an iOS device
Most of the settings here are descriptive, starting with a Name for the profile that the user will see on the device and a unique Identifier named similarly to plist files—for example, “com.bynkii.bookprofile”—that serves two important purposes: First, if no other profile on a device has that same identifier, the profile’s settings are added to the device. Second, if a profile on the device does have the same identifier, the settings in the new profile replace the previous profile’s settings.
This functionality can make it easy to update an existing profile. Rather than performing a full remove and replace, you can just edit an existing profile while retaining the same identifier, and re-install the profile on the device. The exception is when changing Exchange accounts. When changing an Exchange account, you must remove the profile with the Exchange info so that the Exchange data can be purged.
The Organization and Description fields are available for you to insert customized information that—like the Name field contents—are displayed on the device.
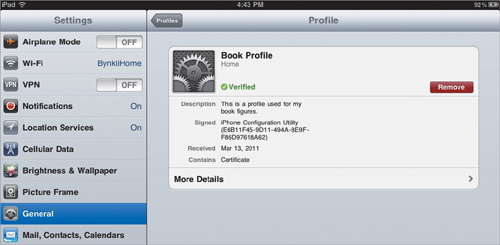
The Security setting controls the ability to remove the profile and has three settings: Always, With Authorization, and Never. Always is pretty self-explanatory: The profile can always be removed by clicking Remove in the profile’s information section (Figure 4.3).
Figure 4.3. Click Remove to delete a profile from a device.
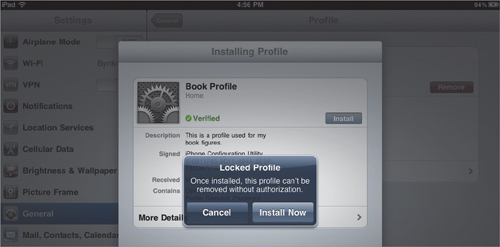
If you choose With Authorization, the profile can be removed only by entering a passcode that you set when you create the profile in the iPCU. You’ll see a warning to that effect when you install a profile with this security setting (Figure 4.4).
Figure 4.4. Warning displayed when installing an app that requires authorization
If you choose the final option, Never, you’re required to erase all the data from the device to remove the profile.
Realistically, don’t choose Never unless you are in a high-security environment (and I mean “Lawrence Livermore National Laboratory where we perform nuclear weapons research,” not just “I don’t want people to know about our new website data” security); or unless you are not going to update that profile anytime soon. Choosing Never usually causes far more problems than it solves. Choosing With Authorization will cover you 99 percent of the time. If the device is a personal device that someone is using for work purposes, consider choosing Always. because it’s kind of rude to lock someone out of her own phone.
Setting a Passcode
Next are the Passcode settings (Figure 4.5). These settings are simple enough, but you have a lot more granularity than you can access using only the device or iTunes.
Figure 4.5. Passcode settings in iPCU
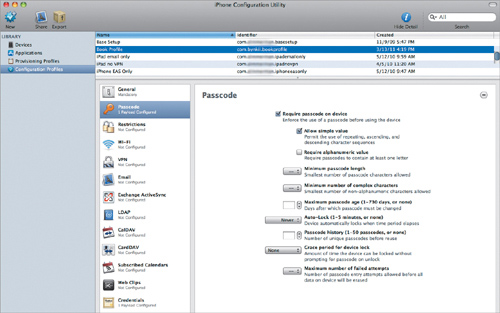
For example, if you don’t want people to choose a passcode like “7777”, simply deselect “Allow simple value.” If you want to force the use of letters and numbers in a passcode, select “Require alphanumeric value.” You can set the “Minimum passcode length” from 1 to 16 characters, set the “Minimum number of complex characters” (such as &, $, or !) from 1 to 16, and choose “Maximum passcode age” up to 730 days. You can also restrict the number of unique passcodes that must be used before a passcode can be repeated, along with a few other passcode settings.
Really, none of the settings available differ much from password settings of any standard IT setup, save one: “Maximum number of failed attempts.” This setting can be dangerous, because it lets you limit the number of times an incorrect passcode can be entered before the device erases itself (up to a maximum of 16 tries.) Yes, this restriction can be useful if your iOS devices carry critical confidential data; but, if this value is set too low, you can create a large user support headache for yourself.
This setting falls into a category I like to call “If you have to ask, the answer is No!” so, if you are currently asking yourself, “Should I use this?”, then don’t use it. If you actually need to use this setting, you’ll know and you won’t have to ask. Any setting that can cause a device to erase itself should be implemented with the greatest care and caution.
Choosing Restrictions
Restrictions is the most complex group of settings and the worst named. Restrictions. Really? This is the best Apple could come up with? Anyway, these settings enable and disable most of the basic hardware functionality on the device (Figure 4.6).
Figure 4.6. Restrictions settings
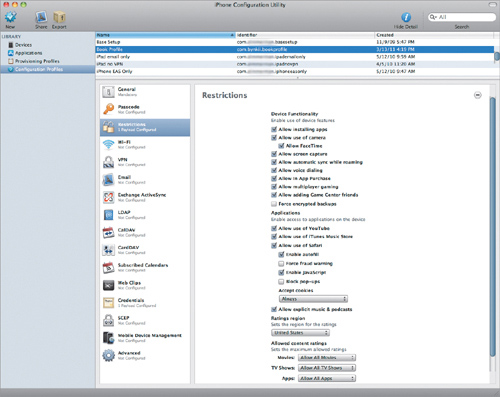
I’m not going to detail every one of these settings, as there’s a ton of them and they’re all pretty self-explanatory. However, a few are worth noting. For example, if you want to avoid the hideous roaming charges that both AT&T and Verizon love so well (in the U.S. at least), deselect “Allow automatic sync while roaming.” A user can still check her communications automatically, and a device that’s not being actively used won’t rack up a few thousand dollars of data charges because that user gets a lot of email.
Selecting “Force encrypted backups” just makes sense, and causes almost no noticeable problems on the user’s end. You may also want to deselect “Allow explicit music & podcasts” if the device is mostly used in a corporate setting. “Allow use of iTunes Music Store” applies only to the device. It’s not going to stop people from using iTunes on their Mac or Windows computers.
Configuring Wi-Fi
The Wi-Fi settings are short and to the point. You specify the SSID of the network, whether or not it’s hidden, its security type, and the password (for personal networks). If you specify Enterprise in the “Security Type” pop-up menu, you reveal many more options, such as several Extensible Authentication Protocol (EAP) types; Authentication information; and Trust, which contains the certificates used to validate the authentication server for the network.
Notice that you can set up multiple networks here. So, if a user must travel between facilities—each with its own Wi-Fi network setup—you can populate his iOS device with the information for each network ahead of time, so his device just works. This also saves you from handing everyone the password to the wireless network, which is not only a good idea, but sometimes a regulatory requirement.
Setting Up VPN
The VPN settings are the opposite of the Wi-Fi settings: They are not to the point, not terribly clear, and painfully easy to incorrectly configure so that your VPN will never work (Figure 4.7).
Figure 4.7. VPN settings are easy to configure incorrectly.
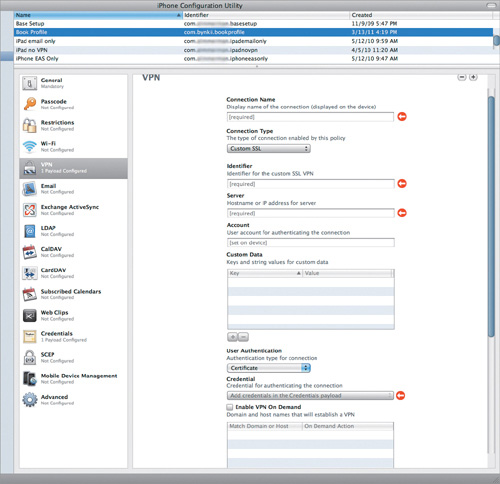
In addition, some of the VPN types listed in the iPCU—such as F5 SSL, Cisco AnyConnect, and Juniper SSL—require you to first install the appropriate apps from the Apple App Store. Not fun.
I’m not trying to downplay the importance of VPN or to avoid it; but there are six specified VPN connection types along with a “Custom SSL” setting, and at least 108 separate VPN settings; and, as with the Wi-Fi settings, you can configure multiple VPNs setups here. Furthermore, if you are dealing with “VPN on Demand” and some of the custom options, you’ll be looking at even more settings.
Fully explaining all of that is literally a book unto itself and, in fact, many VPN books have been written. VPNs are still overly complex as the VPN settings show. If you are responsible for maintaining your VPN, I don’t need to tell you what settings to use. If you are not the person maintaining your VPN, schedule some time to sit down with your VPN guru, the iPCU, and an iOS device to work out the best settings for your devices. Then use them. Take copious notes—you’ll be glad you did.
Setting Up Email
These settings configure POP/IMAP email accounts for your devices (Figure 4.8).
Figure 4.8. POP/IMAP email account settings
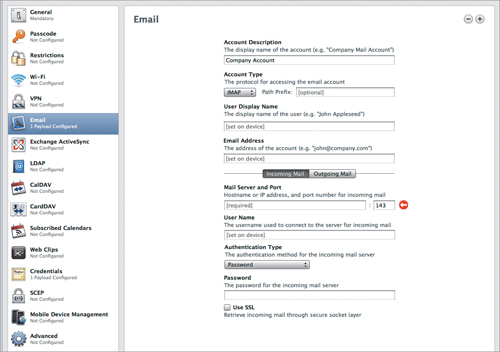
One thing right away: Don’t use POP. If someone is checking her email with an iOS device, it is fairly certain that it isn’t the only way she checks email. You really, really want to use IMAP here. Yes, I know, POP has that “leave it on the server” option. That’s nice but it’s not IMAP, which is designed from the ground up to be used by multiple devices checking the same account. If you were entering the 24 hours of Le Mans, would you drive an Audi R15 TDI, or a ’78 Pinto with a big spoiler and glasspacks? Right. Use IMAP.
By the same token, also use SSL. If you haven’t enabled this on your server, now is a great time to do so. Open wireless networks are a gold mine for people doing illicit data mining, and SSL is an easily-implemented method to prevent them from mining you. So, use SSL. The only other thing I’d specifically recommend is using authenticated SMTP. It’s a cheap way to stop unauthorized people from using your SMTP server, and iOS supports it.
As far as the other settings go, email settings are email settings are email settings. However, you will want to leave some settings blank for the user to fill in: the User Display Name, the User Name, and the Password. If you fill those out, you’ll have to create a custom profile for everyone, or change the settings every time you install them on a device. You don’t want to do that, do you? Of course not.
However, the downside of letting users enter that information is if you install a profile via USB, the user has to enter that information during that installation. So, when you’re installing profiles to set up email or any other option that requires user input, you won’t want to do so over USB. Luckily, as you’ll see, you have other ways to distribute these profiles.
The only setting I want to talk about specifically is Path Prefix, because it is a setting you’ll use with a rather popular email provider, namely Gmail.
When you set up a Gmail account on an iOS device, you’re really setting up an IMAP account—and Google has an “interesting” take on IMAP. If you use the “standard” IMAP settings for Gmail, you’ll realize that you have duplicates of every folder in your Gmail account. That’s because if you look at your account from the folder root, you’ll see you have a [Gmail] tree with all your Gmail “folders” and possibly an [IMAP] tree as well. By setting the Path Prefix to [Gmail], you avoid some of that duplication.
Boy, that’s kind of a pain, isn’t it? Wouldn’t it be nice if you had an easier way to deal with Gmail that set up Google Calendars and Contacts at the same time? Well, you do. You can use Exchange ActiveSync instead of Email for this. Your setup is not only simpler, but you get all your calendaring and contacts, too. (Unfortunately, you still have the same ugly folders issue because Google’s Exchange ActiveSync implementation is as “interesting” as their IMAP implementation, but at least you do less work for it.)
Using Exchange ActiveSync
Microsoft Exchange is, for better or worse, the 800-pound gorilla of corporate email; and its mobile protocol, Exchange ActiveSync (EAS), is the way you connect mobile devices to Exchange. However, a while ago, Microsoft did something quite brilliant with EAS: they decoupled it from Exchange. So, it still has the name, but you can use it with servers that have nothing to do with Exchange, such as servers from Google, Kerio, Zimbra, Atmail, and others.
Exchange ActiveSync, name aside, is a boon to iOS devices and the like because—rather than configuring your email server and your calendar server and your contact server separately—you just set up EAS and you’re done. Exchange ActiveSync also allows handy things for IT folk such as the remote wipe of a device without signing up each and every device for “Find my iPad/iPhone.” In Exchange ActiveSync settings (Figure 4.9), you configure Exchange ActiveSync accounts on your iOS devices.
Figure 4.9. Exchange ActiveSync settings
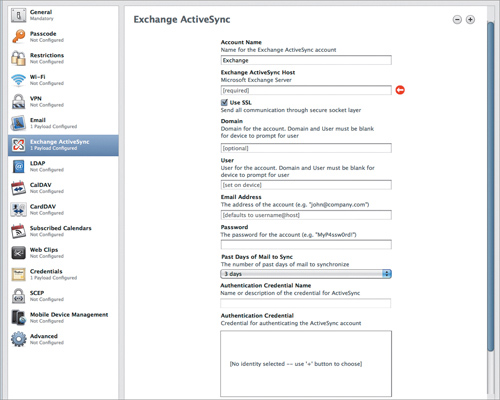
As with email, you’ll find the “normal” fields here, such as Account Name, the server name, Use SSL (YES), and so on. A few fields, however, may appear a bit odd to the uninitiated. First of these is the Domain field. If you are on a Windows network using an Exchange Server, the domain is usually your Windows domain. If you’re using a server such as Gmail, or Kerio Connect (that is, something other than an actual Microsoft Exchange server), you can leave this field blank.
The other strange fields are the authentication credential fields. These are used with certificates that validate the server to the client. This may seem odd, but it is a good way to avoid accidental connection to a rogue Exchange server that happens to have the same DNS address as the desired server. As with email settings, leave the User, Email, and Password fields blank unless you specifically want to fill them in for each user.
Enabling LDAP
Lightweight Directory Access Protocol (LDAP) started as a way to track email contact information and eventually morphed into the way companies manage all their computers and users. While Active Directory, Open Directory, and OpenLDAP are all based on LDAP, for the purposes of this book, LDAP is used only as a contact database.
Most of the settings here are pretty basic (Figure 4.10), with a couple of exceptions. The first exception is the “Account Username” field. Depending on your server type, your account name can look like:
• john
• cn=john,cn=users,dc=example,dc=com
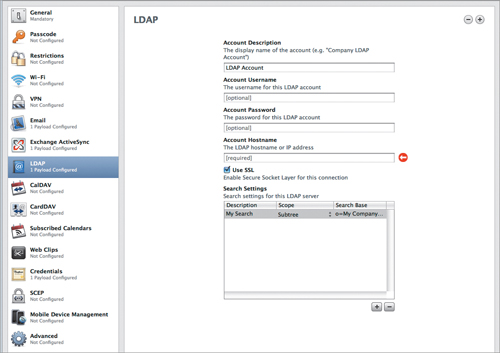
The last example is a full distinguished name and completely specifies the user, who in this case is john, in the users container in the domain example.com. It’s simple, but only if you know how to read LDAP-ese. In that sense, LDAP is kind of like VPN. If you’re running your LDAP server, you already know this; if you aren’t, schedule some time with your directory administrator and have that person help you set up this information.
The second LDAP setting that might catch you off guard is the Search Settings field, which requires some basic knowledge of LDAP structure. LDAP is, in general, structured like a tree. At the root, you have the domain, so company.com would map to “dc=company,dc=com”. Everything expands out from there in a variety of containers (generally, although somewhat incorrectly, abbreviated as CN) and organizational units (OU).
When searching an LDAP directory, you obviously want to limit how much data has to be searched for the benefit of the search speed, and also to control the overall load on the system. A hundred devices searching thousands of entries are going to create a greater server load than if they’re searching a few hundred entries. So, you limit searches by the scope, or range, of the search and by the starting point. To set your search scope, you have three options:
• Base, which searches only the defined search base. If the data you want is one level below that base, the search won’t find it.
• One Level, which searches the base and the level immediately below it
• Subtree, which searches the base and everything below the base regardless of the number of levels.
The next step is to set up your Search Base or starting point. Since you’re really just using LDAP for email contact information, you’ll want to set up the container or OU for your users. If your LDAP directory is Apple’s Open Directory, typically the OU will be the users container, the Open Directory Master computer name, and the domain name. So:
cn=users,dc=odmasterserver,dc=domain,dc=com
would be a typical search base for a generic Open Directory setup. Other LDAP implementations would be different, but similar to this.
By restricting your starting point to just the users container, you can set the search scope to be “Subtree”, and not worry about every device iterating through every part of the LDAP directory just to find Bob’s email address. When LDAP is set up, both the Email and Contacts apps on the device will automatically use LDAP data for activities such as autofilling email addresses in messages.
Setting the Date with CalDAV
CalDAV is an open calendaring standard used by many companies, Apple and Google among them, to set up calendar servers. Unsurprisingly, iOS supports CalDAV. (A little background: CalDAV combines .ics calendaring files as the data format and WebDAV as the transport mechanism, hence: CalDAV.) The setup is simple with the only oddball bit being the Principal URL (Figure 4.11). That’s the URL that contains the path to the CalDAV store on the server. This path can vary depending on the server and its implementation. For example, the Principal URL might look like /caldav/users/domain.com/john/.
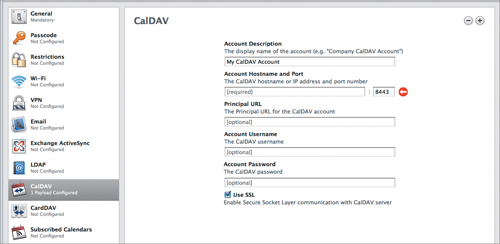
As with Email and other “user input required” settings, leave the Account Username and Account Password fields blank to permit the user to enter that information. And always use SSL.
Getting in Touch with CardDAV
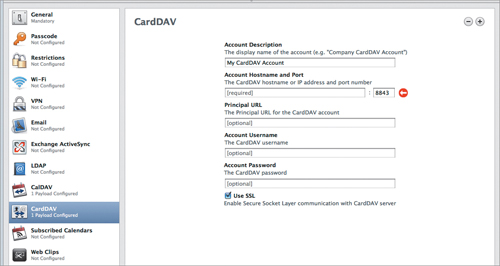
As you saw earlier, LDAP, while usable for email addresses and other contact info, is not always the best choice for many reasons, including that it’s kind of a pain to set up. So, a few years back, Apple and several other entities took the CalDAV concept and applied it to contacts. What they came up with was using the vCard format as the data store and, again, WebDAV as the transport mechanism. The result? CardDAV. The setup is identical to CalDAV, including my standard warning to use SSL (Figure 4.12).
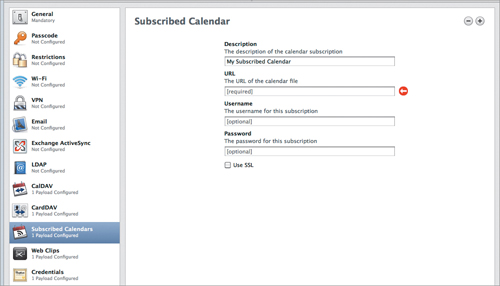
Keeping Up with Subscribed Calendars
These are publicly-accessible, read-only calendars based on the .ics file format that may be used for event lists, team schedules, and so on. Apple has a list of publicly accessible calendars at www.apple.com/downloads/macosx/calendars/. If the calendar in question requires a username and password, those would be entered here (Figure 4.13), unless they need to be customized for each user, in which case you’d leave them blank. As always, use SSL if it’s an option. (Though, sometimes, you just don’t care. I doubt it’s a problem if Little Bobby Haxx0r sniffs the updates to my calendar of sunrise/sunset times in Helsinki.)
Figure 4.13. Enter username and password in the Subscribed Calendar settings.
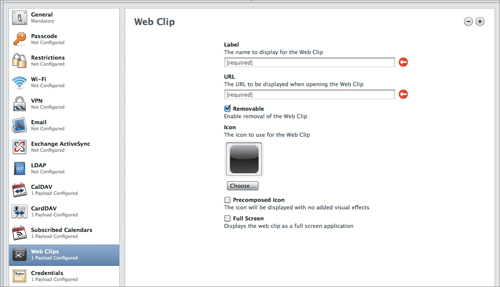
Using Web Clips
At first glance, these settings can seem kind of useless. “What? Now we don’t want them typing in a browser?” But if you think about it, placing web links on an iOS device can be pretty useful for many companies. For example, do you have an internal Wiki or other informational web page? You can set those up here, and make them available on an iOS device without requiring the user to trawl through bookmarks. Do you have custom internal web applications for your users? Enter the info here (Figure 4.14), add a pretty icon, and select the “Full Screen” check-box. When someone taps that link, it looks and behaves like an app, not a web page. Smaller companies may not have many uses for this feature, but for larger companies, these links can be quite handy.
Figure 4.14. Create web links for the iOS device.
Setting Credentials
Here and there I’ve talked about certificates and SSL. Well, if you have your own web or email servers and you’re using SSL, you’re going to have your own certificates for them. Or maybe you’re using certs for Exchange or your VPN. If you want to install them on the iOS devices that need them, here’s where you do it (Figure 4.15).
Figure 4.15. Credentials settings

And it’s pretty simple. When you click the Add (+) button in the main Credentials pane, you’ll see a dialog that asks you to locate the cert file you want to use. Navigate to the file, click Open, and if it’s a valid cert file, you’re ready to go. As with Email, CalDAV, Exchange ActiveSync, and other settings, you can create multiple entries here. When you install this profile, the certificates are installed on the device, and ready for use.
About SCEP
Simple Certificate Enrollment Protocol (SCEP) can securely add certificates to a device over the air (OTA). In this group of settings, you enter the information needed to use your device with a SCEP server. I’m not going to go into this in any detail here because several later chapters are devoted to SCEP and will provide all the detail you need.
Using Mobile Device Management
Mobile Device Management (MDM) allows you to do everything you’ve done here in the iPCU, but wirelessly, securely, and with a lot less work on the part of the user. MDM works with Apple’s Push Notification Server (APNS) to wirelessly push configurations and configuration changes to iOS devices. As you’ll see later in the book, you can do some really cool stuff with MDM. Because Mobile Device Management will be explored in detail later, you can leave these settings alone for now; although if you examine them, you’ll begin to see what you can do with MDM, and how useful it can be.
Managing Advanced Settings
Remember back in the “Setting a Passcode” section that I said some things that fall into the “If I have to ask, the answer is probably No” category? The Advanced settings in the iPCU are the perfect example. Here you change your devices’ cellular connection settings. Apple says it in the iPCU settings themselves, and I’ll repeat it here: These settings should only be managed by trained professionals. If you mess these up, your users won’t have an iPhone or an iPad with 3G features any more. They have an iPod Touch. The iPod Touch is a neat bit of kit, but not if you need to make a call or use the cellular network to get work done. Unless you have a clear need to change these settings and know exactly what you are doing and why you are doing it, stay away from these settings like they were a swarm of rabid wolverines.
Wrapping Up
Woohoo! You made it through all the configuration profile settings! Congratulate yourself, you now have a solid bit of knowledge to help you manage and set up your iOS devices. Next, we’ll dive a little deeper and look at the structure of the configuration files you’ll be creating when you want to install these settings on devices without using a USB cable.