
15. Setting Up a Mobile Device Management Server
In this chapter, I talk about setting up a Mobile Device Management server. Because of the differences between doing this for Mac OS X 10.6 Server and Mac OS X Server 10.7, I’ll split this chapter along those lines. For Mac OS X 10.6 Server and earlier, I’ll be using Casper. For Mac OS X Server 10.7, I’ll use Apple’s Profile Manager.
But first let’s talk a bit about what you need to think about and plan before you start downloading and installing things.
Do You Really Need to Run Your Own Server?
Although I’ve mostly talked about Casper in previous chapters, the truth is, you can use quite a few cloud-based Mobile Device Management servers in the software as a service (SAAS) model. Given the way Mobile Device Management works, there’s a certain amount of logic behind using the cloud, especially if you don’t have the facilities or expertise to devote to managing iOS devices and running the server underneath the Mobile Device Management package.
If you just want to manage your iOS devices, but don’t want to run another server, or add this onto an existing server, then a cloud service is an excellent option. Just do pay attention to things like SLAs and response times. Especially what constitutes a response. Remember “Hi, this is <person> from <provider>, we see you have a problem, a technician will be contacting you in four to six business days,” delivered within four hours at 3 am on a Sunday does in fact meet a 24×7×4 response time requirement. It also sucks, but contracts are about the letter of the law, not the spirit, so do make sure the letter says what you think it should.
How Big Should Your Server Be?
As it turns out, capacity planning for Mobile Device Management servers is still a bit of an unrefined art. For everything other than applications, you’re dealing with small bursts of data. Configuration profiles are on the low end of the kilobyte scale, so almost any fairly modern network and Internet connection is up to the bandwidth task. Yes, apps can get into megabyte sizes, but even so, we’re talking low megabytes and it’s unlikely that you’re pushing apps on a daily basis.
Also, thanks to Mobile Device Management, you don’t have to supervise the push. If it takes a day or so to fully update a few hundred devices, that’s something you can plan for and manage. You probably don’t need a huge dedicated server farm for this task or even a dedicated server at all. While testing for this book, my hardware was a Mac Mini server with 8 GB of RAM with two 500 GB hard drives. Admittedly, my device pool size is small, but my needs didn’t even make the Mini breathe hard.
So, if all you’re doing with the Mobile Device Management server is Mobile Device Management stuff, you don’t need to plan for a $30K hardware buy, although your situation may make a big bucks server desirable. (I say this because some of the MDM products, such as Casper or Absolute Manage, do a lot more than Mobile Device Management, and if you’re going to use them to manage your desktop computers, for example, you will need a bigger server.) However, for most companies in the SMB market, a server with the same rating as Mac Mini (or two) should be able to manage a lot of devices.
Firewall Planning
Because of the way Mobile Device Management works, you need two kinds of connectivity. Obviously, you’ll need a connection between your server and your devices.
In addition, you’ll need to talk to certain Apple services such as the Apple Push Notification Server (gateway.push.apple.com), the Apple site for determining if an app is too big for your cellular provider’s network and must be downloaded via Wi-Fi (ax.init.itunes.apple.com), and the Apple site for validating distribution certificates (ocsp.apple.com).
To support access to those sites, some nonstandard, iOS-specific ports must be opened:
• Port 2195, used by your Mobile Device Management server to talk to the Apple Push Notification Server
• Port 5223, used by the Apple Push Notification Server to talk to iOS devices
Further, you may need to open port 443 and/or port 80 through your Mobile Device Management server’s firewall. If you’re using Casper, you may also need to allow port 8443, Casper’s default SSL port.
If opening any of those ports is an issue in your system, you may want to seriously consider using a cloud-based service.
Getting a Push Notification Certificate
To use Mobile Device Management, you must have a push notification certificate from Apple. To get that certificate, you must be enrolled in the iOS Enterprise Developer Program (http://developer.apple.com/programs/ios/enterprise/), which as of this writing costs $299/year.
When you’re a part of the program, getting the certificate is cake in the “Portal” sense of the word. (The cake, in this case, is not a lie, but you will do a lot of jumping through hoops to get it.) JAMF has an excellent how-to document that applies to Mac OS X, Windows, and Linux. You can read it at www.jamfsoftware.com/libraries/pdf/white_papers/JAMFSoftware-Creating_an_Apple_Push_Notification_Certificate.pdf. The basic steps for getting the certificate are:
1. On your Mobile Device Management server, generate an SSL CSR.
2. Go to the Apple iOS Dev Center, and enter the iOS Provisioning Portal.
3. In the App IDs section, create a new App ID. Enter a description and a bundle identifier. This must start with com.apple.mgmt and end with a unique string, for example, com.apple.mgmt.com.bynkii.com.
4. In the list of certificates you’ll get, look for the one with the bundle ID you just entered, and click Configure.
5. Select the “Enable for Apple Push Notification” checkbox, and click the Configure button for “Production Push SSL Certificate.”
6. The wizard that appears allows you to upload the CSR you created and generate the push cert. Do what the nice wizard tells you to do.
7. Save the cert to your computer.
The preceding steps specifically apply to Mac OS X Server. If you’re installing Casper on Windows or Red Hat Linux, your world will be a bit different, and I recommend you follow the documentation at www.jamfsoftware.com/libraries/pdf/white_papers/Installing_the_JAMF_Software_Server_on_Alternate_Platforms.pdf.
Since you’re going to be using this cert with Casper in this chapter, you need to do a few more things.
1. Install the cert you downloaded into the keychain by double-clicking the cert and installing it into the system keychain or your login keychain. (Or really, any keychain you can access because this step is just a starting point to exporting the cert to a different format. I used my login keychain because doing so sometimes makes it easier to get to the private key for the cert.)
Note that if you don’t have the Apple WWDR intermediate cert installed, Keychain Access will gripe about your cert being signed by an unknown authority. If you go to Certificates in the iOS Provisioning Portal, you can download that cert from there and install it into the same keychain that you installed the push cert. This doesn’t really affect anything, but it avoids that annoying red text.
2. Select both the Push cert and the private key (Figure 15.1) and export both of them as a .p12 bundle. You’ll be asked to create a password to secure the bundle. That’s a good idea. Make sure you remember this password because you’ll need it later.
Figure 15.1. Push cert and private key
![]()
3. Save the .p12 bundle somewhere, and then quit Keychain Access.
Using Mac OS X Server 10.7
Setting up push management with Mac OS X Server 10.7 is easier than in earlier versions. Open the server application, and log into the server running Profile Manager. Select the server in the “Hardware” section, then click the Settings tab. On the line that reads “Enable Apple push notifications”, click the Edit button. Then, enter an Apple ID that has an email address attached to it. (The ID itself doesn’t have to be an email address, it just has to have one associated with it. If you don’t have an Apple ID, there’s a button there for you to create one.)
At this point, you just enter the required info and click Acquire Certificates. Assuming your Apple ID is valid, the whole process is completed in about a minute.
Once the certs are acquired, click OK, and select the checkbox to enable push notifications, and you’re done. Simple as can be.
As it turns out, I already went over this in Chapter 10, “Implementing SCEP on Mac OS X Server.” So rather than repeat everything here, I’ll refer you back to that chapter, and the section “Implementing SCEP on Mac OS X Server 10.7.”
Installing Casper on Mac OS X 10.6 Server
So, we’ve got our server set up, and we have our copy of Casper. We’ve configured our firewall correctly and have a push cert, so we’re pretty much good to go.
One of the nicer aspects of Casper is that you don’t have to install and configure it from the server itself. Casper uses SSH for the installation and configuration steps. So, if you don’t have easy physical access to the server and don’t want to do everything via Apple Remote Desktop or VNC, you don’t have to.
1. Mount the Casper disk image, and after reading the documentation (because you always read the documentation before you start, right?), start the JAMF Software Server (JSS).
2. Give it the DNS name/IP address of the server you’re installing Casper on, along with a username and password that have both SSH and administrator privileges. The JSS setup will think a minute, and then offer you two options: “Install the JSS with a Distribution Point” and “Install the JSS without a Distribution Point” (Figure 15.2).
Figure 15.2. Distribution point options
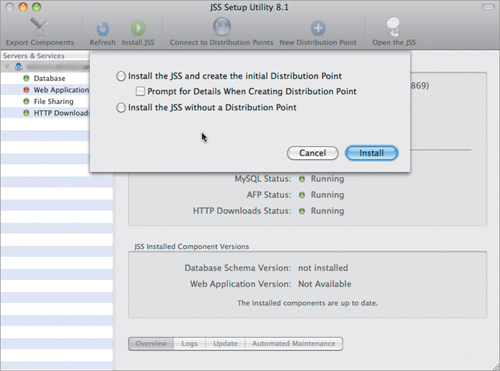
We are setting up Casper as a Mobile Device Management server only. It can actually do quite a bit more, but we can’t cover the entire breadth of Casper’s services in this book. However, if you are looking for a framework for managing your Macs and your iOS devices, Casper is an excellent option.
3. Because we’re only interested in Mobile Device Management, choose “Install the JSS without a Distribution Point.” The JSS Setup Utility will finish the initial install and open a web browser page that allows you to finish the setup and manage Casper.
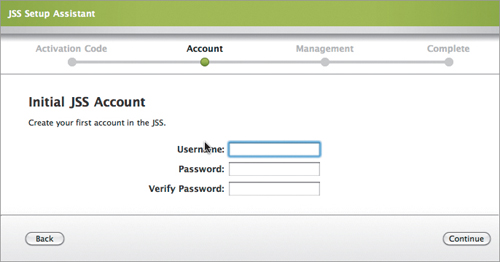
4. Enter your Organization/Company Name and the Activation Code for Casper (Figure 15.3), followed by the initial administrator account and password (Figure 15.4).
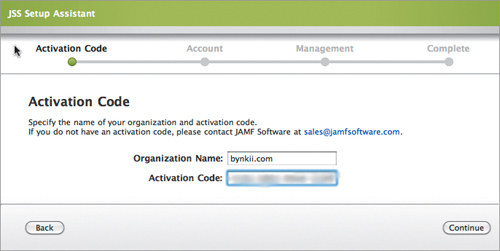
Figure 15.4. Initial JSS administrator account
Just in case you haven’t picked up on it, Casper and JSS are interchangeable for our purposes. Technically, JSS is a superset that includes Casper.
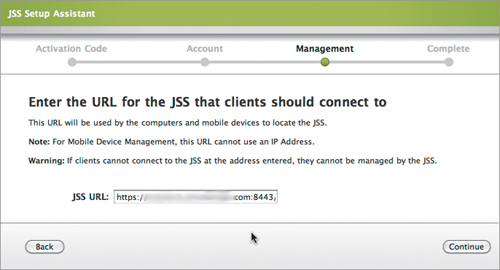
5. Enter the URL that clients will use to communicate with Casper (Figure 15.5). If you don’t have a reason to use a different URL, use the default URL provided.
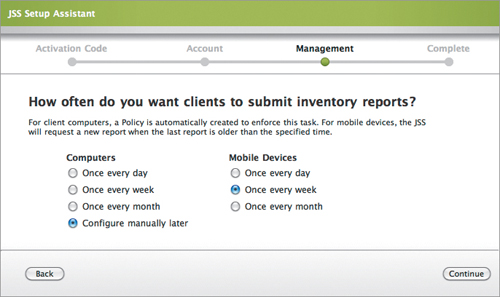
6. Enter the inventory report frequency (Figure 15.6). I would really like it if Casper was better able to be set up as just a Mobile Device Management server or computer management server, and let us pick “never” as an option. But, since it doesn’t, and we are performing Mobile Device Management only, set the Computers option to “Configure manually later” and set the Mobile Devices option to whatever will work best for you.
Figure 15.6. Inventory report settings
Given the Mac OS X Server reliance on DNS, this tip may be redundant, but just in case: You really, really, really want to make sure that the DNS setup for this server is correct. This DNS name will be used by devices when they enroll and the URL that you’ll use to manage the server. Incorrect DNS here will cause a never-ending stream of problems.
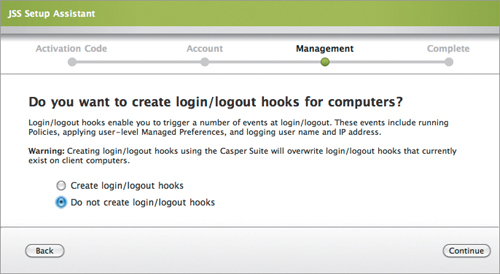
7. You’ll have to decide how often you want computers to check for available policies (Figure 15.7). Since we don’t care in this context, set this to “Configure manually later.” The next option will ask if you want to create login/logout hooks for computers (Figure 15.8). Again, we don’t care here, so set this to “Do not create login/logout hooks.”
Figure 15.7. Policy check settings
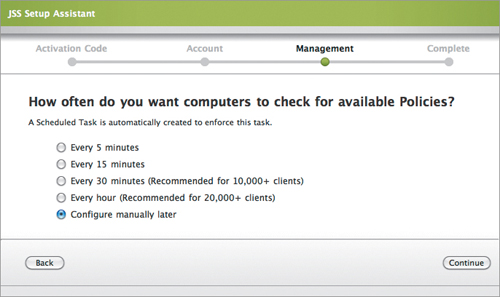
Figure 15.8. Login/logout hook settings
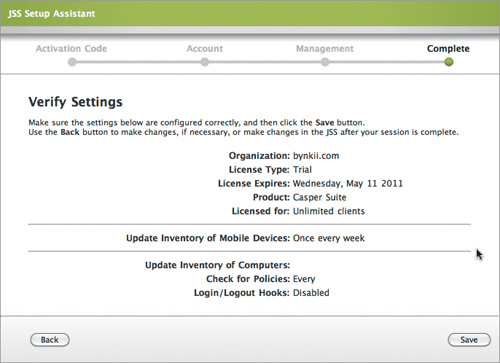
8. Verify your settings (Figure 15.9) and click Save.
Figure 15.9. Final confirmation and save
Configuring Casper for Mobile Device Management
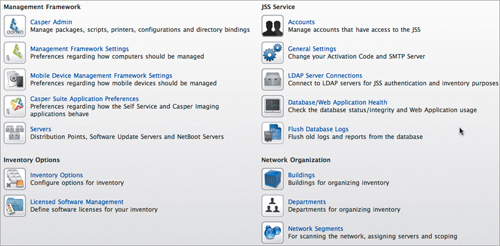
With the Casper installation done, you’ll see a page with a list of links that you can use to set up various features of Casper. You can run these from this page, or within Casper itself using the Settings page (Figure 15.10).
Figure 15.10. Casper settings page
Configuring LDAP
If you aren’t using LDAP, (that is, Open Directory, Active Directory, or OpenLDAP) to run your server, you can skip this section.
I highly recommend that you connect Casper to LDAP because it makes some Mobile Device Management tasks much easier, such as automatically entering email addresses and user names. Click LDAP Server Connections, and then click the Add LDAP Server Connection button.
In the wizard that pops up, choose your directory type, and then just do what the wizard asks. The wizard is straightforward for the most part. Only the attribute mappings section can be a bit confusing (Figure 15.11).
Figure 15.11. Attribute mappings settings
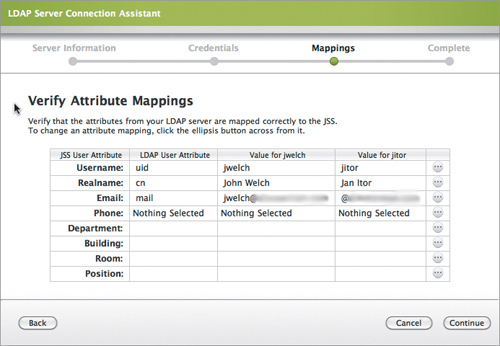
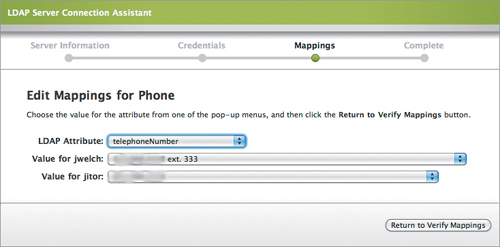
The mappings don’t much apply to iOS devices, but if you want to correctly integrate Casper into your LDAP infrastructure, you should set up the mappings by telling Casper the attributes your LDAP server uses for phone, department, and so on. You want to do this because not every implementation of LDAP uses the same attributes for the same data. To set the mappings, click the ellipsis in the row you want to configure, and select the applicable LDAP attribute (Figure 15.12).
Figure 15.12. Sample attribute mapping
You’ll also be asked to enter two LDAP user group names, which are used to verify group membership for the users you used to configure the LDAP mappings. Once that’s done, click Save, and Casper can now talk to your LDAP server.
Configuring Email Settings
Since you probably want Casper to email you with various notifications, you’ll want to set up an SMTP connection. If you don’t care about email notifications, feel free to skip this section.
1. To set up an SMTP connection for Casper, click General Settings on the main Casper settings page, and then click SMTP Server.
2. Fill in the settings (Figure 15.13).
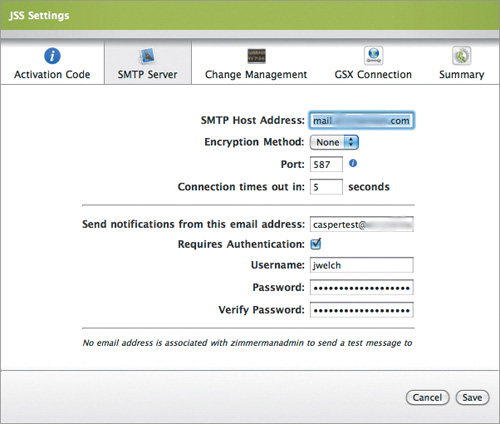
3. Click Save. (Kudos to JAMF for handling authenticated SMTP well; it’s not that common.)
Uploading the Push Notification Certificate
To use the Mobile Device Management functionality of Casper (or any Mobile Device Management server), you have to install the Push Notification Certificate you previously downloaded and exported.
1. From the main settings page, click Mobile Device Management Framework Settings and then click the APNs tab (Figure 15.14).
Figure 15.14. Completed Push Notification Certificate install
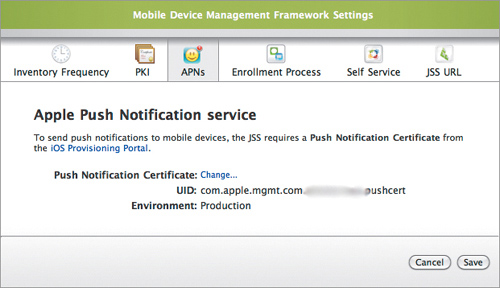
2. Click the Upload link, and upload the .p12 cert you exported.
3. You’ll also need to enter the password that you created for the .p12 cert when you exported it.
4. Click Save, and you’re done.
Setting Up the SCEP Server
Casper comes with built-in SCEP functionality, or you can use an external SCEP server. For this section, let’s use the built-in functionality.
Along with SCEP, Casper allows you to use your own certificate authentication (CA) or use its built-in CA feature. Again, to keep things simple for this section, we’ll use the built-in CA and other certificate functionality.
1. From the main settings page, click Mobile Device Management Framework Settings.
2. Click the PKI tab, and then select Use Built-In Certificate Authority (Figure 15.15).
Figure 15.15. Completed root CA setup
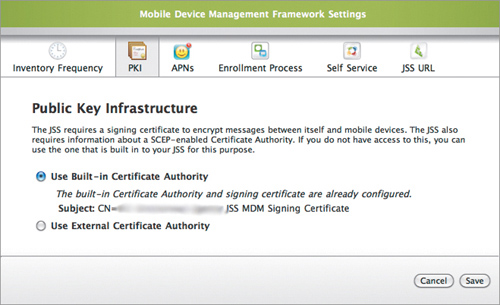
3. For the subject, type something like CN=My Company’s JSS Mobile Device Management Signing Certificate.
4. Select a key size (which should be at least 2048), and then enter a keystore password.
5. Click Save.
Considering how painful SCEP can be to set up on its own, I recommend setting up this option regardless of which Mobile Device Management product you use.
You’ll also need to create a Web server cert to secure communications between the iOS device and the Casper server. One thing to keep an eye on is that if you have any kind of cert already installed for the web server, even the default cert that Mac OS X Server creates for you, you can’t have Casper also set up a cert.
In that situation, you’re better off deleting the default installed cert, setting up Casper, and then creating a new cert if you need one. To set up a web server cert with Casper:
1. Start up the JSS Setup Utility, connect to the Casper server, and select Web Application (Figure 15.16).
Figure 15.16. Web Server cert setup in the JSS Setup Utility
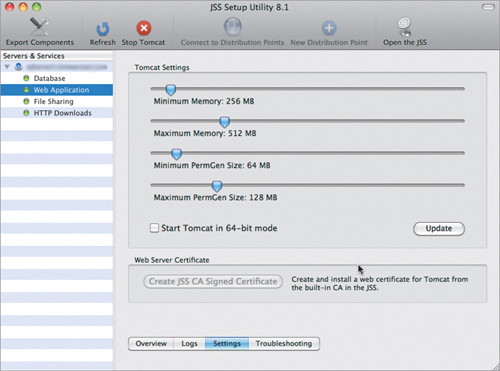
2. Click the Create JSS CA Signed Certificate button to create the cert.
3. When the setup utility is done, click OK.
Setting Up the Initial Enrollment Profile
This is the initial MDM profile that is installed on iOS devices when they enroll. To set this up, from the main settings page, click Mobile Device Management Framework Settings, and then click “Enrollment Process” (Figure 15.17).
Figure 15.17. Initial MDM enrollment profile setup
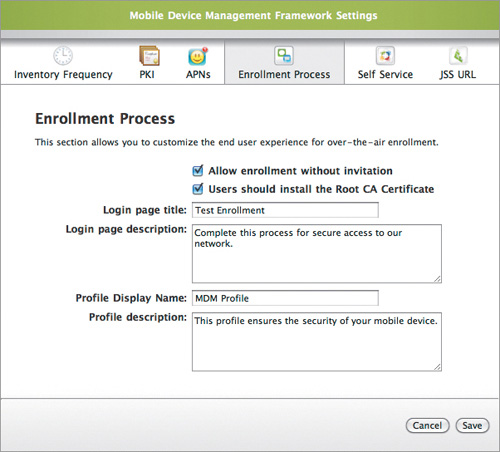
There’s not really much you can set up here. You can allow users to enroll without being invited (there are as many reasons to allow this as not), and have the users install the Root CA certificate (a good idea.) You can give the login page the device will see a title and description, and do the same for the profile.
At this point, Casper is basically set up for Mobile Device Management functionality, and you need only set up your configuration profiles and invite devices to enroll.
Wrapping Up
Casper comes with solid documentation, the kind that I dearly wish more companies would spend time on creating. You can download the main Casper product documentation from the JAMF site at www.jamfsoftware.com/support/documentation. You can download additional PDFs, including the all important “Generating an Apple Push Notification Certificate,” at www.jamfsoftware.com/resources/pdf-library. I highly recommend perusing those sites, even if you aren’t going to use Casper. There’s a lot of information that’s useful for any iOS administrator regardless of the management package in use.