
Chapter 12. Sync and Share Media Files Using iTunes and iCloud
You’ll learn to:
Navigate iTunes 11
Shop the iTunes Store
Sync music, video, and other media to your iPad
Share files on your home network
Beam iPad content to your TV
ITUNES IS APPLE’S ALL-IN-ONE media jukebox and iPad management program. It’s a master of many trades: It’s a repository for all the audio, video, ebook, and podcast files in your media library, and it converts CD tracks into digital files. It also syncs any or all of your media to your iPad. It even lets you transfer music, apps, and books you bought on other iOS devices to your tablet. And for $25 a year, the optional iTunes Match service keeps a copy of your music library on iCloud, Apple’s online storage locker (Chapter 17).
This chapter focuses on using iTunes in tandem with your tablet: that is, downloading Store purchases to your computer, and then getting them over to your iPad.
Apple’s latest version of the program is iTunes 11, which made its debut at the end of November 2012. If you’ve used iTunes before, you’re sure to notice a lot of differences about how it works—and works with your iPad. Chapter 13 delves more into the inner workings of iTunes as a desktop music-management program, but if you’ve got your iPad ready to roll and you’re thinking of syncing, flip the page.
The iTunes 11 Window: An Introduction
ITUNES IS YOUR IPAD’S best friend. You can do just about everything with your digital files here—convert songs on a CD into iPad-ready tunes, buy music, listen to Internet radio stations, watch videos, and more. Here’s a quick tour of the main iTunes window and what all the buttons and sliders do.

All your iTunes media libraries can be found under the Library pop-up menu on the far left side of the window. Click the pop-up menu button to open it. Select a library (like Music) to display its contents in the iTunes window, like so:
From the open Library pop-up menu (shown here), you can see what’s in your various media libraries. As you add music, movies, and other stuff to iTunes, select the appropriate icon to find what you’re looking for—a song, a TV show, and so on. Programs you buy for the iPad land here under Apps. Want to change what iTunes lists? Press Ctrl+comma (⌘-comma) to call up iTunes’ Preferences menu, and then click the General tab. In the “Show” area, turn on (or off) the checkboxes for, say, Tones or iTunes U.
If you have a music CD in your computer’s drive, it shows up in the Library menu as well. Click the gray Eject icon (
 )next to the disc’s name to safely pop it out
of your computer.
)next to the disc’s name to safely pop it out
of your computer.In the Shared area, you can browse the media libraries of other iTunes fans and stream their music. If you have iTunes’ Home Sharing feature turned on (described on Use iTunes Home Sharing on Your iPad) and you see house icons here, you can copy music and videos between machines.
The outer edges of the iTunes window are full of buttons and controls. Here’s what they do:
Play and pause a song or video—or jump to the next or previous track. The volume slider adjusts the sound level. If you see a
 icon, you have an Apple TV or set of
AirPlay-enabled speakers on your network, and you can play your
iTunes content through them from your iPad (Stream and Mirror Files with AirPlay) or iTunes. The
Microsoft Windows version of iTunes has a small square icon in the
upper-left corner, shown above. Click the triangle next to it to
turn iTunes’ File-Edit-View-Controls-Store-Help menu bar on or
off.
icon, you have an Apple TV or set of
AirPlay-enabled speakers on your network, and you can play your
iTunes content through them from your iPad (Stream and Mirror Files with AirPlay) or iTunes. The
Microsoft Windows version of iTunes has a small square icon in the
upper-left corner, shown above. Click the triangle next to it to
turn iTunes’ File-Edit-View-Controls-Store-Help menu bar on or
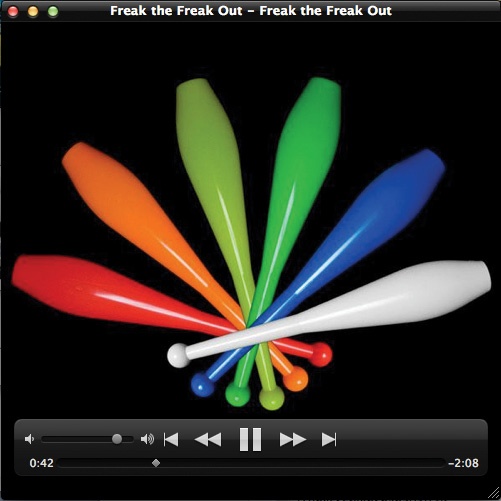
off.The center of the upper pane shows the song currently playing. Click the album cover to see a larger picture of it pop up on-screen, complete with its own set of playback controls (the opening page of this chapter shows an example). This window has a few other icons of note. Click the Loop icon (
 )to repeat the current album or playlist, and
click it again so it looks like
)to repeat the current album or playlist, and
click it again so it looks like  to repeat the current track. Click the
 icon to shuffle your music and click it again
to return to normal play order. To see what’s in your Up Next list (Manage Your Expectations With Up Next), click the
icon to shuffle your music and click it again
to return to normal play order. To see what’s in your Up Next list (Manage Your Expectations With Up Next), click the
 icon.
icon.A search box awaits your keywords.


Next, there’s the horizontal row of buttons under the iTunes playback controls.
Click any of the first four buttons in the row to sort a selected library (Music, in this case) into different groupings, like song title, album, all the works of that artist, or genre. Click the Playlists button to see all your customized song lists (Make a New Playlist in iTunes 11). Click the Radio button to stream any of the hundreds of Internet radio stations through iTunes. Click the Match button to sign up for or see your iTunes Match collection (Use iTunes Match).
If you have an iPad connected to iTunes, click the iPad button to sync new files, change the iPad’s settings, or see how much room you have left on it.
Feel a shopportunity coming on? Click the Store button to dive right into Apple’s online emporium. When you’re in the Store, this button changes to say Library—click it to come back home.
How iTunes Organizes Your Content
MUSIC, VIDEOS, APPS, AND other content you download from the iTunes Store land in their respective libraries—songs in the Music library, Hawaii Five-0 episodes in TV Shows, and so on. Just click the Library pop-up menu in the top-left corner to jump between media types. You’ll find copies of songs or videos you bought in the Purchased lists under the Playlists button, a one-click trip to see where all your spare cash went.
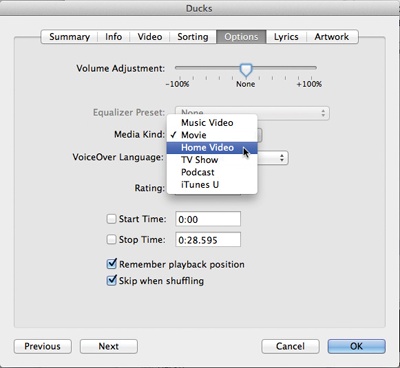
But say you add files that don’t come from the iTunes Store, like videos you download from the Internet Archive (a great source of free, public-domain material, including ebooks, old movies, and years’ worth of Grateful Dead concert recordings; go to www.archive.org). If one of these files ends up in the wrong part of the iTunes library, you can fix it so that it lands where it belongs—movies in Movies, ebooks in Books, and so on.
In the iTunes window, click the file you want to reassign and choose File→Get Info (or press Ctrl-I [⌘-I]) to call up the Info box. Click the Options tab and then, next to the label “Media Kind,” select the appropriate category from the pop-up menu (see below). Then click OK.
Where iTunes Stores Your Files
BEHIND ITS STEELY SILVER-FRAMED window, iTunes stores your music, movies, and everything else you add to it inside its own iTunes folder on your hard drive (which, unless you moved it, is in Music→iTunes [Home→Music→iTunes]). If you’re running Windows 8, Windows 7, or Windows Vista, your iTunes folder is at User→[User Name]→Music→iTunes, and Windows XP users can find it at My Documents→My Music→iTunes.
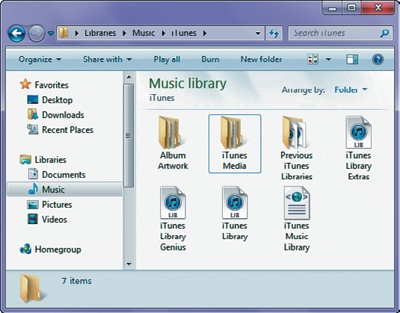
I nside the iTunes folder, you’ll find your iTunes library file, called iTunes Library.itl (or iTunes Library on Macs with old versions of iTunes), a database that contains the names of all the songs, playlists, videos, and other content you added to iTunes. Be careful not to move or delete this file if you poke around in the folder. If iTunes can’t find the file, it gives a little sigh and creates a new list—one that doesn’t have a record of all your songs and other media goodies.
If you do accidentally delete the library file, your media is still on your computer—even if iTunes doesn’t know it or show it. That’s because iTunes stores all your media in the iTunes Music folder (or Media folder, as explained in the Tip below), which is also inside the main iTunes folder. You may lose your custom playlist if your library file goes missing, but you can always add your media files back to iTunes (File→Add to Library) to recreate your library.
Tip
Older versions of iTunes (from back when it managed only music) store your stuff in the iTunes Music folder; newer versions use the iTunes Media folder. If you have a Media folder, iTunes neatly groups things into subfolders like Games, Music, and TV Shows, making it easy to find your downloaded episodes of Mad Men among all the song files. To reorganize your files media-style, choose File→Library→Organize Library and choose “Reorganize files in the folder ‘iTunes Music.’”
The iTunes Store
CLICK THE ITUNES STORE button on the right side of the main iTunes window and you land in the Store’s virtual aisles. They’re jam-packed with digital merchandise, all filed by category across the top of the main window: Music, Movies, TV Shows, App Store, Books, Podcasts, and so on. Click a tab to go to a store section. You can also hover over a tab and click the triangle that appears; a pop-up menu lets you jump directly to a subcategory within the section (Blues in Music, for example). Done shopping? Click the Library button to leave the Store.
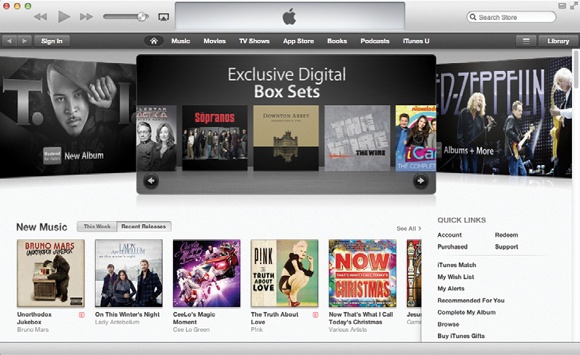
The iTunes Store window highlights iTunes’ latest audio and video releases and specials. Here are a few tips for shopping the Store:
The Store highlights interesting items from each category, so scroll down to see new goodies in Movies, Apps, and so on. Click the History list icon (
 )to see items you previously
window-shopped.
)to see items you previously
window-shopped.If you’re looking for a specific item, like old episodes of WKRP in Cincinnati or the new U2 album, use the search box in the upper-right corner; enter titles, artist names, or keywords.
Preview songs by double-clicking a track’s title. The Buy button is there waiting for your impulse purchase, making it extremely easy to run up your credit card tab. Your purchases land right in your iTunes library.
Scroll over to the right side of the Store window to see the Quick Links area, where you can buy gift certificates, manage your account, get technical support, and see what’s new in iTunes.
If your iPad is in range of a wireless or cellular-data network, you have another way to get to the Store: over the airwaves, as explained next.
The Wireless iTunes Store
WITH AN IPAD, YOU don’t even need your stodgy old computer to shop the iTunes Store—you can tap your way into it right over a wireless Internet or 4G/3G connection. Many WiFi–enabled Starbucks coffee shops also let you browse and buy in the iTunes Store, including the music playing right there at Starbucks.
To buy stuff on your iPad when you’re out and in the mood to shop:
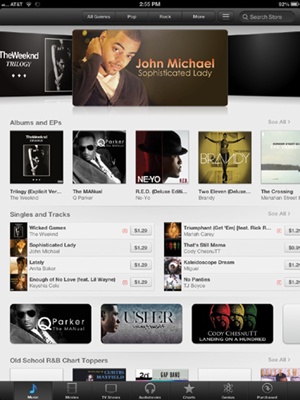
Tap the purple iTunes icon on the iPad’s Home screen. Make sure you have a ’Net connection; see Chapter 4 for guidance on making that happen.
The Store appears on-screen. It opens on the Music page the first time out, but remembers your last open page if you’ve been here before. If you want to buy music, tap your way through categories like “Recent Releases” until you find an album or song you like. (Tap an album to see all its songs.)
Tap a song title for a 90-second preview.
For other purchases, tap an icon (Video, TV Shows, and so on) at the bottom of the window, or use the search box at the top to enter keywords. (Want programs? Hit the Home screen’s App Store icon.)
To buy and download music, videos, and audiobooks, tap the price button, and then tap the Buy button. For free items like TV previews, tap Free.
Type in your Apple ID password and let the download begin. You can check the status of your purchase-in-progress by tapping the Downloads icon, which also lets you pause a download if you need to. (If you don’t have an Apple ID, tap the Create New Account button on the sign-in screen and follow the steps. You can sign in to and out of your account with a link at the bottom of the Store screen.)
Tap the Purchased icon on the iTunes screen to see all the music you’ve ever bought through your iTunes account—and re-download the songs to your iPad.
To get fresh iPad-bought songs or videos back into your iTunes library (which, of course, sits on your computer), sync up your iPad when you get home. The tracks appear in the Purchased playlist. You can also turn on Automatic Downloads to snag it—or just grab it right from iCloud (Use iTunes in the Cloud).
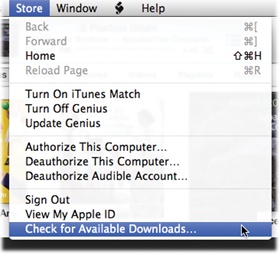
Check for Downloads
IT’S BOUND TO HAPPEN sometime: You’re breathlessly downloading a hot new book or movie and your computer freezes, crashes, or your Internet connection goes on the fritz. Or you and your WiFi iPad were in the middle of snagging an album from the wireless iTunes Store, and the rest of the gang decided it was time to leave the coffee shop.
If that happens, don’t worry. iTunes is designed to pick up the download where it left off. Just restart the program and reconnect to the Internet.
If, for some reason, iTunes doesn’t go back to whatever it was downloading before The Incident, choose Store→“Check for Available Downloads” to resume your downloading business. You can use this same link to check for available purchases any time you think you might have something waiting, like a new episode from a TV Show Season Pass or a pre-ordered album.
Authorize Computers for iTunes and Home Sharing
APPLE’S USAGE AGREEMENT LETS you play Store purchases on up to five computers: Windows PCs, Macs, or any combination of them. Although iTunes Plus songs (those with liner notes and other extras) and songs sold after April 2009 don’t have password-demanding copy restrictions, music tracks purchased before 2009 and most videos still do.
For protected content, you must type in your Apple ID and password on each computer to authorize it to play songs, videos, and audiobooks purchased with that account. Each computer must have an Internet connection to relay the information back to Store headquarters. (You don’t have to authorize each and every purchase; you just authorize the computer itself.)
You authorized your first machine when you initially signed up for an Apple ID. To authorize another computer, choose Store→Authorize This Computer on that Windows PC or Mac.
You can also share media among the computers on your home network using the Home Sharing feature built into iTunes 9 and later.
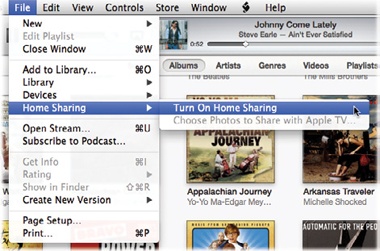
In the iTunes Library pop-up menu, click the cute little house-shaped Home Sharing icon. (If you don’t see the icon, choose File→Home Sharing→Turn On Home Sharing. If you get told to authorize the computer for that Apple ID, choose Store→Authorize This Computer.) On the screen that appears next, type in your Apple ID account name and password.
Click the Turn On Home Sharing button.
Repeat these steps for every computer on the network you want to share files with (up to four others).
Once you set up all the computers, each of their iTunes libraries appears in everyone else’s Library menu. Click the triangle beside the House icon to get to the library you want to explore. Click on a file to stream it to your own machine over the network. If you must have this file on your computer, select it and click the Import button in the bottom-right corner of the iTunes window. Click the Settings button next to Import if you want to automatically copy certain types of files, like music, among these machines—and eventually over to your iPad.
Deauthorize Your Computer
APPLE LETS YOU PLAY your iTunes Store purchases on up to five computers. You won’t be able to play purchased music, books, or videos on a sixth computer if you try to authorize it. That’s because Apple’s authorization system will see five other computers already on its list and deny your request.
To play protected files on Computer Number 6, you have to deauthorize another computer. Choose Store→Deauthorize This Computer from the computer about to get the boot, and then type in your Apple ID and password. The updated information zips back to Apple.

Are you thinking of putting that older computer up for sale? Before wiping the drive clean and sending it on its way, be sure to deauthorize the machine so your new one will be able to play copy-protected files. Erasing a hard drive, by itself, doesn’t deauthorize the computer.
If you forget to deauthorize a machine before getting rid of it, you can still knock it off your List of Five, but you have to reauthorize every machine in your iTunes arsenal all over again. To make it so:
In iTunes, choose Store→View My Apple ID.
Type in your password and then click the View Account button.
On the account information page where it lists the number of computers you authorized, click Deauthorize All.
Note that you only see this button if you’ve hit the five-computer limit—and you can use it just once a year. Once you deauthorize all your machines, go back to the computers in your Home Sharing network and re-authorize each one.
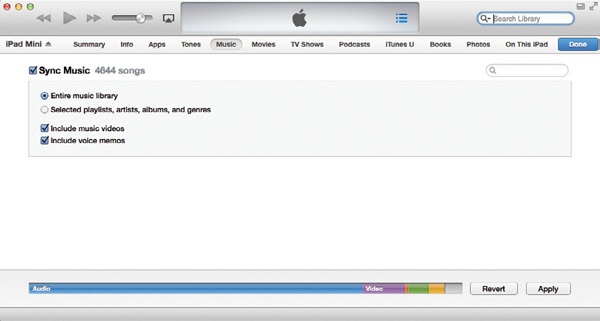
Automatically Sync the iPad
WHEN IT COMES TO syncing content to your iPad, iTunes 11 offers several ways to move your media from computer to tablet. If you want to automatically copy all your music or every podcast in your library each time you sync up, you have two ways to do that. (Want to pick and choose what goes on that iPad? Turn the page for more selective syncing options.)
To copy everything in a certain library, Music for example, each time you sync:
Plug the small end of the USB cable into your Windows PC or Macintosh.
Plug the cable’s Lightning or Dock Connector plug into the bottom of the iPad or iPad Mini (fourth-generation iPads and Minis use the Lightning cable).
Click the iPad button in the main iTunes window.
On the iPad settings screen, click the Music tab, as shown below.
Turn on the checkbox next to Sync Music, and make sure “Entire music library” is selected.
Sit back and let iTunes leap into action, syncing away and doing all that heavy lifting for you. When you add new tracks to iTunes and sync up the iPad, those new songs move over to the tablet automatically. Repeat the steps as needed for your other iTunes media libraries.
If you don’t want to go through the steps to automatically sync each media type—and you have a small iTunes library, or one set up just for the iPad (Set Up Multiple iTunes Libraries)—click the Summary tab with your iPad connected. In the Options area, remove the check in the box next to “Manually manage music and videos.” Click the Apply and then the Sync button to move everything to the iPad (if it fits).
Manually Sync Your iPad
IF YOU OPT OUT of autosyncing your iPad or your media doesn’t fit, you now need to choose songs or videos for it. Until you do, your iPad just sits there, empty and forlorn in your iTunes window, waiting for you to give it something to play with. You can manually sync using the USB cable or over the WiFi airwaves (Sync Your iPad with iTunes).
Manual Method #1
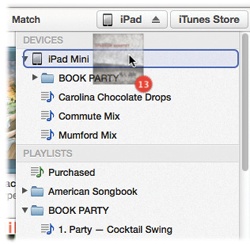
Click the iPad icon at the top of the iTunes window. That opens up a world of syncing preferences.
Click the Music tab, and then turn on the “Sync Music” checkbox.
Click the button next to “Selected playlists, artists, and genres” and check off the items you want to copy to your iPad. (No playlists? See Chapter 13.)
Click the Apply button at the bottom of the iTunes window. (As the rest of this chapter explains, the steps are similar for movies, TV shows, and so on.)
Manual Method #2
This one’s for those into fine-grained picking and choosing: Click the Summary tab and confirm “Manually manage music and videos” is turned on. Now click the songs, albums, or videos you want and drag them to the right side of the iTunes window. A panel pops open, revealing your connected iPad icon and iTunes playlists. Drop the files where you want ’em.
Manual Method #3
Every item in your iTunes library has a checkmark next to its name when you first import it. Clear the checkmark next to whatever you don’t want on your iPad. (If you have a big library and want just a small subset of your media, hold down the Control [⌘] key while clicking any title; that performs the nifty trick of removing all the checkmarks. Then go back and check just the stuff you do want.)
Click the iPad icon in the iTunes window, and then click the Summary tab.
At the bottom of the Summary screen, turn off the checlbox next to “Manually manage music and videos” and turn on the checkbox next to “Sync only checked songs and videos.” Click Apply and then click Sync.
Troubleshoot Syncing Problems
EVERY ONCE IN A while, minor hardware or software issues may trip up a smooth sync. Here are some of the more common problems—and how to fix them.
Your iPad doesn’t show up in iTunes. The first step to syncing is getting your iPad to appear in the iTunes window. If it’s not there, check a few things. First, make sure you have the latest version of both iTunes and the iPad firmware installed (Update Your iPad’s Software). If so and you sync via USB cable, check to see that the cable is firmly plugged in on both ends. If that doesn’t help, try plugging the cable into a different USB 2.0 port on your computer. The cable itself could be bad—if so, you can get a new one, Lightning-style or Dock Connector, for $19 at store.apple.com. If you opted for iTunes Wi-Fi Sync (Sync Your iPad with iTunes), make sure the iPad and computer are on the same functioning wireless network. Also, make sure your iPad has a decent battery charge. Still no luck? Restart the iPad (Troubleshooting Basics) and while you’re at it, restart the computer as well.
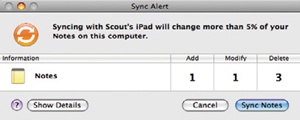
Weird error messages while syncing. If you’re syncing contacts, calendars, and other items from the Info tab, you may see a Sync Alert box pop up if, say, you have two versions of the same person’s contact info on your computer and iPad (usually from editing info on both machines between sync sessions), or if more than 5 percent of the information will get changed on the computer during the sync. Click the Show Details button to see the different versions and pick the one you want to go with. You can also cancel the sync if you want to check out your files on both computer and iPad but don’t have time to deal with it now.
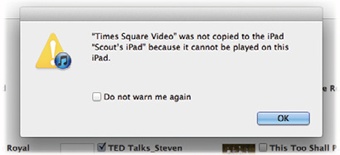
Some items didn’t sync to the iPad. The two most common reasons for an incomplete sync are fullness and formats. If the iPad’s drive is close to overflowing, you simply can’t fit any more content on it. And if some of the files you try to sync are in incompatible formats, the iPad won’t sync them. (This is often the case with video files—there are many formats around the Web, but the iPad works with only a few of them: .mp4, .m4v, and .mov.) In either case, iTunes should display a message about the situation. The solutions are simple: Delete some files from the iPad to make room for the new things, and convert incompatible files to formats that work on the iPad. (Apple’s $30 QuickTime Pro software at www.apple.com/quicktime is one of the many software options here.)
Use iTunes in the Cloud
IT’S SIMPLE TO BUY digital goods from the iTunes Store, but how do you easily get the stuff you buy on one gadget onto all your iOS devices and computers? That’s where Apple’s iTunes in the Cloud service comes in. It acts as an online backup service for all the music, apps, video, and books you buy. Once you buy something from the Store, iTunes in the Cloud knows it and can download copies to all the devices and computers that use the same Apple ID. As with many things in the Appleverse (as well as automobiles), you have two ways to copy files across devices: automatic and manual. Here’s how to do either:
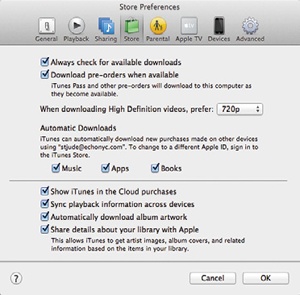
Automatically download purchases. To have iTunes on your computer automatically download to your iPad a copy of the music, apps, and books you buy on other devices, choose Edit [iTunes]→Preferences→Store. Under Automatic Downloads, turn on the checkboxes next to Music, Apps, and/or Books (you need to manually download videos, as described below). Click OK.
To make your iPad grab stuff you bought through iTunes on your computer, go to the iPad’s Home screen and tap Settings→Store. Sign in to your iTunes account and tap the On buttons next to Music, Apps, and/or Books.
Manually download purchases. If you just want certain things from your Store purchases, you can download what you want when you want it. On your computer, click the Store button in the iTunes window and log into your account. In the Quick Links panel, click Purchased. On the next screen, you can see the music, movies, TV shows, apps, and books you bought; click the All button to see everything, or the “Not on This Computer” button (circled below) to see just the items your computer lacks. Click an item’s title and then click the cloud icon (
 )to download it.

To get selective on the iPad, tap iTunes open from the Home screen and then tap the Purchased icon at the bottom of the Store screen. Tap All to see everything you’ve ever bought or “Not on this iPad” to see just a list of the things missing from the tablet. Tap the cloud icon and type in your Apple ID and password to download the stuff to your iPad.
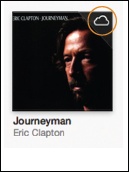
iCloud in the iTunes 11 Library
IF YOU’VE BEEN USING iTunes for a few years and upgraded to
iTunes 11, you may notice little cloud icons (![]() or
or ![]() ) on or next to some of the items within your
library—or even next to your Library pop-up menu. This isn’t a
meteorological commentary on your taste in music and video. This is
iCloud keeping track of the items you previously bought with your
Apple ID. It lets you know that, hey, just because you bought and
downloaded that Eric Clapton album on your work computer doesn’t mean
you have to go all the way to the iTunes Store to click on the
Purchased link to manually download it to this
iTunes library.
) on or next to some of the items within your
library—or even next to your Library pop-up menu. This isn’t a
meteorological commentary on your taste in music and video. This is
iCloud keeping track of the items you previously bought with your
Apple ID. It lets you know that, hey, just because you bought and
downloaded that Eric Clapton album on your work computer doesn’t mean
you have to go all the way to the iTunes Store to click on the
Purchased link to manually download it to this
iTunes library.
To download the item when you’re in album view, roll the mouse
over the ![]() k icon. This gives you a
k icon. This gives you a ![]() icon, which you can then click to begin the
download. (If you skip the chance to download the item and move on,
the icon reverts back to
icon, which you can then click to begin the
download. (If you skip the chance to download the item and move on,
the icon reverts back to ![]() .)Other libraries, like TV Shows, just show the
.)Other libraries, like TV Shows, just show the
![]() icon next to the available items, as shown
below.
icon next to the available items, as shown
below.
When iTunes is downloading files, you see a small
![]() icon up in the right side of the iTunes window;
click it to see how much longer you have to wait.
icon up in the right side of the iTunes window;
click it to see how much longer you have to wait.

If you purposefully keep your iTunes purchases on separate machines and don’t want to see clouds on virtual library items everywhere you look, turn off the fluffy icons and ignore those purchases by choosing View→Hide Music in the Cloud. That way, you’ll see only the songs residing on your current computer.
Use iTunes Home Sharing on Your iPad
AS MENTIONED EARLIER, you can use iTunes’ handy Home Sharing feature to stream media from a sharing computer to your iPad over your home wireless network. Tapping into shared media libraries greatly increases your choice of audio and video files, and sharing is especially useful if you have, say, a combined 500 gigabytes of media across your network devices and only a 16 GB iPad.
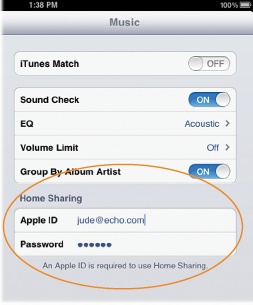
To take advantage of Home Sharing on your iPad, you need to turn it on in both iTunes and on your tablet, and on all the participating devices in your home wireless network. You also need an Apple ID. Here’s how to set up Home Sharing on your iPad:
If you haven’t already, open iTunes and choose File→Home Sharing→Turn On Home Sharing. Type in your Apple ID, and then click the Create Home Share button.
On the iPad, tap Home→Settings→Music. In the Home Sharing area (circled below), type in the same Apple ID.
Tip
Want to keep sharing a Mac’s iTunes library, even if that host
Mac decides to take a snooze during a movie? On that Mac, choose
![]() →System Preferences→Energy Saver and turn on
the checkbox next to “Wake for network access.”
→System Preferences→Energy Saver and turn on
the checkbox next to “Wake for network access.”
Now it’s time to decide what to stream to your iPad. For music, go to the iPad’s Home screen and tap the Music icon. On the Music screen, tap the More button at the bottom of the screen. In the box that pops up, tap Shared (shown below-left), and then tap the name of the library you want to sample (right). All the songs and playlists from that library now appear on your iPad’s iTunes list, ready to play.
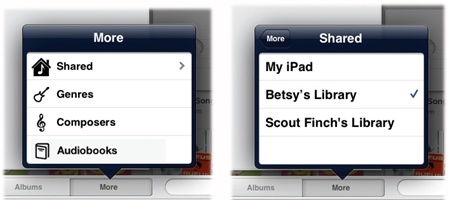
To stream video, tap Home→Videos→Shared. Tap the square gray library icon to see all the movies, TV shows, music videos, and other clips available to watch. Tap a video thumbnail to stream the file to your iPad screen.
Photo Sharing with iTunes
You can’t stream photos to the iPad with Home Sharing, but iTunes can beam them to a second-gen (or later) Apple TV. In iTunes, tap File→Home Sharing→Choose Photos to Share. In the box that appears (below), choose the photo albums or folders you want to see. Then use the Apple TV remote, go to its Photos menu, find your newly shared photos, and view them on your TV.
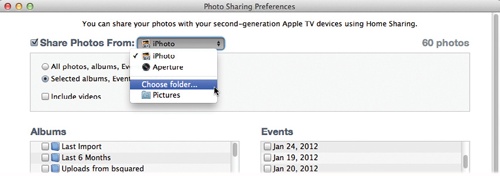
You can even set your Apple TV to use your shared photos as a screensaver. On your Apple TV’s main screen, go to Settings→Screen Saver→Photos. Choose your computer from the list, and then select the photo folder, iPhoto event, or other collection that the screen saver can grab for those quiet moments.
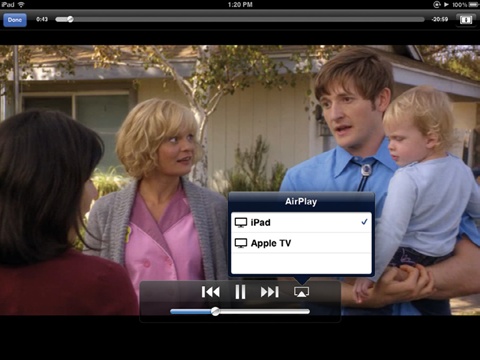
Stream and Mirror Files with AirPlay
THE IPAD CAN PULL in content from shared iTunes libraries, but it can also push out its own music, videos, compatible apps, and photos to other devices via AirPlay, Apple’s technology for wirelessly streaming files to compatible audio gear and gadgets, like Apple TV. For example, with an Apple TV (second-generation or later) connected to an HDTV, you can share your videos, photos, and music with everyone else in the room.
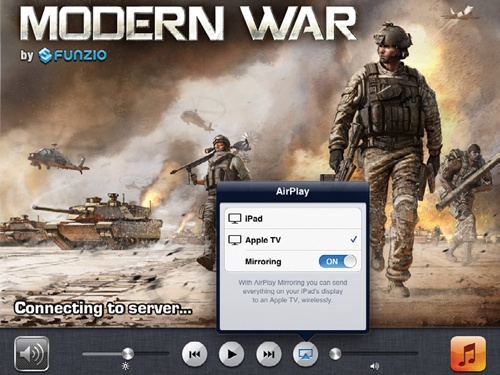
As of iOS 5 or later, you can even mirror (duplicate) whatever is on your iPad 2, third- or fourth-generation iPad, or iPad Mini’s screen to the TV—which is great for gaming, presentations, or showing off fancy apps. A music system linked to the network through an Apple AirPort Express base station is also AirPlay-friendly.
Once you have your AirPlay-equipped device set up on your home
network, pumping out the picture from your iPad is easy. Start up the
file you want to stream, find the AirPlay icon (![]() )on the iPad’s screen, and tap it. On the menu
that appears (shown below), choose where you want to see or hear your
selection, like “Apple TV.” Your song, video, or photo slideshow begins
playing there.
)on the iPad’s screen, and tap it. On the menu
that appears (shown below), choose where you want to see or hear your
selection, like “Apple TV.” Your song, video, or photo slideshow begins
playing there.
You can also get the AirPlay controls by double-clicking the iPad’s Home button and flicking left to right as far as you can go along the row of apps at the bottom of the screen. The images on the opposite page show the buttons.
Even when you beam your media to an Apple TV, you control playback
from the iPad itself. For audio and video, the standard old playback controls
(![]() ,
, ![]() ,
, ![]() , and
, and ![]() ) appear on the iPad’s screen (shown right) so you
can play, pause, and jump around in the content. As for photos, you
simultaneously see your pics on an Apple TV-connected television screen
and on your iPad. You can swipe through them at your own pace, providing
impromptu narration for your slideshow. If you created automatic
slideshows on your iPad (Play Slideshows on Your TV),
you can beam ’em to the big screen through AirPlay, too.
) appear on the iPad’s screen (shown right) so you
can play, pause, and jump around in the content. As for photos, you
simultaneously see your pics on an Apple TV-connected television screen
and on your iPad. You can swipe through them at your own pace, providing
impromptu narration for your slideshow. If you created automatic
slideshows on your iPad (Play Slideshows on Your TV),
you can beam ’em to the big screen through AirPlay, too.

Video Mirroring
To turn on video mirroring for games and other apps, double-click the iPad’s Home button to summon the playback controls in the app panel (shown below). Tap the AirPlay icon, turn on mirroring, and then tap to choose your preferred viewing screen. The faster the WiFi network, the smoother the playback, so consider a speedy 802.11n router if you need some zip.
When you’re done streaming and beaming, tap the AirPlay icon and then tap iPad on the menu to return all your audio and video output to the tablet.
Manage Your Expectations With Up Next
EVER HAVE ITUNES BLASTING out your whole library on shuffle—and find yourself curious about the next song in the rotation? Maybe it’s a track you’re not in the mood for at the moment. You can sneak a peak at the upcoming song (and several others after it) with the new Up Next feature built into iTunes 11.
To use Up Next while iTunes is playing, click the
![]() icon in the display area of the iTunes window, as
shown below. The Up Next list pops up to reveal what’s, well, up next in
your music queue as you listen to your tunes.
icon in the display area of the iTunes window, as
shown below. The Up Next list pops up to reveal what’s, well, up next in
your music queue as you listen to your tunes.
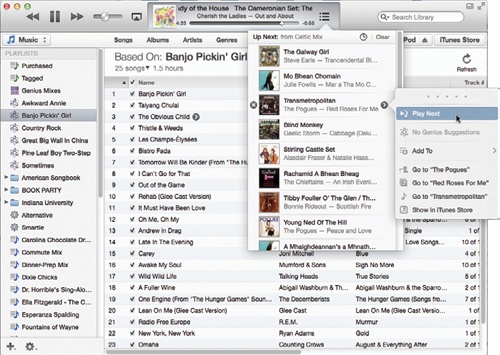
Up Next can do a lot for your impromptu music-management whims:
You can drag and drop albums, playlists, and songs onto the Up Next button to add them to the list of upcoming tracks.
Want to move a song up in the current play order? Select the track in the Up Next list, click
 , and choose Play Next.
To delete a song from the Up Next list, move your cursor over the title and then click the
 next to the name. To whack all the tracks in
the Up Next list, click the Clear button in the menu.
next to the name. To whack all the tracks in
the Up Next list, click the Clear button in the menu.To see songs already played, click the clock icon. Click the same icon to go back to the current Up Next list.
Even better, you can add songs from Up Next playlists to your
connected iPad. Just click ![]() to see the list of pending tracks. Click the
to see the list of pending tracks. Click the
![]() icon next to a song or album you want to add to
the iPad and then choose Add To from the menu. On the Add To submenu,
select your iPad to copy the tracks.
icon next to a song or album you want to add to
the iPad and then choose Add To from the menu. On the Add To submenu,
select your iPad to copy the tracks.
Use iTunes Match
YOU MAY BE SAYING to yourself, “Well, this iTunes in the Cloud thing is great in case my hard drive ever croaks, but I didn’t buy everything in my library from the iTunes Store. What about all the tracks I ripped from my CD collection?” You have two options here:
You can back up your computer (and your iTunes library with it) to an external drive or set of discs using free software like Windows’ built-in Backup utility or Apple’s Time Machine, included with Mac OS X.
For $25 a year, you can sign up for Apple’s iTunes Match subscription service. iTunes Match safely stores any song in your music library on Apple’s iCloud servers. You can download a copy of those songs to any of your iOS devices and computers (up to 10 total, and five of those can be devices authorized with the same Apple ID) so your library is always with you.
For home-ripped tracks that the iTunes Store also sells (it has 28 million songs), iTunes Match adds new Store copies to your iCloud account. For more obscure tracks, ones that the Store doesn’t sell, iTunes Match uploads a copy of each rare gem from your computer to your iCloud account (and yes, that means Apple is wading around in your personal music files).
To use iTunes Match, you need an Apple ID (Set Up an Apple ID), an Internet connection, and an iPad, iPhone, or iPod Touch running iOS 5 or later. Then there’s the money part—you also need a credit card to pay $24.99 a year for a subscription, which covers up to 25,000 songs. And finally, you need some time while iTunes Match uploads your rare tracks to iCloud.
To sign up for iTunes Match, open iTunes on your computer, choose Store→Turn On iTunes Match, and then click the Subscribe button. After you sign up, your music and playlists are added to your big giant iCloud library, including any tracks that iTunes had to upload.
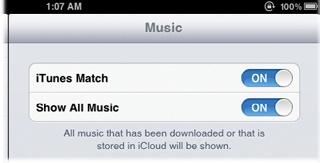
Now you need to get the iPad into the mix. Tap Settings→Music. Flip on iTunes Match. While this initially removes all the songs from your iPad, you can grab them again by tapping the Cloud icon. To see the tracks you’ve already downloaded, along with tracks you can download, tap Settings→Music→Show All Music→On.
Once you pony up the $25 for iTunes Match, you get on-the-go access to your entire music library, along with your Genius Playlists and Genius Mixes, from your iPad or any other ’Net-connected iOS 5 or later device.