Chapter 8
Documenting Your Travel and Vacation in Pictures
IN THIS CHAPTER
![]() Using Portrait mode for nonhuman subjects
Using Portrait mode for nonhuman subjects
![]() Photographing travel cityscapes through hotel windows
Photographing travel cityscapes through hotel windows
![]() Minimizing clutter in your travel photos
Minimizing clutter in your travel photos
![]() Choosing S-curve compositions when traveling
Choosing S-curve compositions when traveling
![]() Composing for equidistance
Composing for equidistance
![]() Placing people with more space in front of them
Placing people with more space in front of them
Whether your travel or vacation adventure is across the world or to the next state, documenting your experiences will act as a highly valued time-capsule for future generations.
Do you value those old photo albums from generations past? They give us a glimpse into our family history, especially the fun photos taken by past family members when travelling or on vacation. So, do the same courtesy to our future generations and give them the opportunity for a sense of nostalgia many decades from now.
In this chapter, you discover pro tips for capturing the best of your travel and vacation photos. Never again will you bore your friends and family members back home with hundreds of soul-less snapshot photos of historic European buildings. You and your family are the stars of this show, and this chapter leads you down the path of travel photography greatness.
Camera Considerations
Travel photography is technically not very different than other genres of photography. Certain travel photography techniques, however, are somewhat unique to the travel photography genre. This section showcases a few examples of how you can operate your camera to benefit your diverse travel photography experiences.
Using Burst mode for moving subjects
For non-Europeans, the image of the European cyclist or simply a lone bicycle is a cliché, but still a lovely photo indulgence. When you see that wonderful grandmother or gentleman ride toward you on a classic Italian bicycle, choose Burst mode to guarantee the shot. (See Chapter 5 for more on Burst mode.)
Figure 8-1 shows the best photo chosen from a burst of eight photos. The reason this one was the best was because the cyclist’s position was perfectly under the classic European window. Also, choose either the best stride (for people walking or running), or if on a bicycle or motorcycle, the best location of the subject in relation to the background.
 Check with local laws regarding photographing people without permission. The general rule for locations without such laws is that you don't photograph people in embarrassing or compromising situations. Maintain respect for your chosen subject. Also, you can’t sell your travel photos of people for commercial purposes without a model release. Commercial purposes refer to an image of people being used to sell a product or a service without them knowing. Always be respectful and show local residents in the best possible light. See Chapter 10 to get more insight on how to photograph strangers in a way that retains dignity.
Capturing portraits with both Portrait and Photo modes
Travel photography with family members inevitably includes backgrounds of famous landmarks or quaint historic back alleys. If possible, try to capture two versions of each portrait: one with Portrait mode on for background blur, and the other without Portrait mode, using the normal camera on Photo mode. The reason this is valuable is because some famous landmarks and locations still look fantastic even blurred, and the blur makes your family member look great.
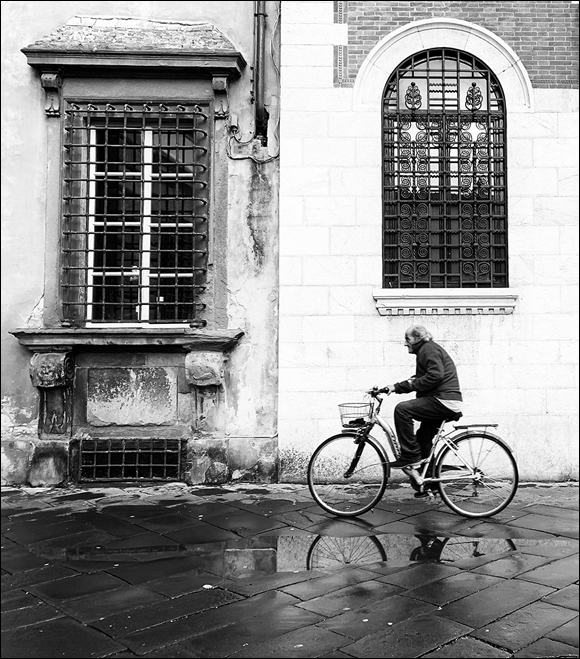
FIGURE 8-1: Burst mode is often used for sports, but it’s also useful for any fast-moving subjects.
A good example of this is in Figure 8-2, which shows the famous Rogue Alley in Saint John, New Brunswick, Canada. With Portrait mode on, the background is blurred but still as attractive and appealing as ever.
Figure 8-3 is in the same location outside of Rogue Coffee, but this time the photo has no background blur due to a normal portrait using Photo mode.
 To save time when you are in a rush, you can let one photo do double-duty. Just take one travel portrait using Portrait mode, and the background blur of that one portrait can be adjusted for full blur, or a sharp, no-blur background (see Chapter 4 to find out how to activate Portrait mode and how to adjust the level of background blur). Even though Chapter 4 discusses selfie Portrait mode, the instructions are identical for normal back-facing camera photography of your family member.

FIGURE 8-2: Create travel portraits with Portrait mode for pleasing background blur.
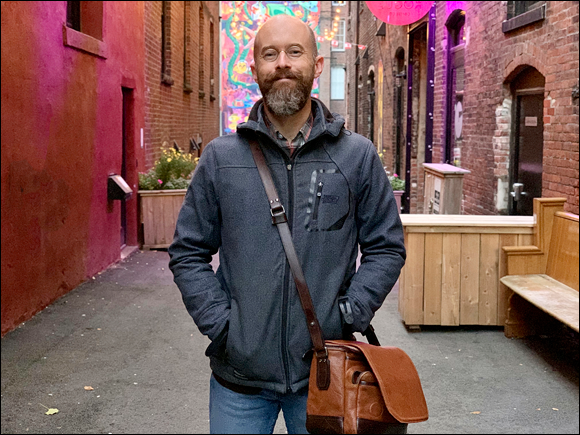
FIGURE 8-3: Take the same photo without background blur using the normal Photo mode.
Photographing nonportraits in Portrait mode
When travelling, you often encounter flowers or budding trees that are not native to your own country. If you come across a wonderfully colorful or intricately designed flower or blossom, try this trick to take your travel photos to the next level:
- Switch to Portrait mode.
- Pretend that the flower or blossom is a human face.
Tap on the face of the flower until a square icon is visible.
Ignore any warning that says “Move Farther Away.”
- When the flower is in focus and the background is blurry, take the photo.
Figures 8-4 and 8-5 are good examples of how you can capture a full cherry blossom tree, such as this one in Japan, but also get a really great portrait of the blossom by switching to Portrait mode. Keep in mind that this Portrait mode camera hack works best with late model iPhones.

FIGURE 8-4: You can use Portrait mode for flowering trees such as cherry blossoms.
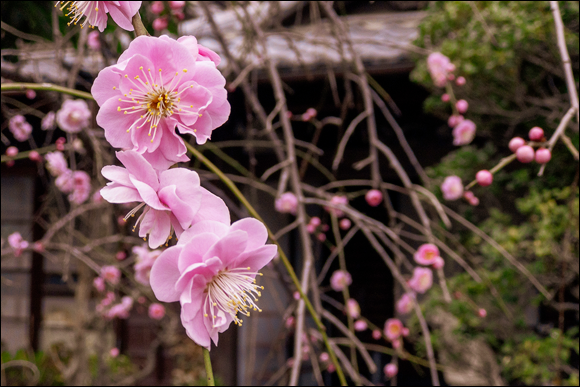
FIGURE 8-5: Get close to a blossom or flower and activate Portrait mode for background blur.
Choosing black and white for iconic locations
Multigenerational portraits in the context of travel or vacation photography create highly cherished memories and when printed are especially fantastic as wall art. Figure 8-6 shows a father and son walking through a famous European archway. This color photo is okay, but it has a few distractions, such as the yellow shed and red box. To transform this family travel photo into frame-worthy wall art, take the photo in black and white using one of the black-and-white filters, or convert the photo to black and white later on, as in Figure 8-7.
 Don’t worry about missing out on the color version years down the road. When you take an iPhone photo in black and white, you can always revert to color at any future date.
Keep in mind that the ability to revert to color is only possible if your photo stays within your iPhone’s Photos app. If you send your black-and-white iPhone-captured photo to a third-party app for extra editing and then bring that photo back into the iPhone Photos app, your ability to revert to the color version will be lost. That’s why most third-party apps give you the option to either make a copy or overwrite your original photo. Always choose to make a copy, which will retain your original photo within your Photos app.
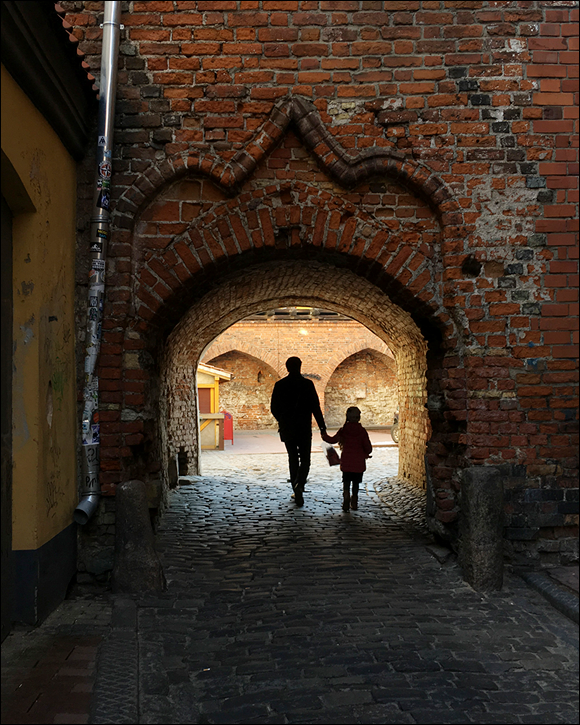
FIGURE 8-6: Color travel photos sometimes have distractions that detract from the look and feel of the scene.
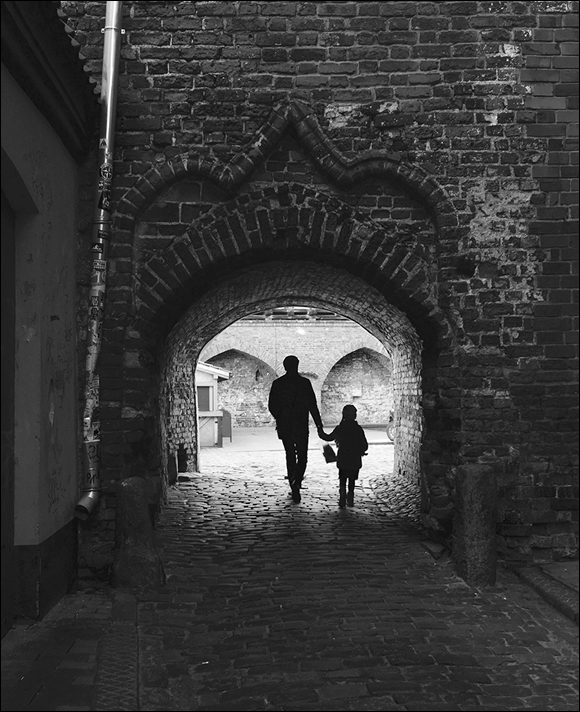
FIGURE 8-7: Choose black and white for multigenerational artistic travel photos.
Your third-party app edited photo will come into Photos as a copy. This is a good thing, as you will then have both your original iPhone created photo that can be reverted to color at any time and also your extra-edited photo. You will see two versions of the same photo within your Photos app. If you don’t plan to use any third-party apps for editing, you can ignore this.
To find out how to capture a photo using a black-and-white filter, see Chapter 2.
Photographing cityscapes through windows
When travelling to a major city, ask your hotel for a room on an upper floor. You can create dramatic photos, both with iPhone and DSLR cameras, simply by placing your lens directly on the windowpane. Here are the steps to create brilliant travel cityscape photos.
- Ideally choose a time before sunrise or after sunset to avoid windowpane reflections.
Turn off all lights in your hotel room.
The darker your room, the better.- Dress with dark clothing to avoid reflections.
- Orient your iPhone so that the lens end is closest to the glass.
- If your scene allows for it, place your iPhone flush against the window.
- With your lens touching or almost touching the glass window pane, take the photo.
A lot of people who are into iPhone photography also have DSLR or mirrorless cameras, and the preceding steps are identical for larger cameras. Figure 8-8 shows a photographer with the tip of her lens actually touching the glass. The closer your lens is to the window pane, the less chance of reflections ruining your image.
Photographing travel scenes with the ultra wide lens
If you’re the owner of an iPhone 11 Pro model, train yourself to choose the ultra wide-angle lens for travel street scenes. Most photographers assume that the ultra wide lens is primarily for landscape or architectural photography, but it’s also a truly unique tool to present your travels in an unusual way.
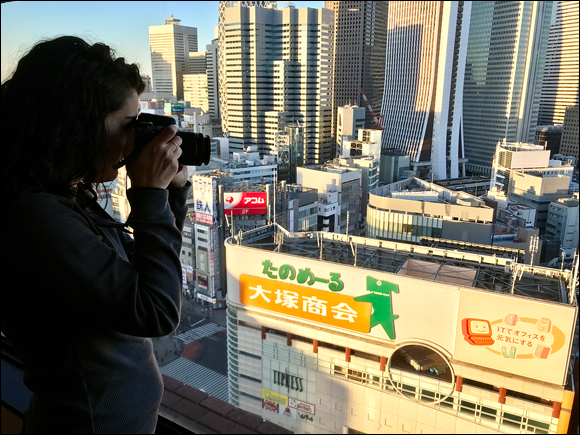
FIGURE 8-8: Get your lens as close to the glass as possible. Ideally, it should be physically touching the window pane.
Figure 8-9 shows a famous street in San Juan, Puerto Rico. Because it was photographed using the iPhone’s ultra wide lens, the photo seems to feel stretched and unusual. That’s because the ultra wide lens shows reality in a much different way than what the human eye sees. And because of this visual uniqueness, your photos will gain much more attention from viewers because of how novel your scene appears to be.
Getting detail in night scenes using Night mode
With the advent of the iPhone 11, Night mode allows you to extend your travel photography opportunities by helping you capture images at night. The nice thing about Night mode is that you don’t need to do anything. Your iPhone will automatically switch to Night mode if it senses that the light is low enough to warrant the feature.
For those with iPhone 11 series models, test Night mode when the light gets lower in the sky or in your house. As in Figure 8-10, a yellow icon appears that displays how many seconds it will take for your iPhone to capture the night scene successfully.
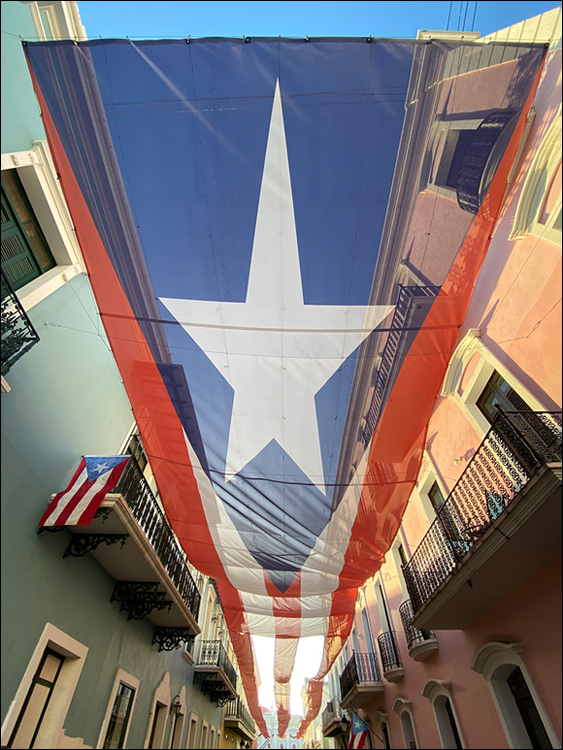
FIGURE 8-9: If you have an ultra wide-angle lens, use it for travel streetscapes for a very unique perspective.
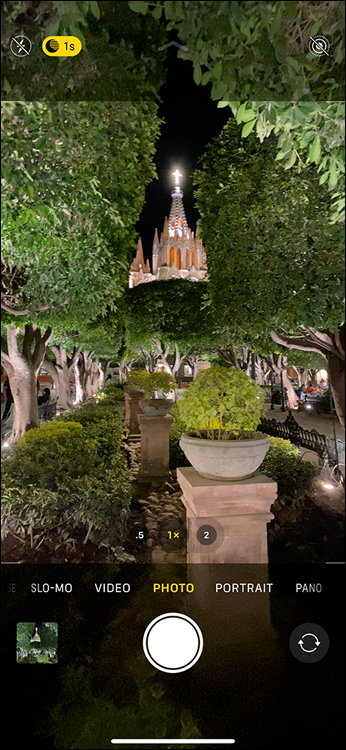
FIGURE 8-10: Night mode on iPhone 11 series models is indicated by a little yellow icon that comes on automatically.
Keep your iPhone as still as possible while the exposures are happening. A tripod is ideal, a stable platform is second best, and hand-held with your arms tucked into your rib cage should be fine if you have no other stability options.
If you don’t see a yellow icon rather a white one without a time indicator, it means that your iPhone can get away without Night mode. You can force Night mode, however, simply by tapping on that white icon and manually choosing how many seconds you want Night mode to use for your image capture.
For new users of Night mode, don’t worry about the white icon’s manual options. Simply take your night photos allowing your iPhone to decide for you.
Choosing all three lenses for iconic scenes
The iPhone 11 Pro models have three lenses: the normal, wide, and ultra wide. If you own a Pro model, try to capture iconic scenes using all three lens choices. For example, if you’re on a cruise and see a beautiful sunrise or sunset scene, find a location on the ship that allows you to capture the same scene with all three lens views.
Figure 8-11 is an example of a Caribbean sunrise of the exact same scene, but each photo turned out to be its own unique photograph. While you may not want to take three photos of every scene, at least the grand or iconic locations would be worthy of taking the time to capture with all three angles.
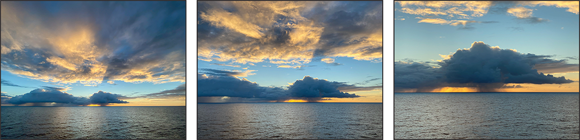
FIGURE 8-11: Use all three lenses for iconic scenes if you have an 11 Pro iPhone.
Gear Considerations
In our current digital age, we’ve been liberated from lack of knowledge (Google, Siri, Alexa), but enslaved to the need for a power socket! When you’re travelling, a few extra gear items gain importance simply because you may be in unfamiliar environments that may or may not have power for your iPhone.
But power isn’t the only thing to consider. In the following sections, you read about a few travel safety precautions, a tough yet good-looking iPhone travel bag, protecting your iPhone from water, and why selfie sticks are great for the lone traveler.
Extending your photography with battery packs
You can extend the battery life of your iPhone in two primary ways:
- Apple has its own protective Smart Battery Case that fits most iPhone models.
- Battery companies create power supplies that will charge your iPhone via a cable.
Either one of these options will probably be more than enough for most travelers, as modern iPhones usually last for at least a full day of average use. And then when you get back to your hotel at night, you can charge up for the next day.
Figure 8-12 is an example of my iPhone 11 Max Pro with the Apple Smart Battery Case and a supplementary battery pack for multiday camping adventures.
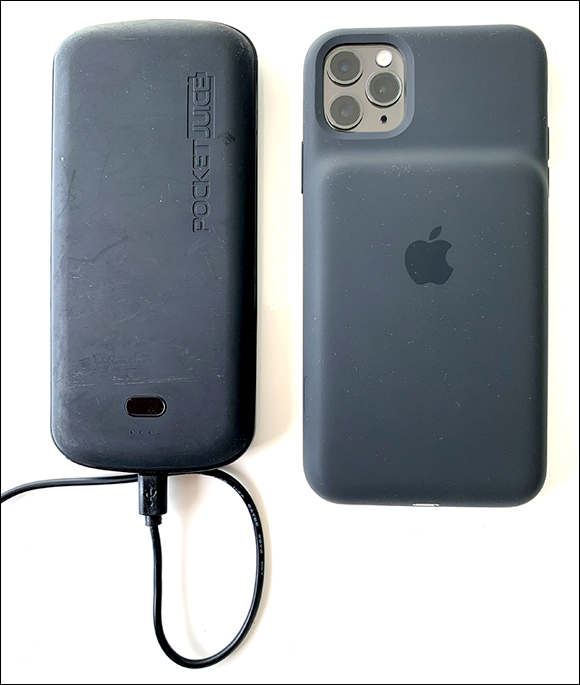
FIGURE 8-12: The combination of an Apple Smart Battery Case and a battery pack will potentially extend your photography for multiple days without AC wall-socket power.
There are, however, power users who drain their iPhone batteries quickly due to intense RAW image processing and video usage. For them, an extra power supply is a wise choice, especially when far away from an urban environment with a lack of café power sockets.
If you plan on camping or going on a safari, you may actually want to double up on the extra power by choosing both the Smart Battery Case and a separate battery pack. This option would potentially keep you photographing for multiple days of average iPhone usage.
A rarely used but necessary third power option that backcountry adventurers keep in their backpacks is portable solar panels. This option may not be a practical, or even necessary, solution for most people, but for those who are travelling off-road for days on end, portable solar panels can be a lifesaver.
Packing a tabletop-sized tripod
A tripod isn’t critical for travel photography, as most often you’ll be with family and have enough baggage as it is. However, if you tend to pack light, any type of travel or tabletop tripod will do the trick.
Photographing or filming yourself with a selfie stick
If you don’t want to pack a tripod on your next travel adventure, some selfie sticks actually come with three little legs that can fold out to act as a type of tripod. But the real value of selfie sticks for solo travelers is the ability to create selfie photos without having your arm extended within the picture.
Take a look at Figure 8-13. Normally when people take mobile device selfies, you can see that it’s a selfie because of their extended arm in the picture, but in this example, it appears that the woman was posing for a normal photo taken by a friend. Consider a good quality selfie stick like the one in Figure 8-14 made by CliqueFie and sold by Apple within the Apple Store.
Purchasing the best protective case for your needs
Will your travel adventures include water? Even though late model iPhones have decent water resistance, it’s best not to tempt fate. To that end, a waterproof case and floatable lanyard are indispensable.

FIGURE 8-13: Solo travelers and influencers can create better selfies using selfie sticks, avoiding their extended arm in the picture.
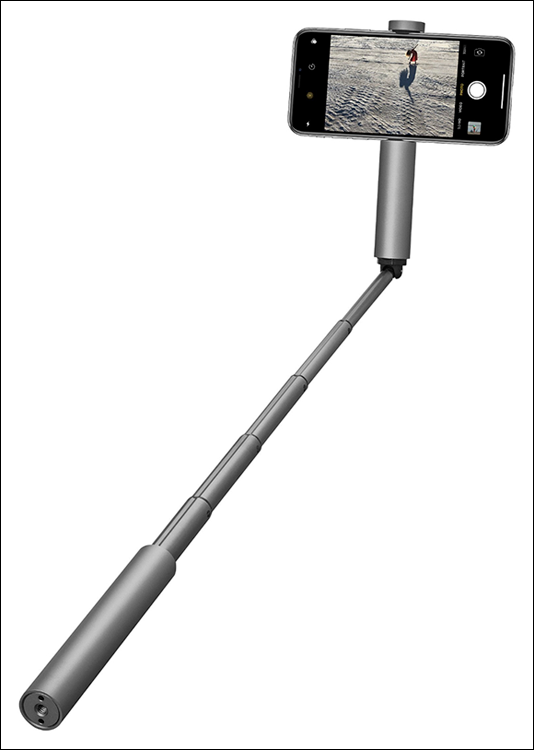
FIGURE 8-14: A portable and good quality selfie stick made by CliqueFie.
Figure 8-15 shows a scene where parents are most likely to lose their iPhones to the depths of the river or lake. The kids are having a blast, Dad looks over the boat to snap a photo, and the rogue wave makes him drop his iPhone and it's gone forever. Companies like Catalyst create both waterproof iPhone cases and floating lanyards, shown in Figure 8-16. This combo allows your iPhone to float safely until you can circle back to pick it out of the water.
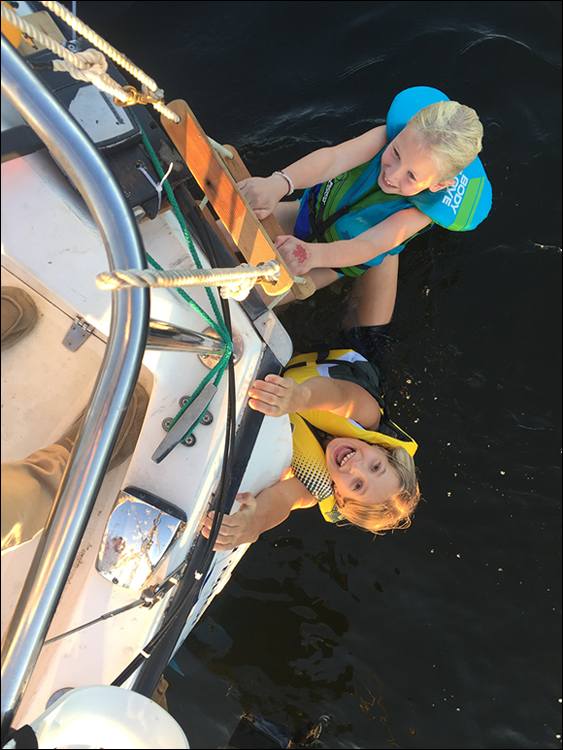
FIGURE 8-15: A common scenario: Leaning over the water to take a photo, potentially dropping your iPhone.
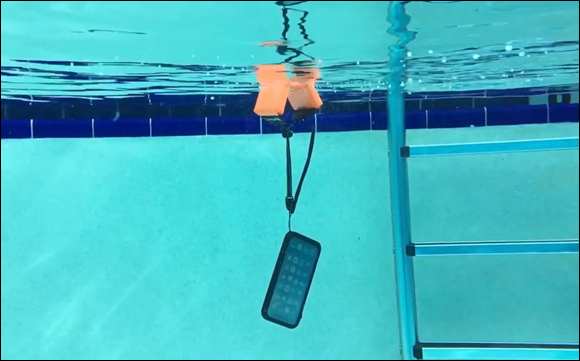
FIGURE 8-16: A Catalyst brand floating lanyard and waterproof case protecting an iPhone from loss and water damage.
Choosing a tough mobile device bag
iPhone photography bags can be good-looking, functional, and tough. Figure 8-17 shows my much loved iPhone Camera Bag by Waterfield Designs from San Francisco. This bag has been around the world a number of times and has the scars to prove it yet has always kept my iPhone safe.
The lower elastic straps are for a mini tripod or selfie stick, and the interior has dividers for extra items that you may want to pack for your next urban iPhone photography shoot. It comes in either leather or ballistic nylon.

FIGURE 8-17: The iPhone Camera Bag by Waterfield Designs.
Keeping your gear safe while traveling
One of the most popular iPhone cases is a wallet, such as Figure 8-18. While a wallet case is practical for day-to-day use, it’s not an ideal option for when you’re travelling. Even though you may be in a relatively safe destination, removing the temptation for thieves and pickpockets is an inexpensive insurance policy.
An iPhone itself has limited appeal for thieves as they know how well protected an iPhone is when the password is locked. An iPhone within a wallet, however, has much more appeal to a thief, so it’s best to leave your wallet case at home when travelling.

FIGURE 8-18: Cash visible from a person photographing with a wallet case.
Lighting Considerations
The beauty of travel, either for vacation or for adventure, is that you’re pretty much guaranteed to encounter types of light that you’re not used to in your own hometown. The following sections contain a sampling of types of light that you may encounter on your travels and corresponding iPhone photos so that you can mimic them to create your own travel photography gems!
Backlight
Backlight, or sometimes called backlighting, refers to light hitting your subject from behind. That would mean that your subject is between your camera and the sun or light source. Take a look at the Mexican papel picado colored flags in Figure 8-19. They appear to be glowing, don’t they? And the mojigangas life-sized mannequin has an attractive rim of light around its head.
Backlighting has the wonderful ability to make translucent material, such as paper and foliage glow, and it also creates definition around people by creating a rim of light around their upper body.
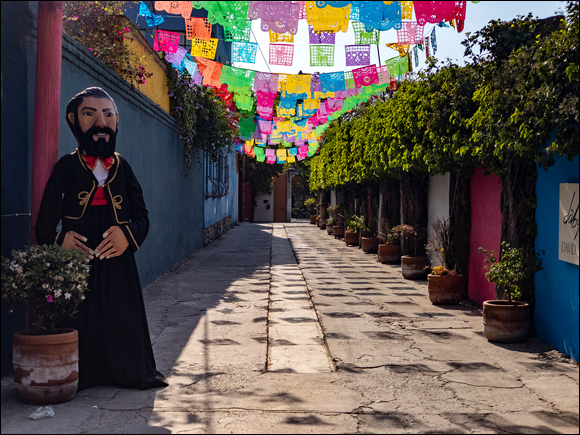
FIGURE 8-19: Backlight occurs when the subject is between the sun and your camera.
Side light
Side light is fantastic for travel photography, especially in open spaces, such as the famous square in Riga, Latvia shown in Figure 8-20. Long shadows are cast when the sunlight is low, and you can make really good use of this light to capture people within their urban environments.
Don’t worry that the beautiful buildings are a bit dark. The goal is less to document the famous landmarks, and rather to create artistic photos that capture the side light shadows cast by people walking through your composition.
Raking light
Raking light gets its name for the way in which the sun rakes along the surface of a flat object, such as the wall of a building. The light is at such a slight angle that most of the surface of the wall is in shadow. Any protrusions or texture on the wall will catch the sunlight, creating a very unique photograph similar to Figure 8-21.
To capture a photo similar to this Mexican exterior, watch for the time when the sunlight is low in the sky and is at such a slight angle to the building’s surface that only flowers, door handles, or window shutters catch the light.

FIGURE 8-20: Side lighting is often created by low sunlight shining between buildings.

FIGURE 8-21: Raking light skims the surface of a wall, beautifully illuminating only objects or texture that protrude from the wall.
You only have about a two- or three-minute window of time to get this type of photo, as the rays of the low-lying sun move quickly.
Reflective light
Smooth or rain-soaked cobblestones have a stunning ability to reflect color. Don’t forget to head out into town just after it rains, searching for colorful buildings that reflect onto the street. Figure 8-22 shows an example of a San Miguel de Allende, Mexico street that reflects color even when dry, due to the fact that the stones are so smooth and flat.
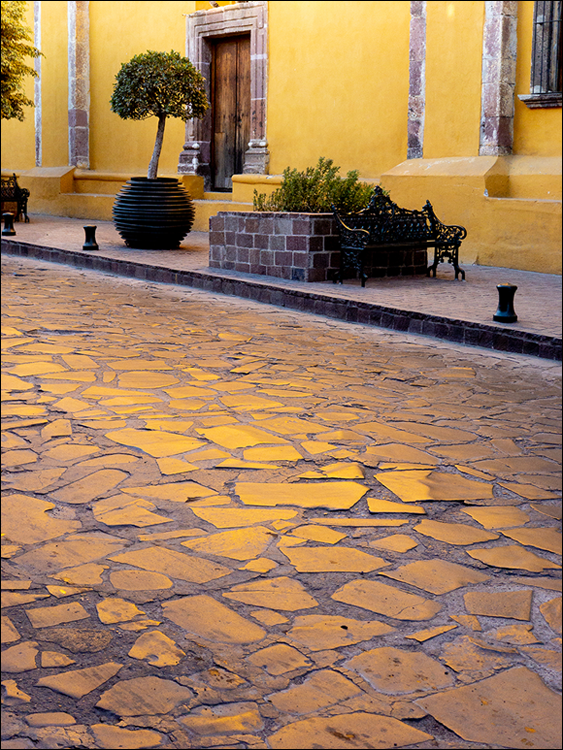
FIGURE 8-22: Cobblestone streets can reflect the same color as the nearby buildings.
Diagonal light
Diagonal light is good for travel portraiture, especially when you ask your friend or family member to look in the direction of the light. Simply look for a great background that has light shining at approximately 45 degrees and place them within the scene based on the location of the light rays.
Figure 8-23 shows an example of a light ray that raked along a beautiful exterior, which made the perfect backdrop for a travel portrait session.

FIGURE 8-23: Diagonal light rays shine at about a 45-degree angle, which works well for travel portraits against interesting backgrounds.
Silhouette light
The famous Cristo Rey statue in Guanajuato State in Mexico shows how you can use the sun to create artistic looking travel iPhone photos. When photographing famous landmarks, try to use the sun to create silhouettes of statues. Simply place your iPhone so that the sun is directly behind the statue, which will usually make the statue pitch black.
Figure 8-24 is an example of adding metaphor to a famous landmark. This statue of Christ is photographed hundreds of times every day. So how do you make your travel photo stand out from the crowd? Use artistic techniques such as silhouette lighting to add a sense of mystery and metaphor.
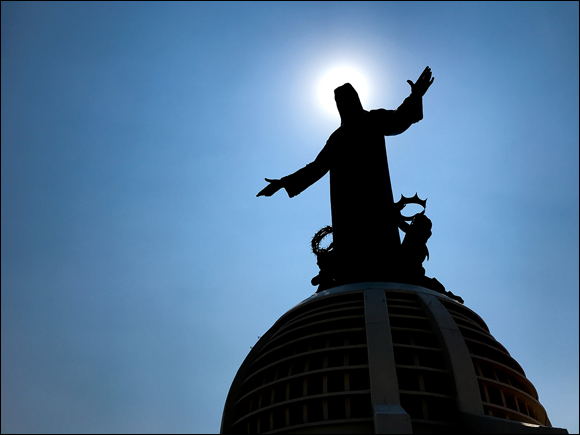
FIGURE 8-24: Silhouette lighting can add drama, mystery, and metaphor to your travel photos.
Shadow light
Low-lying sunlight, such as sunset and sunrise, allows for stunning photo opportunities when travelling. Look for rays of light that shoot through structures and ask a family member to stand in the light. Try not to actually include them in the photo, just their shadow. This adds a sense of mystery and sometimes hilarity to your travel photos.
Figure 8-25 is an example where it appears that a friend’s legs are elongated as if they were on massive stilts! You can have a lot of fun playing with shadows, especially if you have kids with you on your trip.
Magic hour light
Magic hour is a truly fantastic time of day to capture travel photos. Chapter 5 has a section dedicated to magic hour if you are interested in tips on how to make use of this unique type of light.
Figure 8-26 shows an example of a famous landmark scene in Jerusalem, Israel. The photo has a calming blueish color tone, and then when the sun was just about to peak through the clouds the atmosphere switched to a golden color tone, as shown in Figure 8-27.
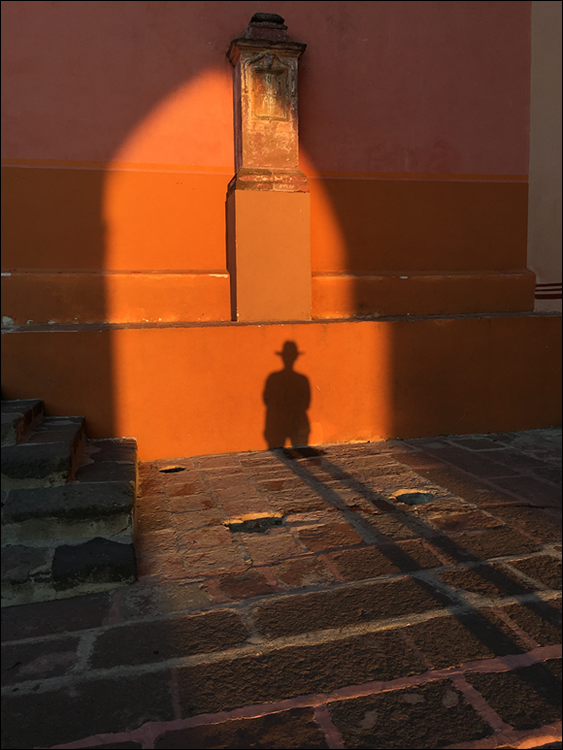
FIGURE 8-25: Look for rays of light at sunrise or sunset to allow for unusual shadow portraits.
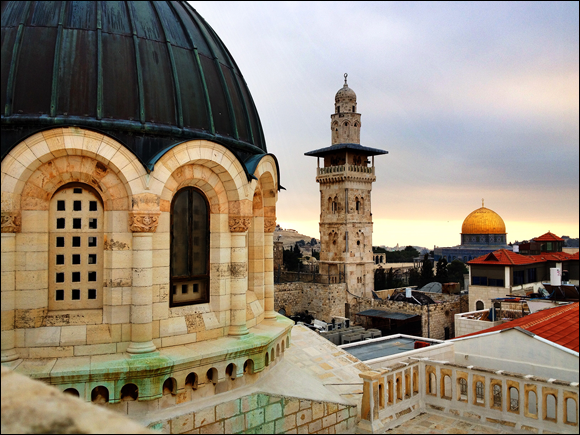
FIGURE 8-27: An example of golden hour.

FIGURE 8-26: An example of blue hour.
If you have the time to wait in the same location, capture your desired travel scene in both blue and golden hours. Both of the photos will look pretty much the same compositionally, but the quality of light will make the photos truly unique.
Blue and yellow light
On the photographer’s color wheel (not to be confused with the painter’s color wheel), red and cyan are opposite colors, green and magenta are opposites, and blue and yellow are opposite colors. Out of these three opposing color combinations, blue and yellow are the most popular and visually appealing. This appeal may be due to the fact that all our lives we have witnessed blue and yellow together, such as the sun and sky, water and sun, golden farmer’s fields plus blue sky, and many other blue and yellow combinations that we consider beautiful.
Figure 8-28 shows an example of a Japanese lantern that is illuminated by warm yellow light, and the interior of a shop that has blue light shining through the shoji paper screen window. The blue and yellow color combination of this composition provides a sense of harmony to the viewer.
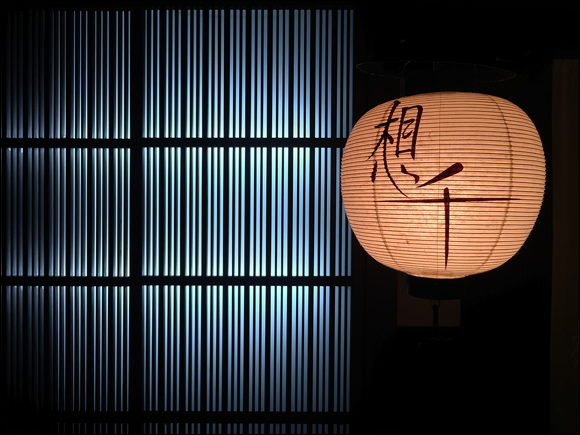
FIGURE 8-28: Look for any type of light that exhibits the blue/yellow color combination.
The good news for your travel photography is that finding blue and yellow while on your journeys is easy. Artificial (electric) lights are often yellow-toned, so look for blue background behind the lights. Or simply make use of the naturally occurring yellow and orange warmth of the setting sun mixed with blue colors that you’ll find while travelling.
Photography Tips for Your Next Trip
In the following sections, you discover a series of quick tips used by the top professional travel photographers. As you go through each tip and sample iPhone photo, keep a note of which techniques resonate with you and how you can plan to implement them on your next trip.
Practicing design-based photography
It’s often tempting to photograph an entire beautiful building when travelling. That’s fine, but to add a sense of fine art to your collection, try to focus on design-based photos that rely on form and angles. Figure 8-29 shows four photos taken of the same wall at different times of the day. These photos would be considered art photography more so than documentary photography. Place your photos together into a quadrant design using Instagram’s Layout app for extra impact!
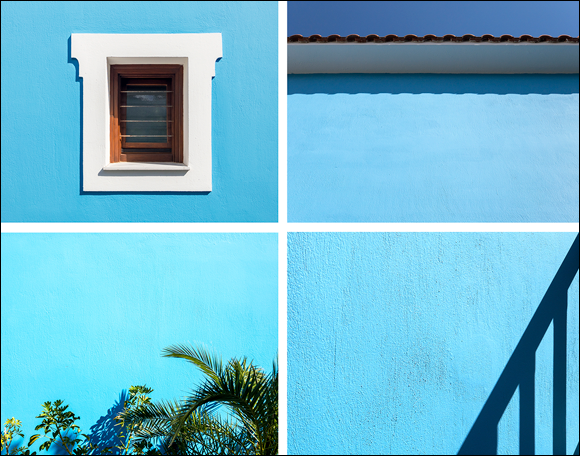
FIGURE 8-29: Photograph details that include angles and shadows for more of a fine art look and then combine them into a collage using apps like Layout.
Placing S-curves in your compositions
An S-curve is one of the oldest compositional technique in the history of art. Think of a painting of a garden with a path winding through it or a forest trail. These pathway scenes almost always have a curve to them, and rarely are straight-lined.
An S-curve is pleasing to the eye, and they’re found often in nature and in urban environments. Figure 8-30 shows a mountain village scene in Nagano, Japan. The road exhibits a curve that leads the viewer’s eye throughout the picture space. Keep in mind that the curve doesn't need to be in the exact shape of the letter S.
Framing your primary subject
Your travel photography should certainly contain normal documentary snapshots, but don’t forget to add a sense of fine art to your images by using a compositional technique called framing.
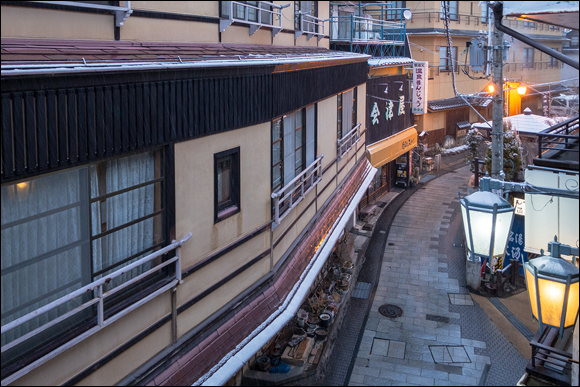
FIGURE 8-30: S-curves lead your viewer’s eyes through your photo.
The famous Parroquia in San Miguel de Allende, Mexico is photographed ad nauseum, so why not mix things up and hide most of the church by using a frame? Look for ways to visually enclose the iconic structure that you’re photographing, such as well-positioned trees in Figure 8-31. By doing so, you will create a sense of mystery. Your viewer will be intrigued enough to ask to see more photos of that location.
Photographing exterior architecture twice
When travelling, you’ll certainly encounter exterior buildings, shops, houses, and other buildings that look interesting to you. Use this general rule to successfully capture exterior façades, such as the Japanese shop front in Figure 8-32:
- Photograph the building façade perfectly straight on.
- Then, photograph the building façade at a 45-degree angle as in Figure 8-33.
These two angles are widely used by professional architectural photographers. It’s rare that pros capture façades outside of these two angle options.

FIGURE 8-31: By framing and partially hiding famous landmarks, you can create unique and mysterious travel photos.
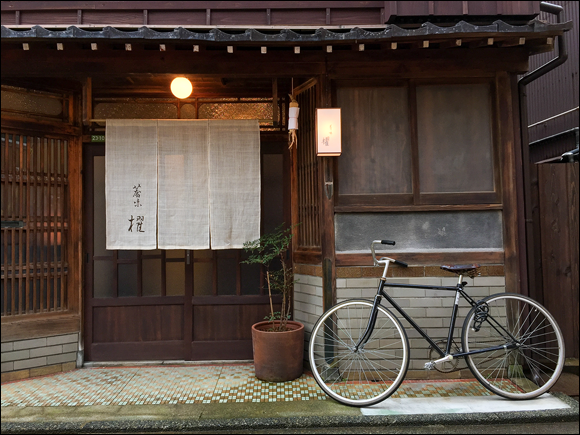
FIGURE 8-32: Completely straight-on is the most common way to photograph exteriors.
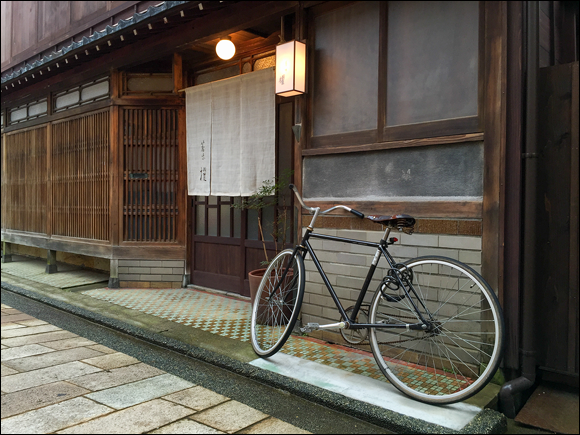
FIGURE 8-33: Photographing at a 45-degree angle is another popular way to photograph exteriors.
Including pattern photos of unusual scenes
While cobblestone streets may not be as unique to those who live in Europe or Latin America, for the rest of the world they certainly have charm for those who only experience pavement every day. When you see any type of scene that does not have a primary subject, such as hundreds of equally sized cobblestones, you can consider the scene an example of a pattern or texture photo.
Take a look at Figure 8-34. It has no unique main subject in the photo, because all of the cobblestones are the subject. You could consider this a pattern photo then, and by carefully composing so that the lines are even, you can create an intriguing frame-worthy travel photo. Just make sure that there is no object in your photo that would steal the attention away from the hundreds of other cobblestones.
Other texture or pattern photo examples are a brick wall, sand on the seashore, repeating tiles on an old church floor, and any scene where there is no visually distracting main subject that steals the attention from the rest of the picture.
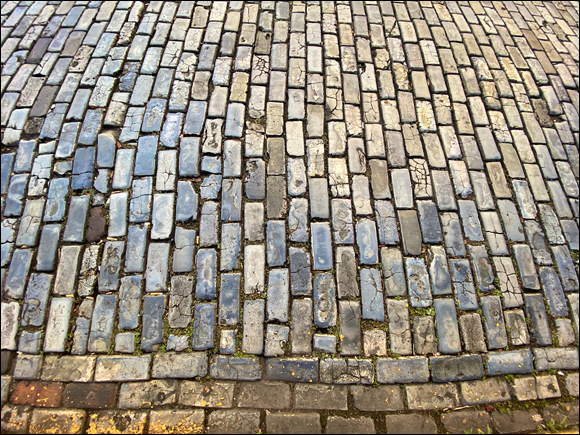
FIGURE 8-34: A pattern or texture photo doesn’t contain a unique main subject, as each element in the photo is a similar size, shape, or tone.
Scheduling famous landmarks as early as possible
Have you ever planned to visit a highly Instagrammed famous location, hoping to get a photo when no one else is in your shot? With tourism on the rise worldwide, it’s getting harder and harder to photograph without fellow tourists ruining your serene iPhone photo.
Figure 8-35 shows a very rare time when there was no one in the famous bamboo groves of Kyoto, Japan. The only reason this was possible was due to a 6 a.m. photo shoot start time! Yes, it’s hard to wake up early when you’ve been photographing the night before, but your lack of sleep will be worth it to get the exact shot that you want.
Waiting for animals to move into the picture space
It’s rare that you will be able to control the movements of an animal, so as a photographer you will just need a lot of patience. Take the swan in Figure 8-36, for example. It would have been better to have captured the swan when it was positioned a bit to the left, so that it was swimming into the picture space instead of swimming out of the picture space.
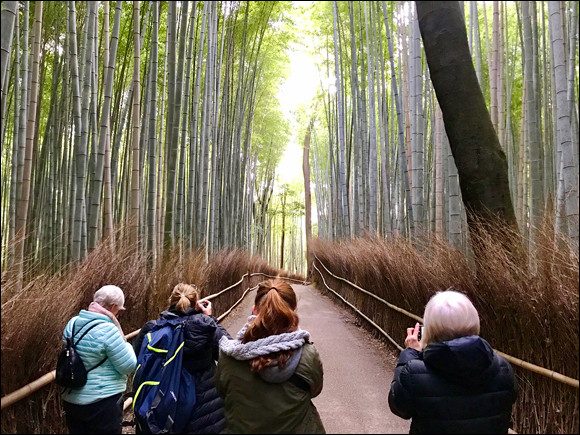
FIGURE 8-35: If possible, plan to arrive at iconic locations as soon as there is light in the sky.
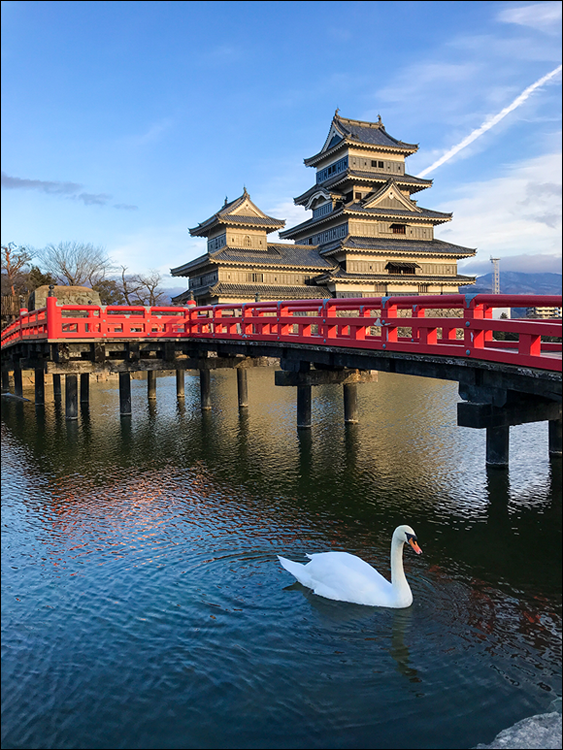
FIGURE 8-36: When possible, capture animals moving so that there is more space in front of them than behind them.
You viewers will appreciate having the animal flow into your photo, as it’s a more visually harmonious way to compose animals in motion.
Choosing your background first
Are you travelling with a group of friends or family members? Put your creative thinking hat on when deciding on group photo locations. If you are showing your travel photos publicly on social media, very few people will be interested in group photos with a blah-looking background.
Figure 8-37 is an example where I saw the location first and then gathered my friends for a fun group photo. Even go so far as place your friends so that their positioning is harmonious with the background. This is a great way for your social media friends and followers to stay engaged with your images, rather than flip quickly to the next picture.

FIGURE 8-37: Find your backgrounds first and then add your friends and family members second.
Matching color when possible
For lack of a better term, matching color simply means that you wait until another person, animal, car, or other moving object enters your composition that has the same color. This technique is rarely practiced because it involves a lot of waiting.
Take Figure 8-38, for example. I saw the classic green VW Beetle and also knew that San Miguel de Allende taxis are also painted the same green color. So, with a relatively easy five-minute wait, crouched in position, the magic happened when the taxi drove straight into the composition.
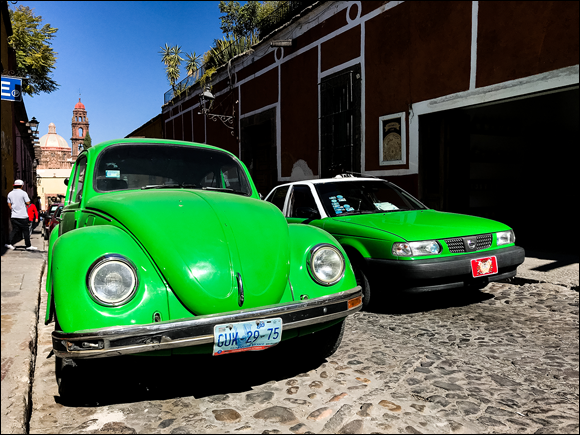
FIGURE 8-38: Wait for a second subject to enter your frame that includes the same or similar colors as your primary subject.
Including national text and fonts in your photos
It won’t matter that most of your viewers won’t be able to read the letters of the foreign language that you just photographed on your overseas trip. The main priority, however, is that you successfully added a sense of place for the sake of your viewer.
While your viewers may not know Thai script as in Figure 8-39, they may assume that the script looks like a South-East Asian language. Without any description to tell them what the language is, they at least can place the photo in a rough geographic area.
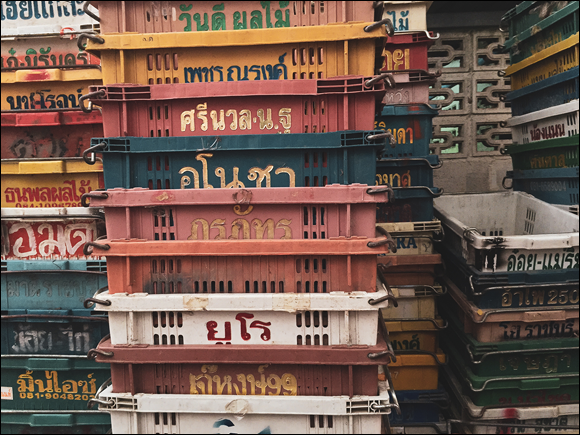
FIGURE 8-39: Artistically include a lot of national script within your travel iPhone photos.
Composing with equidistance
The Corinth canal in Greece is a stunning location for iPhone photos and videos. When you encounter a scene like this canal, you will see that location is symmetrical. The left side is pretty much the same as the right side, with the canal in the dead-center.
Usually when you see a symmetrical scene, it’s best to compose your image using equidistance. When used as a photographic term, equidistance simply means that the left side distance is equivalent to the right-side distance. Take a look at Figure 8-40. The canal is placed perfectly centered so that the cliffs have the same distance measurements on either side of the canal.
Tightening the view of iconic buildings
When travelling, it’s often advantageous to try every trick in the book to take your photos from documentary snapshots to fine art travel photos. One way to do this is to look at a famous landmark and choose a detail to capture rather than showing the whole structure.

FIGURE 8-40: When your subject exhibits symmetry, make sure that the left side and the right side have the same distance measurements within your composition.
The Leaning Tower of Pisa is a great example. This location is one of the most photographed in the world, so how can your photo stand out from the crowd? Try to tighten your view of the tower, or whatever you’re photographing, so that you are creating a detail photo. Throw in your favorite black-and-white filter, and you just created a frame-worthy fine art wall-hanging, similar to Figure 8-41.
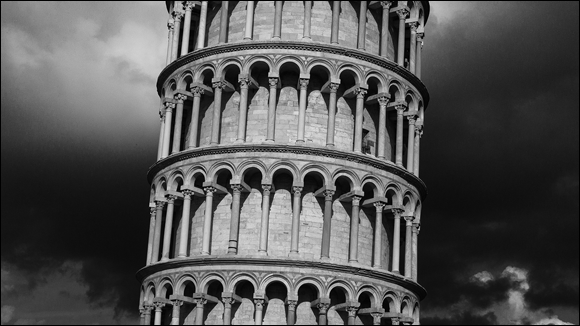
FIGURE 8-41: Iconic structures can be interpreted just as effectively as detail shots, where you choose your iPhone’s telephoto lens or you zoom in.
Composing family members looking into the frame
Everybody wants to look good when being photographed during vacation or travelling. So, the next time that you photograph your friend or family member at that stunning Greek island beach, ask him or her to look into the picture space. This simply means that there will be far more space in front of the person than behind, as in Figure 8-42.

FIGURE 8-42: Have your model to the side of your frame, where they are looking into the picture space instead of looking out of the picture.
Reviewing your favorite establishments
Did you just enjoy the best chocolate of your life while in Europe? Or maybe an unbeatable gordita while in Mexico? If you had a really positive experience at a local business while travelling, take a moment to give that establishment a positive review on Trip Advisor, Google, Facebook, Yelp, and any other review site. Local establishments can greatly benefit by your reviews, which allows them to provide for their families and continue to produce great products and services.
When I visit Jerusalem, I can’t get enough of Arabic coffee served in the traditional way, as in Figure 8-43. This café near the Western Wall is my go-to both in the morning and midday. After that blast of delicious caffeine, I’m good to go for a lot more iPhone photographs!

FIGURE 8-43: Help local establishments by posting positive reviews when you are travelling.