Chapter 2
Taking the Complete Camera Walk-Around
IN THIS CHAPTER
![]() Opening your camera in different ways
Opening your camera in different ways
![]() Holding your iPhone properly
Holding your iPhone properly
![]() Zooming in to your subject
Zooming in to your subject
![]() Photographing with the selfie camera
Photographing with the selfie camera
![]() Using the Live Photo feature
Using the Live Photo feature
![]() Applying filters to your photos
Applying filters to your photos
Your iPhone includes a surprising number of advanced features. However, the designers also tried to make the iPhone a simple device to use, which is good news for you. This ease of use allows you to quickly and easily get the shot without having to learn complex techniques.
The goal of this chapter is to help you quickly master the iPhone camera by offering you what’s often called a walk-around. When you understand the layout of the camera, and what each feature does, you’ll be able to act quickly when the decisive moment presents itself to you.
 Keep in mind that this book uses screenshots from the iPhone 11 series models. The look of the screenshots may be a bit different than your own iPhone, but the core concepts are the same. When absolutely needed, I include a screenshot from the 11 series and the X (and earlier) series models.
Discovering the Different Ways to Open Your Camera
In Chapter 1, you discover the usual method for opening the iPhone camera from both the lock screen and while navigating your apps on your home screen. You can, however, take advantage of a number of other ways to access the camera so that you can get to photographing faster:
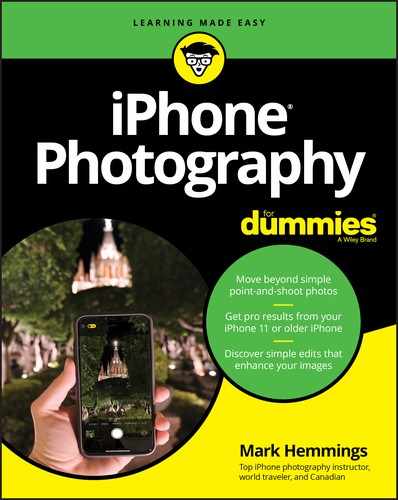
- Left-swipe from your lock screen: Instead of holding the camera icon at the bottom right of your lock screen for a full second, try the right-to-left swipe, as shown in Figure 2-1. Simply put your finger slightly outside the edge of your phone on the right side and then swipe to the left. This motion opens your camera quickly for those fleeting moments!
- Control Center camera access: To access the Control Center, which gives you the option to open the camera app, simply swipe down with your index finger from the upper-right corner of the screen, as shown in Figure 2-2. You see a number of customizable quick-access icons. Tap the one that is shaped like a camera. If you’re using an older model iPhone and/or have an older version of the iOS operating system, swipe up from the bottom edge of your screen to open the Control Center.

FIGURE 2-1: Swipe right to left to quickly access the camera.
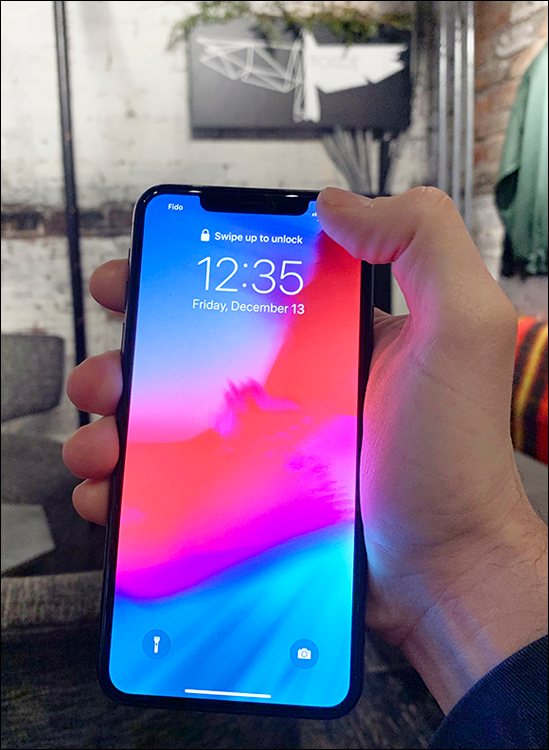
FIGURE 2-2: Swipe down from the upper-right corner to access Control Center.
Properly Holding Your iPhone for Steady Photographs
Have you ever taken an iPhone photo with your arms fully extended and your iPhone as far away from your face as possible? While this posture may be the way that the majority of mobile photographers take their photos, it’s not a good idea.
 One of the keys to creating sharp photos is to have a stable platform for your iPhone. To provide this stability, you can use a tripod, rest your iPhone on a stable surface, or use your own steady hands. But how do you make sure that your hands and arms are steady? The answer is simple:
- Pull your elbows into your ribcage to stabilize your arms.
- Place your iPhone as close to your face as possible, based on your level of close-sightedness.
Take a deep breath in, exhale, and when you’re at the bottom of your exhale, take the photo.
If your level of mobility allows for it, kneel to take your photo using one leg as a stabilizer.
Figures 2-3 and 2-4 give you an example of optimal postures and camera-holding positions.
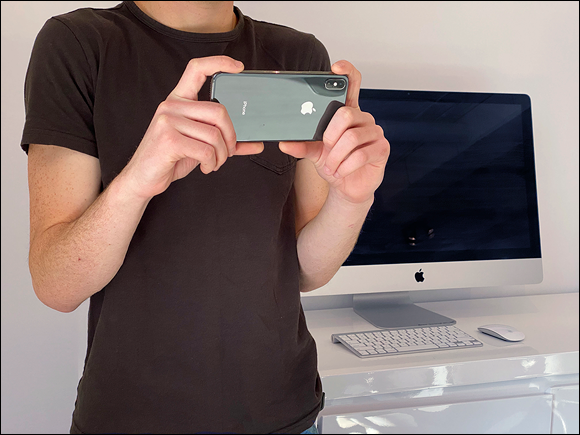
FIGURE 2-3: Elbows pulled into your ribcage and phone as close to you as possible.

FIGURE 2-4: Ideal kneeling position for steady photo capture.
By using these stabilizing tips each time that you take a handheld photo, you will come home with far more successfully sharp photos.
A tripod is the gold standard for sharp photos from any type of camera, but you may not have one with you.
Taking a Photo Without Using the Normal Shutter Button
The majority of iPhone photos are captured by tapping the prominent large circle within the camera app. However, in some circumstances, an alternate shutter release is more advantageous. Shutter release is a photography term that refers to any object that tells the camera to take a photo as soon as you activate it. A shutter release may be physical, such as the volume buttons on Apple EarPods, or it may be part of an iPhone screen that requires a tap or a press of your finger.
Use the method of tripping the shutter that is most convenient and natural for you.
Side shutter using the volume buttons
With your camera app open and ready to take a photo, instead of using the normal shutter circle to take your photo, try pressing the volume buttons. Using the side shutter is a different way to capture your image, and often photographers feel that using a physical button as a shutter release is more like how they create photos using their larger DSLR cameras. Some people like the physical feedback of a push-button shutter release, and this method is a perfect alternative.
It doesn’t matter if you press the volume-up or volume-down button, as both will take the photo. The volume buttons are on the side of your iPhone and have a + and - etching similar to Figure 2-5.
Apple EarPods volume controller shutter release
Apple EarPods can also act as a shutter-release cable. If you have a pair of Apple EarPods, all you have to do is open the camera app, plug in your EarPods, and then press either the volume-up or the volume-down button, as shown in Figure 2-6.
FIGURE 2-5: Press either the + or - volume button to take a photo.

FIGURE 2-6: Use the volume buttons on your EarPods to take a photo.
This method of taking a photo is really useful for creating a super-steady photo when your iPhone is on a tripod or resting on a stable surface. It’s also an easier way to press the shutter button when doing selfie photos (taking photos of yourself). Figure 2-7 has an example of an iPhone user taking a selfie by using the volume buttons to activate the camera. (Want more selfie tips? Check out Chapter 4!)

FIGURE 2-7: Make it easier to take selfies by tapping your EarPods’ volume buttons.
Zooming in to Your Subject
If you feel that your main subject appears too far away in your composition, you can visually bring that subject much closer to occupy more space within your picture. The term zooming in is borrowed from standard cameras that have lenses that can physically zoom in and zoom out. Simply stated, by the act of zooming out you can have a very wide looking scene where a lot is included in your photo, or you can zoom in to capture the plumage of a beautiful bird in a distant tree.
Originally, the ability of cameras to zoom either in or out was only done with a mechanical movement of metal and glass within the zoom lens, similar to the lens pictured in Figure 2-8.
With the advent of point and shoot cameras, and then mobile device cameras, such as the iPhone, digital zooming was made possible. Digital zoom doesn’t rely on any physical movement of the camera lenses. In simplistic terms, it’s an artificial expansion of pixels (millions of single bits that make up your photo) that simulates the effects of a traditional zoom lens.
The good part of digital zoom is that you can visually bring faraway objects closer within your composition. Think of that bird on a distant tree.
 Zooming in does have a downside, however. With each increase in digital zoom, the quality of the overall image decreases.

FIGURE 2-8: Example of a zoom lens used on DSLR or mirrorless style cameras.
The designers of the various mobile device companies knew about the limitations of digital zooming, which is why they introduced dual-lens mobile device cameras. The first iPhone with two lenses was released in late 2016 and named the iPhone 7 Plus. The addition of a lens that was less wide than the normal iPhone lens allowed photographers to rely less on digital zooming when trying to see far-away objects. Picture quality quickly improved in the world of iPhone photography, no doubt because digital zooming was done less frequently.
But is digital zooming all that bad? Not really, especially with late-model iPhones. One motto that you may want to keep top of mind: “It’s better to get the shot with technical imperfections than to miss the shot entirely.”
Zooming best practices
To practice using digital zoom on one of your photos, give the following steps a try after you choose the lens that has the most telephoto view. Take a look at Figure 2-9 to see three lens views. Depending on your camera model, choose the lens that visually appears to bring distant objects closer to you. For some iPhone models, it will be called the x2 lens, and for others the x1 lens.
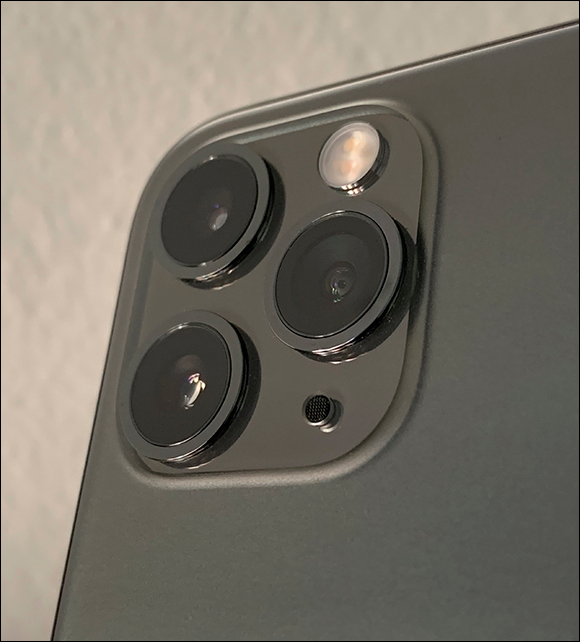
FIGURE 2-9: Choose the x2 telephoto lens, if possible.
Try these easy steps with your own iPhone to practice the pinch-to-zoom technique, which allows you to view distant objects much closer.
- Open your camera app.
- Choose the x2 lens, if possible; if not, choose the x1 lens.
- Find a scene in front of you that has a distant object that you want to see closer.
- Pinch your finger and thumb and place them on your screen.
- Move your finger and thumb away from each other while still fully touching the screen.
- Stop the digital zoom when you feel your subject is big enough within your composition.
Figure 2-10 shows examples of the finger placement needed to perform the pinch-to-zoom technique. Keep in mind that both your finger and thumb need to have constant contact with the screen during the entire zooming process, or it won’t work. This pinch-to-zoom technique works for both zooming in prior to taking the photo and also afterward when you are reviewing your photo, such as what you see in Figure 2-10. The pinch-to-zoom process is identical for both taking and reviewing your photos.
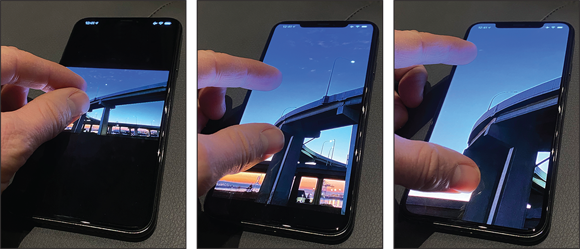
FIGURE 2-10: Initiating the pinch-to-zoom technique using your thumb and forefinger.
Cropping instead of digital zooming
The contents of Chapter 11 go into cropping in greater detail, so the following steps are simply a quick tip for alternate zooming results:
- Take your photo of the distant object using your most telephoto-view lens.
- Open your Photos app and locate the photo you just created.
- Crop your photo to the extent that you can now see that distant object much better.
 At some point, you may hear the term interpolation when talking about digital zoom. Interpolation is a technical word that refers to artificially making a digital photo larger, or you could say making a photo appear to be zoomed-in much more than what the physical lens can naturally produce.
You may be wondering why anyone would crop a photo, which makes it smaller, rather than use the intelligence of the iPhone to create a realistic looking digital zoom. The answer is twofold:
- Not too many years ago, digital zoom results were terrible! These days, they’re extremely good due to advancements in image manipulation programming. However, many people remember the old days of poor quality interpolation and are still reluctant to use digital zoom.
- Even though the cropped image is smaller in resolution size, purists would prefer to sacrifice photo size to avoid any image resizing manipulation by the iPhone’s computer.
Either option is fine to get you exactly what you want in your image. Please remember, however, that the more you digitally zoom in with your finger and thumb, the harder it is for your iPhone’s brain to give you a good sharp and clear image. In saying that, however, the late model iPhones do a remarkable job at what they call 10x digital zoom, which is the maximum telephoto that you can achieve on a late model iPhone.
If you have your iPhone with you right now, choose your 2x or 1x lens view and then use the pinch-to-zoom technique to zoom in to 10x to see just how far away you can photograph. Now take the photo and upon review, check out the quality of the 10x zoom photo. It’s not too bad, is it? While not perfect, feel free to use digital zoom to bring those distant objects really close.
If you don’t have your iPhone with you at the moment, Figure 2-11 shows just how much zoom you can achieve by using the 2x lens plus 10x digital zoom. Do you see how close the building’s arches appear to be now? It’s a pretty good quality photo for being so far away from the iPhone’s camera.
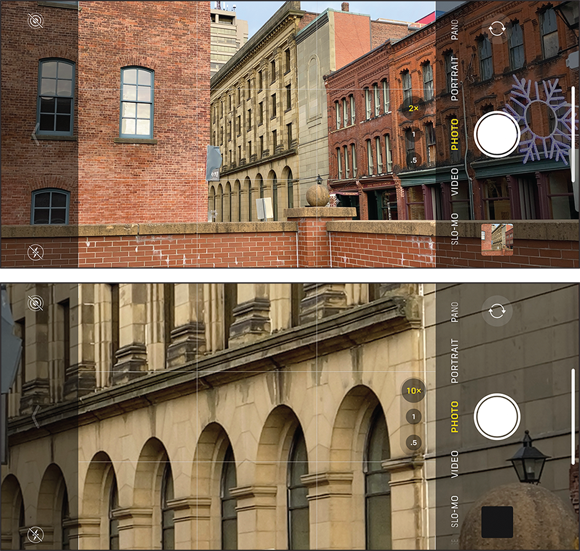
FIGURE 2-11: The impressive result of extending digital zoom all the way up to 10x magnification.
Using the Selfie Camera with and without Background Blur
Taking a photo of yourself with the front-facing lens on your iPhone is popularly called a selfie. You hold your iPhone away from your face, and then when you like the composition (how you’re framed in the photo), you take the shot.
Sometimes called the selfie-cam, the front-facing lens on your iPhone is actually quite useful for a number of different applications. But its greatest claim to fame is getting a good shot of you! Here’s how to access the front-facing camera for your next selfie, with an example of what it looks like in Figure 2-12:
- Open the iPhone camera app.
- Tap on the intertwined arrow-circle icon at the bottom right.
- When you see yourself and like the composition, take the photo.
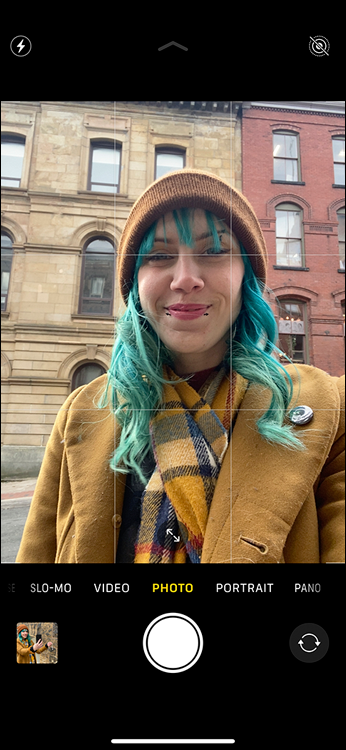
FIGURE 2-12: The selfie camera screen appearance.
After you take your selfie and review the photo, you may feel that it’s not the best-looking self-portrait that you’ve seen. This viewpoint is understandable, as wide-angle lenses like this one tend to distort faces to the point of looking a bit rounder and heavier than in reality. While you can’t do much about the physical limitations of wide-angle camera lenses, some digital solutions do at least make your selfie look a bit more professional!
Follow these steps to activate Portrait mode, which usually does a good job of creating better-looking selfies.
- Open up the camera app.
- Tap the selfie icon to switch to the front-facing camera.
- Instead of PHOTO, choose PORTRAIT.
- When you see a pleasant blur in the background, take the photo.
- Go to your Photos app and compare the two photos.
Figure 2-13 shows you an example of how the two different selfie camera modes present you to the world. It’s usually the case that people like the PORTRAIT mode instead of the PHOTO mode for selfies, as the background blur makes the entire photo more pleasing to look at.
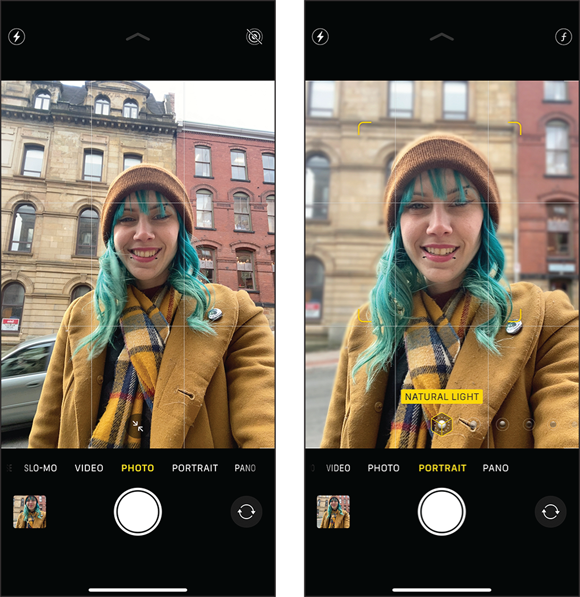
FIGURE 2-13: A comparison of the normal selfie and the portrait selfie.
The selfie camera has so many more wonderful features, and you can read about them to a greater level of detail in Chapter 4. Keep in mind that not all older model iPhones have Portrait mode.
Knowing When to Use (and not Use) the Camera Flash
With the advent of the iPhone 11 series models, you don’t need to worry too much about when to use the flash. With intelligent software wizardry, Apple has been able to create flash-free, evenly lit photographs that were previously impossible. Apple believes in its technology so much that if you turn your flash to Auto mode, you may not even see it fire unless you’re in a very dark environment.
You can easily access the flash by tapping on the little lightning bolt icon at the top left of your screen, as shown in Figure 2-14. Please keep in mind that the iPhone X and earlier series models look a bit different, but the functionality is pretty much the same.
Try the iPhone 11 series flash operation, visually illustrated in Figure 2-15:
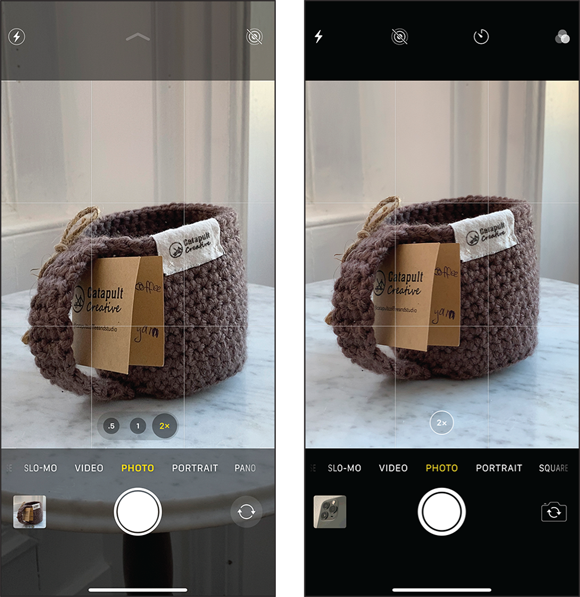
FIGURE 2-14: The flash icon set to the On position for both the 11 series and also the X and earlier series iPhones.
- Tap your flash icon at the top left to the On position.
- Tap the arrow icon in the upper middle of your screen.
- At the bottom left of your camera screen, tap the flash icon.
Choose Flash Auto if you are unsure of when your photos will need a flash.
(Your iPhone will choose to activate the flash based on its assessment of the scene.)
- Choose On if you want to force the flash to fire for every shot you take, even if your photo may not really need the flash to fire.
- Choose Off to return your flash to the never fire position, which is what most people use as a default for their photography.
- To return to the normal camera’s app appearance, tap the arrow at the top middle of your camera screen.
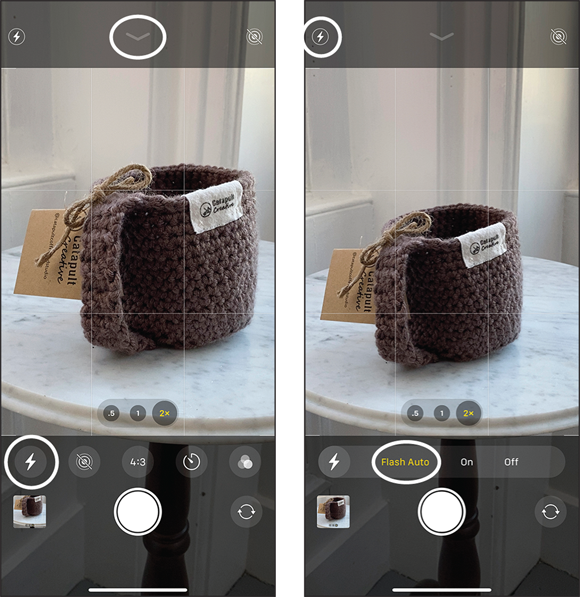
FIGURE 2-15: Screenshot samples of iPhone 11 series flash operation.
If you have an iPhone X series or earlier model, flash operation is super simple:
- Tap the flash icon at the top left of your iPhone camera screen.
- Choose either Auto, On, or Off using the same decision-making parameters that you just read about in the preceding iPhone 11 flash instructions.
- Take your photo, remembering to switch back to flash off mode when finished.
If you have your iPhone with you right now, please take two test photos of the exact same object, such as your coffee cup or a can of soda. The first one should be with the flash on, and the second one without the flash on. Upon reviewing your two test photos, which one do you like the best? Figure 2-16 gives you a typical result if you can’t do your own test-run right now.

FIGURE 2-16: A side-by-side comparison of flash on versus flash off.
Most of the time viewers prefer the photo without the flash. The primary reason for this choice is that a flash tends to flatten out the look of the object being photographed. What previously had a three-dimensional organic appearance, now has a cold-looking, two-dimensional feel. A flash usually takes viewers outside of what they’re used to seeing with their own eyes, to a view that is far less appealing due to the harsh, artificial, and directional light source.
You may be wondering when you would ever even bother with the flash. The following list can help you make your decision:
Turn on Auto Flash when you are
- In a poorly lit room photographing a specific object that isn’t too large
- Photographing receipts for business (take the photo at a slight angle for best results)
- Doing selfies in darker environments
- Taking fun snapshots of kids playing
- Photographing an object or person with light shining from behind them
- Unsure of when a photo would be better with a flash
Turn flash on when you are
- Documenting scientific or medical findings
- Creating progress report photos of detailed work if you’re a contractor
- Doing any trade-related work that favors sharp detail over artistic appearance
Try not to use your flash for
- Artistic and creative photos
- Portraits of people (selfies are an exception)
- Product photography
- Any large space, as the flash won’t be strong enough to illuminate the room
- Pretty much any scenario where you want an attractive, natural looking image
“But what about all those amazing images from photographers who use flash all the time? Why do they get such great results?” This question is valid. The term on-camera flash refers to cameras of any type that have the flash built into the camera body (such as all smartphone cameras that have flashes). Figure 2-17 shows you what the flash looks like on the iPhone 11 Pro Max. Regardless of what model you have, the flashes on all iPhones are very close to the camera lens, which is not ideal for flattering light.
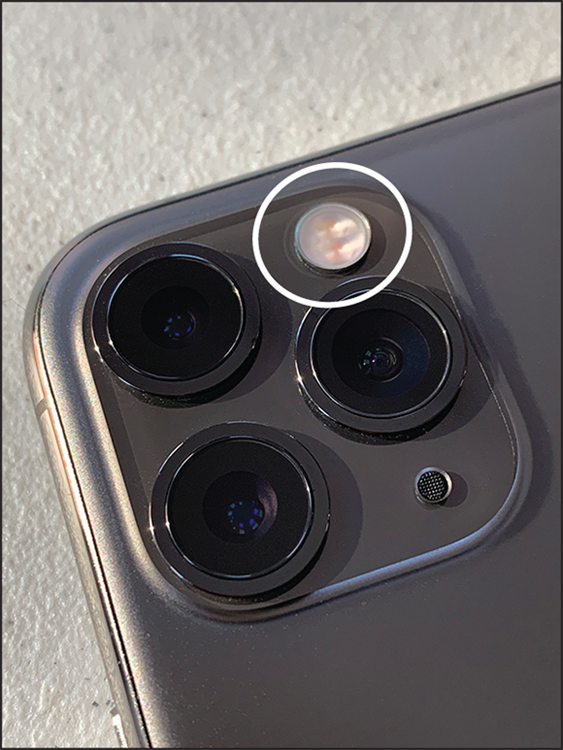
FIGURE 2-17: The location of an iPhone flash.
An off-camera flash setup is what the amateurs and pros use for stunning flash photography. Their flash or flashes are not attached to their camera, and they have different ways to make sure that their flashes fire at the same time that they take their photo. Because their flash(es) are not illuminating the subject directly straightforward (as in your iPhone), the subject maintains its sense of three-dimensionality and organic look.
Keep in mind, though, that with advancements in electronics, optics, and programming, each generation of iPhone produces better and better flash photographs. A great example is the selfie camera’s (front-facing camera) flash. While it’s technically not a flash but a full screen of continuous light, it produces remarkably good facial illumination when photographing yourself or you with a friend.
Give it a try … switch your camera to selfie mode, turn your flash to the On position, and take the photo. If you have kept your iPhone updated (the most recent operating system), then you will see a pleasing warm light fill your entire screen. Figure 2-18 shows how the selfie camera shines with a warmish-looking soft light.
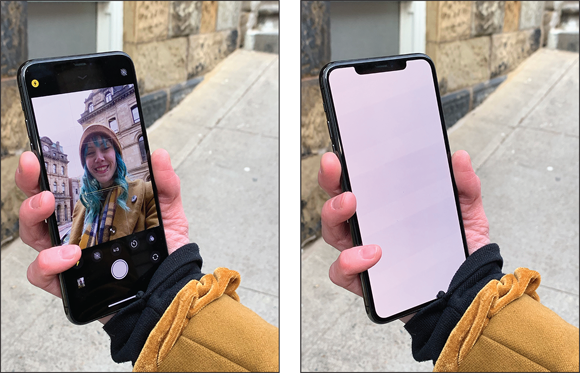
FIGURE 2-18: The selfie camera’s method for illuminating faces.
Getting to Know Live Photos
Live Photos first started as a bit of a gimmick a few years ago, but has been refined substantially to the point where they’re a fantastic way to express yourself.
A Live Photo is a series of photos taken 1.5 seconds before and 1.5 seconds after you press the shutter release button. When your Live Photo capture is complete, the result is similar to a normal video. The quick video clip is fun to share with friends, as you can choose the very best-looking still photo from a choice of many still photos that make up the Live Photo. As it’s a fun option and not really made for serious art photography, Live Photos are usually created between friends or of events with family members.
Chapter 15 offers a deeper dive into Live Photos. This section primarily helps you turning Live Photos on and off. Figure 2-19 displays the Live Photo icon for both the 11 series and the X series and earlier iPhone models.
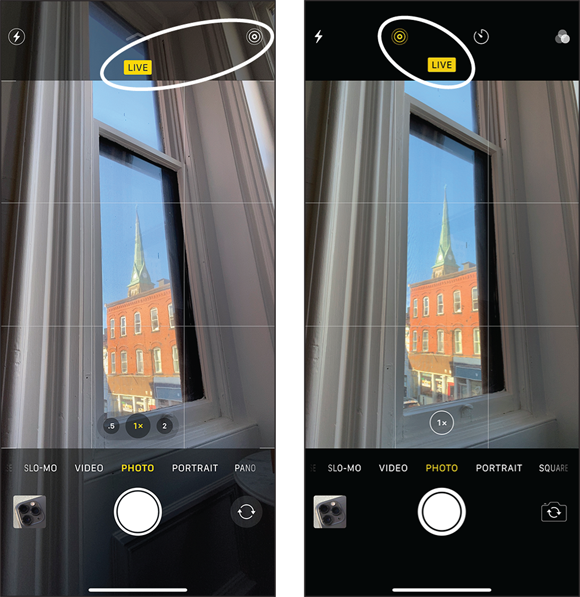
FIGURE 2-19: The Live Photo icons for the two current iOS versions.
Using Live Photo
When the icon has a diagonal line through it, Live Photo is turned off. If no line goes through the icon, Live Photo is activated. Follow these steps to create and view your first Live Photo:
Find moving subjects, such as cars going by or trees swaying in the wind.
If you don’t see any moving subjects, you can physically move your iPhone for a similar effect.
- Tap the circular Live Photo icon.
When ready, tap the normal shutter button to take the Live Photo.
Your Live Photo pops up in your Photos App, with a LIVE icon at the top left.
Press and hold your finger anywhere within your photo.
Live Photo is activated, giving you about a three-second video clip.
To turn Live Photo off, simply tap the Live photo icon again.
Making sure Live Photo isn’t on by default
If Live Photos is turned on by default, you’re running the risk of using up more space on your iPhone and your iCloud storage quota. If you have a generous amount of internal and cloud storage space, having Live Photo on all the time won’t be an issue. However, for those with 32GB or possibly 64GB iPhone models, it’s usually best to keep Live Photo off and simply turn it on only when needed.
To turn off Live Photo by default, do the following:
- Turn off Live Photo at the top of your camera app screen.
- In your iPhone Settings app, scroll down until you see Camera.
Within Camera, tap Preserve Settings.
Make sure that the Live Photo toggle is green, as in Figure 2-20.
Live Photo will remember that you want it to be off from now on.
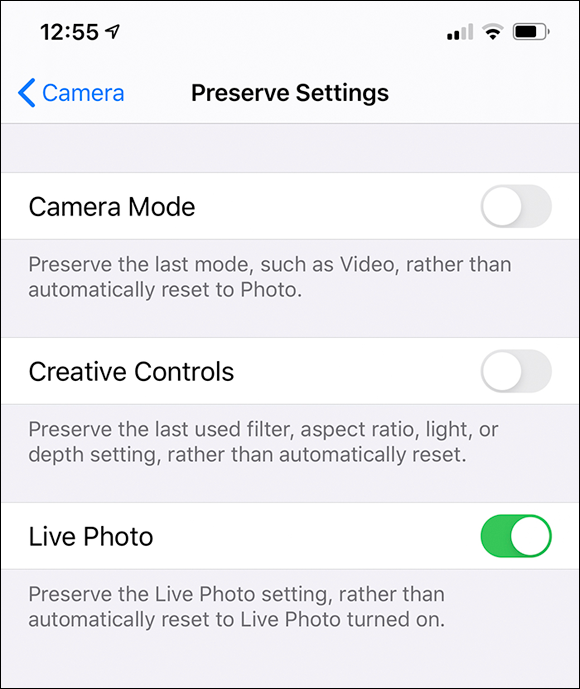
FIGURE 2-20: Tap the Live Photo toggle to green to remind your camera of your Live Photo preferences.
Using the Camera Timer for Stable and Sharp Photos
Your iPhone has a count-down timer that allows for a delay between the time that you tap the shutter release button and the time that the photo is actually taken. This delay comes in two different time options: a three-second delay and a ten-second delay.
The three-second timer delay is popular for landscape and product photographers as it diminishes the chance of camera shake due to the photographer touching the iPhone.
The ten-second timer delay is useful for group family portraiture when you (as the photographer) need to set your iPhone up on a tripod and then run into the group so that you can be included in the photo.
To activate either timer, follow these instructions based on your model of iPhone:
- For iPhone 11 series models: Tap on the top-middle arrow to reveal the extra options. Tap on the icon that looks like a clock timer and choose either 3s or 10s, as shown in Figure 2-21.
- For X series models and earlier: Tap the timer icon at the top of your camera screen and choose either 3s or 10s. Tap the shutter button to take your photo and watch the countdown on your screen.
When the camera starts to take the photo, it will take ten consecutive photos rapidly. When you’re doing group family photos, inevitably one person is blinking or making a funny face, which can ruin the entire photo unless you have decent photo-editing skills! To avoid this problem, you get to choose the best image out of ten images taken.
To choose the best of the ten photos, follow these easy steps:
- Go to your Photos app and locate the photo that you just took.
Tap Select at the bottom middle of your screen (see Figure 2-22).
This option is visible only if you see an icon at the top left of your screen that reads Burst (10 photos).
At the very bottom of your screen, you have the option to scroll through ten photos that pretty much look identical (see Figure 2-23).

FIGURE 2-21: Activating your camera’s three- or ten- second timer.

FIGURE 2-22: Tap Select at the bottom middle of your screen to start the best photo selection process.
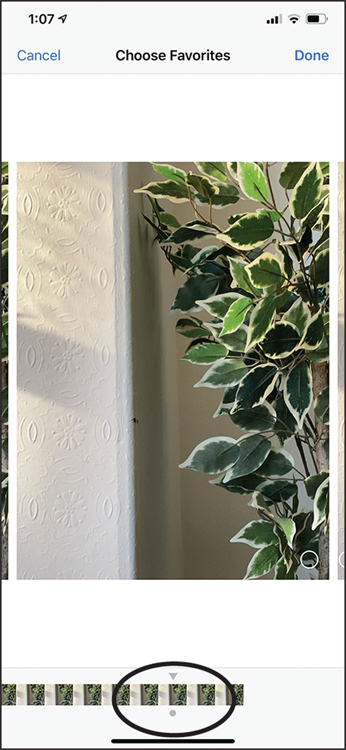
FIGURE 2-23: Scroll through and review the ten photos using the slider at the bottom of your screen.
Tap on the little circle icon at the bottom right of the photo that you like the best.
The icon now changes to blue and includes a check mark (see Figure 2-24).
- Tap Done at the top right.
- To keep all the photos, tap the Keep Everything option; to keep just the single photo that you chose as the best, choose the Keep Only 1 Favorite option (see Figure 2-25).
You don’t need to choose only one best photo. Feel free to choose as many favorite photos as you like by tapping multiple circle icons at the bottom right of each photo that you’d like to keep.
Family portraits
To create successful family portraits that include you in them, follow these simple steps:
- Gather your group within an attractive setting and flattering light, such as early morning or evening.

FIGURE 2-24: A blue check mark activates when you tap on your favorite of the ten photos.
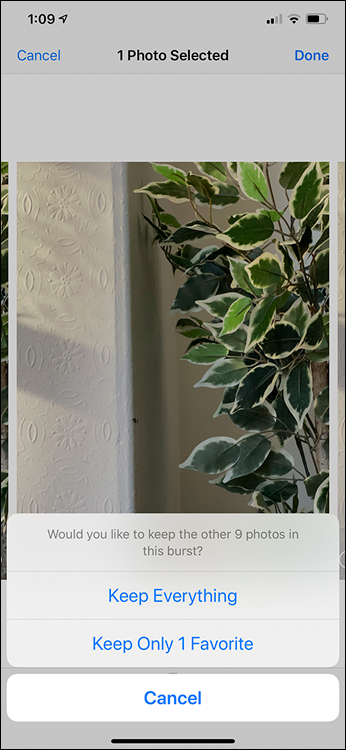
FIGURE 2-25: To save space on your device, choose the Keep Only 1 Favorite option.
- Put your camera on a tripod or propped up on a stable surface, such as a fence or large boulder.
- Ask the group to save a space for you when it’s time to get into the composition.
Press the 10s option, and as soon as you see the numbers start to count down, quickly join the group.
If you see a little white light flashing every second next to your camera lens, everything is working normally.
The flashes intensify, giving you about a two-second warning that the camera will take the photo.
When reviewing your group photo, you can choose the best family portrait then, or choose on another day. There is no time limit to choosing the best photo out of the ten taken.
Selfies with a tripod or stand
iPhones are adept at taking quality selfies. However, seeing such a large and close-up view of your face on the screen can sometimes feel a bit awkward. Maybe you feel that your face takes up a huge amount of the selfie photo!
To remedy this problem, you can back away a bit from the camera to allow more of the background and surroundings into your selfie. Choose a tripod, a mobile device stand set on a stable platform, or a selfie stick to allow your camera to be further from your face. (Check out Chapter 4 for more details on these accessories.)
With your iPhone on a tripod or a stand, choose the three-second timer. The three seconds give you enough time to take your hand away from the camera and establish your brilliant smile!
Landscape photography using your timer
Landscape photographers love using the three-second timer to create incredible tack-sharp photos. Did you know that even the act of tapping your camera’s shutter button can cause the minutest amount of camera shake?
To avoid camera shake when your iPhone is on a tripod, set up your landscape scene as you like (more on Landscape photography in Chapter 5) and then take your photo using the three-second timer.
The three-second timer is better than the ten-second timer for landscapes because even within ten seconds, the lighting outside may change, ruining your brilliant landscape photo.
Either after your photo has been taken or in a warm café sipping your cappuccino, choose the best of ten landscape photos. Do they all look the same to you? If so, the iPhone has an incredible feature created just for you!
When you’re reviewing your landscape photo in the Photos app and you press Select, do you see that your iPhone has already selected the photo that it thinks is best? It’s signified by a little gray dot at the bottom of one of the ten photos just taken. iPhone thinks this photo is the sharpest, and you can accept its judgment or choose your own best photo.
You may be wondering how your iPhone could possibly know what photo is best. Well, it all comes down to advancements in Artificial Intelligence, and your iPhone’s brilliant programming. The computer will analyze all ten photos almost instantly and choose the photo that exhibits the most amount of sharpness and other beneficial image qualities. Your iPhone is looking out for you!
Getting Creative with Filters
Your iPhone camera has ten creative filters that you can use for a quick and fun addition to your images. Accessing these filters is easy, and you can see in real time what the applied filter will look like even before you take the photo.
In the past, it was generally considered best practice to add a filter to your photo after the photo was taken rather than apply your filter before you tap the shutter button to take the photo.
That filter usage rule was extremely important advice before the advent of nondestructive editing (NDE), but now with NDE you can apply filters anytime you like. The term nondestructive editing means that within your Photos app, you can apply any filter either before or after you take the photo, and even years later, you can always revert back to the original unfiltered photo, with no loss of quality. Even when certain filters go out of style you can always go back to square-one.
Chapter 11 goes into filter usage to a greater level than what follows. To access the filters, follow these steps:
- Open your camera as if you were taking a normal photo.
- On an iPhone 11, tap the top-middle arrow to access the camera extras, as in Figure 2-26.
FIGURE 2-26: The upper-middle arrow icon opens up your extra Camera app features.
- Tap on the last icon that resembles three overlapping circles, as shown in Figure 2-27.
Tap on Vivid, as in Figure 2-28.
You see a boost in color vibrancy.
The next option is Vivid Warm and then seven more filter options.
After cycling through all filters, choose your favorite and then take your photo.
Check out Figure 2-29, which shows what each filter effect does to a single scene in front of the iPhone.
Choosing the best camera filter for your photograph
While some of the supplied filters may seem to be a bit gimmicky, at times you will want to use a color photo simply for a sense of fun. For example, some of the filters that have the word Warm in their title are usually good for family photos and shots of your kids.

FIGURE 2-27: Tap on the Filters icon that looks like three overlapping circles.
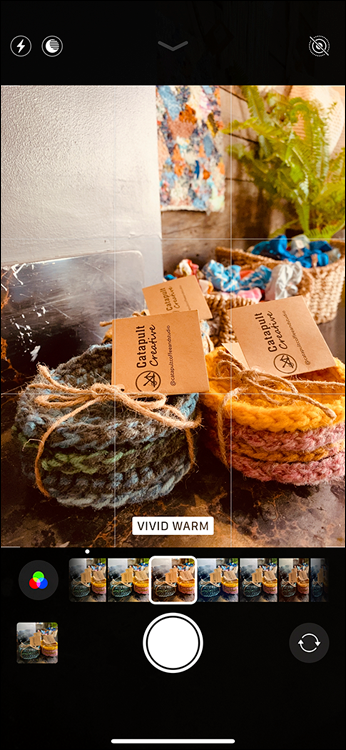
FIGURE 2-28: When you tap Vivid or any other filter, you see an immediate change to your photo.

FIGURE 2-29: Visual changes to your photo based on filter choice.
Filters with the word Cool in their title are often useful for artistic photographs that are helped by the filter’s mood-altering capabilities.
Experiment with the three black-and-white filters to change almost any type of color photo into an artistic image that would be worthy to hang on your wall.
Reverting to the original
Don’t like your filter choice? No problem! To revert to the original photo, all you need to do is
- Open your Photos app and locate your photo.
- Tap the word Edit at the top right of your screen.
Tap on the word Revert written in red and then tap Revert to Original.
Your photo is now back to its normal nonfiltered state.
Feel free to repeat this process of filtering and reverting as much as you like. There are no limits to how many times you alter your photo within the Photos app, as you can always return to the original with no loss of quality.