Chapter 1
Introducing iPhone Photography
IN THIS CHAPTER
![]() Discovering the differences between single and multilens iPhones
Discovering the differences between single and multilens iPhones
![]() Understanding the differences in the iPhone 11 series camera app layout
Understanding the differences in the iPhone 11 series camera app layout
![]() Taking photos using the iPhone’s built-in camera
Taking photos using the iPhone’s built-in camera
![]() Viewing, editing, and sharing your photos
Viewing, editing, and sharing your photos
iPhone photography is one of the most satisfying ways to express yourself, as the iPhone and its camera allow you to present your interpretation of the world to as many people as possible. And the best part is that you don’t need to be represented by an art gallery or hire expensive talent agents. Simply pull the iPhone out of your pocket, take the photo that is in front of you, edit that photo to perfection, and then share your finely tuned image to the world via social media, all within one little handheld device!
Getting to Know the Camera in Your iPhone
As of this writing, Apple produces iPhones that have a single lens camera, a dual lens, and a triple lens. Understanding these hardware differences straightaway can help you navigate your own iPhone better, as well as help you with future purchasing decisions.
 One thing to keep in mind is that it doesn’t matter if your iPhone model only has one lens. Don’t ever feel that you may be left out because of your model of iPhone! Here is a truth that you can hold onto: Learning about composition, light, color, and photographic genre best practices are more important than having the latest and greatest gear. Rest assured, you’ll succeed with this book regardless of your iPhone model and its age.
The following list describes which iPhone model has what lenses. Included are iPhones that are supported by iOS 13, as of this writing.
- Triple Ultra Wide, wide, and telephoto lens iPhone models: 11 Pro and 11 Pro Max
- Dual Ultra Wide and wide angle lens iPhone models: iPhone 11
- Dual wide and telephoto lens iPhone models: Xs, Xs Max, X, 8 Plus, and 7 Plus
- Single lens wide angle iPhone models: Xr, 8, 7, 6s Plus, 6s, 6 Plus, and SE
Models with one lens
The single lens iPhone has one camera that has a wide-angle view, which means that a single lens iPhone is fantastic for landscapes, travel or vacation photography, street photography, architecture, full-body portraiture, and many more genres. But that’s not all … this lens (as with all iPhone wide angle lenses) can photograph small objects at a very close distance. Thus, it becomes a useful substitute when DSLR (large camera) photographers need to photograph something small, but don’t have what are called close-up macro lenses with them.
Figure 1-1 shows an example of the out-of-production but highly regarded iPhone SE, which sports a single lens. All iPhone series earlier than the 11 models have a single lens option and are usually less expensive to purchase.
Models with two lenses
Most dual lens iPhones add what Apple calls a telephoto view, which means that the second additional lens has what is popularly called a zoomed-in view. That description is technically incorrect as the lens cannot physically zoom in and out. However, it’s an adequate description in that you’ll be able to see faraway objects much better by using this additional lens.
 This telephoto lens is very similar to the viewing angle of your eyes. Thus, it has been a popular field of view for those who want an accurate display of whatever is in front of their lens.

FIGURE 1-1: Example of a single lens iPhone model.
With the advent of the iPhone 11 series, the non-Pro dual lens models called iPhone 11 do not have a telephoto lens option. However, they can certainly zoom in with what is called digital zoom. Their lenses are the wide and the ultra-wide-angle versions. The triple lens iPhone 11 Pro series includes the telephoto lens as well as the two wide angle options.
Figure 1-2 is an example of what a typical two lens iPhone would look like. Keep in mind that earlier series iPhones had the two lenses side-by-side in a horizontal arrangement, while later series iPhones had the two lenses stacked vertically.
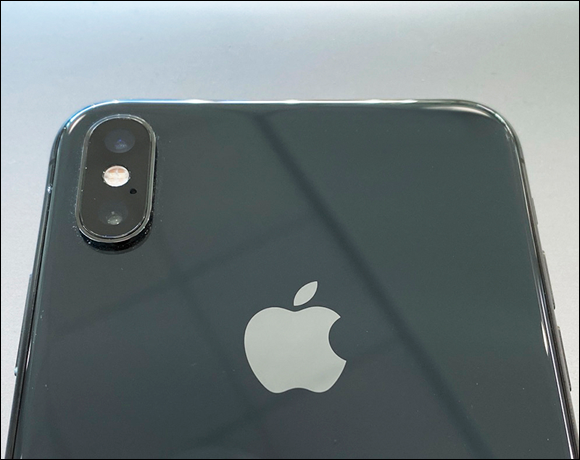
FIGURE 1-2: The dual lens iPhone XS Max’s wide-angle and telephoto lenses.
Models with three lenses
With the advent of the iPhone 11 Pro models, Apple has entered the three-lens game. The new addition is called an Ultra Wide angle lens, and it is truly wide! You’ll be able to fit in your composition a huge amount of the scene in front of you for a unique super wide view.
The Ultra Wide lens is perfect for landscape and architectural photographers, and street photographers have been putting this lens to very good use as well. The other two lenses haven’t changed much with regards to the viewing angle. You’ll still have the normal wide angle and telephoto view, much the same as what you would have been used to with any older dual lens iPhone models.
The iPhone 11 Pro Max and its triple lens layout is shown in Figure 1-3. However, keep in mind that the 11 Pro (which is a bit smaller in size) has the same three lenses with the same image quality.

FIGURE 1-3: Triple lens cameras that come with the iPhone 11 Pro and 11 Pro Max models.
Future models with more than three lenses
Could there ever be a four-lens iPhone model? At the time of this writing, there are only rumors. However, it wouldn’t be surprising to have an additional fourth lens in the future that is even more of a telephoto view than the normal telephoto lens. While it would take a near engineering miracle to fit a longer telephoto lens on an iPhone, micro technology is advancing at such a rate that we may see such an iPhone within a short amount of time.
Taking a Quick Tour of the iPhone Camera App
As of this writing, the iPhone 11 camera screens have a slightly different look than the camera screen that you will see with any iPhone from series X models and earlier. But don’t worry; this camera walk-around will still make sense to you even though the figures may look a little different than your own iPhone’s camera screen. For example, Figure 1-4 shows the typical camera screen view of the iPhone XS Max, using iOS 13. If you have a single lens iPhone, such as the XR, your screen will look slightly different than Figure 1-4 due to the fact that you won’t see the 1x zoom option that comes with dual lens iPhones.
The iPhone 11 series has a brand-new look, which neatens up the camera interface and has some usability improvements. This book shows examples from an iPhone 11 series model, which looks similar to Figure 1-5. Again, don’t feel that you will be left out because you don’t have an iPhone 11. Even though the look is slightly different, the core functionality is quite similar to previous generations of iPhones.

FIGURE 1-4: Camera screen view of an iPhone XS Max iPhone.

FIGURE 1-5: The new camera look introduced on all iPhone 11 series models.
Taking a Photo
When you turn on your iPhone, you see what is called your lock screen, which looks similar to Figure 1-6. Press and hold the small camera icon at the bottom right for about 1 full second and then let go. You should now see the Camera app screen.

FIGURE 1-6: A typical iPhone lock screen.
Alternatively, if you’re already within your iPhone and you can see all your apps, simply tap on the camera icon. Figure 1-7 shows an example of the iPhone Camera app icon.
With your Camera app open, find a good scene that you want to photograph and tap the large white shutter button circle at the bottom of the screen, as shown in Figure 1-8.

FIGURE 1-7: A highlighted screenshot showing the Camera app icon.

FIGURE 1-8: Example of the shutter button used to take a photo.
Viewing Your iPhone Photos
After taking your photo, close the Camera app and return to your home screen. Tap your Photos app, as shown in Figure 1-9.

FIGURE 1-9: A highlighted screenshot showing the Photos app, where your photos are stored.
You can actually access your photo at the bottom left of your Camera app screen. Simply tap the little square thumbnail version of your latest photo, and it will open full size for you to review.
At the bottom right of your screen, make sure you tap Albums (as shown in Figure 1-10), and then tap the Recents album at the top left of your app screen.
You can flip between all your photos using a horizontal swipe motion with your finger or thumb (see Figure 1-11).
To see greater detail in your photo, use the pinch-to-zoom technique. Place your index finger and thumb on your photo and then widen the space between both of your fingers to zoom in. Do the opposite to zoom out.

FIGURE 1-10: Choose Albums, and then Recents to access all your photos.

FIGURE 1-11: Your photo review screen.
Editing Your iPhone Photo
On the top right of your screen, tap Edit to access the photo editing tools.
At the bottom middle, tap the Auto magic wand icon, as shown in Figure 1-12. Did you see any changes in your photo?

FIGURE 1-12: Press the Auto magic wand icon for your first photo edit.
Underneath Auto are many small vertical lines that act as a type of scroll bar. As in Figure 1-13, with your finger scroll left and then right until you get your desired artistic appearance.
When done, press the yellow Done option at the bottom right of your screen.
There are so many excellent editing tools beyond this Auto feature — so many of them, in fact, that Chapter 11 is devoted to exploring each tool in depth.
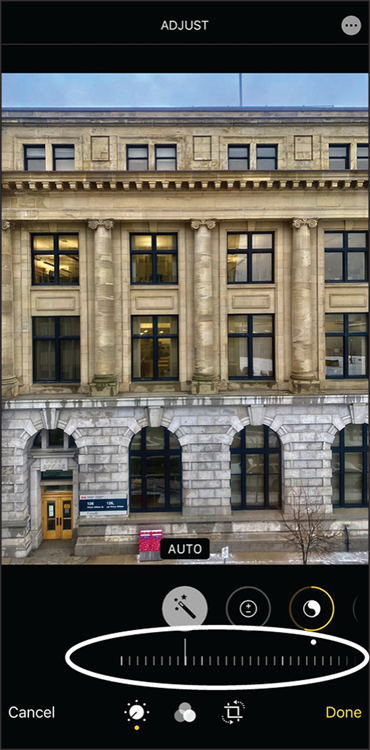
FIGURE 1-13: The scrollable adjustment option for different editing looks.
One of the most common photo editing question from iPhone users is “Do I need to save my photo edits?” The answer is no! The Photos app will do everything for you. In fact, your photo automatically gets saved pretty much every second when you’re doing editing work.
Sharing Your Photos
Sharing your edited photo couldn’t be easier! Tap the little up-arrow Share icon at the bottom left of your screen. (If you don’t see the Share icon, tap anywhere within your photo, and it will appear.) You can now share your photo to Messages, Mail, Airdrop, and any other iOS app that supports sharing. Figure 1-14 shows what the sharing screen looks like.
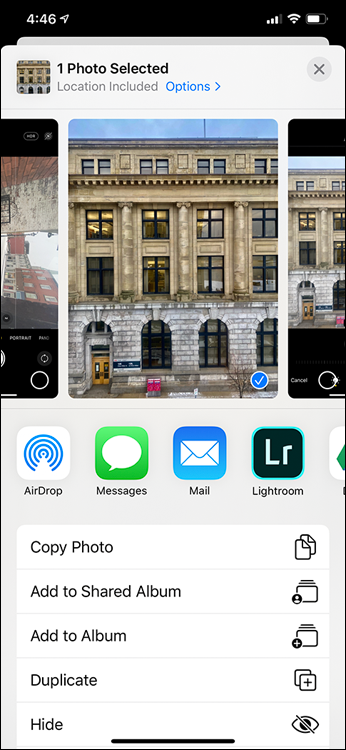
FIGURE 1-14: The sharing screen allows you to share your photo using various apps.