
Cellular automata is an n-dimensional set of cells that interact together with a given set of rules. Over time, these interactions have given way to patterns, and modifying the rules will modify the pattern. The most famous example is probably Conway's Game of Life where cells based on an extremely simple rule set create the most amazing, evolving patterns. In games, cellular automata is usually found simulating liquids in a tile– or block–based game worlds.
In this recipe, we'll explore such a liquid system based on a 2D grid. Since it's 2D, there can be no true waterfalls, but it can still be applied to a heightmap (which we'll show) to create natural-looking rivers.
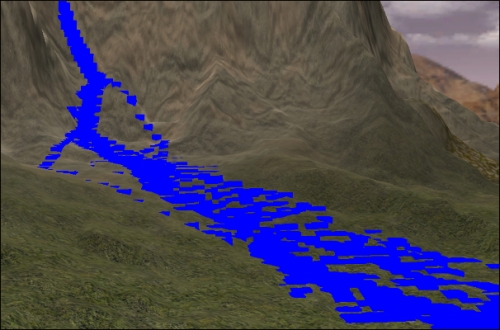
Performance becomes an issue with large cellular automata, which will become evident as they're scaled up. To counter this, we'll also look at a couple of different techniques to keep the resource consumption down. The following image shows water running down the slope of a mountain:
This recipe requires height differences to make it interesting. A heightmap will work very well.
The model we'll develop will evolve around cells that are defined by two parameters: the height of the ground it resides on and the amount of water in it. If the height and amount of water combined are higher than a neighboring cell, water will pour out of it and into its neighbor. To make sure the cells are updated simultaneously, all of the water pouring into a cell will be stored in a separate field and applied at the end of the update cycle. This ensures that water can only move one tile through the field in one update. Otherwise, the same unit of water might travel across the whole grid in one update as we loop through the tiles.
The example mentions a CellUtil class. The code for this can be found in the The CellUtil class section in Appendix, Information Fragments.
The following steps will produce flowing water:
- First of all, let us create a class that contains the cell logic. We can call it
WaterCell. It needs a float field calledamount, another float field calledterrainHeight, and one integer field for the current direction of the flow. It should also store any incoming water in a float field calledincomingAmount. - In addition to the normal getter and setter for
amount, add a method calledadjustAmountthat takes a float variable calleddeltaas the input. Thedeltavariable should be added toamount. - Create a method called
compareCellsthat will move the water between cells. It takes another cell (where the water is coming from) as the input. - The first thing the method does is checks the difference in height between the two cells as follows:
float difference = (otherCell.getTerrainHeight() + otherCell.getAmount()) - (terrainHeight + amount);
- The method will only move the water in one way: from the supplied cell to this cell so it will only act if the difference is positive (and higher than an arbitrary small amount).
- If so, it takes half of the difference since this would even out the amount between the two cells. Before applying it, make sure we don't move more water than there already is in the originating cell:
  amountToChange = difference * 0.5f;
  amountToChange = Math.min(amountToChange, otherCell.getAmount());
- Add the calculated result to the
incomingAmountfield (we don't update the amount for this until everything has been calculated). - However, we must deduct the same amount from the originating cell or there would be a never-ending supply of water. It's done like this:
otherCell.adjustAmount(-amountToChange);
- Finally, return the deducted amount from this method.
- We can leave this class for now and focus on creating a control that will use this class. Create a new class called
WaterFieldControlthat extendsAbstractControl. - It needs two integer fields to control the width and height of the field as well as a 2D array of
WaterCellcalledwaterField. To display it, we'll add aNodeclass calledwaterand aMaterialclass calledmaterial. - The
setSpatialmethod should be overridden and thespatialvariable passed has to be an instance ofNode. Look for a terrain among its children; once found, populatewaterFieldwithWaterCells, applying the height of the terrain for each tile as follows:for(int x = 0; x < width; x++){ for(int y = 0; y < height; y++){ WaterCell cell = new WaterCell();cell.setTerrainHeight(((Terrain)s).getHeight(new Vector2f(x, y))); waterField[x][y] = cell; } } - Now, create a new method called
updateCells. For this example, define a source of water that will never run out right from the beginning by setting the amount of water in one of the middle tiles as 1. - Then, parse through each cell in the
waterFieldarray in a nestedforloop. - If the cell has an amount that is larger than 0, we can go on and check where we should start moving the water. Start with the cell's direction, and if there is water left after checking one direction, continue to look through the other seven directions. This is what the implementation might look like:
WaterCell cell = waterField[x][y]; float cellAmount = cell.getAmount(); if(cellAmount > 0){ int direction = cell.getDirection(); for(int i = 0; i < 8; i++){ int[] dir = CellUtil.getDirection((direction + i) % 8); - For each of these directions, we must first check that it is a valid location within the field. Then, retrieve the neighboring cell and call
compareCellsto try to dump water in it. If this try is successful, set the direction of theneighborCellobject to the tested direction to represent the flow of water, as follows:WaterCell neighborCell = waterField[x+dx][y+dy]; if(cell.getAmount() > 0.01){ floatadjustAmount = neighborCell.compareCells(cell); if(adjustAmount > 0){neighborCell.setDirection(CellUtil.getDirection(dx, dy)); } } - Before you exit the method, parse through the
waterFieldarray once again. This time addincomingWaterto the current amount of the cell and then setincomingWaterto0. - To handle the display of the result, create a new method called
createGeometry. - The first thing we need to do is check whether the
Spatialof the control has a child called Water. If it does, detach it. - Next, define a new
Nodeclass calledwater. Its name should beWateras this is an identifier in this example:water = new Node("Water"); - Again, parse the
waterFieldarray. If any cell's amount is more than 0, you should add aGeometryobject that represents it. - We're going to add some logic to the
getGeometrymethod to avoid recreating theGeometryfield unnecessarily. First of all, setgeometrytonullif theamountvalue is 0. - Otherwise, if
geometryis null, create a newgeometryinstance with a box-like shape as follows:geometry = new Geometry("WaterCell", new Box(1f, 1f, 1f)); - To adapt it to the amount of water we have, scale the resulting cube by typing the following code:
geometry.setLocalScale(1, 1f + amount, 1);
- After this, return the
geometryfield, which might be null. - Coming back to the
WaterFieldControlclass, if the returnedgeometryvariable is not null, set its location and attach it to thewaternode as follows:g.setLocalTranslation(x, -1f + cell.getTerrainHeight() + cell.getAmount() * 0.5f, y); water.attachChild(g);
- Apply the material to the
waternode and then batch it to increase the performance before attaching it to the control'sspatial, as follows:water = GeometryBatchFactory.optimize(water, false); water.setMaterial(material); ((Node)spatial).attachChild(water);
- To finish things off, update the
controlUpdatemethod to callupdateCellsandcreateGeometry. - Now this can be used with a few lines in the application class. First of all, create a new
WaterFieldControlclass that we'll add to aNodeclass that contains aTerraininstance. - Next, we need to create the material for the water. This can be as simple as creating a
Materialinstance withUnshadedMaterialDefinitionand applying a blueish color to it or an advanced custom shader. It is then applied to theWaterFieldControlclass via thesetMaterialmethod.
The beauty of cellular automata is the simplicity with which they work. Each cell has a very basic set of rules. In this example, each cell wants to even out the water level with a neighboring cell. As we go through iteration, the water moves downhill.
It's usually fairly easy to get the automation up and running, but it can take a while to get everything right. For example, even if each cell's amount is updated correctly, we will get weird oscillating water effects if the flow's direction doesn't work correctly. The reason is that there would be a preferred direction the water will take in a new cell. This direction might be the opposite of where it came from, making it want to move back to the cell it came from. Picking a random direction might work in that case, but it makes it more difficult to predict the behavior. This is why we use the direction of the water in the cell it came from. Naturally, the water will have some momentum and will continue to flow until it is stopped.
One thing that can be tricky to grasp at first is the reason why we don't update the water amount directly. The reason is that if water moves from cell x to cell x+1, that water would instantly become available for x+1 once the update method reaches there; also, it could be moved to x+2 and so on. We can't think of the water as real time, and that's why we first perform an outgoing operation on all the cells before we apply the incoming water. We also don't change the amount in the cell we're currently checking for the same reason. Instead, we move any water left in a cell to the incomingWater field.
The main challenge with the method is usually related to performance. Calculating can be expensive and rendering even more so. With a system like this, it's ever-changing and we might be forced to recreate the mesh in every frame. Rendering each cell on its own quickly becomes impossible, and we must use batching to create a single mesh. Even this is not enough, and in this example, we store the cell's geometry field so we don't have to recreate it unless the water level is 0 in a cell. We also scale the cell's geometry field if the water level changes as this is much quicker than creating a new Mesh class for it. The drawback is the additional memory that is used by storing it.
We also made it optional to update the water in every frame. By lowering it to a set amount of updates every second (in practice, its own frame rate), we could severely lessen the impact of the performance. This could also be taken further by only updating parts of the water field with every update, but efforts must be taken to conserve the amount of the water. We could also separate the field into smaller batches and check whether any of these need to be reconstructed.
There are ways to take this example further for those who wish. One could play around with the amount of water that each cell shares. This will make it more expensive to calculate but might give a smoother result. It's also possible to add pressure as a parameter, making it possible for water to move up the slopes. Evaporation might be a way to remove water from the system and clean up any puddles left by the main flow.