
In the previous recipe, we built the basics for an animation by managing the Control class. This would be fine for many types of games, but for a game where a character is in focus, let's say an FPS, we would want a more detailed control. This is where the concept of AnimChannel comes in handy. AnimChannel is a way of dividing a skeleton into different groups of bones and applying an animation only to them. As we will find out in this recipe, this means we can have different animations playing on different parts of the body at the same time.
Tip
Applying animations only to certain channels can help reduce the workload tremendously for a character-focused game. Let's say we're making an FPS or RPG where the character can wield a number of different items and weapons, both one– and two–handed. Making full-body animations for all the combinations, including standing, walking, running, and more, is not feasible. If instead, you are able to apply the weapon animation only to the upper body and a walk animation to the lower body, you get a lot more freedom.
This recipe will also describe some other tricks that might help in developing the game.
We can have different animations playing on different parts of the body at the same time by performing the following steps:
- First of all, we'll implement the
ActionListenerandAnalogListenerinterfaces in our animation'smanagerclass. This will allow us to receive input directly from an input-handling class and decide which animations to play. - Next, we define two
AnimChannels: one for the upper body calledupperChanneland one for the lower calledlowerChannel. We also create aChannelenum to easily choose whether to play an animation in a separate channel or the whole body, as shown in the following code:public enum Channel{ Upper, Lower, All, }- The SceneExplorer can be used to find suitable bones as shown in the following screenshot:
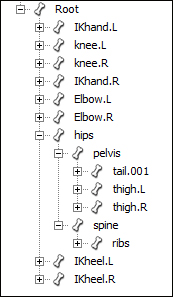
- In the
setSpatialmethod, we create the upper and lower channels inAnimControl. We letAnimChanneladd all the bones recursively using theaddFromRootBonemethod, as shown in the following code:public void setSpatial(Spatial spatial) { super.setSpatial(spatial); animControl = spatial.getControl(AnimControl.class); upperChannel = animControl.createChannel(); lowerChannel = animControl.createChannel(); upperChannel.addFromRootBone("spine"); lowerChannel.addBone("Root"); lowerChannel.addFromRootBone("pelvis"); - In the same method, add this instance as
AnimEventListenertoAnimControlto receive events when animations change or cycle, as shown in the following code:animControl.addListener(this);
- To be able to set specific animations from other classes, we add a method called
setAnimation, which takes an animation andChannel(enum) as the input, as shown in the following code:public void setAnimation(Animation animation, Channel channel){ switch(channel){ case Upper: setAnimation(animation, upperChannel); break; ... } } - In the
onActionmethod, the control can receive input directly fromInputListenerand apply the logic on its own before setting the animation, as shown in the following code:public void onAction(String name, boolean isPressed, float tpf) { if (name.equals("StrafeLeft")) { leftStrafe = isPressed; } ... } else if (name.equals("Jump") && isPressed) { jumpStarted = true; setAnimation(Animation.JumpStart); } if(jumpStarted || firing){ // Do nothing } else if(forward || backward || rightStrafe || leftStrafe) { setAnimation(Animation.Walk); } else { setAnimation(Animation.Idle); } } - Finally, to test the concept of
AnimChannels, we can implementActionListenerin ourSimpleApplicationinstance and bind some keys to it, as shown in the following code:public void onAction(String name, boolean isPressed, float tpf) { if (name.equals("Anim1") && isPressed) { jaime.getControl(AnimationChannelsControl.class) .setAnimation(Animation.Walk, Channel.All); } ... } - As an example of how the concept of
AnimChannelscan be used to create new animations out of combined ones, create a new application and set the walk animation on Jaime'slowerChannelwhile applying the jumping animation onupperChannel. Jaime will now commence a zombie walk impression.
We can see that the Animation enum has had a field called key added. This is not necessary but is part of a way to not have to hard-code animation names.
By using the addFromRootBone method, the channel will automatically add all the bones recursively, starting with the bone that is supplied first. After adding spine to upperChannel, it will continue down the chain, adding shoulders, neck, arms, and hands, as shown in the following screenshot:
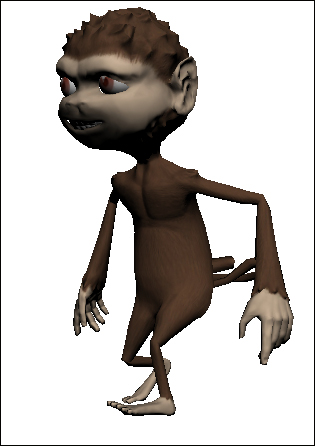
Different animations applied to the upper and lower parts of the body
Since we implemented ActionListener, there's also an onAction method in the class, which can receive an input from a number of external sources, such as InputListener. This also means it can apply logic by itself before deciding on what to play and not simply being an animation-playing control. We can recognize the pattern used here from the GameCharacterControl class from Chapter 2, Cameras and Game Controls.
By supplying a Properties file that maps the animation names, it's possible to use models with different naming conventions. It's also easier for a designer or artist to try out a number of different animations without consulting a programmer to make changes.