
Variants of bridge-building games have been around for a long time. The classical Bridge Builder is a 2D physics game where the player is required connect beams to create a bridge strong enough for a train (or some other moving object) to pass.
This recipe will describe most of the core functionalities needed to create such a game, including making the objects stay 2D and not wander off on the z axis.
We'll have some basic controls for the game:
- Left-click will select a previously built node in the bridge
- Right-click will add a new node or connect two previously built ones
- The Space bar will turn on the physics
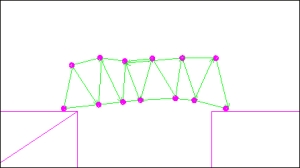
The following figure shows a bridge:
Before we begin with more physics-related functions, we should set up the basic application.
First of all, we create a new class that extends SimpleApplication.
Later on, we're going to use the following two lists:
private List<Geometry> segments;
private List<Point2PointJoint> joints;
We also need some strings as input mappings: LEFT_CLICK, RIGHT_CLICK, and TOGGLE_PHYSICS.
We add a RigidBodyControl field called selectedSegment that will contain the last selected segment in the game.
Since we're strictly making a 2D game, we should change the camera to be orthographic. This can be done by performing the following steps:
- Disable
flyCam. - Find out the aspect ratio by dividing the
camwidth by its height and storing it. - Set
cam.parallelProjectiontotrue. - Then, change
frustrumof the camera to suit and orthographic view as follows:cam.setFrustum(1, 1000, -100 * aspect, 100 * aspect, 100, -100);
- We move it some way along the z axis and rotate it back towards the center, as follows:
cam.setLocation(new Vector3f(0, 0, 20));
cam.setRotation(new Quaternion().fromAngles(new float[]{0,-FastMath.PI,0}));
Now, we can initialize bulletAppState as we usually do. Turn on the debug mode, and most importantly, set speed to 0. We don't want any physics on while we build the bridge.
The world needs a gap to be bridged. So, for this, we'll use RigidBodyControl to represent two cliffs, one on either side, as follows:
- Create one
RigidBodyControlinstance for each side and give itBoxCollisionShapewith a size ofVector3f(75f, 50f, 5f)and0mass. - Place one of them at
Vector3f(-100f, -50f, 0)and the other one atVector3f(100f, -50f, 0). - Then, add them to
physicsSpace.
We're going to start by creating two methods that will help us add new bridge segments to the game:
- We define a method called
createSegmentthat takes aVector3fparameter calledlocationas the input. - The first thing we do is set the
zvalue oflocationto0. This is because we're making a 2D game. - Then, we create a new
RigidBodyControlinstance callednewSegment. We addSphereCollisionShapeto it and then addnewSegmenttophysicsSpace. It's important that it has some mass. This can be implemented as follows:RigidBodyControl newSegment = new RigidBodyControl(new SphereCollisionShape(1f), 5); bulletAppState.getPhysicsSpace().add(newSegment);
- Now, we create a
Geometryinstance based on aSphereshape with the same radius asRigidBodyControl. We will use this as a target for mouse clicks. - The
Geometryobject needsmodelBoundfor which we'll useBoundingSphere. The radius may be bigger thanRigidBodyControl. - The
RigidBodyControlobject is added toGeometryas a control and we use thesetPhysicsLocationmethod to move it to the to the supplied location, as follows:geometry.addControl(newSegment); newSegment.setPhysicsLocation(location);
- The
Geometryobject is then added to the segments list we defined earlier and then it is attached torootNode. - If
selectedSegmentis not null, we will call a method we will define next:createJoint(selectedJoint, newSegment);
- Lastly, in the
createJointmethod, we setselectedSegmentto benewSegment. - Now, we can define the
createJointmethod. It takes twoRigidBodyControlparameters as the input, as shown in the following code:createJoint(RigidBodyControl body1, RigidBodyControl body2)
- First, we find out the location that should be the pivot point of
body2. This is the same asphysicsLocationofbody2subtracted fromphysicsLocationofbody1, as follows:Vector3f pivotPointB = body1.getPhysicsLocation().subtract(body2.getPhysicsLocation());
- Then, we define
Point2PointJointby joining the two segments. The vectors supplied mean thatbody2will pivot in a way that is relative tobody1; we do this using the following code:Point2PointJoint joint = new Point2PointJoint(body1, body2, Vector3f.ZERO, pivotPointB);
- We then add the newly created joint to the
jointslist and tophysicsSpace.
We're now getting to the controls of the application and need another method to help us. The method will check whether a mouse click has hit any segment and return it. To do this, perform the following steps:
- We define a new method called
checkSelection, which returnsRigidBodyControl. - Inside this method, we create a new
Rayinstance, which will have the current mouse cursor's location as the origin; the following code tells you how to do this:Ray ray = new Ray(); ray.setOrigin(cam.getWorldCoordinates(inputManager.getCursorPosition(), 0f));
- Since the view is orthographic, we let the direction be
Vector3f(0, 0, -1f). - Now, we define a new
CollisionResultsinstance to store any segments thatRaycollides with. - The next thing we do is parse through the segment's list and check whether the ray hits any of them.
- If it does, we're done, and then return
RigidBodyControlof segment to the calling method.
We defined a couple of input mappings earlier. Now, we can all implement the functionality for them in the onAction method by performing the following steps:
- If the left mouse button is clicked, we should call
checkSelection. If the returned value is not null, we should setselectedSegmentto that value, as follows:if (name.equals(LEFT_CLICK) && !isPressed) { RigidBodyControl newSelection = checkSelection(); if (newSelection != null) { selectedSegment = newSelection; } } - If the right mouse button is clicked, we should also call
checkSelection. If the returned value is not null and it's notselectedSegment, we callcreateJointwithselectedSegmentand the value ofcheckSelectionto create a link betweenselectedSegmentand the segment returned from the method, as shown in the following code snippet:else if (name.equals(RIGHT_CLICK) && !isPressed) { RigidBodyControl hitSegment = checkSelection(); if (hitSegment != null && hitSegment != selectedSegment) { createJoint(selectedSegment, hitSegment); } - Otherwise, if we didn't hit anything, we call
createSegmentwith the position of the mouse cursor to create a new segment at that location as follows:createSegment(cam.getWorldCoordinates(inputManager.getCursorPosition(), 10f));
- If the Space bar has been pressed, all we need to do is set the speed of
bulletAppStateto1to start the physics.
We're almost done with our simulation now, but we need to do a few more things. This last section will handle the update method and what happens when the physics is running and the bridge is being tested:
- In the
updatemethod, we parse through all the items in the segment list and set thezvalue oflinearVelocityto0, as follows:Vector3f velocity = segment.getControl(RigidBodyControl.class).getLinearVelocity(); velocity.setZ(0); segment.getControl(RigidBodyControl.class).setLinearVelocity(velocity);
- After this, we parse through all the items in the joint's list. For each, we should check whether the joint's
appliedImpulsevalue is higher than a value, let's say10. If it is, the joint should be removed from the list as well as fromphysicsSpace, as follows:Point2PointJoint p = joints.get(i); if (p.getAppliedImpulse() > maxImpulse) { bulletAppState.getPhysicsSpace().remove(p); joints.remove(p); }
The createSegment method creates a new bridge segment that is sphere shaped, both in physicsSpace and the visible world. This is the part that has a mass and can be selected by clicking on it, since Ray only collides with spatials.
The createJoint method creates the visible connection between the newly created segment, and the currently selected one. It does this using Point2PointJoint. This is different from, for example, HingeJoint, since it's not fixed in space, when several Point2Pointjoints are connected and you have something that resembles a bridge.
The mouse selection is covered more in depth in other chapters, but it works by shooting Ray from the mouse's position on the screen, inwards into the game world. Once Ray hits Geometry (which has BoundingSphere that is slightly larger than the visible mesh for increased selectability), the corresponding RigidBodyControl will be selected.
There's no challenge in a bridge-building game if the segments don't have a maximum force they can handle before they break. This is what we take care of in the update method where we check appliedImpulse on each segment. If it goes above a certain threshold, it can be considered to be overloaded and removed, often with disastrous results. We also set linearVelocity along the z axis on each segment to 0 since it's a 2D game and we don't want anything to move to the depth layer.
We start the game with the physics simulation off by setting the speed of bulletAppState to 0. Without doing so, building the game will get tricky pretty fast as everything will fall down. Pressing the Space bar will start the physics, and let the player know whether their engineering skills are up to par.
There are a couple of things missing from the recipe to make it a full-blown bridge builder. First of all, there is usually a limit to the length the segments can have. There might also be a grid structure along which they have to be placed.
It's also quite easy since the bridge currently only has to support its own weight. In a full game, the difficulty is usually increased by adding a heavier object that needs to pass the bridge to complete the level.
Add some monetary constraints to this or a varied terrain and you have a challenging game.