
Chapter 18. Unit Testing
Introduction
Automated testing of software is an essential tool in development. Unit tests are the basic building blocks for automated tests: each component, the unit, of software is accompanied by a test that can be run by a test runner over and over again without any human interaction. In other words, you can write a test once and run it as often as necessary without any additional cost.
In addition to the benefits of good test coverage, testing can also drive the design of software, known as test-driven design, where a test is written before an implementation. You start writing a very simple test, verify that it fails (because the code to be tested doesn’t exist yet), and then write the necessary implementation until the test passes. Once that happens, you extend the test to cover more of the desired functionality and implement again. By repeating those steps, the resulting code looks usually much different from what you’d get by starting with the implementation.
Unit testing in JavaScript isn’t much different from in other programming languages. You need a small framework that provides a test runner, as well as some utilities to write the actual tests.
18.1. Automating Unit Testing
Problem
You want to automate testing your applications and frameworks, maybe even benefit from test-driven design. Writing your own testing framework may be tempting, but it involves a lot of work to cover all the details and special requirements of testing JavaScript code in various browsers.
Solution
While there are other unit testing frameworks for JavaScript, we will take a look at QUnit. QUnit is jQuery’s unit test framework and is used by a wide variety of projects.
To use QUnit, you need to include jQuery and two QUnit files on
your HTML page. QUnit consists of testrunner.js, the test runner and testing
framework, and testsuite.css, which styles the test
suite page to display test results:
<!DOCTYPE html>
<html>
<head>
<title>QUnit basic example</title>
<script src="http://code.jquery.com/jquery-latest.js"></script>
<link rel="stylesheet"
href="http://jqueryjs.googlecode.com/svn/trunk/qunit/testsuite.css" type="text/css"
media="screen" />
<script type="text/javascript"
src="http://jqueryjs.googlecode.com/svn/trunk/qunit/testrunner.js"></script>
<script type="text/javascript">
test("a basic test example", function() {
ok( true, "this test is fine" );
var value = "hello";
equals( value, "hello", "We expect value to be hello" );
});
</script>
</head>
<body>
<div id="main"></div>
</body>
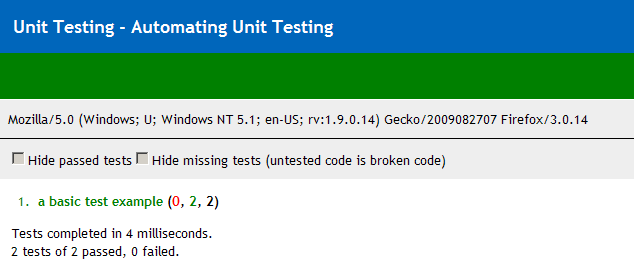
</html>Opening this file in a browser gives the result shown in Figure 18-1.
The only markup necessary in the <body> element is a <div> with id="main". This is required for all QUnit
tests, even when the element itself is empty. This provides the
fixture for tests, which will be explained in Recipe 18.6.
The interesting part is the <script> element following the
testrunner.js include. It consists
of a call to the test function,
with two arguments: the name of the test as a string, which is later
used to display the test results, and a function. The function
contains the actual testing code, which involves one or more
assertions. The example uses two assertions, ok() and equals(), which are explained in detail in
Recipe 18.2.
Note that there is no document-ready block. The test runner
handles that: calling test() just
adds the test to a queue, and its execution is deferred and controlled
by the test runner.
Discussion
The header of the test suite displays the page title, a green
bar when all tests passed (a red bar when at least one test failed), a
gray bar with the navigator.userAgent string (handy for
screenshots of test results in different browsers), and a bar with a
few checkboxes to filter test results.
“Hide passed tests” is useful when a lot of tests ran and only a few failed. Checking the checkbox will hide everything that passed, making it easier to focus on the tests that failed.
“Hide missing tests” is useful when you have a lot of tests that are just placeholders, indicated by the test name “missing test—untested code is broken code.” This can be useful when you have a large untested code base and added placeholders for every test that still needs to be written. In order to focus on tests that are already implemented, you can use the checkbox to temporarily hide the placeholder tests.
The actual contents of the page are the test results. Each entry in the numbered list starts with the name of the test followed by, in parentheses, the number of failed, passed, and total assertions. Clicking the entry will show the results of each assertion, usually with details about expected and actual results. Double-clicking will run just that test (see Recipe 18.8 for details).
Below the test results is a summary, showing the total time it took to run all tests as well as the overall number of total and failed assertions.
18.2. Asserting Results
Problem
Essential elements of any unit test are assertions. The author of the test needs to express the results expected and have the unit testing framework compare them to the actual values that an implementation produces.
Solution
QUnit provides three assertions.
ok( boolean[, message ])
The most basic one is ok(), which requires just one Boolean argument. When the
argument is true, the assertion passes; otherwise, it fails. In
addition, it accepts a string to display as a message in the test
results:
test("ok test", function() {
    ok(true, "ok succeeds");
    ok(false, "ok fails");
});
equals( actual, expected[, message ])
The equals
assertion uses the simple comparison operator (==) to compare the actual and expected
arguments. When they are equal, the assertion passes; otherwise, it
fails. When it fails, both actual and expected values are displayed
in the test result, in addition to a given message:
test("equals test", function() {
    equals("", 0, "equals succeeds");
    equals("three", 3, "equals fails");
});
Compared to ok(), equals() makes it much easier to debug
tests that failed, because it’s obvious which value caused the test
to fail.
same( actual, expected[, message ])
The same() assertion can be used just like equals() and is a better choice in most
cases. Instead of the simple comparison operator (==), it uses the more accurate comparison
operator (===). That way,
undefined doesn’t equal null, 0, or the empty string (""). It also compares the content of
objects so that {key: value} is
equal to {key: value}, even when
comparing two objects with distinct identities.
same() also handles NaN,
dates, regular expressions, arrays, and functions, while equals() would just check the object
identity:
test("same test", function() {
    same(undefined, undefined, "same succeeds");
    same("", 0, "same fails");
});
In case you want to explicitly not compare the content of two
values, equals() can still be
used. In general, same() is the
better choice.
18.3. Testing Synchronous Callbacks
Problem
When testing code with a lot of callbacks, it happens every once in a while that a test that actually should fail just passes, with the assertions in question never showing up in the test results. When the assertions are in a callback that is never called, the assertions aren’t called either, causing the test to silently pass.
Solution
QUnit provides a special assertion to define the number of assertions a test contains. When the test completes without the correct number of assertions, it will fail, no matter what result the other assertions, if any, produced.
Usage is plain and simple; just call expect() at the start of a test, with the
number of expected assertions as the only argument:
test("a test", function() {
    expect(1);
    $("input").myPlugin({
        initialized: function() {
            ok(true, "plugin initialized");
        }
    });
});
Discussion
expect() provides the most value when actually testing
callbacks. When all code is running in the scope of the test function,
expect() provides no additional
value—any error preventing assertions to run would cause the test to
fail anyway, because the test runner catches the error and considers
the test as failed.
18.4. Testing Asynchronous Callbacks
Problem
While expect() is
useful to test synchronous callbacks (see Recipe 18.3), it falls short when
testing asynchronous callbacks. Asynchronous callbacks conflict with
the way the test runner queues and executes tests. When code under
test starts a timeout or interval or an Ajax request, the test runner
will just continue running the rest of the test, as well as other
tests following it, instead of waiting for the result of the
asynchronous operation.
Solution
There are two functions to manually synchronize the test runner
with the asynchronous operation. Call stop() before any asynchronous operation, and call start() after all assertions are done, and the test runner can
continue with other tests:
test("a test", function() {
    stop();
    $.getJSON("/someurl", function(result) {
        equals(result.value, "someExpectedValue");
        start();
    });
});
Discussion
A shortcoming of this approach to manual synchronization is the
risk that start() is never called
when the code under test fails elsewhere. In that case, the test
runner never continues and therefore never finishes to display the end
result. It can’t even display the result for the current test, so all
that is displayed is the result of the previous test.
When that happens, you first need to identify the test that
doesn’t finish by looking for the previous test that finished and then
finding that test in code and skipping to the next test. Once that is
done, you can ease debugging by adding a timeout argument to the call
to stop():
test("a test", function() {
    stop(500);
    $.getJSON("/someurl", function(result) {
        equals(result.value, "someExpectedValue");
        start();
    });
});
In this example, the test runner would wait 500 ms for the test
to finish (using setTimeout); otherwise, it would
declare the test as failed and continue running. By seeing the result
of other tests, it can be much easier to identify the actual problem
and fix it.
Nonetheless, the timeout argument shouldn’t be used for regular tests. If you added it for debugging, remove it once the test works again.
Why is that? The drawback of the timeout is that it makes tests undeterministic. When running the test on a slow machine or under heavy load, the timeout may be too short, causing an otherwise perfectly fine test to fail. Hunting a bug that doesn’t exist at all is a very time-consuming and frustrating experience—avoid it.
18.5. Testing User Actions
Problem
Code that relies on actions initiated by the user can’t be tested by just calling a function. Usually an anonymous function is bound to an element’s event, e.g., a click, which has to be simulated.
Solution
You can trigger the event using jQuery’s trigger() method and test that the expected behavior occurred. If you
don’t want the native browser events to be triggered, you can use
triggerHandler() to just execute the bound event handlers. This is
useful when testing a click event on a link, where trigger() would cause the browser to change
the location, which is hardly desired behavior in a test.
Let’s assume we have a simple key logger that we want to test:
var keylogger = {
    log: null,
    init: function() {
        keylogger.log = [];
        $(document).unbind("keydown").keydown(function(event) {
            keylogger.log.push(event.keyCode);
        });
    }
};
We can manually trigger a keypress event to see whether the logger is working:
test("basic keylogger behavior", function() {
    // initialize
   keylogger.init();

    // trigger event
    var event = $.Event("keydown");
    event.keyCode = 9;
    $(document).trigger(event);

    // verify expected behavior
    same(keylogger.log.length, 1, "a key was logged");
    same(keylogger.log[0], 9, "correct key was logged");
});
Discussion
If your event handler doesn’t rely on any specific properties of
the event, you can just call .trigger(eventType). However, if your event
handler does rely on specific properties of the event, you will need
to create an event object using $.Event and set the necessary properties, as
shown previously.
It’s also important to trigger all relevant events for complex behaviors such as dragging, which is comprised of mousedown, at least one mousemove, and a mouseup. Keep in mind that even some events that seem simple are actually compound; e.g., a click is really a mousedown, mouseup, and then click. Whether you actually need to trigger all three of these depends on the code under test. Triggering a click works for most cases.
18.6. Keeping Tests Atomic
Problem
When tests are lumped together, it’s possible to have tests that should pass but fail or tests that should fail but pass. This is a result of a test having invalid results because of side effects of a previous test:
test("2 asserts", function() {
    $("#main").append("<div>Click here for <span class='bold'>messages</span>.</div>");
    same($("#main div").length, 1, "added message link successfully");
    $("#main").append("<span>You have a message!</span>");
    same($("#main span").length, 1, "added notification successfully");
});
Notice the first append()
adds a <span> that the second
assert doesn’t take into account.
Solution
Use the test() method to keep
tests atomic, being careful to keep each assertion clean of any
possible side effects. You should only rely on the fixture markup,
inside the #main element. Modifying
and relying on anything else can have side effects:
test("test 1", function() {
    $("#main").append("<div>Click here for <span class='bold'>messages
</span>.</div>");
    same($("#main div").length, 1, "added message link successfully");
});
test("test 2", function() {
    $("#main").append("<span>You have a message!</span>");
    same($("#main span").length, 1, "added notification successfully");
});
QUnit will reset the elements inside the #main element after each test, removing any
events that may have existed. As long as you use elements only within
this fixture, you don’t have to manually clean up after your tests to
keep them atomic.
Discussion
In addition to the #main
fixture element, QUnit will also clean up properties of jQuery itself:
$.event.global and $.ajaxSettings. Any global events like
$().ajaxStart() are managed by
jQuery in $.event.global—if your
test had bound lots of them, it could slow down the test runner
significantly when running a lot of tests. By cleaning the property,
QUnit ensures that your tests aren’t affected by global events.
The same applies to $.ajaxSettings, which is usually used via
$.ajaxSetup() to configure common
properties for $.ajax()
calls.
In addition to the filters explained in Recipe 18.8, QUnit also offers a ?noglobals flag. Consider the following
test:
test("global pollution", function(){
    window.pollute = true;
    same(pollute, true);
});
In a normal test run, this passes as a valid result. Running the
same test with the noglobals flag will cause the test
to fail, because QUnit detected that it polluted the window
object.
There is no need to use this flag all the time, but it can be handy to detect global namespace pollution that may be problematic in combination with third-party libraries. And it helps to detect bugs in tests caused by side effects.
18.7. Grouping Tests
Problem
You’ve split up all of your tests to keep them atomic and free of side effects, but you want to keep them logically organized and be able to run a specific group of tests on their own.
Solution
You can use the module()
function to group tests together:
module("group a");
test("a basic test example", function() {
    ok( true, "this test is fine" );
});
test("a basic test example 2", function() {
    ok( true, "this test is fine" );
});

module("group b");
test("a basic test example 3", function() {
    ok( true, "this test is fine" );
});
test("a basic test example 4", function() {
    ok( true, "this test is fine" );
});
All tests that occur after a call to module() will be grouped into that module.
The test names will all be preceded by the module name in the test
results. You can then use that module name to select tests to run (see
Recipe 18.8).
Discussion
In addition to grouping tests, module() can be used to extract common code
from tests within that module. The module() function takes an optional second
parameter to define functions to run before and after each test within
the module:
module("module", {
    setup: function() {
        ok(true, "one extra assert per test");
    }, teardown: function() {
        ok(true, "and one extra assert after each test");
    }
});
test("test with setup and teardown", function() {
    expect(2);
});
You can specify both setup and teardown properties together, or just one of them.
Calling module() again
without the additional argument will simply reset any setup/teardown
functions defined by another module previously.
18.8. Selecting Tests to Run
Problem
When debugging a failing test, it can be a huge waste of time to rerun the entire test suite after every little change to your code just to see whether a single test now passes.
Solution
QUnit offers URL filtering to select the tests to run. This
works best when combined with
modules. You can run just the tests from a given module by appending a
query string with the module name to the test suite URL. For example,
test.html?validation will run all tests
in the module named validation:
// test.html?validation - just the validation module
// test.html?validation&tooltip - validation and tooltip module
// test.html?!validation - exclude the validation module
// test.html?test 3 - just "test 3", the url will be displayed as test.html?test%203
module("validation");
test("test 1", function () {
    ok(true, "bool succeeds");
});
test("test 2", function () {
    equals(5, 5.0, "equals succeeds");
});
module("tooltip");
test("test 3", function () {
    same(true, 3 == 3, "same succeeds");
});
test("test 4", function () {
    ok(false, "bool fails");
});
module("other");
test("test 5", function () {
    equals(3, 5, "equals fails");
});
Discussion
You can combine tests from various modules by specifying
multiple modules at once, delimited with the ampersand; e.g., test.html?validation&tooltip would run
tests that contain validation or
tooltip.
You can exclude tests using the exclamation mark; e.g., test.html?!validation would run all tests
except those from the validation
module.
Instead of manually modifying the URL, you can also double-click any of the test results to rerun just that test. QUnit will use the same filtering mechanism by appending the name of the test to the current location.