
Chapter 10. Notifications
A notification is an important status message or warning. On a smartphone, you get one every time a text message comes in, an alarm goes off, a calendar appointment is imminent, or your battery is running low.
It’s no different on your Mac. Mail and Messages might want to let you know that a new message has arrived. The Calendar app might want to remind you that an important meeting is about to start.
In macOS, you know when some app is trying to get your attention: A message bubble slides into view at the top right of your screen (Figure 10-1, top). Some of these alerts slide away again after five seconds; others require you to click a button, like Close, Snooze, or Show (which opens the program that’s waving its little hand in your face).
Note
Only apps you got from the Mac App Store can tap into the Notification Center. Other programs use whatever alert mechanisms they always have—pop-up dialog boxes, for example.
You’re also notified this way when one of your App Store apps has been automatically updated, or when that update requires you to quit the app or restart the Mac (and you’re offered a Later button).
All kinds of warnings—dying battery, failed Time Machine backups, disks ejected improperly—appear in these subtle notification bubbles, rather than bleating their news in showstopping dialog boxes.
Insta-Respond to Bubbles
Some of those notification bubbles aren’t just the Mac’s way of speaking to you; they’re interactive. That’s particularly handy when the bubble represents an incoming iMessage, FaceTime call, or email—because you can reply to them. See Figure 10-1.
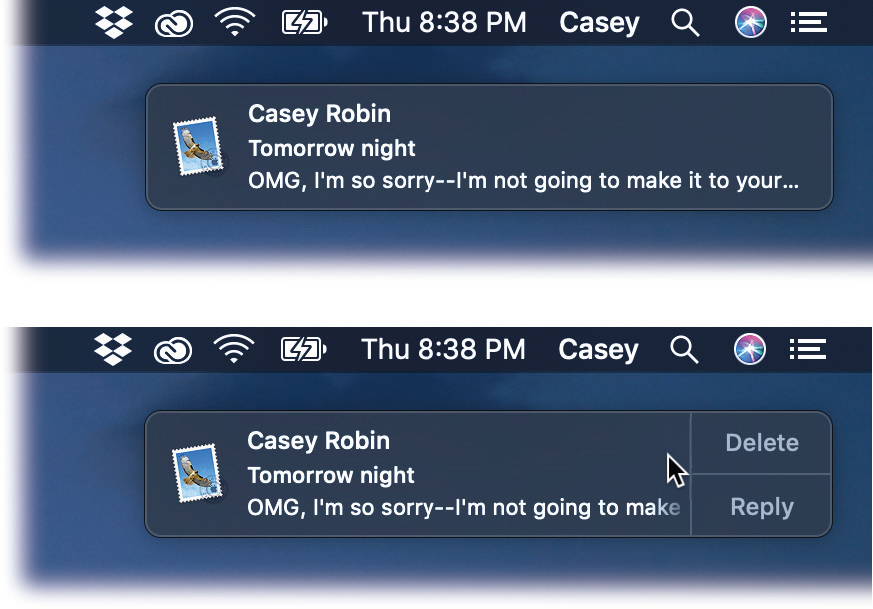
Figure 10-1. Top: MacOS tries to get your attention using notification bubbles.
Bottom: If you point to a bubble before it disappears, it may offer buttons that let you take action. For example, if it’s an incoming instant message, you can hit Reply and then type your response right in the bubble. If it’s a FaceTime call, you can answer it or decline it.
And if it’s email, you can click either Delete or Reply. If you hit Reply, an outgoing, floating message window opens, already addressed, already set up as a response. Just type your reply and hit Send.
Shutting Up the Bubbles
Of course, little bubbles sliding into the top-right corner of your screen may not always be what you want, especially if you’re trying to beat a deadline.
Dismiss One Bubble
If you’re in a hurry, you can get rid of one of these bubbles with a right-swipe on it (two fingers on a trackpad, one on a Magic Mouse, or just drag it off to the right with your mouse).
Do Not Disturb (Manual)
But to truly shut up all notifications, turn on Do Not Disturb (Figure 10-2, top).
Tip
The efficiency nut may prefer to simply Option-click the ![]() button at the right end of the menu bar. It turns gray, indicating that you’ve stifled all bubbles until midnight (or until you Option-click it again).
button at the right end of the menu bar. It turns gray, indicating that you’ve stifled all bubbles until midnight (or until you Option-click it again).
When Do Not Disturb is on, your messages quietly pile up in the Notification Center (described in a moment); they don’t pop up on your screen individually as they happen, and they certainly don’t make any noises.
Do Not Disturb (Automatic)
The Mac can also shut up the bubbles automatically, either according to a daily schedule (like when you’re asleep) or when you’re giving a presentation.
To see it, open System Preferences → Notifications (Figure 10-2, bottom). You’ll find that this version of Do Not Disturb offers all kinds of useful options:
On a schedule. Here you can specify starting and ending hours for Do Not Disturb to kick in automatically. It’s handy if you’d like the Mac to go dark during the same hours you do every night. (There’s no separate setting for weekends; Do Not Disturb will turn on and off for the same hours every day of the week.)
When the display is sleeping. When the screen is dark, it means you’re not at your Mac. You probably don’t need passersby seeing your incoming love notes; besides, you’re not there to witness them arriving anyway.

Figure 10-2. Top: In the Notification Center, on the Today tab, scroll to the very top to see this Do Not Disturb on/off switch.
At the bottom of the panel, you see a little icon. Clicking it takes you directly to the Do Not Disturb panel of System Preferences, shown here at bottom.
Bottom: You can set up Do Not Disturb on a schedule, allowing exceptions in case of emergency.When mirroring to TVs and projectors. If you’re showing an audience something from your Mac, chances are pretty good that you don’t want little notice bubbles to interrupt the show. There’s nothing worse than an audience of 500 witnessing the embarrassing subject lines of your incoming email.
Allow calls from everyone. If you use your Mac as a speakerphone (“Mac as Speakerphone”), you might still want it to ring for incoming calls. In that case, turn on this option. All other notifications are still silenced when Do Not Disturb is engaged—just not phone calls and FaceTime calls.
Allow repeated calls. If you turn this on, and somebody tries to call you more than once within three minutes, it will ring through. The idea here is that nobody would call you multiple times unless it was urgent. You certainly wouldn’t want Do Not Disturb to block somebody trying to tell you that there’s been an accident, that you’ve overslept, or that you’ve just won the lottery.
The Notification Center
All right, now you know how to dismiss, stifle, or respond to notification bubbles. But what if you miss one? Or you decide to act on it later?
Thought you’d never ask.
All those “Hey you!” messages collect on a single screen called the Notification Center (Figure 10-3).

Figure 10-3. Right: Here’s the Notification Center, where all those incoming messages pile up, for your inspection pleasure.
Left: The Today screen shows everything you’ve got coming up—as well as the information widgets you’ve installed here (“Today Tab”).
To make it appear on a laptop, swipe two fingers onto the trackpad from the right. (Start the swipe off to the right of the trackpad. It’s the first time you’ve ever crossed the edge of the trackpad with a Mac gesture. Weird.)
You can also open the Notification Center by clicking the ![]() in the upper-right corner of your screen. That’s a handy trick if your Mac doesn’t have a trackpad—if it’s an iMac, for example. (You can also set up a keystroke or a “hot corner” to open the Notification Center, if you like. See “Redefining a Keystroke” and “Screen corners”.)
in the upper-right corner of your screen. That’s a handy trick if your Mac doesn’t have a trackpad—if it’s an iMac, for example. (You can also set up a keystroke or a “hot corner” to open the Notification Center, if you like. See “Redefining a Keystroke” and “Screen corners”.)
Either way, the Notification Center slides onto the screen like a classy gray window shade, showing every recent item of interest.
Tip
To close the Notification Center, swipe the opposite way (left to right) with two fingers. Or click any other part of the screen. Or click the ![]() again. Or just blink really hard.
again. Or just blink really hard.
The Notification Center has two tabs at the top:
Today. On the Today tab (Figure 10-4), you see today’s weather, all your upcoming appointments and reminders, and an assortment of widgets (calculator, stock report, news headlines) that you’ve installed there. (More on this in a moment.) You also see the answers to any Siri queries that you decided to pin here, as described in “What to Do with Siri’s Results”.
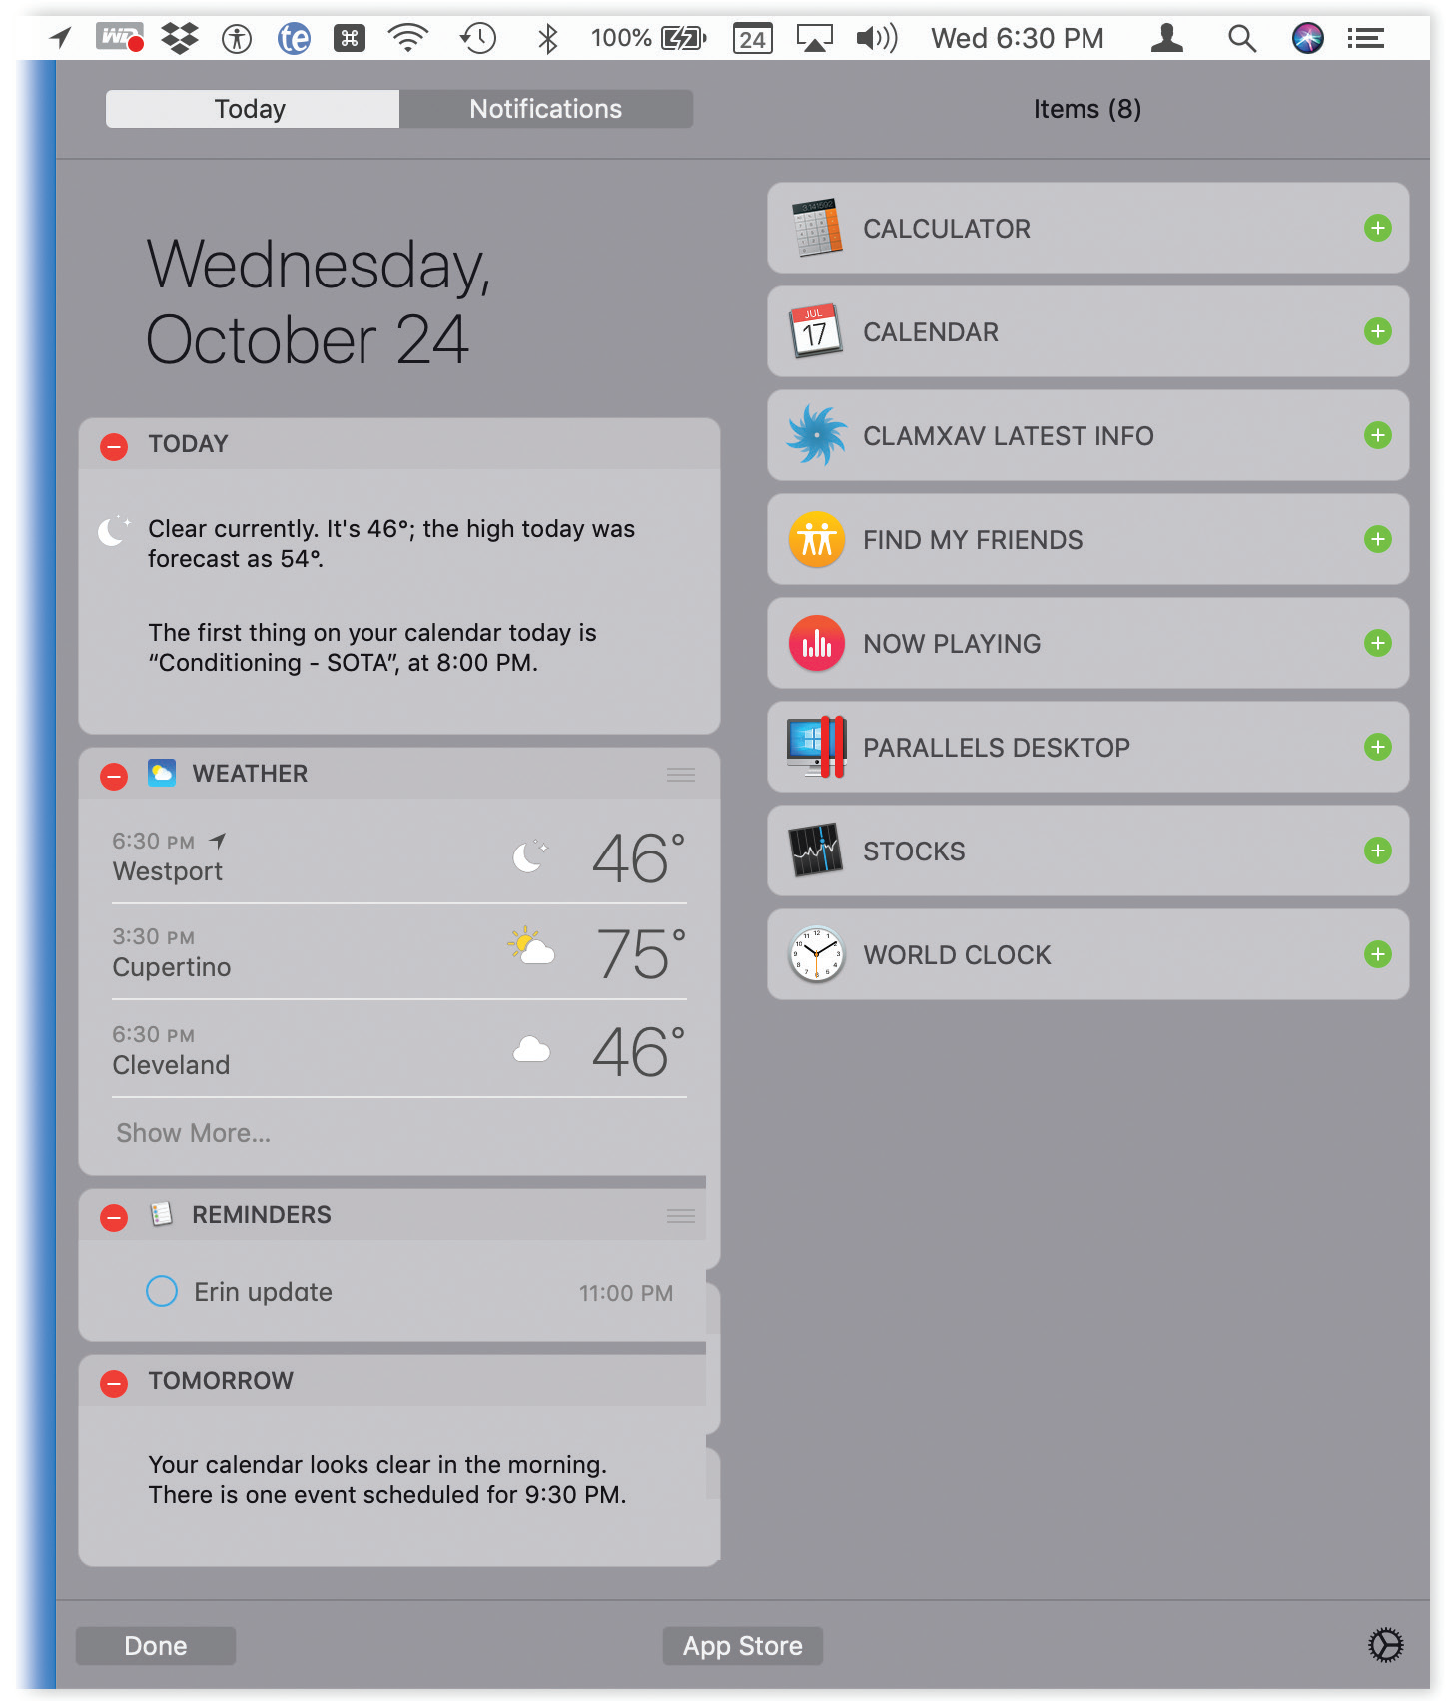
Figure 10-4. Editing the widgets of the Today list is simple enough. The left column represents what’s in the Today list now; the right column lists widgets that aren’t installed at the moment. Click
 to remove a widget from the Today list, or tap
  to add a module.
Drag the up or down to move it higher or lower in the list. Then tap Done.
Notifications. This tab lists all your apps’ notifications, as well as all your Mac’s messages, reminders, upcoming appointments, and so on.
Each produces a scrolling panel; read on.
Today Tab
The Today panel presents an executive summary of everything you need to know today, in plain English: your upcoming appointments (“ ‘Personnel meeting’ is next up on your calendar, at 2 PM”); reminders coming due; weather and stock information; and a preview of your schedule tomorrow. It’s identical to the Today panel on the iPhone or iPad, if you’re scoring at home.
Each of these little info-panels is called a widget, and there are tons of them available. For example, the Mac comes with ones called Calculator, which puts a calculator at your fingertips, and Find My Friends, which lets you see on a map where your loved ones are (this presumes they have iPhones and have permitted you to track them).
To add, remove, or rearrange widgets, click Edit at the bottom of the panel; proceed as described in Figure 10-4.
Intriguingly, Apple also allows apps to add their own sections to the Today list. For example, Dropbox can show a list of files that have been added to your Dropbox folder; Evernote can add buttons for creating new notes or reminders; The New York Times, Yahoo Digest, and Huffington Post apps can add headlines; the Kindle app offers links to the books you’re reading right now; and so on.
Tip
If you’re feeling widget-deprived, click App Store. It opens a special section of the Mac App Store dedicated to apps that install widgets on your Today panel.
Notifications Tab
On the Notifications tab (Figure 10-3, right), you can have two kinds of fun:
Click an item to open the relevant app for more details. For example, click an appointment listed there to open its information panel in Calendar. Click the name of a software update to open the Mac App Store program, where you can read about it and download it. Click a message’s name to open Mail, where you can read the entire message.
Click the little
 to dismiss one day’s entire list of notifications—or one app’s worth—once you’ve seen them. (The appears when you point to a notification.)
So which is it—all the notifications from one app? Or from one day? That’s up to you. It depends on how you’ve set things up in System Preferences → Notifications, as described in the next section. For example, if you’ve chosen to sort your notifications by Recents, the
button deletes a day of notifications; if you’ve chosen Recents by App, it deletes all the notifications from a particular app.
Customizing the Notification Center
You can (and should) specify which apps are allowed to junk up your Notification Center. Open System Preferences → Notifications to see the list of apps that might want to get your attention in the master Notifications list (Figure 10-5).
This is also the place where you can specify the order of the various apps’ notifications in the center. Use the “Notification Center sort order” pop-up menu at the bottom of the window.

Figure 10-5. Here in System Preferences, you can specify which apps are permitted to intrude on the precious billboard that is your Notification Center—and how they’re permitted to intrude.
Some individual apps, including Mail and Calendar, offer additional controls in their Preferences boxes. For example, in Calendar, you can turn off notifications from shared calendars and from meeting invitations.
If you choose Recents, the apps with the newest alerts appear at the top. If you choose Recents by App, the notifications are grouped under headings that correspond to the app generating them. And if you tap Manually by App, you can simply drag the app names up or down in the list to specify their top-to-bottom order on the Notification Center list.
Out of the box, a lot of macOS apps are listed in the Notification Center (along with Do Not Disturb, already described). Here are some of the most significant:
Calendar lets you know about imminent appointments.
Facebook governs the appearance of updates from your Facebook friends.
Mail lets you know when you’ve received a new message. You can also specify whether or not the notification displays the beginning of the message itself when you’re not seated at your Mac, which you may consider to be either useful or a scary privacy violation. (Mercifully, Mail’s Preferences → General tab lets you limit these alerts, so you won’t be buried in a barrage of meaningless heads-up bubbles. You can tell Mail to alert you only when somebody in your Contacts list has written to you, only when a message lands in a smart mailbox folder, only when you get email from someone you’ve designated as a VIP—or whenever any message lands in any mailbox.)
Messages lets you know when somebody has sent you an instant message.
Safari allows certain websites, if they’re open on your Mac, to send you notifications (known as HTML web notifications).
Other companies’ apps may appear in this list, too: BusyCal, Evernote, Skype, and so on.
Now it’s time to change the settings for one app at a time. Click an app’s name to see its individual Notifications settings (Figure 10-5—the Calendar app, in this case). For example, as hinted above, different apps can get your attention in different ways:
None. If certain apps seem to bug you with news you really don’t care about, you can make them shut up forever. They won’t bother you with pop-up messages, although they can still insert items into the Notification Center panel.
Banners. This option makes incoming notifications slide quietly and briefly onto the top right of your screen. Each message holds still long enough for you to read it, but it goes away automatically after a few seconds. Banners are a good option for things like Facebook and Twitter updates and incoming email messages.
Alerts. These notifications don’t go away until you click a button to dismiss them. Good for important messages, like alarms and flight updates.
At the bottom of the Notifications window, you get more settings for each app:
Show notifications on lock screen. Do you want summaries of all your missed notifications to appear on your Lock screen (“5 email notifications”) when you wake the Mac? It’s a great feature, as long as you don’t mind passing busybodies knowing how popular you are.
Show notification preview. This is a privacy thing. Suppose you’ve wandered away from your desk. When someone sends you a text, do you want the notification banner to include the message itself, on the Lock screen where anyone can read it? (That’s the Preview.) Or do you want the banner to indicate only that a person has sent some message, which you can read only after unlocking the Mac?
And it’s not just texts. Do you want Uber information to appear in the banner? How about Facebook updates? The name of your alarm or reminder?
You have two choices here: always (always show the message in the notification banner) or when unlocked (show it only if you’re actually using the Mac).
Show in Notification Center. Do you want this app’s notifications to appear in the Notification Center? If you turn this off for an app, you’ll still get its alert messages, but you won’t see them listed in the Notification Center panel.
Badge app icon. If you turn this option on, then each app’s actual icon (in your Launchpad and on your Dock) sprouts a red, circled number. This number lets you know how many times it’s tried to flag you about something.
Play sound for notifications. Some apps play a sound when a new notification arrives. For example, Calendar dings to remind you of an upcoming event. It’s a little extra insurance that you won’t miss a nudge, but here’s where you can turn these sounds off.