
Chapter 13. Networking, File Sharing & AirDrop
Networks are awesome. Once you’ve got a home or office network, you can copy files from one machine to another—even between Windows PCs and Macs—just as you’d drag files between folders on your own Mac. You can send little messages to other people’s screens. Everyone on the network can consult the same database or calendar, or listen to the same iTunes music collection. You can play games over the network. You can share a single printer or cable modem among all the Macs in the office. You can connect to the network from wherever you are in the world, using the internet as the world’s longest extension cord back to your office.
In macOS, you can even do screen sharing, which means that you, the wise computer whiz, can see what’s on the screen of your pathetic, floundering relative or buddy elsewhere on the network. You can seize control of the other Mac’s mouse and keyboard. You can troubleshoot, fiddle with settings, and so on. It’s the next best thing to being there—often, a lot better than being there.
Note
This chapter concerns itself with local networking—setting up a network in your home or small office. But don’t miss its sibling, Chapter 16, which is about hooking up to the somewhat larger network called the internet.
Wiring the Network
Most people connect their computers using one of two connection systems: Ethernet or Wi-Fi.
Note
Until recently, Apple had its own name for Wi-Fi: AirPort. That’s what it said in System Preferences → Network, for example, and that’s what the ![]() menulet was called. AirPort was a lot cleverer, wordplay-wise, than the meaningless “Wi-Fi.” Unfortunately, not many people realized that AirPort was the same thing as what the rest of the world called Wi-Fi. So at least in its onscreen references, these days, Apple gives AirPort a new name: Wi-Fi.
menulet was called. AirPort was a lot cleverer, wordplay-wise, than the meaningless “Wi-Fi.” Unfortunately, not many people realized that AirPort was the same thing as what the rest of the world called Wi-Fi. So at least in its onscreen references, these days, Apple gives AirPort a new name: Wi-Fi.
Ethernet Networks
Every desktop Mac has an Ethernet jack (Figure 13-1). Apple laptops don’t have Ethernet jacks built in, but you can add one in the form of an adapter that plugs into one of your USB jacks.
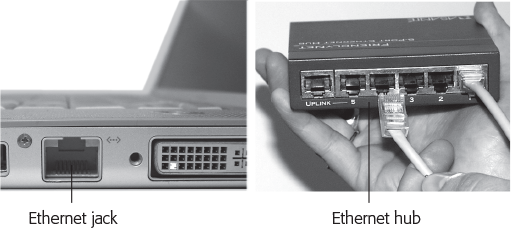
Figure 13-1. Every desktop Mac has a built-in Ethernet jack (left). It looks like an overweight telephone jack. It connects to an Ethernet router or hub (right) via an Ethernet cable (also known as Cat 5 or Cat 6), which ends in what looks like an overweight telephone-wire plug (also known as an RJ-45 connector).
If you connect all the Macs and Ethernet printers in your small office to a central Ethernet hub, switch, or router—a compact, inexpensive box with jacks for five, 10, or even more computers and printers—you’ve got yourself a very fast, very reliable network. (Most people wind up hiding the hub in a closet and running the wiring either along the edges of the room or inside the walls.) You can buy Ethernet cables, plus the hub, at any computer store or, less expensively, from an internet-based mail-order house; none of this stuff is Mac-specific.
Tip
If you want to connect only two Macs—say, your laptop and your desktop machine—you don’t need an Ethernet hub. Instead, you just need a standard Ethernet cable. Run it directly between the Ethernet jacks of the two computers. Then connect the Macs as described in the box on the facing page.
Or don’t use Ethernet at all; just use a person-to-person Wi-Fi network.
Ethernet is the best networking system for many offices. It’s fast, easy, and cheap.
Wi-Fi Networks
Wi-Fi, known to the geeks as 802.11, means wireless networking. It’s the technology that lets laptops get online at high speed in any Wi-Fi “hotspot.” Hotspots are everywhere these days: in homes, offices, coffee shops, hotels, airports, and thousands of other places.
When you’re in a Wi-Fi hotspot, your Mac has a very fast connection to the internet, as though it were connected to a cable modem or DSL.
Every Mac has Wi-Fi circuitry. It lets you connect to your network and the internet wirelessly, as long as you’re within about 150 feet of a base station or (as Windows people call it) an access point. That box must in turn be physically connected to a network and internet connection.
The base station can take any of these forms:
AirPort base station. Apple’s sleek, white, squarish base stations ($100 to $200) come in two flavors, Express and Extreme, and permit as many as 50 computers to connect simultaneously. All of them have USB ports to connect printers, and you can also hook up an external hard drive to the AirPort Extreme.
A Time Capsule. This Apple gizmo is exactly the same as the AirPort base station, except that it also contains a huge hard drive so that it can back up your Macs automatically over the wired or wireless network.
A wireless broadband router. Linksys, Belkin, and lots of other companies make less expensive Wi-Fi base stations. You can plug the base station into an Ethernet router or hub, thus permitting 10 or 20 wireless-equipped computers, including Macs, to join an existing Ethernet network without wiring. (With all due non-fanboyism, however, Apple’s base stations and software are more polished and satisfying to use.)
Tip
It’s perfectly possible to plug a Wi-Fi base station into a regular router, too, to accommodate both wired and wireless computers.
Another Mac. Your Mac can also impersonate an AirPort base station. In effect, the Mac becomes a software-based base station, and you save yourself the cost of a separate physical base station.
A modem. A few, proud people still get online by dialing via modem, which is built into some old AirPort base station models. The base station is plugged into a phone jack. Wireless Macs in the house can get online by triggering the base station to dial by remote control.
Tip
If you connect through a modern router or AirPort base station, you already have a great firewall protecting you. You don’t have to turn on macOS’s firewall.
You use the AirPort Utility (in your Applications → Utilities folder) to set up your base station; if you have a typical cable modem or DSL, the setup practically takes care of itself.
Whether you’ve set up your own wireless network or want to hop onto somebody else’s, Chapter 16 has the full scoop on joining Wi-Fi networks.
Cell Networks
If you have an iPhone or a similar cellphone, you may be able to get your Mac online even when you’re hundreds of miles from the nearest Ethernet jack or Wi-Fi hotspot. Thanks to tethering, your phone can act as an internet antenna for your laptop, relying on the slow, expensive, but almost ubiquitous cellular network for its connection. Details are in “Tethering (Personal Hotspot)”.
FireWire Networks
Apple is busily phasing out the convenient, fast FireWire jacks on its Macs. But if you have two FireWire-equipped Macs, you can create a blazing-fast connection between them with nothing more than a FireWire cable. Details are in the free downloadable appendix to this chapter called “FireWire Networking.” It’s available on this book’s “Missing CD” page at missingmanuals.com.
File Sharing: Three Ways
When you’re done wiring (or not wiring, as the case may be), your network is ready. Your Mac should “see” any Ethernet or shared USB printers, in readiness to print (Chapter 14). You can now play network games or use a network calendar. And you can now turn on file sharing, one of the most useful features of all.
In file sharing, you can drag files back and forth between different Macs (or even Windows PCs) on the network, exactly as though the other computer’s folder or disk were a hard drive connected to your own machine.
The thing is, it’s not easy being Apple. You have to write one operating system that’s supposed to please everyone, from the self-employed first-time newbie to the network administrator for NASA. You have to design a networking system simple enough for the laptop owner who just wants to copy things to a desktop Mac when returning from a trip, yet secure and flexible enough for the network designer at a large corporation.
Clearly, different people have different attitudes about the need for security and flexibility.
That’s why macOS offers three ways to share files, striking three different positions along the simplicity-to-flexibility spectrum:
The easiest way: AirDrop. This feature is dreamy—if there are other people in your house or office who have wireless Macs running Lion or later. Imagine this: You open the AirDrop folder, where you see everybody else’s icons. To give someone a file, you drop its icon on that person’s face. Done.
Slightly harder way: the Public folder. Every account holder has a Public folder. It’s free for anyone else on the network to access. Like a grocery store bulletin board, there’s no password required. Super-convenient, super-easy.
There’s only one downside, and you may not care about it: You have to move or copy files into the Public folder before anyone else can see them. Depending on how many files you want to share, this can get tedious, disrupt your standard organizational structure, and eat up disk space.
The flexible way: any folder. You can also make any file, folder, or disk available for inspection by other people on the network. This method means you don’t have to move files into the Public folder, for starters. It also gives you elaborate control over who is allowed to do what to your files. You might want to permit your company’s executives to see and edit your documents, but allow the peons in Accounting just to see them. And Andy, that unreliable goofball in Sales? You don’t want him even seeing what’s in your shared folder.
Of course, setting up all those levels of control means more work and more complexity.
The following pages tackle these three methods one at a time.
AirDrop
AirDrop is one of macOS’s star attractions. It’s a breakthrough in speed, simplicity, and efficiency. There’s no setup, no passwords involved. It lets you copy files to someone else’s Mac, iPhone, iPad, or iPod Touch up to 30 feet away, instantly and wirelessly; you don’t need an internet connection or even a Wi-Fi network. It works on a flight, a beach, or a sailboat in the middle of the Atlantic. It also works if you’re on a Wi-Fi network, doing other things online.
You can exchange files with any Mac running macOS Lion or later, and any i-gadget running iOS 7 or later.
Sending by AirDrop
Usually, you begin the sending process in one of two ways:
From the Finder. Right-click or two-finger click the file’s icon. From the shortcut menu, choose Share → AirDrop. The box shown in Figure 13-2 appears.
Note
Here’s a second way to send something in the Finder: Open the AirDrop window. (It’s listed in the Sidebar at the left side of every Finder window. Or choose Go → AirDrop, or press Shift-
 -R.) Drag the icon(s) you want to send onto the icon of the receiving device (Figure 13-3).
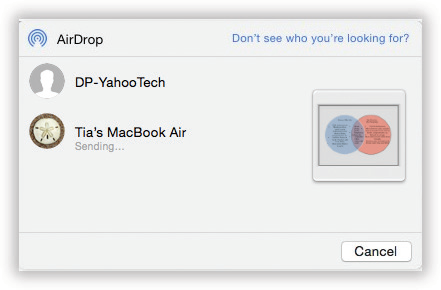
Figure 13-2. The icons of nearby AirDrop-friendly Apple gadgets and Macs show up in this fun-sized window. You’ve already said what you want to send; now you just have to specify who gets it. Click the destination device’s icon and then click Send.
From an app. When you’re looking at whatever you want to send, click the
 button. From the shortcut menu, choose AirDrop.
And where is that
button? Everywhere. It’s at the top of every Finder window and at the top of every Quick Look window. It’s in Open and Save boxes. It’s available on every page in Safari, map in Maps, photo in Photos, contact in Contacts, and note in Notes. Lots of non-Apple apps offer that button, too. (See “Does the file have the correct file name suffix?” for more on the Share button.)In each case, you should now proceed as shown in Figure 13-2.
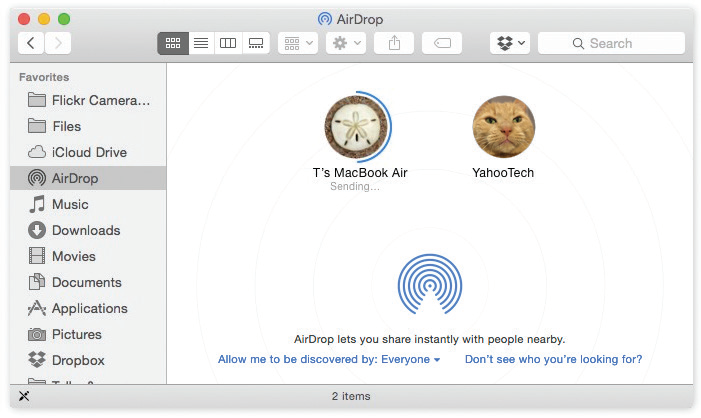
Figure 13-3. If there are other recent Macs within about 30 feet, you see their logged-in owners’ icons here. Usually, the icons display the Mac owners’ account pictures; but if they have facial photos in your Contacts, then you see those instead.
A message appears on the other gadget’s screen, asking if the owner wants to accept your file. If she chooses Accept, then the transaction is complete. Quick, effortless, wireless, delightful.
Note
At one time, you and your recipient’s Mac both had to have their AirDrop windows open. That’s no longer true; AirDrop works whether that window is open or not.
Eight Reasons AirDrop Might Seem Not to Work
Miraculous though AirDrop may seem when it’s working, certain stars do have to be in alignment. If AirDrop isn’t working as advertised, here are some things to check:
Both sender and receiver must have Bluetooth and Wi-Fi turned on. They also have to be within about 30 feet of each other.
AirDrop doesn’t work with really old Apple models. It does work with the MacBook Pro (made since late 2008), MacBook Air (since late 2010), MacBook (late 2008), iMac (early 2009), Mac mini (mid-2010), and Mac Pro (mid-2010).
And among i-devices, it requires an iPhone 5 or later, iPad mini (any generation), iPad (4th generation or later), or iPod Touch (5th generation or later).
On the Mac, AirDrop requires macOS Lion or later. On an iPhone, iPad, or iPod Touch, it requires iOS 7 or later.
If your Mac can’t seem to “see” other nearby, older Macs (pre-2012 models)—either when sending or receiving an AirDrop file—the process may require an extra step. If you’ve right-clicked or two-finger clicked an icon or used the
button in a program, click “Don’t see who you’re looking for?” at top right (see Figure 13-2) and then click Search for an Older Mac.The “Don’t see who you’re looking for?” link also appears in the AirDrop window in the Finder (you can see it in Figure 13-3). Here again, only by clicking Search for an Older Mac will you see the icons for pre-2012 Mac models show up.
And, by the way: When your Mac is seeing those older Macs, it can’t see newer ones—and vice versa.
If you don’t see the AirDrop icon in your Finder’s Sidebar, it’s because somebody turned off its checkbox in Finder → Preferences → Sidebar. (You can still use AirDrop, though.)
If your lucky recipient’s icon still isn’t showing up on your Mac, he may have AirDrop turned off or restricted.
Ask him to swipe up from the bottom of his screen and tap AirDrop (iOS device) or open the AirDrop window (Mac). Here you can control who can see you: Off (nobody), Contacts Only (people in your address book), or Everyone. It’s supposed to be a security precaution, but you may as well leave it set to Everyone; after all, you have to approve every file individually, so it’s not as though some passing hacker can shove evil files down your throat.
And if one of you has turned on Contacts Only, you still won’t be able to participate in AirDrop transactions unless you’re also logged into your iCloud account.
AirDrop doesn’t work if you’ve turned on “Block all connections” in your firewall (“The Firewall”).
AirDrop requires both sending and receiving devices to be on (awake).
Receiving a File by AirDrop
If someone’s sending you a file by AirDrop, the steps depend on whether you’re using a Mac or an i-gadget:
Receiving on the Mac. You get a notification (see Figure 13-4).
Tip
Actually, if you’re sending something to yourself—from your phone to your Mac, for example—this confirmation doesn’t appear. Apple notices that both devices are signed into the same iCloud account and figures you don’t need protection from yourself. So it just dumps the incoming file directly into your Downloads folder without making you accept it first. (You still get a notification that the transaction has happened.)
The file winds up in your Downloads folder. This folder generally sits on the Dock, so it’s easy to find. But you can also choose Go → Downloads, or press Option-
-L, to jump there.Receiving on an iPhone/iPad/iPod Touch. A message says “[Other guy’s name] would like to share [the file’s name].” Tap Decline or Accept.
If your iOS device knows what to do with the file, it opens automatically in the appropriate app (a photo in Photos, a web page in Safari, and so on). If it’s not sure what to do with it, then it offers a list of apps that can open it. For example, suppose someone’s just sent you a Word document. You’re offered a choice of apps that can handle Word files (either to open them or to store them), like Evernote and Dropbox. Tap the one you want.
If you don’t have any app that can open the file, iOS sometimes offers you the chance to download one that can. And if even that trick comes up empty-handed, your i-device rejects the incoming file altogether.
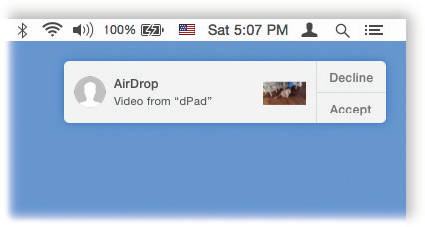
Figure 13-4. A file arriving on your Mac via AirDrop announces itself with a notification. You can click either Decline (you don’t want the file) or Accept. If you click Accept, the file transfer proceeds automatically. The transfer is encrypted, so evildoers nearby have no clue what you’re transferring (or even that you’re transferring). It winds up in your Downloads folder.
There’s a lot of great stuff in AirDrop:
If you see someone’s name beneath her icon in the AirDrop window, that means that she’s in your Contacts and has signed in with her Apple ID. That’s an extra bit of confidence that she is who her icon says she is.
AirDrop creates a temporary two-computer wireless network. That’s why it works even if you’re not in a Wi-Fi hotspot.
If you’re the one receiving a file, you can cancel a half-finished transfer by clicking the
 button on the progress bar that wraps around the sender’s icon in the AirDrop window. (Another way: If your Downloads folder is set to Stack view, then you can click the button in the corner of the file’s icon.)
Note
AirDrop also works from an iPhone to a Mac, of course. For directions on sending a file in that direction, see “AirDrop”.
Sharing Your Public Folder
All right. If AirDrop is so great, why doesn’t it wipe out all other forms of file transfer and save this book a bunch of pages? Because (a) it works only on Macs and Apple devices, (b) it works only wirelessly, and (c) it’s a one-way street. Other people can’t take files from your Mac—you have to shove the files to them.
This next method eliminates those limitations. It’s the Public-folder method.
Inside your Home folder, there’s a folder called Public. (Inside everybody’s Home folder is a folder called Public.) Anything you put into this folder is automatically available to everyone else on the network. They don’t need a password, they don’t need an account on your Mac—they just have to be on the same network, wireless or wired. They can put files here or copy things out.
To make your Public folder available to your networkmates, you have to turn on the File Sharing master switch. Choose System Preferences → Sharing, and then turn on File Sharing (as shown in Figure 13-5).
Now round up the files and folders you want to share with all comers on the network and drag them into your Home → Public folder. That’s all there is to it.
Note
You may notice that there’s already something in your Public folder: a subfolder called Drop Box. It’s there so that other people can give you files from across the network, as described in Figure 13-7.
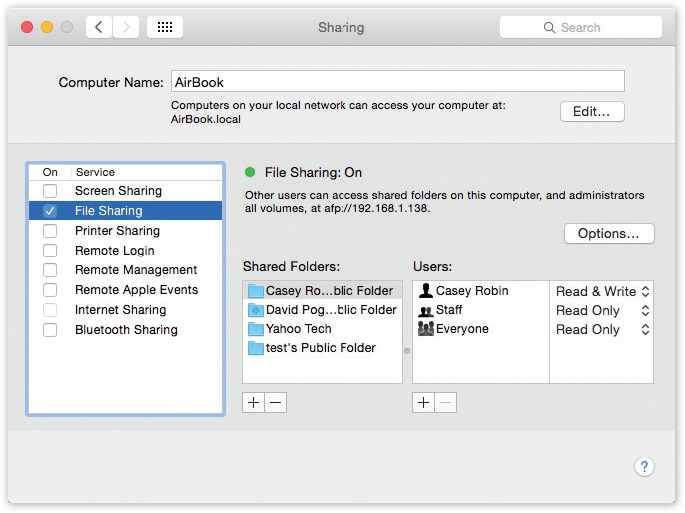
Figure 13-5. Here’s the master switch that makes your Public folder (and any other folders you designate) available to other people on the network. You can edit the Computer Name, if you like. Your Mac will appear on the network with this name. Make it nice and descriptive, such as Front Desk iMac.
So now that you’ve set up Public folder sharing, how are other people supposed to access your Public folder? See “Accessing Shared Files”.
Sharing Any Folder
If the Public-folder method seems too simple and restrictive, you can graduate to the “share any folder” method. In this scheme, you can make any file, folder, or disk available to other people on the network.
The advantage here is that you don’t have to move your files into the Public folder; they can sit right where you have them. And this time you can set up elaborate sharing privileges (also known as permissions) that grant individuals different levels of access to your files.
This method is more complicated to set up than that Public-folder business. In fact, just to underline its complexity, Apple has created two different setup procedures. You can share one icon at a time by opening its Get Info window; or you can work in a master list of shared items in System Preferences. The following pages cover both methods.
The Get Info Method
Here’s how to share a Mac file, disk, or folder disk using its Get Info window. The following steps assume you’ve turned on System Preferences → Sharing → File Sharing, as shown in Figure 13-5.
Select the folder or disk you want to share. Choose File → Get Info.
The Get Info dialog box appears (Figure 13-6). Expand the General panel if it’s not already visible.
Note
Sharing an entire disk means every folder and file on it is available to anyone you give access to. On the other hand, by sharing only a folder or two, you can keep most of the stuff on your hard drive private, out of view of curious network comrades. Sharing only a folder or two does them a favor, too, by making it easier for them to find the files they’re supposed to have. This way, they don’t have to root through your entire drive looking for the stuff they actually need.
Turn on “Shared folder.”
If file sharing isn’t turned on, you’re asked to confirm; click Enable. Enter your administrator password, if necessary.
Tip
To help you remember what you’ve made available to other people on the network, a banner labeled “Shared Folder” appears across the top of any Finder window you’ve shared. It even appears at the top of the Open and Save dialog boxes.
OK, this disk or folder is now shared. But with whom?
Expand the Sharing & Permissions panel, if it’s not already visible. Click the
 icon and enter your administrator’s password.
The controls in the Sharing & Permissions area spring to life and become editable. At the bottom of the Info panel is a little table. The first column can display the names of individual account holders, like Casey or Chris, or groups of account holders, like Everyone or Accounting Dept.
The second column lists the privileges each person or group has for this folder.
Now, the average person has no clue what “privileges” means, and this is why things get a little hairy when you’re setting up folder-by-folder permissions. But read on; it’s not as bad as it seems.
Edit the table by adding people’s names. Then set their access permissions.
At the moment, your name appears in the Name column, and it probably says Read & Write in the Privilege column. In other words, you’re currently the master of this folder. You can put things in, and you can take things out.
If you just want to share files with yourself, so you can transfer them from one computer to another, you can stop here.
If you want to share files with other people—well, at the moment, the privileges for Everyone are probably set to “Read only.” Other people can see this folder, but they can’t do anything with it.
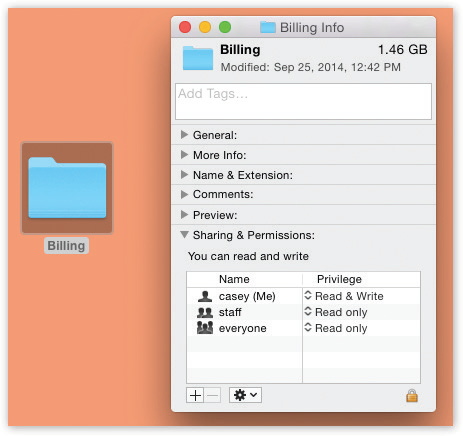
Figure 13-6. The file-sharing permissions controls are here, in the Get Info box for any file, folder, or disk.
Your job is to work through this list of people, specifying how much control each person has over the file or folder you’re sharing.
To add the name of a person or group, click the + button below the list. The list shown in Figure 13-7 appears.
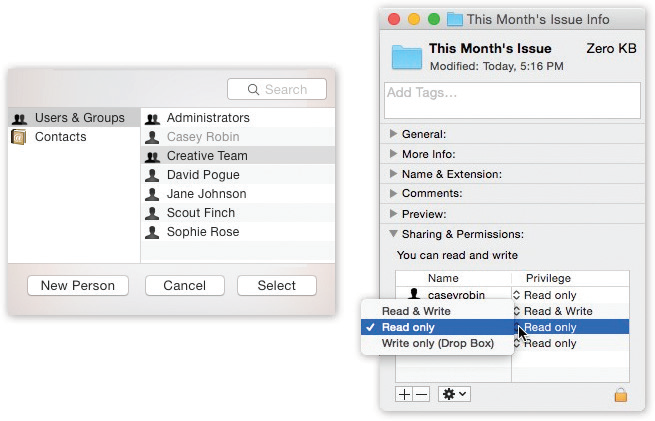
Figure 13-7. This list includes every account holder on your Mac, plus groups you’ve set up, plus the contents of your address book. One by one, you can add them to the list of lucky sharers of your files or folders—give each a password, if they don’t already have accounts on this Mac—and then change the degree of access they have to the stuff you’re sharing.
Now click a name in the list. Then, from the Privilege pop-up menu, choose a permissions setting:
Read & Write has the most access of all. This person, like you, can add, change, or delete any file in the shared folder, or make any changes she likes to a document. Give Read & Write permission to people you trust not to mess things up.
Read only means “Look, but don’t touch.” This person can see what’s in the folder (or file) and can copy it, but he can’t delete or change the original. It’s a good setting for distributing company documents or making source files available to your minions.
Write only (Drop Box) means other people can’t even open the folder. They can drop things into it, but it’s like a mail slot: The letter disappears into the slot, and then it’s too late for them to change their minds. As the folder’s owner, you can do what you like with the deposited goodies. This drop-box effect is great when you want students, co-workers, or family members to be able to turn things in to you—homework, reports, scandalous diaries—without running the risk that someone else might see those files. (This option doesn’t appear for documents—only disks and folders.)
No access is an option only for Everyone. It means other people can see this file or folder’s icon but can’t do a thing with it.
Tip
Usually, you’ll want the privileges for the folder to also apply to everything inside it; it would be a real drag to have to change the sharing privileges of the contents one icon at a time. That’s why the
 menu at the bottom of the Get Info box has a command called “Apply to enclosed items.”
Close the Get Info window.
Now the folder is ready for invasion from across the network.
The System Preferences Method
It’s very convenient to turn on sharing one folder at a time, using the Get Info window. But there’s another way in, too, one that displays all your shared stuff in a handy master list.
To see it, choose System Preferences → Sharing → File Sharing (and make sure it’s turned on). Now you’re looking at a slightly different kind of permissions table, shown in Figure 13-8. It has three columns:
Shared folders. The first column lists the files, folders, and disks you’ve shared. You’ll probably see that every account’s Public folder is already listed here, since they’re all shared automatically. (You can turn off sharing for a Public folder, too, just by clicking it and then clicking the — button.)
But you can add more icons to this list. Either drag them into the list directly from the desktop or a Finder window, or click the +, navigate to the item you want to share, select it, and then click Add. Either way, that item now appears in the Shared Folders list.
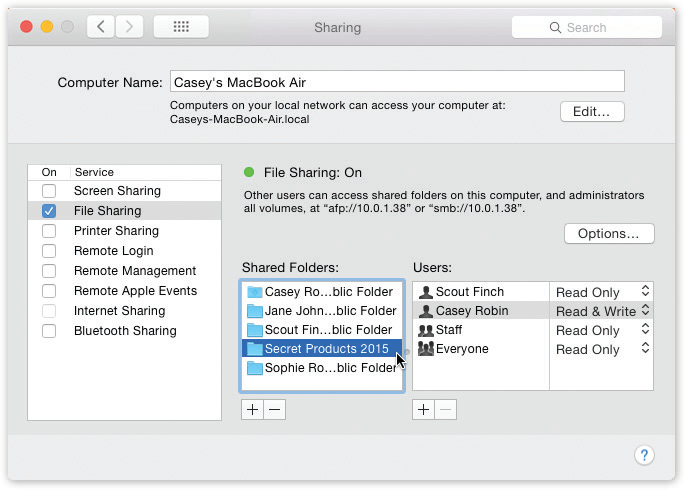
Figure 13-8. Hiding in System Preferences is a list of every disk and folder you’ve shared. To stop sharing something, click it and then click the — button. To share a new disk or folder, drag its icon off the desktop, or out of its window, directly into the Shared Folders list.
Users. When you click a shared item, the second column sprouts a list of who gets to work with it from across the network. You’re listed here, of course, since it’s your stuff. There’s also a listing here for Everyone, which really means “everyone else”—that is, everyone who’s not specifically listed here.
You can add to this list, too. Click + to open the person-selection box shown in Figure 13-7. It lists the other account holders on your Mac, and some predefined groups, as well as the contents of your Contacts.
Note
Most of the Contacts people don’t actually have accounts on this Mac, of course. If you choose somebody from this list, you’re asked to make up an account password. When you click Create Account, you’ve actually created a Sharing Only account on your Mac for that person, as described in the box below. When you return to the Accounts pane of System Preferences, you’ll see that new person listed.
Double-click a person’s name to add her to the list of people who can access this item from over the network, and then set up the appropriate privileges (described next).
To remove someone from this list, just click the name and then click the — button.
Users. This third column lets you specify how much access each person in the second column has to this folder. Your choices, once again, are Read & Write (full access to change or delete this item’s contents); Read Only (open or copy, but can’t edit or delete); and Write Only (Drop Box), which lets the person put things into this disk or folder, but not open it or see what else is in it.
For the Everyone group, you also get an option called No Access, which means this item is completely off-limits to everyone else on the network.
And now, having slogged through all these options and permutations, your Mac is ready for invasion from across the network.
Accessing Shared Files
The previous pages have described setting up a Mac so people at other computers can access its files. There’s an easy, limited way (use the Public folder) and a more elaborate way (turn on sharing settings for each folder individually).
Now comes the payoff for both methods: sitting at another computer and connecting to the one you set up. There are two ways to go about it: You can use the Sidebar, or you can use the older, more flexible Connect to Server command. The following pages cover both methods.
Connection Method A: Use the Sidebar
Suppose, then, you’re seated in front of your Mac, and you want to see the files on another Mac on the network. Proceed like this:
Open any Finder window. Click Network.
The Network icon appears in the Locations category of the Sidebar at the left side of the window. It reveals icons for all the computers on the network. See Figure 13-9.
Tip
The same Sidebar items show up in the Save and Open dialog boxes of your programs, too, making the entire network available to you for opening and saving files.
If you don’t see a certain Mac’s icon here, it might be turned off, it might not be on the network, or it might have File Sharing turned off.
Note
Or it might not have the right file-sharing type turned on. To check, open System Preferences → Sharing; click File Sharing and then Options. You’ll see checkboxes for AFP and SMB; your computers can’t see each other if they don’t have one of these options in common.

Figure 13-9. Top: Click Network in the Sidebar. Macs appear in the Sidebar with whatever names they’ve been given in System Preferences → Sharing. Their icons usually resemble the computers themselves.
Bottom: When you open a computer’s icon, you see whatever shared folders it contains—starting with a Public folder for each account holder.If you don’t see any computers at all in the Network “folder,” then your computer might not be on the network. Or maybe you’ve turned off the checkboxes for Connected Servers and Bonjour Computers in Finder → Preferences → Sidebar.
Tip
If the other Mac is just asleep, it still shows up in the Sidebar, and you can wake it up to get at it. How is that possible? Through the miracle of the Wake for Network Access feature described in “GEM IN THE ROUGH Auto-Wake for Network Access”.
If you’re on a corporate-style network that has the sub-chunks known as workgroups, you may also see any “network neighborhoods” (limbs of your network tree). For example, you may see the names of network zones (clusters of machines, as found in big companies and universities).
Or, if you’re trying to tap into a Windows machine, open the icon representing the workgroup (computer cluster) that contains the machine you want. In small office networks, it’s usually called MSHOME or WORKGROUP. In big corporations, these workgroups can be called almost anything—as long as the name is no more than 15 letters long with no punctuation. (Thanks, Microsoft.)
If you do see icons for workgroups or other network “zones,” double-click until you’re seeing the icons for individual computers.
Note
If you’re a network nerd, you may be interested to note that macOS can “see” servers that use the SMB/CIFS, NFS, FTP, and WebDAV protocols running on macOS Server, Unix, Linux, Novell NetWare, and Windows servers (NT, 2000, XP, Vista, and Windows 7, 8, or 10). But the Sidebar reveals only the shared computers on your subnet (your local, internal office network).
Double-click the computer whose files you want to open.
In the main window, you now see the Public Folder icons for each account holder on that computer: Mom, Dad, Sissy, whatever, as shown in Figure 13-9. (They may have shared other folders with you as well.) If you have an account on the other computer, you’ll see a folder representing your stuff, too. At this point, you’re considered a guest.
Note
This amount of access depends on a setting in System Preferences → Users & Groups. Click the Guest account to see it: “Allow guests to connect to shared folders.” That checkbox is usually turned on—but it’s something to check if you can’t seem to connect.
From here, the remaining instructions diverge, depending on whether you want to access other people’s stuff or your stuff. That’s why there are two alternative versions of step 3 here:
3a. If you want to access the stuff that somebody else has left for you, then double-click that person’s Public folder.
Instantly, that folder’s contents appear in the Finder window.
In this situation, you’re only a guest. You don’t have to bother with a password. On the other hand, the only thing you can generally see inside the other person’s account folder is his Public folder.
Tip
Actually, you might see other folders here—if the account holder has specifically shared them and decided that you’re important enough to have access to them.
One thing you’ll find inside the Public folder is the Drop Box folder. This folder exists so you can give files and folders to the other person. You can drop any of your own icons onto the Drop Box folder—but you can’t open the Drop Box folder to see what other people have put there.
If you see anything else at all in the Public folder you’ve opened, it’s stuff the account holder has copied there for the enjoyment of you and your networkmates. You’re not allowed to delete anything from the other person’s Public folder or make changes to anything in it.
You can, however, open those icons, read them, or even copy them to your Mac—and then edit your copies.
Tip
Every now and then, you’ll click the name of a Mac in the Finder Sidebar, hoping to see its contents—and instead of seeing a list of the shared Public folders, you’ll get a Not Connected or Connection Failed message at the top of your window.
In that case, go to the shared Mac and do this: Open System Preferences → Sharing. Click File Sharing and then Options. Turn off “Share files and folders using SMB.” Close System Preferences. Often, that’s all it takes to make your Mac visible and connectable from other Macs on the network. (If not, then try restarting the shared Mac to make the SMB change stick.)
3b. To access your own Home folder on the other Mac, click the Connect As button (Figure 13-10). Sign in as usual.
When the “Connect to the file server” box appears, you’re supposed to specify your account name and password (from the Mac you’re tapping into). This is the same name and password you’d use to log in if you were actually sitting at that machine.
Type your account name (long or short version) and password. And if you didn’t set up a password for your account, leave the password box empty.
Tip
The dialog box shown in Figure 13-10 includes the delightful and timesaving “Remember this password in my keychain” option, which makes the Mac memorize your password for a certain disk so you don’t have to type it—or even see this dialog box—every darned time you connect. (If you have no password, though, then “Remember this password” doesn’t work. You’ll have to confront—and press Return to dismiss—the “Connect to the file server” box every time.)
When you click Connect (or press Return), the other Mac’s icon shows up in your Sidebar, and its contents appear in the main window. (The other Mac’s icon may also show up on the desktop, if you’ve turned on the “Connected Servers” option in Finder → Preferences → Sidebar.)
Note
Once you’ve connected to a Mac using your account, the other Mac has a lock on your identity. You’ll be able to connect to the other Mac over and over again during this same computing session, without ever having to retype your password.
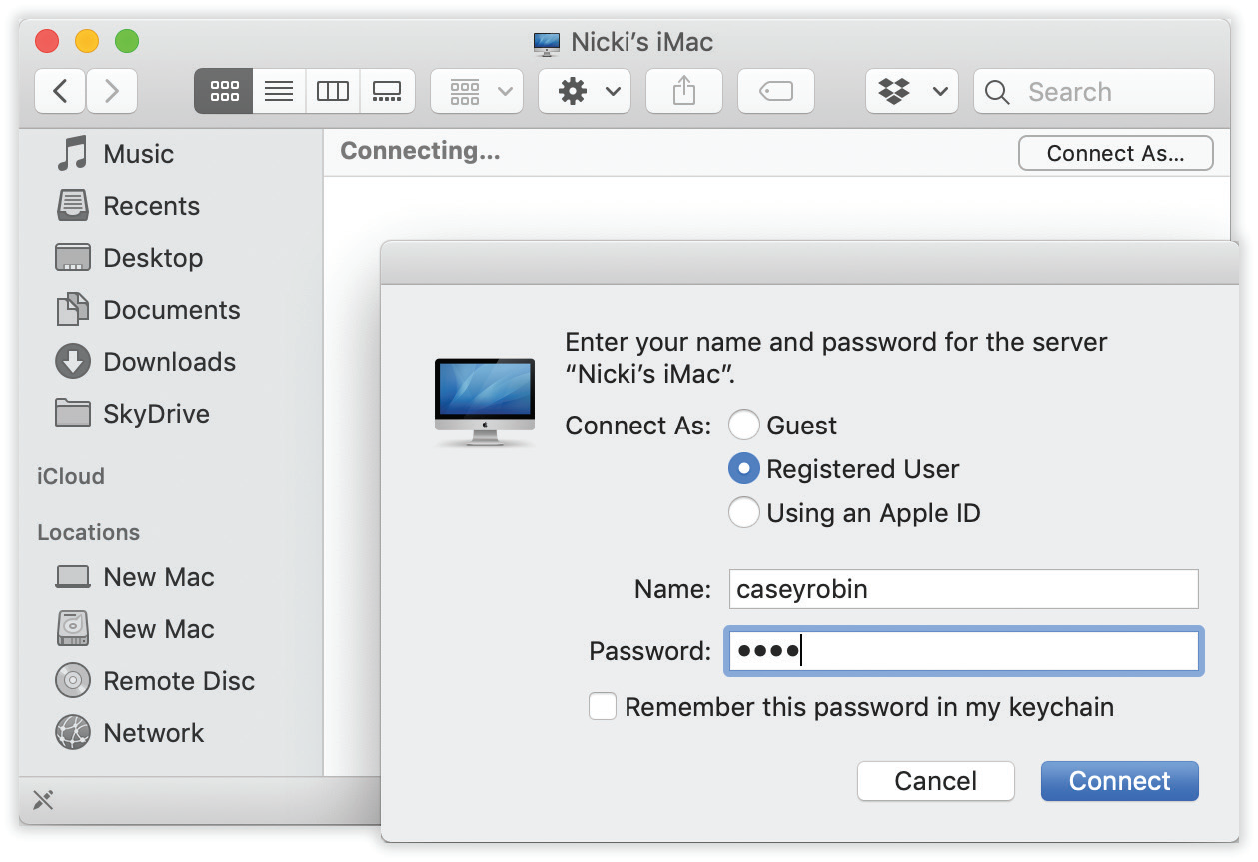
Figure 13-10. You can sign into your account on another Mac on the network (even while somebody else is using that Mac in person). Click “Connect as” and then enter your name and password. Turn on “Remember this password in my keychain” to speed up the process for next time. The Change Password button lets you change your account password on the other machine. No matter which method you use to connect to a shared folder or disk, its icon shows up in the Sidebar.
In the meantime, you can double-click icons to open them, make copies of them, and otherwise manipulate them exactly as though they were icons on your own hard drive. Depending on what permissions you’ve been given, you can even edit or trash those files.
Tip
There’s one significant difference between working with “local” icons and working with those that sit elsewhere on the network. When you delete a file from another Mac on the network, either by pressing the Delete key or by dragging it to the Trash, a message appears to let you know that you’re about to delete that item instantly and permanently. It won’t simply land in the Trash “folder,” awaiting the Empty Trash command.
You can even use Spotlight to find files on that networked disk. If the Mac across the network is running Leopard or a later Mac version, in fact, you can search for words inside its files, just as though you were sitting in front of it. If not, you can still search for text in files’ names.
Connection Method B: Connect to Server
The Sidebar method of connecting to networked folders and disks is practically effortless. It involves nothing more than clicking your way through folders—a skill that, in theory, you already know.
But the Sidebar method has its drawbacks. For example, the Sidebar doesn’t let you type in a disk’s network address. As a result, you can’t access any shared disk on the internet (an FTP site, for example), or indeed anywhere beyond your local subnet (your own small network).
Fortunately, there’s another way. When you choose Go → Connect to Server, you get the dialog box shown in Figure 13-11. You’re supposed to type in the address of the shared disk you want.
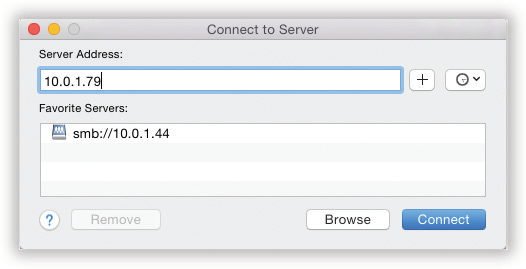
Figure 13-11. The Sidebar method of connecting to shared disks and folders is quick and easy, but it doesn’t let you connect to certain kinds of disks. The Connect to Server method entails plodding through several dialog boxes, but it can find just about every kind of networked disk.
For example, from here you can connect to the following:
Everyday Macs on your network. If you know the IP address of the Mac you’re trying to access (you geek!), you can type nothing but its IP address into the box and then hit Connect. Or you can just type its Bonjour name, something like this: afp://upstairs-PowerMac.local/.
Tip
To find out your Mac’s IP address, open the Network pane of System Preferences. There, near the top, you’ll see a message like this: “Wi-Fi is connected to Tim’s Hotspot and has the IP address 192.168.1.113.” That’s your IP address.
To see your Bonjour address, open the Sharing pane of System Preferences. Click File Sharing. Near the top, you’ll see the computer name with “.local” tacked onto its name—and hyphens instead of spaces—like this: Little-MacBook.local.
After you enter your account password and choose the shared disk or folder you want, you’re connected exactly as though you had clicked “Connect as” (Figure 13-10).
The next time you open the Connect to Server dialog box, macOS remembers that address, as a courtesy to you, and shows it pre-entered in the Address field.
Macs across the internet. If your Mac has a permanent (static) IP address, then the computer itself can be a server, to which you can connect from anywhere in the world via the internet. Details on this procedure are in Chapter 20.
Windows machines. Find out the PC’s IP address or computer name, and then use this format for the address: smb://192.168.1.34 or smb://Cheapo-Dell.
After a moment, you’re asked to enter your Windows account name and password, and then to choose the name of the shared folder you want. When you click OK, the shared folder’s contents appear in the window, ready to use, and the computer’s icon appears in your Sidebar. (More on sharing with Windows PCs later in this chapter.)
Tip
If you know the name of the shared folder, you can add that after a slash, like this: smb://192.168.4.23/sharedstuff. You save yourself one dialog box.
NFS servers. If you’re on a network with Unix machines, you can tap into one of their shared directories using this address format: nfs://Machine-Name/pathname, where Machine-Name is the computer’s name or IP address, and pathname is the folder path to the shared item you want.
FTP servers. MacOS makes it simple to bring FTP servers onto your screen, too. (These are the drives, out there on the internet, that store the files used by websites.)
In the Connect to Server dialog box, type the FTP address of the server you want, like this: ftp://www.apple.com. If the site’s administrators have permitted anonymous access—the equivalent of a Guest account—that’s all there is to it. A Finder window pops open, revealing the FTP site’s contents.
If you need a password for the FTP site, however, you’re now asked for your name and password.
Tip
You can eliminate that password-dialog-box step by using this address format: ftp://yourname:[email protected].
Once you type it and press Return, the FTP server’s icon appears in the Sidebar. Its contents appear, too, ready to open or copy.
WebDAV server. This special web-based shared disk requires a special address format, something like this: http://Computer-Name/pathname.
In each case, once you click OK, you may be asked for your name and password.
And now, some timesaving features in the Connect to Server box:
Once you’ve typed a disk’s address, you can click + to add it to the list of server favorites. The next time you want to connect, you can just double-click its name.
The clock-icon pop-up menu lists Recent Servers—computers you’ve accessed recently over the network. If you choose one of them from this pop-up menu, you can skip having to type in an address.
Note
Like the Sidebar network-browsing method, the Connect to Server command displays each connected computer as an icon in your Sidebar, even within the Open or Save dialog boxes of your programs. You don’t have to burrow through the Sidebar’s Network icon to open files from them, or to save files onto them.
Disconnecting Yourself
When you’re finished using a shared disk or folder, you can disconnect from it as shown in Figure 13-12.
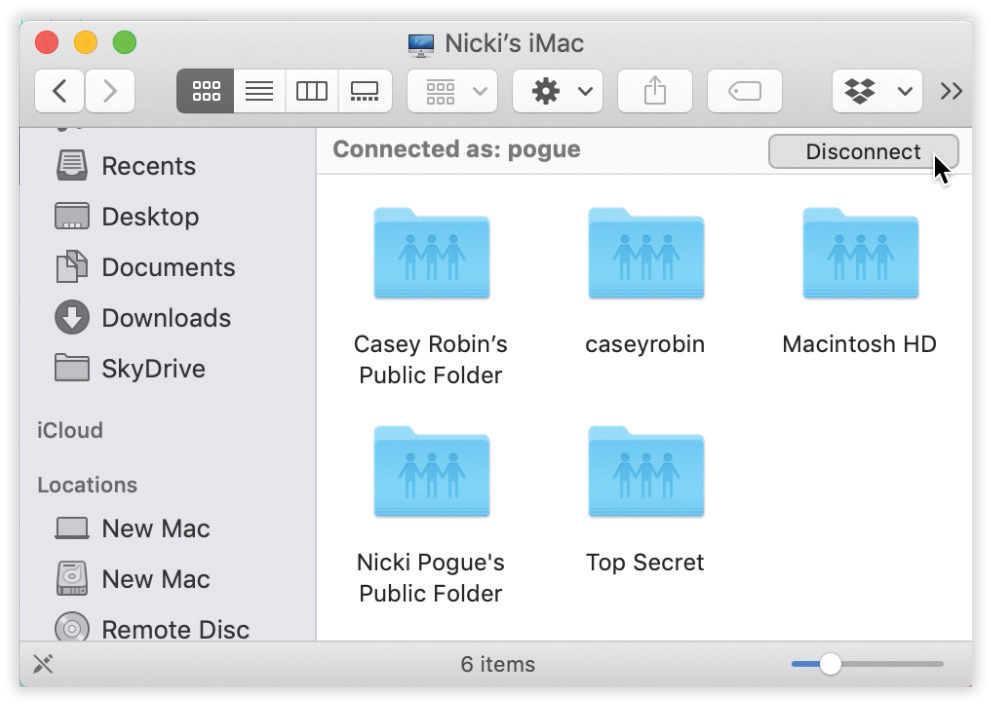
Figure 13-12. To disconnect from a shared network disk or folder, click Disconnect at the top-right corner of the window.
Disconnecting Others
In macOS, you really have to work if you want to know whether other people on the network are accessing your Mac. You have to choose System Preferences → Sharing → File Sharing → Options. There you’ll see something like “Number of users connected: 1.”
Maybe that’s because there’s nothing to worry about. You certainly have nothing to fear from a security standpoint, since you control what others can see on your Mac. Nor will you experience much computer slowdown as you work, thanks to macOS’s prodigious multitasking features.
Still, if you’re feeling particularly antisocial, you can slam shut the door to your Mac. Just open System Preferences → Sharing and turn off File Sharing. If anybody is, in fact, connected to your Mac at the time (from a Mac), you, the door-slammer, get to see the dialog box in Figure 13-13, which sends a little warning message to whomever’s connected to your Mac.
If nobody is connected right now, your Mac instantly becomes an island once again.
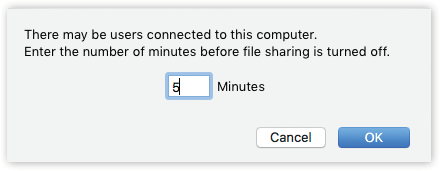
Figure 13-13. This dialog box asks you how much notice you want to give your co-workers that they’re about to be disconnected.
Networking with Windows
Macs and Windows PCs can see one another on the network, with no special software (or talent) required. In fact, you can go in either direction. Your Mac can see shared folders on a Windows PC, and a Windows PC can see shared folders on your Mac.
It goes like this.
Seated at the Mac, Seeing the PC
Suppose you have a Windows PC and a Mac on the same wired or wireless network. Here’s how you get the Mac and PC chatting:
On your Windows PC, share some files.
This isn’t really a book about Windows networking (thank heaven), but here are the basics.
On a PC with Windows 8 or Windows 10, there may be nothing to it. All your personal files probably come preshared. You can skip to step 2.
If step 2 doesn’t seem to work, then maybe your PC files aren’t already shared, and you have some reading ahead of you:
Just as on the Mac, there are two ways to share files in Windows. One of them is super-simple: You just copy the files you want to share into a central, fully accessible folder. As long as nobody has turned off the Guest access feature, no passwords, accounts, or other steps are required.
In Windows Vista, that’s the Public folder, which appears in the Navigation pane of every Explorer window. (In Vista, there’s one Public folder for the whole computer, not one per account holder.)
In Windows 7, there’s a Public folder in each library. That is, there’s a Public Documents, Public Pictures, Public Music, and so on.
Note
There is no system of Public folders in Windows 8 and later—but if you upgraded your PC from an earlier Windows version, then the Public folders are still there and work the same way.
The second, more complicated method is the “share any folder” method, just as in macOS. In Vista, you right-click the folder you want to share, choose Properties from the shortcut menu, click the Sharing tab, and then turn on “Share this folder on the network.”
In Windows 7, use the Share With menu at the top of any folder’s window; in Windows 8 or later, use the Share tab on the Ribbon at the top of any Explorer window at the desktop.
Repeat for any other folders you want to make available to your Mac.
On the Mac, open any Finder window.
The shared PCs appear as individual computer names in the Sidebar (Figure 13-14).
(If you work in a big company, you may have to click the All icon to see the icons of their workgroups—network clusters. Unless you or a network administrator changed it, the workgroup name is probably MSHOME or WORKGROUP. Double-click the workgroup name you want.)
Tip
You can also access the shared PC via the Connect to Server command, as described in “Connection Method B: Connect to Server”. You could type into it smb://192.168.1.103 (or whatever the PC’s IP address is) or smb://SuperDell (or whatever its name is) and hit Return—and then skip to step 5. In fact, using the Connect to Server method often works when the Sidebar method doesn’t.
Click the name of the computer you want.
If you’re using one of the simple file-sharing methods on the PC, as already described, that’s all there is to it. The contents of the Shared Documents or Public folder now appear on your Mac’s screen. You can work with them just as you would your own files.
If you’re using one of the “shared folder” methods, read on.
Click Connect As.
This button appears in the top-right corner of the Finder window. Now you’re asked for your name and password (Figure 13-14, top).
Note
In Windows 8 and later, there are two ways to log into a computer—two kinds of user accounts. You can sign in with a Microsoft ID (which is just like an Apple ID) or with a regular local account. (Microsoft pushes you very hard to use a Microsoft ID; many features of Windows won’t work without it.)
If you’re trying to connect to a Windows account with a Microsoft ID, be sure to use that as the account name in this step (it looks like an email address), along with the corresponding password. If you enter the account’s human name, you won’t be able to connect.
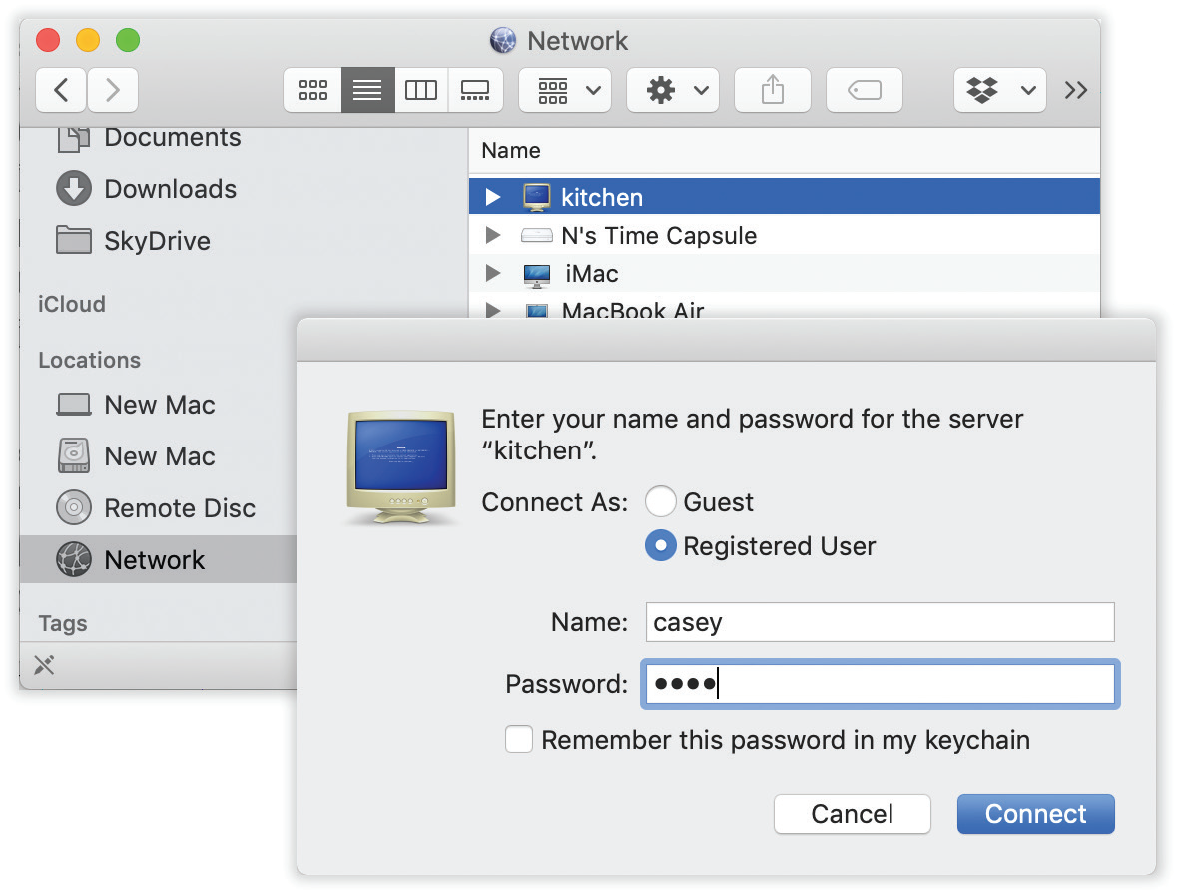
Figure 13-14. Click the PC’s name in the Network folder of the Sidebar (bottom). If it’s part of a workgroup, click your workgroup name first.
Next, enter the account name and password you’d enter if you were seated at the PC—your regular login password (top).
When you click Connect, you get to see all your PC files in the Finder window.Enter the name and password for your account on the PC, and then click OK.
The contents of the shared folder on the Windows machine appear in your Finder window, just as though you’d tapped into another Mac (Figure 13-14, bottom). The icon of the shared folder appears on your desktop, too, and an Eject button (
 ) appears next to the PC’s name in your Sidebar.
From here, it’s a simple matter to drag files between the machines, open Word documents on the PC using Word for the Mac, and so on—exactly like you’re hooked into another Mac.
Tip
Finally, for heaven’s sake, make an alias of the Windows folder you’ve finally opened. That way, you can just double-click to open it the next time!
Seated at the PC, Seeing the Mac
Cross-platformers, rejoice: MacOS lets you share files in both directions. Not only can your Mac see other PCs on the network, but they can see the Mac, too.
On the Mac, open System Preferences → Sharing. Click File Sharing (make sure File Sharing is turned on), and then click Options to open the dialog box shown in Figure 13-15.
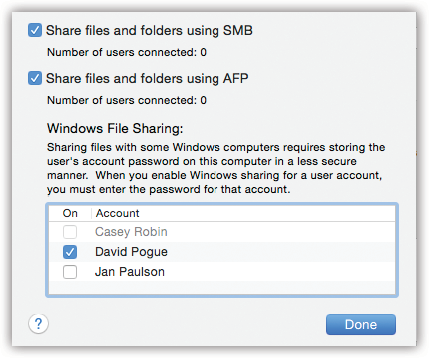
Figure 13-15. Prepare your Mac for visitation by the Windows PC. It won’t hurt a bit. The system-wide On switch for invasion from Windows is the first checkbox shown here, in the System Preferences → Sharing → File Sharing → Options box.
Next, turn on the individual accounts of people you want to allow to connect from the PC. You’ll be asked to enter their account passwords, too. Click Done when you’re done.
Turn on “Share files and folders using SMB.” Below that checkbox, you see a list of all the accounts on your Mac. Turn on the checkboxes to specify which Mac accounts you want to be able to access. You’ll have to type in each person’s password, too. Click Done.
Now you’re ready to open your Mac files on the PC.
If your PC has Windows Vista, then choose Start → Network; if it’s Windows 7 or later, then expand the Network heading in the Sidebar of any desktop (File Explorer) window. If you’ve sacrificed the proper animals to the networking gods, your Mac’s icon should appear in the network window, as shown in Figure 13-16, top.
Double-click the Mac’s icon. Public-folder stuff is available immediately. Otherwise, you have to sign in with your Mac account name and password; Figure 13-16, middle, has the details.
In the final window, you see your actual Home folder—on the Windows PC! You’re ready to open its files, copy them back and forth, or whatever (see Figure 13-16, bottom).
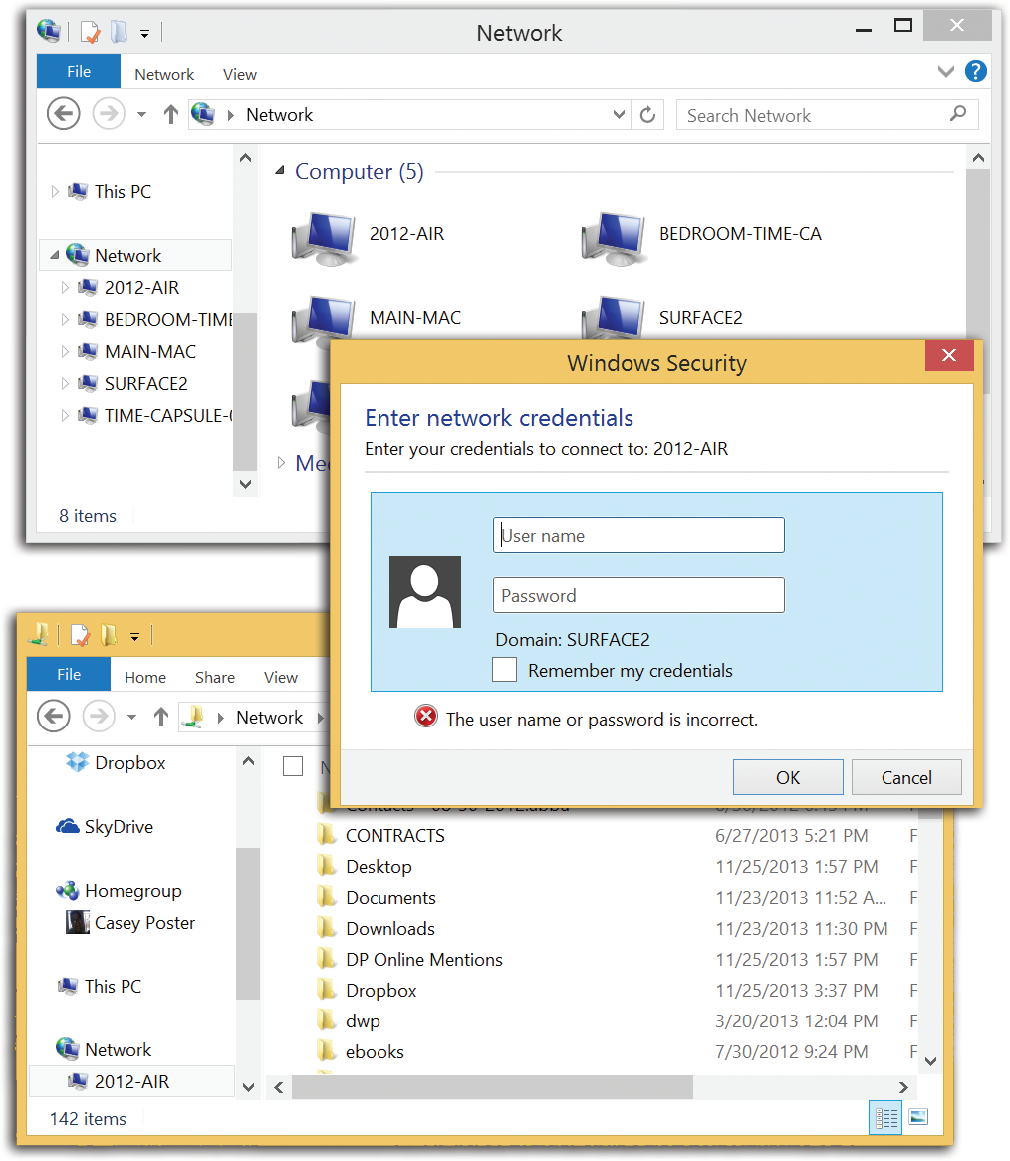
Figure 13-16. Top: Double-click the Mac you want to visit from your PC (Windows 8.1 is shown here).
Middle: Type your Mac’s name and password.
(If you’re using Vista or earlier, it’s more complicated. Enter your Mac’s NetBIOS name in all capitals, or its IP address, and then a backslash, and then your Mac account short name. You can find out your Mac’s NetBIOS name—what Windows calls it—on the Network pane of System Preferences. Click Advanced, and then WINS.)
Turn on “Remember my credentials” if you plan to do this again someday. Click OK.
Bottom: Here’s your Mac Home folder—in Windows! Open it up to find all your stuff.
More Mac-Windows Connections
The direct Mac-to-Windows file-sharing feature of macOS is by far the easiest way to access one another’s files. But it’s not the only way. Chapter 6 offers a long list of other options, from flash drives to the third-party service Dropbox.
Screen Sharing
MacOS has answered the prayers of baffled beginners and exasperated experts everywhere. Now, when a novice needs help from a guru, the guru doesn’t have to run all the way downstairs or fly to Omaha to assist. Thanks to macOS’s screen-sharing feature, you can see exactly what’s on the screen of another Mac, from across the network—and even seize control of the other Mac’s mouse and keyboard (with the newbie’s permission, of course).
(Anyone who’s ever tried to help someone troubleshoot over the phone knows exactly how helpful this is. If you haven’t, this small example may suffice: “OK, open the Apple menu and choose About This Mac.” Pause. “What’s the Apple menu?”)
Nor is playing Bail-Out-the-Newbie the only situation when screen sharing is useful. It’s also great for collaborating on a document, showing something to someone for approval, or just freaking people out. It can also be handy when you are the owner of both Macs (a laptop and a desktop, for example), and you want to run a program you don’t have on the Mac in front of you. For example, you might want to adjust the playlist selection on the upstairs Mac that’s connected to your sound system.
Or maybe you just want to keep an eye on what your kids are doing on the Macs upstairs in their rooms.
The controlling person can do everything on the controlled Mac, including running programs, messing around with the folders and files, and even shutting it down. You can even press keystrokes on your Mac—![]() -Tab,
-Tab, ![]() -space,
-space, ![]() -Option-Escape, and so on—to trigger the corresponding functions on the other Mac.
-Option-Escape, and so on—to trigger the corresponding functions on the other Mac.
MacOS is crawling with ways to use screen sharing. You can do it over a network, over the internet, and even during a Messages chat.
Truth is, the Messages method, described in Chapter 19, is much simpler and better than the small-network method described here. It doesn’t require names or passwords, it doesn’t require the same macOS version on both Macs, it’s easy to flip back between seeing the other guy’s screen and your own, and you can transfer files by dragging them from your screen to the other guy’s (or vice versa). Then again, the small-network method described here is built right into the Finder and doesn’t require logging into Messages.
In modern macOS screen sharing, you can log into a distant Mac and control it as though you were logged into your own account—while somebody else is using it and seeing a totally different screen! Read on.
Other Mac: Give Permission in Advance
Trying to understand meta concepts like seeing one Mac’s screen on the monitor of another can get confusing fast. So in this example, suppose that you’re seated at Your Mac, and you want to control the Other Mac.
Now, it would be a chaotic world if any Mac could suddenly take control of any other Mac (although it could be fun). Fortunately, though, nobody can share your screen or take control of your Mac without your explicit permission. To give such permission, sit down at Other Mac. Choose System Preferences → Sharing, and then turn on Screen Sharing.
At this point, there are three levels of security to protect Other Mac against unauthorized remote-control mischief:
Secure. If you select All Users, then anyone with an account on your Mac will be able to tap in and take control anytime they like, even when you’re not around. They’ll just have to enter the same name and password they’d use if they were sitting in front of your machine.
If “anyone” means “you and your spouse” or “you and the two other fourth-grade teachers,” then that’s probably perfectly fine.
Securer. For greater security, though, you can limit who’s allowed to stop in. Click “Only these users” and then click the +. A small panel appears, listing everyone with an account on your Mac. Choose the ones you trust not to mess things up while you’re away from your Mac (Figure 13-17).
Tip
You can permit people to see your Mac’s screen remotely by entering their Apple ID and passwords. That’s a lot simpler and uses less disk space than before, when each person had to have a full-blown account on your Mac, complete with Pictures folder, Movies folder, and so on. To set this up, see the box in “GEM IN THE ROUGH Sharing Only Accounts”.
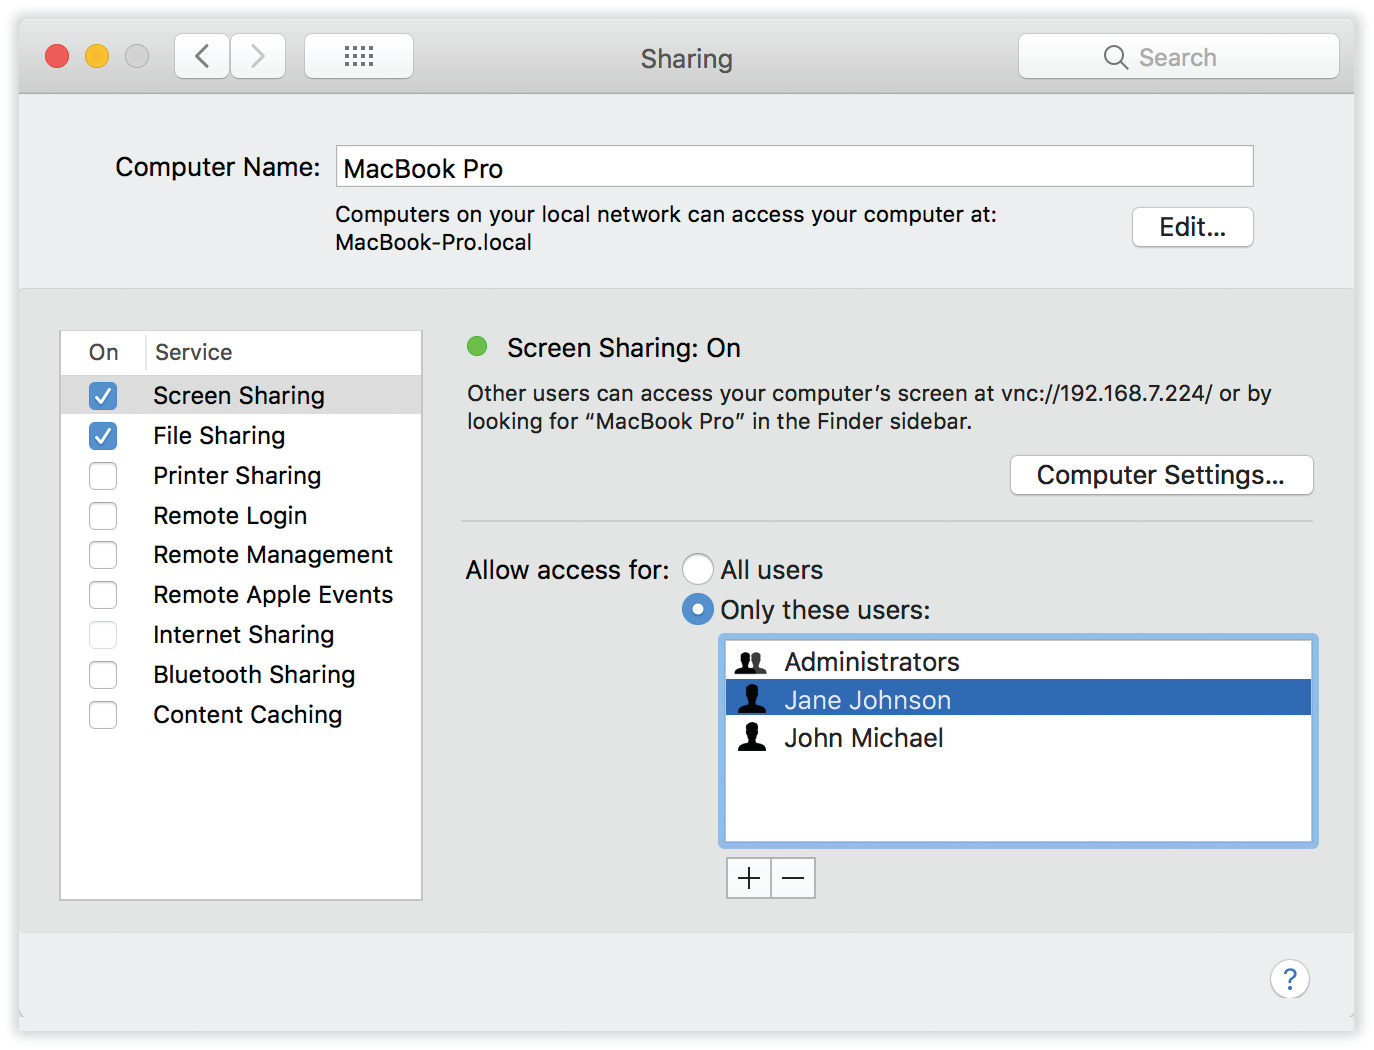
Figure 13-17. Your Mac is now ready to be observed and even controlled by other machines across the network. The people listed here are allowed to tap in anytime they like, even when you’re not at your machine.
Securest. If you click “Only these users” and then don’t add anyone to the list, then only people who have Administrator accounts on your Mac (“Administrator accounts”) can tap into your screen.
Alternatively, if you’re only a little bit of a Scrooge, you can set things up so they can request permission to share your screen—as long as you’re sitting in front of your Mac at the time and feeling generous.
To set this up, click Computer Settings and then turn on “Anyone may request permission to share screen.” Now your fans will have to request permission to enter, and you’ll have to grant it (by clicking OK on the screen), in real time, while you’re there to watch what they’re doing.
Your Mac: Take Control
All right, Other Mac has been prepared for invasion. Now suppose you’re the person on the other end. You’re the guru, or the parent, or whoever wants to take control.
Sit at Your Mac elsewhere on your home or office network, and proceed like this:
Open a Finder window. Expand the Shared list in the Sidebar, if necessary, so you see the icon of Other Mac. Click it.
The strip at the top of the main window displays a button that wasn’t there before: Share Screen (Figure 13-18, top).
Click Share Screen.
Now you see the box shown at middle in Figure 13-18. It offers as many as three different ways for you to prove that you’re not some German teenage hacker.
“By requesting permission” sends the other Mac’s current operator a message asking if it’s OK for you to take over. If that person grants permission, that’s it; the Other Mac’s screen image appears on your screen, and you can skip the rest of these steps.
But what if nobody’s seated at the other Mac to grant permission? If you sometimes use the Other Mac yourself, and you have an account on it, then you can choose “Registered user.”
And what if nobody’s at the other Mac to grant you permission and you don’t have a user account on that machine? In that case, you may be able to use the Using an Apple ID option. If Other Mac’s owner wants you to have access and has set you up that way (following the steps in the box in “GEM IN THE ROUGH Sharing Only Accounts”), then you can connect just by entering your Apple ID and password.
Tip
In theory, you can also connect from across the internet, assuming you left your Mac at home turned on and connected to a broadband modem, and assuming you’ve worked through the port-forwarding issue described in “UP TO SPEED The IP Address Mess: Port Forwarding”.
In this case, though, you’d begin by choosing Go → Connect to Server in the Finder; in the Connect to Server box, type in vnc://123.456.78.90 (or whatever your home Mac’s public IP address is). The rest of the steps are the same.
If you have a user account on the Other Mac, then click “Registered user” and log in. If not, but your Apple ID has been preapproved, click Using an Apple ID and supply your sharing password.
Your Mac, of course, knows your Apple ID already (because you’ve entered it in your account screen in System Preferences → Users & Groups). It shows up here in the dialog box; all you have to do is enter your password.
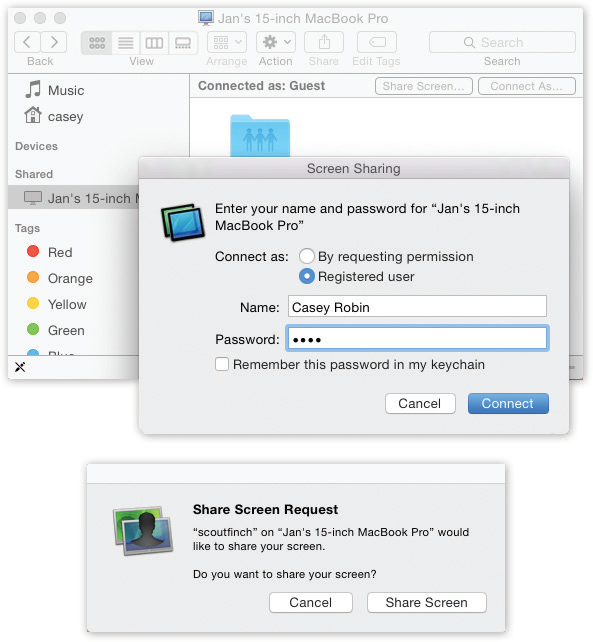
Figure 13-18. Top: Start by clicking Share Screen in the strip at the top of Your Mac’s window.
Middle: If you’ve been pre-added to the VIP list of authorized screen sharers, then you can sign in with either your account name and password or your Apple ID. If not, then you can request permission to share Other Mac’s screen (provided the Mac owner has turned on that option in System Preferences → Sharing → Screen Sharing → Computer Settings). You’ll be granted permission only if Other Mac’s owner is present and OKs you.
Bottom: If you request permission, the other person (sitting at the Other Mac) sees your request like this.Click Connect.
If you’ve signed in with the same account that’s already logged into the Other Mac (for example, if they’re both your Macs), then that’s all there is to it. The Other Mac’s screen image fills yours, and you can skip the next step.
But if you’ve just connected using a different account, you see the dialog box shown in Figure 13-19. If you choose “Connect to a virtual display,” then you can use your account on the Other Mac even while somebody else is using her account. Simultaneously. Crazy stuff.
(The only evidence she’ll have that you’re rooting around behind the scenes is a tiny menu-bar icon that looks like this:
 .)
.)Note
If nobody is using the Other Mac at the moment, then it doesn’t matter which option you click.
Click either “Ask to share the display” (to see the same thing as the Other Mac person) or “Connect to a virtual display” (to log into a different account and work independently).
And now a weird and wonderful sight appears. As shown in Figure 13-20, your screen now fills with a second screen—from the Other Mac. You have full keyboard and mouse control to work with that other machine exactly as though you were sitting in front of it.
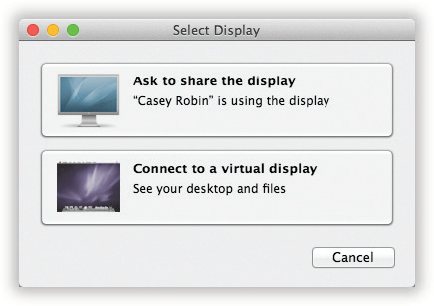
Figure 13-19. The Mac wants to know if you want to view or control the screen that’s in use right now by whomever’s using the Other Mac—or if you want to use the “virtual display” option, where you take control of your account on the Other Mac without disturbing the totally different activity of whomever is seated there.
Well, maybe not exactly. There are a few caveats and options:
Full Screen mode. There it is, in its customary upper-left spot: the green
 button. If you click it, then your view of the Other Mac expands to fill your screen, edge to edge; now there’s no sign at all that you’re actually using a different computer.
The speed-vs.-blurriness issue. Remember, you’re asking the Other Mac to pump its video display across the network—and that takes time. Milliseconds, in fact.
So ordinarily, the Mac uses something called adaptive quality, which just means that the screen gets blurry when you scroll, quit a program, or do anything else that creates a sudden change in the picture. You can turn off this feature by choosing View → Full Quality. Now you get full sharpness all the time—but things take longer to scroll, appear, and disappear.
Mismatched screen sizes. If the other screen is smaller than yours, no big deal. It floats at actual size on your monitor, with room to spare. But if it’s the same size as yours or larger, then the Other Mac’s screen gets shrunk down to fit in a window.
If you’d prefer to see it at actual size, choose View → Turn Scaling Off. Of course, now you have to scroll in the Screen Sharing window to see the whole image.
Tip
Another way to turn scaling on and off is to click the “Scaling Off” and “Scaling On” buttons on the Screen Sharing toolbar (at top in Figure 13-20).
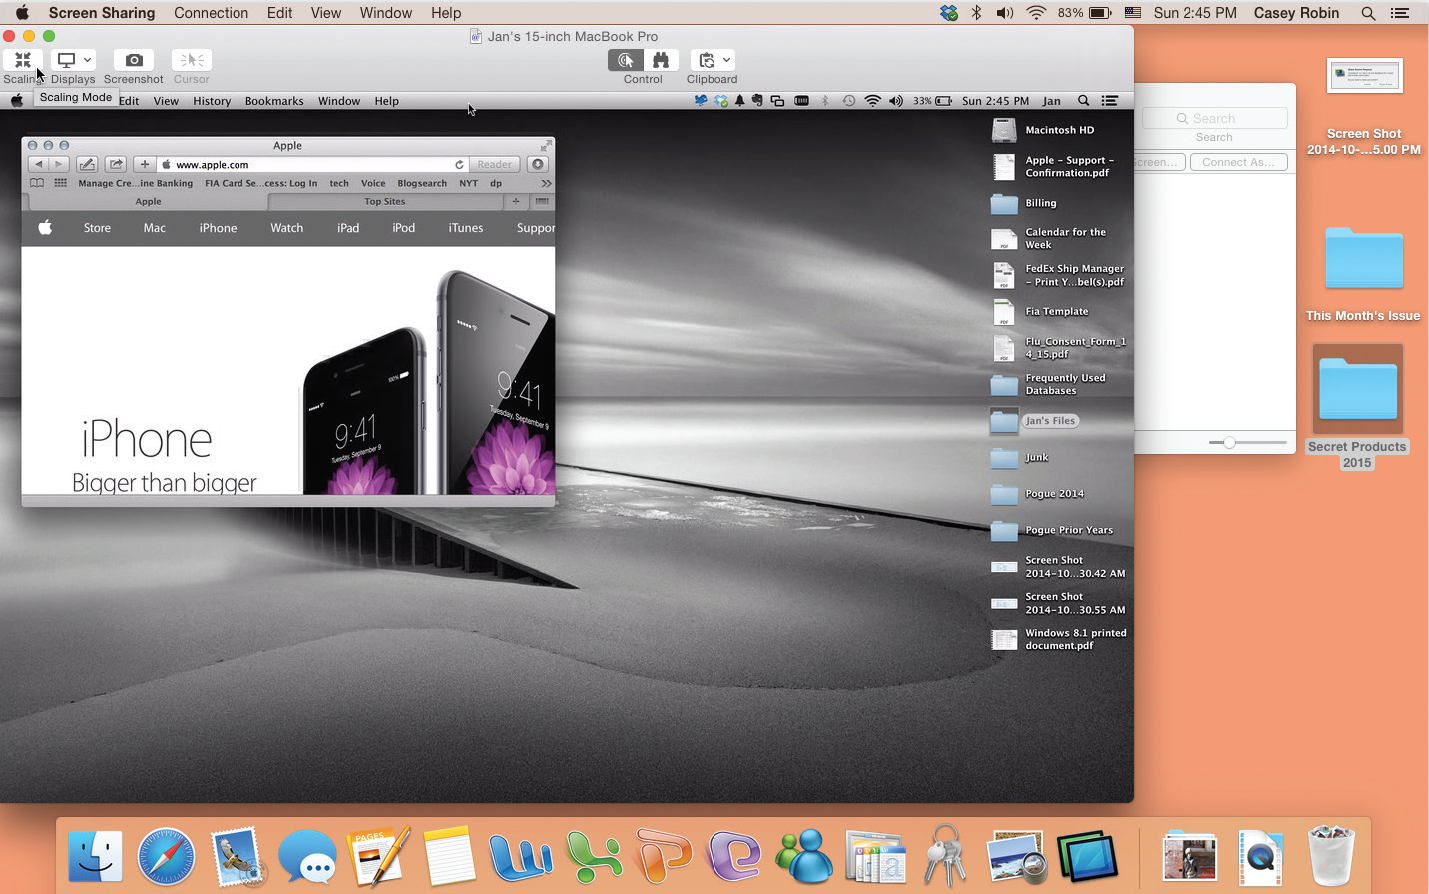
Figure 13-20. Don’t be alarmed. You’re looking at the Other Mac’s desktop in a window on your Mac desktop. You have keyboard and mouse control, and so does the other guy (if he’s there); when you’re really bored, you can play King of the Cursor. (Note the Screen Sharing toolbar, which has been made visible by choosing View → Show Toolbar.)
Observe Mode. In Observe Mode, your cursor turns white, and you give up all your typing and clicking powers. In other words, you’re playing “Look but don’t touch.” (To enter this mode, choose View → Switch to Observe Mode, or click the corresponding toolbar icon.)
This is a handy option when the person at the Other Mac just wants to give you a slideshow or a presentation, or when you just want to watch what he’s doing when you’re on a troubleshooting hunt, or when he’s freaked out by having you move the mouse or type stuff by remote control.
Share the Clipboard. You can actually copy and paste material from the remote-controlled Mac to your own—or the other way—thanks to a freaky little wormhole in the space-time continuum. In the toolbar (or in the Edit menu), click the Clipboard pull-down menu and choose Use Shared Clipboard. With this on, you can copy and paste freely between Your Mac and the Other Mac. If you want to do such inter-Mac copying more manually, you can also choose Send Clipboard to put what’s on your Clipboard onto the Other Mac’s Clipboard, or Get Clipboard to copy the Other Mac’s Clipboard contents onto your Clipboard. Breathe slowly and drink plenty of fluids, and your brain won’t explode.
Dragging files between computers. You can now transfer files from one Mac to the other, just by dragging their icons. Drag the icon from the distant Mac clear out of its window, and pause over your own desktop until your cursor sprouts a green
 icon. When you let go, the files get copied to your own Mac.
Quitting. When you hit the
-Q keystroke, you don’t quit Screen Sharing; you quit whatever program is running on the Other Mac! So when you’re finished having your way with the other computer, choose Screen Sharing → Quit Screen Sharing to return to your own desktop (and your own sanity).
The Toolbar
If you don’t see the screen-sharing toolbar, you can summon it by choosing View → Show Toolbar. It starts out with buttons for Control Mode, Observe Mode, Scaling Off, Scaling On, and Clipboard.
But if you right-click or two-finger click the toolbar, you’re offered a shortcut menu containing the usual controls over how the toolbar buttons appear (Icon and Text, Icon Only, Text Only, and so on), plus a Customize Toolbar command that produces the box shown in Figure 13-21.
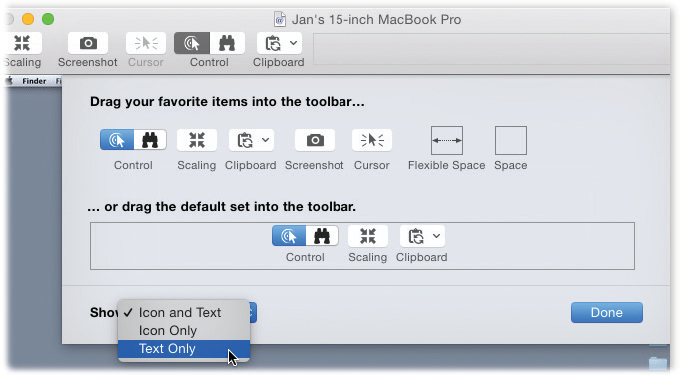
Figure 13-21. In here, you can move the toolbar buttons around by dragging, change the assortment of available buttons, add gaps between the buttons (drag a space or a flexible space into position—see ???), and modify how the buttons appear.
Variations on Screen Sharing
The previous steps guide you through screen sharing between two Macs running OS X 10.5 or later. But screen sharing is based on a standard technology called VNC, and macOS is bristling with different permutations.
Screen sharing through Messages
Two people who both have OS X 10.5 or later can perform exactly the same screen-sharing stunt over the internet. No accounts, passwords, or setup are required—only the granting of permission by the other guy. Just initiate a Messages chat, and then proceed as described in “Audio and Video Chats”. It’s really awesome.
Screen sharing the manual way
Screen Sharing is an actual, double-clickable program, with its own icon on your Mac. (It’s in the System → Library → CoreServices → Applications folder.) When you double-click it, you can type in the public IP address or domain name of the computer you want to connect to, and presto: You’re connected!
More Dialing In from the Road
If you have a full-time internet connection, a special thrill awaits. You can connect to your Mac from anywhere in the world via the internet. If you have a laptop, you don’t need to worry when you discover you’ve left a critical file on your desktop Mac at home.
MacOS offers several ways to connect to your Mac from a distant location, including file sharing over the internet, virtual private networking (VPN), FTP, and SSH (secure shell). Chapter 20 has more details.