
Chapter 16. Internet Setup & iCloud
As Apple’s programmers slogged away for months to create the Mac operating system, there were areas where they must have felt like they were happily gliding on ice: networking and the internet. For the most part, the internet already runs on Unix, and hundreds of extremely polished tools and software chunks were already available.
There are all kinds of ways to get your Mac onto the internet these days:
Wi-Fi. Wi-Fi hotspots are glorious conveniences if you have a laptop. Without stirring from your hotel bed, you’re online at high speed. Sometimes for free.
Cable modems, DSL. Over 80 percent of the U.S. internet population connects over higher-speed wires, using broadband connections that are always on: cable modems, DSL, or corporate networks. (These, of course, are often what’s at the other end of an internet hotspot.)
Tethering. Tethering is letting your cellphone act as a glorified internet antenna for your Mac, whether connected by a cable or a Bluetooth wireless link. You pay your phone company extra for this convenience.
Cellular modems. A few well-heeled individuals enjoy the go-anywhere bliss of USB cellular modems, which get them online just about anywhere they can make a phone call. These modems are offered by Verizon, Sprint, AT&T, and so on, and usually cost around $50 a month.
Note
A MiFi is sort of a cellular modem, too. It’s a pocketable, battery-operated, portable hotspot. It converts the cellular signal into a Wi-Fi signal, so up to five people can be online at once, while the MiFi itself sits happily in your pocket or laptop bag.
Dial-up modems. Their numbers are shrinking, but some people still connect to the internet using a modem that dials out over ordinary phone lines. The service is cheap, but the connection is slow.
This chapter explains how to set up each one of these. It also describes some of macOS’s offbeat internet featurettes. It tackles Family Sharing, which lets several computers in the same household share a single broadband connection; the popular virtual wallet feature Apple Pay; and iCloud, Apple’s suite of free online syncing tools.
The Best News You’ve Heard All Day
If you upgraded to macOS Mojave from an earlier version of the Mac operating system, breathe easy: You’re already online, since the installer picked up your networking and internet settings from that earlier installation. The moment you see the macOS desktop, you’re ready to use the internet (and skip the next dozen pages).
Read on, however, if you need to plug in the internet settings manually. If you’re setting up a new Mac, or if you simply want to create a new internet account, you definitely have some typing to look forward to.
Network Central and Multihoming
In this chapter, you’ll be spending a lot of time in System Preferences → Network (Figure 16-1). This list summarizes the ways your Mac can connect to the internet or an office network—Ethernet, Wi-Fi, Bluetooth, cellular modem card, VPN (Chapter 20), and so on.
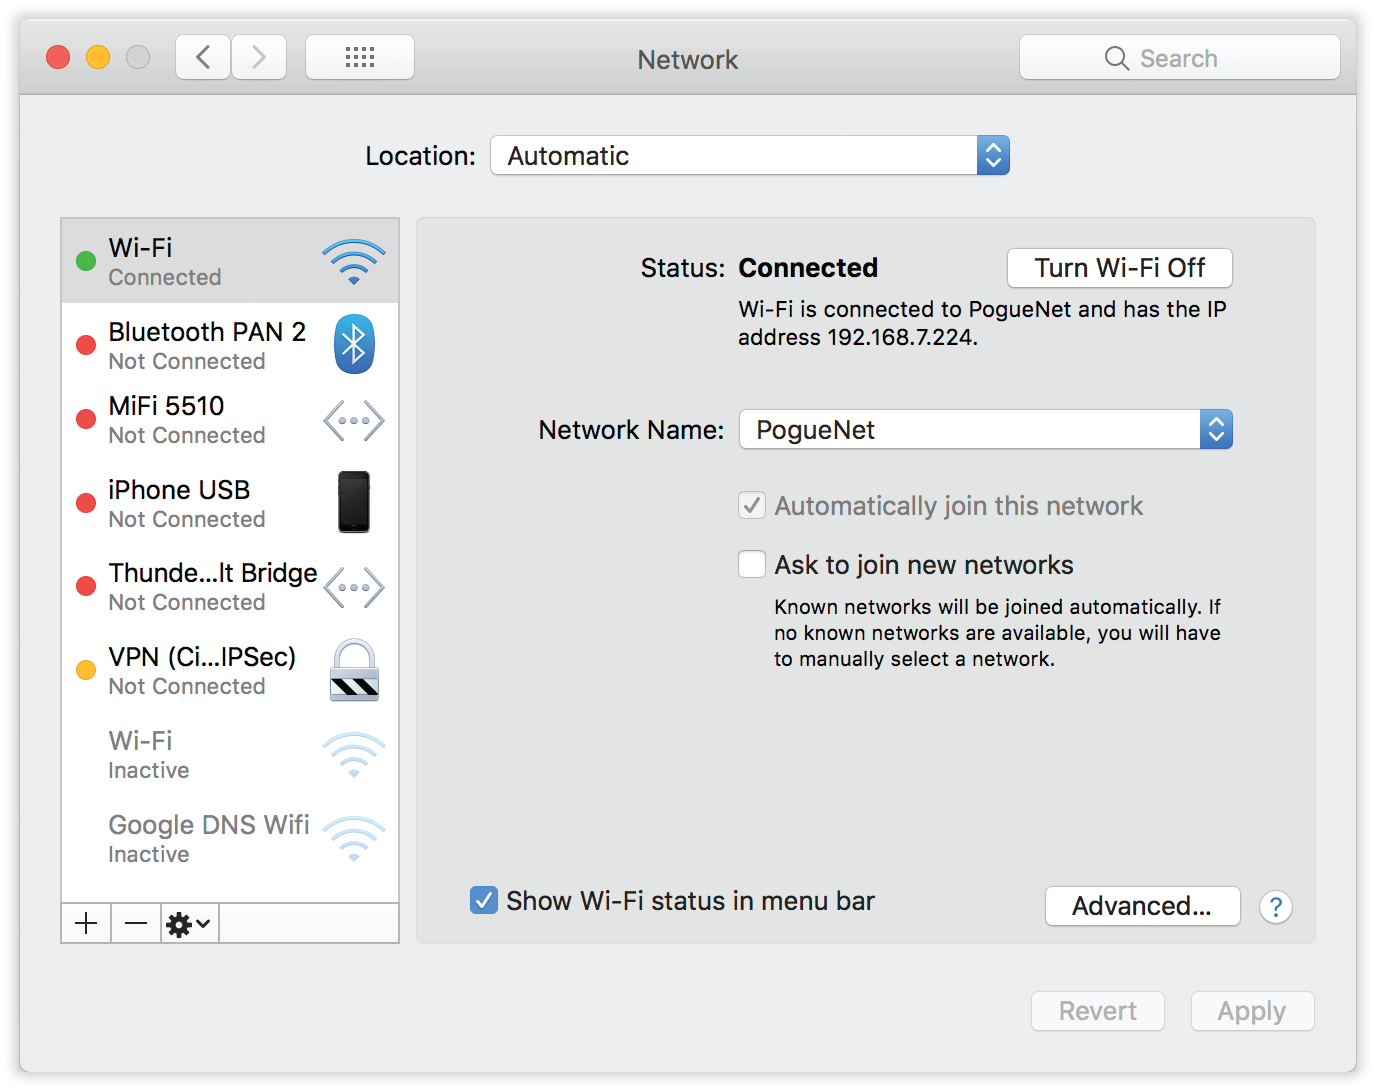
Figure 16-1. You set up your network connections here, and you can connect to and disconnect from them here. The listed network connections are tagged with color-coded dots. A green dot means turned on and connected to a network; yellow means the connection is working but some other setting is wrong (for example, your Mac can’t get an IP address); and red means there’s no connection or you haven’t yet set up a connection.
Multihoming
The order of the network connections listed in the Network pane is important. That’s the sequence the Mac uses as it tries to get online. If one of your programs needs internet access and the first method isn’t hooked up, then the Mac switches to the next available connection automatically.
In fact, macOS can maintain multiple simultaneous network connections—Ethernet, Wi-Fi, dial-up, even FireWire—with a feature known as multihoming.
This feature is especially relevant for laptops. When you open your web browser, your laptop might first check to see if it’s plugged into an Ethernet cable, which is the fastest, most secure type of connection. If there’s no Ethernet, then it looks for a Wi-Fi network.
Here’s how to go about setting up the connection-attempt sequence you want:
Open System Preferences → Network.
The Network status screen (Figure 16-1) brings home the point of multihoming: You can have more than one network connection operating at once.
From the
 pop-up menu, choose Set Service Order.
Now you see the display shown in Figure 16-2. It lists all the ways your Mac knows how to get online, or onto an office network.
Drag the items up and down the list into priority order.
If you have a wired broadband connection, for example, you might want to drag your Ethernet connection to the top of the list, since that’s almost always the fastest way to get online.
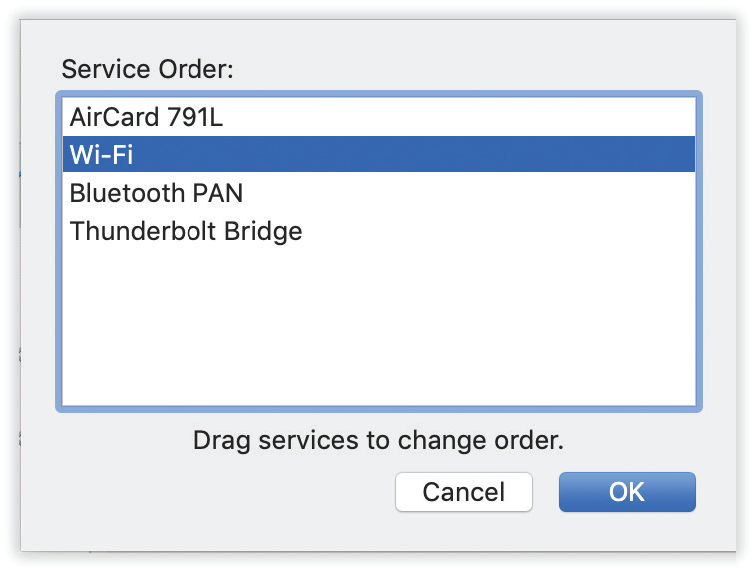
Figure 16-2. The key to multihoming is sliding the network connection methods’ names up or down. Note that you can choose a different connection sequence for each location. (Locations are described later in this chapter.)
-
You return to the Network pane of System Preferences, where the master list of connections magically re-sorts itself to match your efforts.
Your Mac will now be able to switch connections even in real time, during a single internet session. If lightning takes out your Ethernet hub in the middle of your web surfing, your Mac will seamlessly switch to your Wi-Fi network, for example, to keep your session alive.
All right, then: Your paperwork is complete. The following pages guide you through the process of setting up these various connections.
Broadband Connections
If your Mac is connected wirelessly or, um, wirefully to a cable modem, DSL, or office network, you’re one of the lucky ones. You have a high-speed broadband connection to the internet that’s always available, always on. You never have to wait to dial.
Automatic Configuration
Most broadband connections require no setup whatsoever. Take a new Mac out of the box, plug in the Ethernet cable to your cable modem—or choose a wireless network from the ![]() menulet—and you can begin surfing the web instantly.
menulet—and you can begin surfing the web instantly.
That’s because most cable modems, DSL boxes, and wireless base stations use DHCP. It stands for Dynamic Host Configuration Protocol, but what it means is “We’ll fill in your Network pane of System Preferences automatically.” (Including techie specs like IP address and DNS server addresses.)
Manual Configuration
If, for some reason, you’re not able to surf the web or check email the first time you try, it’s remotely possible that your broadband modem or your office network doesn’t offer DHCP. In that case, you may have to fiddle with the Network pane of System Preferences, preferably with a customer-support rep from your broadband company on the phone.
On the Network pane, click your internet connection (Wi-Fi, built-in Ethernet, cellular modem, whatever). Click Advanced; click TCP/IP. Now you see something like Figure 16-3. Don’t be alarmed by the morass of numbers and periods—it’s all in good fun. (If you find TCP/IP fun, that is.)
Note
There’s a bright side to having a static IP address, an internet address that’s all your own and won’t change: Because your Mac has this one reliable address, several cool macOS features are available to you. For example, it’s easier to access your files from anywhere in the world, as described in Chapter 20.
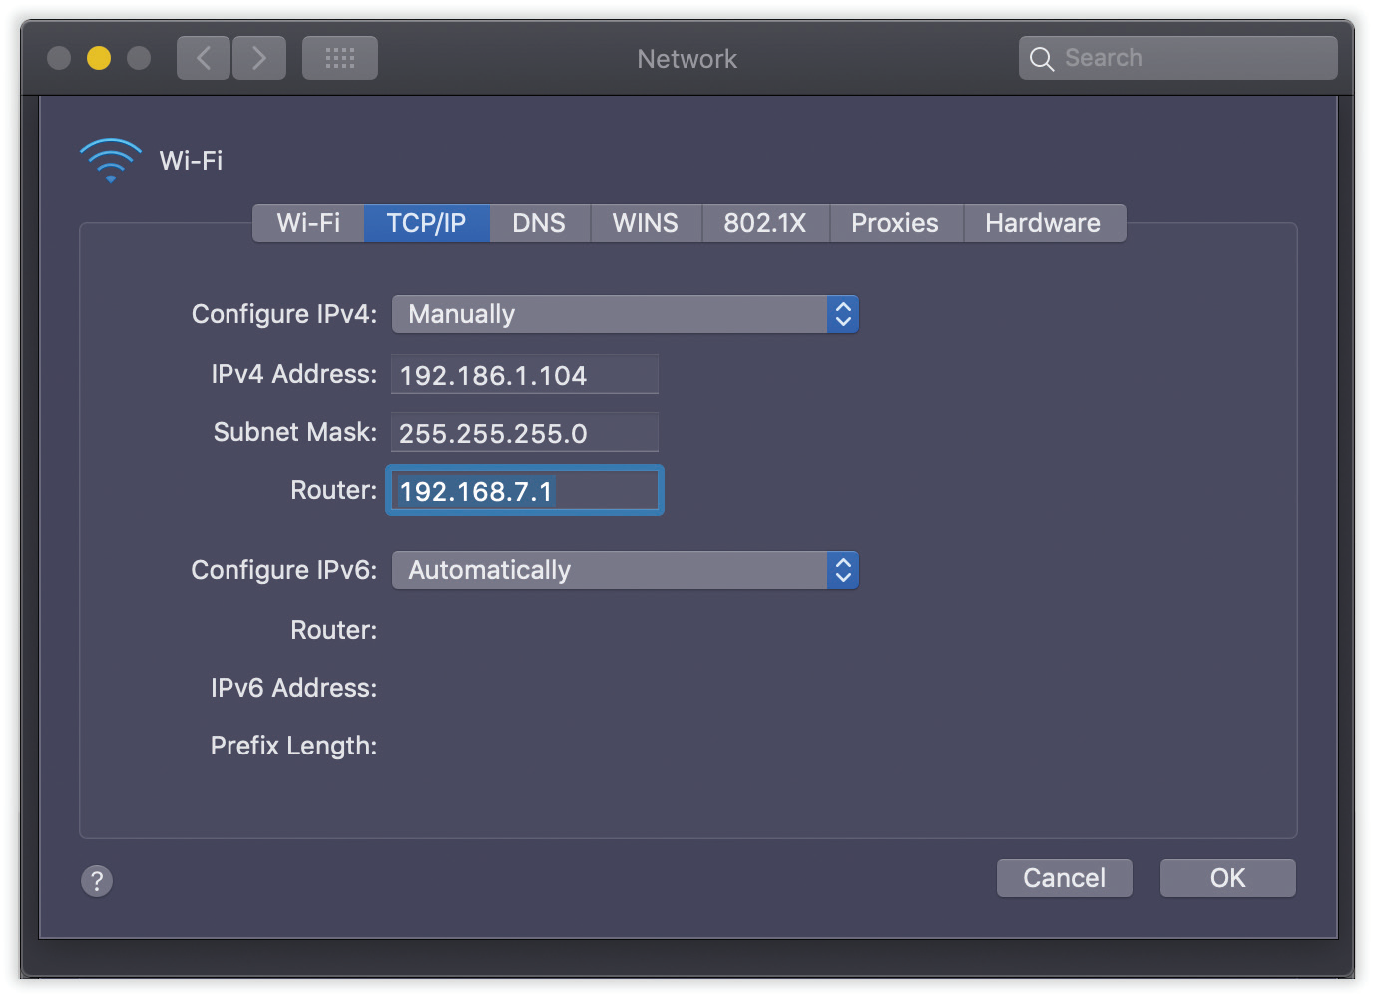
Figure 16-3. Here’s the setup for a cable-modem account with a static IP address, which means you have to type in all these numbers yourself.
Ethernet Connections
The beauty of Ethernet connections is that they’re super-fast and super-secure. No bad guys sitting across the coffee shop, armed with shareware “sniffing” software, can intercept your email and chat messages, as they theoretically can when you’re on wireless.
And 99 percent of the time, connecting to an Ethernet network is as simple as connecting the cable to the Mac. That’s it. You’re online, quickly and securely, and you never have to worry about connecting or disconnecting.
Wi-Fi Connections
Your Mac can communicate with a wireless base station up to 300 feet away. Doing so lets you surf the web from your laptop in a hotel room, for example, or share files with someone across the building from you.
Chapter 13 has much more information about setting up a Wi-Fi network. The real fun begins, however, when it comes time to join one.
Sometimes you just want to join a friend’s Wi-Fi network. Sometimes you’ve got time to kill in an airport, and it’s worth a $7 splurge for half an hour. And sometimes, at some street corners in big cities, Wi-Fi signals bleeding out of apartment buildings might give you a choice of several free hotspots to join.
Your Mac joins Wi-Fi hotspots like this:
First, it sniffs around for a Wi-Fi network you’ve used before. If it finds one, it connects quietly and automatically. You’re not asked for permission, a password, or anything else; you’re just online. (It’s that way, for example, when you come home with your laptop every day.) For details on this memorization feature, see the box below.
If the Mac can’t find a known hotspot, but it detects a new hotspot or two, a message appears on the screen, displaying their names. Double-click one to connect.
Tip
If you don’t want your Mac to keep interrupting you with its discoveries of new hotspots—it can get pretty annoying when you’re in a taxi driving through a city—you can shut them off. In System Preferences, click Network, click Wi-Fi, and then turn off “Ask to join new networks.”
If you’re in the presence of a commercial hotspot—one that requires payment or reading some kind of insipid legal agreement—macOS opens a miniature web page, shoving it right into your face, even if your web browser isn’t open; see Figure 16-4.

 If you missed the opportunity to join a hotspot when the message appeared, or if you joined the wrong one or a nonworking one, you have another chance. You can always choose a hotspot’s name from the menulet, as shown in Figure 16-5. A
  icon indicates a hotspot that requires a password, so you don’t waste your time trying to join it (unless, of course, you have the password).
Tip
It always takes a computer a few seconds—maybe 5 or 10—to connect to the internet over Wi-Fi. In macOS, the ![]() menulet itself ripples with a black-and-gray animation to let you know you’re still in the connection process. It’s an anti-frustration aid. (Oh, and each hotspot’s signal strength appears right in the menulet.)
menulet itself ripples with a black-and-gray animation to let you know you’re still in the connection process. It’s an anti-frustration aid. (Oh, and each hotspot’s signal strength appears right in the menulet.)

Figure 16-4. MacOS auto-opens a page like this whenever it senses that you’re in a commercial Wi-Fi network, one that requires you to sign in. (That’s a big improvement from the old way, where you’d join a network and then have no clue that you wouldn’t be able to get any further until you opened up your web browser to find that login screen.)
Before you get too excited, though, some lowering of expectations is in order. There are a bunch of reasons why your ![]() menulet might indicate that you’re in a hotspot, but you can’t actually get online:
menulet might indicate that you’re in a hotspot, but you can’t actually get online:
It’s locked. If there’s a
next to the hotspot’s name in your menulet, it’s password protected. That’s partly to prevent hackers from “sniffing” the transmissions and intercepting messages and partly to keep random passersby like you off the network.The signal isn’t strong enough. Sometimes the Wi-Fi signal is strong enough to make the hotspot’s name show up in your
menu but not strong enough for an actual connection.You’re not on the list. Sometimes, for security, hotspots are rigged to permit only specific computers to join, and yours isn’t one of them.
You haven’t logged in yet. Commercial hotspots (the ones you have to pay for) don’t connect you to the internet until you’ve supplied your payment details on a special web page that appears automatically when you open your browser, as described in the next section.
The router’s on, but the internet’s not connected. Sometimes a wireless router is broadcasting but its internet connection is down. It’d be like a cordless phone that has a good connection back to the base station in the kitchen—but the phone cord isn’t plugged into the base station.
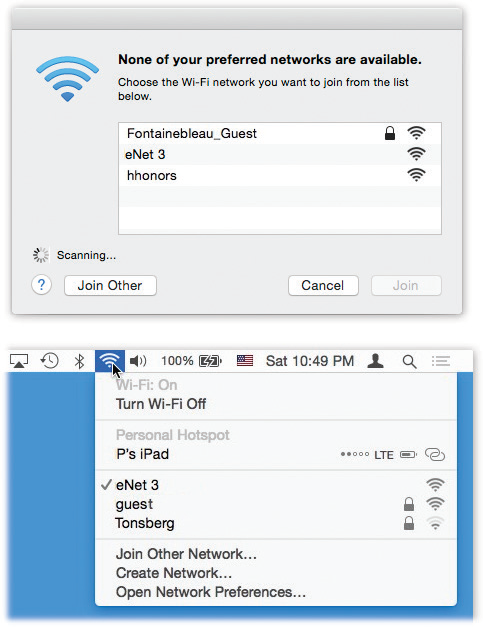
Figure 16-5. Top: Congratulations—your Mac has discovered new Wi-Fi hotspots all around you! You even get to see the signal strength right in the menu. Double-click one to join it. But if you see a icon next to the hotspot’s name, beware: It’s been protected by a password. If you don’t know it, then you won’t be able to connect.
Bottom: Later, you can always switch networks using the Wi-Fi menulet.
Or, if you have an iPhone or cellular iPad with Instant Hotspot turned on (“Instant Hotspot”), you can hop right onto your own private network.
Commercial Hotspots
Choosing the name of the hotspot you want to join is generally all you have to do—if it’s a home Wi-Fi network.
Unfortunately, joining a commercial Wi-Fi hotspot—one that requires a credit card number (in a hotel room or an airport, for example)—requires more than just connecting to it. You also have to sign into it before you can send so much as a single email message.
To do that, open your web browser—if, in fact, macOS doesn’t auto-open the sign-up screen (see Figure 16-4). You’ll see the “Enter your payment information” screen either immediately or as soon as you try to open a web page of your choice. (Even at free hotspots, you might have to click OK on a welcome page to initiate the connection.)
Supply your credit card information or (if you have a membership to this Wi-Fi chain, like Boingo or T-Mobile) your name and password. Click Submit or Proceed, try not to contemplate how this $8 per hour is pure profit for somebody, and enjoy your surfing.
Tethering (Personal Hotspot)
Wi-Fi hotspots are fast and usually cheap—but they’re spots. Beyond 150 feet away, you’re offline.
Fortunately, if you have an iPhone, Android phone, or another smartphone, you’ve got a cellular modem in your pocket. Most smartphones nowadays offer tethering, where the cellphone passes the internet along to your laptop (or even your desktop computer). The phone connects to your laptop either with a USB cable or wirelessly (Bluetooth or Wi-Fi).
The nice part is that you can get online almost anywhere there’s cellphone coverage. The less-nice part is that the connection isn’t always blazing fast, and you usually have to pay your cellphone company extra for the privilege.
Here’s a typical example: Suppose you have an iPhone. You open Settings → Personal Hotspot. You turn Personal Hotspot on. You use the password your phone has supplied or assign one to your private little hotspot.
Now, on your laptop, you choose your iPhone’s name from the ![]() menulet. (The menulet shows the iPhone’s name even if it’s asleep and Personal Hotspot is turned off, as described in “Instant Hotspot”.)
menulet. (The menulet shows the iPhone’s name even if it’s asleep and Personal Hotspot is turned off, as described in “Instant Hotspot”.)
You enter your hotspot password (just this time—later, your laptop will remember), and presto: Your laptop is online. A bright blue “Personal Hotspot: 1 Connection” banner appears on your iPhone to remind you, and your ![]() menulet changes to the International Symbol for Apple Tethering:
menulet changes to the International Symbol for Apple Tethering: ![]() .
.
Tethering eats up your phone’s battery like crazy; you’ll be lucky to get 3 hours out of it. So you probably shouldn’t count on watching Netflix on your laptop via your phone.
But for email, emergency web checks, and other mobile crises, tethering is a convenient, useful feature. And when you’re on the road for a couple of weeks, it’s a heck of a lot cheaper than paying your hotel $13 a night for Wi-Fi.
Cellular Modems
No wonder laptop luggers across America are getting into cellular internet services. All the big cellphone companies offer USB sticks or wireless MiFi pucks that let your laptop get online at high speed anywhere in major cities. No hunting for a coffee shop; with a cellular internet service, you can check your email while zooming down the road in a taxi. (Outside metropolitan areas, you can still get online wirelessly, though slowly.) It’s the same idea as tethering, except you’re not draining your phone’s battery.
Verizon, Sprint, and AT&T all offer cellular internet networks with speeds approaching a cable modem’s. So why isn’t the world beating a path to this delicious technology’s door? Because it’s expensive—maybe $50 a month on top of your phone bill.
To get online, insert the USB stick or turn on the MiFi; it may take about 15 seconds for the thing to latch onto the cellular signal. Now you’re supposed to make the internet connection using the special “dialing” software provided by the cellphone company. Technically, though, you may not need it. You can start and stop the internet connection using a menulet—no phone-company software required.
Dial-Up Modem Connections
Macs haven’t come with built-in modems for years. You can get a non-Apple USB modem for $50, but clearly Apple is trying to shove the trusty dial-up technology into the recycling bin.
Still, millions of people never got the memo. If you’re among them, then you need to sign up for internet service. Once you’ve selected a service provider, you plug its settings into the Network pane of System Preferences. You get the necessary information directly from your ISP by consulting either its web page, the instruction sheets that came with your account, or a help-desk agent on the phone.
Further details on macOS’s dial-up modem setup are in the free appendix to this chapter, “Setting Up a Dial-Up Connection.” It’s available on this book’s “Missing CD” page at missingmanuals.com.
Switching Locations
If you travel with a laptop, you may find yourself frequently opening up System Preferences → Network so you can switch between internet settings: Ethernet at the office, Wi-Fi at home.
The simple solution is the ![]() → Location submenu, which appears once you’ve set up more than one location. As Figure 16-6 illustrates, all you have to do is tell it where you are. MacOS handles the details of switching internet connections.
→ Location submenu, which appears once you’ve set up more than one location. As Figure 16-6 illustrates, all you have to do is tell it where you are. MacOS handles the details of switching internet connections.
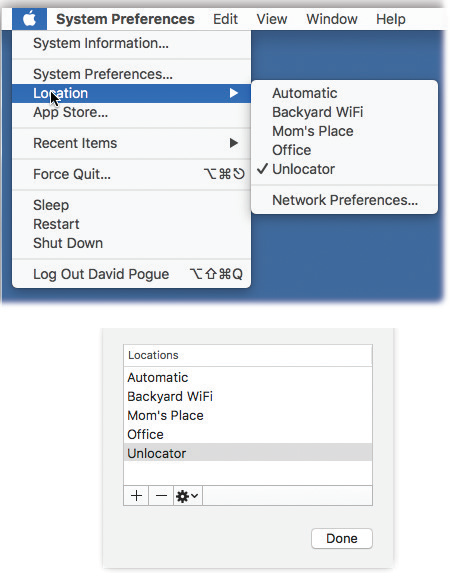
Figure 16-6. Top: The Location feature lets you switch from one “location” to another by choosing its name—either from the  menu or from an identical pop-up menu that appears in the Network pane of System Preferences.
Automatic means “the standard, default one you originally set up.” (Don’t be fooled: Despite its name, Automatic isn’t the only location that offers multihoming, described earlier in this chapter.)
Bottom: When you choose Edit Locations, your locations appear; click the + button. A new entry appears at the bottom of the list. Type a name for your new location, such as Chicago Office or Dining Room Floor.
Creating a New Location
To create a location, which is nothing more than a set of memorized settings, open System Preferences, click Network, and then choose Edit Locations from the Location pop-up menu. Continue as shown in Figure 16-6 at bottom.
Tip
You can use the commands in the ![]() menu to rename or duplicate a location.
menu to rename or duplicate a location.
When you click Done, you return to the Network panel. Take this opportunity to set up the kind of internet connection you use at the corresponding location, just as described on the first pages of this chapter. If you travel regularly, you can build a list of locations, each of which “knows” the way you like to get online in each city you visit.
A key part of making a new location is putting the various internet connection types (Ethernet, Wi-Fi, Modem, Bluetooth) into the correct order. Your connections will be slightly quicker if you give the modem connection priority in your Hotel setup, the Wi-Fi connection priority in your Starbucks setup, and so on.
You can even turn off some connections entirely. For example, if you use nothing but a cable modem when you’re at home, you might want to create a location in which only the Ethernet connection is active. Use the Make Service Inactive command in the ![]() menu.
menu.
Conversely, if your laptop uses nothing but Wi-Fi when you’re on the road, then your location could include nothing but the Wi-Fi connection. You’ll save a few seconds each time you try to go online, because your Mac won’t bother hunting for an internet connection that doesn’t exist.
Making the Switch
Once you’ve set up your various locations, you can switch among them using the ![]() → Location submenu, as shown in Figure 16-6. As soon as you do so, your Mac is automatically set to get online the way you like.
→ Location submenu, as shown in Figure 16-6. As soon as you do so, your Mac is automatically set to get online the way you like.
Internet Sharing
If you have cable modem or DSL service, you’re a very lucky individual. You get terrific internet speed and an always-on connection. Too bad only one computer in your household or office can enjoy these luxuries.
It doesn’t have to be that way. You can spread the joy of high-speed internet to every Mac (and PC) on your network in either of two ways:
Buy a router. A router is a little box, costing about $50, that connects directly to the cable modem or DSL box. In most cases, it has multiple internet jacks so you can plug in several Macs, PCs, and/or wireless base stations. As a bonus, a router provides excellent security, serving as a firewall to keep out unsolicited visits from hackers on the internet.
Use Internet Sharing. MacOS’s Internet Sharing feature is the software version of a router: It distributes a single internet signal to every computer on the network. But unlike a router, it’s free. You just fire it up on the one Mac that’s connected directly to the internet—the gateway computer.
But there’s a downside: If the gateway Mac is turned off or asleep, then the other machines can’t get online.
Most people use Internet Sharing to share a broadband connection like a cable modem or DSL. But there are other times when it comes in handy. If you have a cellular modem, for example, you might want to share its signal via Wi-Fi so the kids in the back seat can get online with their iPod Touches.
The only requirement: The internet-connected Mac must have some other kind of connection (Ethernet, Wi-Fi, Bluetooth, FireWire) to the Macs that will share the connection.
Turning On Internet Sharing
To turn on Internet Sharing on the gateway Mac, open the Sharing panel of System Preferences. Click Internet Sharing, as shown in Figure 16-7, but don’t turn on the checkbox yet.
Before you do that, you have to specify (a) how the gateway Mac is connected to the internet, and (b) how it’s connected to the other Macs on your network:
Share your connection from. Using this pop-up menu, identify how this Mac (the gateway machine) connects to the internet—via built-in Ethernet, Wi-Fi, cellular modem, or Bluetooth DUN (dial-up networking—that is, tethering to your cellphone or iPad).
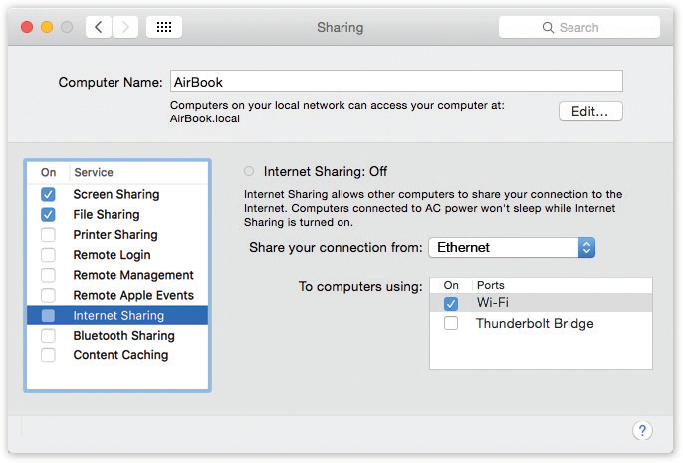
Figure 16-7. Ka-ching! You and your buddy are about to save money. In this example, an Ethernet wire is getting this Mac online. But it’s sharing that internet connection with other Macs via Wi-Fi. They can get online, too.
To computers using. Using these checkboxes, specify how you want your Mac to rebroadcast the internet signal to the others. (It has to be a different network channel. You can’t get your signal via Wi-Fi and then pass it on via Wi-Fi.)
Note
Which checkboxes appear here depends on which kinds of internet connections are turned on in the Network pane of System Preferences. If the gateway Mac doesn’t have Wi-Fi circuitry, for example, or if Wi-Fi is turned off in the current configuration, then the Wi-Fi option doesn’t appear.
Now visit each of the other Macs on the same network. Open the Network pane of System Preferences. Select the network method you chose in the second step above: Wi-Fi, Built-in Ethernet, or FireWire. Click Apply.
If the gateway Mac is rebroadcasting using Wi-Fi—by far the most common use of this feature—then you have one more step. In your ![]() menulet, you’ll see a strange new “hotspot” that wasn’t there before, bearing the name of the gateway Mac. (It might say, for example, “Casey’s MacBook Air.”) Choose its name to begin your borrowed internet connection.
menulet, you’ll see a strange new “hotspot” that wasn’t there before, bearing the name of the gateway Mac. (It might say, for example, “Casey’s MacBook Air.”) Choose its name to begin your borrowed internet connection.
As long as the gateway Mac remains on and online, both it and your other computers, even Windows PCs, can get onto the internet simultaneously, all at high speed. You’ve created a software base station. The Mac itself is now the transmitter for internet signals to and from any other Wi-Fi computers within range.
Tip
You can let a wired Mac share a wireless connection, too. Suppose, for example, that you and a buddy both have laptops in a hotel lobby. You’re online, having paid $13 to use the hotel’s Wi-Fi network. If you set up Internet Sharing appropriately, your buddy can connect to your Mac via an Ethernet cable and surf along with you—no extra charge.
Meet iCloud
If you have a Mac, you’ll see frequent references to Apple’s free iCloud service. It’s a huge array of features that are designed to make you glad you belong in the Apple ecosystem. iCloud synchronizes information across all your Macs, iPhones, iPads, iPod Touches, across family members, across the world, wirelessly and automatically. It keeps track of every song, book, movie, app, and TV show you’ve bought from Apple, so that you can download them onto any other gadget with an Apple logo on the back. It lets you find a lost Apple gadget. It gives you an email account. And a lot more.
The rest of this chapter details each of iCloud’s goodies, one at a time. They’re described in the order they appear in System Preferences → iCloud (Figure 16-8).
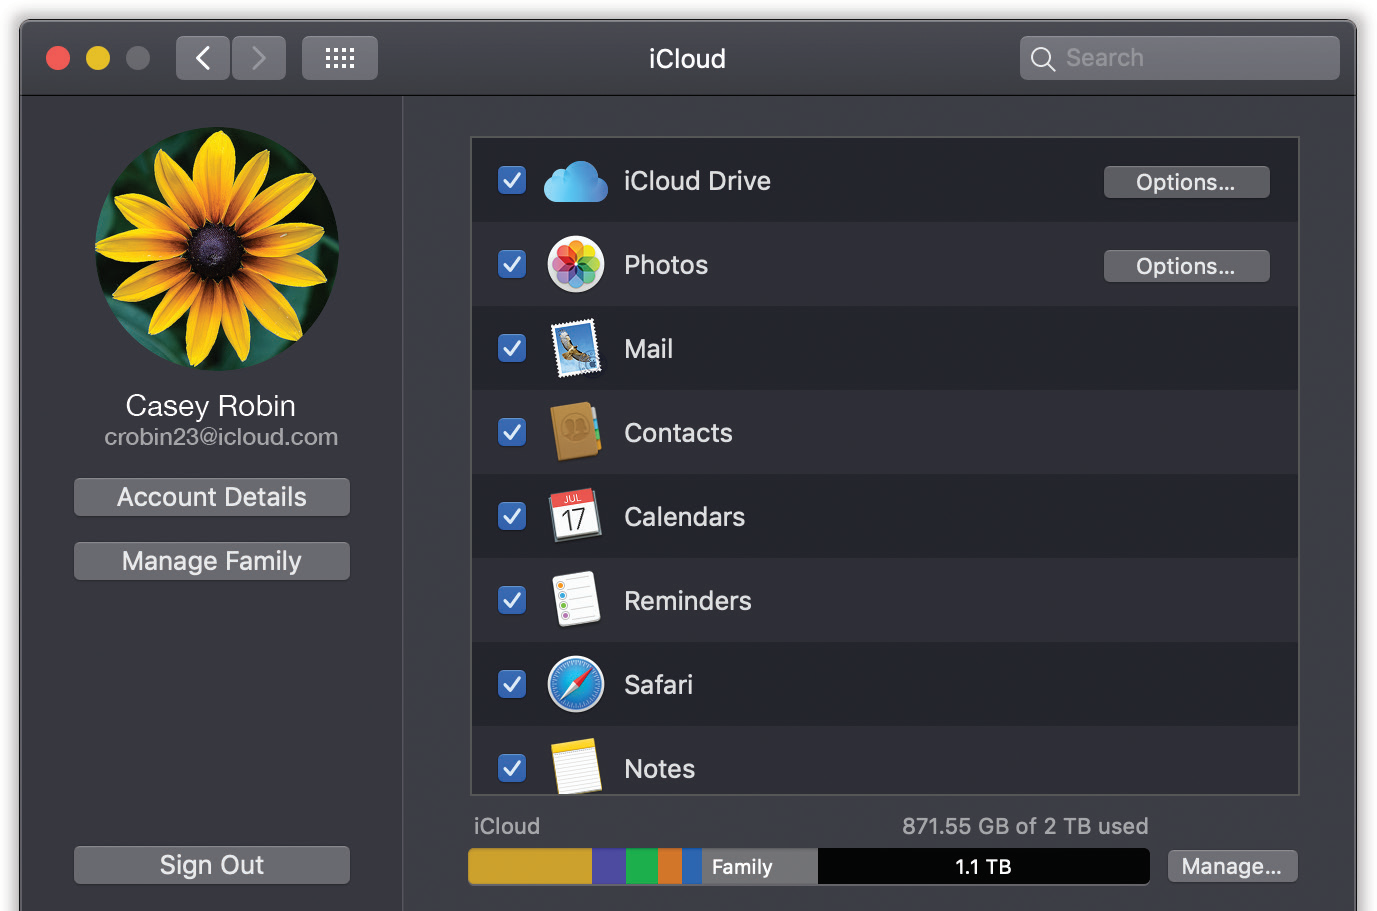
Figure 16-8. The headquarters of iCloud’s features. You’ll find a nearly identical panel on your iPhone, iPad, or iPod Touch (in Settings → iCloud).
Photos
For most people, pictures are extremely important data. iCloud takes the worry out of maintaining your collection by making sure they’re backed up and available online.
In System Preferences → iCloud, click the Options button next to Photos to see three on/off checkboxes: iCloud Photos (formerly iCloud Photo Library), My Photo Stream, and Shared Albums (formerly iCloud Photo Sharing). Read on.
iCloud Photos
This feature keeps your photos and videos backed up online and synced. All your photos and videos are always backed up, and always accessible from any of your gadgets. That’s all there is to it. Every photo that winds up on your Mac, every picture you take with your iPhone, all wind up on both. You can even see all of this at iCloud.com (click Photos), complete with tabs for Moments, Albums, and the other Photos categories.
There is, of course, a catch. Your entire iCloud account comes with only 5 gigabytes of free storage. If you start backing up your photo library to it, too, you’ll have to pay to expand that storage.
My Photo Stream
Every time a new photo enters your life—when you take a picture with an i-gadget, for example, or import one onto your Mac—it gets added to your Photo Stream. In other words, it appears automatically on all your other iCloud machines.
Unlike iCloud Photos, this feature is free. On the other hand, it maintains only the most recent 1,000 photos you’ve taken (Figure 16-9). There’s another limitation, too: The iCloud servers store your photos for only 30 days. But as long as your gadgets go online at least once a month, they’ll remain current with the Photo Stream.
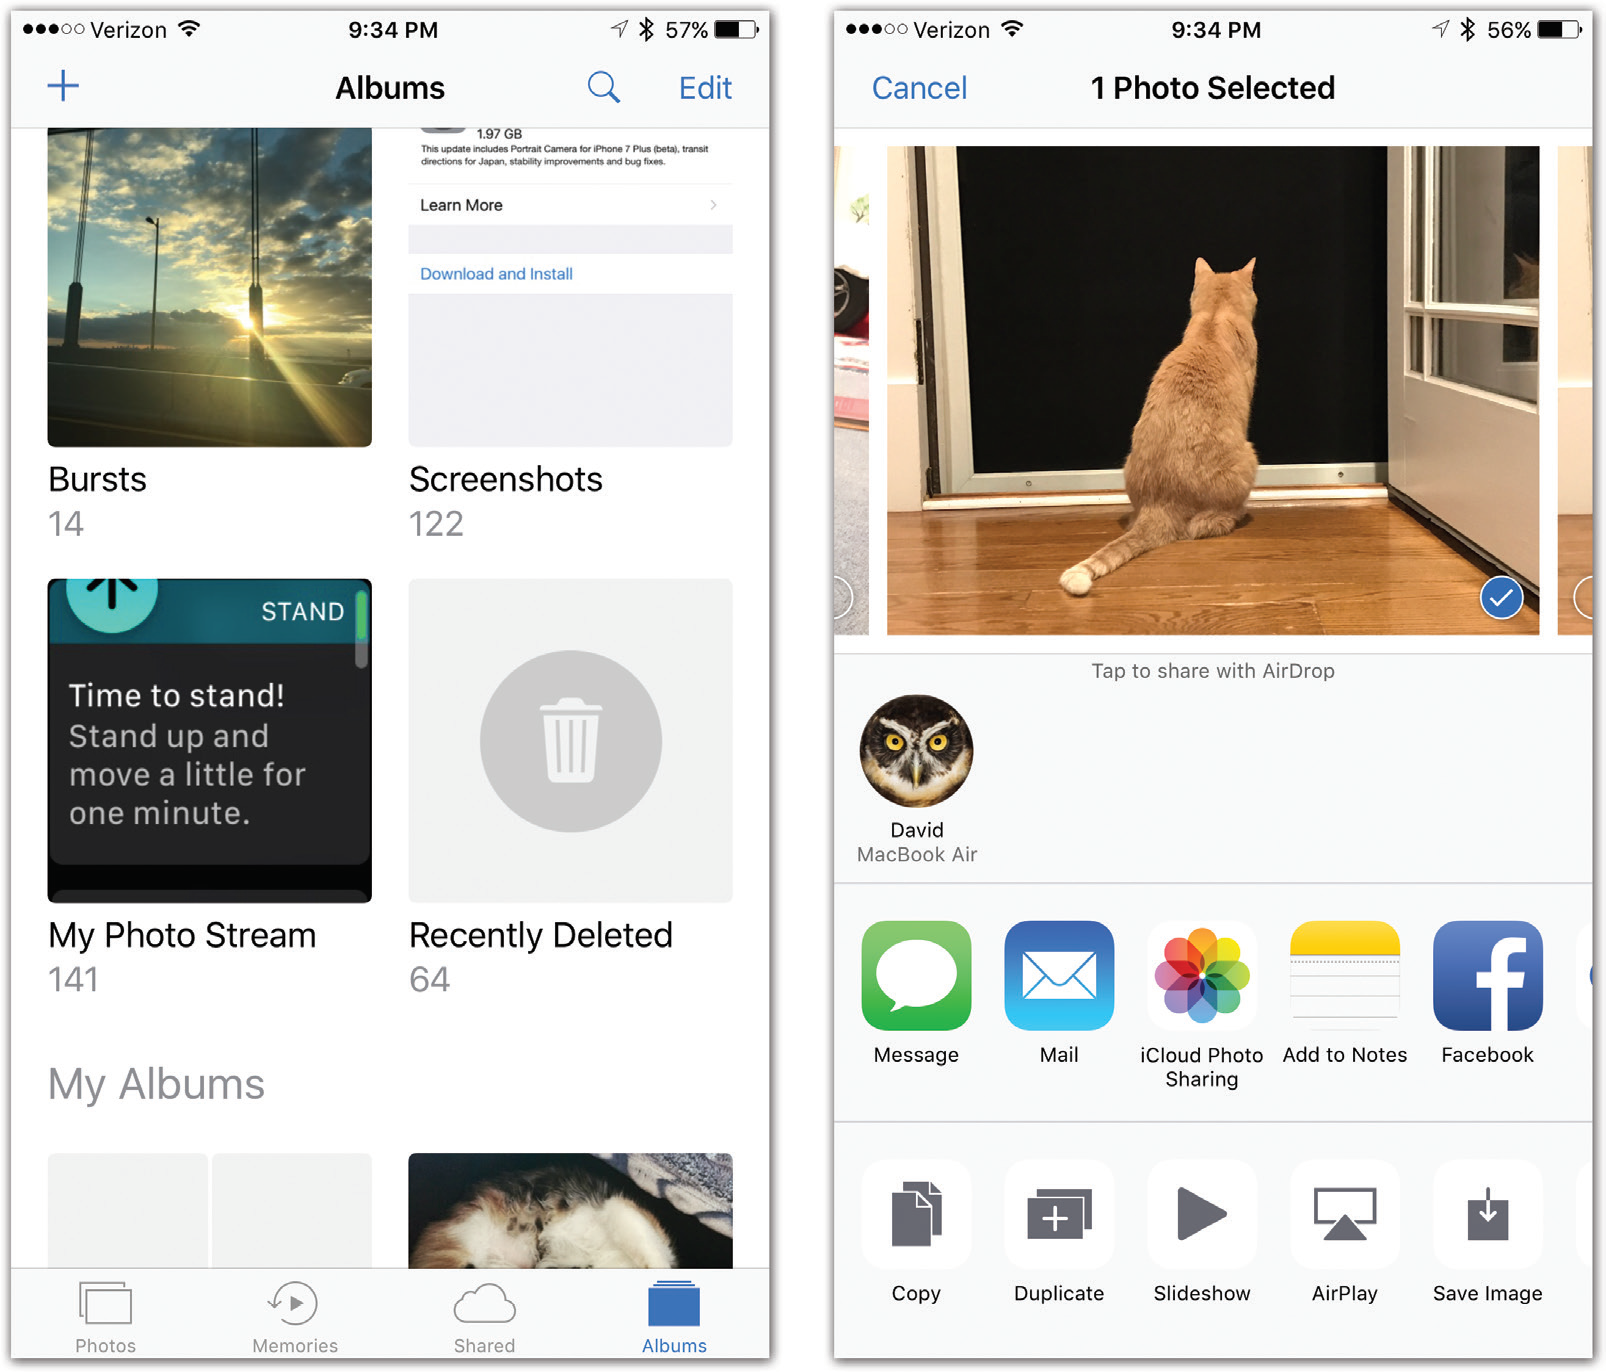
Figure 16-9. Left: Why, look! It’s photos you imported onto your Mac at home. How’d they get here on the iPhone? iCloud!
To rescue one of these photos from the 1,000-photo rule, open it. Then tap the  button.
Right: Finally, tap Save Image (bottom row, right). Now, even after that photo disappears from the Photo Stream, having been displaced by the 1,001st incoming photo, you’ll still have your permanent copy.
And once a photo arrives, you can save it to your Camera Roll, where it’s permanently saved. See Figure 16-9.
Note
Photo Stream is the one iCloud feature that doesn’t sync over the cellular airwaves. It sends photos around only when you’re in a Wi-Fi hotspot or connected to a wired network.
To find your Photo Stream, open the Photos app on your phone, tablet, Apple TV, or Mac. There it is, in the Albums list: An “album” called My Photo Stream. (On a Windows PC, you’d get a Photo Stream folder in your Pictures folder.)
Note
If you’ve turned this feature on in System Preferences, but you don’t see the My Photo Stream album in Photos, it’s because you’ve also turned on iCloud Photos. When that’s on, you’re already getting all your pictures and videos stored everywhere, so there’s no point in having a folder containing only your last 1,000 pictures.
This, in its way, is one of the best features in all of iCloudland, because it means you don’t have to sync your iPhone over a USB cable to get your photos onto your computer. It all happens automatically, wirelessly over Wi-Fi.
Shared Albums
Shared Albums lets you send photos or videos to other people’s Apple gadgets (Macs, iPhones, iPads, Apple TVs)—and, in a more limited way, even to non-Apple people. After a party or some other get-together, you can send your best shots to everyone who attended; after a trip, you can post your photographic memories for anyone who might care.
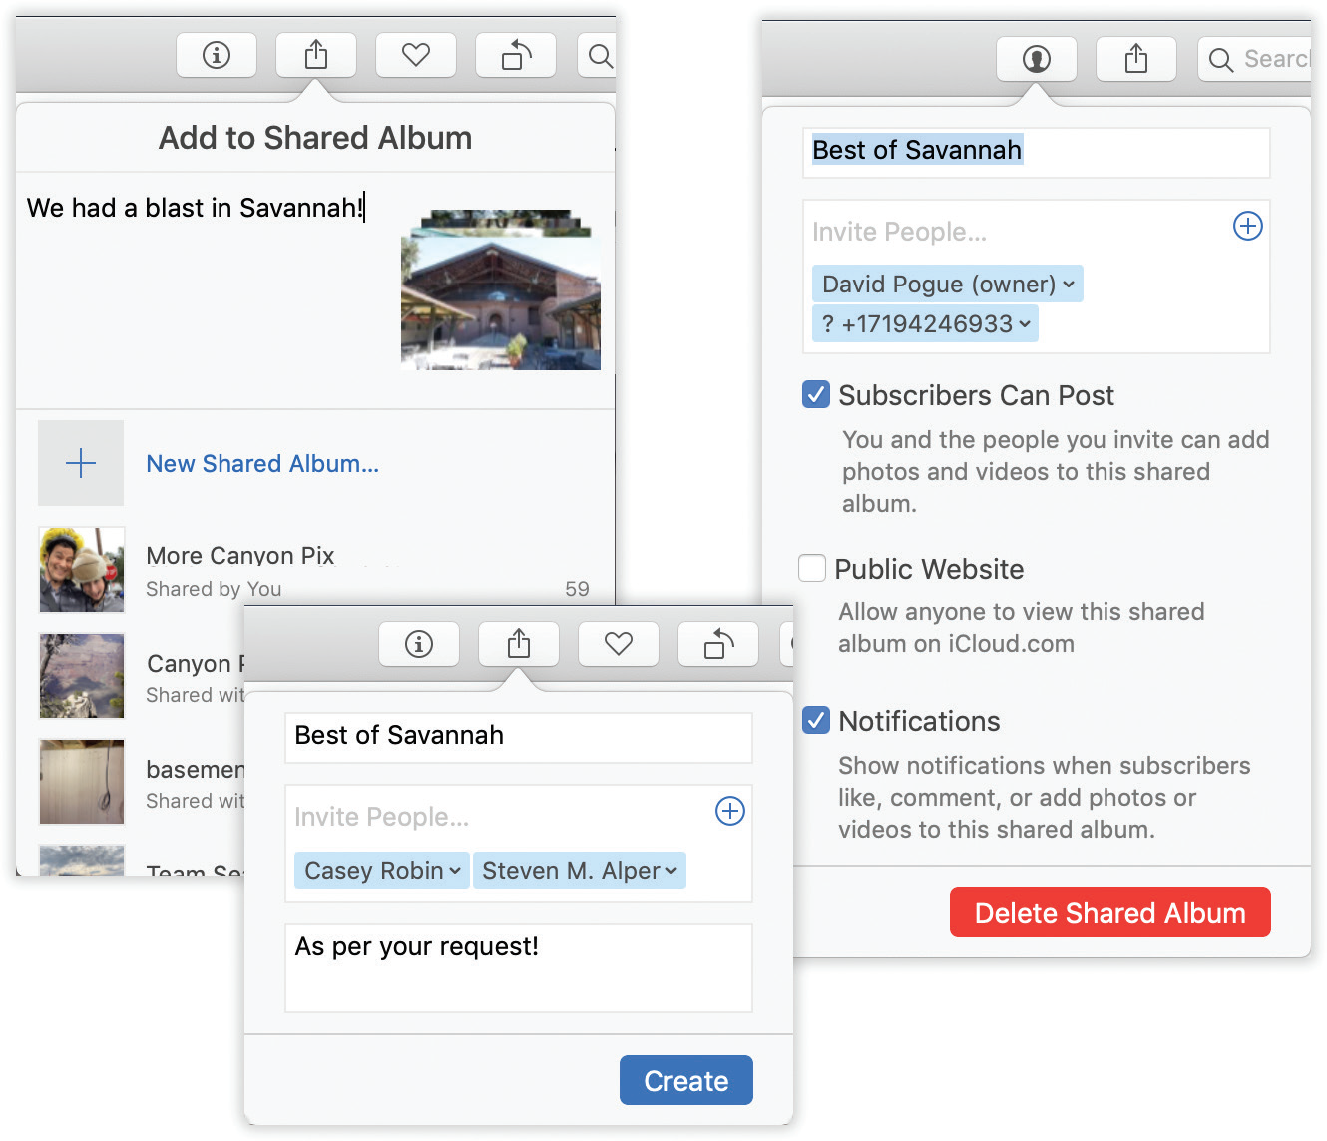
Figure 16-10. The life cycle of a shared album, as visible in the Photos app:
Top left: After selecting the photos and videos you want to share, click and then Shared Albums. This box appears; type a comment if you like. Click New Shared Album.
Bottom: Name the album; invite people to view these pictures. They’re invited by email.
Right: Later, you can permit your guests to post their own pictures, make this site visible to the unwashed non-Apple masses, and request notifications when someone interacts with your album.
The lucky recipients can post comments about your pix, click a “like” button to indicate their enthusiasm, or even submit their pictures and videos. It’s like having a tiny Instagram network of your very own, consisting solely of people you invite.
The steps for creating Shared Albums vary by program. Figure 16-10, for example, shows how it works in the Photos app.
iCloud Drive
The iCloud Drive is Apple’s version of Dropbox. It’s a folder, present on every Mac, iPhone, iPad, and iPod Touch, that lists whatever you’ve put into it—an online “disk” that holds 5 gigabytes (more, if you’re willing to pay).
The iCloud Drive is a perfect place to put stuff you want to be able to access from any Apple gadget, wherever you go. It’s a great backup, too.
If you click Options next to iCloud Drive in the iCloud pane of System Preferences (shown in Figure 16-8), you find two tabs. The first, Documents, lists all the Mac apps that have stored files or preference settings on your Drive. Look Me Up By Email is a list of apps that permit other iCloud members to find you by looking up your address.
You can read more about iCloud Drive—and its offshoot, iCloud Desktop & Documents—starting in “Revert”.
Email Address
Apple offers an email address as part of each iCloud account. Of course, you already have an email account. So why bother? The first advantage is the simple address: [email protected]. (It may look like what you’ve got is [email protected], but mail sent to [email protected] comes to exactly the same place. These addresses are aliases of each other.)
Second, me.com addresses are integrated into macOS’s Mail program, as you’ll see in Chapter 17. You can also read your me.com email from any computer anywhere in the world, via the iCloud.com website, or on your iPhone/iPod Touch/iPad.
Besides, it’s always great to have a backup account, one you never enter on websites so that it never gets overrun with spam. Or vice versa: Let this be your junk account, the address you use for online forms. Either way, it’s great to have a second account.
To make things even sweeter, your me.com or iCloud.com mail is completely synced. Delete a message on one gadget, and you’ll find it in the Deleted Mail folder on another. Send a message from your iPhone, and you’ll find it in the Sent Mail folder on your Mac. And so on.
Data Synchronization
iCloud began life as a synchronization service. It can keep your calendar, address book, reminders, notes, bookmarks, and documents updated and identical on all your gadgets: Mac, PC, iPhone, iPad, iPod Touch. Also your web passwords and credit card numbers. And all your photos, too, rounded up from all your Apple gadgets.
It’s a huge convenience—almost magical. It’s one of the great payoffs of living within Apple’s ecosystem of gadgets. It offers both the convenience factor—all your stuff is always on all your gadgets—and a safety/backup factor, since you have duplicates everywhere.
It works by storing the master copies of your stuff—email, notes, reminders, contacts, calendars, web bookmarks, and documents—on the web. (Or “in the cloud,” as the product managers would say.)
Whenever your Macs, PCs, or i-gadgets are online—over Wi-Fi or cellular—they connect to the mother ship and update themselves. Edit an address on your iPhone, and shortly thereafter you’ll find the same change in Contacts (on your Mac) and Outlook (on your PC). Send an email reply from your PC at the office, and you’ll find it in your Sent Mail folder on the Mac at home. Add a web bookmark anywhere and find it everywhere else. Edit a spreadsheet in Numbers on your iPad and find the same numbers updated on your Mac.
Actually, there’s even another place where you can work with your data: on the web. Using your computer, you can log into iCloud.com to find web-based clones of Calendar, Contacts, and Mail.
Figure 16-8 shows the on/off switches for these sync features. They include these:
Contacts, Calendars. There’s nothing as exasperating as realizing that the address book you’re consulting on your home Mac is missing somebody you’re sure you entered—on your phone. This option keeps all your address books and calendars synchronized. Delete a phone number on your computer at home, and you’ll find it gone from your phone. Enter an appointment on your iPhone, and you’ll find the calendar updated everywhere else.
Reminders. This option refers to the to-do items you create in the phone’s Reminders app; very shortly, those reminders will show up on your Mac (in Reminders, Calendar, or BusyCal) or PC (in Outlook). How great to make a reminder for yourself in one place and have it reminding you later in another one!
Safari. If a website is important enough to merit bookmarking while you’re using your phone, why shouldn’t it also show up in the Bookmarks menu on your desktop PC at home, your Mac laptop, or your iPad? This option syncs your Safari Reading List, too.
Notes. This option syncs the notes from your phone’s Notes app into the Notes app on the Mac, the email program on your PC, your other i-gadgets, and, of course, the iCloud website.
Keychain. The iCloud Keychain keeps all your online name/password combinations synchronized across all your Apple machines, so you don’t have to memorize them or even type them as you log into various sites. Credit card numbers, too. See “The Keychain”.
Voice Memos. New in macOS Mojave (and iOS 12): The audio recordings you make on your phone can be synced to the new Voice Memos app on your Mac, and vice versa. But finding the On switch for this feature isn’t easy. In System Preferences → iCloud, click Options next to iCloud Drive. Here is the Voice Memos switch.
To set up syncing, turn on the checkboxes for the items you want synced. That’s it. There is no step 2.
Note
You may notice that there are no switches here for syncing stuff you buy from Apple, like books, movies, apps, and music. They’re not so much synced as they are stored for you online. You can download them at any time to any of your machines.
Find My Mac, Find My iPhone
Did you leave your iPhone somewhere? Did your laptop get stolen? Has that mischievous 5-year-old hidden your iPad again?
You can check into iCloud.com to see the exact location of your Mac, iPhone, iPad, Apple Watch, or AirPods (out of their case and near your phone); see Figure 16-11. You can even make it beep loudly for 2 minutes, so you can figure out which room of the house you left it in. If the missing item is an iPad or an iPhone, you can make it beep even if the ringer switch is off, and even if the device is asleep. You can also make a message pop up on the screen; if you actually left the thing in a taxi or on some restaurant table, you can use this feature to plead for its return. The bottom line: If you ever lose your Apple gear, you have a fighting chance at getting it back.
(That’s if it’s online, and if you turned on Find My Mac in the iCloud panel of System Preferences.)
If an ethical person finds your Mac, you might get it back. If it’s a person who says, “Hey, cool! A free MacBook!” then maybe you can bombard him with so many of these messages that he gives it back in exasperation.
If not, you can either lock the gadget with a password (yes, by remote control) or even avail yourself of one more amazing last-ditch feature: Erase Mac (or iPhone or iPad).
That means deleting your data by remote control, from wherever you happen to be. The greedy thief can do nothing but stare in amazement as the Mac, phone, or tablet suddenly erases itself, winding up completely empty.
Note
And by the way: That thief can’t erase your stolen phone or tablet himself, thanks to Apple’s ingenious Activation Lock feature. It prevents the phone or tablet from being erased without your Apple ID and password. Good luck with that, bad guy!
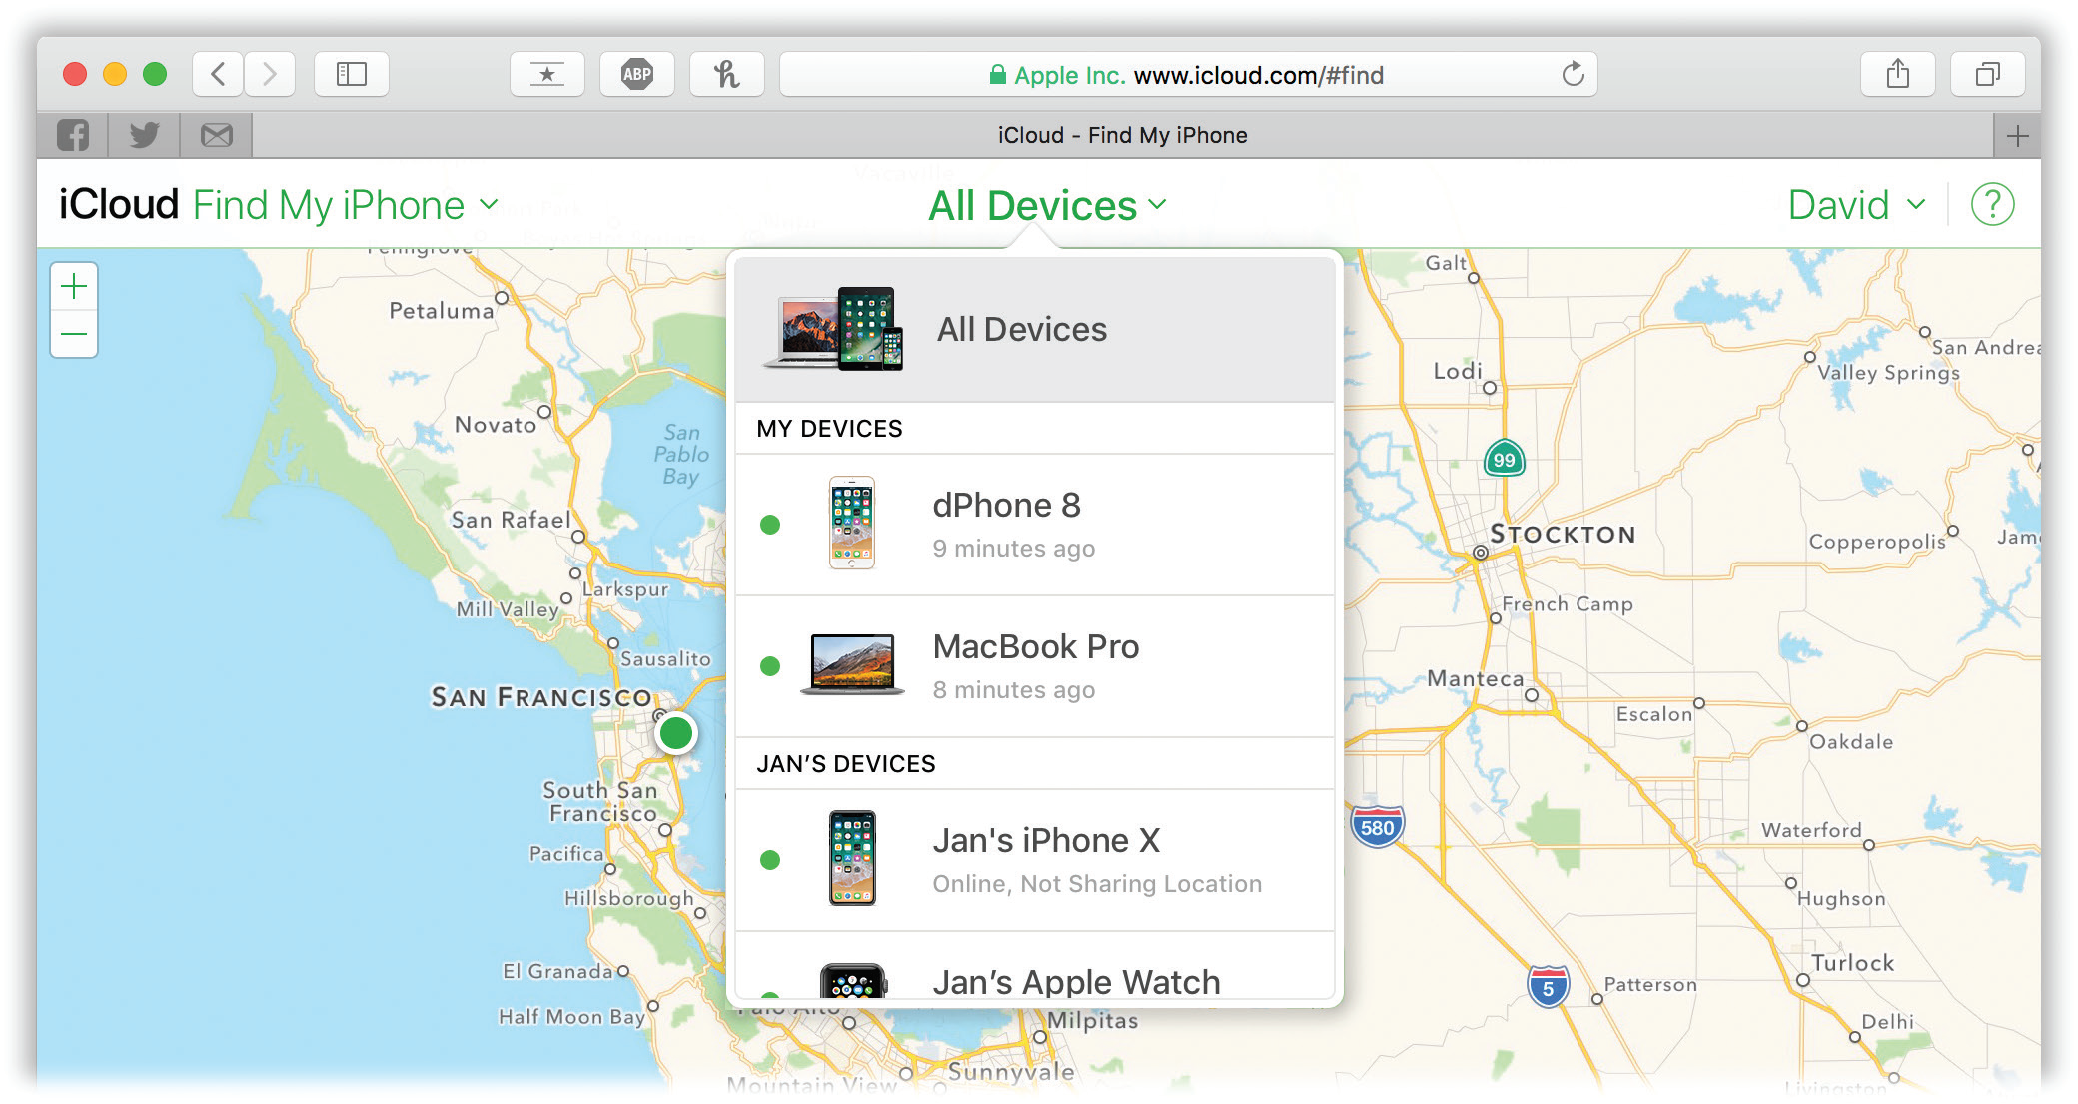
Figure 16-11. The location process takes a minute. You can zoom in to or out of the map, click Satellite to see an overhead photo of the area, or click Hybrid to see the photo with street names superimposed.
The big green dot indicates that one of your Apple gadgets isn’t as lost as you thought.
To set up your Mac so you can find it remotely, open System Preferences → iCloud. Make sure Find My Mac is turned on. That’s all there is to it.
Later, if the worst should come to pass and you can’t find your Mac, go to any computer and call up iCloud.com. Log in with your Apple name and password.
Click Find iPhone. If you’re asked for your password again, type it; Apple wants to make sure it’s really, really you who’s messing around with your account settings.
The website updates to show you, on a map, the current location of your Macs (and iPhones, iPod Touches, and iPads); see Figure 16-11.
Note
If they’re not online, or if they’re turned all the way off, the map shows you the last known location (if that was within the past 24 hours). If it’s been longer than 24 hours, you don’t see their current locations. If they’re just asleep—even if your laptop’s lid is closed—you do.
If just knowing where the thing is isn’t enough to satisfy you, click the little pushpin that represents your Mac (or choose its name from the menu at top center), and try one of these three buttons:
Play Sound. When you click this button, a very loud sonar-like pinging sound instantly chimes on your Mac, wherever it is, no matter what its volume setting. Even if your laptop is closed and asleep, it will ring. The idea is to help you find it in whatever room of the house you left it in.
When it’s all over, Apple sends an email confirmation to your @me.com address.
Lock. What if you worry about the security of your Mac’s info, but you don’t want to erase it completely and just want to throw a low-level veil of casual protection over the thing? Easy: Lock it by remote control.
The Lock button lets you make up a four-digit passcode (which overrides the one you already had, if any). Without it, the sleazy crook can’t erase your Mac, and can’t even get into it.
You’re also offered the opportunity to type a message; it will appear on the Unlock screen, below the four boxes where you’re supposed to type in the four-digit code. You might type something like “Thank you for finding my lost laptop! Please call me at 212-555-1003 for a delicious frosty reward.”
Erase Mac. This is the last-ditch security option, for when your immediate concern isn’t so much the Mac as all the private stuff that’s on it. Click this button, confirm the dire warning box, and click Erase All Data. By remote control, you’ve just erased everything from your Mac, wherever it may be. (If the Mac is ever returned, you can restore it from your Time Machine backup.)
Once you’ve wiped the Mac, you can no longer find it or send messages to it using Find My Mac.
Family Sharing
It took years, but Apple has finally acknowledged a fundamental fact of life: Many of us have families.
It used to be a hassle to manage your Apple life with kids. What if they wanted to buy a book, movie, or app? They had to use your credit card—and you had to reveal your iCloud password to them. Or what if they wanted to see a movie that you bought? Should they really have to buy it again?
Family Sharing solves those problems. Once you’ve turned on Family Sharing and invited your family members, here’s how your life will be different:
One credit card to rule them all. Up to six of you can buy books, movies, apps, and music on your master credit card.
Ask before buying. When your kids try to buy stuff, your device pops up a permission request. You have to approve each purchase.
Younger Appleheads. Within Family Sharing, you can now create Apple accounts for tiny tots; 13 is no longer the age minimum.
Shared everything. All of you get instant access to one another’s music, video, ebooks, and app purchases—again, without having to know one another’s Apple passwords.
Find one another. You can use your phone to see where your kids are, and vice versa (with permission, of course).
Find one another’s phones. The miraculous Find My Mac feature (“Find My Mac, Find My iPhone”) now works for every device in the family. If your daughter can’t find her phone, you can find it for her with your Mac.
Mutual photo album, mutual calendar, and mutual reminders. When you turn on Family Sharing, your Photos, Calendar, and Reminders apps each sprout a new category that’s preconfigured to permit access by everyone in your family.
Setting Up Family Sharing
You can turn on Family Sharing either on the Mac (in System Preferences → iCloud) or on the phone. Since this book is about the Mac, here are the steps to do it there (Figure 16-12).
In System Preferences → iCloud, click Set Up Family. Read about the juicy features, and then click Continue. The next screen asks you to confirm that you are the sage adult, the Organizer—the one with the power, the wisdom, and the credit card. Click Continue (unless it’s listing the wrong iCloud account, in which case you can fix it now).
On successive screens, you read about the idea of shared Apple Store purchases; you’re shown the credit card that Apple believes you want to use; you’re offered the chance to share your location with the others. Each time, read and click Continue or Confirm.
Finally, you’re ready to introduce the software to your family.
Click the + button at lower left. Then:
If the kid has an iCloud account and is standing right there with you in person: Type in her name or email address. (Your child’s name must already be in your Contacts; if not, go add her first. By the way, you’re a terrible parent.)
You’re asked to confirm that you’re actually present with her by entering the security code for your credit card. When you click Continue, she can now enter her iCloud password on your Mac to complete her setup.
On the next screen, she has a couple of decisions to make.
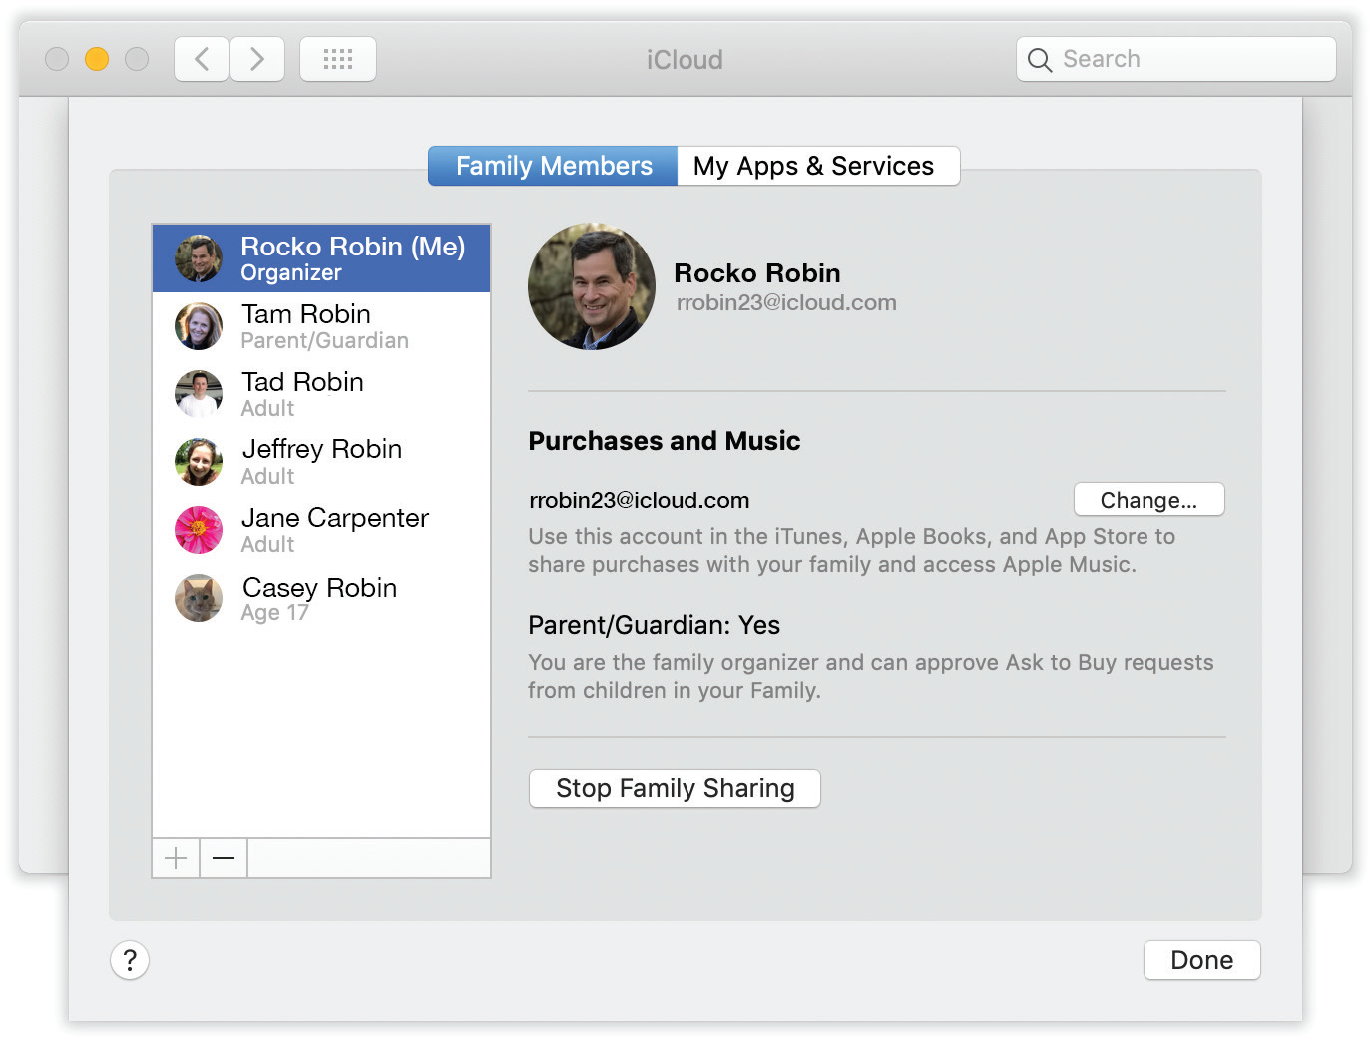
Figure 16-12. The iCloud pane of System Preferences is the central hub of Family Sharing planning. The setup process involves a bunch of dialog boxes, but at least you have to walk through them only once.
If the kid has an iCloud account but isn’t with you at the moment: Type in her email address. Click Send an Invitation.
Your little darling gets an email at that address. She must open it on her Apple gadget—in the Mail app on her iPhone or Mac, for example.
When she hits View Invitation, she can either enter her iCloud name and password (if she has an iCloud account), or get an Apple ID (if she doesn’t).
Once she accepts the invitation, she can choose a picture to represent herself; tap Confirm to agree to be in your family; enter her iCloud password to share the stuff she’s bought from Apple; agree to Apple’s lawyers’ demands; and, finally, opt in to sharing her location with the rest of the family.
If the kid is under 13: Your kid doesn’t have an iCloud account, because until Family Sharing came along, you had to be over 13 to get an iCloud account. No longer!
Choose “Create an Apple ID for a child who doesn’t have an account.” Click Continue. On the screen that follows, you’ll enter the kid’s name and birth date (Figure 16-13, top).
Make up a name and password for the new iCloud account, too. Decide whether you want the family to be able to see where the kid is at all times. Click Continue.
On the Parent Privacy Disclosure screen, enter the security code for your credit card yet again (to prove that you’re you, and not, for example, your naughty kid).
On the next screen, you choose and answer three security questions for this new iCloud account. Click Continue. Then more legalese on two screens (click “I agree,” and then Agree).
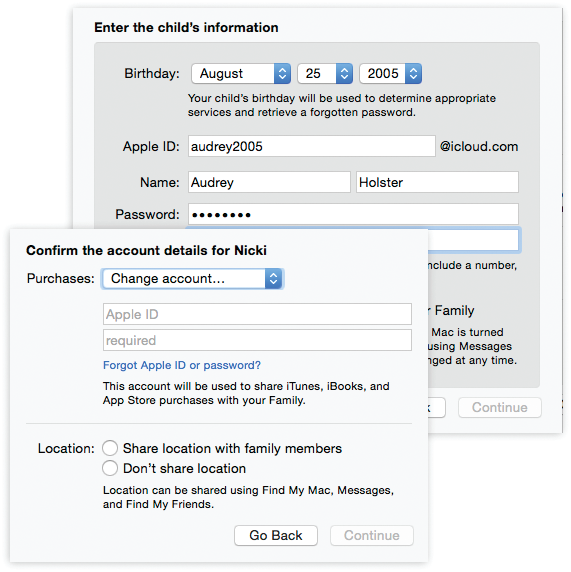
Figure 16-13. Top: You’ll notice that the dialog box requires a birth year that confirms that your kid’s age is under 13. If your kid is over 13, you should set up an iCloud account in the usual way—at iCloud.com, for example, or in System Preferences → iCloud.
Bottom: A newly added family member has some decisions to make. First, the Purchases pop-up menu lets her specify her iCloud address—the one whose purchases she’ll be pooling with the family. (It’s usually the same address you just specified, but not always.)
Second, here she can turn on location sharing. In other words: The rest of the family will be able to see where she is, using Messages, Find My Mac, and the Find My Friends app on the iPhone or iPad.
You can, of course, repeat this cycle to add additional family members, up to a maximum of six. Their names and ages appear on the Family screen.
From here, you can click someone’s name to perform stunts like these:
Delete a family member. Man, you guys really don’t get along, do you? Anyway, click the — button.
Turn Ask To Buy on or off. This option appears when you’ve selected a child’s name. If you decide that your kid is responsible enough not to need your permission for each purchase, you can turn this option off.
Note
If you turn off Ask To Buy for someone after she turns 18, you can’t turn it on again.
Turn Parent/Guardian on or off. This option appears when you’ve selected an adult’s name. It gives Ask To Buy approval privileges to someone else besides you—your spouse, for example.
Turn “Allow [this person] to see your location” on or off. Do you want this person to be able to see where you are (by using Messages, Find My Mac, or Find My Friends)?
Once kids turn 13, by the way, Apple automatically gives them more control over their own lives. They can, for example, turn off Ask To Buy themselves, on their own Macs or phones. They can even express their disgust for you by leaving the Family Sharing group. (On her own phone, for example, your daughter can visit Settings → iCloud → Family, tap her name, and then tap Leave Family. Harsh!)
Life in Family Sharing
Once everything’s set up, here’s how you and your nutty kids will get along:
Purchases. Whenever one of your kids (for whom you’ve turned on Ask To Buy) tries to buy music, videos, apps, or books from Apple—even free items—he has to ask you (Figure 16-14).
Furthermore, each of you can see and download everything everyone else has bought. To do that, open the appropriate program: App Store, iTunes, or Books. Click Purchased, and then tap the family member’s name to see what he’s got; tap the
 to download any of it for yourself.
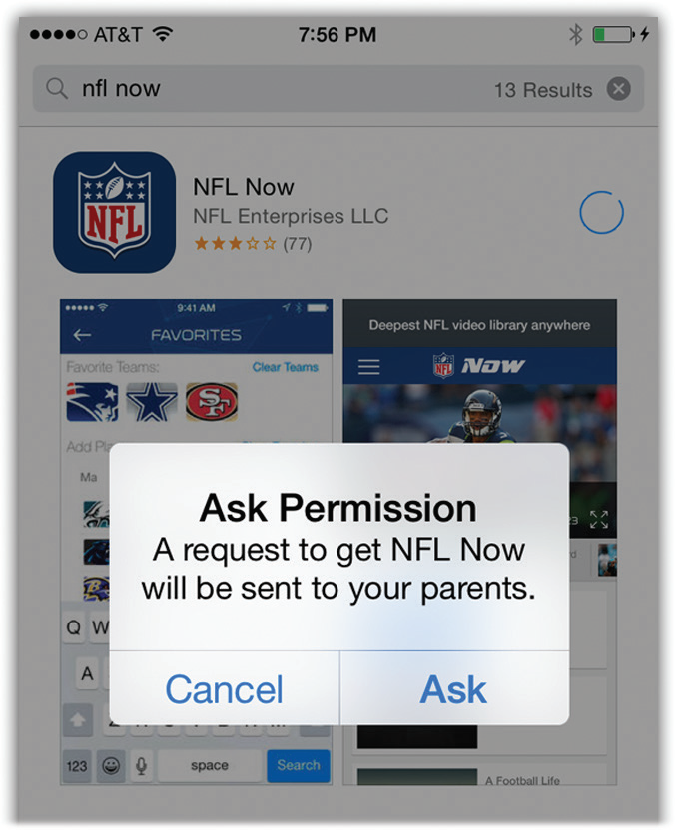
Figure 16-14. Your kid can’t download anything from one of Apple’s stores without your OK.
You’re notified about the purchase on your phone or Mac, and you can decline it or click Review to read about it on its Store page. If it seems OK, you can tap Approve. You also have to enter your iCloud password to prevent your kid from sneaking over to your Mac or phone and approving his own request.
(If you don’t respond within 24 hours, the request expires. Your kid has to ask again.)Tip
Anything you buy, your kids will see. Keep that in mind when you download a book like Tough Love: Sending the Unruly Child to Military School.
However, you have two lines of defense. First, you can hide your purchases so nobody sees them. On the Mac, in iTunes, click Store and then Purchased (right side). Point to the thing you want to hide, click the
 , and click Hide. Second, remember that you can set up parental control on each kid’s Mac or phone, shielding their impressionable eyes from R-rated movies and stuff. See “Parental Controls”.
Where are you? Go to iCloud.com and click Find iPhone (see “Find My Mac, Find My iPhone”) to see where their phones or gadgets are right now, which may or may not be with their owners. Or, on an iPhone or iPad, use the Find My Friends app to see where in town (or in the world) your posse is right now.
Note
If one of you needs secrecy for the afternoon (Apple sweetly gives, as an example, shopping for a gift for your spouse), open System Preferences → iCloud. Click Manage Family. Click the person you want to hide from. Turn off “Allow [this person] to see your location.” Now you’re untrackable until you turn the switch on again.
Photos, appointments, and reminders. In Photos, Calendar, and Reminders, each of you will find a new category, called Family, that’s auto-shared among you all. You’re all free to make and edit appointments in this calendar, to set up reminders in Reminders (“Flu shots after school!”), or to add photos or videos (or comments) to this album; everyone else will see the changes instantly.
Apple Pay on the Web
Apple Pay (Figure 16-15) is a feature of recent iPhones. It lets you pay for things without cash, without cards, without signing anything, without your wallet: Just hold the phone. You don’t have to open an app, don’t have to enter a code, don’t even have to wake the phone up; just hold your finger on the Home button (it reads your fingerprint to make sure it’s you) or look at the Face ID camera (on iPhones and iPads with that feature). You’ve just paid.
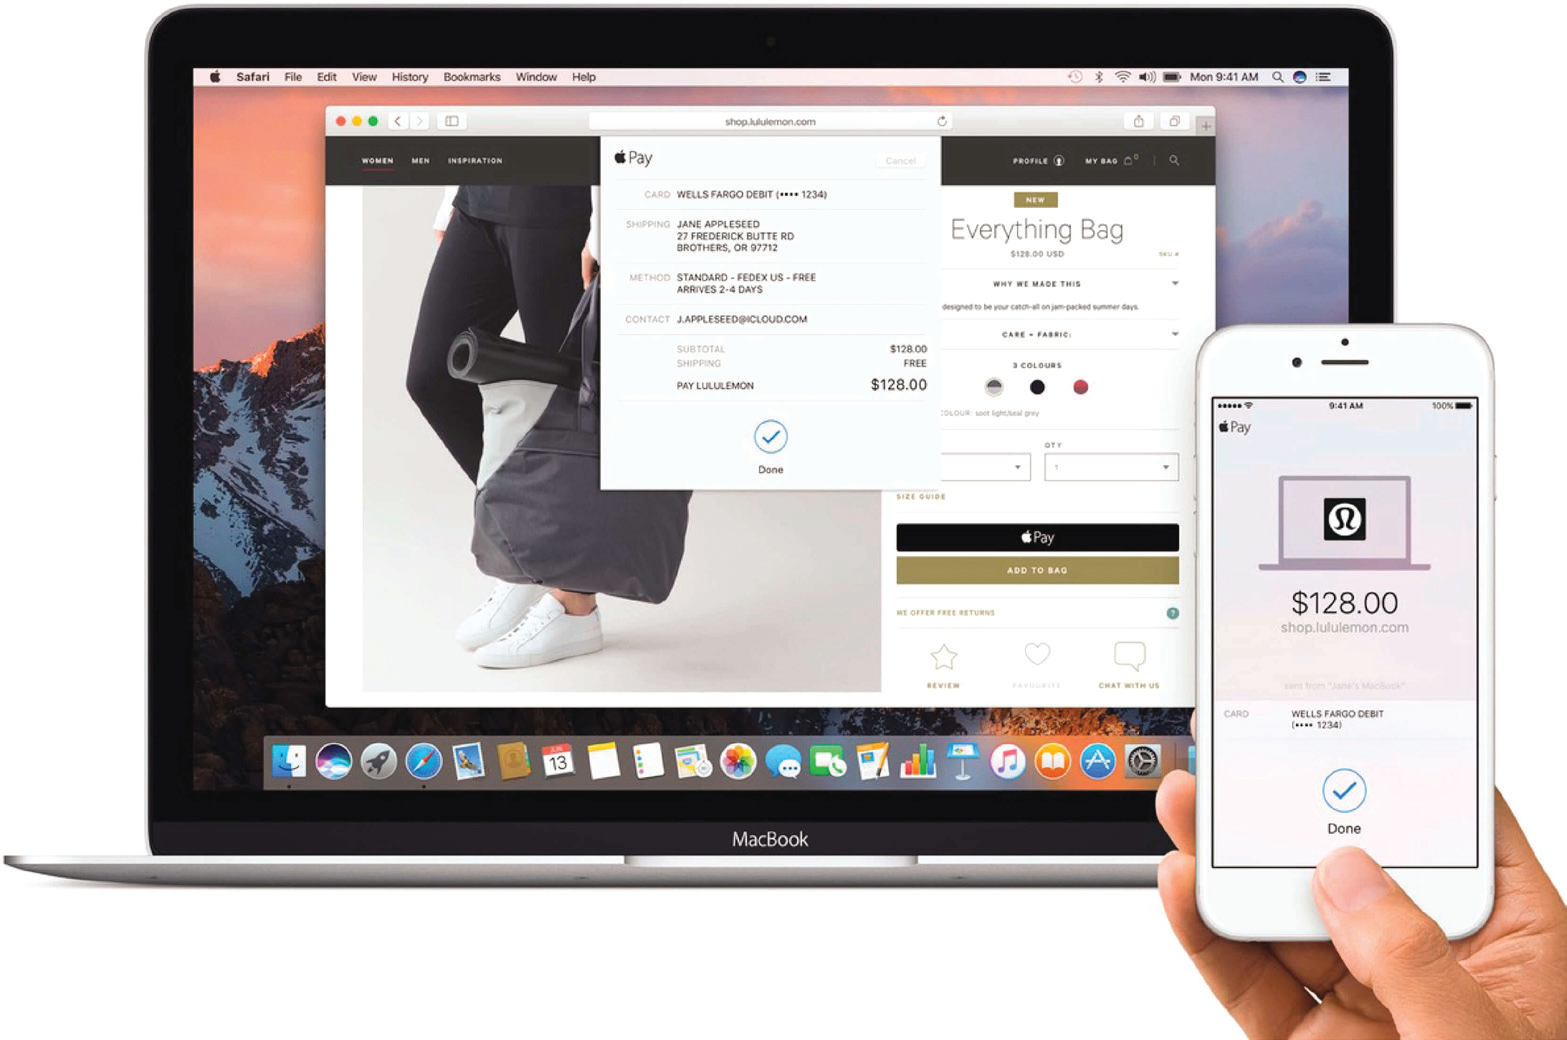
Figure 16-15. Apple Pay lets you use the fingerprint reader or Face ID on your phone to confirm purchases on your Mac. Crazy! The only trick now is finding websites that actually offer Apple Pay as a payment method.
You can’t pay for things everywhere; the merchant has to have a wireless terminal attached to the register. You’ll usually know, because you’ll see the Apple Pay logo or a wireless-transmission logo displayed. Even so, Apple says over a million stores and restaurants accept Apple Pay, including chains like McDonald’s, Walgreens, Macy’s, Subway, Panera Bread, Duane Reade, Bloomingdale’s, Staples, Chevron, and Whole Foods. More are coming. (The list is here: apple.com/apple-pay/where-to-use.)
You can’t do that with your Mac, although it sure would be fun to see someone hold an iMac up to the Starbucks cash register.
What you can do on the Mac is buy stuff in the Safari browser, on websites that accept Apple Pay. (About 200,000 do, including Apple, Seamless, StubHub, Airbnb, Fandango, Groupon, Ticketmaster, and so on.)
If you have a laptop with a fingerprint reader, you can complete those purchases with a single tap on your Touch ID sensor. If not, you can use an Apple Watch or an iPhone as the identification authenticator; read on.
The Setup
To set up Apple Pay, you have to teach your Mac about your credit card (if you haven’t already on your phone).
If your Mac has a fingerprint (Touch ID) sensor. Open System Preferences → Wallet & Apple Pay. Click Add Card.
If you’ve already set up a credit card with Apple (through the App Store or iTunes, for example), then all you have to do is supply the security code and then tap Next, Accept, and Done.
If not, on the Add Card screen, you’re asked to hold your Visa, Mastercard, or American Express card up to the Mac’s camera. Hold steady until the digits of your card, your name, and the expiration date blink onto the screen, autorecognized. Cool! You can manually edit any of those four fields before clicking Next, Accept, and Done. (You can also choose Enter Card Details Manually and type in the numbers yourself.)
Next, your bank has to verify that all systems are go for Apple Pay; it’s generally instantaneous. (Most banks work with Apple Pay, but not all of them.) You’ll see a notification when it’s all ready.
If your Mac doesn’t have a fingerprint sensor. You can’t set up Apple Pay without an iPhone or iPad. (Open Settings → Wallet & Apple Pay and turn on “Allow Payments on Mac.”)
As a final step, open Safari → Preferences → Privacy. Turn on “Allow websites to check if Apple Pay is set up.”
The Shopping
Next time you’re shopping at an Apple Pay–friendly website, and you’re on the payment screen where the “Buy with Apple Pay” logo appears, click it.
A sheet appears where you can choose a different credit card (if you’ve registered more than one)—and where you must authenticate. If you’re using a Mac with a fingerprint reader, just touch your finger to it, and the whole thing is complete.
If you’re shopping on a Mac that doesn’t have its own fingerprint reader, a “Confirm on iPhone” or “Confirm on Apple Watch” message lets you know you can authenticate with your iPhone’s fingerprint reader or Face ID, or with a double-press of the Watch’s side button. The “OK, all clear” signal gets sent to your Mac automatically.
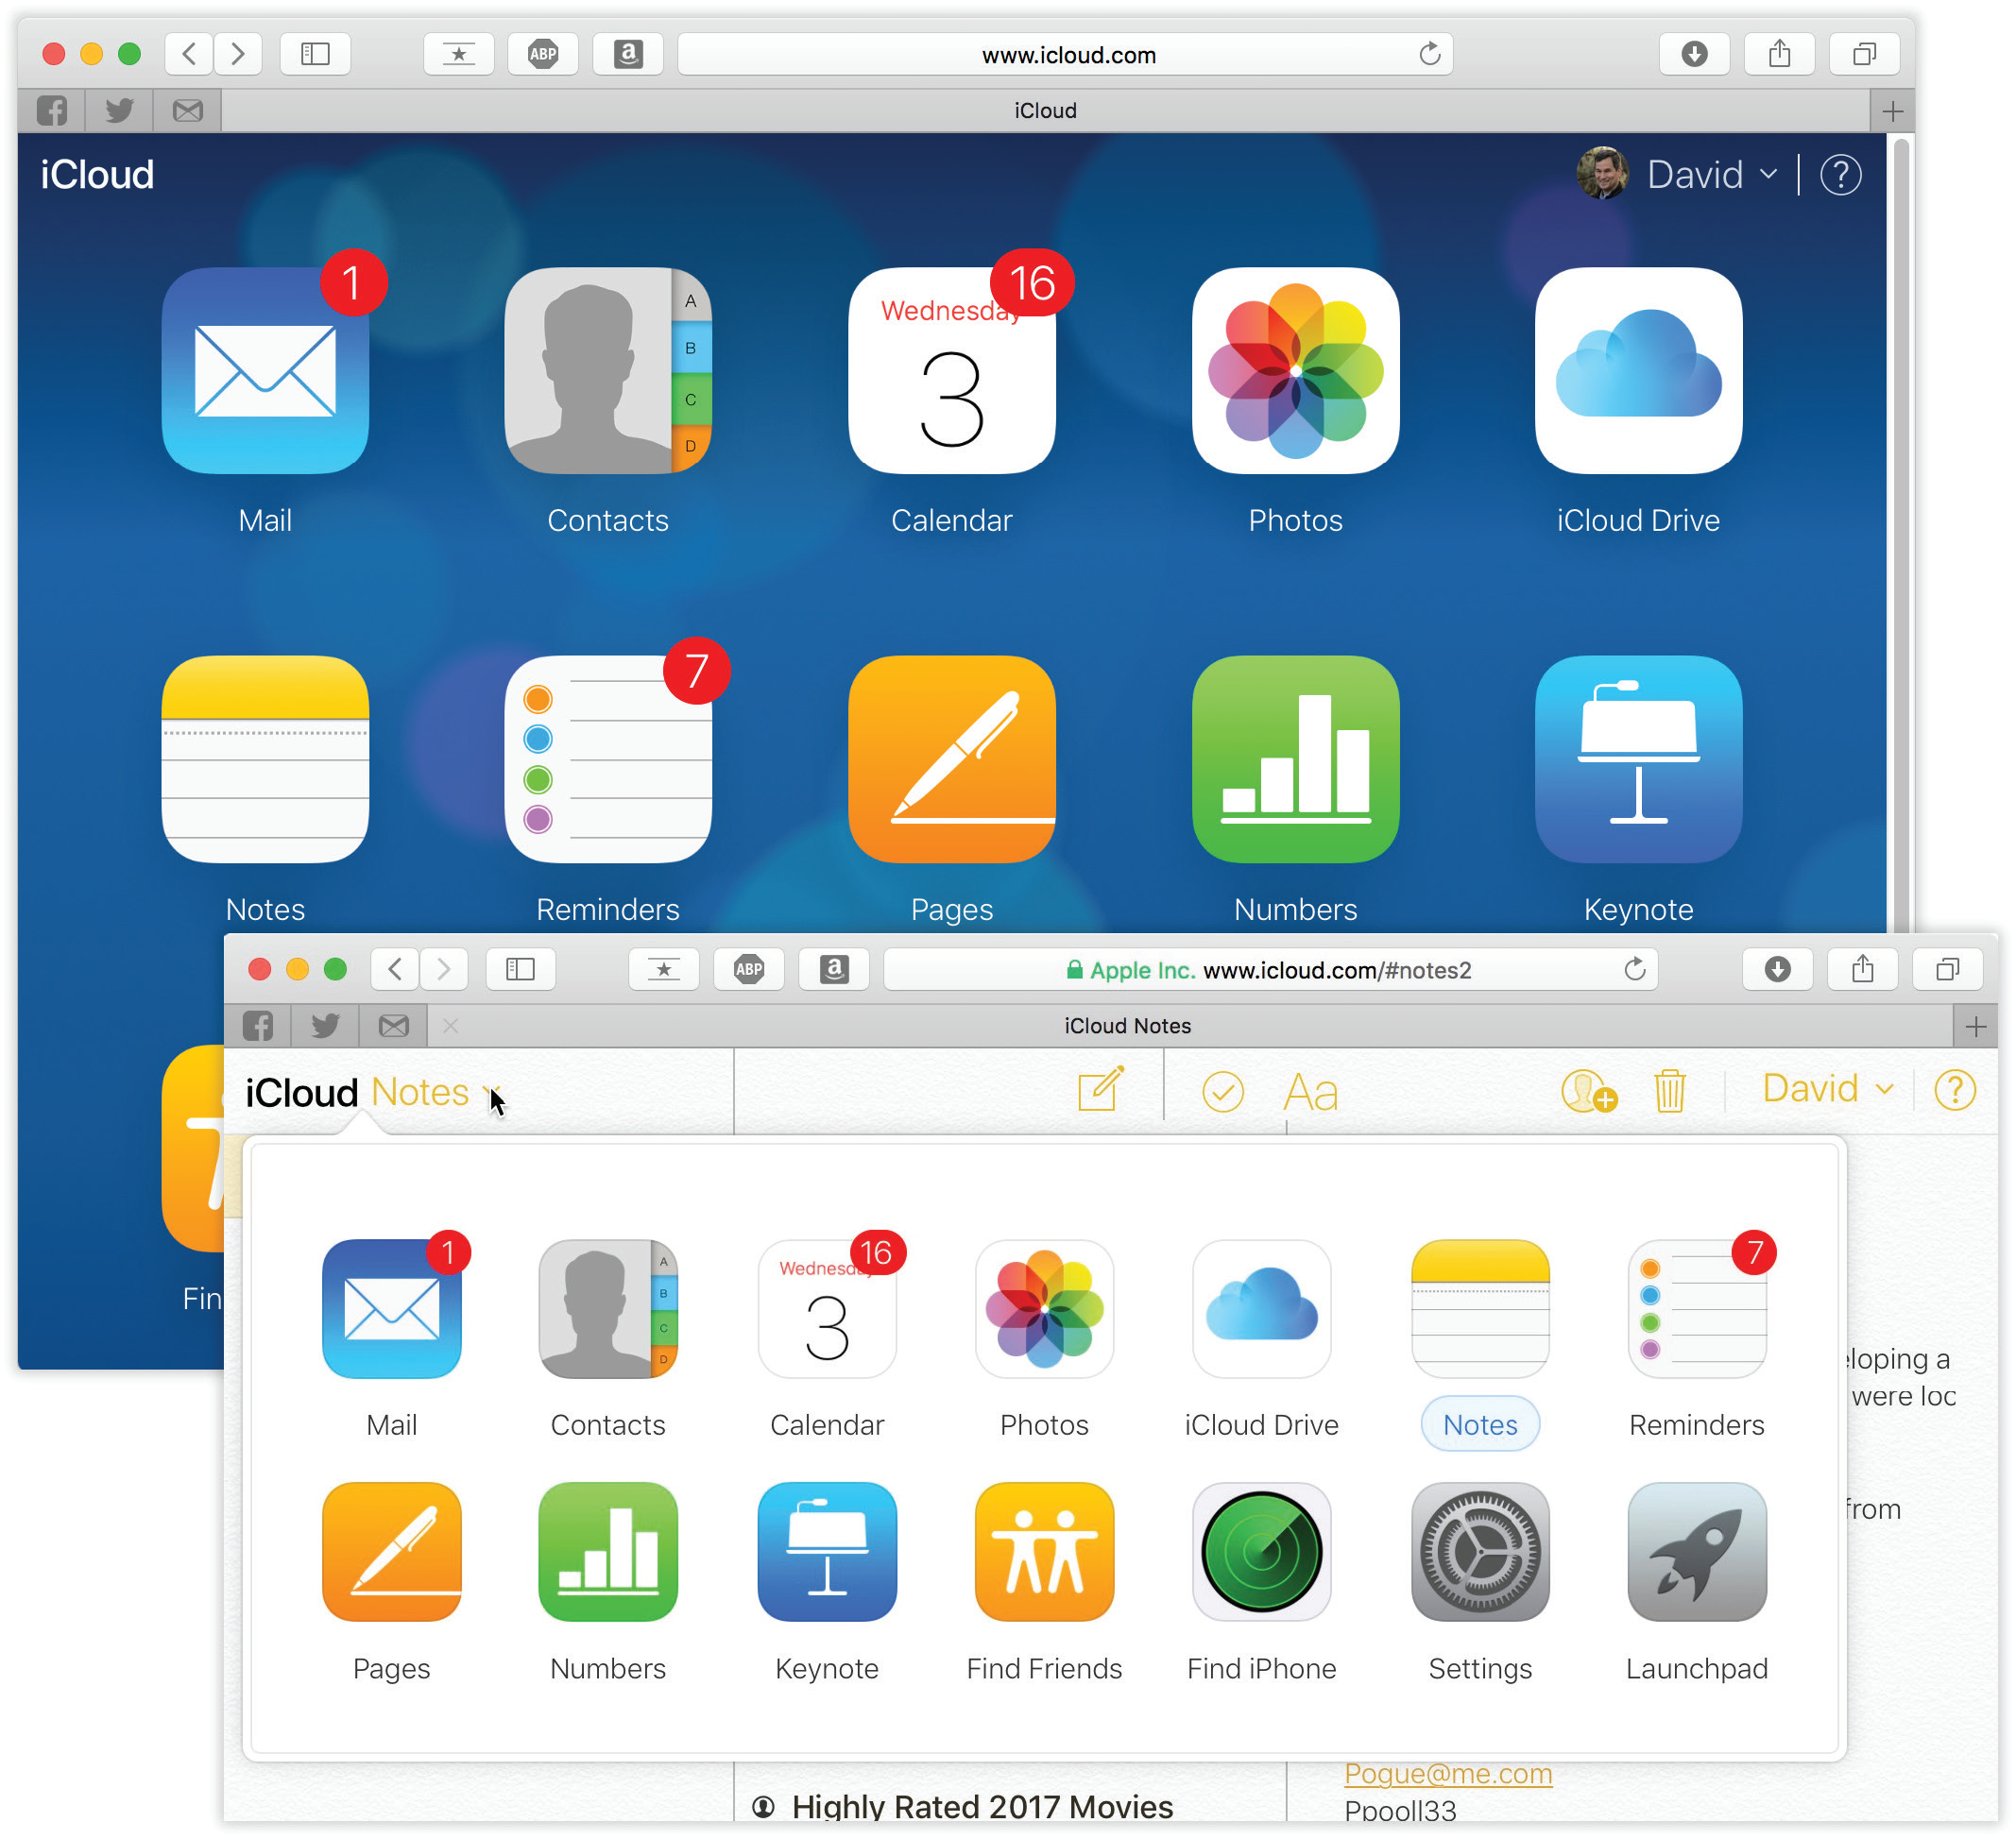
Figure 16-16. Top: Here’s the iCloud home screen, showing the major online features of this service. All of this stuff, of course, is an online mirror of what’s on your Mac.
Bottom: Once you’re in one of the modules—Mail, Calendar, Notes, or whatever—you can switch among iCloud features using the  that always appears in the upper-left corner.
More iCloud Features
Not all of iCloud’s goodies are represented as checkboxes in System Preferences → iCloud. Don’t forget that iCloud’s online hub is waiting for you—available from any computer, tablet, or phone—at iCloud.com (Figure 16-16).
And even that’s not all there is to iCloud. Read on.
Continuity
The set of features Apple calls Continuity turn the iPhone into a part of the Mac. They let you make calls from your Mac as though it were a speakerphone. They let you send and receive text messages from your Mac—to any cellphone on earth. They let you AirDrop files between computer and phone, wirelessly. And more.
Continuity gets its own chapter (Chapter 8).
Books, Music, Apps, Movies: The Locker in the Sky
Apple, if you hadn’t noticed, has become a big seller of multimedia files. It has the biggest music store in the world. It has the biggest app store, for both i-gadgets and Macs. It sells an awful lot of TV shows and movies. Its ebook store, Books, is no Amazon.com, but it’s chugging along.
When you buy a song, movie, app, or book, you’ve always been allowed to copy it to all your other Apple equipment—no extra charge. But iCloud automates, or at least formalizes, that process. Once you buy something, it’s added to a tidy list of items that you can download to all your other machines.
Here’s how to grab them:
iPhone, iPad, iPod Touch. Open the App Store icon (for apps), the Books app (for books), or the iTunes Store app (for songs, movies, or TV shows; tap the category you want). Tap More. Tap Purchased. Tap Not on This iPhone.
There they are: all the items you’ve bought on your other machines using the same Apple ID. To download anything listed here onto this machine, tap the
button. Or tap an album name to see the list of songs on it so you can download just some of those songs.You can save yourself all that tapping by opening Settings → iTunes & App Store and turning the Automatic Downloads switches to On (for Music, Apps, and Books & Audiobooks). From now on, whenever you’re on Wi-Fi, stuff you’ve bought on other Apple machines gets downloaded to this one automatically, in the background.
Mac. Open the App Store program (for apps) or the iTunes app (for songs, TV shows, books, and movies). Click Purchased (on the right), and there they are: all the digital goodies you’ve bought using this Apple ID, ready to open or re-download if necessary.
Tip
To make this automatic, open iTunes. Choose iTunes → Preferences → Downloads. Under Automatic Downloads, turn on Music, Movies, and TV Shows, as you see fit. Click OK.