Chapter 17. Mail & Contacts
If you have an email address or two, you’ll be happy to discover that macOS includes Mail, a program that lets you get and send email without having to wade through a lot of spam (junk mail). Mail is a surprisingly complete program, filled with shortcuts and great features around every turn.
Setting Up Mail
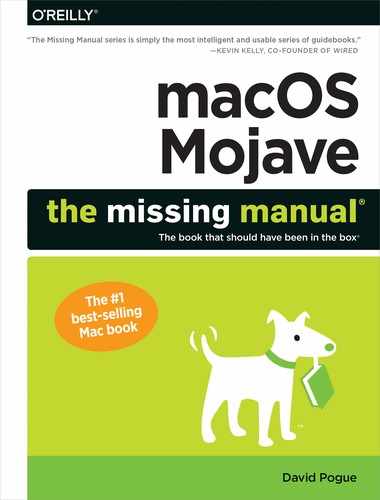
Mail can’t get your mail unless it knows the details of your email account. The first time you open Mail, then, it asks you for your account information. It’s kind of hoping you use a common email service like Gmail, Yahoo, AOL, or Microsoft Exchange (Figure 17-1), or a common internet provider like Verizon or Comcast. In those situations, all you have to do is type your email name and password. If Mail recognizes the suffix (for example, @gmail.com), then it does the heavy lifting for you. Mail is ready to go online.
Note
You can perform exactly the same account setup in the Internet Accounts pane in System Preferences. There’s no advantage of one method or the other, except that the System Preferences pane lets you enter your account information for online calendars and address books, too.
Now, if you use a service provider that Mail doesn’t recognize when you type in your email name and password—you weirdo—then you have to set up your mail account the long way. Mail prompts you along, and you confront dialog boxes, where you’re supposed to type in various settings to specify your email account. Some of this information may require a call to your internet service provider (ISP).
If that happens to you, you’ll have to enter details like your name, password, mail-server addresses (incoming and outgoing), and security settings.
When you’ve made it through the setup screens, turn on Take Account Online to make your new account “live.” If you entered everything correctly, Mail checks for new mail right away.
Figure 17-1. This dialog box lets you plug in the email settings provided by your internet service. If you want to add another email account later, choose Mail → Add Account and then enter your information in the resulting dialog box. (Or, if you like doing things the hard way, choose Mail → Preferences → Accounts tab, click the + in the lower-left corner of the window, and then enter your account information in the fields on the right.)
Importing Old Mail
Mail also can import your email collection from an email program you’ve used before—Thunderbird, Netscape/Mozilla, Eudora, or even a version of Mail that’s stored somewhere else (say, on an old Mac’s hard drive). Importing is a big help in making a smooth transition between your old email world and your new one.
To bring over your old mail and mailboxes, choose File → Import Mailboxes. Mail offers to import your old email collection from just about any other Mac email program.
Later in the process, you can even specify which email folders you want to import. When the importing process is finished—and it can take a very long time—you’ll find precisely the same folders set up in Mail.
Checking Your Mail
You get new mail and send mail you’ve already written using the Get Mail command. You can trigger it in any of several ways:
Click the
 button on the toolbar.
Choose Mailbox → Get All New Mail (or press Shift-
 -N).
-N).Right-click or two-finger click Mail’s Dock icon and choose Get New Mail from the shortcut menu. You can use this method from within any program, as long as Mail is already open.
Wait. Mail comes set to check your email automatically every few minutes. To adjust its timing or to turn this feature off, choose Mail → Preferences, click General, and then choose a time interval from the “Check for new messages” pop-up menu.
Tip
If you choose Automatically, you’ll get incoming messages the instant they arrive—at least in any accounts that offer “push” email.
Now Mail contacts the mail servers listed in the Accounts pane of Mail’s preferences, retrieving new messages and downloading any files attached to those messages. It also sends any outgoing messages that couldn’t be sent when you wrote them.
Tip
If you’d like to monitor your mail progress in a separate window, choose Window → Activity or press ![]() -0. The Activity window gives you a Stop button, progress bars, and other useful information.
-0. The Activity window gives you a Stop button, progress bars, and other useful information.
Also, if you’re having trouble connecting to some (or all) of your email accounts, choose Window → Connection Doctor. There you can see detailed information about accounts that aren’t responding. If your computer’s internet connection is at fault, you can click Network Diagnostics to try to get back online.
The Mailboxes List
The mailboxes panel, the leftmost list on the screen, lists all your email accounts’ folders (and subfolders, and sub-subfolders) for easy access.
Tip
You can also collapse or expand the various sections of the mailboxes list (On My Mac and Reminders, for example) by clicking the Hide or Show button next to each one. That button doesn’t appear, however, until you point to the capitalized section title (like MAILBOXES or ON MY MAC).
Under the Mailboxes heading, you may find these folders:
Inbox holds mail you’ve received. If you have more than one email account, you can expand the triangles to see separate folders for each of your accounts. You’ll see this pattern repeated with the Sent, Junk, and other mailboxes, too—separate accounts have separate subheadings.
Tip
If Mail has something to tell you about your Inbox (like, for instance, that Mail can’t connect to it), a tiny warning triangle (
 ) appears on the right side of the Mailboxes heading. Click it to see what Mail is griping about.
If you see a wavy
 icon, that’s Mail’s way of announcing that you’re offline. Click the icon to try to connect to the internet.
VIPs displays messages from the most important people in your life—those you’ve designated as VIPs (“VIPs”). This folder doesn’t appear if you haven’t identified any VIPs.
Flagged. If you’ve flagged any messages, the flag headings appear here, too. (Flags are described starting in “Flagging Messages”.)
Outbox holds mail you’ve written but haven’t yet sent (because you were on an airplane when you wrote it, for example). If you have no mail waiting to be sent, then the Outbox disappears.
Drafts holds messages you’ve started but don’t want to send just yet.
Sent, unsurprisingly, holds copies of messages you’ve sent.
Trash works a lot like the Trash on your desktop, in that messages you put there don’t actually disappear. They remain in the Trash folder until you permanently delete them—or until Mail’s automatic trash-cleaning service deletes them for you.
Junk appears when you use Mail’s spam filter, as described starting in “The Anti-Spam Toolkit”.
Tailoring the Look of Mail
Apple put a lot of energy into exploiting the size and shape of your screen. In a program made for managing lists and reading messages, you need all the room you can get.

Figure 17-2. Mail can have several different layouts. In the standard three-column view (top), all your mailboxes are grouped tidily in the far-left column. You can hide that column, though, so that you have more space for reading (middle). You can also return to the older layout (bottom), in which the messages list is above the message body.
You’ve always been able to tweak Mail’s look, layout, and proportions—but now you have both the modern layout (three columns) and the Classic layout (list above, message below), which is still around. The following pages offer advice for modifying the design of both layouts.
Tweaking the Three-Column Layout
The three-column view is shown in Figure 17-2 at top. Here’s some of the plastic surgery you can perform:
Try Full Screen mode. Click the green
 dot in the upper-left corner to make the Mail window expand to fill your monitor. (See “Full Screen Mode” for details on Full Screen mode.) Full Screen mode is a natural for space-hungry email, especially on a small laptop screen.
Tip
When you click outside an open message, it collapses to the bottom of the screen, where only the title bar is visible. Now you’re free to peruse other messages; the first one pops back up when you click its title bar.
Similarly, if you begin writing several messages, they can all be accessible at once; they sprout tabs across the top, just like Safari web pages do.
Install folders onto the Favorites bar. You can drag any icon in the mailboxes list onto the Favorites toolbar, where it becomes a button or a pop-up menu. The button works exactly like a folder: For example, you can drag a message onto one to file it there, or you can click one of these folder buttons (or use its pop-up menu) to see what’s inside.
As you can see in Figure 17-3, the Favorites bar comes with starter buttons already installed, like Inbox, Sent, Notes, and so on. But you can, and should, install your own favorites there, and remove the ones you don’t want. (To move a button around,
-drag it. To get rid of it, just drag it away from the toolbar.)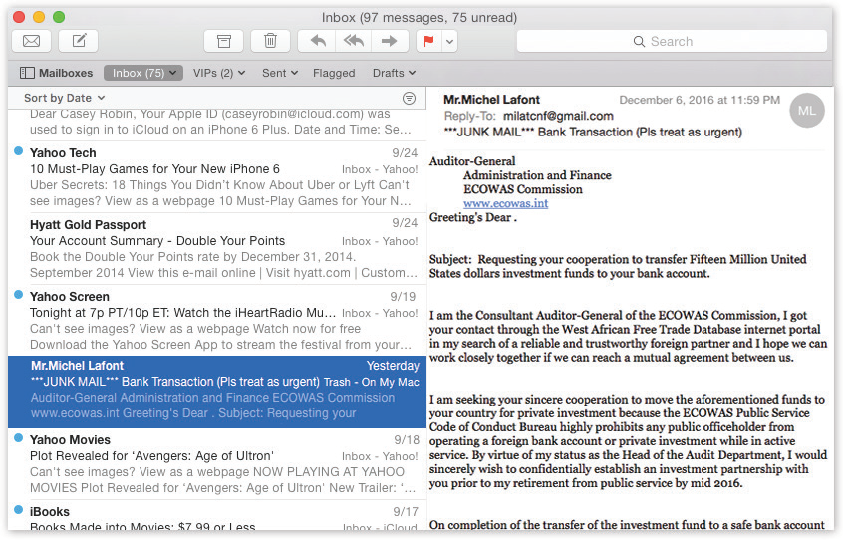
Figure 17-3. Click a button on the Favorites bar to see that folder’s contents in the messages list. The messages list shows the first couple of lines of each message.
Tip
You can also hide this Favorites bar when you feel the urge. Choose View → Hide Favorites Bar, of course.
Hide the mailboxes panel completely. To do that, click the
 above it. Now you have much more screen space to work with.
Tip
Hey, here’s a thought! Combine the previous two ideas. Install the most important folders onto the Favorites bar, so you can get at them, and then hide the mailboxes list. Now you have easy access to the most important folders, but your mailboxes list isn’t eating up a lot of screen space. This glorious, space-efficient result is shown in Figure 17-2, center.
Label the toolbar buttons. Out of the box, the buttons on the toolbar (
,  , and so on) have no labels. But if you right-click or two-finger click the toolbar, you get a pop-up menu that offers you other styles for those buttons: Icon & Text, Icon Only, Text Only (which is very space-efficient), and None (which is even more space-efficient—provided you know the keyboard shortcuts for all the buttons you’ve just hidden away).
Change the type size/icon size for the folders in the mailboxes panel. To do that, open System Preferences → General. Use the “Sidebar icon size” pop-up menu to choose Small, Medium, or Large.
Note
Whatever size you choose here also affects the font and icon sizes in the Finder window Sidebar. Apple figures that if you’re that eagle-eyed (or that vision-impaired), you’ll want the same size adjustment in both apps.
Redesign the New Message window. Do you want the Cc and Bcc lines to show up? How about the Priority pop-up menu?
You can make all these settings using the little
 menu in the New Message window; see Figure 17-4.
Figure 17-4. To redesign the New Message window, use the little pop-up menu shown here. Turn on the pieces you want in your everyday email composing.
Adjust the message window width. Drag the very right edge of the window inward or outward to adjust the width of the message itself. Double-click the edge of the messages list to make it snap to what Mail thinks is its proper width.
Adjust the width of the mailboxes or messages list. Similarly, you can drag the right edges of the first two columns to adjust their width. Or double-click the right edge to make the column exactly as wide as Mail thinks it should be.
Change what morsels show up in the messages list. The messages list (center column) usually shows the sender’s name, subject line, and the first few lines of the message itself (an iPhone/iPad feature brought to the Mac). But you can add additional info displays to the list—message size, mailbox, date sent, and so on—by choosing from the View → Message Attributes submenu.
Change what details show up in the header. The header is the top part of a message, where you see the details of how the message reached you. Ordinarily, Mail shields you from the geekiest details of the header; if you really want to see it all, choose View → Message → All Headers.
But if you’d rather, you can tailor the standard header so that Mail always shows you exactly the information you want. In Mail → Preferences → Viewing, use the “Show message headers” pop-up menu to choose Custom. Now you can add just the details you always want to see: Attachments, Bcc, Cc, Flag, From, Reply-To, Resent-Cc, and so on.
Control how many lines of preview text appear. In Mail → Preferences → Viewing, you can use the List Preview pop-up menu to control how many lines of each message you want to appear, in light gray, as a preview of what’s in the message itself. You can choose up to five lines, or choose None to hide the preview completely.
Sort the messages. Use the “Sort by” pop-up menu (“by Date,” “by Attachment,” “by Unread,” and so on). Use the bottom two commands—Ascending or Descending—to control which way the sorting goes (A to Z, Z to A, or whatever).
Tip
If you click the “Sort by” bar above the messages list, you jump directly to the top—just like you do on the iPhone or iPad. Some ideas you just can’t keep down.
Tweaking the Classic Layout
Out of the box, Mail assumes a three-column layout (Figure 17-2, top): mailboxes list at left, messages list in the middle, and the message itself at right.
There are two advantages to this layout. First, your Mac’s screen is wider than it is tall, so columns of information make more sense than horizontal strips. Second, by devoting only about half the screen to the message itself, the column of text is kept to a comfortable reading width; too wide, and your eyeballs have to scan across the whole screen, which is supposedly tiring.
But if you hate that layout, you can always go back to the older layout, shown at bottom in Figure 17-2, by choosing Mail → Preferences → Viewing and turning on “Show Classic layout.” Here again, you can adjust the sizes of the panes and columns by dragging the divider lines. You can also control which columns appear using the commands in the View → Columns menu.
Tweaking the Full-Screen Layout
Mail, of all programs, benefits from Full Screen mode (“Full Screen Mode”), because there are a lot of panels to keep open. In macOS Mojave, you can opt to see the new-message (or Reply) pane off to the right, rather than superimposed (see Figure 17-5).
To set that up, open Mail → Preferences → General → “Prefer opening messages in split view when in full screen mode.”
Note
Weirdly enough, this feature works only if the “Displays have separate spaces” checkbox is turned on in System Preferences → Mission Control. Log out and then back in again to make the change take effect.
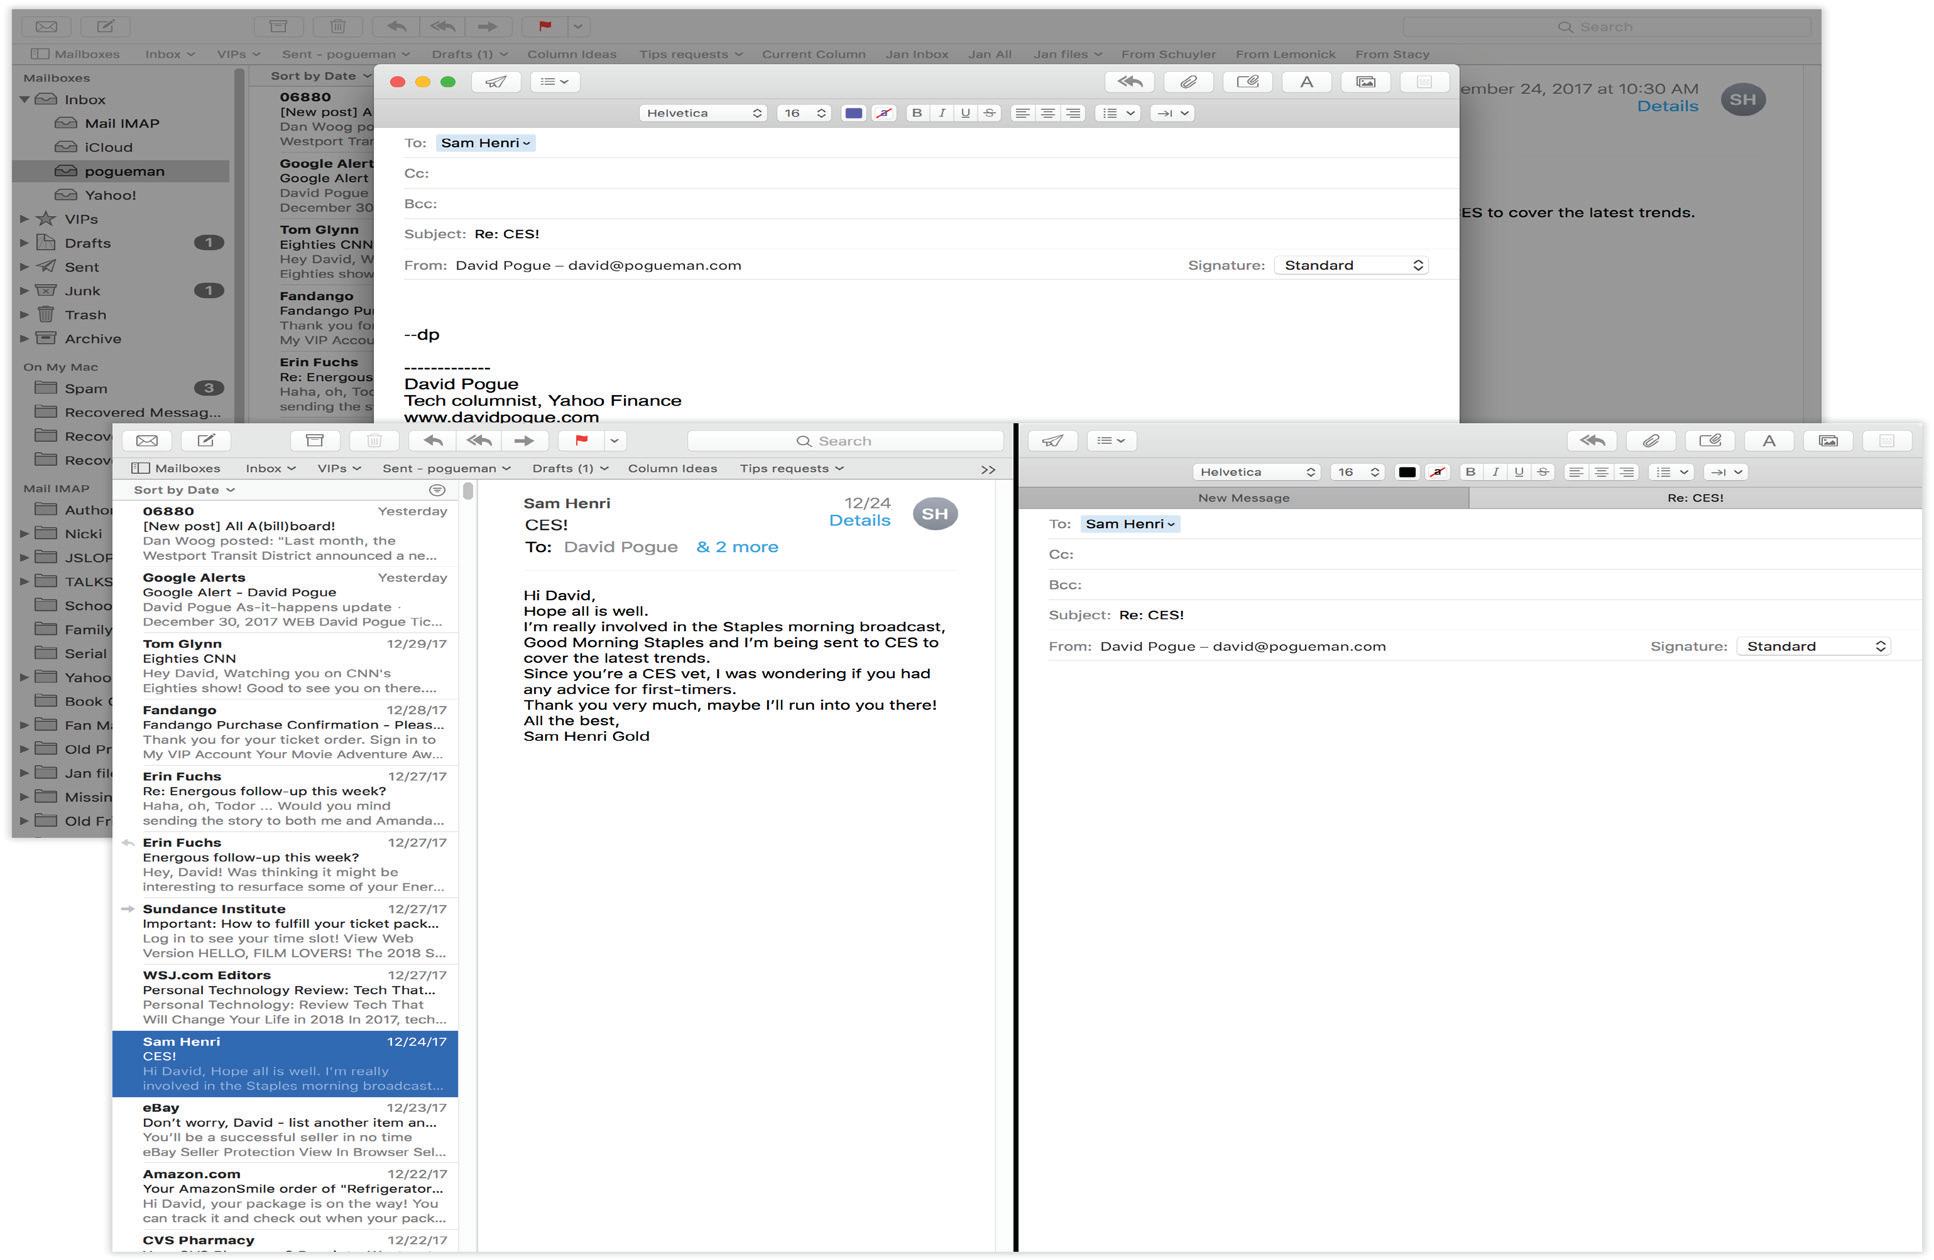
Figure 17-5. In Full Screen mode, a new outgoing message or reply usually floats in a window on top of the rest of the Mail program (top). That can be frustrating, because you can’t refer to any other messages while writing.
In macOS Mojave, though, the composition window can sit in a third pane off to the right (bottom).
Dark Mode in Mail
As you know from “Designing Your Desktop”, Dark Mode, which gives your Mac a deep-gray color for menu bars and windows, can look really cool. White type on black may not be exactly what you want when reading email, however.
To make all messages appear with white backgrounds: Choose Mail → Preferences → Viewing → “Use dark backgrounds for messages.” Now Mail still uses the dark look for menus, lists, and panels, but the actual message bodies are white.
To make one message appear with a white background: Choose View → Message → Show With Light Background. Only the currently open message goes white. (This command is available only if, in fact, Mail is set to show dark backgrounds.) Choose View → Message → Show With Dark Background to restore the original look.
The Toolbar
In either layout—Classic or standard—you have full control over the toolbar. You can rearrange or remove icon buttons (by ![]() -dragging them); add interesting new buttons to the toolbar (View → Customize Toolbar); change its display to show just text labels or just icons (choose View → Customize Toolbar, and then use the Show pop-up menu); or hide the toolbar entirely (using the View → Hide Toolbar command).
-dragging them); add interesting new buttons to the toolbar (View → Customize Toolbar); change its display to show just text labels or just icons (choose View → Customize Toolbar, and then use the Show pop-up menu); or hide the toolbar entirely (using the View → Hide Toolbar command).
Tip
Even when the toolbar is hidden, you can still hit Option-![]() -F to use the search box. (Press
-F to use the search box. (Press ![]() -F by itself to search the current message.)
-F by itself to search the current message.)
Writing Messages
To send an email, click ![]() in the toolbar or press
in the toolbar or press ![]() -N. The New Message form, shown in Figure 17-5, opens.
-N. The New Message form, shown in Figure 17-5, opens.
Note
The handsome, pre-designed templates known as Stationary are gone in macOS Mojave.
Here’s how you go about writing a message:
In the To field, type the recipient’s email address.
If somebody is in your Contacts, type the first couple of letters of the name or email address; Mail automatically completes the address. (If the first guess is wrong, then type another letter or two until Mail revises its guess.)
Tip
If Mail constantly tries to autofill in the address of someone you don’t really communicate with, you can zap that address from its memory by choosing Window → Previous Recipients. Click the undesired address, and then click Remove From List.
As in most dialog boxes, you can jump from blank to blank (from To to Cc, for example) by pressing Tab. To send this message to more than one person, separate the addresses with commas: [email protected], [email protected], and so on.
Tip
If you send most of your email to addresses within the same organization (like [email protected], [email protected], and [email protected]), Mail can automatically turn all other email addresses red. It’s a feature designed to avoid sending confidential messages to outside addresses.
To turn this feature on, choose Mail → Preferences, click Composing, turn on “Mark addresses not ending with,” and then type the “safe” domain (like apple.com) into the blank.
To send a copy to other recipients, enter their addresses in the Cc field.
Cc stands for carbon copy. Getting an email message where your name is in the Cc line implies: “I sent you a copy because I thought you’d want to know about this correspondence, but I’m not expecting you to reply.”
Tip
If Mail recognizes the address you type into the To or Cc box (because it’s someone in your Contacts, for instance), then the name turns into a shaded, round-ended button. In addition to looking cool, these buttons sprout a
 when you point to them; when you click there, you get a list of useful commands (including Show Contact Card). The buttons are also drag-and-droppable. For example, you can drag one from the To field to the Cc field, or from Contacts to Mail.
Type the topic of the message in the Subject field.
It’s courteous to put some thought into the subject line. Use “Change in plans for next week,” for instance, instead of “Yo.” On the other hand, don’t put the entire message into the subject line.
Specify an email format.
There are two kinds of email: plain text and formatted (which Apple calls Rich Text). Plain text messages are faster to send and open. And even though the message itself is plain, you can still attach pictures and other files. But formatted messages, of course, let you use fonts, styles, and colors to design your message.
To control which kind of mail you send on a message-by-message basis, choose from the Format menu either Make Plain Text or Make Rich Text. To change the setting for all new outgoing messages, choose Mail → Preferences → Composing; choose from the Message Format pop-up menu.
(But note: Even if you choose Rich Text, Mail sends a plain text message if you don’t actually use any formatting—choose a new font, size, or whatever.)
Tip
If you plan to send formatted mail, remember that your recipients won’t see the fonts you use unless their machines have the same ones installed. Bottom line: For email to Mac and Windows owners alike, stick to universal choices like Arial, Times, and Courier.
Type your message in the message box.
You can use all standard editing techniques, including dictation, copy, paste, drag-and-drop, and so on. If you selected the Rich Text style of email, you can use word processor–like formatting (Figure 17-6).
Tip
And don’t miss the new Emoji browser at the top right of your message window. It opens a tidy palette containing thousands of emoji symbols, organized by category.
As you type, Mail checks your spelling, using a dotted underline to mark questionable words. You can read much more about macOS’s built-in spelling/grammar checker (and typing expander) starting in “Power Typing”.
Tip
If you think what this message needs is a photo of something (or a scan of a document) nearby, and your iPhone is handy, choose File → Insert from iPhone → Take Photo (or → Scan Document). Your phone awakes, ready to snap a pic or scan a doc as described in “Continuity Camera”. It magically appears on your Mac, in the outgoing message. (This also works if you have an iPad nearby instead of an iPhone.)
If you’re composing a long email message, or if it’s one you don’t want to send until later, press
-S or choose File → Save. You’ve just saved the message in your Drafts folder. It’ll still be there next time you open Mail. To reopen a saved draft later, click the Drafts icon in the mailboxes column and then double-click the message you want to work on.Click Send
 (or press Shift--D).
Mail sends the message.
Tip
To resend a message you’ve already sent, click it and then choose Message → Send Again, or press Shift-![]() -D.
-D.
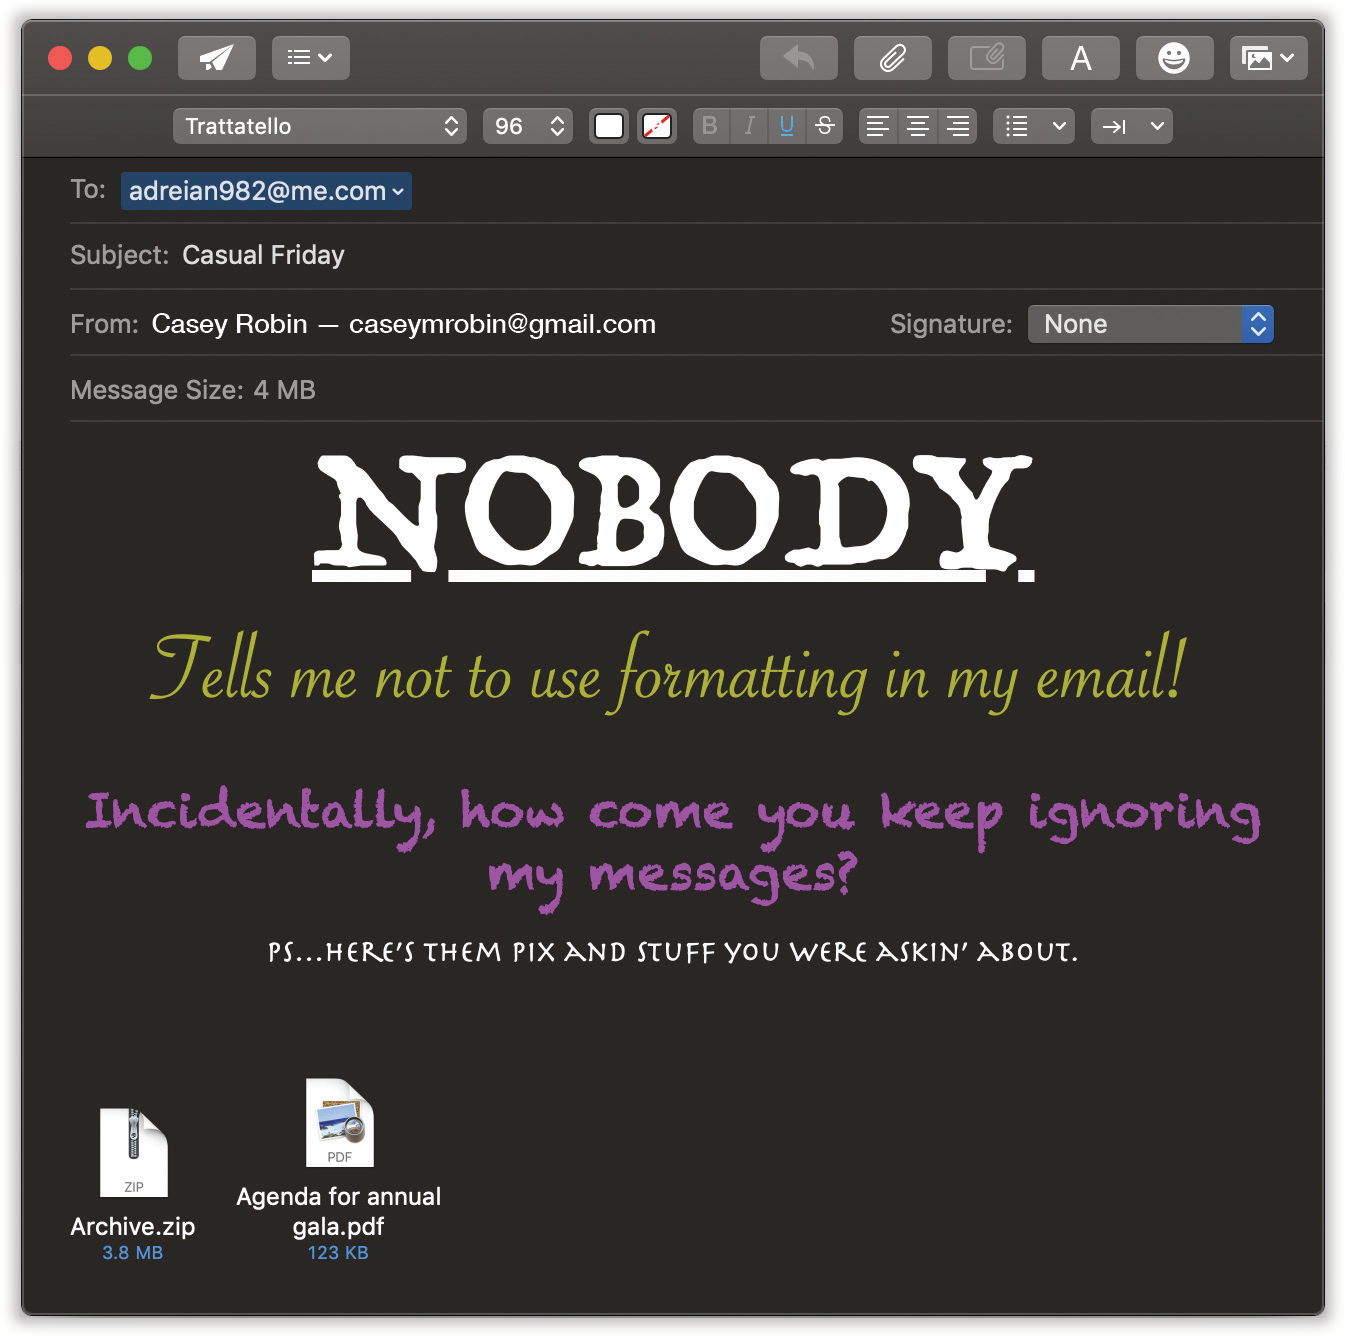
Figure 17-6. If you want to use formatting, click the Show Format Bar icon ( ) on the toolbar to open the Format bar—a strip of buttons for font, style, color, justification, bulleted lists, indentation, and so on. (The Format menu contains menu versions of the same stuff.)
If you’d rather have Mail place each message you write in the Outbox folder instead of connecting to the Net when you click Send, choose Mailbox → Take All Accounts Offline. While you’re offline, Mail refrains from trying to connect, which is a great feature when you’re working on a laptop at 39,000 feet and don’t feel like paying for Wi-Fi. (Choose Mailbox → Take All Accounts Online to reverse the procedure.)
Attaching Files to Messages
Sending little text messages is fine, but sometimes you want to send somebody a photograph, a sound, or a Word document.
To attach a file to a message you’ve written, use one of these methods:
Drag the icons you want to attach directly off the desktop (or out of a folder) into the New Message window. There your attachments appear with their own hyperlinked icons (visible in Figure 17-6), meaning that your recipient can simply click to open them.
Tip
Exposé was born for this moment. Hit
-F3 to make all open windows flee to the edges of the screen, revealing the desktop. Root around until you find the file you want to send. Begin dragging it; without releasing the mouse, press -F3 again to bring your message window back into view. Complete your drag into the message window.Mail makes it look as though you can park the attached file’s icon (or the full image of a graphics file) inside the text of the message, mingled with your typing. On the receiving end, however, all the attachments might end up clumped together at the end of the message (depending on which email system your correspondent uses).
Drag the icons you want to attach from the desktop onto Mail’s Dock icon. Mail dutifully creates a new outgoing message, with the files already attached.
Click
 on the New Message toolbar, choose File → Attach Files, or press Shift--A. The Open File sheet appears so you can find the files you want to include. (You can choose multiple files simultaneously in this dialog box. Just -click or Shift-click them as though you were selecting them in a Finder window.)
Once you’ve selected them, click Choose File (or press Return). You return to the New Message window, where the attachments’ icons appear, ready to ride along when you send the message.
To remove an attachment, drag across its icon to highlight it, and then press the Delete key. (You can also choose Message → Remove Attachments.)
Mail Drop: Sending Huge Attachments
You’re about to discover what may be one of the best features in the history of email.
Since the dawn of email, we, the downtrodden masses, have been told over and over again: Don’t attach big files! Anything over about 5 megabytes is too much for most email systems. Best case, your entire message will bounce back to you; worst case, you’ll clog the recipients’ inboxes so that they can’t receive any more mail.
So the world has slogged along with workarounds—sites like SendThisFile.com, or services like Dropbox that require signup.
Today, that era is over.
If you use Mail in macOS, you’ll probably never have to think about the file sizes of your attachments again. Go ahead—attach a whole video. Attach a gigantic Photoshop document, or several, or dozens. Attach a gigantic Keynote or PowerPoint file. Your file-size limit is now 5 gigabytes—about 1,000 times what it used to be.
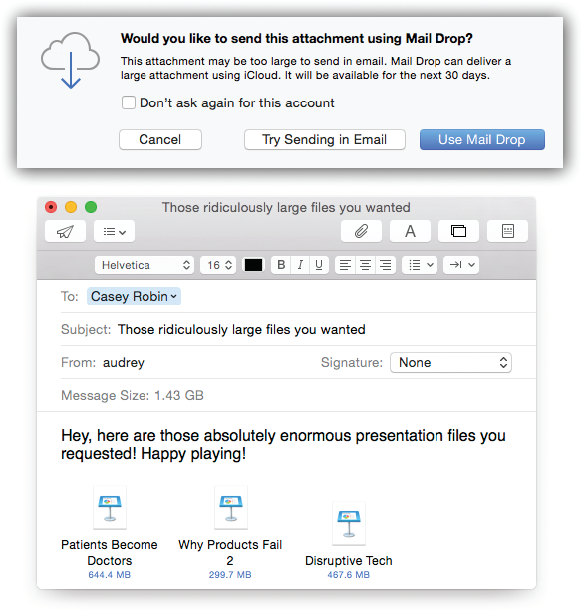
Figure 17-7. There’s no reason not to use Mail Drop. In fact, there’s no reason not to turn on “Don’t ask again for this account,” too. From now on, Mail Drop will work just like magic—invisibly.
You can attach a bunch of huge files to a single message, as long as the grand total is under 5 gigabytes.
The files’ icons show up right in the body of the message.
The first time you attach a big file to an outgoing message and then click Send, Mail offers the message shown in Figure 17-7.
Note
Mail Drop is an iCloud feature. It works only if your Mac is currently signed into your iCloud account. (The files you send don’t count toward your iCloud storage limit, though.)
Behind the scenes, Mail Drop uploads your file to iCloud’s computers, where it sits for up to 30 days, waiting for your recipient to get a clue and download it.
If the recipient also has Yosemite or later Mail, the attachment is quietly auto-downloaded in the background, so that it’s on his Mac already when he opens the message. He’ll click, it’ll open, and he’ll probably never even consider the miracle of what just happened.
If you’re sending to any other computer or mail program, your message contains an indication of the file’s 30-day expiration date, and a “Click to download” link. (Clicking it opens the recipient’s web browser, where the file begins to download immediately.) It’s one extra step, and a little waiting—but that’s what people get for not drinking the Apple Kool-Aid.
And now Apple’s entirely reasonable fine print:
Mail Drop allows you to send a maximum of 200 messages a day, or messages to more than 1,000 recipients a day from your iCloud account. A single message sent via iCloud can have a maximum of 100 recipients.
iCloud’s online holding tank for Mail Drop attachments doesn’t hold more than 1 terabyte of files. In other words, once you’ve Mail Dropped that many attachments, you won’t be able to send any more until those files have been downloaded (or 30 days have elapsed on some of them).
Mail Drop is fantastic.
Marking Up, Signing, and Drawing on Attachments
You can mark up PDF and graphics attachments at the moment of sending them, too. You can add your signature to a contract, circle a typo on a document, draw arrows on a diagram, and so on.
All this magic awaits in the Markup toolbar—but finding it is a bit tricky. First, you have to attach a graphic—a photo, PDF file, or other kind of image—using any of the tricks described in “Attaching Files to Messages”.
Once the image appears in your outgoing message, click to select it. At that point, the tiny ![]() icon appears in its upper-right corner; from it, choose Markup (Figure 17-8).
icon appears in its upper-right corner; from it, choose Markup (Figure 17-8).
What you’ll quickly discover is that this entire markup feature is shared, pixel for pixel, with the markup feature in your Preview program. And it’s described in detail in “Annotations and Drawing Tools”.
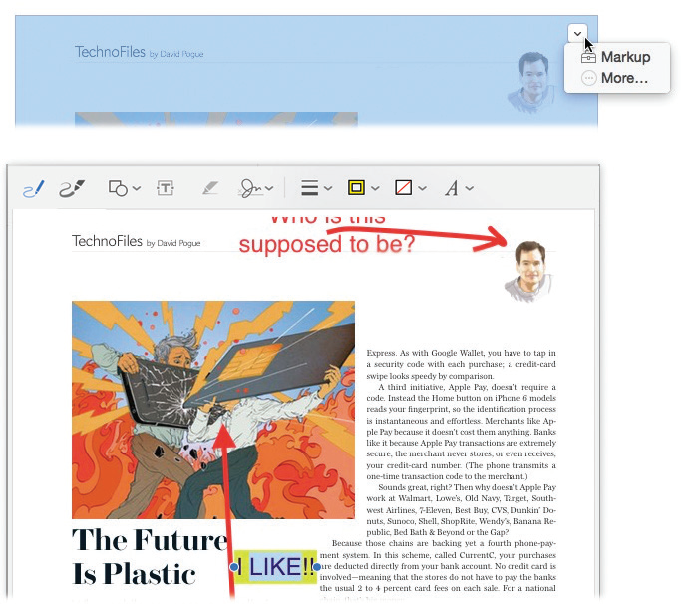
Figure 17-8. Top: This button doesn’t appear until you attach a graphic and then select it.
Bottom: The buttons on this toolbar let you draw and type on your image. Don’t miss the  tool, upper right, which auto-perfects your attempts to draw lines, circles, and angles.
Signatures
Signatures are bits of text that get stamped at the bottom of your outgoing email messages. A signature might contain a name, a postal address, a pithy quote, or even a scan of your real signature, as shown in Figure 17-9.
You can customize your signatures by choosing Mail → Preferences → Signatures. Here’s what you should know:
To build up a library of signatures that you can use in any of your accounts: Select All Signatures in the leftmost pane, and then click the + button to add each new signature (Figure 17-9). Give each new signature a name in the middle pane, and then customize the signatures’ text in the rightmost pane.
Tip
If you ever get tired of a signature, you can delete it forever by selecting All Signatures → [your signature’s name], clicking the — button, and then clicking OK.
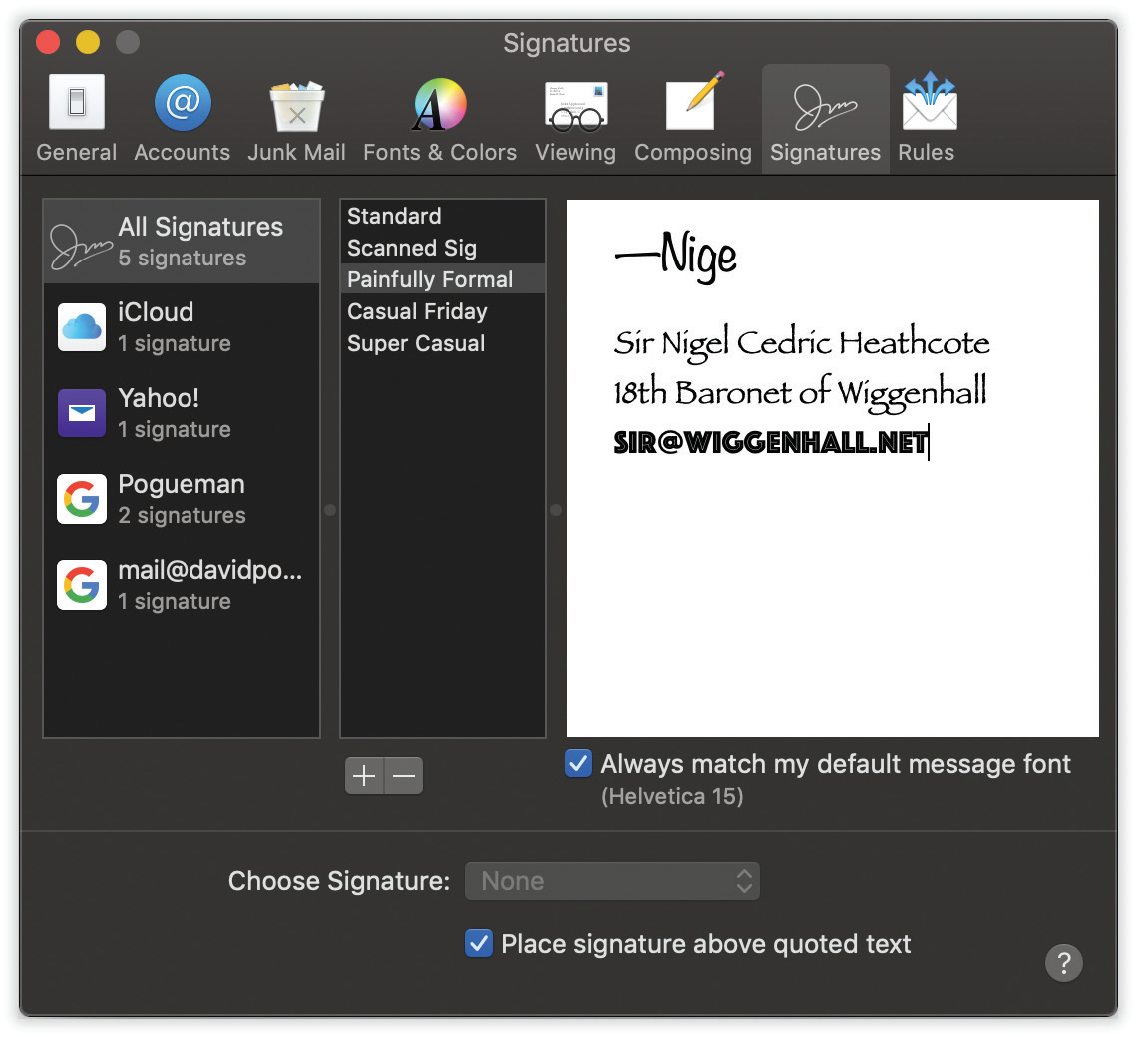
Figure 17-9. After naming your signature in the middle pane and typing the text on the right, don’t miss the Format menu, which you can use to dress up your signature with colors and formatting. You can even paste a graphic (like a scan of your handwritten signature) into the box. Click OK. (You can use formatted signatures only when sending Rich Text messages.)
To make a signature available in one of your email accounts: Drag the signature’s name from the middle pane onto the name of the account in the leftmost pane. In other words, you can make certain signatures available to only your work (or personal) account, so you never accidentally end up appending your secret FBI contact signature to the bottom of a birthday invitation.
To assign a particular signature to one account: In the left pane, click an account; pick from the Choose Signature pop-up menu. Each time you compose a message from that account, Mail inserts the signature you selected.
Tip
To make things more interesting for your recipients, pick At Random; Mail selects a different signature each time you send a message. Or, if you’re not that much of a risk-taker, choose In Sequential Order; Mail picks the next signature in order for each new message you write.
Remember that you can always change your signature on a message-by-message basis, using the Signature pop-up menu in any new email message.
To use the signature feature as a prefix in replies: Turn on “Place signature above quoted text.” If you turn on this setting, your signature gets inserted above any text that you’re replying to, rather than below. You’d use this setting if your “signature” said something like, “Hi there! You wrote this to me!”
Tip
If you’re into consistent typographical styling, also turn on “Always match my default font.” That setting makes sure that any messages you send contain the signature in the same font as the rest of the message, lending it an air of professionalism.
Reading Email
Mail puts all incoming email into your Inbox; the statistic after the word Inbox lets you know how many messages you haven’t yet read. New messages are also marked with light-blue dots in the main list.
Tip
The Mail icon in the Dock also shows how many new messages you have waiting; it’s the number in the red circle. In Mail → Preferences → General, you can specify which mailbox it’s tallying up—or have it tally up all of them.
Click the Inbox folder to see a list of received messages. If it’s a long list, press Control-Page Up and Control-Page Down to scroll. (Page Up and Page Down without the Control key scroll the message pane instead.)
Tip
If you ![]() -click more than one mailbox folder, you can combine them (and their total-message counts) into one unified messages list.
-click more than one mailbox folder, you can combine them (and their total-message counts) into one unified messages list.
Click the name of a message once to read it in the message window, or double-click a message to open it into a separate window. (If a message is already selected, then pressing Return also opens its separate window.)
When you click the name of a message in the messages list (or press the ![]() and
and ![]() keys to highlight successive messages in that list), you see the message itself, along with any attachments, in the message pane.
keys to highlight successive messages in that list), you see the message itself, along with any attachments, in the message pane.
Tip
Instead of reading your email yourself, you might prefer to have Mojave read it to you, as you sit back in your chair sipping a strawberry daiquiri. Highlight the text you want to hear (or choose Edit → Select All), and then choose Edit → Speech → Start Speaking. To stop the insanity, choose Edit → Speech → Stop Speaking.
At the top of a message, you see its header—date, subject, addresses, and some handy buttons that don’t appear until you point to them (Figure 17-10).
Once you’ve viewed a message, you can respond to it, delete it, print it, file it, and so on. The following pages should get you started.
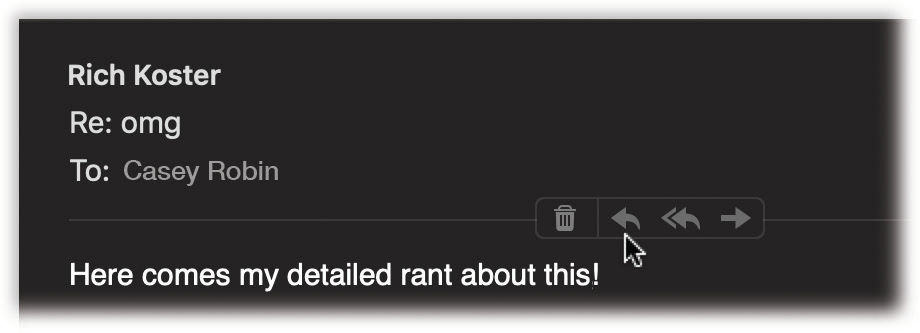
Figure 17-10. If you point to the header without clicking, you get to see the ghosts of four useful buttons: Trash, Reply, Reply All, and Forward.
Conversation View
Threading is one of the most useful mail-sorting methods to come along in a long time. It groups all messages that are part of the same back-and-forth conversation as a single item in the main messages list. (In this discussion, let’s call that one item the main message. In Mail, it’s always the most recent message in the conversation.)
Less sophisticated email programs figure out which messages go together by matching only their subject lines. But Mail is smarter; it also studies the message headers, senders, recipients, and dates. Even if someone changes the subject line along the way, Mail still knows that a conversation is a conversation.
As shown in Figure 17-11, Conversation view, as Apple calls it, hides all the usual awful indents, repetitions, forwards of forwards, and so on. You see only neatly numbered scrolling blocks, each representing the newly added text in each back-and-forth.
The subject line of the thread isn’t repeated at the top of each message. It appears only at the very top of the column of messages. (You can also see it by clicking Details in the header area of a message, or referring to this conversation’s entry in the message list.)
Note
When Organize by Conversation is turned on, you might be wondering: What happens to chronological order? In other words, if the messages in a certain thread took place over several days or weeks, where does Mail wind up listing them when it sorts your messages list by date?
Answer: They’re all clumped together in the main message—the most recent message. That is, if the messages on a certain topic arrived on July 1, 4, 7, and 11, you’ll find all four grouped with the July 11 message. They’re essentially pulled out of the chronological list to join the latest one, for your reviewing pleasure.
To turn on threading, choose View → Organize by Conversation. Each main message in the messages list sprouts a little numbered badge, like “3![]() ,” to indicate messages that have been clustered together (Figure 17-11, inset).
,” to indicate messages that have been clustered together (Figure 17-11, inset).
Here are some powerful ways to use threading:
View all the messages in a conversation by clicking the main message in the messages list. In the message pane, you see all the back-and-forths, minus all the duplication and the replies to replies.
Tip
In macOS, the messages in a conversation appear chronologically, oldest at the top. It used to be the other way around—but Apple thinks this way makes more sense. (The latest message still appears when you click the thread’s name.) If you prefer to see the messages from newest to oldest, then choose Mail → Preferences → Viewing and turn on “Show most recent message at the top.”
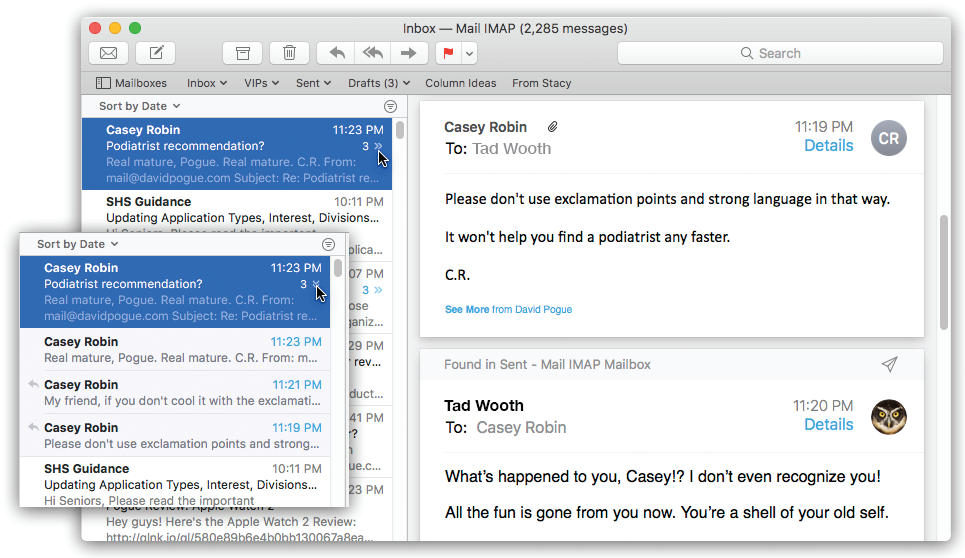
Figure 17-11. In Conversation view, the back-and-forths are represented concisely. (You can see the redundant stuff, if you really want to, by clicking the See More link at the bottom of each message.)
Inset: Click the tiny number, as shown here by the cursor, to view a list of the messages within the clump.Expand a list of the messages in a conversation by clicking the small blue number-of-messages badge—or by clicking the main message and then pressing the
 key. A tiny message-conversation list sprouts out of the one listed message, as shown in the inset in Figure 17-11. (Or you can make all conversations display their sub-messages like this; to do that, choose View → Expand All Conversations.)
Once you’ve expanded the mini-list, you can walk through it (in the messages list) by pressing the up/down arrow keys. In the preview pane where the actual emails appear, you can press Option-
 or Option-
 to jump from one to the next.
Examine messages from multiple mailboxes. Normally, conversations display only messages held in the same mailbox, but that’s not especially convenient when you want to see, for example, both messages you’ve received (from your Inbox) and your replies (from your Sent box). To work around that problem, turn on “Include related messages” in Mail → Preferences → Viewing. These options mean “Include messages in other mailboxes, too, like Sent messages—not just this one mailbox.” Now your conversations seamlessly combine related messages from all mailboxes.
Move all the messages in a conversation to a new mailbox by dragging the main message. You might find this useful, for example, when you’ve just finished a project and want to file away all the email related to it quickly. You can even delete all the messages in a thread at once by deleting its main entry.
Note
If you drag a message to a different folder, it still appears in the conversation thread.
Send someone all the messages in a thread by selecting the main message and then clicking Forward as usual. Mail automatically copies all the messages of the thread into a new message, putting the oldest at the top. You might find this useful, for instance, when you want to send your boss all the correspondence you’ve had with someone about a certain project.
Manipulate an individual message in a conversation by first clicking it in the message-reading pane. For example, if you have five messages in a conversation, and you want to forward only the juicy one, which happens to be message #2, then click #2 and then use the Forward command—or Reply, Delete, or whatever. (You can also click one of the four light-gray buttons that appear when you point to the message header—Delete, Reply, Reply All, Forward.)
Tip
In Mail → Preferences → Viewing, you’ll find a bunch of fine-tuning tweaks that apply to conversations. For example, you can ask that messages that are part of the same conversation show up highlighted in a color you choose—even when conversation grouping is turned off.
Filters
Mail offers one-click filters that hide or show all messages in the list of a certain kind—like ones you haven’t yet read.
![]() You might have to hunt for the
You might have to hunt for the ![]() button, but it’s there, atop the list of messages. When you click it, you automatically turn on the first filter: Unread. All the messages in the list that you have read are hidden—until you click the
button, but it’s there, atop the list of messages. When you click it, you automatically turn on the first filter: Unread. All the messages in the list that you have read are hidden—until you click the ![]() button again to turn off the filter.
button again to turn off the filter.
When the filter is on, you can click the word “Unread” to see a list of other ways to filter the list, as shown in Figure 17-12.
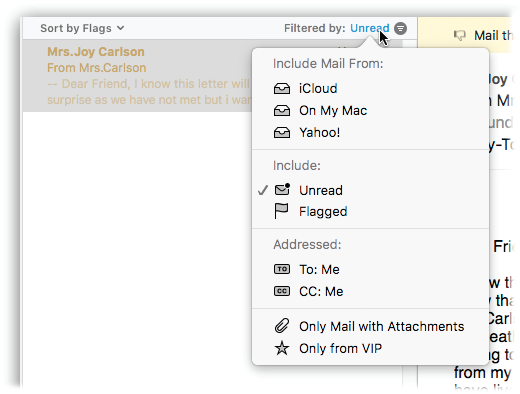
Figure 17-12. Using the Filters pop-up menu, you can tell Mail to show you only the messages from a certain account; only messages you’ve flagged; only messages to you (or that you were copied on); only the ones with attachments; or only the ones from people in your VIP list.
Adding the Sender to Contacts
When you choose the Message → Add Sender to Contacts command, Mail memorizes the email address of the person whose message is on the screen. In fact, you can highlight a huge number of messages and add all the senders simultaneously using this technique.
Thereafter, you’ll be able to address a new message to somebody just by typing the first few letters of her name or email address.
Data Detectors
Data detectors are described in “Ink: Handwriting Recognition”. They’re what you see when macOS recognizes commonly used bits of written information: a physical address, a phone number, a date and time, a flight number, and so on. With one quick click, you can send that information into the appropriate macOS program, like Calendar, Contacts, the Flight Tracker widget in Dashboard, or your web browser (for looking up an address on a map).
Data detectors are especially useful—primarily useful, in fact—in Mail. Watch for the dotted rectangle that appears when you point to a name, address, date, time, or flight number.
Here’s what’s neat: If a Data Detector detects that there’s discussion of an appointment in the body of a message, or if it finds somebody’s contact information, it displays a banner strip at the top, as shown in Figure 17-13. With one click of the Add button, you can add that appointment to your Calendar, or that phone number to Contacts. (You see a similar banner if the person is already in Contacts but this message contains an additional or updated address or phone number.)
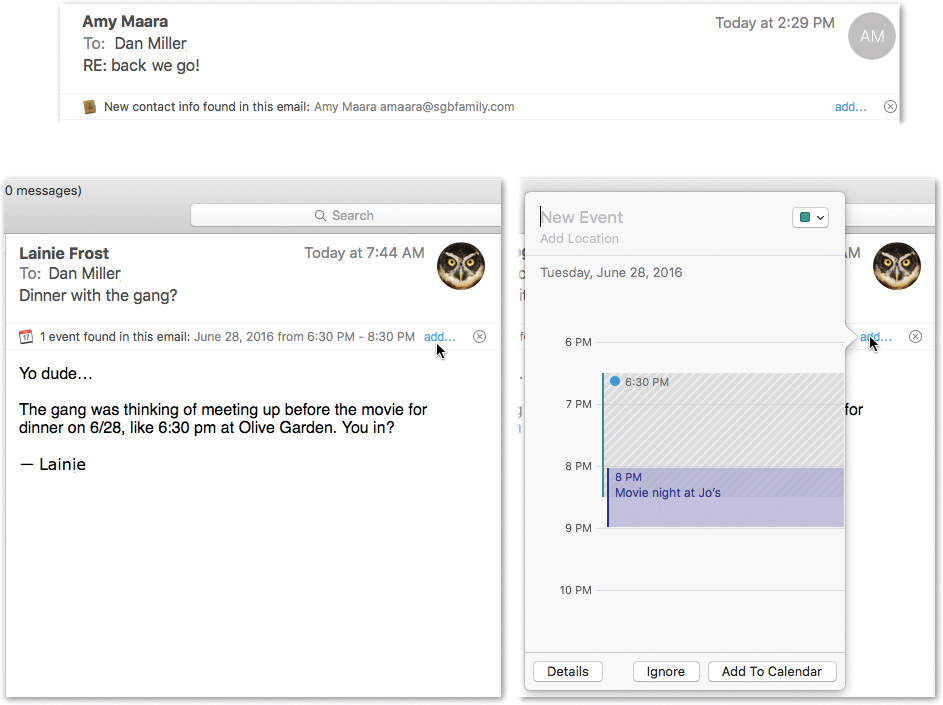
Figure 17-13. Top: Oh, look! Mail has spotted some contact information in the body of a message. It’s offering to add this person to your Contacts.
Bottom left: Mail understands the time and date discussion in the message.
Bottom right: Click Add to see how this event would look on your calendar. Type a name for it, choose a category color for it at top right, and click Add To Calendar.
Opening File Attachments
Just as you can attach files to a message, so can people send files to you. Sometimes they don’t even bother to type a note; you wind up receiving an empty email message with a file or two attached. Only the presence of the file’s icon in the message body (or the paper clip icon in the header) tells you there’s something attached.
Mail stores downloaded files in a hidden folder on your hard drive. To bring them out into the open, you must proceed in one of these ways:
Click the Quick Look button in the message header. You’re treated to a nearly full-size preview of the file’s contents. Yes, Quick Look has come to email. It works exactly as described in “Quick Look”.
Click the Save button in the message header to save it to your Downloads folder, nestled within easy reach in the Dock. (It’s a pop-up menu, which is handy if there’s more than one attachment. You can either save all attachments at once or choose from the pop-up menu to save them individually.)
Tip
If you don’t want to use the Downloads folder, you can choose a new autosave location for attachments by choosing Mail → Preferences → General → Downloads folder.
Drag the attachment icon (it appears at the bottom of the message) out of the message window and onto any visible portion of your desktop or any visible folder window.
Double-click the attachment’s icon, or single-click the blue link underneath the icon. If you were sent a document (a photo, Word file, or Excel file, for example), it now opens in the corresponding program.
Note
After the attachment is open, use the File → Save As command to save the file into a folder of your choice. Otherwise, any changes you make to the document will be lost.
Right-click or two-finger click the attachment’s icon at the bottom of the message. From the shortcut menu, you can open it, save it, Quick Look it, and so on.
Replying to a Message
To answer a message, click the Reply (![]() ) button on the message toolbar (or choose Message → Reply, or press
) button on the message toolbar (or choose Message → Reply, or press ![]() -R). If the message was originally addressed to multiple recipients, you can send your reply to everyone simultaneously by clicking Reply All (
-R). If the message was originally addressed to multiple recipients, you can send your reply to everyone simultaneously by clicking Reply All (![]() ) instead (Shift-
) instead (Shift-![]() -R).
-R).
A new message window opens, already addressed. As a courtesy to your correspondent, Mail places the original message at the bottom of the window, set off by a vertical bar, as shown in Figure 17-14.
Tip
If you highlight some text before clicking Reply, then Mail pastes only that portion of the original message into your reply. That’s a great convenience to your correspondent, who now knows exactly which part of the message you’re responding to.
The original sender’s name is automatically placed in the To field. The subject is the same as the original subject with the addition of “Re:” (shorthand for “regarding”). You’re now ready to type your response.
At this point, you can add or delete recipients, edit the subject line or the original message, attach a file, and so on.
Tip
Use the Return key to create blank lines in the original message. Using this method, you can splice your own comments into the paragraphs of the original message, replying point by point. The brackets preceding each line of the original message help your correspondent keep straight what’s yours and what’s hers.
When you’re finished, click Send (![]() ).
).
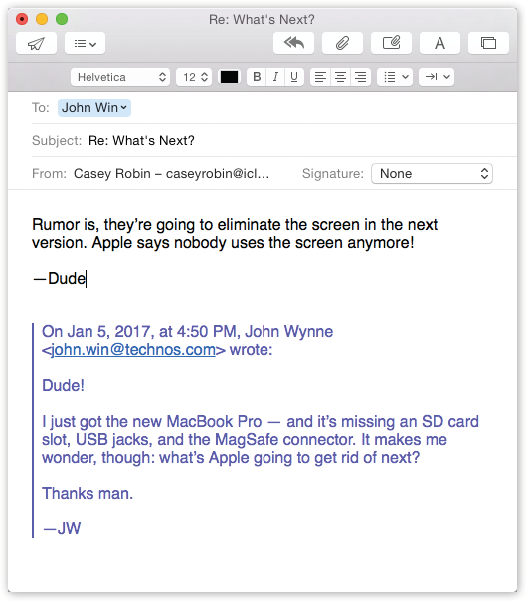
Figure 17-14. In Mail messages formatted with Rich Text (not to be confused with the Rich Text Format word-processing format, which is very different), a reply includes the original message, marked in a special color (which you can change in Mail → Preferences → Fonts & Colors) and with a vertical bar to differentiate it from the text of your reply.
(In plain-text messages, each line of the reply is >denoted >with >brackets, although only your recipient will see them.)
Forwarding Messages
Instead of replying to the person who sent you a message, you may sometimes want to pass the note on to a third person.
To do so, click the Forward (![]() ) toolbar button (or choose Message → Forward, or press Shift-
) toolbar button (or choose Message → Forward, or press Shift-![]() -F). A new message opens, looking a lot like the one that appears when you reply. You may wish to precede the original message with a comment of your own, along the lines of: “Frank: I thought you’d be interested in this joke about your mom.”
-F). A new message opens, looking a lot like the one that appears when you reply. You may wish to precede the original message with a comment of your own, along the lines of: “Frank: I thought you’d be interested in this joke about your mom.”
Finally, address it as you would any outgoing piece of mail.
Redirecting Messages
A redirected message is similar to a forwarded message, with one useful difference: When you forward a message, your recipient sees that it came from you. When you redirect it, your recipient sees the original writer’s name as the sender. In other words, a redirected message uses you as a low-profile relay station between two other people.
Treasure this feature. Plenty of email programs don’t offer a Redirect command at all. You can use it to transfer messages from one of your own accounts to another, or to pass along a message that came to you by mistake.
To redirect a message, choose Message → Redirect, or press Shift-![]() -E. You get an outgoing copy of the message—this time without any quoting marks. (You can edit redirected messages before you send them, too, which is perfect for April Fools’ Day pranks.)
-E. You get an outgoing copy of the message—this time without any quoting marks. (You can edit redirected messages before you send them, too, which is perfect for April Fools’ Day pranks.)
Printing Messages
Sometimes there’s no substitute for a printout. Choose File → Print, or press ![]() -P to summon the Print dialog box.
-P to summon the Print dialog box.
Filing Messages
Mail lets you create new mailboxes (mail folders) in the mailboxes list. You might create one for important messages, another for order confirmations from web shopping, still another for friends and family, and so on. You can even create mailboxes inside these mailboxes, a feature beloved by the hopelessly organized.
Tip
You can drag mailbox folders up and down in the list to rearrange them. Sweet.
Mail even offers smart mailboxes—self-updating folders that show you all your mail from your boss, for example, or every message with “mortgage” in its subject. It’s the same idea as smart folders in the Finder or smart playlists in iTunes: folders whose contents are based around criteria you specify (Figure 17-15).
The commands you need are all in the Mailbox menu. For example, to create a new mailbox folder, choose Mailbox → New Mailbox. To create a smart mailbox, choose Mailbox → New Smart Mailbox.
Mail asks you to name the new mailbox. If you have more than one email account, you can specify which one will contain the new folder. (Smart mailboxes, however, always sit outside your other mailboxes.)
Tip
If you want to create a folder inside a folder, then use slashes in the name of your new mailbox. (If you use the name Cephalopods/Squid, for example, then Mail creates a folder called Cephalopods, with a subfolder called Squid.) You can also drag the mailbox icons up and down in the drawer to place one inside another.
That trick doesn’t work for smart mailboxes, however. The only way to organize smart mailboxes is to put them inside a smart mailbox folder, which you create using Mailbox → New Smart Mailbox Folder. You might do that if you have several smart mailboxes for mail from your co-workers (“From Jim,” “From Anne,” and so on) and want to put them together in one collapsible group to save screen space.
When you click OK, a new icon appears in the mailboxes column, ready for use.
You can move a selected message (or a group of messages) into a mailbox folder in any of three ways:
Drag it out of the messages list onto a mailbox icon.
Click the new Move button on the toolbar. Most of the time it says “Move to” and lists all your mailboxes.
Sometimes, though, the button shows the name of a certain mailbox. The idea here is that Mail has noticed where you filed a message from this person, or on this topic, in the past—and is trying to save you some time by proposing that folder as a one-click destination.
Choose from the Message → Move To submenu, which lists all your mailboxes.
Right-click or two-finger click a message, or one of several you’ve highlighted. From the resulting shortcut menu, choose Move To, and then, from the submenu, choose the mailbox you want.
Of course, the only way to change the contents of a smart mailbox is to change the criteria it uses to populate itself. To do so, double-click the smart mailbox icon and use the dialog box that appears (Figure 17-15).
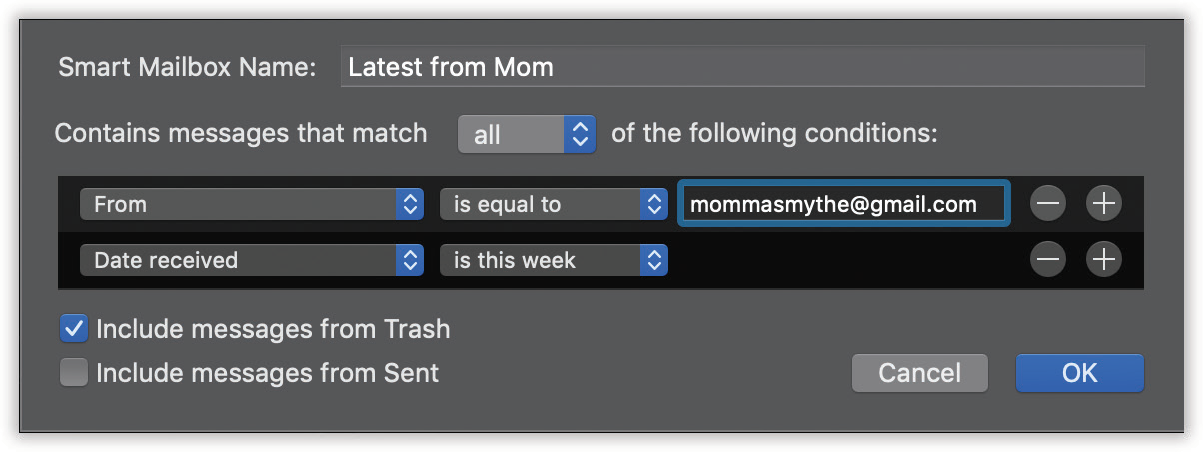
Figure 17-15. Mail lets you create self-populating folders. In this example, a smart mailbox will automatically display all messages from Momma Smith that you’ve received in the past week.
Flagging Messages
Sometimes you’ll receive email that prompts you to some sort of action, but you may not have the time (or the fortitude) to face the task at the moment. (“Hi there… it’s me, your accountant. Would you mind rounding up your expenses for 2004 through 2014 and sending me a list by email?”)
That’s why Mail lets you flag a message, summoning a little flag icon in a new column next to the message’s name. In fact, you can use seven differently colored flags.
These indicators can mean anything you like—they simply call attention to certain messages.
Once you’ve applied some flags, you can use their power in all kinds of ways. For example, you can view all of them in one place—in the Flagged folder that appears near the top of the mailboxes list.
You can also sort your mail list by flag color (choose Sort by → Flags at the top of the messages list). You can search for flagged messages using the search box. Better yet, you can view all messages with a certain flag color—magically rounded up from all your different accounts and mailboxes—by clicking the corresponding icon in the Flagged folder of the mailboxes list.
Tip
Just in case you don’t find “Red,” “Orange,” “Yellow,” and so on to be the most descriptive possible flag names, you can change them.
First, though, make sure you’ve applied a couple of flags to different messages already. That’s necessary to make the Flagged mailbox appear in the mailboxes list. If you open the flippy triangle, you’ll see the names of the flags you’ve applied so far. You can change a flag’s name just the way you’d name a file—start by double-clicking it.
To flag a message in this way, select the message (or several messages) and then choose one of the colored flags in the Message → Flag submenu. Or right-click or two-finger click the message’s name in the list and, from the shortcut menu, choose one of the seven flag colors. (To clear the flags, repeat the procedure, but use the Message → Flag → Clear Flag command instead.)
If you’re using only one flag to simply mean “flag this,” and you don’t need all the colors, you can also press Shift-![]() -L.
-L.
Mark as Read/Unread
Once you’ve looked at a message, Mail removes the blue dot from its name—the dot that tells you it’s a new message. But what if you had only glanced at it, and you don’t really consider it fully processed?
In that situation, you can use the Mark As Unread command, which basically means “Put the blue dot back.” That turns into a Mark As Read command, too.
You’ll find these commands in the Message menu, as well as in the shortcut menu that appears when you right-click or two-finger click a message or group of selected messages.
In fact, there’s a swipey way to do the same job: On a trackpad or Magic Mouse surface, drag two fingers to the right across a message to mark it as read (or unread).
Finding Messages
The box in the upper-right corner of the main mail window is Mail’s own private Spotlight—a fast, powerful search command. That’s essential when you have to deal with masses of email (see Figure 17-16).
This search box incorporates the same pop-up suggestions lists and “search tokens” as regular file searching in the Finder. In fact, it understands plain-English search requests like “messages from Charlene about Halloween.”
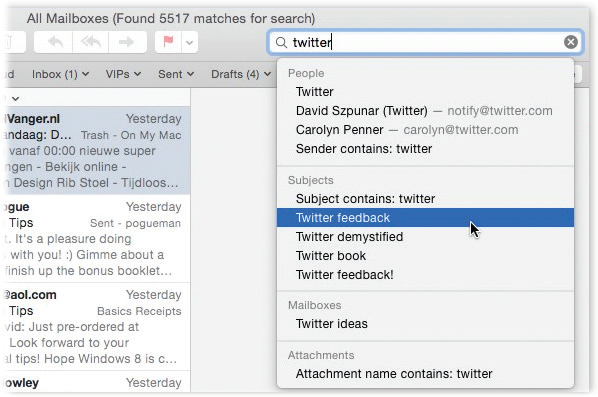
Figure 17-16. You can jump to the search box by clicking or by pressing Option--F. As you type, Mail shrinks the list of messages—and simultaneously displays a list of suggestions. You can fine-tune your results using the mailbox buttons you’ve installed on the Favorites bar. To return to the full messages list, click the tiny  at the right side of the search box.
Here’s how it works:
Press Option-
-F (or click in the search box).The cursor jumps up there.
Start typing what you’re looking for.
As you type, the messages list changes to show only the matching messages from all your mail folders.
New in macOS Mojave, in fact, is a first section of list results called Top Hits. These are the results Mail thinks are most likely to be what you’re looking for, based on factors like the age of the messages, whether you’ve read or replied to them, whether the correspondent is one of your VIP contacts, and so on.
You can also type “natural-language” phrases that mention any combination of a person, time period, or subject. For example, you can type “mail from Casey last week,” “mail to Alex last year,” “messages about Italy yesterday,” and so on.
Tip
The word “mail” or “messages” in these phrases might feel more English-like, but it’s optional. Typing “from Casey last week” or “about Italy yesterday” finds exactly the same messages.
If you see the message you’re looking for, great. Click it and off you go.
But this initial search is a pretty broad one. Mail is rounding up messages that match your search term in any way. If you type veg, you see messages from Murray Vegelstein, messages from [email protected], and messages with the subject line “HOT DEALS IN VEGAS.” All of them in one big stew.
To help you sort through it, Mail produces a Suggestions list, which sprouts from the search box. As in the Finder, it’s Mail’s way of asking what sort of thing your search term is. Is it a person? A subject? The status of a message? A date? Figure 17-16 shows the idea.
Click the suggestion you want.
Mail filters the list. For example, if you click Murray Vegelstein, you’ll see only the messages to or from Murray.
Edit the search token.
The search token is the little bubble that appears in the search box after you’ve clicked one of the suggestions. You can click the little
in the search token to change it. For example, if you’ve clicked somebody’s name, that pop-up menu says To, From, or Entire Message (including the header and the body).You can also type more into the search box to add another search token. For example, the first token might limit the search to messages from one person; you could then create another one that limits the search to a certain date.
Tip
Once you’ve built up a complicated search like this, save yourself the effort next time by saving that search. Click the Save button just below the search box. You get the Smart Mailbox dialog box, shown in Figure 17-15, already filled out with the search setup you’ve specified. All you have to do is give it a name and click OK to transform your search into a smart mailbox that you can open anytime.
You’ve done a lot of refining of this search. But you still haven’t limited your results by account or folder. Mail is showing you results from either all mailboxes, or from only the most recent mailbox you’ve searched. Fortunately, your Favorites bar has now sprouted two new buttons: one called All, and one that names the folder you most recently clicked.
Click a button on the Favorites bar to change which mailbox is being searched.
The results list updates itself.
Tip
If you ![]() -click several mail folders before you search, you can limit the search to that particular set of mailboxes. (In that case, you see a button on the Favorites bar called Selected Mailboxes.)
-click several mail folders before you search, you can limit the search to that particular set of mailboxes. (In that case, you see a button on the Favorites bar called Selected Mailboxes.)
When you’re finished hunting around, you can empty out the search box, and get back to your regularly scheduled lists of email, by clicking any other mailbox, or by clicking the ![]() button at the right end of the search box.
button at the right end of the search box.
A few last notes on searching:
Mail searching is almost exactly like Finder searching, right down to the saved-search mechanism. See Chapter 3 for details.
You can also search for certain text within an open message. Choose Edit → Find → Find (or press
-F) to bring up the Find dialog box (Figure 17-17).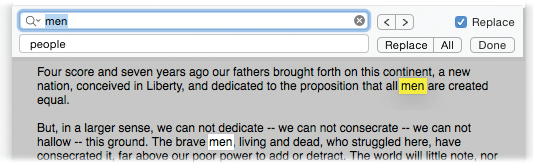
Figure 17-17. The Find box works just as it does in a word processor, except that the Replace function works only on messages you’re writing—Mail doesn’t let you change the words of received mail. Lawyers would have a field day with that one.
As with regular Spotlight, Mail matches your search term by looking only at the beginnings of words. Searching for flag will find messages that contain the words flagstone and flagellum, but not Redflag Incorporated.
In Mail → Preferences → General, you can specify whether you want Mail to include the Trash folder, Junk folder, and encrypted messages when you search all mailboxes.
Deleting Messages
Sometimes it’s junk mail. Sometimes you’re just done with it. Either way, it’s a snap to delete a selected message, several selected messages, or a message that’s currently before you on the screen. You can press the Delete key, click the Delete (![]() ) button on the toolbar, choose Edit → Delete, or drag messages out of the list window and into your Trash mailbox—or even onto the Dock’s Trash icon.
) button on the toolbar, choose Edit → Delete, or drag messages out of the list window and into your Trash mailbox—or even onto the Dock’s Trash icon.
Actually, even that’s not the end of the list of ways: You can also swipe/drag leftward all the way across a message (with two fingers on your trackpad, or using a mouse) to delete it; a red Trash button appears briefly during your drag to let you know what’s about to happen. It’s the same way you’d do it on an iPhone.
Tip
If you delete a message by accident, the Undo command (Edit → Undo or ![]() -Z) restores it.
-Z) restores it.
All these commands move the messages to the Trash folder. If you like, you can then click that Trash icon to view a list of the messages you’ve deleted. You can even rescue messages by dragging them back into a mailbox (back to the Inbox, for example).
Emptying the Trash folder
Mail doesn’t vaporize messages in the Trash folder until you “empty the trash,” just like in the Finder. You can empty the Trash folder in any of several ways:
Click a message (or several) within the Trash folder list, and then click the
icon on the toolbar (or press the Delete key). Now those messages are really gone.Choose Mailbox → Erase Deleted Items (Shift-
-Delete). (If you have multiple accounts, choose Erase Deleted Items → In All Accounts.)Right-click or two-finger click the Trash mailbox icon, and then choose Erase Deleted Items from the shortcut menu. Or choose the same command from the
 pop-up menu at the bottom of the window.
Wait. Mail will permanently delete these messages automatically after a week.
If a week is too long (or not long enough), you can change this interval. Choose Mail → Preferences, click Accounts, and select the account name from the list at left. Then click Mailbox Behaviors and change the “Erase deleted messages” pop-up menu. If you choose “When quitting Mail” from the pop-up menu, then Mail will take out the trash every time you quit the program.
Turning deleted mail invisible
Mail offers another—and very unusual—method of deleting messages that doesn’t involve the Trash folder at all. Using this method, pressing the Delete key (or clicking the ![]() toolbar button) simply hides the selected message in the list. Hidden messages remain hidden, but they don’t go away for good until you use the rebuild mailbox command described in the box below.
toolbar button) simply hides the selected message in the list. Hidden messages remain hidden, but they don’t go away for good until you use the rebuild mailbox command described in the box below.
If this arrangement sounds useful, choose Mail → Preferences; click Accounts and select the account from the list on the left; click Mailbox Behaviors; from the Trash Mailbox pop-up menu, choose None.
From now on, messages you delete vanish from the list. They’re not really gone, however. You can bring them back, at least in gray, dimmed, ghostly form, by choosing View → Show Deleted Messages (or pressing Ctrl-![]() -L). Using this system, in other words, you never truly delete messages; you just hide them.
-L). Using this system, in other words, you never truly delete messages; you just hide them.
At first, you might be concerned about the disk space and database size involved in keeping your old messages around forever like this. Truth is, macOS is perfectly capable of maintaining many thousands of messages in its mailbox databases—and with the sizes of hard drives nowadays, a few thousand messages aren’t likely to make much of a dent.
Meanwhile, there’s a huge benefit to this arrangement. At some point, almost everyone wishes he could resurrect a deleted message—maybe months later, maybe years later. Using the hidden-deleted-message system, your old messages are always around for reference. (The downside to this system, of course, is that SEC investigators can use it to find incriminating mail that you thought you’d deleted.)
When you do want to purge these messages for good, you can always return to the Mailbox Behaviors dialog box and turn the “Move deleted mail to a separate folder” checkbox back on.
Archiving messages
There’s one final option for getting unwanted messages out of your hair: archiving. It just means “Get it out of my sight for now.” Archiving sweeps the selected message into a folder called Archived, where it will stay until you deal with it further (by moving or deleting it). There’s one of these folders per account.
To archive a selected message, a group of selected messages, or a conversation, choose Message → Archive, or click the Archive icon on the toolbar.
Exporting Mailboxes
Time Machine (“Time Machine”) keeps a watchful eye on your Mac and backs up its data regularly—including your email. If you ever delete a message by accident or otherwise make a mess of your email stash, you can duck into Time Machine right from within Mail.
But not everybody wants to use Time Machine, for personal reasons—lack of a second hard drive, aversion to software named after H.G. Wells novels, whatever.
Yet having a backup of your email is critically important. Fortunately, there’s a second good way to back up your email—export it, like this:
In the mailboxes column, choose which mailbox or mailboxes you want to archive.
If you have multiple mailboxes in mind, then
-click each one until you’ve selected all the ones you want.Right-click to get the pop-up menu and choose Export Mailbox(es).
You can also get to this command by choosing Mailbox → Export Mailbox.
In the box that appears, navigate to the place you want to stash this cache of valuable mail, like a server, a flash drive, or a folder. Click Choose.
Your exported mailboxes are saved to the location you’ve chosen. You can now go back to work writing new messages.
Later, if you need to pull one of those stashes back into duty, choose File → Import Mailboxes. Choose the Apple Mail option and then navigate back to the place where you stored your mailboxes.
Message Rules
Once you know how to create folders, the next step in managing your email is to set up a series of message rules (filters) that file, answer, or delete incoming messages automatically based on their contents (such as their subject, address, and/or size). Message rules require you to think like the distant relative of a programmer, but the mental effort can reward you many times over. Message rules turn Mail into a surprisingly smart and efficient secretary.
Setting up message rules
Here’s how to set up a message rule:
Choose Mail → Preferences. Click the Rules icon.
The Rules pane appears, as shown at top in Figure 17-18.
Click Add Rule.
Now the dialog box shown at bottom in Figure 17-18 appears.
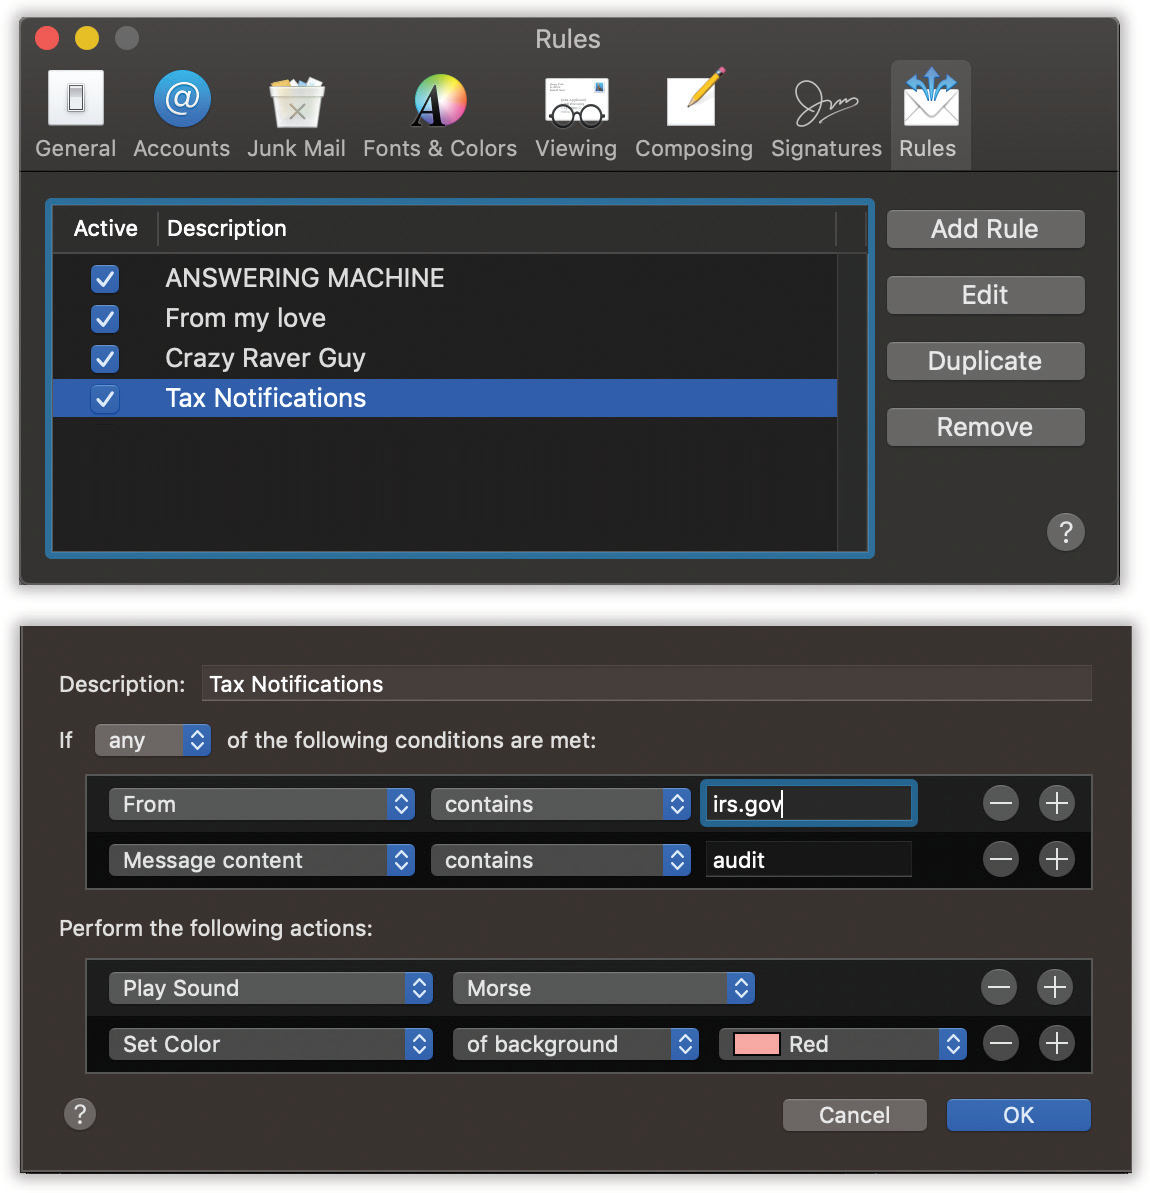
Figure 17-18. Top: Mail rules can screen out junk mail, serve as an email answering machine, or call important messages to your attention. All mail message rules you’ve created appear in this list. (The color shading for each rule is a reflection of the colorizing options you’ve set up, if any.)
Bottom: Double-click a rule to open the Edit Rule dialog box, where you can specify what should set off the rule and what it should do in response.Use the criteria options (at the top) to specify how Mail should select messages to process.
For example, if you’d like the program to watch out for messages from a particular person, you would set up the first two pop-up menus to say “From” and “Contains,” respectively.
To flag messages containing $$$$, XXX, !!!!, and so on, set the pop-up menus to say “Subject” and “Contains.”
You can set up multiple criteria here to flag messages whose subjects contain any one of those common spam triggers. (If you change the “any” pop-up menu to say “all,” then all the criteria must be true for the rule to kick in.)
Specify which words or people you want the message rule to watch for.
In the text box to the right of the two pop-up menus, type the word, address, name, or phrase you want Mail to watch for—a person’s name, or $$$$, in the previous examples.
In the lower half of the box, specify what you want to happen to messages that match the criteria.
If, in steps 1 through 4, you’ve told your rule to watch for junk mail containing $$$$ in the subject line, here’s where you can tell Mail to delete it or move it into, say, a Junk folder.
With a little imagination, you’ll see how the options in this pop-up menu can do absolutely amazing things with your incoming email. Mail can colorize, delete, move, redirect, or forward messages—or even play a sound when you get a certain message.
By setting up the controls as shown in Figure 17-18, for example, you’ll have specified that whenever your mother sends something to you that mentions a visit, you’ll hear a specific alert noise—and the email will be highlighted in red, so it will jump out at you in the Inbox.
In the very top box, name your mail rule. Click OK.
At this point, Mail offers to apply your freshly minted rule to all the messages in the mailboxes that are currently selected. It’s your one chance to go back in time—because from now on, the rule will apply only to new messages. Click either Apply or Don’t Apply.
Now you’re back to the Rules pane (Figure 17-18, top). Here you can choose a sequence for your rules by dragging them up and down. Here, too, you can turn off the ones you won’t be needing at the moment but may use again one day.
Tip
Mail applies rules as they appear, from top to bottom, in the list. If a rule doesn’t seem to be working properly, it may be that an earlier rule is intercepting and processing some messages before the “broken” rule even sees them. To fix this, try dragging the rule (or the interfering rule) up or down in the list.
VIPs
In the real world, VIPs are people who get backstage passes to concerts or special treatment at business functions (it stands for “very important person”). In macOS, it means “somebody whose mail is important enough that I want it brought to my attention immediately when it arrives.”
So who should your VIPs be? That’s up to you. Your spouse, your boss, and your doctor come to mind.
To designate someone as a VIP, follow the steps shown in Figure 17-19. From now on, lots of interesting things happen:
A new mailbox, called VIPs, appears in your mailboxes list. Click it to see all the mail from all your VIPs (even messages you’ve deleted). Or click the flippy triangle to see your VIPs’ names, each representing messages from that person.
A new menu button called VIPs appears on your Favorites toolbar. Click to see all VIP messages, or click the
to see a pop-up menu of all the VIPs’ names. Here again, the point is that you can jump to the messages from just that person.If you use iCloud, the same person is now a VIP on all your other Macs (running Mountain Lion or later), plus iPhones and iPads (running iOS 6 or later).
Best of all, you can set up your Mac so that when a new message from a VIP comes in, an alert bubble appears in the top-right corner of your screen (Figure 17-19, bottom). That feature, of course, is part of the Notification Center, and it’s described in Chapter 10. See the box on the next page for instructions on setting this up.
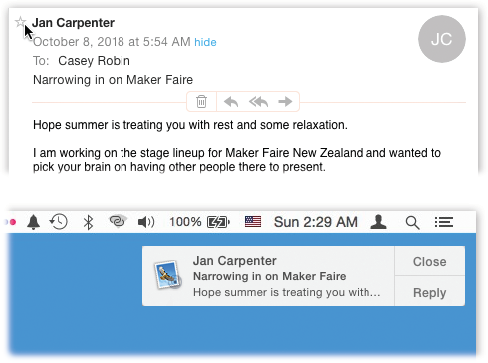
Figure 17-19. Top: To designate a VIP, open a message she’s sent you. Point to her name. A hollow star appears; click there. The star darkens. (Or choose Add to VIPs from the pop-up menu that appears when you point to her name.) Note: If that person one day insults you, fires you, or dumps you, then you can remove her VIP status by clicking that same star again.
Bottom: MacOS can alert you when VIP messages arrive—and you can reply right on the spot.
The Anti-Spam Toolkit
Spam, the junk that now makes up more than 80 percent of email, is a problem that’s only getting worse. Luckily, you, along with Mail’s advanced spam filters, can make it better—at least for your email accounts.
Using the Junk Mail Filter
You’ll see the effects of Mail’s spam filter the first time you check your mail: Certain message titles appear in brown. These are the messages that Mail considers junk.
Note
Out of the box, Mail doesn’t apply its spam-targeting features to people whose addresses are in your Contacts, to people you’ve emailed recently, or to messages sent to you by name rather than just by email address. You can adjust these settings in the Mail → Preferences → Junk Mail tab.
During your first couple of weeks with Mail, your job is to supervise Mail’s work. That is, if you get spam that Mail misses, then click the message and then click the Junk button on the toolbar. On the other hand, if Mail flags legitimate mail as spam, slap it gently on the wrist by clicking the Not Junk button. Over time, Mail gets better and better at filtering.
The trouble with this so-called Training mode is that you’re still left with the task of trashing the spam yourself, saving you no time whatsoever.
Once Mail has perfected its filtering skills to your satisfaction, though, open Mail’s preferences, click Junk Mail, and then click “Move it to the Junk mailbox.” From now on, Mail automatically files what it deems junk into a Junk mailbox, where it’s much easier to scan and delete the messages en masse.
Tip
Don’t miss the “Trust Junk Mail headers” option in the Junk Mail pane of the Preferences window. If you turn on that checkbox, then Mail takes your internet provider’s word that certain messages are spam, giving you a double layer of spam protection.
More Anti-Spam Tips
The Junk filter goes a long way toward cleaning out the spam from your mail collection—but it doesn’t catch everything. If you’re overrun by spam, here are some other steps you can take:
Rules. Set up some message rules, as described on the preceding pages, that autoflag as spam messages that have subject lines containing trigger words like “Viagra,” “Herbal,” “Mortgage,” “Refinance,” “Enlarge,” “Your”—you get the idea.
Create a private account. If you’re overrun by spam, consider sacrificing your current address, using it for the public areas of the internet, like chat rooms, online shopping, website and software registration, and newsgroup posting. Open a new, separate email account for person-to-person email.
Spammers use automated software robots that scour every public internet message and web page, recording email addresses they find. (That’s probably how they got your address in the first place.)
Using this technique, at least you’re now restricting the junk mail to a secondary mail account.
For goodness’ sake, don’t order anything sold by the spammers. If only one person in 500,000 does so, the spammer makes money.
Contacts
Contacts is macOS’s little-black-book program—an electronic Rolodex where you can stash the names, job titles, addresses, phone numbers, email addresses, and internet chat screen names of all the people in your life. It can also hold related information, like birthdays, anniversaries, and any other tidbits of personal data you’d like to keep at your fingertips (Figure 17-20).
The best part: It’s centralized. This one address list appears everywhere: in Mail, Messages, and so on. And it synchronizes with your iPhone, iPad, Apple Watch, other Macs, and even Windows PCs (via iCloud).
Once you make Contacts the central repository of all your personal contact information, you can call up this information in a number of convenient ways:
You can open Contacts and then search for a contact by typing just a few letters in the search box.
Regardless of what program you’re in, you can use a single keystroke (the
 key on aluminum keyboards, or
  on more recent ones) to summon the Contacts Dashboard widget. There you can search for any contact you want. When you’re done, hide the widget with the same quick keystroke.
When you’re composing messages in Mail, Contacts automatically fills in email addresses for you when you type the first few letters.
Tip
If you choose Window → Previous Recipients from within Mail, you can browse the addresses of everyone you’ve ever corresponded with, without even launching the Contacts program. From here, you can delete one (so that Mail will quit autocompleting that address) or add it to Contacts.

Figure 17-20. Contacts is meant to look like a physical address book. On the left, the full list of names; on the right, the card for the one person whose name you’ve clicked. (You can hide the names list by choosing View → Card Only, or bring it back with View → List and Card.)
When you use Messages to chat with people in Contacts, the pictures you’ve stored of them automatically appear in chat windows.
Contacts can sync with an iPod, iPhone, iPad, or Apple Watch, giving you a “little black book” that fits in your shirt pocket, can be operated one-handed, and comes with built-in musical accompaniment. You can have that happen wirelessly, using iCloud, just when you connect your iPod/iPhone/iPad to your Mac. (To set this up, open iTunes while your i-gadget is connected. Click the i-gadget’s icon; on the Contacts or Info tab, turn on Synchronize Contacts.)
The free iCloud service can synchronize your contacts to the web so you can see them while you’re away from your Mac.
You can find Contacts in your Applications folder or in the Dock.
Importing Addresses
The easiest way to add people to Contacts is to import them from another service, like Yahoo or Exchange, or another program, like Microsoft Outlook (for Mac).
Importing from Yahoo, Google, Exchange, or another internet service
Contacts can synchronize its contacts with online Rolodexes that may be very important to you: your Gmail (Google) contacts, Yahoo contacts, iCloud address book, or your company’s Microsoft Exchange master address book (Figure 17-21).
Figure 17-21. Contacts can sync your digital Rolodex with online contact managers like Yahoo and Google. Turn on the appropriate checkbox to enter your account name and password. For other account types, like Exchange, click the + button below the list to begin.
In Contacts, choose Contacts → Preferences → Accounts. There, staring you in the face, are checkboxes that let you sync your contacts with iCloud, Yahoo, Google. Turn on the checkbox you want, click Configure, agree to the legalese, enter your account information, and boom—you’re done. Contacts is now synced with your online accounts. Change information in one place and it’s also changed in the other. Even your contacts’ photos, if your online address book has them, show up in Contacts!
Tip
You can also enter this information in the Internet Accounts pane of System Preferences.
If some other online service maintains your address book, Contacts can sync with it, too, as long as it uses one of the standard sharing formats (Exchange, CardDAV, or Lightweight Directory Access Protocol, known to the pros as LDAP). To teach Contacts about those, choose Contacts → Preferences → Accounts. Click the + button in the lower left, enter your account information on the resulting screen, click Create, and away you go.
Note
Contacts may display an advanced Account Settings screen, where you have to enter more detailed information. If you’re a hands-on sort of nerd, you can also force this screen to open on your command. To do that, press Option and point to the Create button, which now says Continue. Click it.
Once you’ve set up a Contacts account, you can also change its settings, right there in the same Preferences dialog box. Specify how often you want your Mac to sync changes with the online account, for example.
Importing from another address-book program
Contacts can also slurp in contact info from other address-book or list programs, like Microsoft Outlook, Palm Desktop, Excel, and others. Not directly, of course; that would be too easy. But most of those programs can export their information as an intermediary file in one of four popular formats: vCard, LDAP Interchange Format (LDIF), tab-delimited, or comma-separated value (CSV).
For example, Microsoft’s programs can export addresses as vCards; Thunderbird can export in LDIF format; Excel can export tab-delimited or CSV files.
It’s a fine art, this importing business; all kinds of things can go wrong. The fields (like Name, Street, Phone) may not be in the right order. Tab-separated export files may not have the right number of empty fields. And so on.
For best results, choose Contacts → Help and search for “Importing contacts from other applications.” The resulting page gives special tips for each kind of export/import file format. (Fortunately, if the fields are out of order, Contacts will offer you the chance to straighten them out.)
About vCards
Contacts exchanges contact information with other programs primarily through vCards. “vCard” is short for virtual business card. More and more email programs send and receive these electronic business cards, which you can identify by their .vcf file name extensions (if, that is, you’ve set your Mac to display these extensions).
If you ever receive an email with a vCard file attached, drag the .vcf file into your Contacts window to create an instant entry with a complete set of information. You can create vCards of your own, too. Just drag a name out of your Contacts and onto the desktop (or into a piece of outgoing mail).
Tip
In addition to letting you create vCards of individual entries, Contacts makes it easy to create vCards that contain several entries. To do so, ![]() -click the entries in the Name column that you want included, and drag them to the desktop. There they’ll appear all together as a single vCard. You can even drag an item from the Group page to the desktop to make a vCard that contains all the group’s entries.
-click the entries in the Name column that you want included, and drag them to the desktop. There they’ll appear all together as a single vCard. You can even drag an item from the Group page to the desktop to make a vCard that contains all the group’s entries.
Keep this trick in mind if you ever want to copy all your contacts from an old PC to a new Mac. By creating a single vCard containing all your contacts, you’ve made it trivial to import them into the copy of Contacts running on your new Mac.
Creating Address Cards
Each entry in Contacts is called a card—like a paper Rolodex card, with predefined spaces to hold all the standard contact information.
To add a new person, choose File → New Card, press ![]() -N, or click the + button beneath the Name column. Then type in the contact information, pressing the Tab key to move from field to field, as shown in Figure 17-22.
-N, or click the + button beneath the Name column. Then type in the contact information, pressing the Tab key to move from field to field, as shown in Figure 17-22.
Figure 17-22 shows some unusual fields that you can plug into your address cards. The phonetic first/last name fields (shown at top) let you store phonetic spellings of hard-to-pronounce names. There’s a “birthday” field and a place to store the Twitter name, too. To add fields like these, choose from the Card → Add Field menu.

Figure 17-22. If one of your contacts happens to have three office phone extensions, a pager number, two home phone lines, a cellphone, and a couple of fax machines, no problem—you can add as many fields as you need. Each time you fill up a phone, email, chat name, or address box, a new, empty one magically sprouts up. Click a field’s name to change its label; you can select one of the standard labels from the pop-up menu (“home,” “work,” and so on) or make up your own labels by choosing Custom.
Tip
If you find yourself constantly adding the same fields to new cards, check out the Template pane of Contacts’ Preferences (Contacts → Preferences). There you can customize exactly which fields appear for new cards.
Each card also contains a free-form Note field at the bottom, where you can type any other random crumbs of information you’d like to store about the person (pet’s name, embarrassing nicknames, favorite Chinese restaurant, whatever).
Editing an address
When you create a new address card, you’re automatically in Edit mode, which means you can add and remove fields and change the information on the card. To switch into Browse mode (where you can view and copy contact information but not change it), click the Edit button or choose Edit → Edit Card (![]() -L). You can switch out of Browse Mode in the same ways.
-L). You can switch out of Browse Mode in the same ways.
Adding addresses from Mail
You can make new contacts right in Mail, saving you the trouble of having to type names and email addresses manually. Select a message in Mail, and then choose Message → Add Sender to Contacts (Shift-![]() -Y). Presto: MacOS adds a new card to the Contacts, with the name and email address fields already filled in. Later, you can edit the card in Contacts to add phone numbers, street addresses, and so on.
-Y). Presto: MacOS adds a new card to the Contacts, with the name and email address fields already filled in. Later, you can edit the card in Contacts to add phone numbers, street addresses, and so on.
Groups
A group is a collection of related address cards, saved under a single descriptive name (see Figure 17-23).
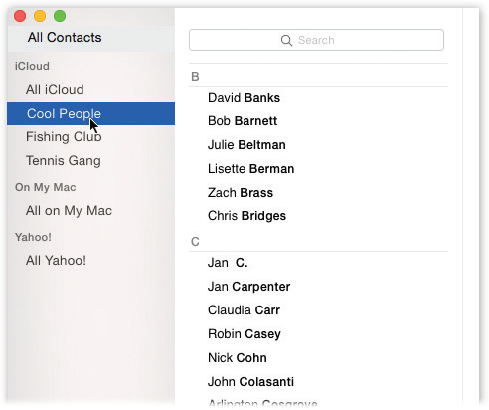
Figure 17-23. Groups are handy. If, for example, you regularly send out a family newsletter to 35 relatives, you might gather the address cards of all your assorted siblings, cousins, nieces, nephews, uncles, and aunts into a single group called Family. When addressing an outgoing message using Mail, you can type this group name to reach all your kin at once.
Organizing your contacts into groups can make them much easier to find and use—especially when your database of addresses climbs into the hundreds.
Tip
When you send an email message to a group en masse, how does Mail know which email address to use for each person?
Because you’ve told it. In Contacts, choose Edit → Edit Distribution List. A special dialog box appears, listing everyone in each group, along with each person’s complete list of email addresses. (Use the tiny pop-up menu above the list to choose Phone or Address; that way, you can also indicate the preferred phone number and mailing address.) Just click the preferred email address to make it bold.
To see your groups, choose View → Groups, press ![]() -3, or click the red bookmark at the top of the page that shows individuals’ names.
-3, or click the red bookmark at the top of the page that shows individuals’ names.
To create a group, click the + button at the bottom of the Group column in the Contacts window, or choose File → New Group (Shift-![]() -N). Type a name for the newly spawned group icon in the Group column.
-N). Type a name for the newly spawned group icon in the Group column.
Now you have to fill up the group with the appropriate subset of names. There are three ways to do that:
To turn a set of address cards into a group quickly when you’re in regular address-book mode (not Groups), select multiple entries from the Names column. You can do that either by Shift-clicking the names (to make contiguous selections) or by
-clicking (for noncontiguous selections)—and then choose File → New Group From Selection. You end up with a new group containing all the selected names.While you’re on the Groups page, click All Contacts at the top of the screen. Now your full names list appears on the right page; drag names directly onto the group names to put them there.
If you’re not on the Groups page, drag contacts up onto the Groups bookmark at the top of the page—leave the mouse button down as Contacts shows you the Groups page—and continue dragging onto the group’s name.
Note
You’re not moving those names; in essence, you’re creating aliases of them, just as you might put songs in different playlists in iTunes. The only exception is Exchange accounts; those names can exist in only one group or folder at a time.
Once you’ve created some groups, you can even add groups to other groups, as though you were nesting folders. You might find it useful to keep a Nieces group and a Nephews group, for example, but to keep both groups inside a master Family group. To do this, create the two groups. Then drag each onto the Family group. Now, whenever you select Family, you’ll see both Nieces and Nephews listed among the rest of the cards; double-click either group to see its members.
Tip
If, while viewing the list of groups, you Option-click someone’s name in the main list, Contacts shows you all the groups and folders that person belongs to.
Smart groups
The Finder has smart folders, Mail has smart mailboxes, and iTunes has smart playlists; inevitably, Contacts has smart groups.
Smart address groups, like smart folders in the Finder, automatically populate themselves with items that match criteria you specify. For example, you might create a smart group called “Apple Employees” that lists all your contacts with “apple.com” in their email addresses.
To create a smart group, choose File → New Smart Group (Option-![]() -N). Then use the resulting dialog box (which looks a lot like Mail’s smart mailbox dialog box) to specify how you’d like the smart group to fill itself.
-N). Then use the resulting dialog box (which looks a lot like Mail’s smart mailbox dialog box) to specify how you’d like the smart group to fill itself.
Once you’re done, you can use your new smart group much like you’d use a regular group. You can’t add contacts to a smart group yourself, but you can still send an email to all the members of a smart group, for example, or drag one to the Finder to create a composite vCard.
Removing someone from a group
To take someone out of a group, first click the group name, and then click the person’s name in the Name column and press the Delete key. If you want to remove the person from Contacts itself, click Delete in the resulting dialog box. Otherwise, just click Remove from Group or press Return. Contacts keeps the card but removes it from the currently selected group.
Note
If you selected All Contacts in the Group column, rather than a specific group, then you don’t get a Remove from Group option. Instead, the Mac just asks you to confirm that you do, in fact, want to permanently remove the card.
Adding Pictures
You can dress up each Contacts entry with a photo. Whenever you’re editing somebody’s address book card, drag a digital photo—preferably 64 pixels square, or a multiple of that—onto the empty headshot square. Or double-click the picture well. You can choose from categories like Defaults (canned symbolic photos like animals and bugs); Recents (photos you’ve used recently); Camera (handy if this person is with you—take a new photo); and Linked (photos from online services like Facebook). Don’t miss the swirly button, which lets you apply nutty Photo Boothish effects. At that point, you can enlarge, reposition, or crop the photo. Click Done when you’re done.
You don’t necessarily have to use a photo, of course. You could add any graphic you want to represent someone, even if it’s a Bart Simpson face or a skull and crossbones. You can use any standard image file format in an address card—JPEG, GIF, PNG, TIFF, or even PDF. You can drag any of these directly into one of the squares here.
From now on, if you receive an email from that person, the photo shows up right in the email message—even on your phone or iPad.
Tip
If you’ve got snapshots in Photos, it’s particularly easy to add a picture to any address card. Just drag a picture directly from the main Photos window to the picture frame on the address card to insert it.
Replacing and removing a picture
To replace a photo on an address card, just drag a new image on top of the old one. If you want to get rid of a picture without replacing it, select the card and then choose Card → Clear Custom Image (or, in Edit mode, select the picture and then press Delete).
Free headshots from Facebook
Yes, there’s a little photo well on each card of your Contacts app. But here’s a wild guess: Most of yours are empty. After all, who’s going to go to the trouble of hunting down headshots of 500 acquaintances, just to fully illustrate his Contacts?
Fortunately, macOS stands ready to help. With one click, it can harvest headshots from the world’s largest database of names and faces: Facebook.
Visit System Preferences → Internet Accounts. Click your Facebook account to see the magical button: Get Profile Photos. When you click it, macOS goes online for a massive research mission. Using your contacts’ names and phone numbers as matching criteria, it ventures off to Facebook, finds the profile photos of everyone in your Contacts, and installs them into Contacts automatically.
Crazier still, it even grabs the headshots of people in your Contacts who aren’t your Facebook friends!
If you already have a photo for somebody, don’t worry; it doesn’t get replaced. Of course, you can switch to the new Facebook profile picture if you prefer. Use the Linked heading in the photo picker as described already.
Tip
You can use the Get Profile Photos button even if you don’t want your Facebook friends loaded into your copy of Contacts (by turning off Contacts in System Preferences → Internet Accounts → Facebook).
Finding an Address
You can search for a Contacts entry inside the currently selected group by typing a few letters of a name (or address, or any other snippet of contact information) in the search box. To search all your contacts instead of just the current group, click All Contacts in the Group list.
Tip
You can press ![]() -F to jump directly to the search field and start typing. Your savings: one mouse click.
-F to jump directly to the search field and start typing. Your savings: one mouse click.
With each letter you type, Contacts filters your social circle and displays the number of matches at the bottom. The matching records themselves appear in the Name column, the first of the matching card entries appears in the far-right pane, and the matching text itself appears highlighted in the matching card.
If Contacts finds more than one matching card, use the ![]() and
and ![]() keys, or Return and Shift-Return, to navigate through them.
keys, or Return and Shift-Return, to navigate through them.
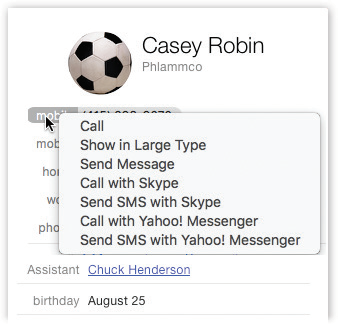
Figure 17-24. The options that become available when you click the field labels on an address card vary according to field type. Pop-up menus let you send email, open a web page, or view a map, depending on the type of field you’ve clicked.
If you have an iPhone, and it’s on the same Wi-Fi network, you even see this Call option. It lets you use your Mac as a speakerphone, as described in “Mac as Speakerphone”.
The Send Message command sends an iMessage to the phone number or email address whose label you’ve clicked—if, in fact, it’s an iMessages-registered number or address.
And the Show Map button appears when you point to an address. It opens the Maps program and shows you this address on a map.
Once you’ve found the card you’re looking for, you can perform some interesting stunts. If you click the label of a phone number (see Figure 17-24), you see the Show in Large Type option: Contacts displays the number in a gigantic font, making it possible to read the number from across the room. Or also click the label of an email address to create a preaddressed email message, or click a home page to launch your browser and go to somebody’s site. You can also copy and paste (or drag) address card info into another program or convert it into a Sticky Note.
Tip
Once you find a street address in your Contacts, you can find those coordinates on a map by clicking the label (such as Home or Work) and, from the shortcut menu, choosing Show in Maps. The Maps app obediently leaps open to display the address.
Changing the Contacts Display
You can’t do much to customize Contacts’ appearance, but the Preferences pane (Contacts → Preferences) gives you at least a couple of options in the General pane that are worth checking out:
Show first name. Choose to have names displayed with the first name followed by the last name, or vice versa.
Sort By. Sort the entries in Contacts by either first or last name.
Printing Options
When you choose File → Print and click Show Details, the Style pop-up menu offers four ways to print whatever addresses are selected at the moment:
Mailing Labels. This option prints addresses on standard sheets of sticky mailing labels—Avery, for example—that you buy at office-supply stores.
Tip
As you manipulate settings, you can see your changes in the preview pane on the left. If the preview is too small for you to see, use the Zoom slider. (It doesn’t affect your printout.)
Envelopes. This feature is great if you have bad handwriting; rather than hand addressing your envelopes, you can have Contacts print them out for you. Use the Layout pop-up menu to pick the size of your envelopes—it’s usually listed on the outside of the envelope box.
Lists. If all you want is a paper backup of your Contacts entries, then use this setting. In the Attributes list, turn on the checkboxes of the fields you want printed—just name and phone number, for example.
Pocket Contacts. This feature prints a convenient paper address book from your virtual one. If you pick Indexed from the Flip Style pop-up menu, then each page’s edge will even list the first letters of the last names listed on the page, making it a cinch to find the page with the address you want. (Here again, you can pick which fields you’d like to include—phone numbers, addresses, and so on.)
As you fiddle with the options presented here, you get to see a miniature preview, right in the dialog box, that shows what you’re going to get.
No matter which mode you choose, the only cards that print are the ones that were selected when you chose File → Print. If you want to print all your cards, therefore, click All in the Group column before you print.
Tip
You can combine the smart-groups feature with the printing features in one clever way: to print yourself a portable phone book when you’re heading off for a visit to a different city. That is, set up a smart group that rounds up everyone you know who lives in Chicago, and then print that as a pocket address book.
Contacts Backups
Your Contacts may represent years of typing and compiling effort. Losing all that information to a corrupted database or a hard drive crash could be devastating. Here are three ways to protect your Contacts data:
Back up your entire Contacts database. Choose File → Export → Contacts Archive. Store the resulting backup file on another drive, if you like. Later, you can use the File → Import command to find that data and slurp it back in.
Turn on iCloud syncing. An iCloud account has its privileges—and one of them is automatic synchronizing with the iCloud mother ship online.
Back up your whole Mac with Time Machine. “Time Machine” tells you how.