
Chapter 11. The Free Programs of macOS
Right out of the box, macOS comes with a healthy assortment of about 50 freebies: programs for sending email, writing documents, doing math, even playing games. Some have been around for years. Others, like Maps and Books, are newer. They’re designed not only to show off some of macOS’s most dramatic technologies, but also to let you get real work done without having to invest in additional software.
Your Free Programs
A broad assortment of programs sits in the Applications folder in the main hard drive window, and another couple dozen less frequently used apps await in the Applications → Utilities folder.
This chapter guides you through every item in your new software library, one program at a time. (Of course, your Applications list may vary. Apple might have blessed your particular Mac model with some bonus programs, or you may have downloaded or installed some on your own.)
Tip
A reminder: You can jump straight to the Applications folder in the Finder by pressing Shift-![]() -A (the shortcut for Go → Applications), or by clicking the Applications folder icon in the Sidebar. You might consider adding the Application folder’s icon to the Dock, too, so you can access it no matter what program you’re in. Shift-
-A (the shortcut for Go → Applications), or by clicking the Applications folder icon in the Sidebar. You might consider adding the Application folder’s icon to the Dock, too, so you can access it no matter what program you’re in. Shift-![]() -U (or Go → Utilities) takes you, of course, to the Utilities folder.
-U (or Go → Utilities) takes you, of course, to the Utilities folder.
App Store
See Chapter 5 for full details on the Mac App Store.
Automator
This software-robot program is described in a free downloadable PDF appendix to this chapter, “Automator & AppleScript.” You can download it from this book’s “Missing CD” page at missingmanuals.com.
Books
Books (formerly called iBooks) is Apple’s ebook reading program. It lets you carry around dozens or hundreds of books, which, in the pre-ebook days, would have drawn some funny looks in public.
The beauty of all this is iCloud syncing. If you’re reading a book on your iPhone in line for the DMV, you’ll find that your iPad opens up to exactly the same page when you’re on the train home. And when you open your MacBook at home, the book will be on the same page as where you left the iPad. Your books, documents, notes, highlighting, and other details are synced among your Apple gadgets, too. (You can turn that syncing feature off in Books → Preferences → General if it spooks you.)
Most people think of Books as a reader for books that Apple sells on its iTunes bookstore—best-sellers and current fiction, for example—and it does that very well. But you can also load it up with your own PDF documents, as well as thousands of free, older, out-of-copyright books.
Tip
In the interest of fairness, it’s worth noting that Amazon’s free Kindle app, and Barnes & Noble’s free B&N eReader app, are much the same thing—but offer much bigger book libraries at lower prices than Apple’s.
Downloading Books
To shop the Books bookstore, open the Books app. Click Book Store in the upper-left corner; the app becomes the literary equivalent of the App Store, complete with the icons across the top. The links here offer everything you’d need in your bibliographic quest: Bestsellers, Read It Before You Watch It (movie tie-ins), and so on. You can also search by name or click Purchased to see what you’ve bought.
Note
Once you’ve bought a book from Apple, you can download it again on other Macs, iPhones, iPod Touches, and iPads. Buy once, read many times. That’s the purpose of the Not in My Library tab, which appears when you click Purchased.
But unless you have some kind of privacy concern, you may as well tell Books to download your books automatically as you buy them on your other Apple gadgets. Open Books → Preferences → Store and turn on “Download new purchases automatically.” That way you’ll never forget what you bought on your iPad as you sit down at your Mac.
Once you find a book that looks good, you can click Get Sample to download a free chapter, read ratings and reviews, or click the price itself to buy the book and download it straight to the Mac.
If you see a book cover bearing the ![]() icon, that’s a book you own—it’s available in your online locker—but you haven’t downloaded it to this Mac yet. Click to download.
icon, that’s a book you own—it’s available in your online locker—but you haven’t downloaded it to this Mac yet. Click to download.
ePub Files
Apple’s bookstore isn’t the only way to get books. You can also load up your ebook reader from your computer, feeding it with ePub files.
Actually, ePub is the normal Books format. It’s a very popular standard for ebook readers, Apple’s and otherwise. The only difference between ePub documents you create and the ones Apple sells is that Apple’s are copy protected.
To add your own ePub documents to your Books library, just drag their icons off the desktop and into the Books window. Or choose File → Add to Library.
And where are you supposed to get all these files? Free (and not free) ebooks in ePub format are everywhere. There are 53,000 free downloadable books at gutenberg.org, for example, and over a million at books.google.com—oldies, but classic oldies, with lots of Mark Twain, Agatha Christie, Herman Melville, H.G. Wells, and so on. (Lots of these are available in the Free pages of Apple’s own Books store, too.)
PDF Files
Books can display and catalog PDF documents, too. PDFs are everywhere—people send them as attachments, and you can turn any document into a PDF file. (For example, on the Mac, in any program, choose File → Print; in the resulting dialog box, click PDF → Save as PDF.) You bring them into Books by dragging them into its window, or with File → Add to Library.
When you double-click one, though, it doesn’t open in Books; it opens into Preview. Which is, after all, a program expressly designed for reading PDF documents.
You’ve been warned.
Your Library
When you open Books, you see your own personal library represented as little book covers (Figure 11-1). Mostly what you’ll do here is click a book to open it. But there are all kinds of other activities waiting for you:
You can reorganize your bookshelf. Use the Sort By pop-up menu to choose Most Recent or Title—or Sort Manually, which means you can drag books around into any order you like.
You can view your library as a compact list. Click List at the top to switch the book-cover view to a much more boring (but more compact) list view. The column headings let you sort the list by author, title, category, and so on. And there’s a search box, too, which lets you search your books’ titles—helpful if you have an enormous library.
To delete a book, click it and then press the Delete key; confirm in the warning box. Of course, deleting a book from the Mac doesn’t delete your safety copy on your other gadgets or online.
Organize your books into folders. In Books, the “folders” are called collections, but it’s the same idea. You might have one for school, one for work, and a third for somebody who shares your Mac, for example.
To see your collections, click Collections; the Collections list opens at the left side. Make a new collection by clicking the + button (or choose Use File → New Collection); type to name it.
Now, to file your books away, select them (you can press
 as you click to select multiple books); then choose File → Add to Collection and choose the name of the collection you want them in.
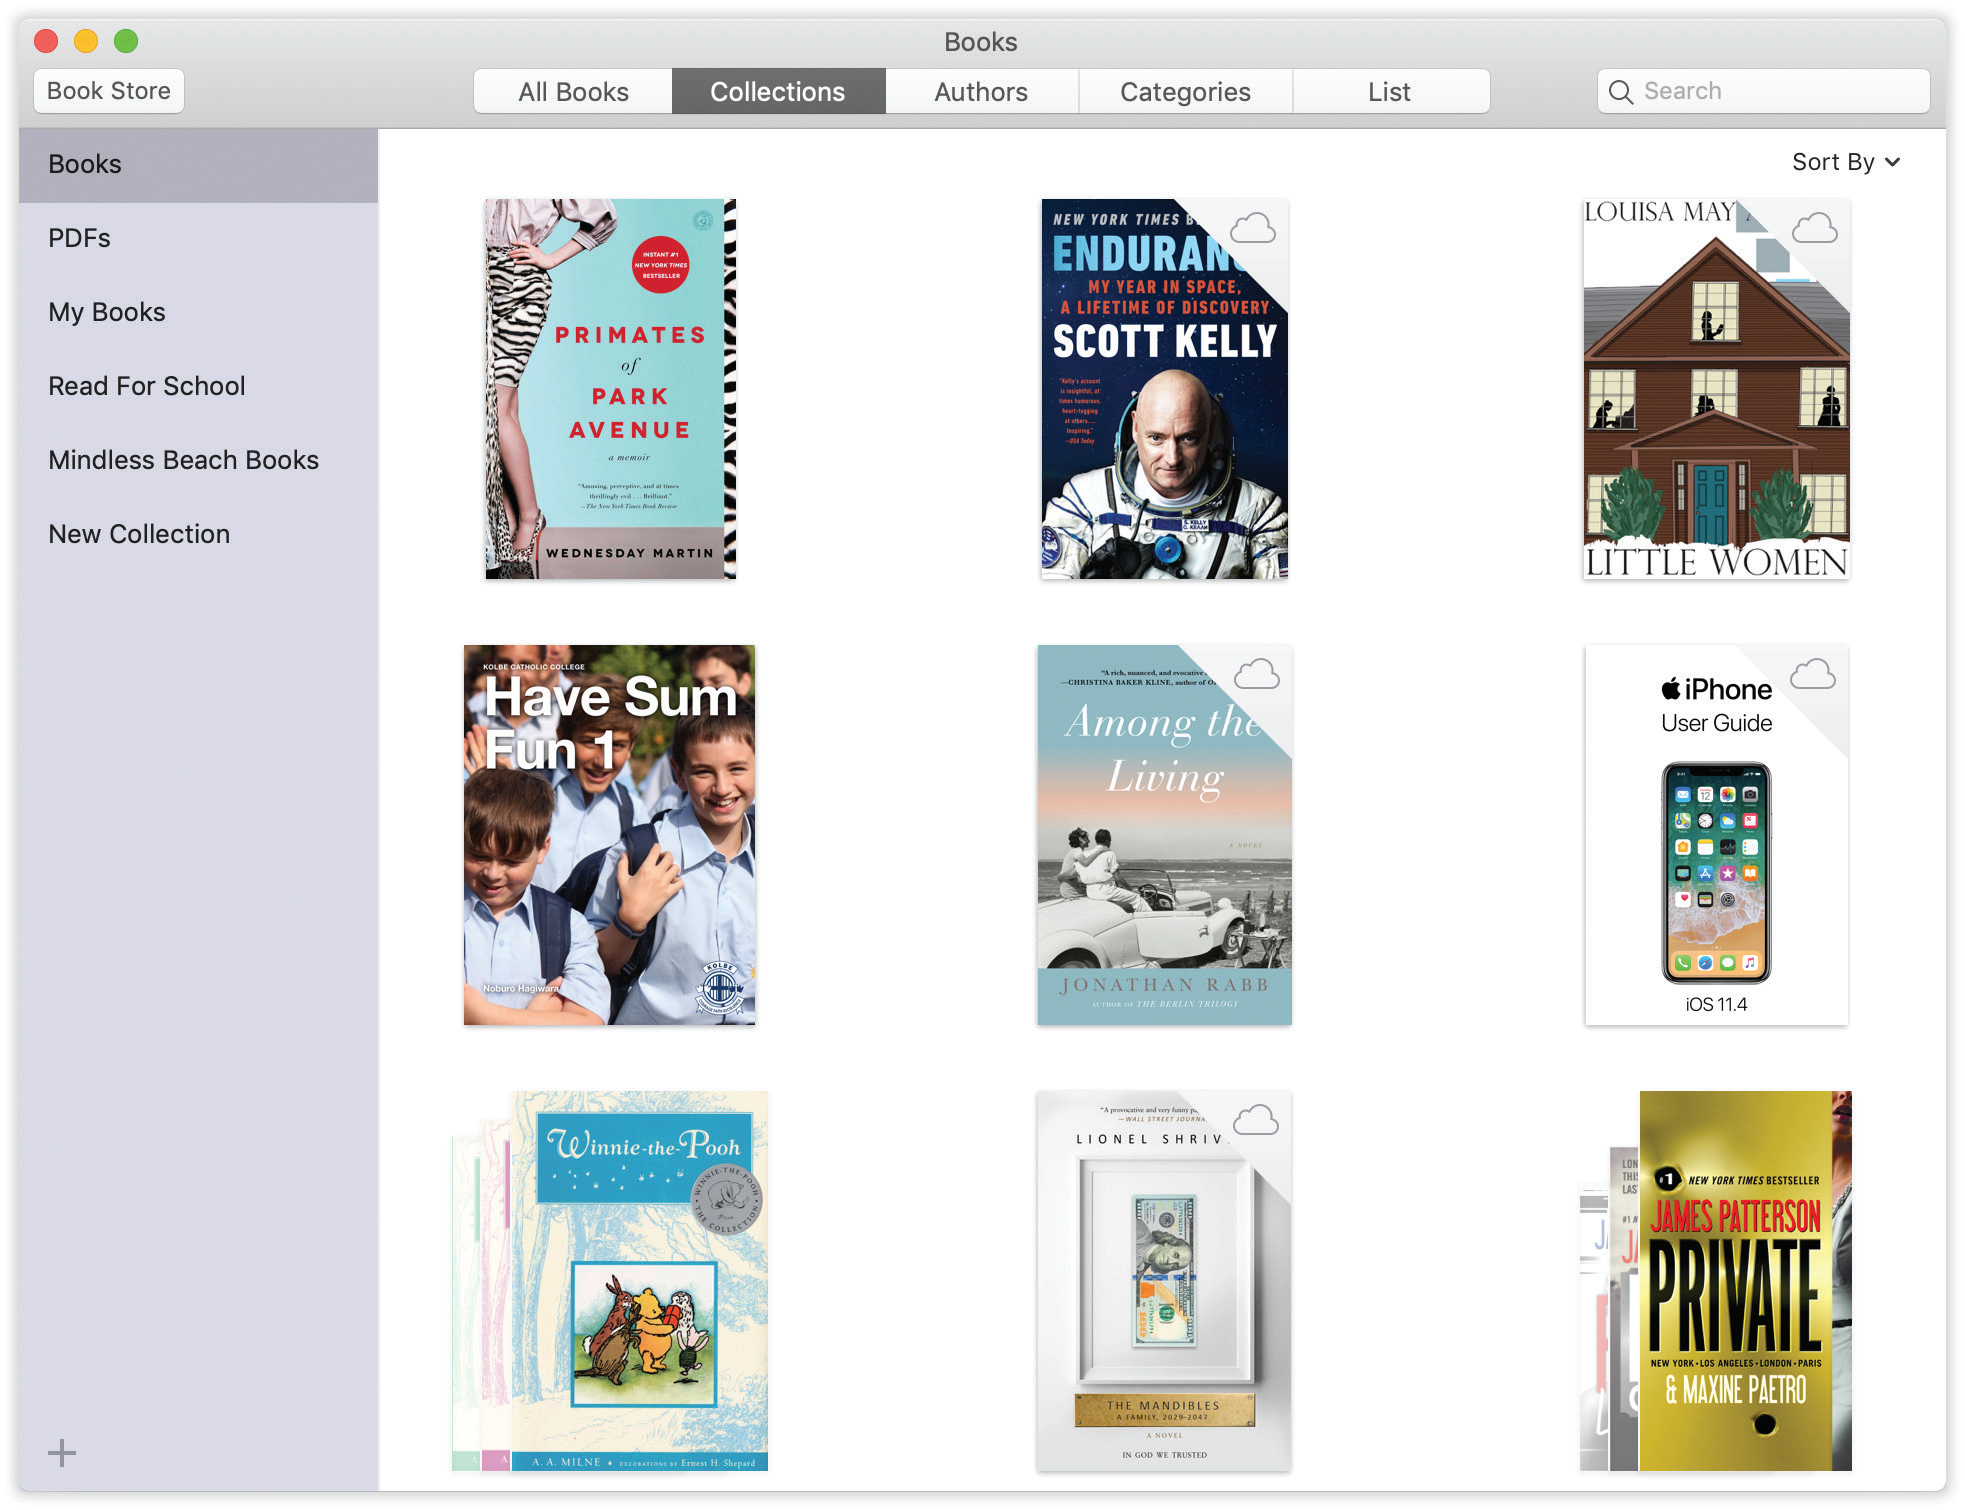
Figure 11-1. Your Books library is more than just book covers. Stamps at the top-right corner indicate which are new, which are free samples, and which are actually online, waiting to be downloaded ( ).
).
In the Sort By pop-up menu (upper right), you can choose Show Title & Author to add that information beneath the book covers.
Reading
But come on—you’re a reader, not a librarian. Here’s how you read an ebook.
Open the book by double-clicking the book cover. Now the book opens, ready for you to read. Looks great, doesn’t it (Figure 11-2)? If you’re returning to a book you’ve been reading, Books remembers your place.
Tip
You can open several books at once, you multitasking maniac.
In general, reading is simple: Just read. Turn pages like this:
Press the space bar. (Add Shift to turn back a page.)
Tap the
 key. (Press
  to turn back.)
Point to the right margin; click the > button that appears. (Left margin to go back.)
Swipe two fingers across the trackpad—to the right (to go forward) or left (to go back a page).
Tip
The Touch Bar, if you have one (“The Complicated Story of the Function Keys”), displays a handy “map” of the entire book. By clicking it or dragging your finger through it, you can jump directly to a different spot in the book. As you drag, your main screen shows the page number you’re about to open.
What’s super cool is that, after having jumped to that distant spot to check something, the Touch Bar then offers you a ![]() button, which teleports you right back to where you were.
button, which teleports you right back to where you were.
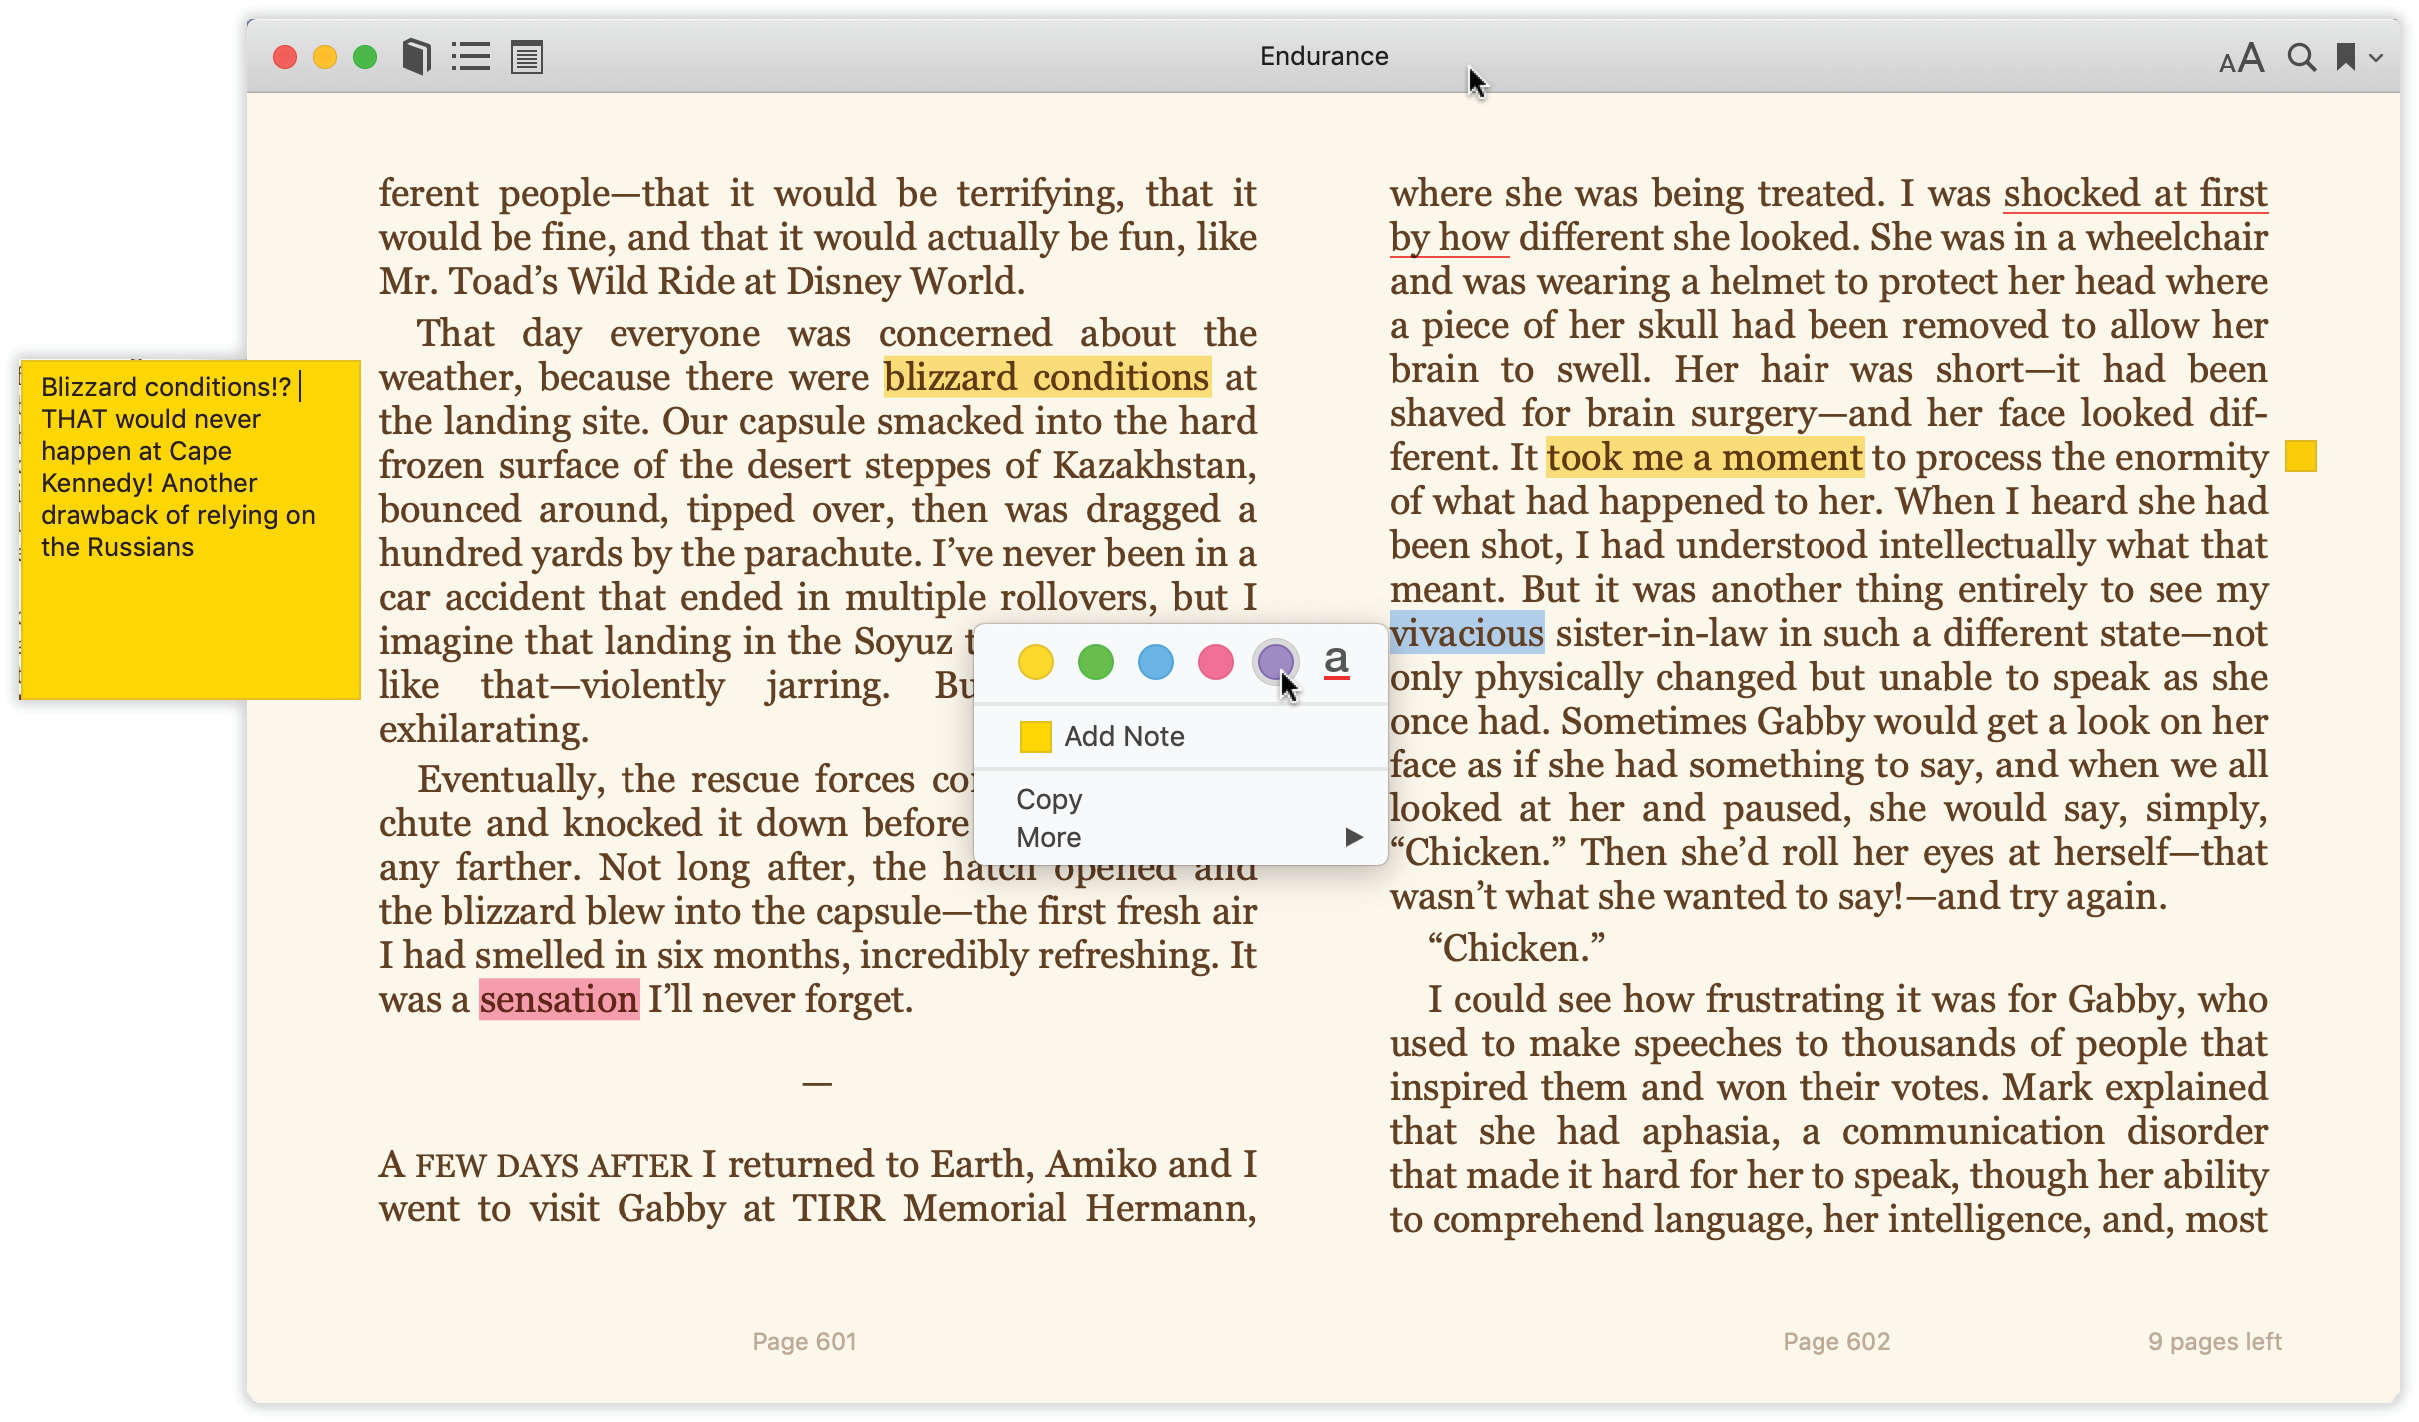
Figure 11-2. Here’s a composite shot showing all kinds of Books features: a Note open (left), the highlighting palette (middle), and the navigation bar (top).
Ordinarily, the reading experience is much quieter.
You should also take a moment to adjust your reading environment. For example:
Enter Full Screen mode for the biggest, least distracting view of your book (see “Full Screen Mode”).
Specify either a one-page or a two-page spread (use the Single Page or Two Pages commands in the View menu). In Full Screen mode, Single Page isn’t available.
Adjust the type size using the
 button. That’s a huge feature for people with tired or over-40 eyes. And it’s something paper books definitely can’t do.
The same pop-out panel offers a Fonts menu, where you can choose from eight typefaces for your book.
Adjust the background color. The
button also offers a choice of four page-background colors: white, sepia (off-white), brown (with white text), or black (for nighttime reading).
While you’re reading, Books makes all the onscreen controls fade away so you can read in peace. But if you move your mouse to the top of the window, a row of additional controls appears (Figure 11-2):
 takes you back to the bookshelf (Library view).
 opens the Table of Contents panel. The chapter or page names are “live”— you can click one to jump there.
 opens the Notes panel, described next.
 opens the search box. It lets you search for text within the book you’re reading, which can be extremely useful.
 adds a bookmark to the current page. This isn’t like a physical bookmark, where there’s only one in the whole book; you can use them to flag as many pages, for as many reasons, as you like. (The same button appears on your Touch Bar, if you have one.)
Once you’ve accumulated a bookmark or two, use the
 next to the menu to see a list of them—and to jump back to one.
Tip
A Books book can include pictures and even videos. Double-click a picture in a book to zoom in on it.
Notes, Highlighting, and Other Options
Here are some more stunts that you’d have trouble pulling off in a printed book. If you double-click a word, you get a graceful, elegant page from Books’ built-in dictionary. You know—in the unlikely event that you encounter a word you don’t know.
If you drag across some text to highlight it, you get a few surprise options (Figure 11-2):
Highlight. Click one of the colored dots to add tinted, transparent highlighting, or underlining, to the word you clicked. (To remove highlighting, click inside a highlighted area and click Remove Highlighting.)
Note. When you click Add Note, Books creates highlighting on the selected passage and opens an empty, colored sticky note so you can type in your own annotations. When you click outside the note, it collapses down to a tiny Post-it square in the margin. Click to reopen it.
To delete a note, click the highlighted text. Click Remove Note or Remove Highlight & Note.
Copy copies the highlighted text, ready for pasting in some other program.
In the More menu, a few additional options lurk:
Search Book opens the same search box you’d get by clicking the
icon—except that this time the highlighted word is already filled in, saving you a bit of typing.Search Web, Search Wikipedia hand off the highlighted text to Safari, which searches Google or Wikipedia.
Mail, Messages, Notes opens the share sheet (“Does the file have the correct file name suffix?”) so you can send the highlighted material to somebody else by message or email, or add it to a Notes page.
Speak reads the highlighted passage aloud.
Tip
The Mac’s speaking feature isn’t limited to a blob of text you’ve highlighted. You can use the Edit → Speech → Start Speaking command to have the entire book read to you—in a voice that’s only a little robotic. Yes, this is exactly the feature that debuted in the Amazon Kindle and was then removed when publishers screamed bloody murder—but somehow, so far, Apple has gotten away with it.
Once you’ve added bookmarks, notes, and highlighting to your book, they’re magically and wirelessly synced to any other copies of that book—on other gadgets, like the iPad or iPod Touch, other iPhones, or other Mavericks-or-later Macs. Very handy indeed.
Furthermore, if you click the ![]() button, you’ll see the Notes pane. It presents a tidy list of all your bookmarked pages, notes, and highlighted passages. You can click one of the listings to jump to the relevant page.
button, you’ll see the Notes pane. It presents a tidy list of all your bookmarked pages, notes, and highlighted passages. You can click one of the listings to jump to the relevant page.
Books Settings
If you’ve embraced the simple joy of reading electronic books, then you deserve to know where to make settings changes: in Books → Preferences. Here are the options waiting there.
General tab
Let lines break naturally. Ordinarily, Books presents text with ragged-right margins. Select “Justify text” if you like the text to stretch from edge to edge of the screen.
Auto-hyphenate words. Sometimes, typesetting looks better if hyphens allow partial words to appear at the right edge of each line. Especially if you’ve also turned on “Justify text.”
Display Sleep. If you’ve set your screen to go dark after a period of inactivity (to save power—see “Color Tab”), this checkbox adds a 10-minute grace period to your definition of “inactivity.” The idea is to prevent the screen from going dark just because you’re a slow reader.
Sync. Turn this on if you’d like your bookmarks, highlighting, and book collections to be synced with your other Apple gadgets.
Store tab
See the Note in “Automator”.
Parental tab
If you’re a parent, you might wish to shield your impressionable offspring from dirty reading material—or to shield your credit card from wild teenage book-buying sprees (we should all have that problem!).
Click the ![]() and enter your administrator’s password; now you can turn on “Disable the Book Store” to prevent purchases, or “Restrict books with explicit content” to block the downloading of raunchy material.
and enter your administrator’s password; now you can turn on “Disable the Book Store” to prevent purchases, or “Restrict books with explicit content” to block the downloading of raunchy material.
Advanced tab
This tab offers exactly one control: A checkbox called “Enable Advanced menu in menu bar.” It creates an Advanced menu that itself contains exactly one command: “Add EPUB to Library as Proof.”
This is designed to help one very small group: People who create their own Apple-format ebooks, and wish to look them over on various other Apple gadgets to make sure they look right.
Once you’ve exported your book as an ePub file (from Pages, Adobe InDesign, or some other app), use this command to add it to Books as a finished book. When you open it, use the Devices button at top right to choose an iPhone or iPad you’ve connected to your Mac. (The Books app has to be open on that device.) Presto: Your book gets copied to the other gadget, for your proofreading pleasure. The best part: Each time you make a fix in the ePub document, that change is automatically carried through to the Book versions on the Mac and on iOS.
Calculator
For quick calculations, you don’t need any calculator at all. Just ask Siri: “What’s 17 percent of 300?” or “What’s the square root of 77?” or “What’s 35 times 22?”
Tip
The Spotlight menu is a calculator, too. Type or paste an equation into the Spotlight search box; instantly, the answer appears in the results menu.
If you really need to see the numbers, though, you can use this app, which is much more than a simple four-function memory calculator. It can also act as a scientific calculator for students and scientists, a conversion calculator for metric and U.S. measures, and even a currency calculator for world travelers.
The little Calculator widget in the Today pane of the Notification Center is quicker to open, but the stand-alone Calculator program is far more powerful. For example:
Calculator has three modes: Basic, Scientific, and Programmer (Figure 11-3). Switch among them by choosing from the View menu (or pressing
-1 for Basic, -2 for Scientific, or -3 for Programmer).You can operate Calculator by clicking the onscreen buttons, but it’s much easier to press the corresponding number and symbol keys on your keyboard.
As you go, you can make Calculator speak each key you press. The Mac’s voice ensures that you don’t mistype as you keep your eyes on the receipts in front of you, typing by touch.
Just choose Speech → Speak Button Pressed to turn this feature on or off. (You choose which voice does the talking in the Accessibility panel of System Preferences.)
Once you’ve calculated a result, you can copy it (using Edit→Copy, or
-C) and paste it directly into another program.Calculator even offers reverse Polish notation (RPN), a system of entering numbers that’s popular with mathematicians, programmers, and engineers, because it lets them omit parentheses. Choose View → RPN Mode, or
-R, to turn it on and off.
Tip
If your Mac has a Touch Bar (“The Complicated Story of the Function Keys”), you can add to it buttons for a few really advanced Calculator functions—Sine, Cosine, Tangent, Random Number, Pi, Hyperbolic Tangent, and many others. Choose View → Customize Touch Bar to get started.
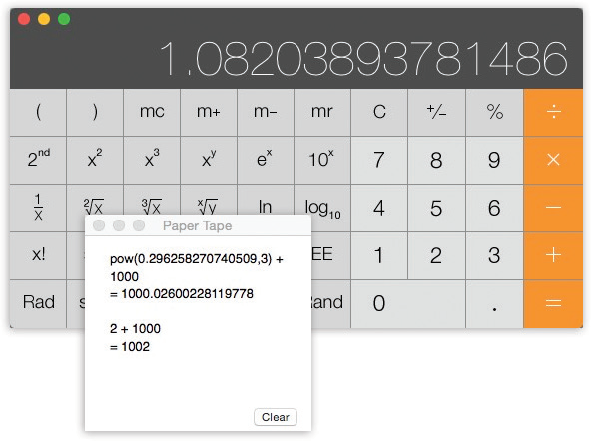
Figure 11-3. The Calculator program offers a four-function Basic mode, a full-blown scientific calculator mode, and a programmer’s calculator (shown here) capable of hex, octal, decimal, and binary notation. The first two modes have a “paper tape” feature (Windows → Paper Tape) that lets you see any errors you may have made way back in a calculation. You can also save the tape as a text file by choosing File → Save Tape As, or print it by selecting File → Print Tape.
Conversions
Calculator is more than a calculator; it’s also a conversion program. No matter what units you’re trying to convert—meters, grams, cubic inches, miles per hour, euros—Calculator is ready.
Now, the truth is, asking Siri to convert units for you, or typing (for example) 35 degrees in centigrade into Spotlight is simpler and quicker to open than this older Calculator feature.
But if you’ve already got Calculator open, here’s the drill: Type in the starting measurement. Then, from the Convert menu, choose the kind of conversion you want (Area, Currency, Temperature, or whatever).
In the dialog box, use the pop-up menus to specify which units you want to convert to and from, and then click OK. There’s your answer!
The next time you want to make this kind of conversion, you can skip steps 2, 3, and 4. Instead, just choose your desired conversion from the Convert → Recent Conversions submenu.
Calculator is especially amazing when it comes to currency conversions—from pesos to American dollars, for example—because it actually goes online to download up-to-the-minute currency rates.
Tip
If you’re working with big numbers, don’t forget to turn on View → Show Thousands Separators. Calculator will add commas (like 1,242,939) to help you read your big numbers more easily.
Calendar
The calendar program that was called iCal for many years is now called Calendar, so that it matches its name on the iPhone and iPad.
Calendar is not so different from those “Hunks of the Midwest Police Stations” paper calendars that people leave hanging on the walls for months past their natural life span.
Tip
Calendar’s Dock icon displays today’s date—even when Calendar isn’t running.
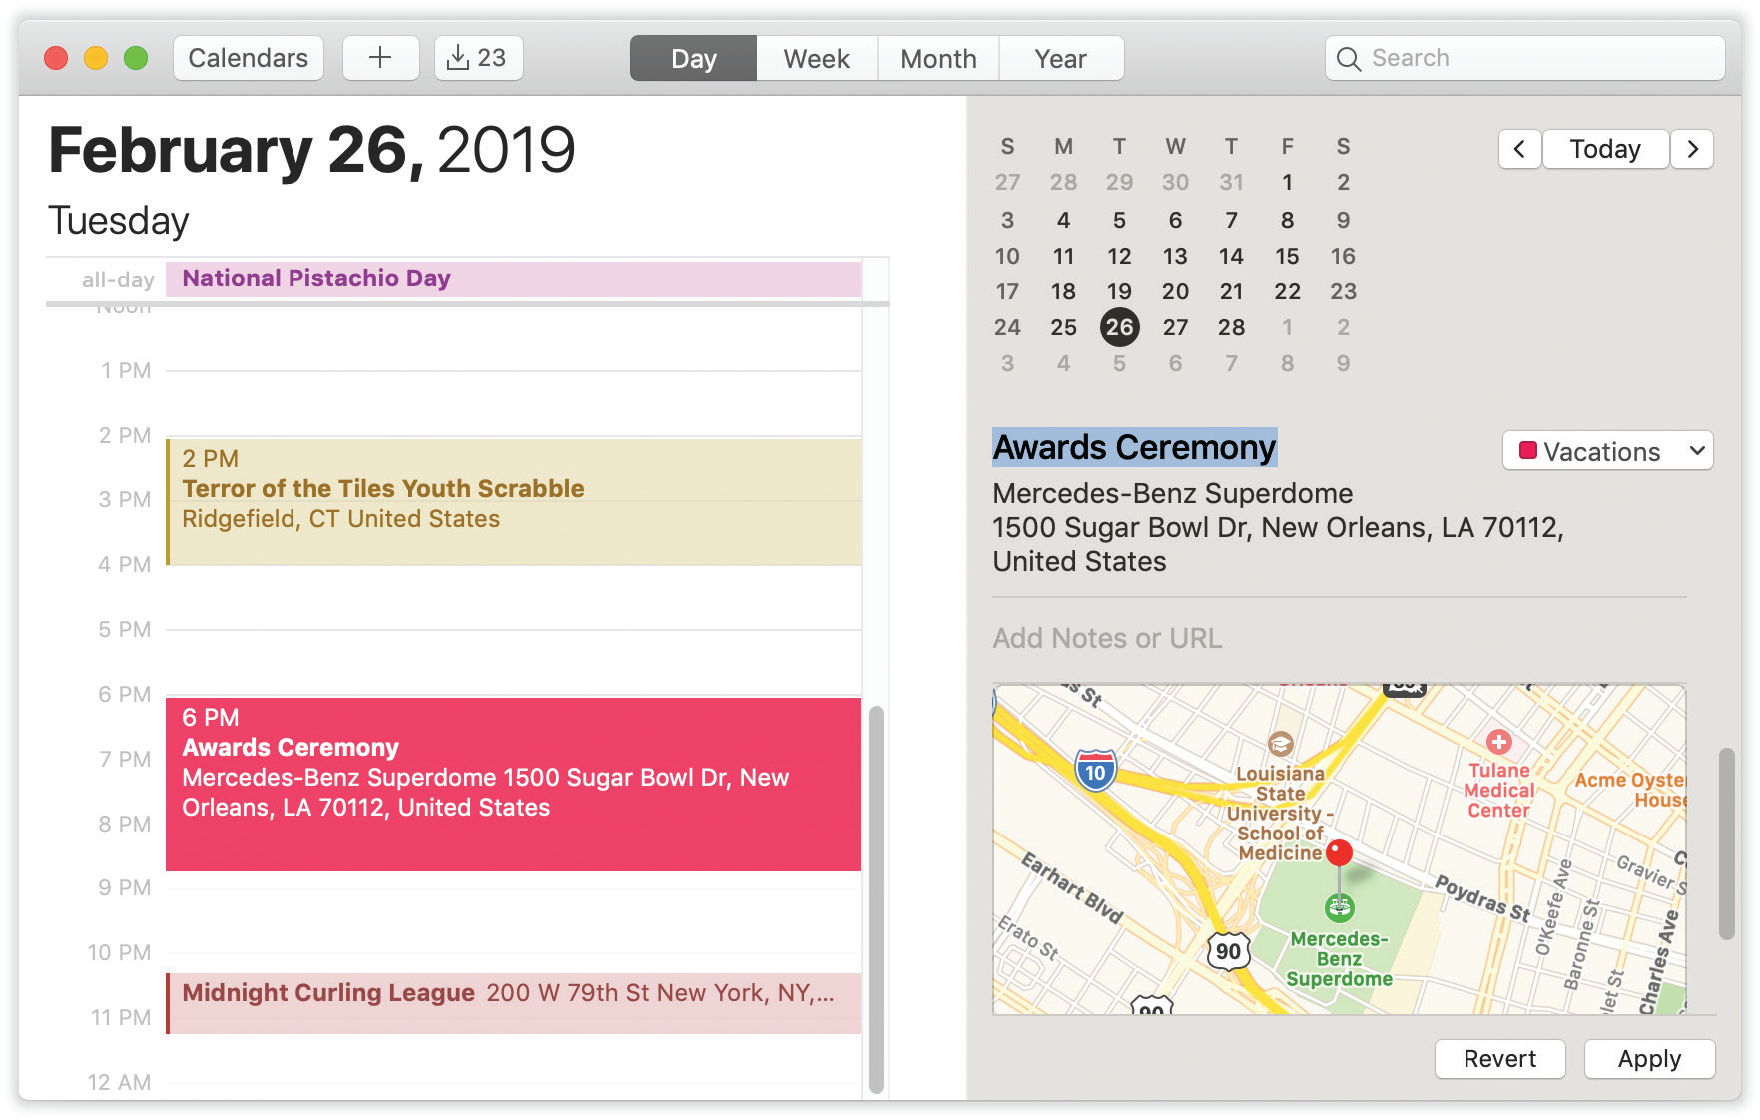
Figure 11-4. In Calendar, the  and
and  buttons at top right take you to the previous or next day, week, month, or year (depending on your current view). In the Day view, shown here, you can click the tiny numbers on the mini-calendar to change days.
But Calendar offers several advantages over paper calendars:
It can automate the process of entering repeating events, such as weekly staff meetings or gym workouts.
Calendar can give you a gentle nudge (with a sound, a dialog box, or even an email) when an important appointment is approaching.
Calendar can share information with Contacts, with Mail, with your iPod/iPad/iPhone, with other Macs, or with “published” calendars on the internet. Some of these features require one of those iCloud accounts described in Chapter 16. But Calendar also works fine on a single Mac, even without an internet connection.
Calendar can subscribe to other people’s calendars. For example, you can subscribe to your spouse’s calendar, thereby finding out when you’ve been committed to after-dinner drinks on the night of the big game. You can also tell Calendar to show your calendars from Google and Yahoo, or even your company’s Exchange calendar.
Working with Views
When you open Calendar, you see something like Figure 11-4. By clicking one of the View buttons above the calendar, or by pressing ![]() -1,
-1, ![]() -2,
-2, ![]() -3, or
-3, or ![]() -4, you can switch among these views:
-4, you can switch among these views:
Day looks exactly like a day-at-a-time desk calendar. On the left side, you see today’s schedule on an hour-by-hour chart. On the right, you see the details of whichever appointment is selected.
If you choose Calendar → Preferences, you can specify what hours constitute a workday. This is ideal both for those annoying power-life people who get up at 5 a.m. for two hours of calisthenics and for the more reasonable people who sleep until 11.
Tip
Calendar provides four quick ways to get to the current day’s date. Click Today (upper-right corner, between the
and ), choose View → Go to Today, or press -T. Or tap Today on the Touch Bar, if your Mac has one.Week fills the main display area with seven columns, reflecting the current week. (You can establish a five-day workweek instead in Calendar → Preferences.)
Tip
If you double-click the date above the calendar, you open the Day view for that day.
Month shows the entire current month. The time of each appointment is listed in gray off to the right of each square.
If a Month-view square is too small to show everything you’ve got scheduled that day, you’ll see a notation at the bottom of the square, like “3 more…” Sometimes, making the window bigger (or full screen) helps make more room, or you can just double-click the date’s number to switch to Day view and see everything at once.
Year view displays the date numbers for the entire year (Figure 11-5).
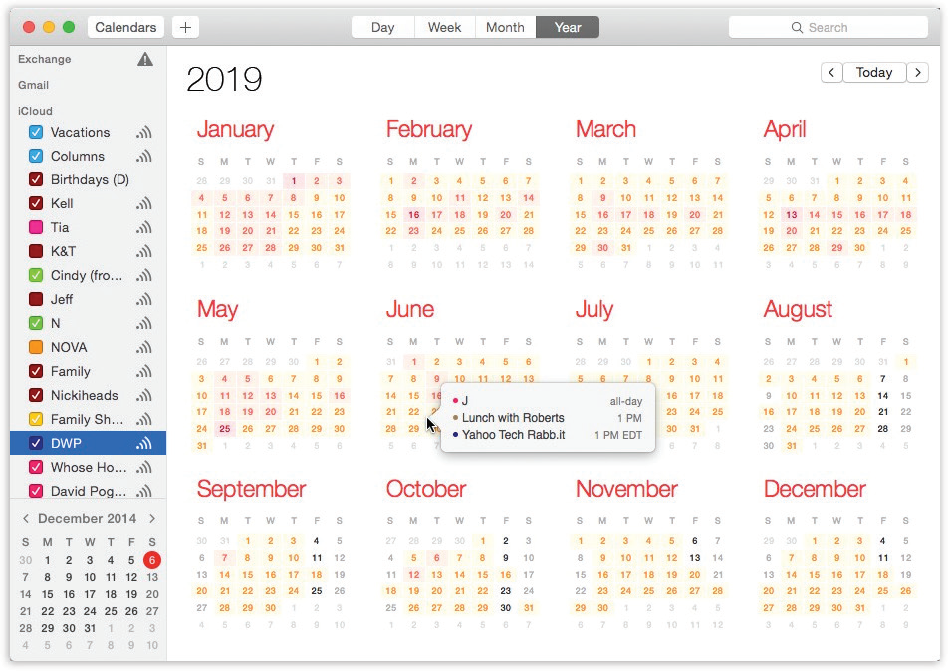
Figure 11-5. Year view shows the entire year. In Calendar → Preferences → Advanced, you can turn on “Show events in year view,” which actually means “Show me a ‘heat map’ to indicate how hectic my schedule is.”
You can single-click a date number to see a pop-out list of the appointments scheduled for that date.
In Week or Month view, double-click an appointment to see more about it, or even make changes to it.
Tip
In Week or Day view, Calendar sprouts a handy horizontal line that shows where you are in time right now. (Look in the hours-of-the-day “ruler” down the left side of the window to see this line’s little red bulb.) A nice touch, and a handy visual aid that can tell you at a glance when you’re already late for something.
Also, in any view, you can switch into Full Screen mode by clicking the green ![]() button (top left). See “Full Screen Mode” for more on Full Screen mode.
button (top left). See “Full Screen Mode” for more on Full Screen mode.
Tip
Each Calendar view scrolls smoothly and endlessly into the past or future. Day and Week views scroll horizontally; Month and Year views scroll vertically.
Making an Appointment
The basic Calendar is easy to figure out. After all, with the exception of one unfortunate Gregorian incident, we’ve been using calendars successfully for centuries.
Even so, there are two ways to record a new appointment: using the mouse, or using the Quick Event box.
The mousy way
You can quickly record an appointment using any of several techniques, listed here in order of decreasing efficiency:
In Month view, double-click a blank spot on the date you want. Type the name of the event and a time slot—for example, Sales meeting 9am-4:30. (See “The Quick Event way” below for details on how Calendar interprets these time notations.)
In Day or Week view, double-click the starting time to create a one-hour appointment. Or drag vertically through the time slots that represent the appointment’s duration. Either way, type the event’s name inside the newly created colored box.
In Day, Week, or Month view, right-click or two-finger click a date and choose New Event from the shortcut menu. Type the event’s name.
Unless you use the drag-over-hours method, a new event believes itself to be one hour long. But in Day or Week view, you can adjust its duration by dragging the bottom edge vertically. Drag the dark top bar up or down to adjust the start time.
In many cases, that’s all there is to it. You’ve just specified the day, time, and title of the appointment. Now you can get on with your life.
Tip
If the Edit balloon is blocking a part of the calendar you need to see, no biggie: Just drag the balloon out of the way, using any blank spot as a handle. It “tears off” and becomes independent.
The Quick Event way
In the Quick Event method, the program spares you the trouble of manually selecting dates, start times, and end times. Instead, the program understands notations like “7 pm Friday,” and puts your new appointment into the right time slot automatically.
To use this feature, press ![]() -N. Or click + (top left of the window) or choose File → New Event. The Quick Event box appears. Proceed as shown in Figure 11-6.
-N. Or click + (top left of the window) or choose File → New Event. The Quick Event box appears. Proceed as shown in Figure 11-6.
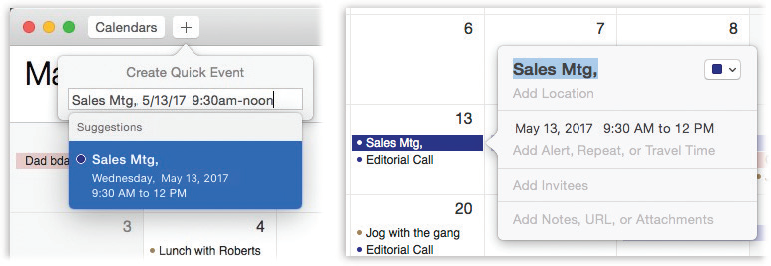
Figure 11-6. Left: Type a plain-English shorthand appointment. Press Return. Marvel as Calendar interprets the times you typed and inserts your meeting into the right time slot.
Note
Calendar proposes adding the new appointment to your default calendar—that is, the category you use most often (read on for details on these calendar categories). Supposedly, you’ve already told it which category is your preferred one by using the Calendar → Preferences → General → Default Calendar pop-up menu.
But as you add a new appointment this way, you can override that setting by holding down the + button. You get a pop-up menu of your calendar categories; only after you click one do you see the Quick Event box shown in Figure 11-6.
Into the Quick Event box, type the name of your appointment and its date and time. For example, you could type Report deadline Aug 12, or “Titanic 2: The Return” Sat 7 pm, or Cara date 11-11:15am. When you press Return, Calendar interprets what you typed, using these rules:
If you didn’t specify an ending time, Calendar sets the appointment to one hour.
If you didn’t enter any time information, Calendar just schedules your event for all day.
If you typed breakfast or morning, Calendar sets the appointment to start at 9 a.m.; lunch or noon, it starts at 12 p.m.; dinner or night, it starts at 7 p.m.
If you enter a weekday (for example, Chicago Monday), Calendar assumes you mean the very next occurrence of that day. (If that’s not what you want, enter the date, like Chicago Jul 3.)
If you enter a time but not a date or day (for example, Fishing 3:30 pm), Calendar assumes you mean today.
The Quick Event system has a feature that saves you time and typos: As you type, Calendar displays a menu of similar appointments you’ve entered in the past (Figure 11-6, left). If you click one, Calendar fills in all the details of the new appointment in one fell swoop, copying them from the earlier event.
As soon as Calendar interprets your shorthand and turns it into a real appointment, its details balloon opens automatically (Figure 11-6, right), so you can clean up any errors and add more details.
Location, alarms, travel time, and other details
No matter which method you use to create the basic event (the mouse way or the Quick Event way), you’re now presented with the information balloon shown at right in Figure 11-6. Here’s where you go to town filling in the details. (This same balloon will appear when you double-click any existing appointment later.)
Tip
You can also open the Info balloon by clicking an appointment and then pressing ![]() -E (which is short for Edit → Edit Event).
-E (which is short for Edit → Edit Event).
For each appointment, you can tab your way to the following information areas:
subject. That’s the large, bold type at the top—the name of your appointment. For example, you might type Fly to Phoenix.
calendar. A calendar, in Calendar’s terminology, is a subset—a category—into which you can place appointments. You can create one for you, one for family-only events, one for book-club appointments, and so on. You can hide and show these categories at will. Details begin in “Searching for events”; for now, note that the tiny colored square in the top-right corner of the Info bubble is a pop-up menu of your calendars.
Tip
Use this same pop-up menu to change an appointment’s category. If you filed something in “Company Memos” that should have been in “Sweet Nothings for Honey-Poo,” then open the event’s information balloon and reassign it. Quick.
location. This field makes a lot of sense; almost everyone needs to record where a meeting is to take place. You might type a reminder for yourself like My place, a specific address like 212 East 23rd, or some other helpful information, like a contact phone number or flight number.
As you type, Calendar busily consults Apple’s worldwide database of street addresses—and proposes a few matches, as shown in Figure 11-7 (top left). You’re under no obligation to choose one of these; you can ignore the suggestions and type “Casey’s treehouse,” for all Apple cares. But if you do choose from Apple’s list of proposals, some cool things happen.

Figure 11-7. Here’s the life cycle of Calendar’s location and travel-time feature.
Top left: To make the travel-time calculation work, you must choose from Calendar’s list of location suggestions, based on what you’ve typed.
Top right: You get a map and weather report for that location.
Bottom left: Calendar knows how long it will take to get there…
Bottom right: …and will remind you when it’s time to get going!For example, you get a little map (which you can click to open the Maps app for a bigger view), as shown in Figure 11-7 (top right). You get to see the current weather, so you know how much to bundle up. And you get to use the travel-time feature described on the facing page.
Note
The next few controls appear only when you expand the Info bubble to see the time and date information. To do that, click whatever time is listed now—or, if you’ve just tabbed your way to the times, press Return.
all-day. An “all-day” event, of course, refers to something that has no specific time of day associated with it: a holiday, a birthday. When you turn on this box, you see the name of the appointment jump to the top of the Calendar screen, in the area reserved for this kind of thing.
starts, ends. You can adjust the times shown here by typing, clicking buttons, or both. Press Tab to jump from one setting to another, and from there to the hours and minutes of the starting time.
Note
The little calendar that pops up when you click the date is handier than typing a date manually.
For example, start by clicking the hour, and then increase or decrease this number either by pressing
 and
and  or by typing a number. Press Tab to highlight the minutes and repeat the arrow-buttons-or-keys business. Finally, press Tab to highlight the AM/PM indicator, and type either A or P—or press or —to change it, if necessary.
Tip
If you specify a different ending date, then a banner appears across the top of the calendar.
time zone. This option appears only after you choose Calendar → Preferences → Advanced and then turn on “Turn on time zone support.” And you would do that only if you plan to be traveling on the day this appointment comes to pass.
Once you’ve done that, a time zone pop-up menu appears. It starts out with “America/New York” (or whatever your Mac’s usual time zone is); if you choose Other, then a tiny world map appears. Click the time zone that represents where you’ll be when this appointment comes due. From the shortcut menu, choose the major city that’s in the same time zone you’ll be in.
Tip
The time zone pop-up menu remembers each new city you select. The next time you travel to a city you’ve visited before, you won’t have to do that clicking-the-world-map business.
Now, when you arrive in the distant city, use the time zone pop-up menu at the top-right corner of the Calendar window to tell Calendar where you are. You’ll see all of Calendar’s appointments jump, like magic, to their correct new time slots.
repeat. The pop-up menu here contains common options for recurring events: every day, every week, and so on. It starts out saying None.
Once you’ve made a selection, you get an end pop-up menu that lets you specify when this event should stop repeating. If you choose “Never,” then you’re stuck seeing this event repeating on your calendar until the end of time (a good choice for recording, say, your anniversary, especially if your spouse might be consulting the same calendar). You can also turn on “After [a certain number of times],” which is a useful option for car and mortgage payments. And if you choose “On date,” you can specify the date when the repetitions come to an end; use this option to indicate the last day of school, for example.
“Custom” lets you specify repeat schedules like “First Monday of the month” or “Every two weeks.”
Tip
If you don’t see the following items in the editing bubble, then click the gray lettering that says “Add Alert, Repeat, or Travel Time” to make them appear.
travel time. This item represents a breakthrough in common sense: It automatically builds travel time into Calendar’s understanding of any appointment. After all, it’s not very useful to get a reminder like “Lunch with Jenkins at 1 p.m.” 10 minutes beforehand if it takes half an hour to get there.
Now, then: If Calendar is to calculate travel time, it has to know where you’re starting out and where you’re going.
To figure out your starting point, the Mac consults your “me” card in the Contacts app (“More Anti-Spam Tips”), and uses either your home address or your work address, depending on the time of day. (How does Calendar know when you’re at work? It cleverly uses the “Day starts at” and “Day ends at” settings in Calendar → Preferences → General.)
If you haven’t specified home and work addresses on your “me” card, then Calendar uses the current location of your Mac as the starting point. (And that works only if you’ve allowed the Mac to track your location; see “Finding Yourself”.)
For the arrival location, the travel-time feature requires that you’ve accepted one of the Mac’s address suggestions, as described in Figure 11-7, top left.
Once all that’s done, the travel-time pop-up menu shows you both the driving and walking times to your appointment. You can override these suggestions if you like; you can choose any time interval from five minutes to two hours, or choose Custom to plug in something not listed here.
The real payoff, of course, comes when you set a reminder for yourself; read on.
alert. This pop-up menu tells Calendar to notify you when a certain appointment is about to begin. Choose how much notice you want: “At time of event,” “5 minutes before,” all the way up to “2 days before.” If it’s a TV show, a reminder five minutes before airtime is fine. If it’s a birthday, you might set up a two-day warning, so there’s time to buy a present.
Actually, you can get a lot more particular than that. If you choose Custom, you can specify any advance-warning interval at all: “16 minutes before,” or “15 days after,” or whatever. (Yes, you can even set up an alarm to ring after the event—great if you want to follow up with something or check the oven.)
Here in Customland, you can also set any of three kinds of flags to get your attention. Calendar can display a message (with a sound, if you like), send you an email, or open a file on your hard drive. (You could use this unusual option to ensure that you don’t forget a work deadline by having Calendar fling the relevant document open in front of your face at the eleventh hour.)
And if you’ve used the travel-time feature already described, Calendar offers choices related to the travel time, such as “at start of travel time” or 5, 15, or 30 minutes before, which may be helpful if you need to plot time for showering. (Figure 11-7, lower right).
Tip
You can set up more than one alarm for the same appointment, each with its own advance-warning interval. Just click the + button to add a new one.
show as (busy/free/tentative/out of office). This little item shows up only if you’ve subscribed to a calendar server, like an internet-based calendar (in geek-speak, a CalDAV server) or your company’s Exchange calendar. It communicates to your colleagues when you might be available for meetings.
Note
If your calendar comes from a CalDAV server, then your only options are “busy” and “free.” The factory setting for most appointments is “busy,” but for all-day events it’s “free.” Which is logical; just because it’s International Gecko Appreciation Day doesn’t mean you’re not available for meetings (rats!).
You might think: “Well, duh—if I’ve got something on the calendar, then I’m obviously busy!” But not necessarily. Some Calendar entries might just be placeholders, reminders to self, TV shows you wanted to watch, appointments you’d be willing to change—not things that would necessarily render you unavailable if a better invitation should come along.
Add Invitees. If the appointment is a meeting or some other gathering, you can type the participants’ names here. If a name is already in your Contacts program, then Calendar proposes autocompleting the name for you.
If you separate several names with commas, Calendar automatically turns each into a shaded button. You can click it for a pop-up menu of commands like Remove Attendee and Send Email. (That last option appears only if the person in Contacts has an email address, or if you typed a name with an email address in brackets, like this: Chris Smith <[email protected]>.)
Tip
If you and your invitees are on the same CalDAV or Exchange calendar service—usually, co-workers at the same company—Calendar can show a “time map” of the invitees’ days, all in a handy scrolling window, so you can find a time when everybody’s free. To see this map, click the Available Meeting Times link beneath the addresses of the invitees you’ve specified, or choose Window → Availability Panel (see Figure 11-8).
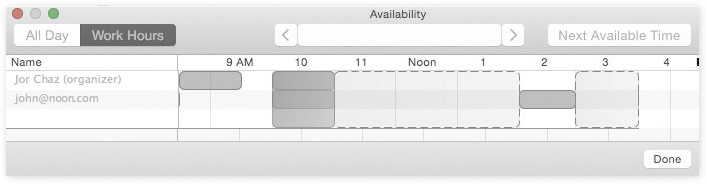
Figure 11-8. Drag the vertical block (your proposed meeting) to a different time slot, or click Next Available Time to find when everybody’s free. Good luck.
Once you’ve specified some attendees, a Send button appears in the Info box. If you click it, Calendar fires up Mail and prepares ready-to-send messages, each with an .ics attachment: a calendar-program invitation file. See the box on the facing page.
Add Notes, URL or Attachments. You can type, paste, or drag any text you like in the note area—driving directions, contact phone numbers, a call history, or whatever.
Your newly scheduled event now shows up on the calendar, complete with the color coding that corresponds to the calendar category you’ve assigned.
What to Do with an Appointment
Once you’ve entrusted your agenda to Calendar, you can start putting it to work. Calendar is only too pleased to remind you (via pop-up messages) of your events, reschedule them, print them out, and so on. Here are a few of the possibilities.
Editing events
To edit a calendar event’s details, click to open its Info balloon (Figure 11-6).
And if you want to change only an appointment’s “calendar” category, right-click or two-finger click anywhere on the appointment and choose from the resulting Calendar shortcut menu. That way, you bypass the need to open the Info balloon.
Rescheduling events
If an event in your life gets rescheduled, you can drag an appointment block vertically in a Day- or Week-view column to make it later or earlier the same day, or horizontally to another date in any view. (If you reschedule a recurring event, Calendar asks if you want to change only this occurrence, or this and all future ones.)
If something is postponed for, say, a month or two, you can grab it in the Month view and drag it down as the months very slowly scroll by. Or you can open the Info balloon and edit the starting and ending dates or times—or just cut and paste the event to a different date.
Lengthening or shortening events
If a scheduled meeting becomes shorter or your lunch hour becomes a lunch hour-and-a-half (in your dreams), changing the length of the representative calendar event is as easy as dragging the bottom border of its block in any column view (see Figure 11-9).
Tip
In Week view, if you’ve grabbed the bottom edge of an appointment’s block so that the cursor changes, you can drag horizontally to make an appointment cross the midnight line and extend into a second day.
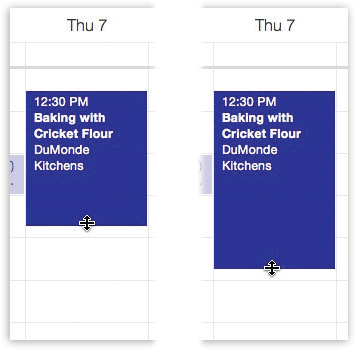
Figure 11-9. You can resize any Calendar event just by dragging its bottom border. As your cursor touches the bottom edge of an event, it turns into a double-headed arrow. You can now drag the event’s edge to make it take up more or less time on your calendar.
Printing events
To commit your calendar to paper, choose File → Print, or press ![]() -P. The resulting Print dialog box lets you include only a certain range of dates, only events on certain calendars, with or without To Do lists or mini-month calendars, and so on.
-P. The resulting Print dialog box lets you include only a certain range of dates, only events on certain calendars, with or without To Do lists or mini-month calendars, and so on.
Searching for events
When you type into the search box at the top right of the Calendar screen, you’re offered some “search tokens” that indicate where you want to search for that phrase (in the name of an event, in its notes, location, and so on). The right-hand column offers a clickable list of search results. Figure 11-10 has the details.

Figure 11-10. Left: Type into the search box; Calendar sprouts a list of suggestions (“Event contains ‘school,’ ” “Notes contain ‘school,’ ” and so on).
Right: Click one to create a search token exactly like the ones that Spotlight and Mail use. They let you build up complex searches, bubble by bubble. Double-click any row of the list to jump to the corresponding event on the calendar and open up its summary balloon.
Deleting events
To delete an appointment, click it and then press the Delete key. If you delete a recurring event (like a weekly meeting), Calendar asks whether you want to delete only that particular instance of the event, or the whole series from that point forward.
The “Calendar” Category Concept
Calendar has calendars that let you organize appointments into subsets. One person might have calendars called Me, Spouse ’n’ Me, and Whole Family. A small business could have categories called Deductible Travel, R&D, and R&R.
And now, the Calendar Tip-O-Rama:
To create a calendar, choose File → New Calendar. You now have to specify where you want this category to live: On My Mac (meaning on your Mac), or on one of your online accounts, like iCloud, Google, Yahoo, or Exchange. Type a name that defines the category in your mind.
Note
When you set up an iCloud account either in System Preferences or when you first run macOS, Calendar automatically transfers your On My Mac categories to iCloud. You can no longer create categories that live only on your Mac. (There’s one exception: If you created your iCloud account in Calendar Preferences, then you can have an On My Mac category.)
To see your list of categories, click the Calendars button (upper left of the window). A Sidebar list appears, if it wasn’t already open.
Hide or show an entire category of appointments at once by turning on or off the appropriate checkbox in the Calendars Sidebar.
To change the color of a category, right-click or two-finger click its name in the Sidebar list. In the pop-up bubble, you choose a new color.
To specify your default calendar, choose Calendar → Preferences → General. Choose from the Default Calendar pop-up menu. (The Default calendar is the category that every new appointment falls into unless you change it. It’s also the category that other apps‚ like Mail, propose putting new appointments into.)
To assign a new appointment to a calendar, click the color swatch in the corner of its Info balloon.
To change an appointment’s calendar category, right-click or two-finger click the appointment’s name and choose a calendar name from the shortcut menu.
You may be able to make calendar groups, too. Those are containers that consolidate the appointments from several other calendars. For example, you could have a calendar group called Kids, containing the individual calendars for each of your offspring. Super-calendars like this make it easier to manage, hide, show, print, and search subsets of your appointments. (Sadly, this feature is available only for On My Mac categories, as described previously—not for online accounts.)
To create a calendar group, choose File → New Calendar Group. Name the resulting item in the Calendar list; for the most part, it behaves like any other calendar. Drag other calendar names onto it to include them. Click the flippy triangle to hide or show the component calendars.
“Publishing” Calendars to the Web
One of Calendar’s best features is its ability to post your calendar on the web, so that other people can subscribe to it, which adds your appointments to their calendars. Anyone with a web browser—or only people you designate—can also view your calendar, right online.
For example, you might use this feature to post the meeting schedule for a club that you manage, or to share the agenda for a series of upcoming financial meetings that all your co-workers will need to consult.
Publishing
The steps for sharing a calendar depend on whether or not you have an iCloud account. Observe:
If you have an iCloud account: Proceed as shown in Figure 11-11. Note that you can specify whether each person can just see the appointments or be able to edit them, too. That’s a delightful, two-way collaboration—a terrific way for a couple or a family to coordinate everyone’s calendars, for example.
Behind the scenes, Calendar sends an invitation to the recipient. If she has a Mac, iPhone, or iPad, she’ll see a notification right in Calendar (![]() ); otherwise, she’ll get the invitation by email. Once she clicks the invitation and clicks Accept, your shared calendar shows up on her machine.
); otherwise, she’ll get the invitation by email. Once she clicks the invitation and clicks Accept, your shared calendar shows up on her machine.
Later you can modify the settings (Figure 11-11, bottom). Or you can stop sharing with someone by clicking the ![]() next to a calendar name, clicking a person’s name, and then pressing the Delete key.
next to a calendar name, clicking a person’s name, and then pressing the Delete key.
Tip
You can also share an iCloud calendar at icloud.com. Just click the ![]() icon beside a calendar’s name.
icon beside a calendar’s name.
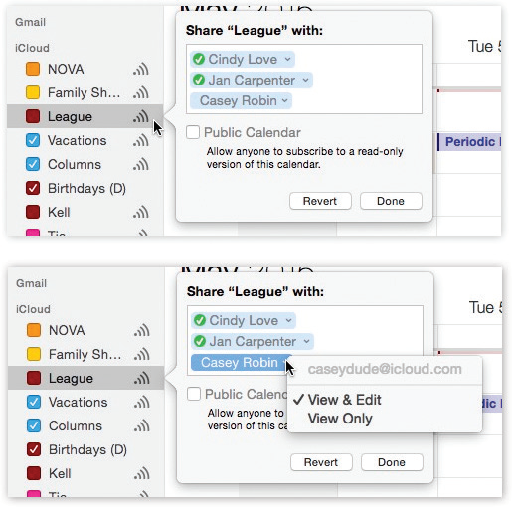
Figure 11-11. Top: Point to the name of the iCloud calendar you want to publish; click the “share” icon ( ) that appears next to its name.
In the pop-out panel, enter the email address of the lucky recipient (it must be someone you’ve entered into your Contacts). You can invite several; just keep entering addresses.
The Public Calendar option means that the whole internet can see this calendar category (if they know the secret URL).
Bottom: Use the to specify whether a person can see your appointments (View Only) or make changes to them, too (View & Edit).
After the recipient has accepted the invitation, click the icon again; this time, a green checkmark appears next to the person’s name.
If you don’t have an iCloud account: If you don’t have iCloud, then you’ll need a website of your own, where your online calendar can be hung. And it has to be a WebDAV-compatible server (ask your web-hosting company). You know what? It might just be easier to sign up for a free iCloud account and do it that way.
In any case, begin by making sure that the Calendars list is open. Click the calendar you want to share. Choose Edit → Publish Calendar. (This command doesn’t appear if you have an iCloud account, since the sharing mechanism is so much simpler with iCloud.)
Tip
You have to perform this step individually for each calendar category. If you want to publish more than one calendar simultaneously, then create a calendar group, and publish that.
A dialog box appears. This is where you specify your web address, its password (if necessary), and how your saved calendar is going to look and work. If you turn on “Publish changes automatically,” then whenever you edit the calendar, Calendar connects to the internet and updates the copy there. (Otherwise, you can right-click or two-finger click the calendar’s name and choose Refresh whenever you want to update the web copy.)
When you click Publish, your Mac connects to the web and then shows you the web address (the URL) of the finished page, complete with a Send Mail button that lets you fire the URL off to your colleagues.
Tip
Whenever you want to send someone the subscription information, click the calendar category you’ve published and choose Edit → Send Publication Email. Calendar will prepare an outgoing email message containing details on subscribing to your calendar.
To stop publishing that calendar, click its name in the Calendars pop-up list and then choose Edit → Stop Publishing.
Subscribing
Often, websites publish calendars that you can bring into Calendar. Maybe you use TripIt.com to manage your flights and hotel reservations. Maybe you’ve found a calendar you like at icalshare.com—a schedule of rocket launches, trade shows, National Hockey League games, NASCAR races, soccer matches, the Survivor TV show, holidays, or whatever.
Each of these web calendars has its own address. To subscribe, choose File → New Calendar Subscription. In the Subscribe to Calendar dialog box, paste the address of the published calendar.
You can also provide your own name for this category, specify how often you want your own copy to be updated (assuming you have a full-time internet connection), and indicate whether or not you want to be bothered with the publisher’s alarms and notes.
When it’s all over, you see a new “calendar” category in your left-side list, representing the published appointments.
Google, Yahoo, and Facebook Calendars
If you maintain a calendar online—at Google, Yahoo, or Facebook, for example—you may take particular pleasure in discovering how easy it is to bring those appointments into Calendar. It’s one handy way to keep, for example, a husband’s and wife’s appointments visible on each other’s calendars.
Setting this up is ridiculously easy. Choose Calendar → Preferences → Accounts. Click + below the list. Enter your Google, Yahoo, or Facebook address (for example, [email protected]) and password. Click Create.
In a minute or so, you’ll see all your Google, Yahoo, or Facebook events show up in Calendar. (Each web calendar has its own heading in the left-side list.) Better yet: It’s a two-way sync; changes you make to these events in Calendar show up on the web, too.
Syncing Calendar with Your iPhone, iPad, and Other Computers
Here’s the real magic of Calendar, iCloud, and the rest of Apple’s software archipelago: Your calendar can be autosynced among all your machines, like your iPhone, iPad, and Macs. Add an appointment on your phone, change an appointment on your iPad, whatever—all your other gadgets are wirelessly and automatically synced to match. See “Meet iCloud” for details on this amazing setup.
Note
Wondering where the To Do list feature went? It was in iCal, but it’s gone in Calendar. That’s because macOS has its own full-blown Reminders app now, described later in this chapter.
Chess
MacOS comes with only one game, but it’s a beauty (Figure 11-12). It’s a traditional chess game played on a gorgeously rendered board with a set of realistic 3D pieces.
Note
The program is actually a sophisticated Unix-based chess program, Sjeng, that Apple packaged up in a new wrapper.
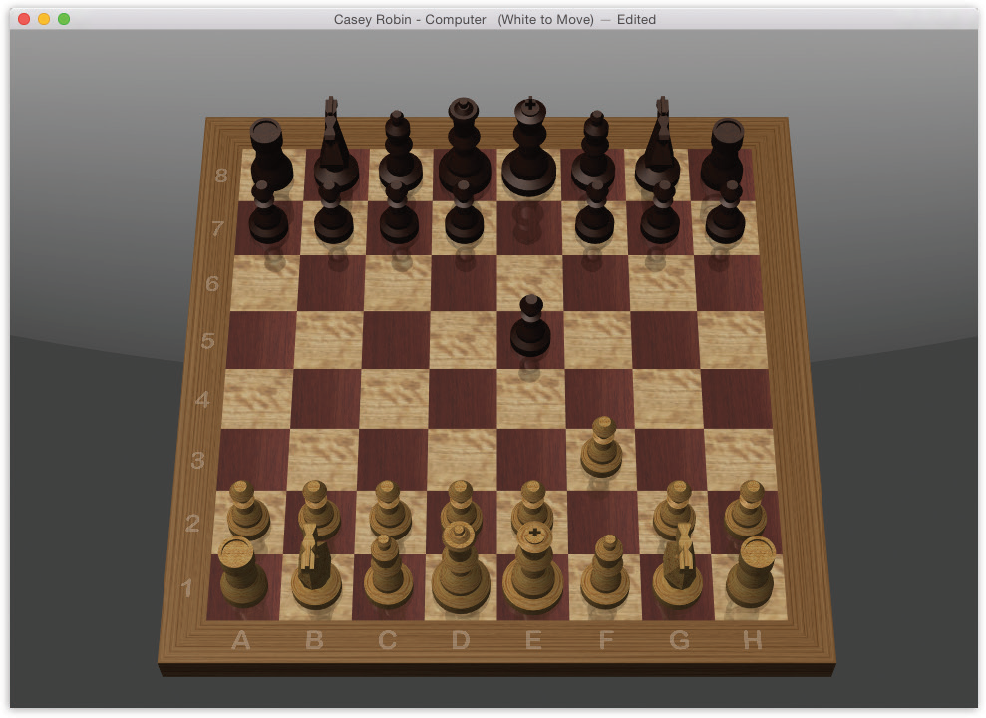
Figure 11-12. You don’t have to be terribly exact about grabbing the chess pieces when it’s time to make your move. Just click anywhere within a piece’s current square to drag it into a new position on the board (shown here in its Wood incarnation). And why is this chessboard rotated like this? Because you can grab a corner of the board and rotate it in 3D space. Cool!
Playing a Game of Chess
When you launch Chess, you’re presented with a fresh, new game that’s set up in Human vs. Computer mode—meaning that you, the Human (light-colored pieces) get to play against the Computer (your Mac, on the dark side). Drag the chess piece of your choice into position on the board, and the game is afoot.
If you choose Game → New, however, you’re offered a pop-up menu with choices like Human vs. Computer, Human vs. Human, and so on. If you switch the pop-up menu to Computer vs. Human, then you and your Mac trade places; the Mac takes the white side of the board and opens the game with the first move, and you play the black side.
Tip
The same New Game dialog box also has a pop-up menu called Variant, which offers three other chess-like games: Crazyhouse, Suicide, and Losers.
On some night when the bowling alley is closed and you’re desperate for entertainment, you might also want to try the Computer vs. Computer option, which pits your Mac against itself. Pour yourself a beer, open a bag of chips, and settle in to watch until someone—either the Mac or the Mac—gains victory.
Chess Prefs
Choose Chess → Preferences to find some useful controls like these:
Style. Apple has gone nuts with the computer-generated materials options in this program. You can choose all kinds of wacky materials for the look of your game board (Wood, Metal, Marble, or Grass) and for your playing pieces (Wood, Metal, Marble, or Fur).
Computer Plays. Use this slider to determine how frustrated you want to get when trying to win at Chess. The farther you drag the slider toward the Stronger side, the more calculations the computer runs before making its next move—and, thus, the harder it gets for you to outthink it. At the Faster setting, Chess won’t spend more than five seconds ruminating over possible moves. Drag the slider all the way to the right, however, and the program may analyze each move for as long as 10 fun-filled hours. This hardest setting, of course, makes it all but impossible to win a game (which may stretch on for a week or more anyway).
Speech. The two checkboxes here let you play Chess using the Mac’s built-in voice-recognition features, telling your chess pieces where to go instead of dragging them, and listening to the Mac tell you which moves it’s making. See “Speech”.
Tip
If your Chess-playing skills are less than optimal, the Moves menu will become your fast friend. The three commands there undo your last move (great for recovering from a blunder), suggest a move when you’re stuck, and display a previous move (in case you failed to notice what the computer just did).
Studying Your Games
You can choose Game → Save to save any game in progress, so you can resume it later.
To analyze the moves making up a game, use the Moves → Game Log command, which displays the history of your game, move by move. A typical move would be recorded as “Nb8 – c6,” meaning the knight on the b8 square moved to the c6 square. With a Chess list document, you could recreate an entire game, move by move.
Contacts
Here’s the old Address Book program, now renamed so that it matches the iPhone and iPad versions. See “More Anti-Spam Tips” for details.
Dashboard
Dashboard, described in Chapter 5, is a true-blue, double-clickable application. As a result, you can remove its icon from your Dock, if you like.
Dictionary
For word nerds everywhere, the Dictionary is a blessing—a handy way to look up word definitions, pronunciations, and synonyms (Figure 11-13). To be precise, macOS comes with electronic versions of multiple reference works in one.
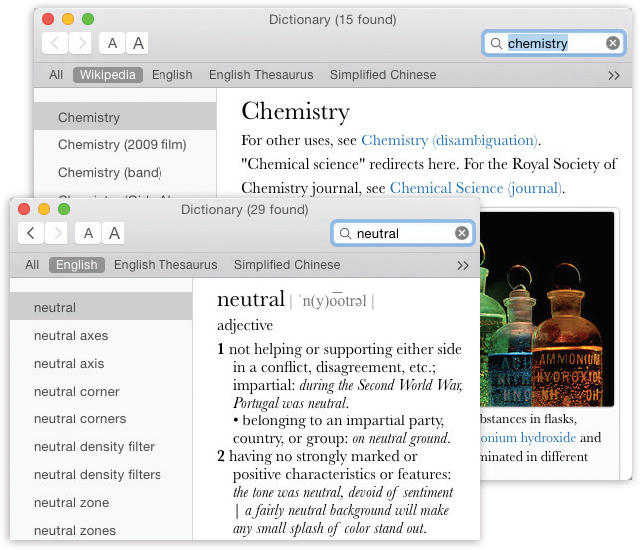
Figure 11-13. When you open the Dictionary, it generally assumes you want a word’s definition (lower left). If you prefer to see the Wikipedia entry (top right) at startup time instead, for example, choose Dictionary → Preferences—and drag Wikipedia upward so that it precedes New Oxford American Dictionary. That’s all there is to it!
The entire New Oxford American Dictionary. The third edition, actually. You’ll note that its entries give you more examples, background, and tables that help to differentiate fine shades of meaning (look up weak for an example).
The complete Oxford American Writer’s Thesaurus.
Two venerable guides to British English: the Oxford Dictionary of English and Oxford Thesaurus of English.
A dictionary of Apple terms, from “access control lists” to “Yosemite.”
Wikipedia. This famous citizen-created encyclopedia isn’t actually on your Mac. Dictionary just gives you an easy way to search the online version, and display the results right in the comfy Dictionary window.
Foreign language dictionaries: You also get Japanese, French, Spanish, German, Dutch, Korean, Italian, Chinese, Hindi, Norwegian, Swedish, Portuguese, Russian, Turkish, Thai, Hebrew, and Danish—plus English translation dictionaries for Arabic, Hindi, French, German, Dutch, Italian, Portuguese, Spanish, Russian, Japanese, Korean, and Chinese.
Note
You don’t ordinarily see these reference books. You have to turn them on in Dictionary → Preferences.
MacOS also comes with about a million ways to look up a word:
Search it in Spotlight. Press
-space, type the word you want into the Spotlight search box, and marvel as the dictionary entry appears at the bottom of the results list. To read the definition, click it once.If you have a trackpad, point to a word in a basic Mac program, and then double-touch the trackpad (don’t actually click) with three fingers. That’s the gesture for the same dictionary panel already described. (It doesn’t work unless you’ve turned it on in System Preferences → Trackpad.)
Double-click the Dictionary icon. You get the window shown at bottom in Figure 11-13. As you type into the Spotlight-y search box, you home in on matching words; click a word, or highlight it and press Return, to view a full, typographically elegant definition, complete with sample sentence and pronunciation guide.
Tip
And if you don’t recognize a word in the definition, click that word to look up its definition. (Each word turns blue and underlined when you point to it, as a reminder.) You can then click again in that definition—and on and on and on.
(You can use the
and buttons on the toolbar, or the -[ and -] keystrokes to go back and forward in your chain of lookups. Hold down the for a pop-up menu of recent lookups.)It’s worth exploring the Dictionary → Preferences dialog box, by the way. There you can choose U.S. or British pronunciations and adjust the font size.
Press
 . Yes, the Dictionary is one of the widgets in the Dashboard (“Dashboard”).
Right-click or two-finger click a highlighted word in a Cocoa program. From the shortcut menu, choose Look Up [word]. You get a panel that pops out of the highlighted word, showing the Dictionary page for that word.
Use the dict:// prefix in Safari. This might sound a little odd, but it’s actually ultra-convenient, because it puts the dictionary right where you’re most likely to need it: on the web.
Turns out that you can look up a word (for example, preposterous) by typing dict://preposterous into the address bar. When you hit Return, Dictionary opens automatically and presents the search results from all its resources (dictionary, thesaurus, Apple terms, and Wikipedia).
Point to a word in a basic Mac program, and then press Control-
-D. That keystroke makes the definition panel sprout right from the word you were pointing to. (The advantage here, of course, is that you don’t have to highlight the word first.) “Basic Mac program,” in this case, means one of the Apple standards: Mail, Stickies, Safari, TextEdit, Messages, and so on.
The front matter of the Oxford American Dictionary (the reference section at the beginning) is here, too. It includes some delicious writers’ tools, including guides to spelling, grammar, capitalization, punctuation, chemical elements, and clichés, along with the full text of the Declaration of Independence and the U.S. Constitution. Just choose Go → Front/Back Matter—and marvel that your Mac comes with a built-in college English course.
Tip
Got a big screen or poor eyesight? Then bump up the type size. Dictionary’s toolbar has bigger/smaller buttons, and there’s a Font Size pop-up menu in the Preferences window.
DVD Player
If you’re one of the few, the proud, who own a DVD drive, you can play back DVD movies using macOS’s aging but perfectly functional DVD Player app.
FaceTime
If you have a Mac laptop or an iMac, then it’s got a built-in microphone and camera. And that means it’s equipped to make free, very high-quality audio and video calls to other Apple computers, phones, and tablets (Figure 11-14). In macOS Mojave 10.14.1 and later, in fact, it can make group video calls, with as many as 32 people on the screen at once.
There’s very little delay, and it works the first time and every time. Now Grandma can see the baby, or you can help someone shop from afar, or you can supervise brain surgery from thousands of miles away (medical training recommended).
From your Mac, you’ll probably make FaceTime calls over a Wi-Fi network. But your callees, using iPhones or cellular iPads, can even conduct video chats over the cellular airwaves, when they’re out and about.

Figure 11-14. Yes, Messages also offers video calls—but FaceTime doesn’t need as fast an internet connection. You’ll often be able to make FaceTime video calls in situations when Messages gives up.
Placing a Call
The FaceTime experience often begins with a more old-fashioned communication—a phone call or a text message, for example. (“Want to FaceTime now?”)
In any case, FaceTime couldn’t be easier to fire up—in many different ways:
From Contacts. If you’re in the Contacts app, and you’ve recorded the iPhone number or Apple ID of someone in your Mac’s Contacts program, you’ll see the
 button next to that person’s name. Click it to place a video call. Or, to place an audio call, click
  , and then click FaceTime Audio.
From the FaceTime app. This app presents a list of your recent FaceTime calls (Figure 11-14, top left). Click the
button next to a name to place a video call. For an audio call, click next to the person’s name.From Messages. If you’re chatting away with somebody by text and you realize that typing is no longer appropriate for the conversation, then click Details at the top of the screen. Click
(for a video call) or and then FaceTime (for a FaceTime audio call).
Tip
If you right-click or two-finger click FaceTime’s Dock icon, you get a handy pop-up menu of Recent Calls. In other words, if you keep FaceTime in your Dock, you can place a new call to somebody on the spur of the moment, whatever you’re doing, without having to open FaceTime first.
At this point, the other guy receives an audio and video message inviting him to a chat. If he clicks Accept, then you’re on. You’re on each other’s screens, seeing and hearing each other in real time. (You appear on your own screen, too, in a little inset window. It’s spinach-in-your-teeth protection.)
Once the chat has begun, here’s some of the fun you can have:
Resize the window. Drag any window edge, or choose Window → Zoom.
Go Full Screen. Click the
 button (or the green
  button) (or the Full Screen button on your Touch Bar, if you have one [“The Complicated Story of the Function Keys”]) to make the window fill your entire screen. Click it again to restore the window.
Move the inset. You can drag the little picture-in-picture window showing you to a different corner of the video window, if you like.
Rotate the screen. FaceTime works in either portrait (upright) or landscape (widescreen) view. Turn Video → Use Landscape on or off to choose, or click the curved arrow in the inset that shows your face. (If you’re calling someone using an iPhone or iPad, your Mac picture rotates automatically when your partner’s gadget rotates. You don’t have to turn the monitor 90 degrees.)
Mute the mike. Either choose Video → Mute, or click the
 button at the bottom of the video window. The video continues. This is handy when you have to make throat-clearing sounds or yell at your kid in the background.
Pause the call. You can also mute (black out) the video, for use when you have to perform small acts of personal grooming. To do that, click
 .
.
Tip
The call is also paused whenever you minimize FaceTime.
When you and your buddy have had quite enough, click ![]() to terminate the call. And marvel that you were alive to see the day.
to terminate the call. And marvel that you were alive to see the day.
Group FaceTime
Well, it took eight years. But FaceTime, at last, can connect more than two people at once in a video chat. In fact, it can connect up to 32 people simultaneously, creating a video party line—as long as everyone concerned has macOS Mojave 10.14.1 or later, or iOS 12.1 or later on an iPhone or iPad.
Note
A Group FaceTime call is incompatible with pre-Mojave or pre-12.1 FaceTime calls. For example, if you have macOS High Sierra, you can’t place a FaceTime call to someone who’s already in a group call.
Begin the call
Often, you’ll want to dive into a group video call from within Messages, where a group chat is already underway. To do that, click Details at the top of the screen. Click ![]() . (Or, for a straight-up audio conference call, hit Audio.)
. (Or, for a straight-up audio conference call, hit Audio.)
Each participant gets a special Group FaceTime message, complete with a Join button. Once you click it, that special button in Messages changes to show how long the call has been going.
Tip
If you’re in a group Messages session, that Join button remains yours to click for as long as the group FaceTime call is still going. In other words, you don’t have to hop on instantly.
Or you can start in the FaceTime app. Click the + at top right; in the To box, specify the names of the participants. Then click Audio or Video. The other peoples’ phones start ringing, and when they click Accept, the audio or video conference begins!
During the call
In regular FaceTime calls, the other guy’s image fills the screen. How are you supposed to conduct a call with dozens of people?
Each face occupies its own rectangle; the more people who join, the smaller the rectangles get (Figure 11-15).

Figure 11-15. On a group FaceTime call, your icon always appears at lower right. The small icons at left, from left to right, mean: Hide/show call list; Mute microphone; Hang up; “Mute” camera; and Full screen.
When someone is talking, FaceTime brings that person’s rectangle front and center (and makes it bigger) automatically. In a lively conversation, therefore, the four main boxes seem to be constantly inflating and deflating to reflect who’s talking.
But even if someone’s not speaking, you can bring him to the front on demand, with either of two degrees of prominence:
Click his box once. It comes to the front, gets slightly larger, and reveals his name or iCloud ID.
Double-click his box. Now it gets much bigger, shamelessly covering up everyone else’s boxes. This is for when you really want to focus on this one person. (Click again to enshrink the box again.)
Tip
If you’ve clicked once, you can click the little ![]() icon to zoom that slightly enlarged box into the fully enlarged version.
icon to zoom that slightly enlarged box into the fully enlarged version.
The Roster
The FaceTime app can’t display big rectangles for more than four people at once. Starting with the fifth joiner, a horizontally scrolling row of faces joins yours at the bottom of the screen—Apple calls it the Roster. But the idea is the same: If one of them speaks, her box jumps into one of the larger four spots on the screen. And even if she’s not speaking, you can click or double-click her square to give it one of the two zoom treatments described already.
Coming and going
If someone’s inviting you to a group call, a notification lets you know. You’ll see an option called Join or ![]() , depending on what you’re doing on the Mac. Or, if you’re in Messages in a group chat, you’ll see a Join button.
, depending on what you’re doing on the Mac. Or, if you’re in Messages in a group chat, you’ll see a Join button.
If you’d like to add someone to a call that’s underway, click the screen, click ![]() , and click Add Person.
, and click Add Person.
If someone drops off the call (by clicking ![]() ), everyone else stays on the call, just as with a traditional conference phone call.
), everyone else stays on the call, just as with a traditional conference phone call.
FaceTime Audio Calls
Video calling is neat and all, but be honest: Don’t you find yourself making regular phone calls more often? Video calling forces us to be “on,” neatly dressed and well behaved, because we’re on camera. Most of the time, we’re perfectly happy (in fact, happier) with audio only.
To place an audio call, you start out exactly as you would when making a video call, as described earlier: in the FaceTime app, Contacts, or Messages. Click ![]() , and then click FaceTime Audio (as opposed to whatever phone numbers are listed there).
, and then click FaceTime Audio (as opposed to whatever phone numbers are listed there).
When you place an audio FaceTime call, the other person’s phone, tablet, or Mac rings. If she accepts your call, it’s better than being on a phone call in two ways. First, you don’t have the usual lag time that throws off your comic timing. And, second, the audio quality is amazing—more like FM radio than cellular. It sounds like the other person is right next to your head; you hear every breath, sniff, and sweater rustle.
Receiving Calls
Life is even simpler when somebody calls you. A notification bubble appears on your screen, and you hear an incoming-call sound. (Which ringtone? That’s up to you; in the FaceTime app, choose FaceTime → Preferences → Settings. Use the Ringtone pop-up menu.) If iTunes is playing music, it pauses automatically. Sweet.
If the Mac is asleep, it wakes; you can even answer the call on the Lock screen, without having to enter your password.
Click Accept to start the call, or Decline if now is not the time. (In that case, the caller will be told you’re not available.)
FaceTime doesn’t have to be running for you to receive a call. That’s generally a cool feature—but if you really don’t want to be interrupted, you can hang up a digital “Do Not Disturb” sign in any of these ways:
In FaceTime, choose FaceTime → Turn FaceTime Off.
Use the Do Not Disturb feature (“Insta-Respond to Bubbles”).
Sign out of FaceTime. (Choose FaceTime → Preferences → Settings, and then click Sign Out.)
Font Book
For details on this font-management program, see Chapter 14.
GarageBand
GarageBand, Apple’s do-it-yourself music construction kit, isn’t actually part of macOS. If you have a copy, that’s because it’s part of the iLife suite that comes on every new Mac (along with iMovie and Photos).
Home
HomeKit is Apple’s home-automation standard. The Home app lets you control any product whose box says “Works with HomeKit”—all those “smart” or “connected” door locks, security cameras, power outlets, thermostats, doorbells, lightbulbs, leak/freeze/temperature/humidity/air-quality sensors, and so on.
This app, new in macOS Mojave, is one of several that Apple has adapted from iOS to macOS. Among other limitations, this means you can’t actually set up any HomeKit gadgets in the Mac app. You still need an iPhone or iPad for that. The miracle of iCloud syncing brings the information onto the Mac (assuming that System Preferences → iCloud → Home is turned on).
Once you’ve installed a gadget, you can use this app (Figure 11-16) to:
Turn it on and off by clicking its icon on the Favorites tab. Handy for light bulbs and locks.
Tip
You can do that either in the Home app or by using Siri voice commands (“Lock the front door,” “Turn on the downstairs lights,” and so on).
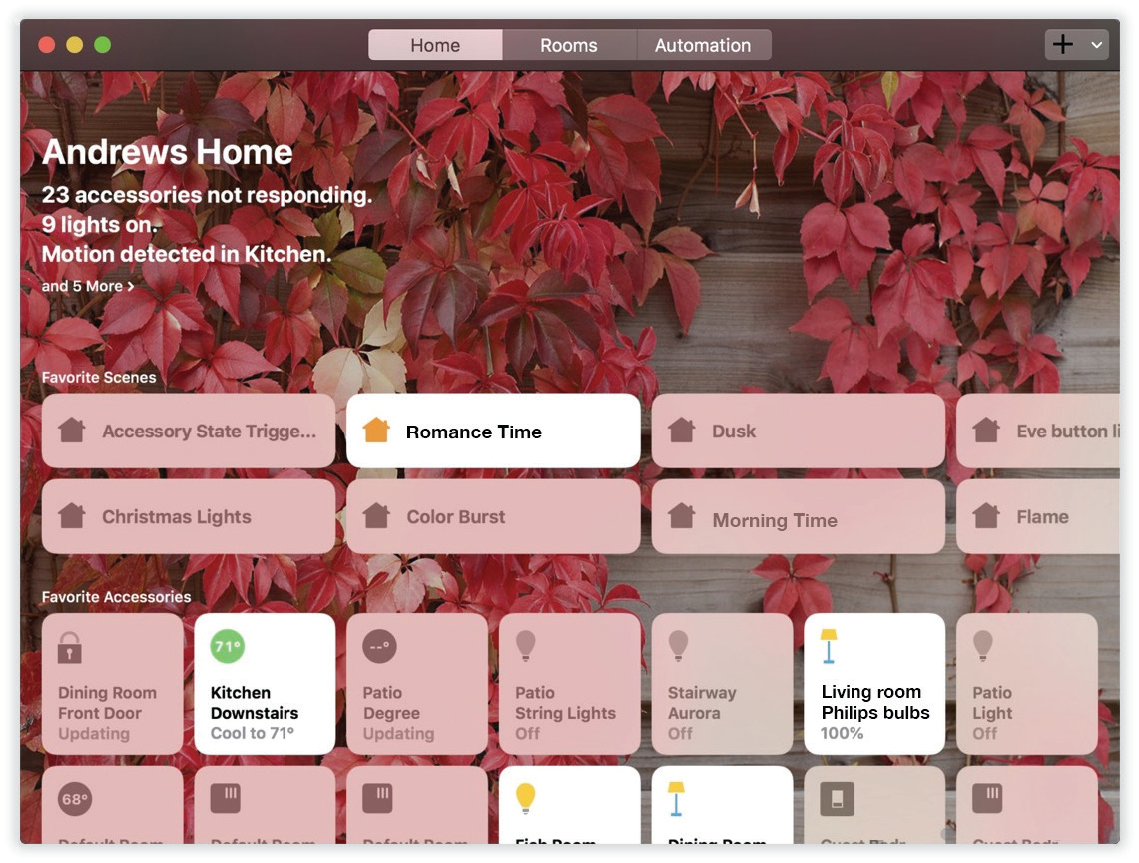
Figure 11-16. If your Home app looks like this, then you’ve invested a lot of money into HomeKit-compatible smart-home gadgets, you control freak.
Adjust its home-control settings, like the temperature for a thermostat. Double-click the gadget’s icon, or right-click it and choose Controls.
Adjust its gadget settings, like its name or which room it’s on. Right-click its icon and choose Settings.
This isn’t really a book about smart-home accessories, but here’s some of the fun you can have once you’ve bought a few (and then read the instructions at support.apple.com/en-us/HT204893):
Set up rooms. If you’ve got a lot of HomeKit accessories—you lucky duck—you may find it easier to keep track of them all by putting their icons on different screens, named for different rooms of your house. You’ll also be able to tell Siri, “Turn off the lights in the living room.”
To create or assign a room, double-click the gadget’s icon, click Settings at top right, click Room, and either choose a room from the list or hit Create New to establish a new one.
Tip
You can take this concept one step further by putting your rooms into zones, which are usually “upstairs” or “downstairs.” To get started: On the Rooms tab, choose Edit → Edit Room. At top left, click Rooms to see the complete list of rooms you’ve got so far. Click one, and then click Zone; choose a zone or hit Create New to make a new one. And voilà: Now you can say “Turn off the lights upstairs!”
Automate your gadgets. On the Automation tab, you can automate those actions based on the time or when you, or other people, arrive or depart.
Create a scene. A “scene” is a bunch of accessories that you switch on and off simultaneously. You might have one called “Goodnight” that turns off all the lights and locks the doors with a single Siri command. To create one, click +, and then Add Scene, and then Custom, and then Add Accessories. Once the scene is set up, click its icon on the Home tab to trigger it.
Control your home by remote control. It’s possible to set things up so that you can operate your gadgets from across the internet, when you’re not even there. This does, however, require that you also own an Apple home hub, which can take the form of a recent Apple TV, a HomePod speaker, or an iPad.
Automate the whole works. If you do, in fact, have a home hub, you can really smartify your home. You can set things up so that all the lights turn off when you leave the house, or that a certain scene happens at a certain time, or that the temperature goes up when your teenager gets home.
Yes, it can get really complicated. But imagine the magic once you get it all figured out!
Image Capture
This unsung little program was originally designed to download pictures from a camera and then process them automatically (turning them into a web page, scaling them to emailable size, and so on). Of course, after Image Capture’s birth, iPhoto (now called Photos) came along, generally blowing its predecessor out of the water.
Even so, Apple includes Image Capture with macOS for these reasons:
Image Capture is a smaller, faster app for downloading all or only some pictures from your camera (Figure 11-17). The Photos app can do that nowadays, but sometimes that’s like using a bulldozer to get out a splinter.
Image Capture can grab images from scanners (Figure 11-18), not just cameras.
Image Capture can download your sounds (like voice notes) from a digital still camera; Photos can’t.
You can open Image Capture in either of two ways: You can simply double-click its icon in your Applications folder, or you can set it up to open automatically whenever you connect a digital camera and turn it on. To set up that arrangement, open Image Capture manually. Using the “Connecting this camera opens:” pop-up menu, choose Image Capture.
Tip
Image Capture remembers your setting here separately for each camera. For example, you can set it up so that when you connect your fancy SLR camera, Aperture opens; when you connect your spouse’s pocket camera, Photos opens; and when you connect your iPhone, Image Capture opens, so you can quickly grab the best shots and email them directly.
Once Image Capture is open, it looks like Figure 11-17. When you connect your camera, cellphone, or scanner, its name appears in the left-side list. To begin, click it. After a moment, Image Capture displays all the photos on the camera’s card, in either list view or icon view (your choice).
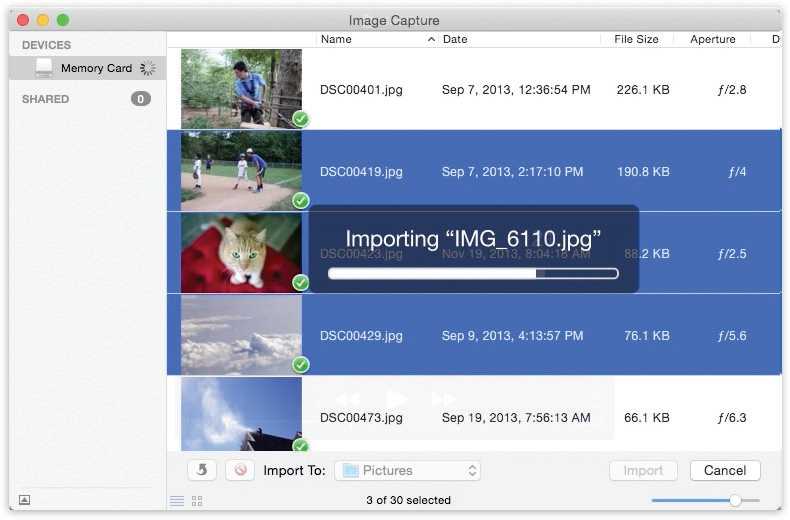
Figure 11-17. In many ways, Image Capture is like a mini Photos app; use the slider in the lower right to change the thumbnail sizes. You can choose the individual pictures you want to download, rotate selected shots (using the lower-left curved-arrow button), or delete shots from the camera.
Import To:
Use this pop-up menu to specify what happens to the imported pictures. Image Capture proposes putting photos, sounds, and movies from the camera into your Home folder’s Pictures folder. But you can specify any folder (choose Other from the pop-up menu).
Furthermore, there are some other very cool options here:
Photos. Neat that you can direct photos from your camera to Photos via Image Capture. Might come in handy when you didn’t expect to want to load photos into your permanent collection, but you change your mind when you actually look them over in Image Capture.
Preview opens the fresh pictures in Preview so you can get a better (and bigger) look at them.
Mail sends the pix directly into the Mac’s email program, which can be handy when the whole point of getting the photos off the camera is to send them to friends.
Build web page creates an actual web page of your downloaded shots. Against a dark-gray background, you get thumbnail images of the pictures in a web page document called index.html. Just click one of the small images to view it at full size, exactly as your website visitors will be able to do once this page is actually on the web. (Getting it online is up to you.)
Note
Image Capture puts the web page files in a Home folder → Pictures → Webpage on [today’s date and time] folder. It contains the graphics files incorporated into this HTML document; you can post the whole thing on your website, if you like.
Image Capture automatically opens up this page in your web browser, proud of its work.
Make PDF. When you choose this option, you wind up with what looks like a Preview window, showing thumbnails of your photos. If you choose Save right now, you’ll get a beautiful, full-color PDF of the selected photos, ready to print out and then, presumably, cut apart with scissors or a paper cutter. But if you use the Layout menu, you can choose different layouts for your photos: 3 × 5, 4 × 6, 8 × 10, and so on.
And what if a photo doesn’t precisely fit the proportions you’ve selected? The Crop commands in the Layout menu (for example, “Crop to 4 × 6”) center each photo within the specified shape and then trim the outer borders if necessary. The Fit commands, on the other hand, shrink the photo as necessary to fit into the specified dimensions, sometimes leaving white margins.
Note
The “crop” commands never touch the actual downloaded photos. The downloaded image files themselves retain their full sizes and resolutions.
Other. The beauty of the Image Capture system is that people can, in theory, write additional processing scripts. Once you’ve written or downloaded them, drop them into your System → Library → Image Capture → Automatic Tasks folder. Then enjoy their presence in the Import To pop-up menu.
Tip
You can set up Image Capture to download everything on the camera automatically when you connect it. No muss, no fuss, no options.
To do that, connect the camera. Click its name in the Devices list. Then, from the “Connecting this camera opens” pop-up menu, choose AutoImporter. From now on, Image Capture downloads all pictures on the camera each time it’s connected. When the downloading process is complete, a little green checkmark appears on the thumbnail of each imported photo.
Import Some, Import All
Clicking Import All, of course, begins the process of downloading the photos to the folder you’ve selected. A progress dialog box appears, showing you thumbnail images of each picture that flies down the wire.
If you prefer to import only some photos, then select them first. (In list view, you click and Shift-click to select a bunch of consecutive photos, and ![]() -click to add individual photos to the selection. In icon view, you can both
-click to add individual photos to the selection. In icon view, you can both ![]() -click and Shift-click to select individual photos.) Then click Import.
-click and Shift-click to select individual photos.) Then click Import.
Scanning
If you own a scanner, chances are good that you won’t be needing whatever special scanning software came with it. Instead, macOS gives you two programs that can operate any standard scanner: Image Capture and Preview. In fact, the controls are identical in both programs.
To scan in Image Capture, turn on your scanner and click its name in the left-side list. Put your photos or documents into the scanner.
Note
You can share a scanner on the network, if you like, by turning on Scanner Sharing in System Preferences → Sharing. That’s sort of a weird option, though, for two reasons. First, what do you gain by sitting somewhere else in the building? Do you really want to yell or call up to whomever’s sitting next to the scanner, “OK! Put in the next photo!”?
Second, don’t forget that anyone else on the network will be able to see whatever you’re scanning. Embarrassment may result. You’ve been warned.
Now you have a couple of decisions to make:
Separate and straighten? If you turn on “Detect separate items” in the Scan Size menu, then macOS will perform a nifty little stunt indeed: It will check to see if you’ve put multiple items onto the scanner glass, like several small photos, as shown in Figure 11-18. (It looks for rectangular images surrounded by empty white space, so if the photos are overlapping, this feature won’t work.)
If it finds multiple items, Image Capture automatically straightens them, compensating for haphazard placement on the glass, and then saves them as individual files.
Where to file? Use the “Scan to” pop-up menu to specify where you want the newly scanned image files to land—in the Pictures folder, for example. You have some other cool options beyond sticking the scans in a folder; for example, you can send the resulting images to Photos, Preview, or Mail.
Once you’ve put a document onto or into the scanner, click Scan. The scanner heaves to life. After a moment, you see on the screen what’s on the glass. It’s simultaneously been sent to the folder (or post-processing task) you requested using the “Scan to” pop-up menu.
More power to you
As you can see, Apple has tried to make basic scanning as simple as possible: one click. That idiotproof method gives you very few options.
If you click Show Details before you scan, though, you get a special panel on the right side of the window that’s filled with useful scanning controls (Figure 11-18).
Here are some of the most useful options:
Resolution. This is the number of tiny scanned dots per inch. 300 is about right for something you plan to print out; 75 is standard for graphics that will be viewed on the screen, like images on a web page.
Name. Here you can specify how you want each image file named when it lands on your hard drive. If it says Scan, then the files will be called Scan 1, Scan 2, and so on.
Format. Usually, the file format for scanned graphics is TIFF. That’s a very high-res format that’s ideal if you’re scanning precious photos for posterity. But if these images are bound for the web, you might want to choose JPEG instead; that’s the standard web format.
Image Correction. If you choose Manual from this pop-up menu, then, incredibly, you’ll be treated to a whole expando-panel of color-correction tools: brightness, tint, saturation, a histogram, and so on.
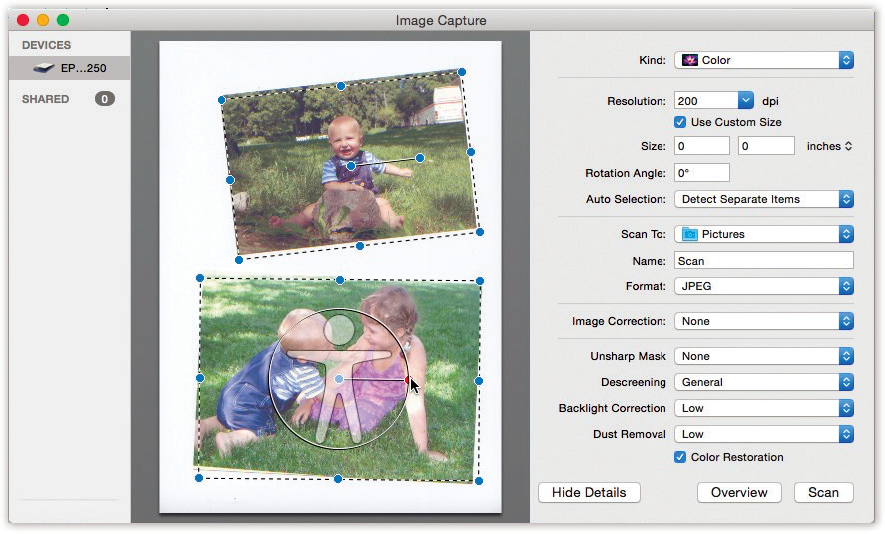
Figure 11-18. When you use the Show Details button, you get a new panel on the right, where you can specify all the tweaky details for the scan you’re about to make: resolution, size, and so on. See how the photos have dotted lines around them? That’s because Detect Separate Items is turned on. These will be scanned into two separate files.
Opening the Details panel has another handy benefit, too: It lets you scan only a portion of what’s on the scanner glass. Once you’ve put the document or photo into the scanner, click Overview. Image Capture does a quick pass and displays on the screen whatever is on the glass. You’ll see a dotted-line rectangle around the entire scanned image—unless you’ve turned on “Detect separate images,” in which case you see a dotted-line rectangle around each item on the glass.
You can adjust these dotted-line rectangles until you’ve enclosed precisely the portion of the image you want scanned. For example, drag the rectangles’ corner handles to resize them; drag inside the rectangles to move them; drag the right end of the line inside the rectangle to rotate it; preview the rotation by pressing Control and Option.
Finally, when you think you’ve got the selection rectangle(s) correctly positioned, click Scan to trigger the actual scan.
Note
These instructions apply to the most common kind of scanner—the flatbed scanner. If you have a scanner with a document feeder—a tray or slot that sucks in one paper document after another from a stack—the instructions are only slightly different.
You may, for example, see a Mode or Scan Mode pop-up menu; if so, choose Document Feeder. You’ll want to use the Show Details option. You may also be offered a Duplex command (meaning “Scan both sides of the paper”—not all scanners can do this).
iMovie
Apple’s video-editing program is big enough and complex enough that it gets a book all its own: iMovie: The Missing Manual, of course.
iPhoto
Well, this is awkward.
For years, iPhoto was the photo organizing/editing program that came free with every Mac. But in 2015, Apple replaced it with a new program called Photos. So you might have iPhoto, you might have Photos, and you might have both.
Since iPhoto is going away, Photos is the app described in this book (“Exporting Shots and Movies”).
iTunes
iTunes is the ultimate software jukebox (Figure 11-19).
The first thing to understand is that iTunes is four apps in one. It’s designed to organize all the music, videos, podcasts, and audiobooks in four places: (1) on your Mac, (2) on your i-gadget, (3) in your $10-a-month Apple Music subscription, if you have one, and (4) in Apple’s traditional $1-a-song music store.
Apple loves to play with the design of this program; every couple of years, it gets another overhaul. The following pages describe version 12.9.
Note
In iTunes 12.7 and later, you can’t use iTunes anymore for syncing apps and ringtones with your iPhone or iPad. After years of listening to consumer complaints that iTunes has become too overloaded with functions, Apple felt this was one task it didn’t need to handle. Today you have to buy and organize apps and ringtones directly from your phone.
The icons at top left (![]() ,
, ![]() ,
, ![]() , and so on) affect what kind of file you’re viewing; the buttons at top center affect whether you’re looking on your computer or online.
, and so on) affect what kind of file you’re viewing; the buttons at top center affect whether you’re looking on your computer or online.
The playback and volume controls are at the top-left corner of iTunes. At the upper-right corner is a search box that lets you pluck one track out of a haystack.
The following pages take you through the many faces of iTunes, one by one.

Figure 11-19. iTunes can play music CDs; tune in to internet radio stations; load up your iPod, iPhone, or iPad; and play music files.
Your Stuff
The key to understanding iTunes’ layout is the pop-up menu at top left. It lists the kinds of files iTunes can manage: Music, Movies, TV Shows, Podcasts, and Audiobooks.
To see what files are on your Mac, choose one of these file types, and then click Library at top center.
Tip
You can also choose a file type using the View → Media Kind submenu—or just by pressing ![]() -1 for Music,
-1 for Music, ![]() -2 for Movies,
-2 for Movies, ![]() -3 for TV Shows, and so on.
-3 for TV Shows, and so on.
The list at left lets you view your files grouped in different ways. For example, if you’re viewing Music, you can see them sorted by Recently Added, Artists, Albums, Songs, Genres, or Videos.
You may see wildly different things in the main window, depending on which of those groupings you’ve chosen. For example, if you click Songs, you see a huge alphabetical list; if you click Albums, you see a square grid of album covers.
Four Ways to Fill Your Library
iTunes gives you at least four ways to get music and video onto your computer—ready for transferring to your devices, if you want:
Let iTunes find your files. The first time you open iTunes, it offers to search your Mac for music files and add them to its library.
Pay for Apple Music. For $10 a month, you can listen to, and download, all the music you want from Apple’s multimillion-song catalog.
Visit the iTunes Store. Another way to feed your library is to shop at the iTunes Store, buying songs to own them, as described starting in “iTunes Store”.
Import music from a CD. iTunes can also convert tracks from audio CDs into digital music files. Just start up iTunes and then stick a CD into your Mac’s CD drive, if you have one. The program asks if you want to convert the songs to audio files for iTunes. (If it doesn’t ask, then click the CD icon at the top of the window.)
The program downloads song titles and artist information from the CD and begins to add the songs to the iTunes library. (For more control over this process, choose iTunes → Preferences → General. Click “Import Settings” to see your options.
Playlists
A playlist is a list of songs you’ve placed into a set to play sequentially. For example, if you’re having a party, you can make a playlist from the current Top 40 and dance music in your library. Some people may question your taste if you, say, alternate tracks from La Bohème with Queen’s “A Night at the Opera,” but hey—it’s your playlist.
To create a playlist in iTunes, press ![]() -N or choose File → New → Playlist. A new playlist, called “Playlist,” appears in the lower-left list (“Music Playlists”), highlighted so you can rename it.
-N or choose File → New → Playlist. A new playlist, called “Playlist,” appears in the lower-left list (“Music Playlists”), highlighted so you can rename it.
Type a name for it: “Cardio Workout,” “Shoe-Shopping Tunes,” “Hits of the Highland Lute,” or whatever. Press Enter.
At this point, you’ve created a list, but there aren’t any songs in it yet. The easiest way to fix that is to click one of the Library headings at left (like Songs or Artists), and drag song or album names onto the name of your empty playlist.
Tip
Instead of making an empty playlist and then dragging songs into it, you can work the other way. You can scroll through a big list of songs, selecting tracks as you go by ![]() -clicking—and then, when you’re finished, choose File → New → Playlist from Selection. All the songs you selected immediately appear on a brand-new playlist.
-clicking—and then, when you’re finished, choose File → New → Playlist from Selection. All the songs you selected immediately appear on a brand-new playlist.
When you drag a song title onto a playlist, you’re not actually moving or copying the song. In essence, you’re creating an alias or shortcut of the original, which means you can have the same song on several different playlists.
iTunes even starts you out with some playlists of its own devising, like “Top 25 Most Played” and “Purchased” (a convenient place to find all your iTunes Store goodies listed in one place).
Smart playlists
Smart playlists constantly rebuild themselves according to criteria you specify. You might tell one to assemble 45 minutes’ worth of songs you’ve rated higher than four stars but rarely listen to, and another to list your most-often-played songs from the ’80s.
Tip
To rate a song, click the Songs heading at left; make the window wide enough that you can see the Rating column. (If you don’t see this column, right-click or two-finger click any column heading and choose Rating from the list of options.) Then just click the Rating column for a selected song. The appropriate number of stars appears—one, two, three, four, or five—depending on the position of your click. You can change a song’s rating as many times as you like—a good thing, considering the short shelf life of a pop hit these days.
To make a smart playlist, choose File → New Smart Playlist (Option-![]() -N). The dialog box shown in Figure 11-20 appears. The controls here are designed to set up a search of your music database. Figure 11-20, for example, illustrates how you’d find up to 74 minutes of Beatles tunes released between 1965 and 1968—that you’ve rated three stars or higher and that you’ve listened to no more than twice.
-N). The dialog box shown in Figure 11-20 appears. The controls here are designed to set up a search of your music database. Figure 11-20, for example, illustrates how you’d find up to 74 minutes of Beatles tunes released between 1965 and 1968—that you’ve rated three stars or higher and that you’ve listened to no more than twice.
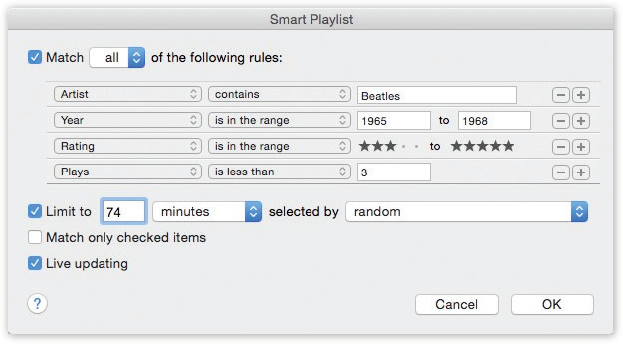
Figure 11-20. A smart playlist is a powerful search command for your iTunes database. You can set up certain criteria, like the hunt for particular Beatles tunes illustrated here. The “Live updating” checkbox makes iTunes keep this playlist updated as your collection changes, as you change your ratings, as your play count changes, and so on.
Editing and deleting playlists
A playlist is easy to change with just a little light mousework. Click the playlist’s name. If you click Open in New Window, a new playlist master window appears.
Now you can:
Change the order of songs in the playlist. Drag song titles up or down within the playlist window to reorder them.
Add new songs to the playlist. Tiptoe through your Music list and drag more songs or albums into the playlist list.
Delete songs from the playlist. If your playlist needs pruning, or that banjo tune just doesn’t fit in with the brass-band tracks, you can ditch it quickly: Click the song in the playlist window and then hit Delete or Backspace to get rid of it.
Deleting a song like this doesn’t delete it from your Mac—just from this playlist.
Delete the whole playlist. To delete an entire playlist, click its name in the list of playlists (far left) and then press Delete. Again, this zaps only the playlist itself, not all the songs you had in it. (Those are still in your Mac’s iTunes folder.)
Click ![]() to close the playlist window.
to close the playlist window.
Apple Music
The Apple Music service, which debuted in 2015, is a rich stew of components. For $10 a month (or $15 for a family of six), you get all of the following:
Unlimited streaming music. You can listen to any band, album, or song in the Apple Music library of 30 million songs—on demand, no ads. It’s not like listening to a radio station, where someone else is programming the music; you program the music.
On the other hand, this is not like Apple’s traditional music store, where you pay $1 per download and you own the song. If you ever stop paying Apple the $10 a month, the music stops. You’re left with nothing.
If you do subscribe, you can tell Siri things like, “Play the top songs of 2005” or “Play some good running music” or “Play some Taylor Swift.”
Nor are you obligated to do all your music programming manually. Apple Music comes equipped with ready-made playlists, prepared by human editors, in all kinds of categories. There are sets of starter songs by various singers (“Intro to Sarah McLachlan”), playlists by genre and era, and playlists for specific activities like Waking Up, Running, Getting It On, and even Breaking Up.
You can freely mix the songs you’re renting with the music you actually own. You can even download songs you don’t own for playback when you have no internet connection (as long as you’re still paying your $10 a month).
Beats 1 Radio. Apple has a “global, 24-hour internet radio station” called Beats 1. (It actually broadcasts live for only 12 hours a day and then repeats.) Listening is free, even to nonpayers.
Live DJs introduce songs and comment on the singers, just as on FM radio stations. Of course, you have no input on the style of music you hear on Beats 1, and you can’t pause, rewind, fast-forward, or save anything you hear for later listening. It’s old-style radio, offering the magic of serendipity.
iTunes Match. iTunes Match, which dates back to 2011, is a cloud-based version of your iTunes library, available to any of your Apple devices. You can stream Apple’s copies of any song files you actually own—ripped from CDs or even acquired illegally. The advantages: First, you save a lot of space on your phone. Second, you can play them on any Apple gadget you own. Third, the versions Apple plays are often of higher quality than your originals.
iTunes Match continues as a separate service for non–Apple Music subscribers (the song limit is now 100,000 songs), for $25 a year. But if you do subscribe to Apple Music, in effect you get iTunes Match automatically.
Now: Two of iTunes’ top-of-window buttons are useful only to Apple Music subscribers: For You (Apple’s automated recommendations for new music you might like) and Browse (meander through Apple’s 30 million tracks, playing them at will).
If you’re not a subscriber, those two buttons are just taking up space. Fortunately, you can hide them: Choose iTunes → Preferences → General, and turn off Show Apple Music Features.
At this point, iTunes’ top-of-window buttons change to say Library, Connect, Radio (“Audiobooks”), and Store. You’re no longer compelled to look at the two tabs reserved for paying customers.
iTunes Store
The iTunes software’s third purpose is to be the face of Apple’s original online music store, the iTunes Store. It’s not like Apple Music, where you’re only renting your music. Here you pay per song (or per movie or TV show), and you can play it as many times as you like, for as long as Apple is in business.
To shop, click Store (the final button in the top-of-screen row of buttons). Now you can buy and download whatever file type you choose from the top-left pop-up menu: Music, Movies, TV Shows, Podcasts, Audiobooks, and so on. This material goes straight into your iTunes library, just a sync away from your i-devices.
Tip
iTunes doesn’t have a monopoly on music sales. Amazon, Google, Napster, and other services sell songs in MP3 format, meaning no copy protection (and Apple compatibility). eMusic.com has great MP3 prices, but the music comes from lesser-known bands. And Amazon’s MP3 Downloader software can whip your purchases right into iTunes.
Music
Here it is, the store that made Apple a powerhouse in the music industry: the Music store. Here are millions of songs, individually downloadable, all without copy protection, for 79 cents, $1, or $1.29, depending on popularity.
There are all kinds of ways to slice, dice, and search this catalog. On the right side of the screen, there’s a Genres pop-up menu that sorts the offerings by music type. Use the search box (top right) to find a song by name, album name, band, composer, and so on.
The various buttons on the front page of the Music store represent music Apple thinks you might like: new releases, big hits, and so on.
Learning these tools for finding songs is handy, because the same tools are available for finding TV shows, movies, podcasts, audiobooks, and so on.
TV, movies, and movie rentals
The iTunes store also offers a vast selection of downloadable TV episodes ($2 apiece, no ads) and movies (buy for $10 to $20, or rent for $3 to $5).
Once you rent a movie, you have 30 days to start watching—and once you start, you have 48 hours to finish before it turns back into a pumpkin (it deletes itself from your computer or phone).
If you download a rental movie to your iPhone, you can’t move it to any other gadget. But if you download it to iTunes, you can move it from Mac to iPad, or whatever, although it can exist on only one machine at a time.
Podcasts
Not everything in the iTunes Store costs money. There are plenty of free audio and video podcasts in the Podcasts area of the store.
Note
The Podcasts category now includes iTunes U recordings: hundreds of thousands of downloadable college courses, all of them free and many of them amazing, for your personal-growth pleasure. Watch the videos of the professors, follow along with the reading materials. You won’t actually earn a college degree this way, but you will attain a degree of enlightenment.
Audiobooks
Some people like to curl up with—or listen to—a good book, and Apple has plenty to offer, both as ebooks (which you buy and read in the Books app) and as audiobooks (which you listen to as you work in the garden or commute to work).
If iTunes doesn’t offer the audiobook you’re interested in, you can find a larger collection (over 50,000 of them) at Audible.com. This web store sells all kinds of audiobooks, plus recorded periodicals like The New York Times and radio shows. To purchase Audible’s wares, you have to have either an Audible account or an Amazon account.
The files land in iTunes automatically when you buy them.
Internet Radio
When Apple says “radio,” it could mean a couple of things.
It could mean the live, hosted Beats 1 radio station that debuted as part of Apple Music but is free to all. (To listen, open the Music Store and click Beats 1 Radio in the panel at right.)
Note
Until early 2016, it could also have meant the free feature called iTunes Radio: custom radio stations, based on songs or singers you like, delivered to you with full pause/skip capabilities and the occasional ad. Sadly, this feature has been discontinued.
Authorizing Computers
All movies and TV shows, and some old music files, are still copy protected. When you create an account in iTunes, you automatically authorize that computer to play copy-protected songs from the iTunes Store.
You can copy those songs and videos onto a maximum of four other computers. To authorize each one to play music from your account, choose Account → Authorizations → Authorize This Computer. (Don’t worry—you have to do this just once per machine.) It’s Apple’s way of making sure you don’t go playing those music tracks on more than five computers, which would greatly displease the music studios.
When you’ve maxed out your limit and can’t authorize any more computers, you may need to deauthorize one. On the computer you wish to demote, choose Account → Authorizations → Deauthorize This Computer.
Syncing an iPad or iPhone
Another function of iTunes is to load up, and back up, your iPhone, iPad, or iPod Touch. You can connect it to your computer either wirelessly—over Wi-Fi—or with the white USB cable that came with it. (To save precious swaths of forest trees, the rest of this chapter refers to “iPhone” when it means “iPhone, iPad, or iPod Touch.”)
Once the phone is connected, click the ![]() near the top-left corner of the iTunes screen. Now you can look over the iPhone’s contents or sync it (read on).
near the top-left corner of the iTunes screen. Now you can look over the iPhone’s contents or sync it (read on).
Note
If you have more than one i-device, and they’re all connected, this button is a pop-up menu. Choose the name of the one you want to manipulate.
Connecting the phone with a cable
Pretty simple: Plug one end of the white cable (supplied with your iPhone) into your computer’s USB jack. Connect the other end to the phone. If the phone is turned on and awake, then it’s officially connected.
Connecting over Wi-Fi
The familiar white USB cable is all well and good—but the iPhone is a wireless device, for Pete’s sake. Why not sync it to your computer wirelessly?
The phone can be charging in its bedside alarm clock dock, happily and automatically syncing with your laptop somewhere else in the house. It transfers all the same stuff to and from your computer—apps, music, books, contacts, calendars, movies, photos, ringtones—but through the air instead of via your USB cable.
Your computer has to be turned on and running iTunes. The phone and the computer have to be on the same Wi-Fi network.
To set up wireless sync, connect the phone using the white USB cable, one last time. Ironic, but true. Now open iTunes and click ![]() at top left. On the Summary tab, scroll down; turn on “Sync with this iPhone over Wi-Fi.” Click Apply. You can now detach the phone.
at top left. On the Summary tab, scroll down; turn on “Sync with this iPhone over Wi-Fi.” Click Apply. You can now detach the phone.
From now on, whenever the phone is on the Wi-Fi network, it’s automatically connected to your computer, wirelessly. You don’t even have to think about it. (Well, OK—you have to think about leaving the computer turned on with iTunes open, which is something of a buzzkill.)
Just connecting it doesn’t necessarily mean syncing it, though; that’s a more data-intensive, battery-drainy process. Syncing happens in either of two ways:
Automatically. If the iPhone is plugged into power (like a speaker dock, an alarm-clock dock, or a wall outlet), and it’s on the same Wi-Fi network, then it syncs with the Mac all by itself.
Manually. You can also trigger a sync manually—and this time, the iPhone doesn’t have to be plugged into power. To do that, on the phone, open Settings → General → iTunes Wi-Fi Sync and click Sync Now. (You can also trigger a Wi-Fi sync from within iTunes—just click the Sync button. It says “Sync” only if, in fact, anything has changed since your last sync.)
Once your iPhone is connected to the computer and you’ve clicked its icon at the upper-left corner of iTunes, the left column of the iTunes window reveals two sets of word buttons.
The top set includes Summary, Music, Movies, TV Shows, Podcasts, Books, Photos, and Info. For the most part, these represent the categories of stuff you can sync to your device. They let you specify exactly what you want copied to it—which songs, which TV shows, which apps, and so on.
For example, on the Music tab, you can turn on either “Entire music library” or “Selected playlists, artists, albums, and genres” for copying to your phone.
Once you’ve made your selections, click the Summary tab and then click Apply. (The Apply button says Sync instead if you haven’t actually changed any settings.)
The bottom set is called On My Device. These buttons let you see what music, movies, and so on are already on your phone.
Playing with Playback
To play a song or video in iTunes, double-click it. Or click iTunes’ Play button (![]() ) or press the space bar. The Mac immediately begins to play the selected files or playlists.
) or press the space bar. The Mac immediately begins to play the selected files or playlists.
Tip
The central display at the top of the window shows not only the name of the song and the album, but also where you are in the song, as represented by the horizontal strip. Drag the handle, or click elsewhere in the strip, to jump around in the song.
As music plays, you can manipulate the music and the visuals of your Mac in all kinds of interesting ways. There are even playback controls on your Touch Bar, if you have one (“The Complicated Story of the Function Keys”). Some people don’t move from their Macs for months at a time.
Turning on the Visualizer
The Visualizer is an onscreen light show that pulses, beats, and dances in sync to the music. (For real party fun, invite some people who grew up in the ’60s to your house to watch.)
To summon this psychedelic display, choose View → Visualizer → Show Visualizer, or just press ![]() -T.
-T.
iTunes now offers two options in this submenu, the iTunes Visualizer and iTunes Classic Visualizer. Check out the latter for that special early-aughts-style trippiness. The show begins immediately—although it’s much more fun if you choose View → Enter Full Screen (Control-![]() -F) so the show takes over your whole monitor. True, you won’t get a lot of work done, but when it comes to stress relief, Visualizer is a lot cheaper than a hot tub.
-F) so the show takes over your whole monitor. True, you won’t get a lot of work done, but when it comes to stress relief, Visualizer is a lot cheaper than a hot tub.
Keyboard control
You can control iTunes’ music playback using its menus, of course, but the keyboard can be far more efficient.
Here are a few of the control keystrokes worth noting:
| Function | Keystroke |
|---|---|
| Play, Pause | space bar |
| Next song/previous song | |
| Louder, quieter | |
| Rewind, fast-forward | Option- |
| Eject the CD | |
| Turn Visualizer on | |
| Turn Visualizer off | |
| Full Screen mode | Control- |
| Exit full-screen Visualizer |
Playing with the graphic equalizer
If you choose Window → Equalizer, you get a handsome control console that lets you adjust the strength of each musical frequency independently (Figure 11-21).
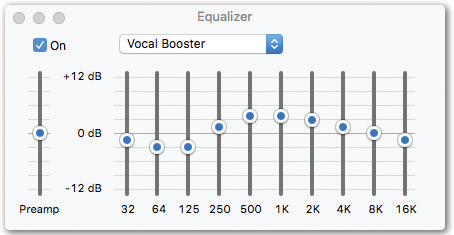
Figure 11-21. Drag the sliders (bass on the left, treble on the right) to accommodate the strengths and weaknesses of your speakers or headphones (and listening tastes). Or save yourself the trouble—use the pop-up menu above the sliders to choose a canned set of slider positions for Classical, Dance, Jazz, Latin, and so on. These settings even transfer to your i-gadgets.
Launchpad
See “Launchpad” for the full story about the program-opening home screen.
See Chapter 17 for the missing Mail manual.
Maps
When Apple brought its Maps app to the iPhone in 2012, the underlying databases had a lot of problems. They didn’t include nearly as many points of interest (buildings, stores, landmarks) as Google’s. Addresses were sometimes wrong. Satellite view showed bridges and roads melting into the sea. In a remarkable apology letter, Apple CEO Tim Cook recommended using one of Maps’ rivals.
But some of Maps’ features are pretty great—and now that Maps is a Mac app, too (Figure 11-22), there’s some handy synergy with the iPhone and iPad. You can look up an address on the Mac and then wirelessly shoot it over to the phone for navigation in the car, for example. Or simply walk over to your Mac; thanks to Handoff (“Handoff”), whatever map was on your phone is now on your Mac. And Maps’ smarts are wired into other macOS programs, like Calendar, Contacts, and Safari.
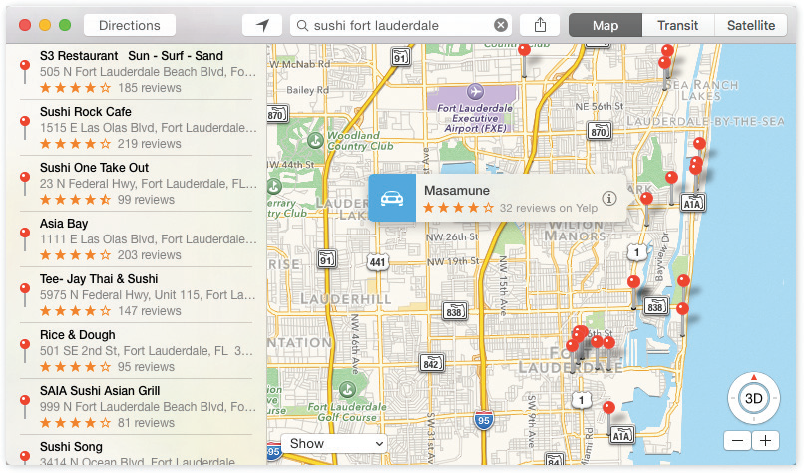
Figure 11-22. Maps lets you type in any address or point of interest and see it on a map, with turn-by-turn directions. It also gives you a national Yellow Pages and real-time traffic alerts. You have a choice of a street-map diagram or actual aerial photos, taken by satellite.
Meet Maps
When you open Maps, you see a blue dot that represents your current location. You can manipulate the map in all the usual ways:
Zoom in or out using the keyboard (press
-plus or -minus), the mouse (double-click to zoom in, add the Option key to zoom out—or just click the + or — buttons), or the trackpad (pinch two fingers to zoom out; spread them to zoom in).Scroll around the map using the keyboard (press the arrow keys), the mouse (drag), or the trackpad (swipe two fingers in any direction).
Rotate the map using the mouse (drag the small compass at lower right) or the trackpad (rotate two fingers). You can return the map to “north is up” by pressing
-, by clicking the compass, or by double-tapping two fingers on the trackpad.You can tilt into a 3D view, which makes it look more like you’re surveying the map at an angle instead of straight down. You can do that with the mouse (click the 3D button), keyboard (press
-0), or the trackpad (press Option and drag with two fingers).
At any time, you can click Satellite (top right) for stunning aerial photos. Using the Show pop-up menu at lower left, you can choose Show Labels to add street names to the aerial views. There’s no guarantee that the Satellite view provides a very recent photo—the Maps database incorporates photography taken at different times—but it’s still very cool.
Finding Yourself
Don’t worry if you scroll away and can’t find yourself on the map again. Click the ![]() at the top left. A blue dot shows your current location.
at the top left. A blue dot shows your current location.
Searching the Maps
You’re not always interested in finding out where you are; often, you know that much perfectly well. Instead, you want to see where something else is. Click in the search box and type what you’re seeking—or, if you spot what you want in the list of recently sought addresses, click it there. (If there’s already something in the box, then click ![]() to clear it out.) Here’s what Maps can find for you:
to clear it out.) Here’s what Maps can find for you:
An address. You can skip the periods (and usually the commas, too). And you can use abbreviations. Typing 710 w end ave ny ny will find 710 West End Avenue, New York, New York. (In any of these examples, you can type a zip code instead of a city and state.)
An intersection. Type 57th and lexington, ny ny. Maps will find the spot where East 57th Street crosses Lexington Avenue in New York City.
A city. Type chicago to see that city. You can zoom in from there.
A zip code or a neighborhood. Type 10012 or greenwich village.
A point of interest. Type washington monument or niagara falls.
A business type. Type drugstores in albany ny or hospitals in roanoke va. (Figure 11-22 shows this idea.)
Tip
Maps is far more useful now that Siri has come to the Mac. You can say things like, “Find pizza near me,” “What’s the quickest way to JFK Airport?” “Get transit directions to Brooklyn,” “Mail these directions to Casey,” or “Zoom in on the map.”
And if your Mac has a Touch Bar (“The Complicated Story of the Function Keys”), then you get one-click buttons for Food, Coffee, Banks, Hotels, Gas, and so on, glowing right at you.
When Maps finds a specific address, an animated, red-topped pushpin comes flying down onto its precise spot on the map. A bubble identifies the location by name. Click outside the bubble to hide it. Click the map pin to bring the bubble back. Click Directions for instant driving directions.
Tip
Or walking directions. Click Walk at the top of the Directions panel.
Click the ![]() bubble to open the Location page; read on.
bubble to open the Location page; read on.
The Details Screen
Once you’ve found something on the map—your current position, say, or something you’ve searched for—you can drop a pin there for future reference. Choose Edit → Drop Pin. A purple pushpin appears. (You can drag the pin to move it, if your aim wasn’t exact.)
Red pushpins represent addresses you’ve looked up. And the tiny icons represent restaurants, stores, and other establishments in Apple’s (actually Yelp’s) database.
All of these pushpins and nano-icons are clickable. You get little labels that identify them. And, if you click the label, you open a details screen (Figure 11-23).
Bookmarks, Recents, Contacts
Maps is also plugged into your Contacts list, which makes it especially easy to find a friend’s house (or just to see how ritzy his neighborhood is).
When you click into the empty search bar at the top of the screen, the Bookmarks/Recents/Contacts menu appears; it can save you a lot of typing.
The list displays Recents (locations you’ve looked up recently—on your Mac or your iOS gadgets); Favorites (locations you’ve bookmarked); and Contacts (people whose addresses you’ve looked up).
When you click an entry in any of these lists, Maps drops a red, animated pushpin onto the map to identify that address.
Finding Friends and Businesses
That pushpin business also comes into play when you use Maps as a glorified national Yellow Pages. If you type, for example, pharmacy 60609, then those red pushpins show you all the drugstores in that Chicago zip code. It’s a great way to find a gas station, a cash machine, or a hospital in a pinch. Click a pushpin to see the name of the corresponding business.
As usual, you can click the pin’s ![]() bubble to open a details screen. If you’ve searched for a friend, then you see the corresponding Contacts card. If you’ve searched for a business, then you get a screen containing its phone number, address, website, and so on; often, you get a beautiful page of Yelp information (photos, reviews, ratings).
bubble to open a details screen. If you’ve searched for a friend, then you see the corresponding Contacts card. If you’ve searched for a business, then you get a screen containing its phone number, address, website, and so on; often, you get a beautiful page of Yelp information (photos, reviews, ratings).
Remember that you can click a web address to open it or send the phone number to your phone to dial it. (“Hello, what time do you close today?”)
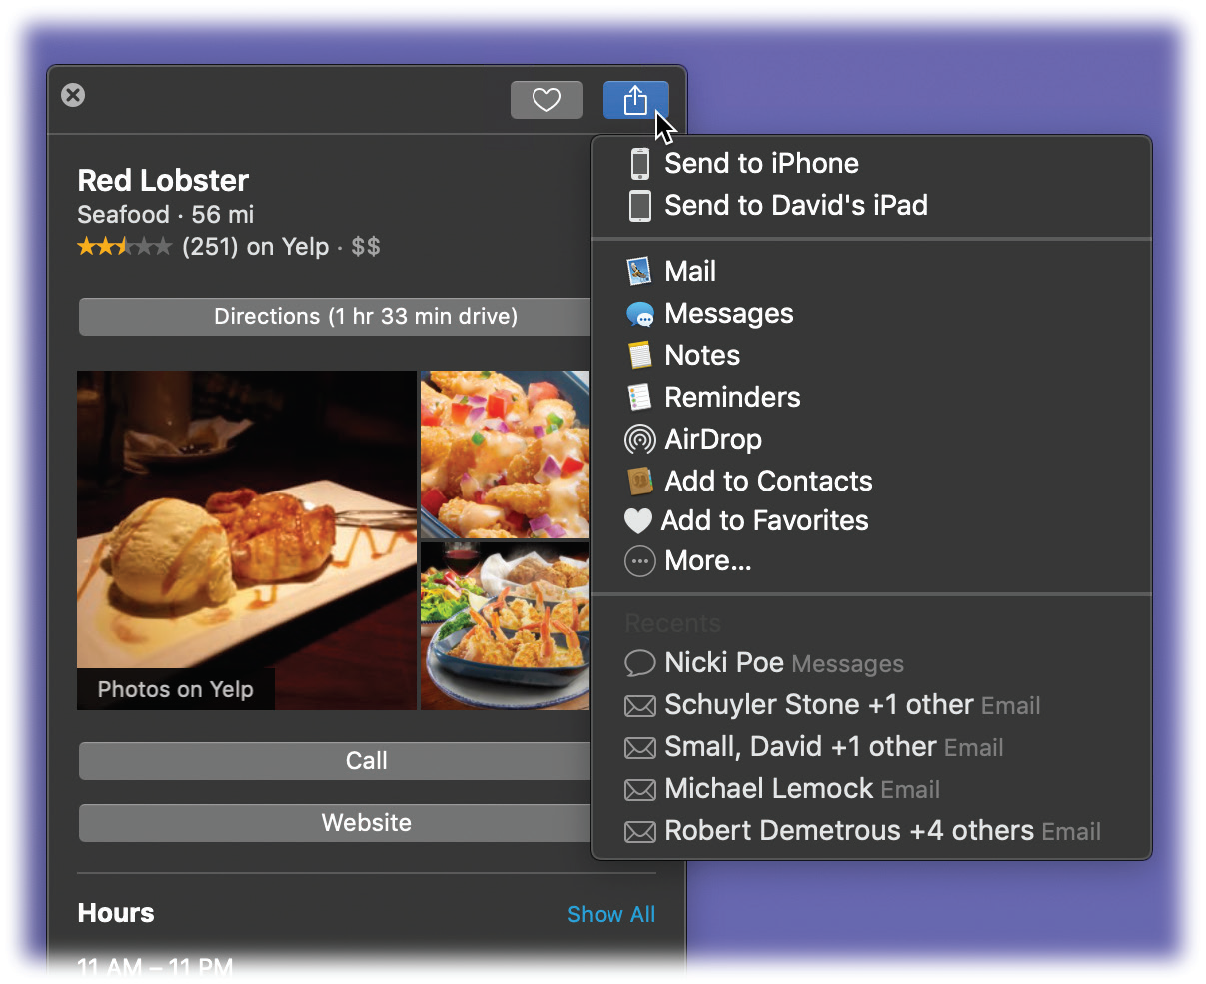
Figure 11-23. On the details screen that sprouts when you click a red pushpin, buttons let you bookmark the spot, get directions, or add the information to Contacts.
If the location is a restaurant or a business, you might get screens full of useful information: customer reviews, photos, hours of operation, delivery and reservation information, and so on.
Best of all, the  button lets you share this location with other people—via AirDrop, email, text message, and so on—or with your other Apple gadgets.
Directions
The Directions panel opens when you click the Directions button (top left of Maps), or when you click the Directions button on any location’s information panel.
The Directions panel offers two search bars: Start and End. Plug in two addresses—the Start address may already say “Current Location”—and let Maps guide you from the first to the second.
Tip
The ![]() button swaps the Start and End points. That’s a great way to find your way back after a trip.
button swaps the Start and End points. That’s a great way to find your way back after a trip.
When everything looks good, Maps displays an overview of the route you’re about to follow. In fact, it may propose several routes on the map, labeled with tags that show how long they’ll take: “1 hr 9 min,” “1 hr 15 min,” and “1 hr 28 min,” for example.
If you click one of these routes or tags, the top of the Directions panel lets you know the distance and estimated time for that option and identifies the main roads you’ll be on.
Now, nobody expects you to use your Mac as a portable GPS device. You’re not going to park it on your dashboard and have it tell you when to turn.
What you can do, though, is send your selected directions to an iPhone or an iPad and use that as your GPS. See Figure 11-23.
Or, if you’re just planning your trip, click any of the steps in the Directions panel; the map zooms in to that particular turn. Your route looks like it’s been drawn in with a highlighter.
Public Transportation
Once you’ve called up some directions, you can click Transit (just below the Start/End box) to see Maps’ suggestion of public-transportation methods to get there. Figure 11-24 shows the result.
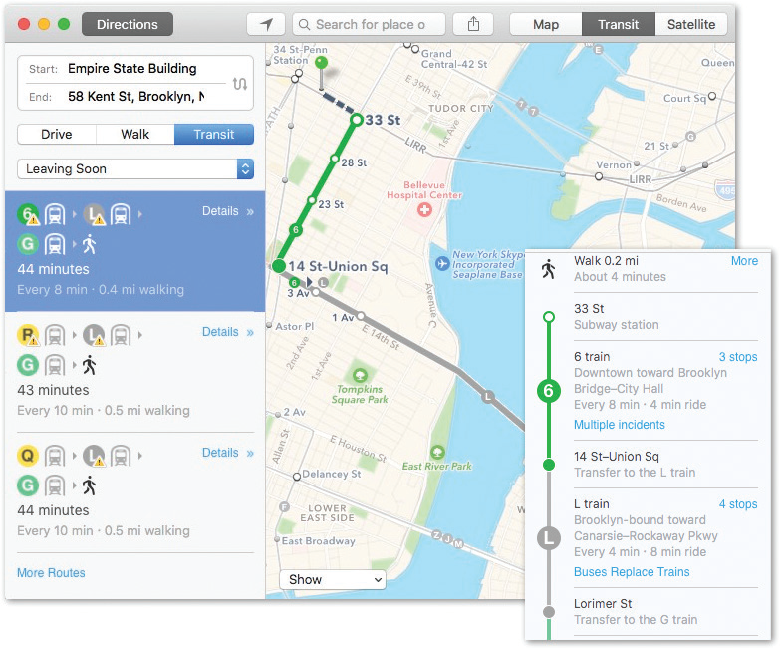
Figure 11-24. Maps knows the complete bus, train, and subway schedules for an ever-growing number of cities. In those cities, click Transit to see your options.
Left: Here Maps is suggesting three different ways to get there using public transit. (Use the Leaving Soon pop-up menu to specify when you plan to travel.)
If you click Details, you’re shown the specifics of each rail, bus, or walking segment (inset, right).
Note
The Transit feature of Maps is now available in dozens of locations worldwide. At this writing, they include, in the U.S., Alabama, Atlanta, Austin, Baltimore, Boston, Chicago, Cincinnati, Cleveland, Columbus, Dallas, Denver, Detroit, Honolulu, Houston, Kansas City, Los Angeles, Miami, Minneapolis, Nevada, New Orleans, New York, Philadelphia, Phoenix, Pittsburgh, Portland (Oregon), Sacramento, Salt Lake City, San Antonio, San Diego, San Francisco, Seattle, Tampa, and Washington, D.C.
Traffic
How’s this for a cool feature? Free, real-time traffic reporting. From the Show pop-up menu (bottom of the screen), choose Show Traffic. Now traffic jams appear on the relevant roads, for your stressing pleasure; orange dotted lines for slow traffic, and red ones for true stop-and-go nightmares.
If you don’t see any dotted lines, it’s either because traffic is moving fine or because Apple doesn’t have any information for those roads. Usually, you get traffic info only for highways, and only in metropolitan areas.
Tiny icons also appear, representing accidents, construction sites, closed roads, and general alerts. Click the icon to make a quick description tag appear (like “Accident, Park Ave at State St”); click that tag to read a full-screen account of what’s going on.
Flyover
You don’t need to be headed somewhere to use Flyover, the Maps app’s most dazzling feature; it has nothing to do with navigation, really. You can operate it even while you’re lying on your couch like a slug; see Figure 11-25.
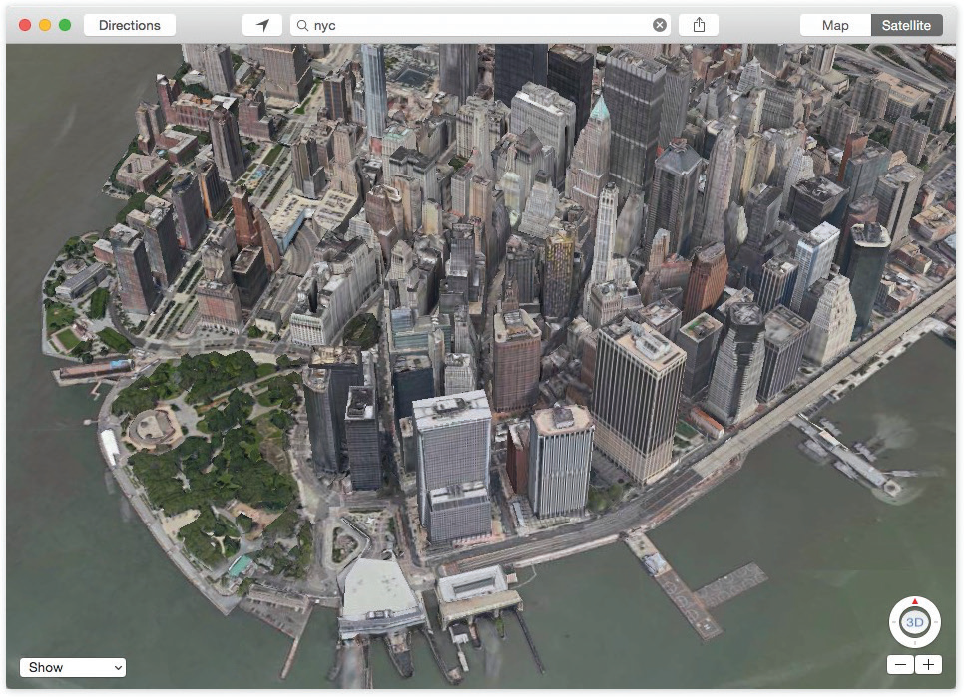
Figure 11-25. Flyover is a dynamic, interactive, photographic 3D model of 240 major cities. It looks something like an aerial video, except that you control the virtual camera. You can pan around these scenes, looking over and around buildings to see what’s behind them. To create this feature, Apple says, it spent two years filming cities from helicopters.
To engage Flyover, enter a city you’d like to tour, and then switch into Satellite view. Click the 3D logo in the lower-right corner.
Now you can go nuts, conducting your own virtual chopper tour of the city using the zooming and rotating tricks described earlier. Only a couple of things are different:
To move around the map, drag it—or use two fingers on the trackpad.
To change your camera angle relative to the ground, press Option as you use two fingers on the trackpad—or drag up or down on the compass at lower right.
To zoom in, spread two fingers on the trackpad—or click the + and — buttons.
It’s immersing, completely amazing, and very unlikely to make you airsick.
Flyover Tours
Apple wasn’t satisfied with letting you pan around virtual 3D city models using your finger. It’s also prepared to give you city tours in 3D.
Use the search box to enter the name of a big city or major landmark. (Some examples: San Francisco, New York, Tokyo, London, Paris, Rome, Madrid, Vancouver, San Jose, Cape Town, Stockholm. Or places like Yosemite National Park, the Sydney Opera House, Stonehenge, St. Peter’s Basilica, or the Brooklyn Bridge.)
When you hit Search, a new button appears on the map: “3D Flyover Tour.” (You can also find the button in the ![]() Info panel for a city or place.) When you hit Start, you’re in for a crazy treat: a fully automated video tour of that city or place. The San Francisco tour shows you the baseball park, the famous Transamerica Pyramid, the Alcatraz prison island, and so on. It’s slow, soothing, cool, and definitely something that paper maps never did.
Info panel for a city or place.) When you hit Start, you’re in for a crazy treat: a fully automated video tour of that city or place. The San Francisco tour shows you the baseball park, the famous Transamerica Pyramid, the Alcatraz prison island, and so on. It’s slow, soothing, cool, and definitely something that paper maps never did.
Messages
See Chapter 19 for details on Messages, the Mac’s instant-messaging/audio-chat/video-chat/text-messaging program.
Mission Control
Chapter 5 covers macOS’s window-management tool.
News
The News app, new in Mojave (and one of the four apps Apple brought over from iOS), does just what Apple promises: It “collects all the stories you want to read, from top news sources, based on topics you’re most interested in.”
Apple employs human editors to choose the stories in the Top Stories and Top Videos sections—rather than software robots. You see the same stories as everyone else here, no matter what your political leanings; in theory, this approach minimizes the triumph of propaganda and clickbait.
If you open the News app and see a bunch of news headlines right off the bat, well, sweet; you’re the beneficiary of iCloud syncing (“Data Synchronization”). News has inherited your taste in news from some other Apple gadget.
If this is the very first time you’ve ever opened News, though, click Continue on the welcome screen. You’re no longer directed to choose the topics or publications you want to follow. Instead, you’re hit right between the eyes with today’s headlines, beautifully laid out. It’s like a specialized newspaper that’s been lovingly cobbled together from all sorts of websites, magazines, and real newspapers.
This is the Today tab. (Tabs, in this case, are the headings in the left-side source list.) Scroll down far enough, and you’ll discover that your “front page” is broken up into sections like Top Stories (chosen by human editors), Trending Stories (chosen by algorithm based on popularity), For You (stories that match your interests—read on), Top Videos, and so on (Figure 11-26). Eventually, you scroll down into topic areas like Politics, Sports, and Movies, plus super-specialized topics that you choose yourself.
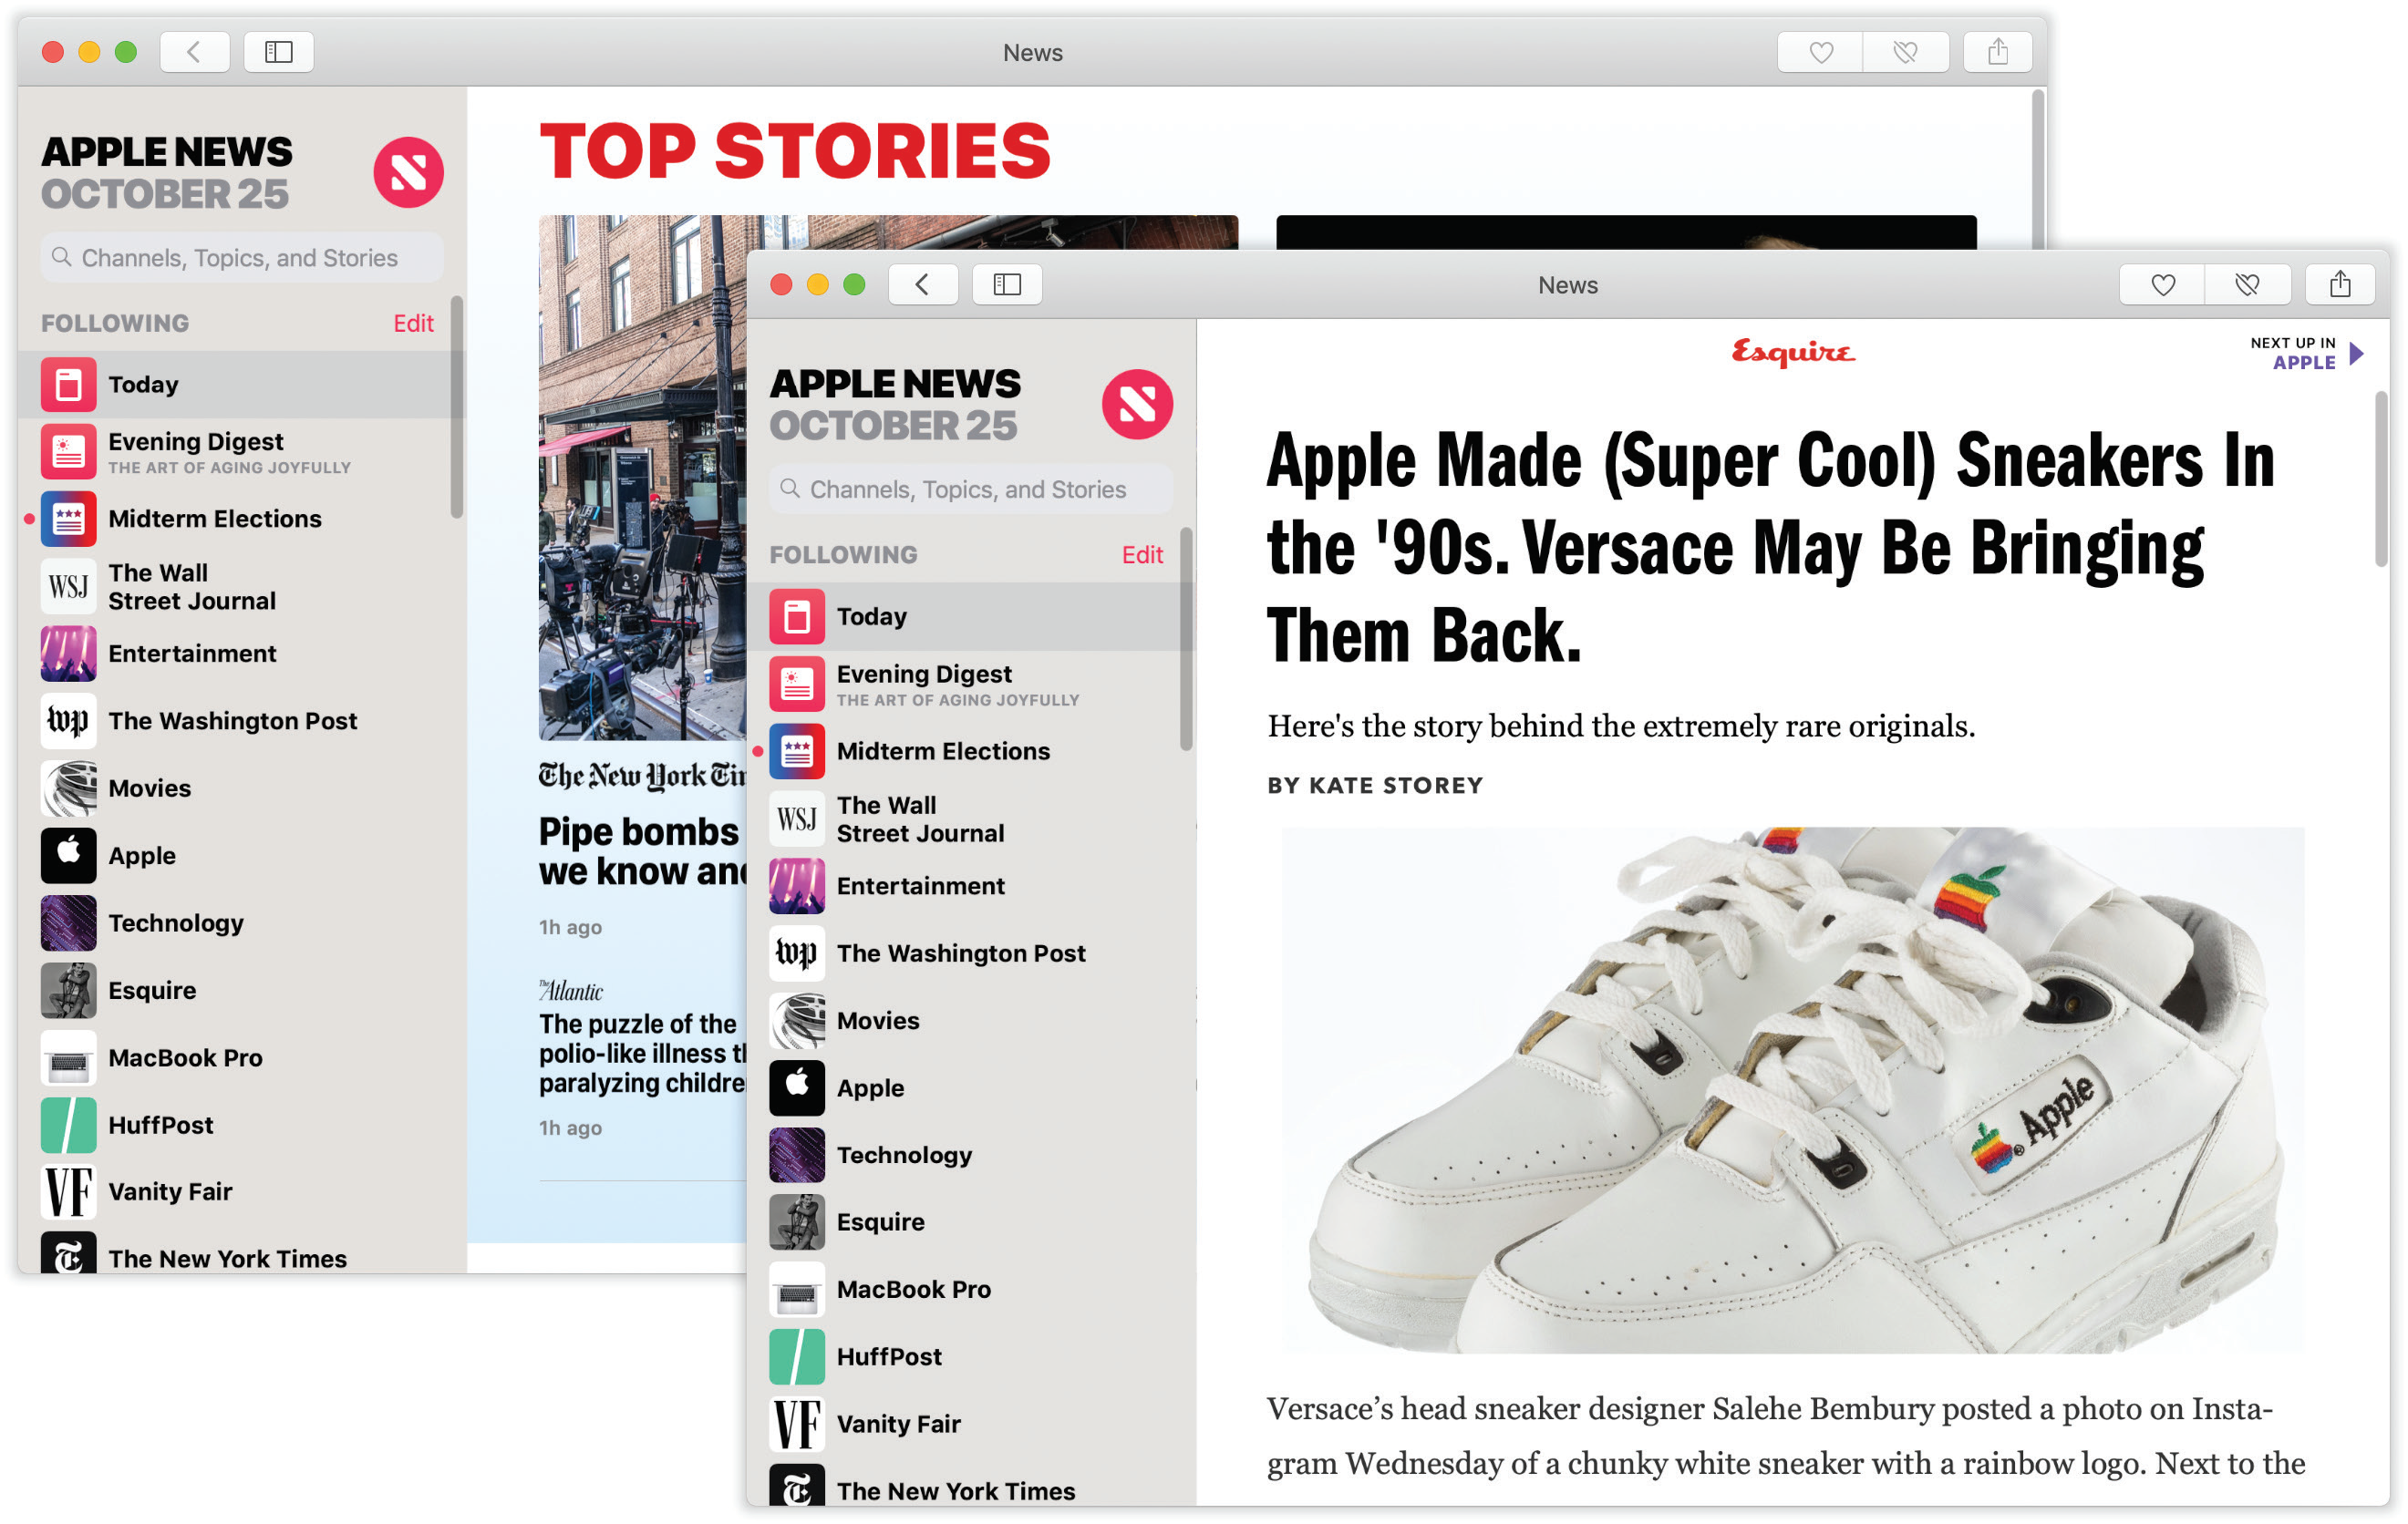
Figure 11-26. Left: The News app’s source column (far left) lists the publications and topics you’ve said you like.
Right: Once you’ve clicked to open a story, using News is simplicity itself. Scroll vertically through an article, or click “Next up” (top right) to pull the next article into view.
On the second tab (called, for example, Evening Digest), you’ll find “a roundup of the day’s best reads.” These are editor-chosen; everybody sees the same stories here. On weekdays, it changes three times a day (morning, afternoon, evening); on weekends, it’s called Weekend Pursuits and lets Apple’s editors have some work/life balance.
The remaining tabs are the publications, websites, and topics (tech, business, politics, fashion, and so on) that you want to follow in your News app.
The Suggested list offers a few starter categories, based on your Mac’s observations about the kinds of news you like to read; click ![]() if you do indeed like that kind of thing, or
if you do indeed like that kind of thing, or ![]() if you don’t.
if you don’t.
At the very bottom of the sources list is the Discover Channels & Topics button. It offers a very tall scrolling list of favorite online publications (The New York Times, Wired, The New Yorker, and hundreds more). You’re supposed to click the ones you want to use as News fodder, and then click Done.
And that’s it: Suddenly, you have a beautiful, infinite, constantly updated, free magazine stand, teeming with stories that have been collated according to your tastes. It’s all free, although you’re not getting the listed publications in full—usually you’re offered just a few selected stories.
Tip
Most of the time, you can’t use News without an internet connection. If you anticipate that you’ll be spending time in the living hell known as Offline mode (like on a subway, sailboat, or airplane), you can save some stories for reading later. To do that, choose File → Save Story. You’ll find your saved stories in the sources list under Saved Stories.
The same list offers a tab called History. It lets you jump back to an article you’ve already read.
Notes
For many years, the Notes app was a simple bucket for pages of text: lists, recipes, driving directions, and brainstorms. They all synced effortlessly among your Apple phones, tablets, and other computers.
Today, Notes has sprouted an array of formatting features that practically turn it into OneNote or Evernote. Now there’s full type formatting, bulleted lists, checklists, web links, and pasted graphics, videos, or maps. MacOS Mojave adds tables and pinned notes. You can collaborate on a Notes page with other people across the internet—or, on the other end of the paranoia scale, you can password-protect certain Notes pages for privacy.
All of this gets synced automatically to your iPhone or iPad, too.
Note
The first time you open Notes in Mojave, it may invite you to upgrade your Notes collection to the new, more flexible format. There’s no downside to accepting this one-way conversion—if all your Macs run El Capitan or later, and all your phones and tablets run iOS 9 or later. Earlier versions, however, won’t be able to open your Notes once you’ve performed this conversion.
Creating a Note
To create a new page in your digital notepad, choose File → New Note (![]() -N), or click the
-N), or click the ![]() button on the top toolbar.
button on the top toolbar.
Once the new page appears, type away (Figure 11-27).
Tip
Notes works with Handoff (“Handoff”). So if you’re editing a note on your Mac, iPhone, or iPad, you’ll be offered the chance to jump to the same note on any other Mac, iPhone, or iPad you own (if it’s on the same Wi-Fi network).
As you go, you can dress up your notes with a variety of formatting:
Paragraph formatting. The
 button gives you one-click access to paragraph styles like Title (big and bold), Heading, or lists with automatic bullets, dashes, or numbering.
Text formatting. You have control over fonts, type sizes, colors, paragraph alignment, and indentation, using the commands in the Format menu.
Checklists. The Checklist button turns any selected paragraphs into a checklist with little circles that you can check off, as shown in Figure 11-27.
Tables. See “Tables”.
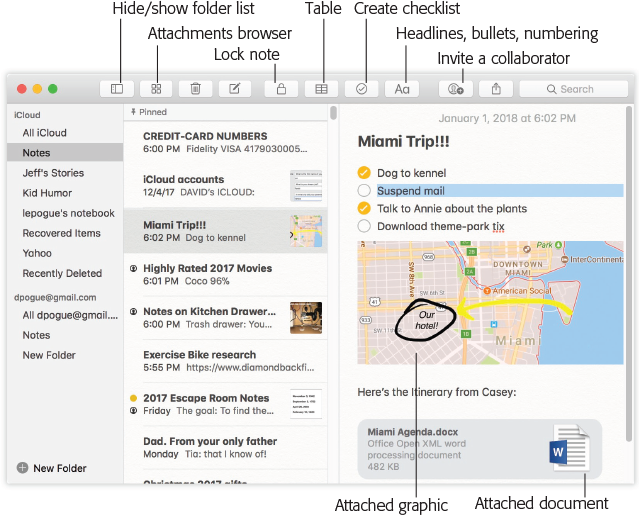
Figure 11-27. The first line of each page becomes the name of that note, as represented in the searchable list of notes (center column).
In this illustration, somebody has also opened up the Folders list, the skinny column at far left. Here you can choose which account’s notes you want to see: your iCloud notes, Gmail, Exchange, or what have you.
While you work, you can paste or drag photos and other graphics into a note, too—and links, maps, and even documents, like PDF files, Word documents, or Excel spreadsheets. Drag such a document into a note from the desktop; there it becomes an icon that you can double-click to open later.
All of this, of course, syncs flawlessly with your iPhone, iPad, or iPod Touch (running iOS 9 or later).
Note
To ensure that syncing takes place, make sure Notes is turned on in System Preferences → iCloud (on your Mac), and in Settings → iCloud (on your phone or tablet). The rest is automatic.
You can click ![]() to delete the current note. Or you can click
to delete the current note. Or you can click ![]() to send the note to someone, by email, AirDrop, Messages, or whatever (“Does the file have the correct file name suffix?”).
to send the note to someone, by email, AirDrop, Messages, or whatever (“Does the file have the correct file name suffix?”).
Conversely, the ![]() button in lots of other programs now lists Notes, meaning that you can send material (map, photo, link, text, address, phone number…) directly to either a new note page or an existing one.
button in lots of other programs now lists Notes, meaning that you can send material (map, photo, link, text, address, phone number…) directly to either a new note page or an existing one.
Tip
You can also print a note; choose File → Print. Just pointing that out.
The Notes List
As you create more pages, the list of pages (at center in Figure 11-27) becomes more useful. It’s your table of contents for the Notes pad. It’s a quick way to jump from one note to another.
Here’s what this list displays:
The first lines of your notes, along with the time or date you last edited them. If there’s a photo or sketch on a note—an unlocked one, anyway—you see its thumbnail, too.
To open a note, click its name. To delete a note, click it and then press the Delete key.
Pinned notes. Ordinarily, your notes appear chronologically, most recent at the top. In Notes → Preferences, you can specify that they be sorted by Date Changed or Title instead.
But you may have a couple of notes—things you refer to a lot—that you want to appear at the top all the time. Passwords, credit card numbers, or frequent-flyer numbers, for example.
That’s why you can pin an individual note to the top of the list, where it won’t move. To do that, click a note and then choose File → Pin Note. Or right-click or two-finger click the note and, from the shortcut menu, choose Pin Note.
You unpin a note using the same techniques (but choose Unpin Note instead).
There’s a search box, too. You can search all your notes instantly.
Tip
If you double-click a note’s name, it opens into a new window, floating on your screen. You can open multiple notes this way, drag them around the screen, and leave them floating there permanently, as though held by magnets on the great refrigerator door of life.
Collaborative Notes
You and your buddies can edit a page in Notes simultaneously, over the internet. It’s great when you and your spouse are planning a dinner party and brainstorming about guests and the menu, for example. Also great for adding items to the grocery or to-do list even after your spouse has left the house to get them taken care of.
Figure 11-28 shows the procedure.
Once you’ve shared a note, the person icon at the top turns dark, and a matching icon appears next to the note’s name in the master list (Figure 11-28, bottom). At any time, you can stop sharing the note—or add more people to its collaboration—by clicking that person icon again and editing the sharing panel that appears.
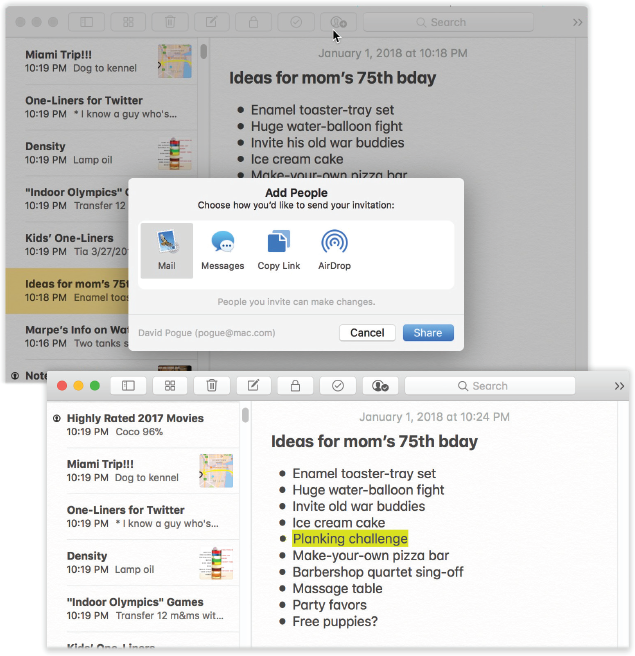
Figure 11-28. Top: To share a note with someone, click the button shown here by the cursor. Send the invitation by message, email, or whatever.
Bottom: The live editing isn’t as animated as it is in Google Docs—you don’t see letter-by-letter typing—but you see any changes the other person makes highlighted briefly in yellow.
Locking Notes
Locked, hidden, password-protected Notes pages are here at last, suitable for listing birthday presents you intend to get for your nosy kid, the formula for your top-secret invisibility potion, or your illicit lovers’ names.
Note that you hide and show all your locked notes with a single password. You can’t (that is, don’t have to) make up a different password for every note.
To lock a note, click the ![]() button in the toolbar; from the shortcut menu, choose Lock This Note. Enter a password for locking/unlocking all your notes (or, if you’ve done this before, enter the password).
button in the toolbar; from the shortcut menu, choose Lock This Note. Enter a password for locking/unlocking all your notes (or, if you’ve done this before, enter the password).
As long as your locked notes are all unlocked, you can still see and edit them. But when there’s any risk of somebody else coming along and seeing them (on your Mac, iPhone, iPad, or any other synced gadget), click the ![]() again—and this time choose Close All Locked Notes.
again—and this time choose Close All Locked Notes.
Now all you see of the locked notes are their titles. Everything on them is replaced by a “This note is locked” message (and a password box).
If you correctly enter the password, then all your hidden notes are suddenly viewable and editable.
Use your power wisely.
The Attachments Browser
The Attachments Browser in Notes is a single screen showing all attachments from all notes, all rounded up on one scrolling screen (see Figure 11-29). Just as in Messages, it’s often incredibly convenient to scan the visual attachments as a way to find a particular note.
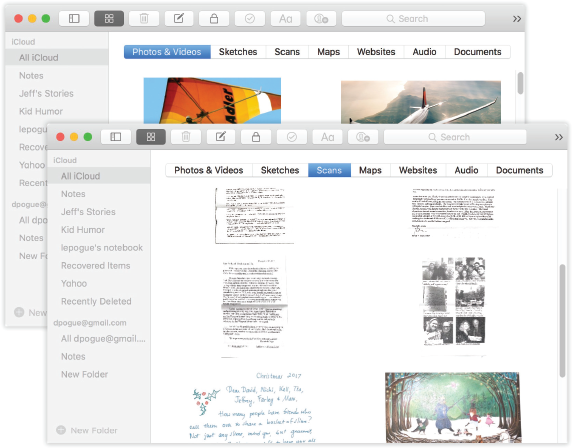
Figure 11-29. The Notes Attachments Browser lists every photo, video, sketch, scan (from your iPhone), map, website, audio file, and other document that appears in any note in your Notes, all in one place. Click one to jump to the note that contains it—a great way to find something you’re looking for without having to know when you wrote it or what it said.
Shown here: The Photos & Videos tab (top) and the Scans tab (bottom), which displays scans you’ve made on your iPhone or iPad (a feature introduced in iOS 11). You can’t create a scan directly in Notes from your Mac.
Notes Folders
You can organize your notes into folders, for ease of wading through them. Any folders you create on the Mac also show up on your iPhone/iPad.
The key to understanding this feature is the slide-out Folders list, which you can see at left in Figure 11-27. You can make it appear by choosing View → Show Folders List, or by clicking the ![]() icon on the toolbar. Then you can adjust the Folder list’s width by dragging the vertical line at its right edge.
icon on the toolbar. Then you can adjust the Folder list’s width by dragging the vertical line at its right edge.
To make a new folder, choose File → New Folder, or click New Folder below the list; name the folder and then press Return. You can then drag existing notes into its name in the Folders list. (The usual rules apply: You can select a swath of notes in a list by clicking the first and then Shift-clicking the last. Or you can click individual, nonconsecutive notes by clicking with the ![]() key pressed.)
key pressed.)
Tip
If you press Option as you drag a note, then you make a copy of it in the new folder instead of moving the original.
Click a folder’s name to see the notes inside it. (Click “All [account name]” to see all the notes in that account. Note accounts are covered on the next page.)
To create a new note within a folder, click the folder’s name first. If you don’t click any folder’s name before you create the note, then it goes into the general Notes category.
You can also rename a folder (right-click or two-finger click its name; choose Rename Folder), delete one (right-click or two-finger click its name; choose Delete Folder), put one inside another (drag its name), and move a folder to a different account—for example, from your iCloud account to your Google one—by dragging it.
Tip
If you’re using the Folders feature, here’s how to see them on your phone or tablet: Click the Accounts button in the upper-left corner of the Notes window. The list of accounts and folders appears, much as it does on your Mac.
Tables
When you click ![]() , you get a table with two columns and two rows. Click in a cell and then start typing. To move to the next cell, press Tab on the keyboard (or click the cell).
, you get a table with two columns and two rows. Click in a cell and then start typing. To move to the next cell, press Tab on the keyboard (or click the cell).
Poke around long enough, and you can find controls for just about every formatting tool you’d ever need in a table (except the ability to manually adjust column widths and the ability to format the cell borders).
The keys to most of it are the tiny handles (![]() and
and ![]() ) that appear when you click inside a cell (Figure 11-30, top):
) that appear when you click inside a cell (Figure 11-30, top):
Add or delete columns. Click inside a cell to make the
 and
and  buttons appear. Click to make the command menu () appear (Figure 11-27, bottom). It offers commands like Add Column (Before or After the current one), and Delete Column. Click and then to see equivalent commands for Rows.
If you’re typing in the lower-right cell, pressing Return also makes a new row.
Move a row or column. Click
or to highlight the corresponding row or column; now you can drag it to a new spot.Select cells. Drag across a couple of cells to make the selection handles appear; you can drag them to expand the highlighting. The usual Edit-menu commands (Cut, Copy, Paste) are now at your disposal. So are the Format-menu commands for bold, italic, underline, and so on.
Convert text into a table. Select the text, and then click the table button (
 ). The selected text winds up in the first column—one cell per paragraph.
Convert table into text. Click inside a cell, and then click
. Choose Convert to Text.
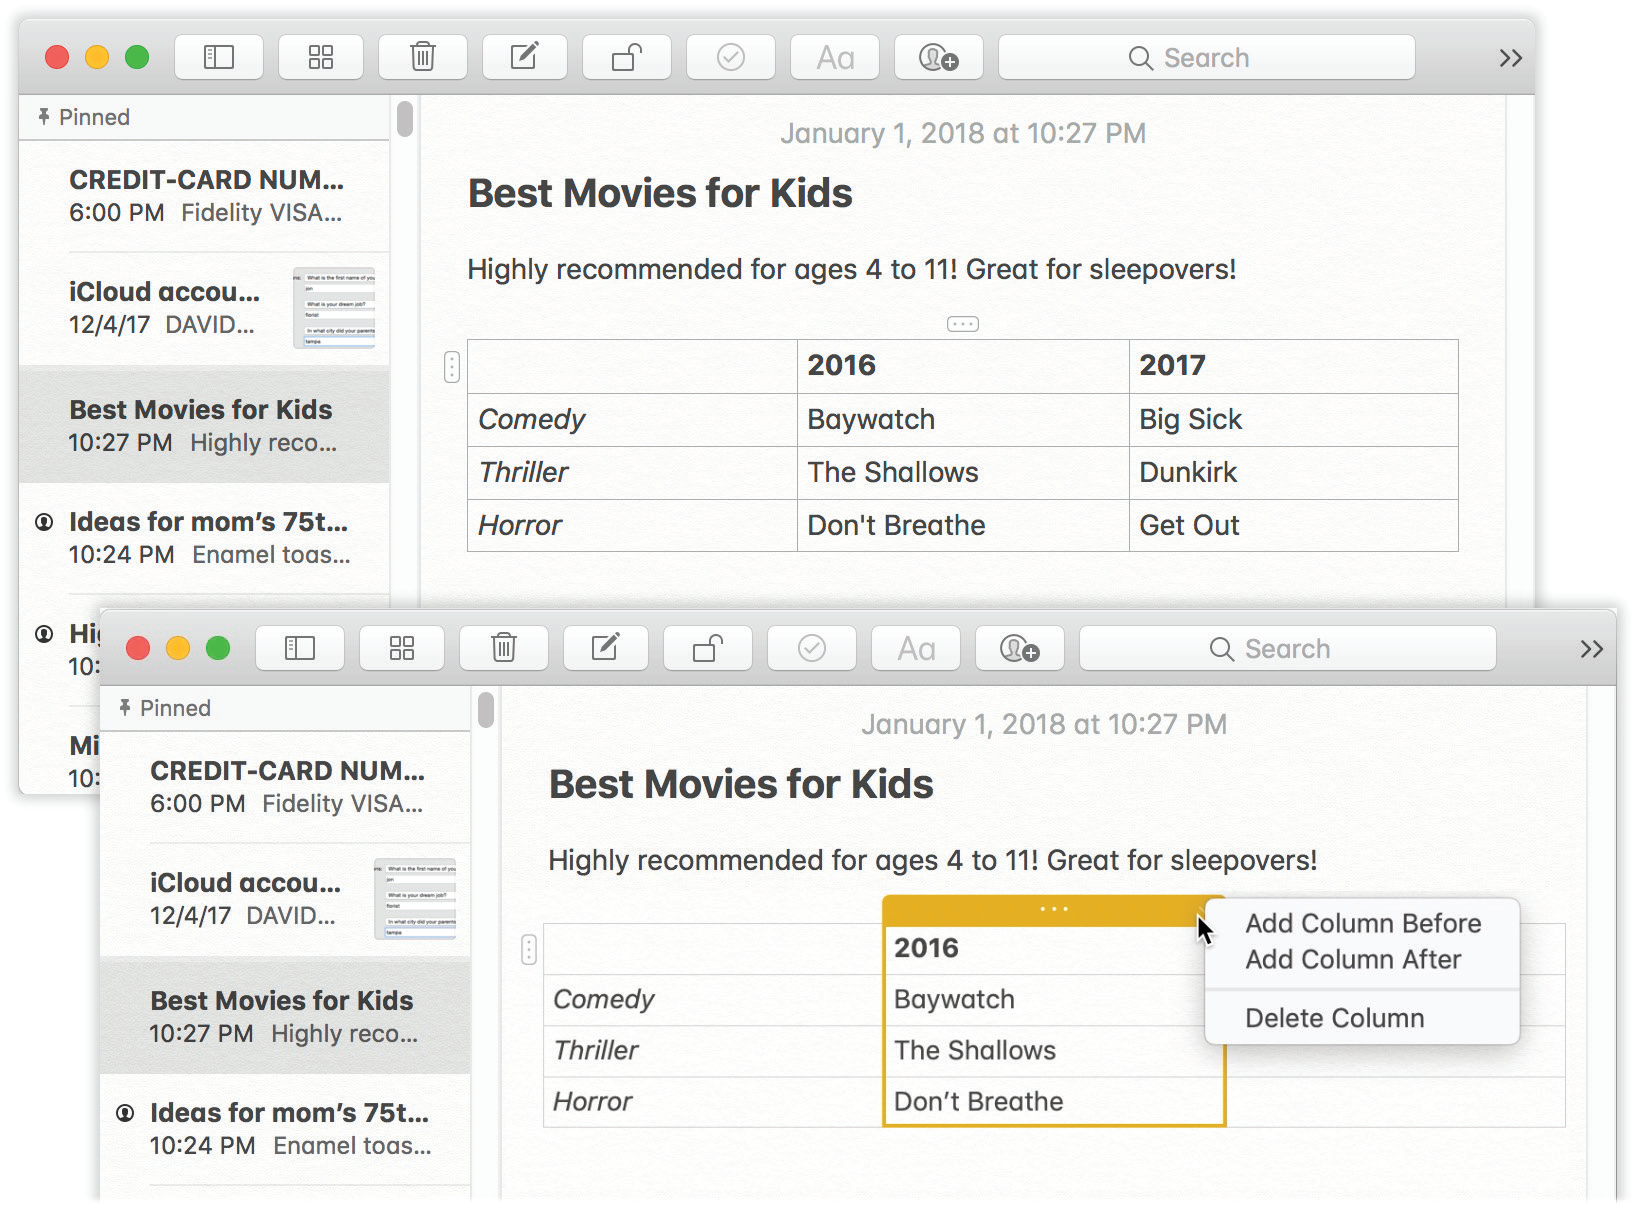
Figure 11-30. Top: Tables give Notes new information-storing capabilities.
Bottom: The key to adjusting and editing tables? The weird little and handles on the cells.
Notes Accounts
Notes also can show you the contents of the Notes modules on Google, Yahoo, AOL, or another IMAP email account. You’ll see each account’s notes in the Folder list, as you can see in Figure 11-27—and from there, you can drag notes hither and yon, among accounts, with abandon. (If the Folder list is hidden, click the ![]() button or choose View → Show Folders.)
button or choose View → Show Folders.)
To set this up, open System Preferences → Internet Accounts. Click the account you want (Exchange, Gmail, Yahoo, AOL, or whatever); finally, turn the Notes switch On.
That should do it. Now each account’s notes appear under their own heading in the Folders list. And your notes are synced, both ways.
All of this makes life a little more complex, of course. For example, when you create a note, you have to worry about which account it’s about to go into. To do that, be sure to specify an account name (and a folder within it, if necessary) before you create the new note.
Numbers, Pages, Keynote
Numbers, Pages, and Keynote are Apple’s spreadsheet, word-processing, and presentation programs, something like Apple-flavored versions of Microsoft’s Excel, Word, and PowerPoint. They’re part of Apple’s iWork suite, which comes preinstalled on every new Mac. And they’re complicated enough that there’s a whole book about them: iWork: The Missing Manual.
Photo Booth
It may be goofy, it may be pointless, but the Photo Booth program is a bigger time drain than Solitaire, the web, and Dancing with the Stars put together.
It’s a match made in heaven for any Mac with a camera above the screen. (Photo Booth doesn’t even open if your Mac doesn’t have some kind of camera.)
Open this program and then peer into the camera. Photo Booth acts like a digital mirror, showing whatever the camera sees—that is, you.
But then click the Effects button (Figure 11-31). You enter a world of special visual effects—and we’re talking very special. Some make you look like a pinhead, or bulbous, or like a conjoined twin; others simulate Andy Warhol paintings, fisheye lenses, and charcoal sketches. In fact, there are five whole pages of effects, nine previews on a page. (The last two pages hold backdrop effects, as already described.)
To page through them, click the left or right arrow buttons, or press ![]() or
or ![]() , or swipe with two fingers on your trackpad (one finger on the Magic Mouse).
, or swipe with two fingers on your trackpad (one finger on the Magic Mouse).
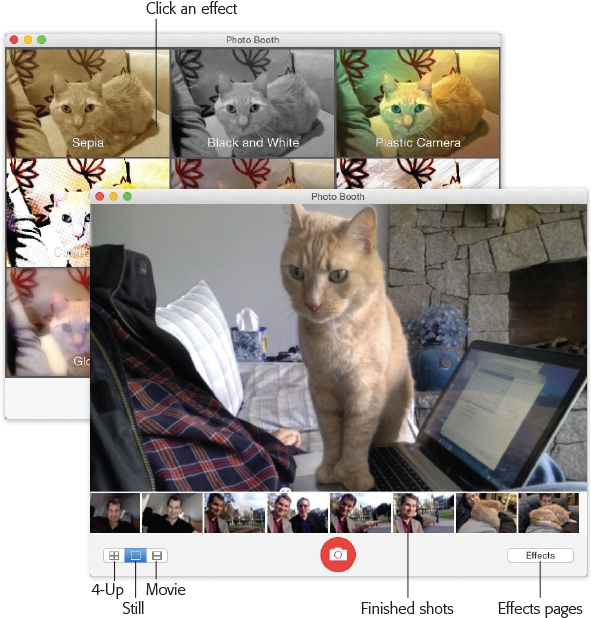
Figure 11-31. Some of the Photo Booth effects are simple color filters; others must have been dreamed up one night in the midst of a serious beer party at Apple. They’re disturbingly creative. If you decide that you really look best without any help from Apple’s warped imagery, click the Normal icon in the center.
The first page contains eight effects, some of which use sophisticated face-recognition smarts to track your face as it moves around the frame. That’s how Dizzy and Lovestruck are able to keep the animated birds or hearts circling your head, and how Chipmunk, Nose Twirl, and Bug Out are able to distort your cheeks, nose, and eyeballs even as you move around.
Some of the effects have sliders that govern their intensity; you’ll see them appear when you click the preview.
Still Photos
When you find an effect that looks appealing (or unappealing, depending on your goals), click the camera button, or press ![]() -Return key. You see and hear a three-second countdown, and then snap!—your screen flashes white to add illumination, and the resulting photo appears on your screen. Its thumbnail joins the collection at the bottom.
-Return key. You see and hear a three-second countdown, and then snap!—your screen flashes white to add illumination, and the resulting photo appears on your screen. Its thumbnail joins the collection at the bottom.
Tip
Option-click the camera button to eliminate the countdown. You can get rid of the screen flash, too, by Shift-clicking. Needless to say, if you press Option and Shift, you get neither the countdown nor the flash.
4-Up Photos
If you click the 4-Up button identified at the bottom left of Figure 11-31, then when you click the Camera icon (or press ![]() -Return key), the 3-2-1 countdown begins, and then Photo Booth snaps four consecutive photos in two seconds. You can exploit the timing just the way you would in a real photo booth—make four different expressions, horse around, whatever.
-Return key), the 3-2-1 countdown begins, and then Photo Booth snaps four consecutive photos in two seconds. You can exploit the timing just the way you would in a real photo booth—make four different expressions, horse around, whatever.
The result is a single graphic with four panes, kind of like what you get at a shopping mall photo booth. (In Photo Booth, they appear rakishly assembled at an angle; but when you export the image, they appear straight, like panes of a window.) Its icon plops into the row of thumbnails at the bottom of the window, just like the single still photos.
Movies
Photo Booth can also record videos, complete with those wacky distortion effects. Click the third icon below the screen, the Movie icon (Figure 11-31), and then click the camera button (or press ![]() -T). You get the 3-2-1 countdown—but this time, Photo Booth records a video, with sound, until you click the Stop button. (The little digital counter at left reminds you that you’re still filming.) When it’s over, the movie’s icon appears in the row of thumbnails, ready to play or export.
-T). You get the 3-2-1 countdown—but this time, Photo Booth records a video, with sound, until you click the Stop button. (The little digital counter at left reminds you that you’re still filming.) When it’s over, the movie’s icon appears in the row of thumbnails, ready to play or export.
Tip
Want to edit your video? Click its thumbnail and then choose Edit → Trim Movie, or hit ![]() -T. When you do, yellow trim handles appear at both ends of the scroll bar (the same ones you’d see when trimming a video on the iPhone or iPad, or in Photos). Drag them inward to trim off any dead air at the beginning or end of your video clip. Hit the space bar to check your work. If the trim is OK, click the Trim button to confirm.
-T. When you do, yellow trim handles appear at both ends of the scroll bar (the same ones you’d see when trimming a video on the iPhone or iPad, or in Photos). Drag them inward to trim off any dead air at the beginning or end of your video clip. Hit the space bar to check your work. If the trim is OK, click the Trim button to confirm.
Exporting Shots and Movies
To look at a photo or movie you’ve captured, click its thumbnail in the scrolling row at the bottom of the screen. (To return to camera mode, click the ![]() .)
.)
Fortunately, these masterpieces of goofiness and distortion aren’t locked in Photo Booth forever. You can share them with your adoring public in any of these ways:
Click the
button. The pop-up menu offers the usual offerings of the Share menu (“Does the file have the correct file name suffix?”): Mail, Messages, AirDrop, Twitter, Facebook, and Flickr, plus Add to Photos and Add to Aperture, if you use those programs.There’s also a “Change profile picture” command (to make this photo represent you on the Login screen), and a More button that opens the System Preferences → Extensions screen described in “Scheduled Startup and Shutdown”.
And speaking of interesting headshots: If you export a 4-Up image and choose it as your Buddy Picture, you’ll get an animated buddy icon. That is, your tiny icon cycles among the four images, creating a crude sort of animation. It’s sort of annoying, actually, but all the kids are doing it.
Click the photo or movie, and then choose File → Export. (Or just right-click or two-finger click the photo or movie itself; choose Export from the shortcut menu.) You’re asked to name and save the exported image or video.
Tip
If you choose File → Export Original instead, then the exported photo or video lacks any of the effects you’ve applied. You get the original, undistorted, underlying photo.
Drag a thumbnail out of the window to your desktop.
Note
These files are stored in a single icon, a package file, that sits in your Home → Pictures folder. Ordinarily, you should never have to mess with it. But if you right-click or two-finger click this icon and choose Show Package Contents → Pictures, you’ll find one JPEG apiece for single shots, four JPEG files for every 4-Up, and MOV files for videos.
As you set off on your Photo Booth adventures, a note of caution: Keep it away from children. They won’t move from Photo Booth for the next 12 years.
Tip
Photo Booth is one of the certified full-screen apps. Click the green ![]() button at upper left to make the app fill your screen, for added graphic juiciness.
button at upper left to make the app fill your screen, for added graphic juiciness.
Photos
Apple loves introducing or standardizing some new technology, persuading us to use it—and then abandoning it the minute a better tech comes along. (The floppy drive, CD burner, 30-pin iPhone connector, the headphone jack…)
Apple has done it again. It has replaced the beloved but aging iPhoto with a new Mac app called Photos. Apple says that times have changed in the 16 years since iPhoto first came along. We capture a lot more with our phones now, and that involves much more than plain old stills: square photos, panoramas, slow-motion videos, time-lapse videos, burst-mode sets, and so on.
And here’s the biggest, baddest, best part of Photos: iCloud Photo Library. That’s automatic, real-time syncing of your entire photo library, including edits and organization, across all your Apple gadgets.
The Layout
Photos is meant to look, feel, and work exactly like Photos on the iPhone/iPad. For example, when you click Photos in the source list at left, Photos automatically groups your photos into sets that are easy to navigate (Figure 11-32).
Tip
The slider at top left controls the size of the thumbnails.
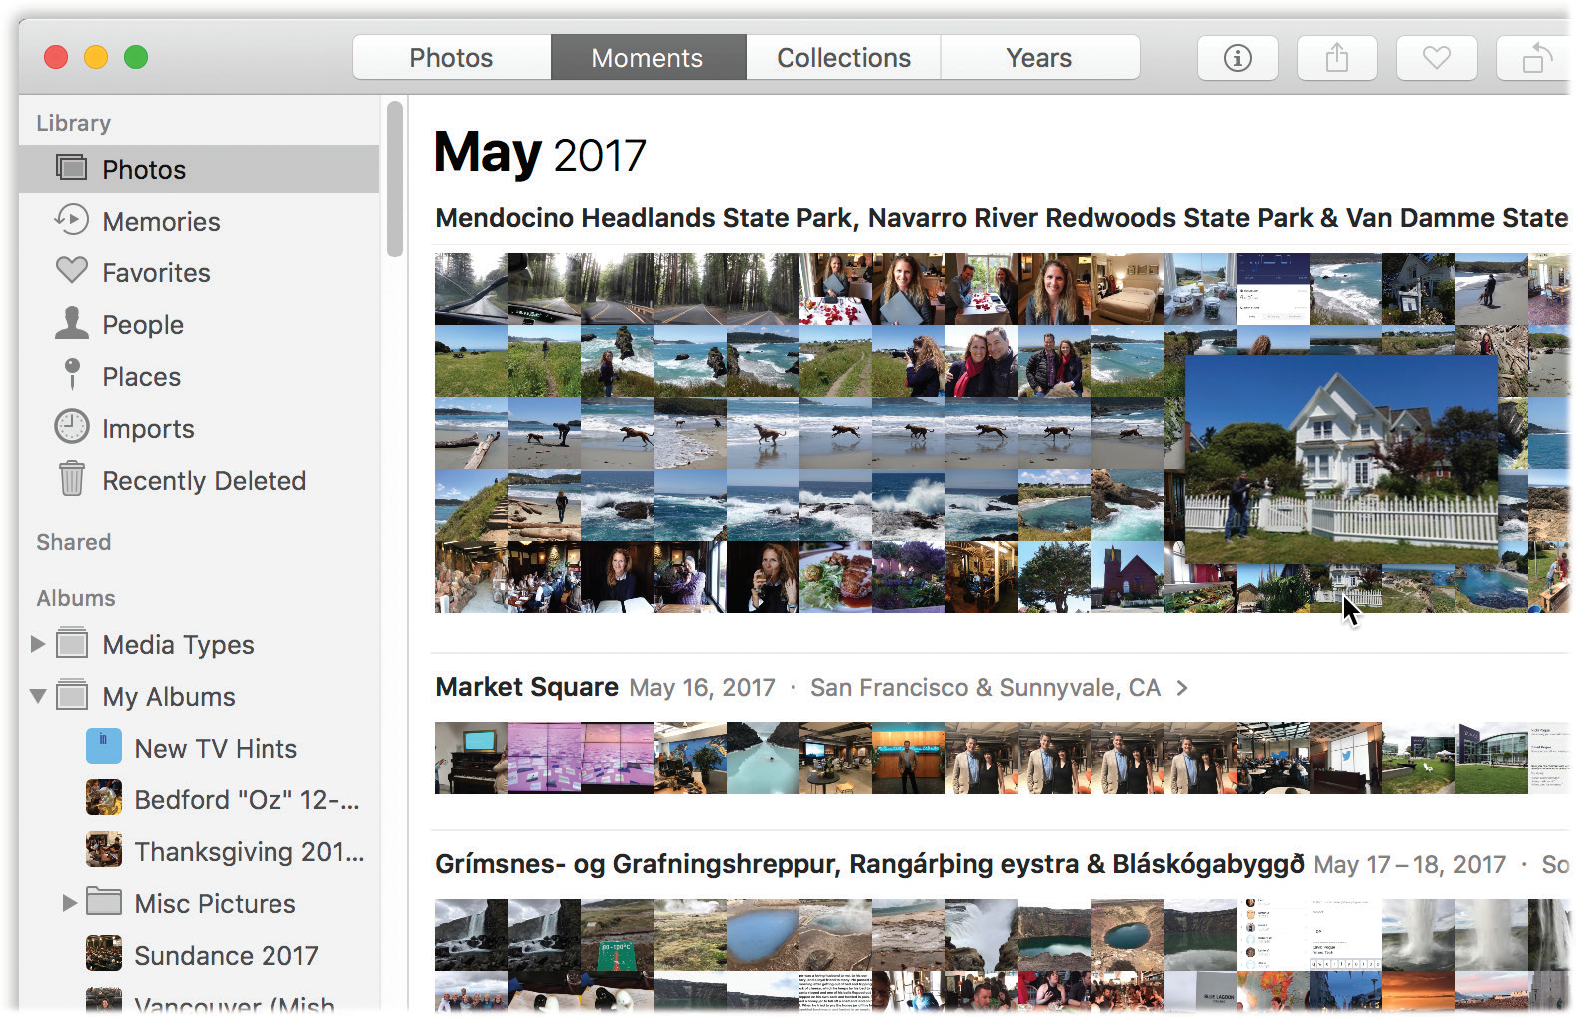
Figure 11-32. Whenever you’re looking at a grid of tiny thumbnail images (in a Year, Collection, or Moment), hold your mouse down within the batch. A larger thumbnail sprouts from your cursor, and you can slide your mouse around within the mosaic to find a particular photo, or batch of them. Release to open that photo at full-screen size for inspection.
Photos boasts a lot of recent improvements. For example, the Auto-Enhance button (![]() ) is now right on the main toolbar in Viewer mode. It does a very good job at fixing the color, exposure, and contrast values for a photo—and now you don’t have to heave into Editing mode to apply it to a photo, or a whole batch of them.
) is now right on the main toolbar in Viewer mode. It does a very good job at fixing the color, exposure, and contrast values for a photo—and now you don’t have to heave into Editing mode to apply it to a photo, or a whole batch of them.
The new Imports view shows not just the latest batch of imported photos, but the batch before that, and the batch before that, and so on.
Using the Showing pop-up menu at top right, you can now filter your view by Favorites, photos you’ve edited, only movies, only stills, and so on.
The time groupings
Here they are, from smallest to largest (you’ll see each view identified in the title bar):
Moments. A moment is a group of photos you took in one place at one time—for example, all the shots at the picnic by the lake. If you take most of your pictures with an iPhone, you’ll see that it uses its own GPS to give each moment a name: “San Francisco, California (Union Square),” for example. Otherwise, or if you have location sharing turned off, moments are simply grouped by date.
Collections. Put a bunch of moments together, and what do you get? A collection. Here again, Photos tries to study the times and places of your photo taking—but this time, it puts them into groups that might span a few days and several locations. You might discover that your entire spring vacation is a single collection, for example.
Years. If you “zoom out” of your photos far enough, you wind up viewing them by year: 2018, 2019, and so on.
Tip
Handily enough, the keystrokes ![]() -1,
-1, ![]() -2,
-2, ![]() -3, and
-3, and ![]() -4 correspond to the Photos, Moments, Collections, and Years tabs.
-4 correspond to the Photos, Moments, Collections, and Years tabs.
You backtrack from a moment or collection by “pinching” on your trackpad, or by clicking the < button at top left.
Note
If the Photos window isn’t wide enough to show tabs for all these groupings, you get a pop-up menu listing them instead.
The Sidebar
The Sidebar list, which lists your albums and other useful categories, is no longer hideable in macOS Mojave (at least until you enter Full Screen view). Its buttons correspond precisely to the ones you’d see on the iPhone or iPad in the Photos app.
The following pages describe each Sidebar entity in turn.
Photos
Here’s where you’ll do most of your hunting. This is Moments, Collections, and Years.
Memories
Memories (Figure 11-33) are automatically selected groups of pix and videos from certain time periods or trips, which, with a click, become gorgeous, musical slideshows. Photos creates three new ones a day, which often dredges up delightful photos of events you’d nearly forgotten about. Most people are pleasantly surprised at how coherent and well-created these are, even though they’re totally automatic. Photos, short pieces of your videos, and even scrolling panoramas are all first-class citizens in these slideshows.
Right off the bat, you see a few of Photos’ suggestions, represented as clearly labeled billboards (“Cape Cod Summer,” “Best of Last Week”…). Memories can auto-recognize and auto-build slideshows of your pets, babies, outdoor activities, performances, weddings, birthdays, and games.
Double-click to open a Memory; at this point, you can scroll down to see more about what’s in it. You’ll see the photos that will be in it, as well as who’s in it (People), and where the photos came from (Places).
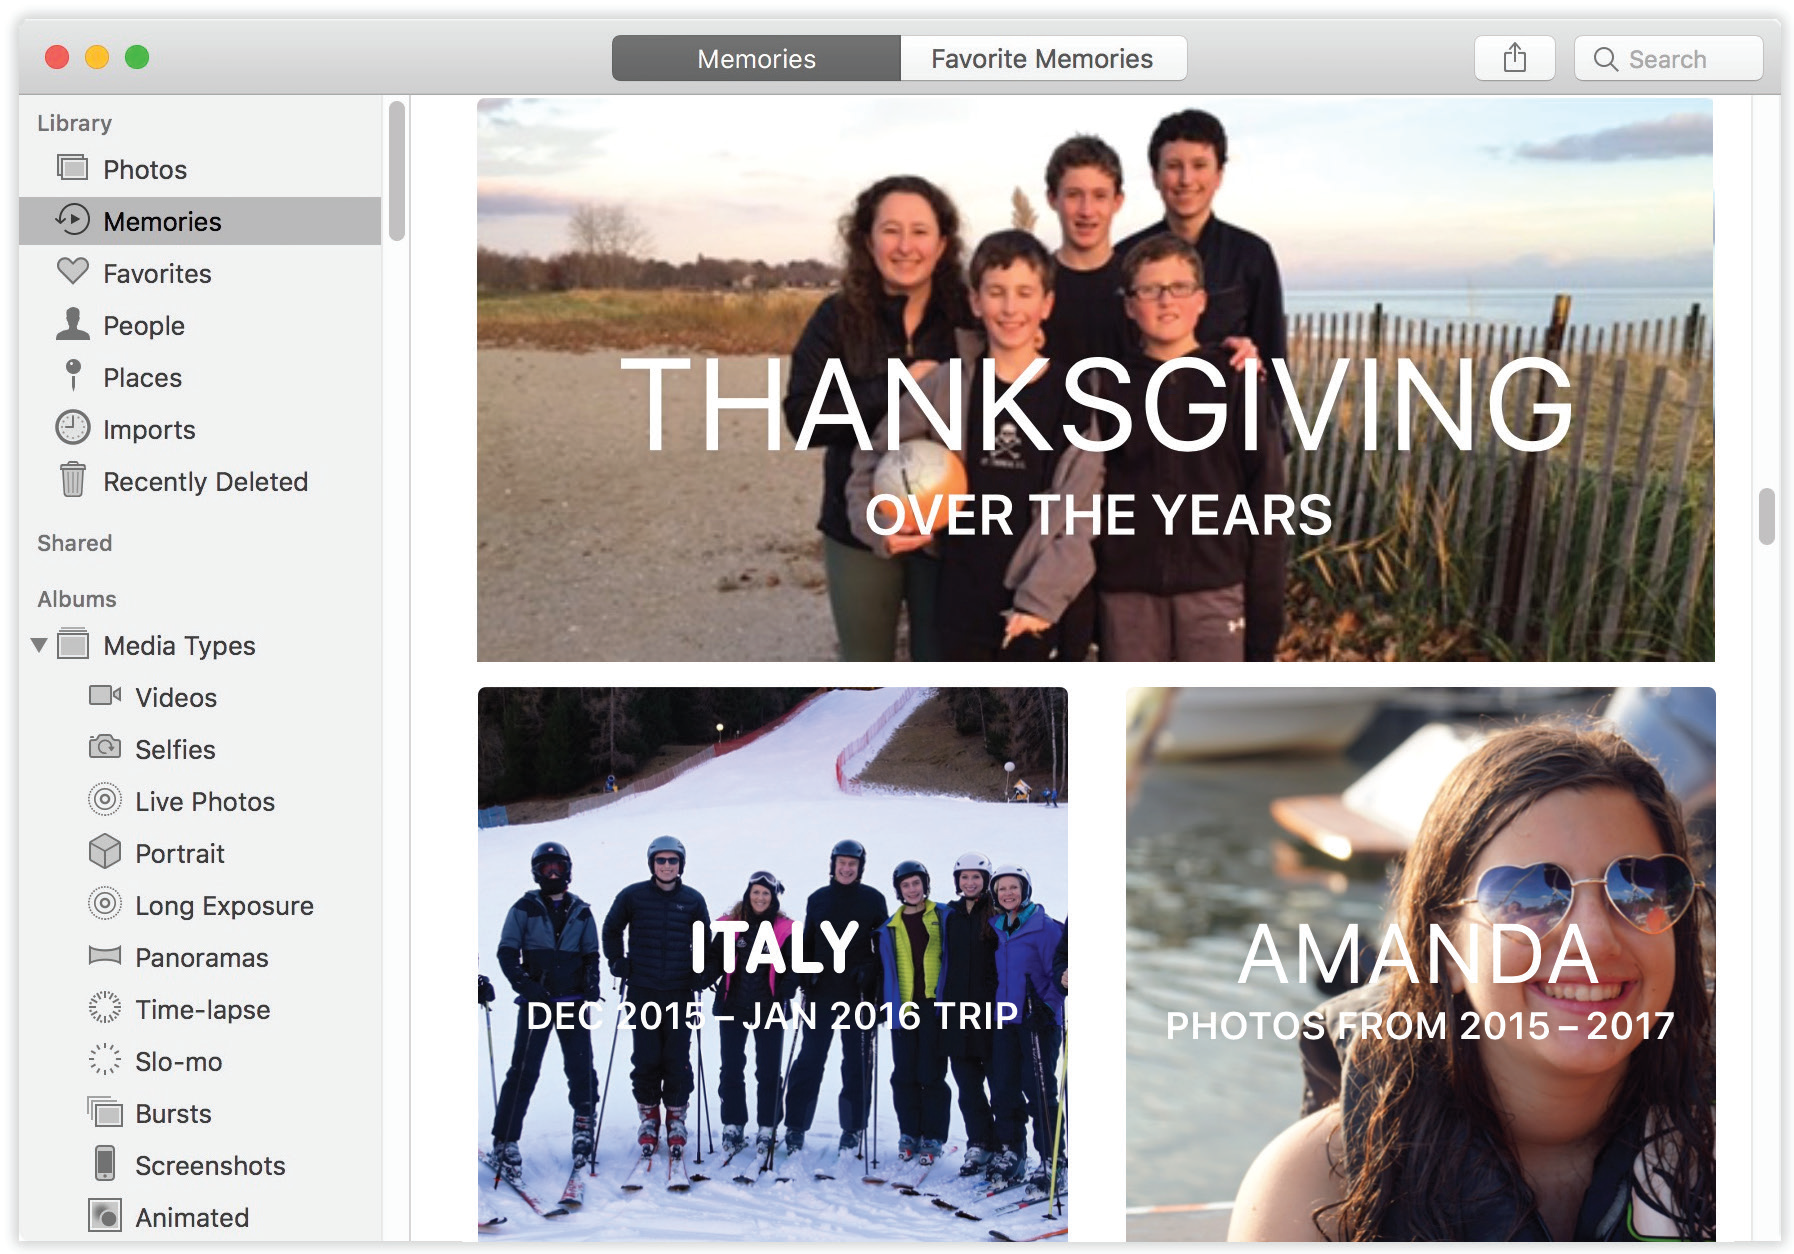
Figure 11-33. These are Memories: lovely, musical slideshows of pictures and movies that the program chooses using tasteful artificial intelligence.
At the very bottom, you’ll see these options:
Delete Memory. Vaporizes this computer-generated collection (does not touch the originals).
Add to Favorite Memories. Adds this slideshow to a new folder on the Albums tab called Favorite Memories, for quick access later.
Block Memory. This command sounds like a parody of a psychological technique, but it actually does what it says: It prevents Photos from ever reminding you again, in Memories, of this day, place, or person. (When you click Block Memory, a shortcut menu identifies the factors that Photos used to create this Memory—Person, Place, or Day—so that you can tell it which of those three is causing you the psychic pain.)
Tip
If, after years of therapy, you can face those painful memories again, click Photos → Preferences → General → Reset Blocked Memories.
Anyway, the real fun begins when you click ![]() to start an instant slideshow. A panel offers a choice of transition styles (Sliding Panels, Reflections, and so on) and musical soundtracks—and then, when you click Play Slideshow, the show begins. It’s usually fantastic.
to start an instant slideshow. A panel offers a choice of transition styles (Sliding Panels, Reflections, and so on) and musical soundtracks—and then, when you click Play Slideshow, the show begins. It’s usually fantastic.
When you come back to your senses, note that you can wiggle the mouse for playback controls—pause, skip, adjust volume, exit, and so on.
Note
On the Mac, you can’t edit which photos and videos appear in a Memory, as you can on the iPhone or iPad.
You can create a Memory using your own choice of photos, too. Open any album and click Show as Memory in the header. Or click the name of any Collection, Moment, or Year to open those photos as a Memory.
Favorites
Any time you spot a photo you might want to return to later, click the ![]() that appears on its thumbnail. Then click this folder in the Sidebar, and boom—there they all are. Handy even for temporary “set-asides”—for example, when you’re choosing photos to include in a photo book, slideshow, or calendar.
that appears on its thumbnail. Then click this folder in the Sidebar, and boom—there they all are. Handy even for temporary “set-asides”—for example, when you’re choosing photos to include in a photo book, slideshow, or calendar.
People
Photos can auto-group the people in your photos, using facial recognition. For example, all pictures of your mom appear in a clump. This feature is fantastic to remember the next time someone—a potential date, the kindergarten teacher, the Passport Bureau—requests a photo of you or someone in your circle.
To see it at work, click People in the Sidebar. Here are thumbnails representing the faces Photos has found and grouped. Click beneath a thumbnail to edit that person’s name. Double-click the thumbnail to see all the photos of this person, laid out exactly like a Memory, described earlier.
Tip
The two buttons at top right, Photos and Faces, control what the thumbnails show—the entire photos containing this person, or a zoom-in of just that person’s face.
At the bottom, you get options like Remove from People Album (great when this person dumps you) and Confirm Additional Faces (refines the training to recognize this person better, using a new set of photos).
Note
This feature doesn’t work until the Mac has analyzed your photos, which can take at least a day. Apple proudly points out that all this analysis is done on your Mac. (That’s in contrast to services like Google Photos, which offers similar features but requires Google to access your photo library.)
You can even drag your favorites into the top of the screen for quick access later.
Places
Every photo you take with a smartphone (and a few very fancy cameras) gets geotagged—stamped, behind the scenes, with its geographical coordinates. When you click Places in the Sidebar, you see a map, dotted with clusters of photos that you took in each place. Double-click repeatedly to “drill down” until you’re looking at the individual photos taken in a certain spot.
Imports
Any old photos-management program can show you the most recent batch of photos you’ve imported (from a camera card or the desktop, for example). But what’s great about Photos is that this is a scrolling display. It shows older batches of imported photos, stretching back in time. Sometimes, that feature makes it super easy to find a photo or video you’re looking for.
Recently Deleted
Even after you think you’ve deleted a photo or video from your phone, you have 30 days to change your mind. Deleted pictures and videos sit in this folder, quietly counting down to their own doomsdays.
If you wind up changing your mind, you can open Recently Deleted, click the photo you’d condemned, and click Recover. The photo pops back into its rightful place in the Photos app, saved from termination.
On the other hand, you can also zap a selected photo into oblivion immediately using the Delete Item button. If nothing is selected, you can hit Delete All.
Media Types
Here are specialized buttons for the kinds of photos the iPhone and iPad can take, like Videos, Selfies, Live Photos (three-second photo/video hybrids), Panoramas, Time-lapse, Slo-mo, and so on. Super handy when you’re trying to show someone your latest time-lapse masterpiece, for example; now you know where to look for it.
My Albums
You can easily create photo “folders” called albums, for your organizing pleasure. A single photo can appear in as many albums as you like, without using any more disk space. If you delete a photo from an album, you’re not removing it from Photos—only from this virtual grouping. You can drag thumbnails around in an album to rearrange them.
Tip
If you drag a photo into several albums, then editing it changes that photo everywhere. But if you copy and paste a photo into a different album, you can edit the two independently. And yet, amazingly enough, you’re still not using any more disk space.
You can’t move very far without finding another way to make an album: Choose File → New Album and then drag thumbnails into it. Or select some thumbnails and then choose File → New Album with Selection. Or click the ![]() that appears when you point to the My Albums in the Sidebar, and then fill it with photos.
that appears when you point to the My Albums in the Sidebar, and then fill it with photos.
If your photo collection came from iPhoto or Aperture, you also see an album (in a folder called, for example, iPhoto Events) for each iPhoto Event or Aperture Project you had in the older program. (Yes, you can also create folders to hold your albums.)
Opening Photos
To open any selected thumbnail so you can see it at full size, press the Return key. (Press it again to close the photo.)
While the photo is open, you can zoom in or out—either drag the top-left slider, or use two fingers on your trackpad (pinch or spread them). If your Mac has a Touch Bar (“The Complicated Story of the Function Keys”), you can click or drag your finger through it to scroll through the photos in this set.
Tip
You can pop back and forth between actual size and a zoomed-in view by tapping the Z key.
You can open a video this way, too. Play it by clicking ![]() or hitting the space bar, or trim off the dead ends using the
or hitting the space bar, or trim off the dead ends using the ![]() → Trim command. For slo-mo videos from the iPhone, you can even adjust the start and stop points for the slow effect.
→ Trim command. For slo-mo videos from the iPhone, you can even adjust the start and stop points for the slow effect.
Editing Photos
Before reading a word about editing in Photos, first absorb this: All the changes described on these pages are nondestructive. That is, Photos never forgets the original photo. At any time, hours or years later, you can select a photo and then choose Image → Revert to Original, thus undoing any changes you’ve ever made. In other words, your changes are never really permanent.
Tip
If you want to do your editing in Photoshop (or any other external program), Apple has restored the “edit in another photo, see the changes back in Photos” feature, which was so useful in the old iPhoto program. Just right-click or two-finger click a photo and, from the shortcut menu, choose, Edit With → Photoshop (or whatever). Or use the Image → Edit With command.
The changes you make in the external app are nondestructive—you can undo them at any time, too. In other words, you can use Photos for its superior organizational and sharing tools, but Photoshop for editing.
Auto Enhance
The quickest way to fix the color and contrast for a photo is to click the ![]() button. It’s so important that it appears at the top of the window when you’re viewing any photo, even before you’ve entered Edit mode. When you click this magical button, Photos analyzes the relative brightness of all the pixels in your photo and attempts to “balance” it. After a moment, the app adjusts the brightness and contrast and intensifies dull or grayish-looking areas. Usually, the pictures look richer and more vivid as a result.
button. It’s so important that it appears at the top of the window when you’re viewing any photo, even before you’ve entered Edit mode. When you click this magical button, Photos analyzes the relative brightness of all the pixels in your photo and attempts to “balance” it. After a moment, the app adjusts the brightness and contrast and intensifies dull or grayish-looking areas. Usually, the pictures look richer and more vivid as a result.
You may find that Auto Enhance has little effect on some photos, only minimally improves others, and totally rescues a few. In any case, if you don’t care for the result, you can click ![]() again to turn Auto Enhance off.
again to turn Auto Enhance off.
To make more fine-tuned corrections to a photo (either an open one or its thumbnail), press ![]() -Return key. The Edit mode appears, where three tabs greet you at the top, listed here from right to left:
-Return key. The Edit mode appears, where three tabs greet you at the top, listed here from right to left:
Crop
When you click this tab, you get a crazy editing screen where you can adjust the size, shape, and angle of the photo.
First, Photos automatically analyzes whatever horizontal lines it finds in the photo—the horizon, for example—and uses them as a guide to straightening the photo automatically. You can reject the proposal (click Reset), or tilt the photo more or less (drag across the round scale).
If you want to rotate the photo more than 90 degrees—for example, if the camera took it sideways—click ![]() as many times as necessary to turn the picture upright.
as many times as necessary to turn the picture upright.
The other work you can do in this mode is cropping. Cropping means shaving off unnecessary portions of a photo. Usually, you crop a photo to improve its composition—adjusting where the subject appears within the frame of the picture. Cropping is also very useful if your photo needs to have a certain aspect ratio (length-to-width proportion), like 8 × 10 or 5 × 7.
To crop a photo you’ve opened, drag any edge or corner of the white border; press Return when the proposed crop looks good. Or use the canned proportions at the right—Square, 3 × 2, 3 × 5, 4 × 3, and so on—to limit the cropping frame to preset proportions.
Filters
Filters are effects that make a photo black and white, oversaturated, or washed out. Click each to see what it looks like on your photo; finish up by clicking Done.
Adjust
On this tab, the right-side panel contains a huge list of Photoshop-style adjustment sliders. For your learning-curve pleasure, they correspond exactly to the ones on the iPhone and iPad (Figure 11-34). For example:
Light, Color, Black & White. When you click one of these categories, you see a “filmstrip” below or beside your photo. You can drag your finger across it, watching the effect on your photo.
As it turns out, each of these sliders controls a handful of variables, all of which it’s changing simultaneously, and each of which you can adjust manually. For example, the Light category includes Brilliance (a slider that, Apple says, “brightens dark areas and pulls in highlights to reveal hidden detail”), Exposure (adjusts the brightness of all pixels), Highlights (pulls lost details out of very bright areas), Shadows (pulls lost details out of very dark areas), Brightness (like Exposure, but doesn’t brighten parts that are already bright), Contrast (heightens the difference between the brightest and darkest areas), and Black Point (determines what is “black,” shifting the entire dark/light range upward or downward).
Retouch. This very special brush can instantly and seamlessly paint out a minor flaw—a zit, a stray hair, or a dust speck or scratch on an old photo. All you have to do is dab away at the blemish with the mouse. Use the slider (or press the [ and ] keys) to resize your cursor until it’s slightly bigger than the thing you want to remove.
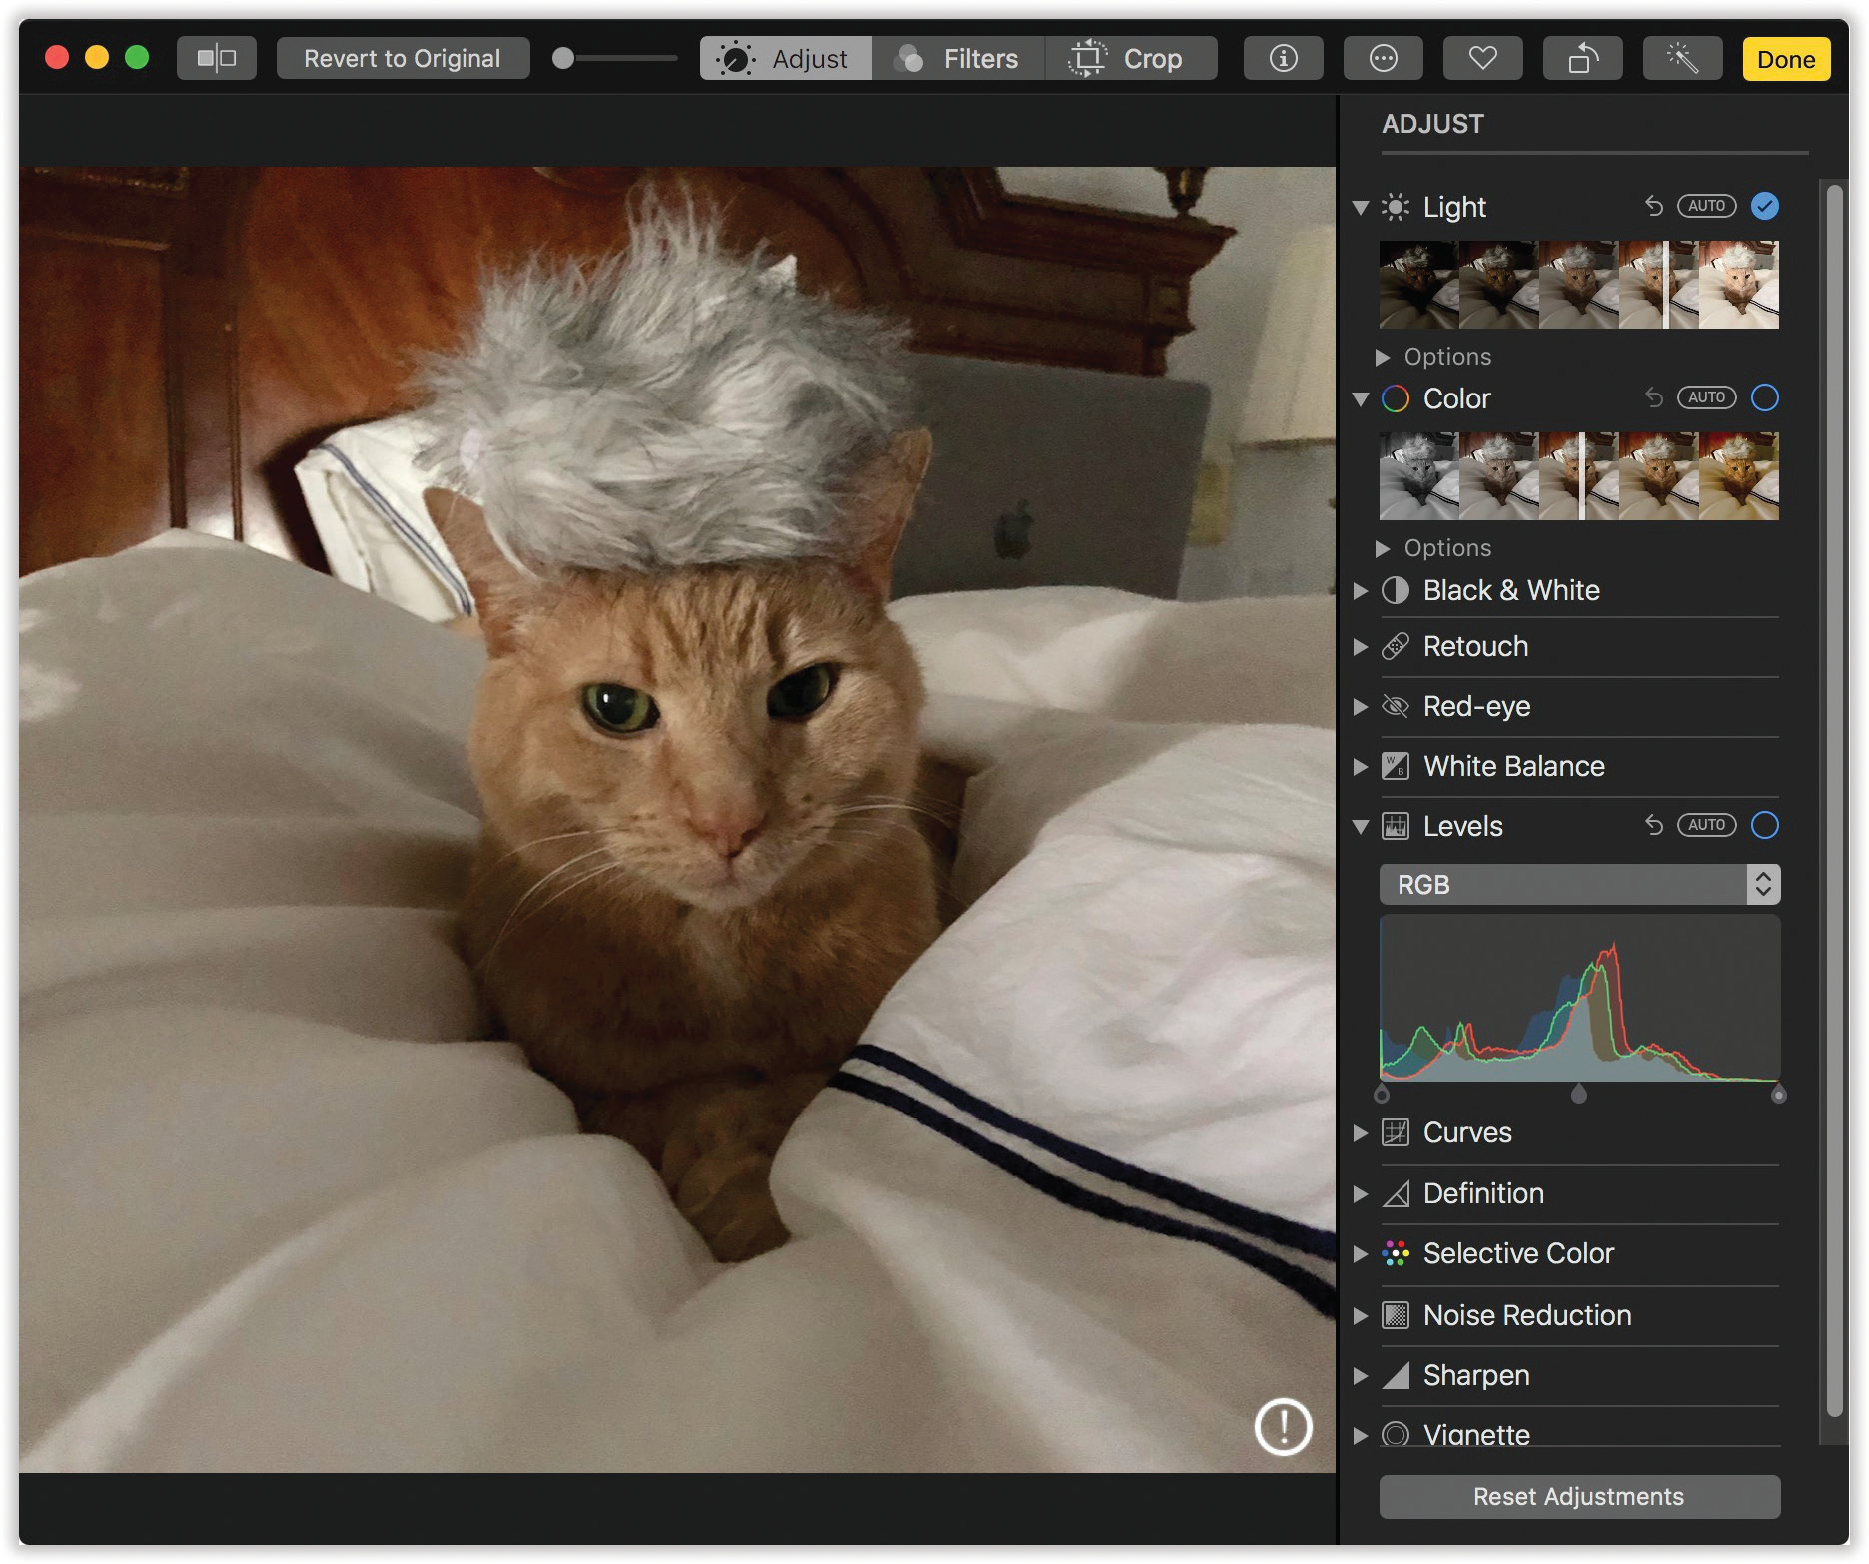
Figure 11-34. The Edit window offers a zillion expandable control tiles, each with its own sliders and menus. It can get pretty technical—fortunately, each also has an Auto button.
Red-eye. Devilish, glowing-red pupils in your subjects’ eyes has ruined many an otherwise great photo. It’s a reflection of the camera’s flash off the blood-red retinal tissue at the back of the eyes.
When you click this button, a message says, “Click each red-eye to correct.” Do what it says: Click inside each eye that has the problem. The app turns the red in each eye to black.
Tip
It helps to zoom in first. Use the slider at top left, or press ![]() -plus.
-plus.
At any point, you can compare your edited photo with the original by holding down the M key.
More control sliders
There’s another book’s worth of editing power in Photos. The other sliders include White Balance (the color of light in the shot—warmer, cooler, and so on); Levels (individual histograms—graphs—showing the distribution of red, green, and blue pixel densities in the photo, with handles that let you shift that distribution); Curves (lets you draw your own pixel-distribution graphs); Definition (adds clarity by adjusting the contrast of the photo’s midtones); Selective Color (adjusts the intensity and shade of individual colors, like yellow or red); Noise Reduction (attempts to minimize “grain,” or speckles); Sharpen (slightly de-blurs the entire image); and Vignette (darkens the corners of the image, focusing the attention on the center).
Most of these controls come with sliders, pop-up menus, and other tweaks that let you specify the effect. Most also offer an Auto button, which spares you from having to know what you’re doing.
Tip
The Extensions button, in Edit mode, gives you access to plug-ins from Apple and other companies that let you do even more with your photo retouching. The one called Markup comes with macOS; it lets you draw or type right onto your photos, exactly as described in “Annotations and Drawing Tools”.
The Rest of Photos
Photos also offers keywords, searching, sharing via iCloud (see “Revert”), slideshows, video trimming, photo books and calendars, and more.
Honestly, Photos is a huge program with a lot going on; you could write a whole book about it. In fact, someone has; check out Photos for Mac and iOS: The Missing Manual.
Preview
Preview is macOS’s scanning software, graphics viewer, fax viewer, and PDF reader. It’s always been teeming with features that most Mac owners never even knew were there—but it’s a flagship macOS program, offering all of Apple’s pet cutting-edge features like Auto Save, Versions, Full Screen mode, saving to iCloud (“Revert”), and a Share button (![]() ) that lets you send a document to somebody else (“Does the file have the correct file name suffix?”).
) that lets you send a document to somebody else (“Does the file have the correct file name suffix?”).
Tip
Preview can even open Microsoft Office documents (Word, PowerPoint, Excel) and iWork documents (Pages, Numbers, Keynote). You can’t edit them in Preview, but you can read them, search them, and print them. No longer must you pay homage to Microsoft’s bottom line just to have a look at the documents people send you.
Importing Camera Photos
Preview can import pictures directly from a digital camera (or iPhone), meaning that there are now three macOS apps that can perform that duty. (Photos and Image Capture are the other two.) It’s sometimes handy to use Preview for this purpose, though, because it has some great tools for photos: color-correction controls, size/resolution options, format conversion, and so on.
The actual importing process, though, is exactly like using Image Capture. Connect your camera, choose File → Import from [your camera’s name], and carry on as described in “Image Capture”.
Operating Your Scanner
Preview can also operate a scanner, auto-straighten the scanned images, and export them as PDF files, JPEG graphics, and so on.
This, too, is exactly like using Image Capture to operate your scanner. Only the first step is different. Open Preview, choose File → Import from Scanner → [your scanner’s name], and proceed as described in “Scanning”. Clearly Apple saved some time by reusing some code.
Multiple Pages, Multiple Views
One hallmark of Preview is its effortless handling of multiples: multiple fax pages, multiple PDF files, batches of photos, and so on. The key to understanding the possibilities is mastering the Sidebar, shown in Figure 11-35. The idea is that these thumbnails let you navigate pages or graphics without having to open a rat’s nest of individual windows.
Tip
You can drag these thumbnails from one Preview window’s Sidebar into another. That’s a great way to mix and match pages from different PDF documents into a single new one, for example.
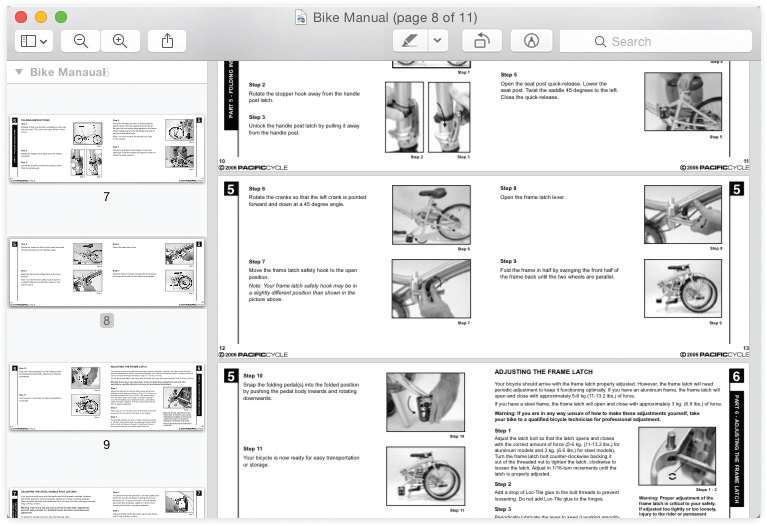
Figure 11-35. The Sidebar can display thumbnails, a table of contents, or annotations, or it can appear as a full-screen array of thumbnail images. Drag the central scroll bar to make the Sidebar bigger; drag the lower-right corner of the Sidebar to make the whole Preview window bigger.
To control the Sidebar, choose one of these commands from the View menu:
Hide Sidebar. Gets the Sidebar out of your way.
Thumbnails. This standard view (Figure 11-35, left) offers a scrolling vertical list of miniature pages or photos. Click one to see it at full size in the main window. Make the thumbnails larger or smaller by dragging the window/Sidebar dividing line.
Table of Contents. If you’re looking over photos, this option turns the Sidebar into a scrolling list of their names. If you’ve opened a group of PDFs all at once, you see a list of them. Or, if you have a PDF that contains chapter headings, you see them listed in the Sidebar as, yes, a table of contents.
Highlights & Notes. Preview is a better PDF editor than ever. If you add comments and highlighting to a PDF document, as described later in this section, you can view all of them in this tidy list—and click one to jump to it.
Bookmarks. Here you can see any bookmarks you’ve added to a PDF, as described later in this section.
Contact Sheet. When you choose this view, the main window scrolls away, leaving you with a full screen of thumbnail miniatures. It’s like a light table where you can look over all your photos or PDF pages at once. Make them bigger or smaller using the magnifying glass buttons at top left.
Tip
You can also change among these views by pressing Option-![]() -1, -2, -3, -4, -5, and -6.
-1, -2, -3, -4, -5, and -6.
Preview as Graphics Viewer
Preview is surprisingly versatile. It can display and manipulate pictures saved in a wide variety of formats, including common graphics formats like JPEG, TIFF, PICT, and GIF; less commonly used formats like BMP, PNG, SGI, and TGA; and even Photoshop, EPS, and PDF graphics.
Tip
Don’t miss the Tools → Show Magnifier command. It gives you a loupe: a magnifying circle (or, in a PDF document, a magnifying rectangle) that lets you inspect part of your graphic or PDF file more closely.
Bunches o’ graphics
If you highlight a group of image files in the Finder and open them all at once (for example, by pressing ![]() -O), Preview opens the first one but lists the thumbnails of the whole group in the Sidebar. You can walk through them with the
-O), Preview opens the first one but lists the thumbnails of the whole group in the Sidebar. You can walk through them with the ![]() and
and ![]() keys, or you can choose View → Slideshow (Shift-
keys, or you can choose View → Slideshow (Shift-![]() -F) to open a full-screen slideshow.
-F) to open a full-screen slideshow.
Tip
You can change the order of the photos just by dragging them around in the Sidebar, in any of its views.
Cropping graphics
To crop graphics in Preview, drag across the part of the graphic that you want to keep. To redraw, drag the round handles on the dotted rectangle; or, to proceed with the crop, choose Tools → Crop. (The keyboard shortcut is ![]() -K.) Since Preview is an Auto Save program, you can always return to the original if you change your mind someday.
-K.) Since Preview is an Auto Save program, you can always return to the original if you change your mind someday.
Tip
You can also rotate an image—even a PDF document—in 90-degree increments and then flip it vertically or horizontally, using the commands in the Tools menu. In fact, if you select several thumbnails in the Sidebar first, you can rotate or flip them all simultaneously.
Fixing up photos
Preview is no Photoshop, but it’s getting closer every year:
Choose Tools → Show Inspector. A floating palette appears. The tabs here depend on whether you’ve opened a PDF document or a photo, but they may include General Info (the photo’s name, its pixel dimensions, and so on); More Info (camera settings like the lens type, ISO setting, focus mode, whether the flash was on, and so on); Keywords (add keywords so you’ll be able to search for this image later using Spotlight); Crop (dimensions and selection size); and Annotations (markings that have been made to an image—maybe by you—using the Tools → Annotate function).
Choose Tools → Adjust Color. A translucent, floating color-adjustment palette appears, teeming with sliders for brightness, contrast, exposure, saturation (color intensity), temperature and tint (color cast), sharpness, and more. See Figure 11-36.
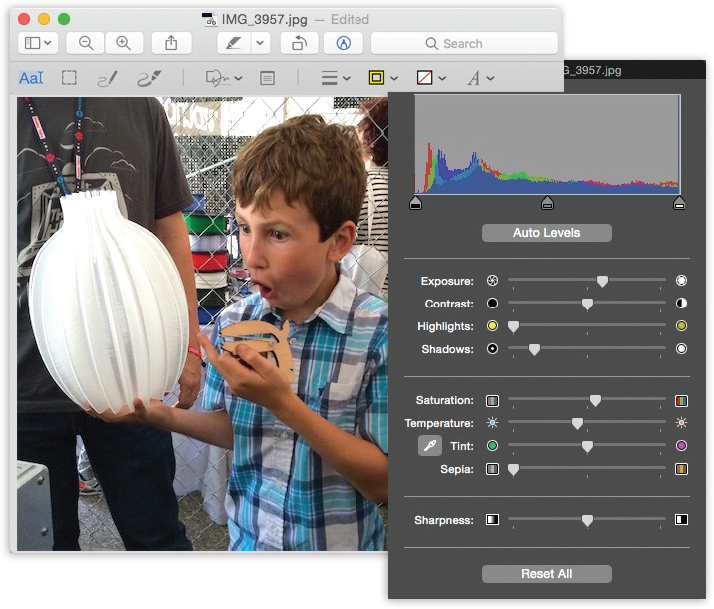
Figure 11-36. Humble little Preview has grown up into a big, strong mini-Photoshop. You can really fix up a photo if you know what you’re doing, using these sliders. Or you can just click the Auto Levels button. It sets all the sliders for you, which generally does an amazing job of making almost any photo look better.
Choose Tools → Adjust Size. This command lets you adjust a photo’s resolution, which comes in handy a lot. For example, you can scale an unwieldy 10-megapixel, gazillion-by-gazillion-pixel shot down to a nice 640 × 480 JPEG that’s small enough to send by email. Or you can shrink a photo down so it fits within a desktop window, for use as a window background.
 There’s not much to it. Type in the new print dimensions you want for the photo, in inches or whatever units you choose from the pop-up menu. If you like, you can also change the resolution (the number of pixels per inch) by editing the Resolution box.
Tip
Here’s a Photoshoppy feature you would never, ever expect to find in a simple viewer like Preview: You can extract a person (or anything, really) from the background. That’s handy when you want to clip yourself out of a group shot to use as your Messages portrait, when you want to paste somebody into a new background, or when you break up with someone and want him out of your photos. See the free PDF appendix to this chapter, “Cutting People from Photos with Preview.” It’s on this book’s “Missing CD” page at missingmanuals.com.
Converting file formats
Preview doesn’t just open all these file formats—it can also convert among most of them. You can pop open some old Mac PICT files and turn them into BMP files for a Windows person, pry open a TIFF file from a scanner and turn it into a JPEG for use on your website, and so on.
Tip
What’s even cooler is that you can open raw PostScript files right into Preview, which converts them into PDF files on the spot. You no longer need a PostScript laser printer to print out high-end diagrams and page layouts that come to you as PostScript files. Thanks to Preview, even an inkjet printer can handle them.
All you have to do is open the file you want to convert and choose File → Export. In the dialog box that appears, choose the new format for the image using the Format pop-up menu (JPEG, TIFF, or PNG, for example); if you press the Option key, you’re offered even more file types. Finally, click Save to export the file.
Preview as PDF Reader
Preview is a nearly full-blown equivalent of Adobe Reader, the free program used by millions to read PDF documents. It lets you search PDF documents, copy text out of them, add comments, fill in forms, click live hyperlinks, add highlighting, circle certain passages, type in notes—features that used to be available only in Adobe’s Acrobat Reader. You can even fill out PDF forms, typing into boxes on the electronic document.
Tip
Don’t forget that Preview is one of macOS’s certified full-screen apps, as described in “Full Screen Mode”. You can also flip through the pages of a PDF using the “next page” gesture: a two-finger swipe on the trackpad.
Here are the basics:
Zoom in and out using
-plus and -minus.Tip
Another way to get a closer look: Press the ` key (upper left of your keyboard), or choose Tools → Show Magnifier. Now a big magnifying glass follows your cursor; you can even press + or — to zoom in or out within it. Dismiss the magnifier by pressing ` again.
Use the View menu commands to control how the PDF document appears: as two-page spreads; as single scrolling sheets of “paper towel”; with borders that indicate ends of pages; and so on.
Press the space bar to page through a document (add Shift to page upward). The Page Up and Page Down keys do the same thing.
Tip
Some PDF documents include a table of contents, which you’ll see in Preview’s Sidebar, complete with flippy triangles that denote chapter headings. Use the
and keys to walk through these chapter headings, and then expand one that looks good by pressing the key. Collapse it again with the key. In other words, you expand and collapse flippy triangles in Preview just as you do in a Finder list view.Bookmark your place by choosing Bookmarks → Add Bookmark (
-D). You’ll be able to return to that spot by choosing its name—the page number and the first several words on the page—from the Bookmarks menu.These remain living, editable entities even after the document is saved and reopened. These are full-blown Acrobat annotations; they’ll show up when your PDF document is opened by Acrobat Reader or even on Windows PCs.
If you want to copy material out of a PDF document—for pasting into a word processor, for example, where you can edit it—click the Text tool (the
 on the toolbar) or choose Tools → Text Selection. Now you can drag through some text (and even graphics) and then choose Edit → Copy, just as though the PDF document were a web page. You can even drag across page boundaries.
To find a word or phrase somewhere in a PDF document, press
-F (or choose Edit → Find → Find) to open the Find box—or just type into the box on the right of the toolbar, if it’s open. Proceed as shown in Figure 11-37.The search results show a snippet of the actual text surrounding each “find,” along with the number of matches per page, and even a thumbnail of the page itself. It’s all about context, baby.
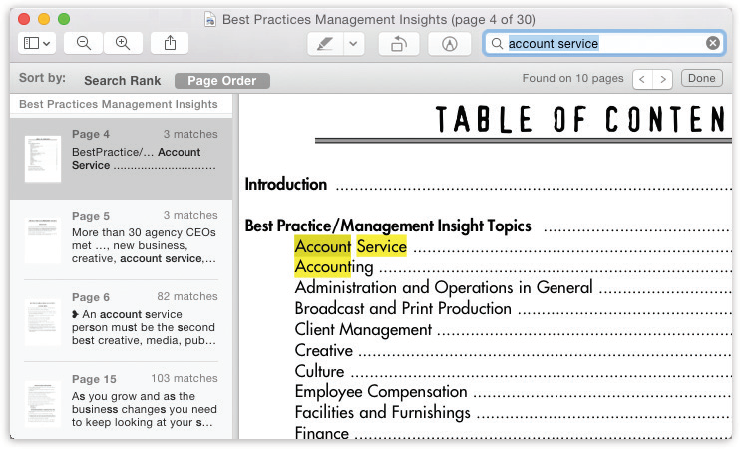
Figure 11-37. Type into the search box. Matches appear in the Sidebar, with page numbers; click one to go there. You can sort the found list either by rank (how likely Preview thinks it is to be what you’re looking for) or in page order; click the appropriate button to sort.
You can save a single page from a PDF as a TIFF file to use it in other graphics, word-processing, or page-layout programs that might not directly recognize PDF.
To extract a page, use the usual File → Export command, making sure to choose the new file format from the pop-up menu. (If you choose a format like Photoshop or JPEG, Preview converts only the currently selected page of your PDF document. That’s because there’s no such thing as a multipage Photoshop or JPEG document. But you already knew that.)
Tip
You can also scan a new page directly into an open PDF document, or use a page you shot on your i-gadget. Choose File → Import from [your device].
Add keywords to a graphic or PDF (choose Tools → Show Inspector; click the
tab; click the + button to fill them in). Later, you’ll be able to call up these documents with a quick Spotlight search for those details.
Annotations and Drawing Tools
Preview has become the Godzilla of PDF editing programs. It is, in fact, a full-blown drawing program now, with a choice of shapes, colors, lines, arrows, and text boxes to dress up a PDF document. These are identical to the drawing tools in Mail, so they’re worth getting to know.
You can type notes (in a box or a bubble), add clickable links (to web addresses or other spots in the document), or use circles, arrows, rectangles, strikethroughs, underlining, or colored highlighting to draw your PDF readers’ attention to certain sections. (You can dress up photos this way, too.) In fact, you can even use your laptop’s trackpad to draw on a document—or to sign one.
To highlight text in a PDF document, click the ![]() button on the toolbar, and then drag across the text. Use the pop-up menu next to the
button on the toolbar, and then drag across the text. Use the pop-up menu next to the ![]() to choose a different highlighter color, or to choose underlining or strikethrough styles.
to choose a different highlighter color, or to choose underlining or strikethrough styles.
For the more ambitious annotation styles, like signing a document or drawing on it, open the Markup toolbar, shown in Figure 11-38. To do that, click ![]() on the toolbar. At this point, the icons on the toolbar offer these features:
on the toolbar. At this point, the icons on the toolbar offer these features:
- Text Selection,
 Rectangular Selection. These toggles let you highlight text in a document (so you can copy it, for example) or select a chunk of a graphic.
  Sketch. This remarkable tool lets you draw freehand in your document—and marvel as Preview cleans up your lines. For example, if you draw what’s more or less a diagonal line, Preview straightens it and makes it a perfect 45 degrees. If you draw what seems to be a box or a circle, Preview zaps it into perfection. Use the
  ,
,  , and
, and  buttons to specify the line thickness, add a colored border, or fill the interior with a background color. Figure 11-38 shows the process.
 Shapes. Use this pop-up menu to choose what kind of perfect shape you want to draw: line, arrow, circle, square, and so on. It will use whatever thickness and color you’ve chosen from the and pop-up menus. Once you’ve selected a tool, drag diagonally on your document to place the shape.
The two icons at the bottom of this palette are unusual for a drawing program, but handy when you want to draw attention to some part of a document or photo.
At lower left in the Shapes pop-up menu, the Mask dims out the entire document except the rectangular portion you enclose. The one at lower right, the loupe, magnifies a circular area to draw the viewer’s eye to it (Figure 11-38, bottom). Whatever attention-flagging markings you enclose using these tools become part of the finished, exported PDF or graphic.
 Text. Click to place a text box on the image. You can drag it or reshape it—and, of course, you can replace the word “Text” inside it with much superior words of your own. Use the
  pop-up menu to choose a font, color, size, and style; use the and buttons to add a colored border or fill the interior with a background color.
 Sign. See the next section for details.
 Note. Click to place a virtual Post-it note onto the document. As you type or paste into it, the note expands; you can’t otherwise control its size or shape. But when you click outside the note, it collapses down into a little square button. At this point, you can change the note’s background color (right-click or two-finger click; choose a color from the shortcut menu); drag the little square to move the note; or open the note back up by double-clicking.
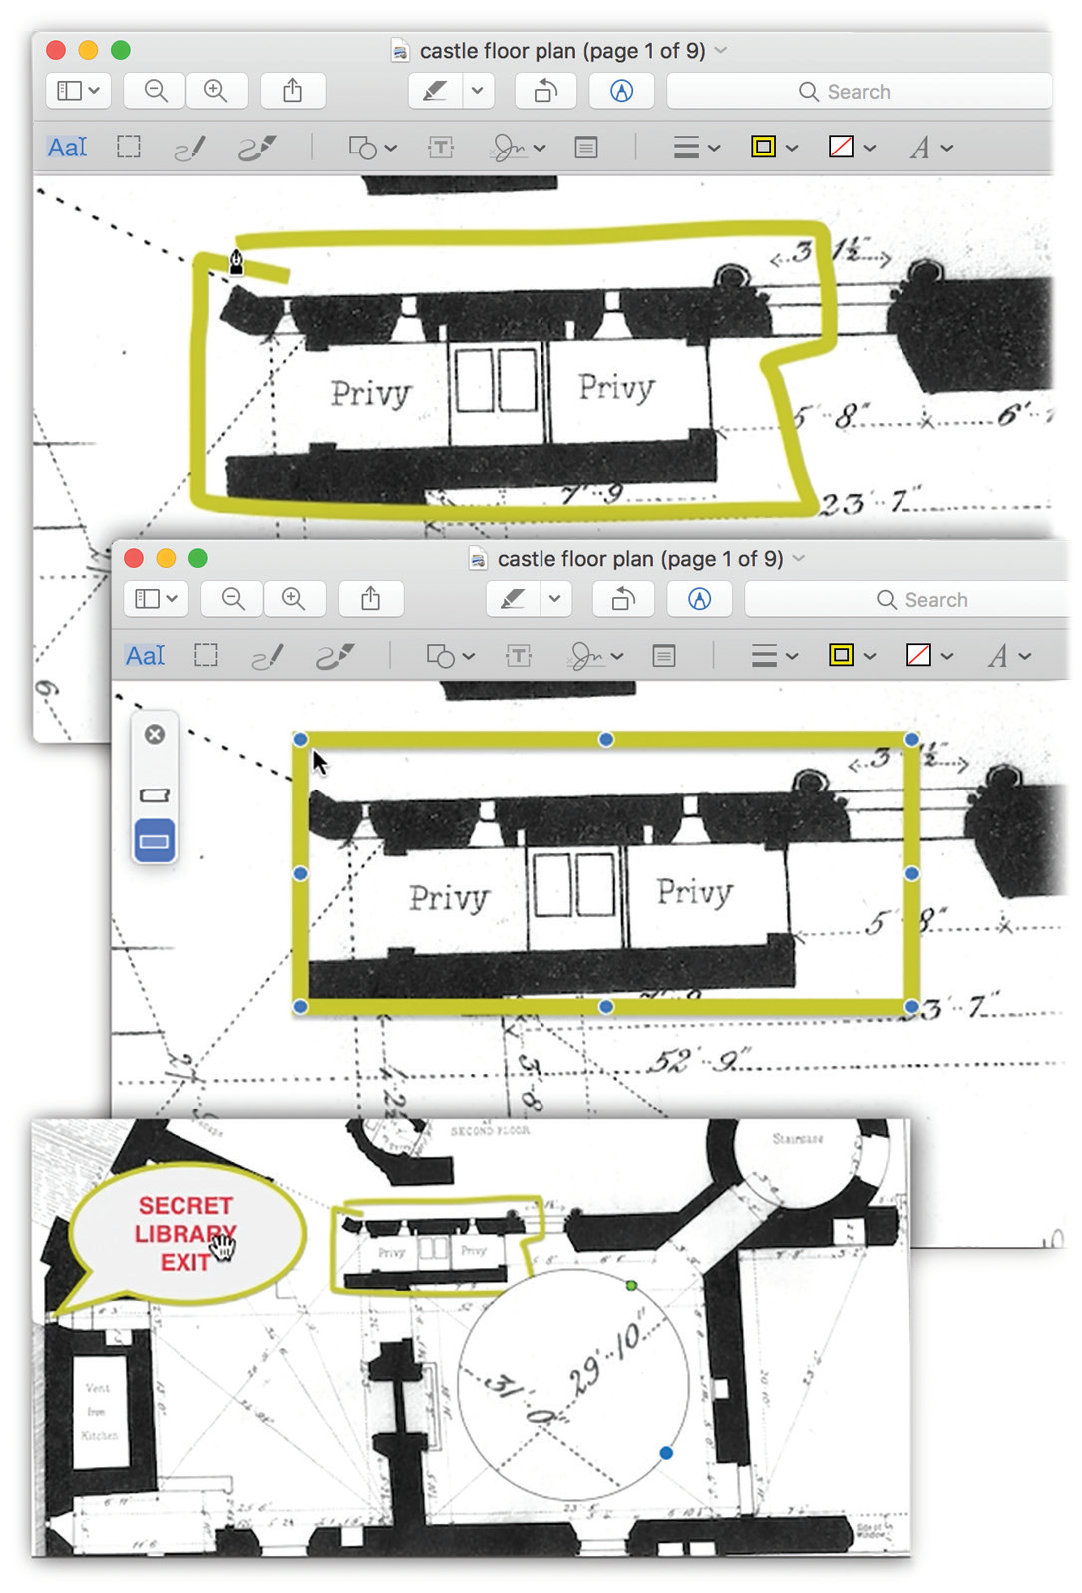
Figure 11-38. As you draw a freehand shape (top), macOS helpfully straightens your straight lines and makes your curved ones perfect (middle).
If you actually prefer your imperfect original, then you can click the original (or any other variation) from the little floating palette (shown at left in the middle illustration).
The Shapes pop-up menu () offers a range of fascinating drawing options. They include the classic Speech Bubble and the loupe, which produces a magnified view of one circular area (bottom).
While you’re editing a loupe, you see a tiny green dot. Drag it to adjust the magnification inside the circle; drag the blue one to change the circle’s size.Tip
Later you can view a tidy list of all your notes and highlighted passages by choosing View → Highlighting and Notes. On the resulting panel, Preview ordinarily displays each text note with your name and the date. If you’d rather not have that info added, then choose Preview → Preferences, click PDF, and then turn off “Add name to annotations.”
- Shape Style. This palette governs the thickness and style of whatever line or shape you’re drawing (or you’ve selected). There are some cool options here, including dashed lines, shadowed ones, chalky-looking ones—and ones with arrowheads.
- Border Color, Fill Color. These palettes affect the border color (line color) and interior background color of whatever shape you’re drawing (or have selected).
- Text Style. Here are your font, size, and style commands for whatever text you’re about to type (or have selected).
Once you’ve made an annotation, you can drag it around, drag its blue control dots to change its shape, edit the text inside it, and so on.
Signing PDF Documents with Your Real Signature
Of macOS’s 47,000 features, few are quite as slick or useful as the PDF signature option (Figure 11-39). It lets your Mac memorize your signature, either by taking a picture of it—or by letting you sign with your finger on your laptop’s trackpad.

Figure 11-39. Top: Hold up your written signature page in front of your Mac’s camera. Make sure it’s big enough to fill the box on the left side—never mind that it appears backward—and position it so that it sits on the blue line, as shown here. After a moment, your isolated, beautifully photographed signature appears in the Preview box.
Middle: You can choose a stored signature from the little pop-up menu.
Bottom: Drag to move your inserted signature; drag the corner dots to adjust its size.
Once Preview has stored your signature, you can slap it into the PDF documents that will come through your life.
The first step is to teach Preview what your signature looks like. On the Markup toolbar, click the Sign pop-up menu, ![]() . In the resulting window, you’re offered two tabs:
. In the resulting window, you’re offered two tabs:
Trackpad. If your Mac has a trackpad, this option lets you write out your signature with your finger! Click where it says “Click Here to Begin,” and then draw away.
Plan ahead; the width of the trackpad is all the space you’ve got. When you’re done, press any key and then click Done. The result may not look exactly like your pen-and-paper signature, but it’ll do for most purposes.
Camera. Sign your name on a piece of white paper; hold it up to your Mac’s camera, as shown in Figure 11-39. When the positioning looks good, click Done. You’ve just stored your signature. (You have to do this only once—per signature, anyway.)
Tip
As a handy bonus, whatever signatures you’ve saved this way also appear in Preview on all your other Macs. (At least those that are signed into the same iCloud account and are running Yosemite or later—and have iCloud Keychain turned on in Settings → iCloud.)
Now, then. When the time comes to sign a document, make the Markup toolbar visible. From the ![]() pop-up menu, choose the signature’s name (Figure 11-39, middle.)
pop-up menu, choose the signature’s name (Figure 11-39, middle.)
The signature appears in its own graphics box. Drag it to a new position, or drag the blue handles to resize it (Figure 11-39, bottom).
Tip
To delete a signature, open the ![]() pop-up menu, point to the signature, and click the
pop-up menu, point to the signature, and click the ![]() next to it in the menu.
next to it in the menu.
Fill in PDF Forms
Here’s a feature that could save a lot of trees: fill-inable PDF forms.
Figure 11-40. When you fill in a form, the cursor changes automatically into an insertion point when it detects a box or a line you can fill in. And it turns into a pointing-finger icon when it’s over a checkbox. Click to put a checkmark in that box; click again to remove the checkmark. It’s hours of fun for the whole family!
When you’re finished, save the document as you would any other. Amazingly, you’ll be able to edit your responses when you open the PDF document again later.
Lots and lots of PDF documents are forms that you’re supposed to fill out—from IRS tax forms to school permission slips. Preview is smart enough to recognize boxes to fill in, lines to type on, and checkboxes to click, meaning that you don’t have to print, fill out, and then scan these things anymore. And it manages to find those lines, text boxes, and checkboxes on any PDF document, not just those that were originally designed to be filled in by PDF form-filling software. See Figure 11-40.
The Toolbar
There’s a lot you can do with Preview’s toolbar. You can customize it (by choosing View → Customize Toolbar), rearrange its icons (by ![]() -dragging them sideways), and remove icons (by
-dragging them sideways), and remove icons (by ![]() -dragging them downward).
-dragging them downward).
Reminders
Reminders is a to-do-list program. It not only records your life’s little tasks, but it also reminds you about them when the time comes. On a laptop, Reminders can even remind you about something based on where you are, just as it does on the iPhone. For example, when you arrive home each day, it can remind you to feed your cats—or when you leave your vacation house, it can ask you if you’ve turned off the gas burners.
If you have an iCloud account, your reminders sync across all your gadgets. Create or check off a task on your iPhone, and you’ll also find it created or checked off on your Mac, iPhone, iPad, iPod Touch, or PC. (Yes, PC. See apple.com/icloud/setup/pc.html).
The syncing business also explains why the location feature is useful even if you have a desktop Mac that doesn’t move around a lot. You can program a reminder on your Mac—and your phone or tablet will alert you when you move into or away from a specified place.
Tip
Siri and Reminders are a match made in heaven. “Remind me to file the Jenkins report when I get to work.” “Remind me to set the TiVo for tonight at 8.” “Remind me about Timmy’s soccer game a week from Saturday.” “Add waffles to my Groceries list.” Speech recognition rocks when it comes to leaving notes for yourself. And iCloud will take care of copying those reminders to your iPhone.
Once you’ve opened Reminders (Figure 11-41), you record a new task by clicking the + button in the upper right, or choose File → New Reminder (![]() -N). A new blank line appears in your list. Type your reminder.
-N). A new blank line appears in your list. Type your reminder.
Later, as you go through life completing tasks, click the checkbox next to each one. Doing that makes the item seem to disappear—but in fact, it whips into a separate list called Completed.
Tip
Reminders is another app that’s greatly accelerated by the Touch Bar, if you have one (“The Complicated Story of the Function Keys”). Here you get instant access to the +, ![]() , and other useful buttons.
, and other useful buttons.
The Details Bubble
If you click an item’s ![]() button, you open the Details bubble. See Figure 11-41.
button, you open the Details bubble. See Figure 11-41.
Here are the options you’ll find:
On a Day. Reminders can remind you at a certain time on a certain date. In the Details bubble, next to “remind me,” turn on On a Day. The proposed time is the next “o’clock”—if it’s 12:15 now, the app suggests 1:00. But you can click the date to open a clickable mini-calendar (to change the date), or click the digits of the time to edit them.
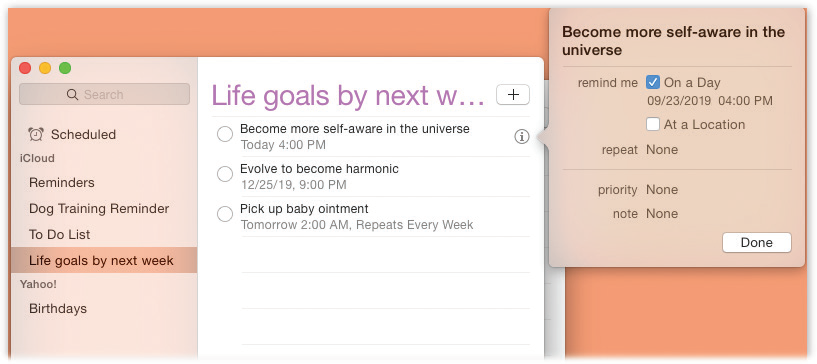
Figure 11-41. To open the Details panel, double-click the reminder item in the list, or click the
 button to its right.
To close the panel, click Done or click anywhere else in Reminders.At a Location. If you turn on this checkbox, your Mac or phone will use its location circuits to remind you of this item when you arrive at a certain place or leave a certain place. (Your laptop will remind you, if it’s turned on and within a Wi-Fi hotspot. But more often, this option will be useful if you have an iPhone or iPad that’s on the same iCloud account. Record the reminder on your Mac—receive the reminder on your phone.)
The little pop-up menu here proposes Current Location—wherever you are at the moment. That’s handy if, for example, you’re dropping off your dry cleaning and want to remember to pick it up the next time you’re driving by.
But you can click that line to specify Home (your home address, as you’ve set it up in Contacts). You can also start typing any city name, or the name of any person in your Contacts whose address you’ve specified. You’ll even see “Porky Pig Home” and “Porky Pig Work,” if Porky has a couple of addresses on file.
The final step here is to click either Leaving or Arriving. Later, your gadgets will remind you at the appointed time, or as you approach (or leave) the appointed address. It’s fairly mind-blowing the first few times it happens.
repeat. Reminders can remind you about things that recur in your life, like quarterly tax payments, haircuts, and anniversaries. Click “repeat” if you want this reminder to appear every day, week, two weeks, month, or year. (This option appears only if you’ve turned on the On a Day option.)
priority. Click this pop-up menu to specify whether this item has High, Medium, or Low priority—or None. You’ll see one, two, or three exclamation marks (!!!) next to each item in your Reminders list, indicating its urgency. In some of the calendar programs that sync with Reminders, you can sort your task list by priority.
note. Here’s a handy place where you can record freehand notes about this item: an address, a phone number, details of any kind.
Click Done to close the Details bubble and record your changes.
The Calendar of Deadline Hell
As you now know, Reminders can give you warnings of upcoming deadlines and to-do items. You don’t have to wait until it gives you a reminder, though. Click Scheduled at the top of the list to review a list of all upcoming reminders.
Lists
Handily enough, you can create more than one to-do list, each with its own name: a Groceries list, Kids’ Chores, a running tally of expenses, and so on. Here’s a great way to log what you eat if you’re on a diet, or to keep a list of movies people recommend.
If you share an iCloud account with another family member, you might create a different Reminder list for each person. (Of course, now you run the risk that your spouse might sneakily add items to your to-do list!)
If you have an Exchange account, one of your lists can be synced to your corporate Tasks list. It doesn’t offer all the features of the other lists in Reminders, but at least it’s kept tidy and separate. (Just set up your Exchange account in System Preferences → Internet Accounts.)
The list of lists is at the left side of Reminders; it’s visible in Figure 11-41.
At the outset, the list of lists lists only one list: Reminders. But you can create others. Click the + button at the bottom-left corner, or choose File → New List, or hit ![]() -L, or just double-click any blank spot in the list of lists. (If you have more than one online account set up, like an iCloud account and a Yahoo account, you’ll have to specify which account gets this list).
-L, or just double-click any blank spot in the list of lists. (If you have more than one online account set up, like an iCloud account and a Yahoo account, you’ll have to specify which account gets this list).
In any case, you’ve just made a new list called New List. Type to rename it to “Groceries list,” “Movies list,” whatever you like. (You can also get rid of a list by clicking it and then pressing the Delete key.)
Tip
You can view the contents of more than one list simultaneously. Just Shift-click the names of the lists you want in the left column; the right-side pane displays a unified, combined list of all their contents.
You can also open a list into a window of its own, just by double-clicking its name in the left column.
Once you’ve created some lists, you can switch among them by pressing the ![]() and
and ![]() keys to “walk” through the list.
keys to “walk” through the list.
You can assign a task to a different list by dragging it. Click any blank part of its line (not the text itself), and drag carefully onto the name of a different list in the List list at left.
Syncing Reminders
Once you’ve set up a few reminders in Reminders, you’ll marvel as it gracefully integrates with the Notification Center when it wants your attention.
But it also auto-synchronizes your to-do lists across other gadgets, like iPhones, iPads, iPod Touches, other Macs, and even Windows PCs.
To give it permission for that kind of sharing, open System Preferences → iCloud and turn on the Reminders checkbox.
Note, however, that Reminders also can coordinate with the to-do list features of Exchange and so-called CalDAV services (Yahoo is one). To set them up, open System Preferences → Internet Accounts. Click the account you want (like Exchange or Yahoo); finally, turn the Reminders switch On.
That should do it. Now your to-do lists are synced, both ways.
Tip
You can also export your lists as .ics files, which you can then import into Google Calendar or another program. Just click the list and then choose File → Export. You can also import an existing .ics file (from another computer, for example) into a Reminders list you’ve selected: It’s File → Import, of course.
QuickTime Player
There’s a lot to say about QuickTime player, but it’s all in Chapter 15.
Safari
The secrets of Apple’s web browser are revealed in Chapter 18.
Stickies
Even in the age of the far more modern Notes program, the old Stickies app is still creaking along. It creates virtual Post-it notes that you can stick anywhere on your screen.
You can use Stickies for quick notes and to-do items, web addresses or phone numbers you need to remember, or any other little scraps and snippets of text you come across. They all show up whenever the Stickies program is running (Figure 11-42).
Creating Sticky Notes
The first time you launch Stickies, a couple of sample notes appear automatically, describing some of the program’s features. You can quickly dispose of each sample by clicking the Close button in the upper-left corner of each note or by choosing File → Close (![]() -W). Each time you close a note, a dialog box asks if you want to save it. If you click Delete Note, the note disappears permanently.
-W). Each time you close a note, a dialog box asks if you want to save it. If you click Delete Note, the note disappears permanently.
To create a new note, choose File → New Note (![]() -N). Then start typing or:
-N). Then start typing or:
Drag text in from any other program. Or drag text clippings from the desktop directly into your note. You can also drag a graphics file into a note to add a picture. You can even drag a sound or a movie in.
Drag the icon of a PDF file into a note. (Stickies can accommodate multipage PDF files. At first, you see only the first page, but the scroll bar reveals the rest.)
Choose File → Import Text and select any plain text file or RTF (Rich Text Format) document to bring it into a note.
Drag URLs into a note directly from a web browser’s address bar.
Tip
If one particular note contains your most important information—your to-do list, say—you can force it to remain in front of all other windows, even if Stickies itself gets shunted to the background. Just click the note, and then choose Note → Floating Window.

Figure 11-42. In the old days of the Mac, the notes you created with Stickies were text-only, single-font deals. Today, however, you can use a mix of fonts, colors, and styles within each note. You can even paste in graphics, sounds, and movies (like PICT, GIF, JPEG, QuickTime, AIFF, whole PDF files, and so on), creating the world’s most elaborate reminders and to-do lists.
After you paste in an image, you can even use the Markup tool to draw, scribble and highlight on it as you would in many other apps. Neat!In many Apple programs, you can select a chunk of text and then choose Make New Sticky Note from the program’s Services menu, or press Shift-
-Y. This command launches Stickies, creates a new note, and fills it with your selected text—all in one step.
Note
All your notes are stored in a file called StickiesDatabase, located in your Home → Library folder. You’re free to copy it, pass it along, and so on, just as you would any file.
Have a favorite style for your sticky notes? First create a new note, choosing the color and text style you like and setting it to the size you prefer. Then choose Window → Use as Default. All new notes you create now appear in the size, font, and color you’ve chosen.
Growing and Shrinking Notes
Stickies includes a few built-in tricks for managing a deskful of notes:
Drag any corner of the note to make it larger or smaller onscreen.
Use the small triangle in the upper-right corner of each note to zoom and shrink note windows with a single click. The first click expands a note nearly to full-screen size. Another click pops the note back down to normal size.
The best option: Double-click anywhere along the dark strip at the top of each note to collapse it into a compact one-line mini-note. You also can collapse a selected note by choosing Window → Collapse (
-M).
Tip
The most efficient way to use Stickies is to keep the notes in their collapsed state. When a note is collapsed, the first line of text shows up in tiny type in the collapsed title bar of the note, so you don’t have to expand the note to remember what’s in it. Plenty of notes can be summed up in a couple of words (“Pick up dry cleaning,” “Call Mom”), so you may even be able to leave your notes this way.
Formatting Notes
Stickies has word processor–like commands for creating designer sticky notes, with any combination of fonts, colors, and styles (explore the Font menu). You can also choose from six background colors from the Color menu.
Saving Sticky Notes
The notes you create in Stickies last only as long as you keep them open. If you close a note to get it out of the way (and click Delete Note in the confirmation box), it vanishes permanently.
If you want to preserve the information you’ve stuffed into your notes in a more permanent form, you can do it in one of two ways: Close the note but hit the Save button, or use File → Export Text. Either way, you save the note as a standalone TextEdit document, with the following format options:
Plain Text. This option saves your note as a plain text file, with neither formatting nor pictures.
RTF. RTF stands for Rich Text Format, a special exchange format that preserves most formatting, including fonts, style, and color choices. You can open the resulting RTF file in just about any word processor with all your formatting still intact.
RTFD. RTFD, a strange and powerful variant of RTF, is a Rich Text Format document with attachments. How do you “attach” items to an RTFD file? Drag the icon of an actual application (Preview, Calculator, or whatever) or a multipage PDF file, into a sticky note. The icon for the program or document appears in the note, but double-clicking the icon doesn’t do anything. When you export the note as an RTFD file, the result is a TextEdit document that has embedded within it the entire program or document you dragged in. The program icon appears just as it did in the sticky note, but if you double-click the icon, the program actually opens.
You can also paste a graphic into your sticky note. When you export the note as an RTFD document, the resulting package file includes a graphics file of the format you pasted.
Stocks
This one’s for you, big-time day trader. The Stocks app—another port-over from iOS, and therefore new in macOS Mojave—tracks the rise and fall of the stocks in your portfolio by downloading the very latest stock prices (see Figure 11-43).
(All right, maybe not the very latest. The price updates may be delayed as much as 20 minutes, which is typical of free stock-info services.)
When you first fire it up (and hit Continue to pass the welcome screen), Stocks shows you a handful of sample securities and indexes in the left-side column: the Dow Jones Industrial Average, the NASDAQ Composite Index, the S&P 500 Index, Apple, Google, and Facebook, for example.
Next to each, you see a spark graph (a miniature of today’s price fluctuations), its current share price, and beneath that, how much that price has gone up or down today. As a handy visual gauge to how elated or depressed you should be, this final number appears on a green background if it’s gone up, or a red one if it’s gone down. Click this number to cycle the display from a percentage to a dollar amount to current market capitalization (“120.3B,” meaning $120.3 billion in total corporate value).
When you click a stock, the top right part of the screen zooms in for the details on that company. Here’s what it contains:
A table of statistics. A capsule summary of today’s price and volume statistics for this stock.
A graph of the stock’s price. It starts out showing you the graph of today’s fluctuations. But by clicking the headings above the chart, you can zoom in or out, from one day (1D) to the entire history of the company (All), with many increments in between.
Tip
Move the cursor across the graph to see the readout for a certain day. Or drag to isolate a certain time period; pop-up labels show how much of a bath you took (or how much of a windfall you received) during the interval you highlighted. Cool!
An assortment of relevant headlines, brought to you by the News app (“Flyover Tours”). Click a headline to read the article.
Customizing Your Portfolio
It’s fairly unlikely that your stock portfolio contains just Apple, Google, and Facebook. Fortunately, you can customize the list of stocks to reflect the companies you do own (or want to track).

Figure 11-43. Top: The Stocks app, newly arrived on the Mac, tracks your portfolio in the left-side column. At the right, you see news stories related to your holdings—a key factor in their value fluctuations.
Bottom: Click a stock to see its price graph over time. Drag through the graph to isolate a certain time interval.
To edit the list, click ![]() in the lower-right corner of the stocks list. You arrive at the editing screen, where these choices await:
in the lower-right corner of the stocks list. You arrive at the editing screen, where these choices await:
Delete a stock by clicking the
 button and then the Remove confirmation button.
Rearrange the list by dragging the grip strips on the right side.
Add a stock by clicking + in the top-left corner; in the search box, type in the company’s name or symbol for a scrolling list of companies with matching names. Click + for one you want to track. You return to the stocks-list editing screen.
When you’re finished setting up your stock list, click Cancel and then Done.
System Preferences
This program opens the door to the nerve center of macOS’s various preferences, settings, and options. Chapter 9 covers every option in detail.
TextEdit
TextEdit is a basic word processor—but it’s not nearly as basic as people think it is. You can create real documents with real formatting, using style sheets, colors, automatic numbering and bullets, tables, and customized line spacing. You can even open, edit, and create Microsoft Word documents. If you had to, you could write a children’s book in TextEdit, and it would look pretty decent.
Better yet, TextEdit (Figure 11-44) is now a showcase for macOS’s iPaddish features, like Full Screen mode, Auto Save, and Versions (see Chapter 5). It can also save your files into your iCloud locker, as described in “Revert”.
And TextEdit works with macOS’s long list of built-in text-editing features: smart links, smart quotes, smart dashes, smart copy/paste, abbreviation expansion, auto–typo correction, data detectors, and so on. (They’re all described in Chapter 6.)
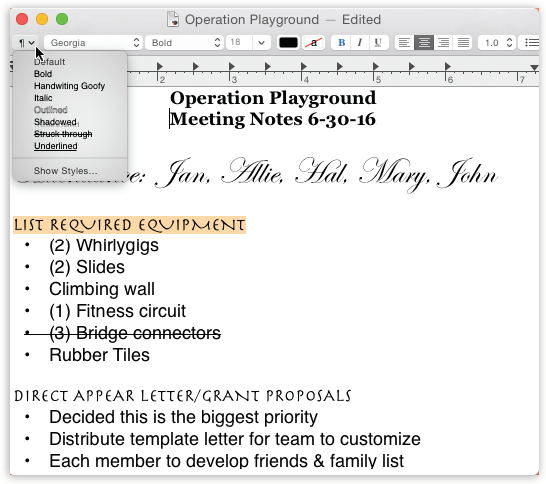
Figure 11-44. The text ruler gives you control over tab stops, paragraph justification, and so on. Pressing -R makes it appear and disappear. On the toolbar, the Style pop-up menu ( ) lists canned sets of character and paragraph formatting, so you can apply them consistently throughout a document.
Tip
You can magnify the type of a TextEdit document just the way you do on an iPhone or an iPad: by pinching or spreading. That is, spread two fingers on your trackpad to zoom in, or pinch on the trackpad to zoom out. Best. Tip. Ever.
TextEdit’s Two Personalities
The one confusing aspect of TextEdit is that it’s both a plain text editor (no formatting; globally compatible) and a true word processor (fonts, sizes, styles; compatible with other word processors). Here’s the scheme:
You can change a plain text document to a formatted one by choosing Format → Make Rich Text or Shift-
-T. The ruler appears automatically to remind you that a new world of formatting has just become available.Conversely, you can change a formatted document (a Word file you’ve opened, for example) to a plain text document by choosing Format → Make Plain Text (or, again, Shift-
-T). An alert message appears to point out that you’re about to lose all formatting.If you know what kind of document you always want to open, go to the TextEdit → Preferences dialog box; on the New Document tab, select Rich Text or Plain Text. That’s what you’ll get each time you choose File → New.
Tip
Here’s also where you can turn on smart links, smart quotes, smart dashes, and the other smart text-processing features described in Chapter 6.
Working in TextEdit
As you begin typing, all the usual word-processing rules apply, with a few twists:
Choose bold, italic, and font sizes using the formatting toolbar. (You can still use the commands in the Format menu.) You can even create subscripts or superscripts, change the color of the text (Format → Font → Show Colors), and so on.
Common paragraph-alignment options—Align Left, Align Right, Center, Justify—are all available as toolbar buttons and also reside in the Format → Text submenu. Adjust the line spacing (single, double, or any fraction or multiple) using the Spacing pop-up menu in the toolbar.
The toolbar also offers automatic bulleting and numbering of paragraphs. Just choose the numbering style you prefer from the pop-up menu at the right end of the toolbar.
Tip
If your Mac has a Touch Bar (“The Complicated Story of the Function Keys”), all of these formatting controls appear as glowing buttons—the better to apply styles without lifting your hands from the keyboard.
You can select several nonadjacent bits of text simultaneously. To pull this off, highlight your first piece of text by dragging, and then press
as you use the mouse to select more text. Bingo: You’ve highlighted two separate chunks of text.When you’re done selecting bits of text here and there, you can operate on them en masse. For example, you can make them all bold or italic in one fell swoop. You can even use the Cut, Copy, and Paste commands, as described in the next section. When you cut or copy, the command acts upon all your selections at once.
You can also drag any one of the highlighted portions to a new area, confident that the other chunks will come along for the ride. All the selected areas wind up consolidated in their new location.
Tip
If you Option-drag one of the highlighted bits, you copy all selected chunks, leaving the originals in place.
Similarly, you can use the Find command. To do that, choose Edit → Find → Find (or just press
-F). Fill in the search box; the sought-for term appears highlighted everywhere in your document at once. (You can also search and replace, using the other commands in the Edit → Find submenu.)If you Option-drag vertically, you can freely select an arbitrary column of text (not necessarily the entire page width). This technique is useful when you want to select only one column in a multicolumn layout, or when you want to select the numbers in a list and format them all at once.
Style Sheets
A style is a prepackaged collection of formatting attributes that you can apply and reapply with a click of the mouse (bold, 24-point Optima, double-spaced, centered, for instance). You can create as many styles as you need: chapter headings, sidebar styles, and so on. You end up with a collection of custom-tailored styles for each of the repeating elements of your document.
Once you’ve created your styles, you can apply them as you need them, confident in the knowledge that they’ll be consistent throughout the document. During the editing process, if you notice that you accidentally styled a headline using the Subhead style, you can fix the problem by simply reapplying the correct style.
Note
TextEdit doesn’t let you change a style’s formatting and thereby update every occurrence of it. Fortunately, you can search for all occurrences of a style and change them all simultaneously (see “POWER USERS’ CLINIC Advanced Typography in TextEdit”).
Creating a named style. To create a style, format some text so it looks the way you like it, complete with font, color, line spacing, tab settings, and so on.
Then, from the
pop-up menu at the left end of the toolbar, choose Show Styles (Figure 11-45). Click Add To Favorites, type a name for the style, turn on both checkboxes, and then click Add.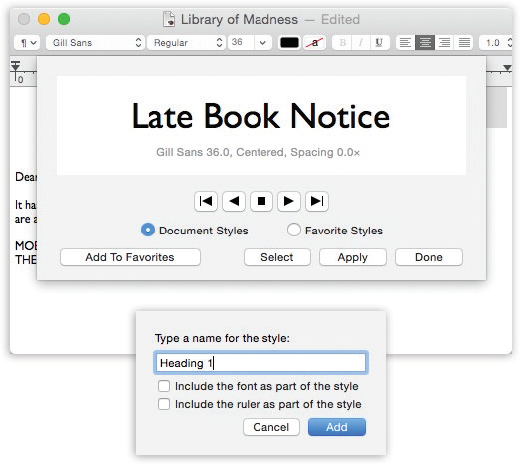
Figure 11-45. Highlight the text you want to format. Then, from the ¶ pop-up menu in the toolbar, choose Show Styles. With each click of the
button, you summon a snippet of the next chunk of formatting. When you find one you like, you can either click Apply (to zap the highlighted text into submission) or Add To Favorites (to reuse this canned style later). In the latter case, you can give the new style a name (bottom).Applying a style. Later, when you want to reuse the formatting you set up, highlight some text and then choose the appropriate name from the
pop-up menu. TextEdit applies the formatting.Tip
If you simply click inside a paragraph, applying a style affects only paragraph attributes, like line spacing, tab stops, and alignment. If you highlight a random chunk of text instead, applying a style affects only character attributes, like the font and type size. If you highlight an entire paragraph, however, both text and paragraph formatting appear.
Deleting a style. To delete a superfluous style, choose Show Styles from the
pop-up menu on the toolbar. Click the Favorite Styles button, choose the unwanted style’s name from the pop-up menu, and then click Remove From Favorites. (Deleting a style doesn’t affect any formatting that’s already in your document; it just removes the name from the Styles menu.)Replacing all occurrences. You can highlight every occurrence of a certain style at once—and then change, copy, or delete them all at once.
To make this work, choose Show Styles from the
pop-up menu. Choose the style you want to work on. (If Document Styles is selected, then click the button to page through the styles; if Favorite Styles is selected, then choose from the pop-up menu.) Then click Select.In the little details sheet that appears, click the options you want, and then click Select. TextEdit highlights every occurrence of that style in the entire document (or selection). At this point, you can use any of the usual text-formatting controls to modify them all simultaneously.
Formatting by example. In TextEdit, you can also use Option-
-C and Option--V (Format → Font → Copy Style and Format → Font → Paste Style) to grab formatting from one place in your document and reuse it elsewhere. (Of course, you can’t apply styles in text-only documents.)
Tables
Tables can make life a lot easier when you want to create a resumé, agenda, program booklet, list, multiple-choice test, web page, or another document where numbers, words, and phrases must be aligned across the page. In the bad old days, people did it by pressing the Tab key to line up columns—a technique that turned into a nightmare as soon as you tried to add or delete text. But using a word processor’s table feature is light-years easier and more flexible, because each row of a table expands to contain whatever you put into it. Everything else in its row remains aligned.
Tip
Tables are sometimes used for designing web pages. Even though you can’t see the table outlines, many a web page is filled with columns of text that are aligned invisibly by tables. Because TextEdit can save your work as an HTML document, it’s a viable candidate for designing basic web pages.
Create a table by choosing Format → Table. The floating Table palette appears (Figure 11-46). Use it to specify how many rows and columns you want. The placeholder table in your document adjusts itself in real time.
Format the table using the other controls in the Table palette. The Alignment controls let you specify how the text in the table cells hugs its border. Cell controls the thickness of the line around the selected cells’ borders (or, if you enter 0, makes the table walls invisible). The color swatch next to Cell specifies the color of the solid lines. The Cell Background controls let you color in the table cells with colors of your choice. (Choose Color Fill from the pop-up menu, and then click the color swatch.) This is an especially valuable option for web designers.
Adjust the rows and columns by dragging the cell borders.
Merge two selected cells by clicking Merge Cells in the Table palette. Once you’ve done that, you can use the Split Cells button to split them apart again. (Split Cells doesn’t work except in cells you’ve previously merged.)
Nest a table inside a cell of another by clicking in the cell and then clicking Nest Table. Change the numbers in the Row and Columns boxes to set up its dimensions (Figure 11-46).
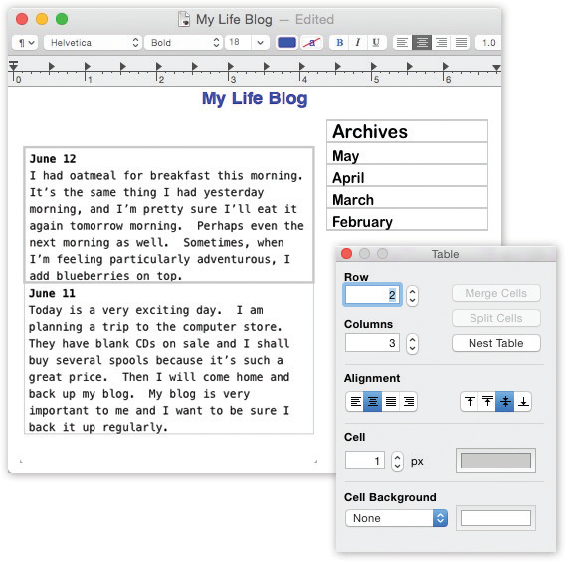
Figure 11-46. Note to web designers: TextEdit may not be Dreamweaver, but it’s great for spinning out quick web pages, thanks to the table features. Here you can see that a big table forms the underlying structure for this web page, along with a couple of nested ones and color selections.
TextEdit as Web Designer
The Table palette isn’t the only clue that Apple intends TextEdit to be a quick-and-dirty web page design program. Consider these other tools:
You can easily add graphics to the page by dragging or pasting them into a document. The program understands many common image formats, including TIFF, PICT, JPEG and PNG.
You can add web-style hyperlinks by highlighting “Click here” (or whatever the link says), choosing Edit → Add Link (
-K), and then entering the web address in the resulting dialog box. Or just drag a link in from Safari, Mail, or another program. (To edit the link later, right-click or two-finger click it, and then choose Edit Link.)Tip
Of course, you can also have TextEdit convert typed links into clickable ones automatically as you type them. That’s the purpose of the Smart Links option in TextEdit → Preferences.
To save a brand-new document as an HTML (web page) file, choose File → Save; from the File Format pop-up menu, choose Web Page. (To save an existing TextEdit document as an HTML file, choose File → Duplicate and then File → Save; choose Web Archive Document from the pop-up menu.)
Don’t miss the HTML options in TextEdit → Preferences. On the Open and Save tab, you can specify what kind of HTML document you want to produce, what Cascading Style Sheets (CSS) setting you want, and whether or not you want TextEdit to include code to preserve blank areas (white space) in your layout.
Tip
When you open a web page document—that is, an HTML document—TextEdit is faced with a quandary. Should it open up the page as though it’s a web page, interpreting the HTML code as though it’s a browser? Or should it reveal the underlying HTML code itself?
Actually, that’s up to you. When you choose File → Open, turn on “Ignore rich text commands” to make the document open up as HTML code. (To make this change permanent, turn on the same checkbox on the Open and Save pane of the TextEdit → Preferences dialog box.)
TextEdit Preferences
Most of the settings in the TextEdit Preferences → New Document pane have no effect on documents that are already open—only on documents you open or create from now on. Most of the settings are self-explanatory; nonetheless, handy explanatory balloons appear if you point to an option without clicking. Here are a few settings that may not be immediately clear:
Font. If Helvetica 12 doesn’t float your boat, you can change TextEdit’s starting font. In fact, you can set two default fonts—one for Rich Text documents and another one for plain text files.
Note
By definition, plain text files don’t have any formatting. So whatever font you choose here for plain text files is for your viewing pleasure only. If you plan to send the file to anyone else, remember that the font choice won’t be saved with the document.
Window Size. These settings have no effect unless you’re in Wrap to Window mode, in which the text rewraps to fit the window width, as opposed to Wrap to Page mode. (You choose these options from TextEdit’s Format menu.) If you are in Wrap to Window mode, then these dimensions determine the size of the window that appears each time you create a new TextEdit document.
Properties. These boxes—Author, Company, and Copyright—are some of the tags that Spotlight inspects when it searches your Mac. If you’d like to be able to round up your documents by these characteristics, fill them in here to specify the information you want to use for most documents. (To fill them in differently for individual documents, choose File → Show Properties instead.)
Options. These are the on/off switches for the various typing aids described in Chapter 6: smart quotes, data detectors, text replacement, and so on.
TextEdit’s Other Writing Tools
TextEdit includes a few other very useful document-editing tools:
Allow Hyphenation. When you select this command from the Format menu, TextEdit breaks up words by syllable and inserts hyphens when necessary in order to create more visually pleasing line breaks.
Tip
It’s especially important to turn this feature on if your paragraph alignment is set to Justify, or if you create narrow columns of text. If hyphenation is turned off, then TextEdit won’t break up long words at the end of a line—even if it leaves big, ugly gaps between words.
Prevent Editing. When you turn this option on (in the Format menu), you’re locked out. You can select and copy text to your heart’s content, but you can’t change anything. Prevent Editing mode can be useful if you want to prevent yourself from making accidental changes to a file, but it’s not much of a security feature. (All anyone has to do is choose Format → Allow Editing to regain full editing privileges.)
Spelling and Grammar. These aren’t TextEdit features; they’re system-wide macOS features, and they’re described starting in “Power Typing”.
Time Machine
This marquee feature of macOS is described in “Time Machine”.
Voice Memos
This audio app, the fourth of the new macOS apps that Apple adapted from iOS, is ideal for recording lectures, musical performances, notes to self, and cute child utterances (Figure 11-47). It can even sync your recordings with your iPhone and other Apple gizmos automatically, courtesy of iCloud.
Click ![]() to start recording from your Mac’s built-in microphone (or whatever source you’ve chosen in System Preferences → Sound). You get to watch the actual sound waves as the recording proceeds (Figure 11-47, left).
to start recording from your Mac’s built-in microphone (or whatever source you’ve chosen in System Preferences → Sound). You get to watch the actual sound waves as the recording proceeds (Figure 11-47, left).
You can pause the recording (![]() ) at any time, and then click Resume to continue; hit Done when the recording session is over.
) at any time, and then click Resume to continue; hit Done when the recording session is over.
The recording shows up with a name based on your current location, like 200 Madison St. (You can turn off this place-naming convention in Voice Memos → Preferences. In that case, every new recording is called, for example, New Recording 35.) You can rename it easily enough: Double-click the temporary name and then type something better (“Baby’s First Words,” “Orch Concert,” whatever).
When you click a recording in the list (Figure 11-47, left), a convenient set of controls appears. Here’s what you can do here:
- . Click to play the recording. You can pause with the
 button. (The space bar plays and pauses, too.)
 Rewind, Fast Forward. Drag the scrubber bar to skip backward or forward in the recording. It’s a great way to skip over the boring pleasantries. Or click the
 or
or  buttons to jump forward or back by 15 seconds. Or just click a spot to jump there.
- . Click to open the standard Share menu. It gives you the chance to send your recording to someone else by AirDrop, email, or Messages—or to drop the audio file into a Notes page.
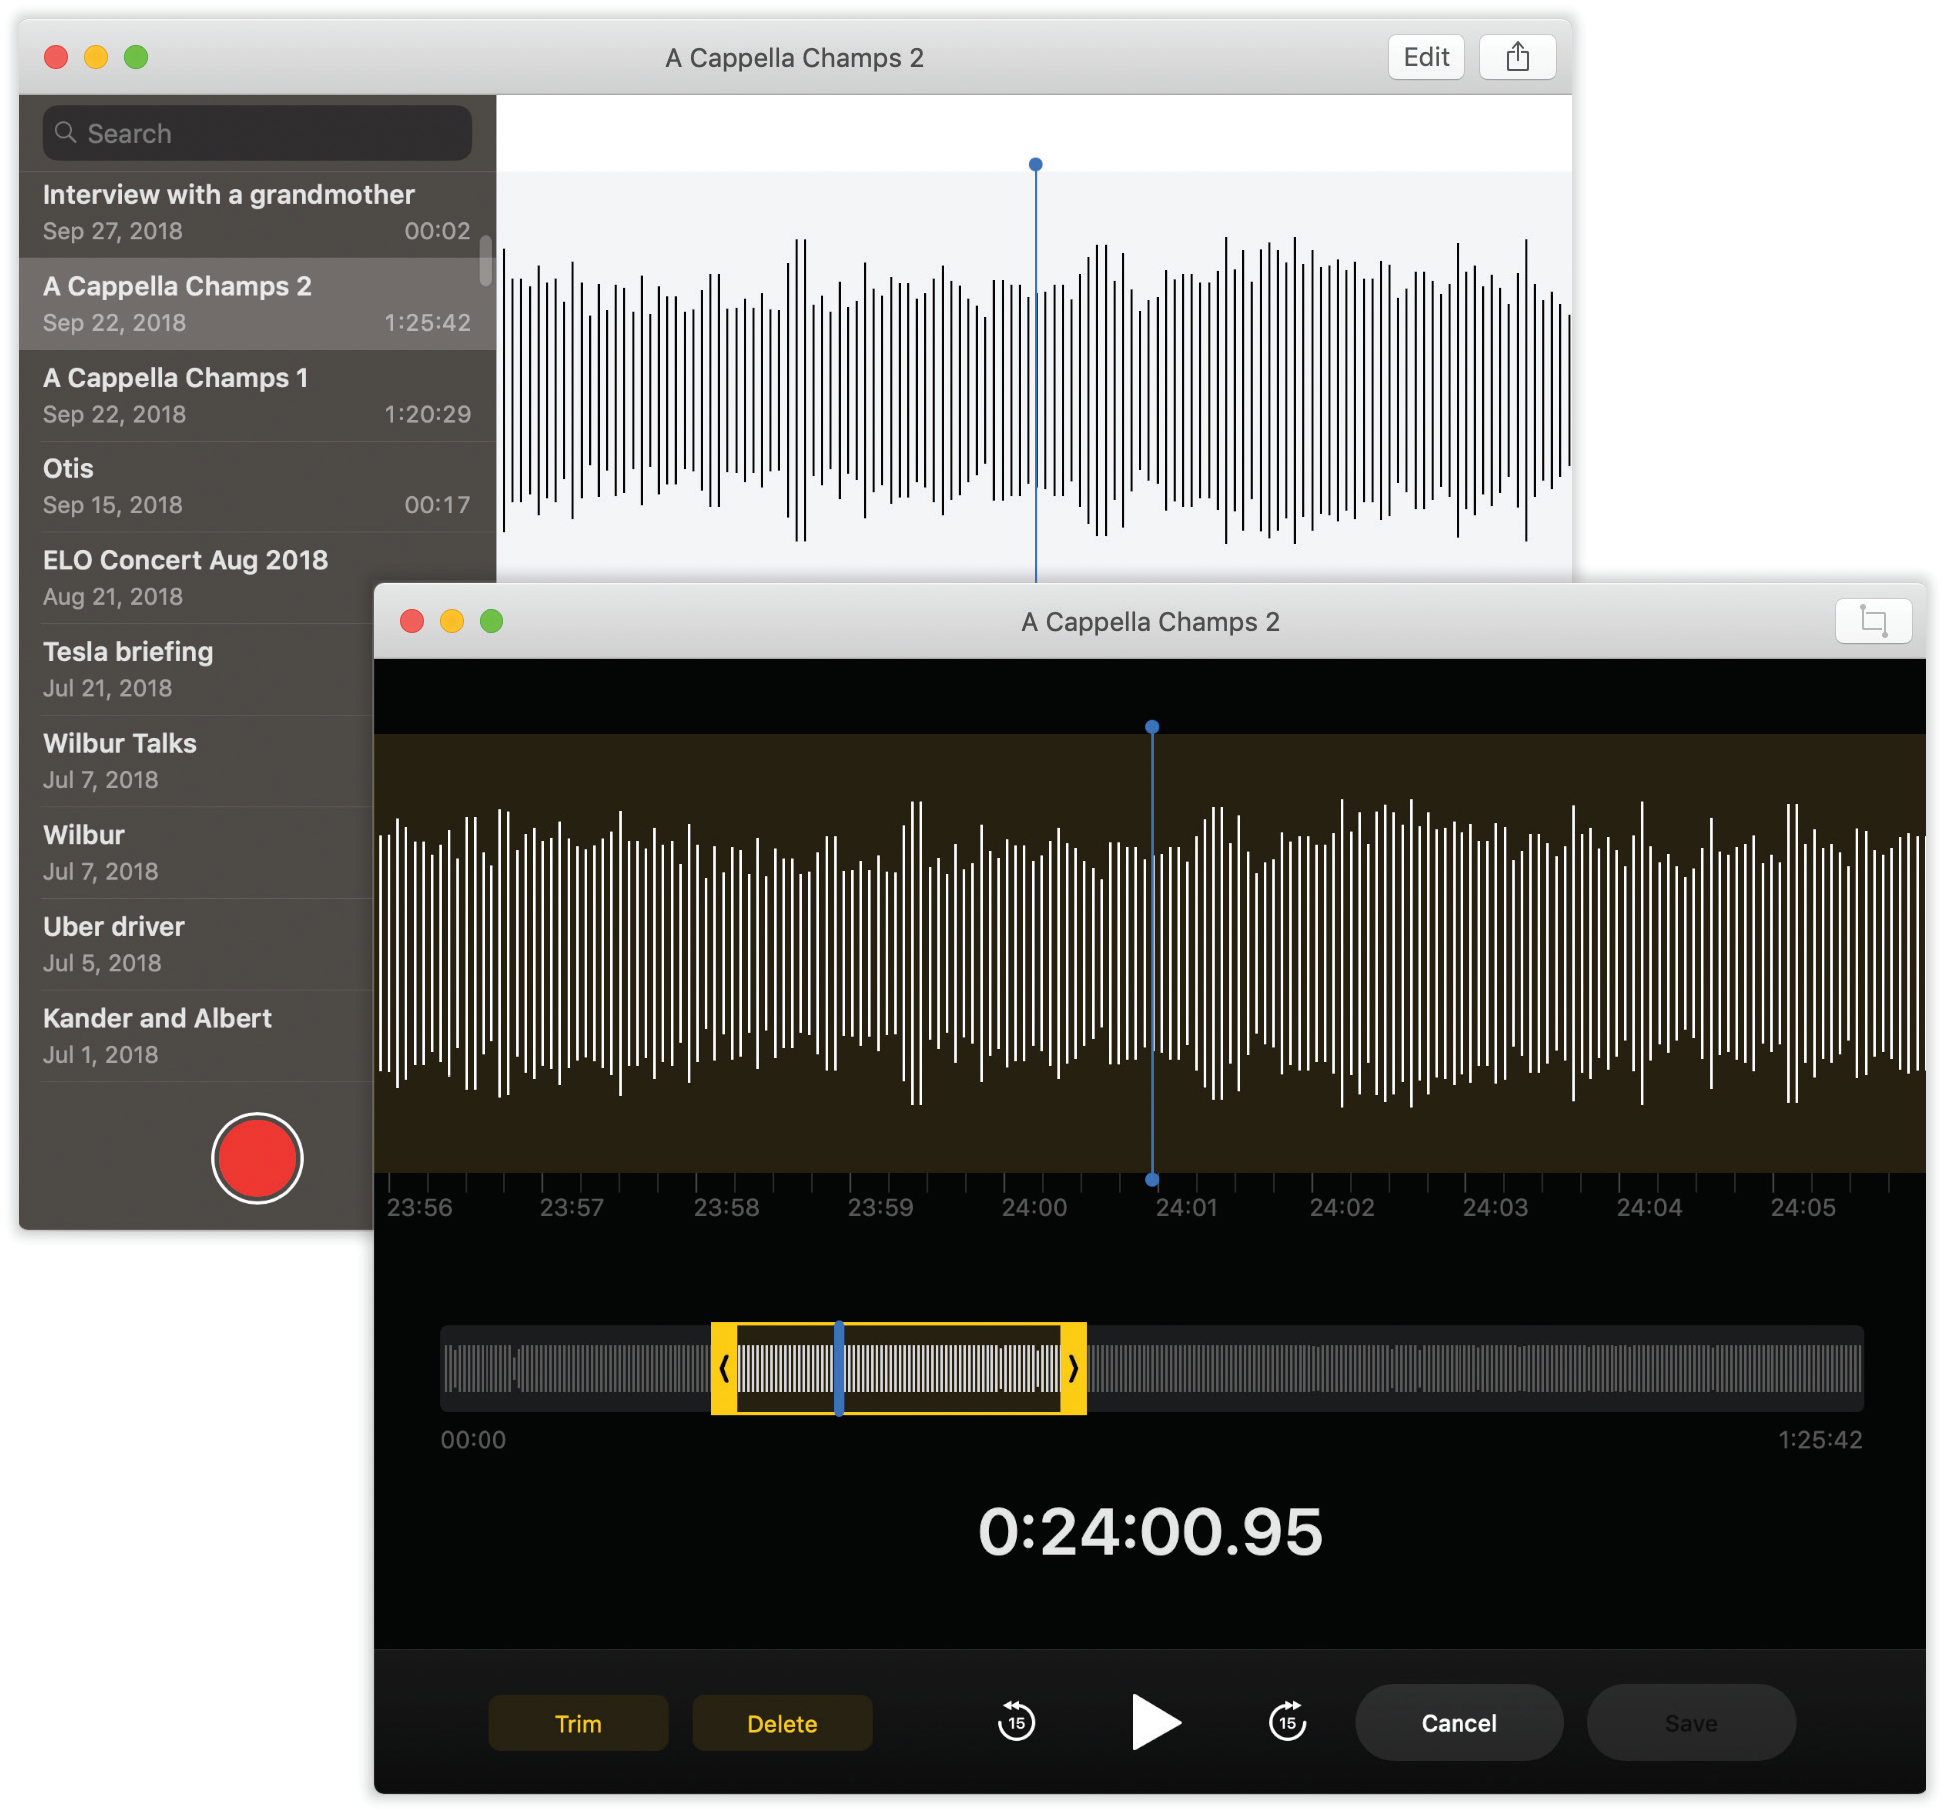
Figure 11-47. Left: You can make very long recordings with Voice Memos. Let it run all day, if you like. Even your most long-winded friends can be immortalized. Right: You can edit one of your recordings in this window. Hack something out of the middle, trim either end, or record new stuff onto the end.
To delete a recording, click its name in the list and then press Delete. You’re not asked for confirmation, but you do have a safety net: The deleted recording will sit in the Recently Deleted folder at the very bottom of the list for 30 days.
To see these recordings on death row, click Recently Deleted. Your options here are Recover All (rescue them from deletion), Erase All, or erase just one recording (select it, press the Delete key, and then click Erase to confirm).
Tip
In Voice Memos → Preferences → Clear Deleted, you can specify how quickly these deleted recordings disappear. Your choices are Immediately, After 1 Day, After 7 Days, After 30 Days, or Never.
Editing Your Recording
You might not guess that such a tiny, self-effacing app actually offers some basic editing functions, but it does. Click a recording, then Edit to open its Edit screen (Figure 11-47, right).
Here you have four options:
Record over it. When the blue playhead line is parked at the beginning or middle of the audio, the big red button says Replace. Click it to record over part (or all) of your original recording. This is kind of handy. If you recorded a brilliant speech, but stumbled on the opening line (or any line, actually), you can replace it without having to redo the whole thing. Hit
to stop.Add onto it. You can also add on more audio to your existing recording. Just park the blue playhead line at the end of the current sound waves, and then hit Resume. Hit
to stop.Trim it. You can trim off the beginning or end of your audio clip—which is great, since that’s where you’ll usually find “dead air” or microphone fumbling before the good stuff starts playing.
To do that, click the Crop button (
 ). At this point, the “map” of the entire sound recording (at the middle of the screen) sprouts yellow crop handles. Drag them inward to isolate the part you want to keep. When you’re close, use the magnified area at top to fine-tune the trip points, using the vertical yellow lines. Play the sound as necessary to guide you ().
Click Trim to shave away everything outside your selected area. If you like the result, click Save. If you’d rather try again, choose Edit → Undo. Or hit Cancel to forget the whole thing.
Cut out a chunk. To cut something out of the middle, isolate the undesired audio using the crop and trim handles as described above. This time, though, hit the Delete button. You’ve just chopped the selection out of the middle.
Here again, you can hit Save (to preserve the edit), or Cancel to back out of the entire operation.
The beauty of all of this, by the way, is that your audio recordings can now magically and wirelessly appear on all your other Apple machinery, just as though they’re calendar appointments or Safari bookmarks. The on/off switch for this syncing is hiding away in System Preferences → iCloud → iCloud Drive → Options → Voice Memos.
Utilities: Your macOS Toolbox
The Utilities folder (inside your Applications folder) is home to another batch of freebies: a couple of dozen tools for monitoring, tuning, tweaking, and troubleshooting your Mac.
Tip
There’s a menu command and a keystroke that can take you there. In the Finder, choose Go → Utilities (Shift-![]() -U).
-U).
Activity Monitor
Activity Monitor is designed to let the technologically savvy Mac fan see how much of the Mac’s available power is being tapped at any given moment.
The list of processes
Even when you’re running only a program or two on your Mac, dozens of computational tasks (processes) are going on in the background. The top part of the window, which looks like a table, shows you all the different processes—visible and invisible—that your Mac is handling at the moment.
Check out how many items appear in the Process list, even when you’re just staring at the desktop. It’s awesome to see how busy your Mac is! Some are easily recognizable programs (such as Finder), while others are background system-level operations you don’t normally see. For each item, you can see the percentage of the CPU being used, who’s using it (either your account name, someone else’s, or root, meaning the Mac itself), and how much memory it’s using.
Or use the View menu to see views like these:
All Processes. This is the complete list of running processes; you’ll notice that the vast majority are little Unix applications you never even knew you had.
All Processes, Hierarchically. In Unix, one process launches another, creating a tree-like hierarchy. The big daddy of them all is the process called launchd. Here and there, you’ll see some other interesting relationships: For example, the Dock launches DashboardClient.
My Processes. This list shows only the programs that pertain to your world, your login. There are still plenty of unfamiliar items, but they’re all running to serve your account.
System Processes. These are the processes run by root—that is, opened by macOS itself.
Other User Processes. Here’s a list of all other processes—“owned” by neither root nor you. Here you might see the processes being run by another account holder, for example (using fast user switching), or people who have connected to this Mac from across a network or the internet.
Active Processes, Inactive Processes. Active processes are the ones that are actually doing something right now; inactive are the ones that are sitting there, waiting for a signal (like a keypress or a mouse click).
Windowed Processes. Now, this is probably what you were expecting: a list of actual programs with actual English names, like Activity Monitor, Finder, Safari, and Mail. These are the only ones running in actual windows, the only ones that are visible.
The System Monitor tabs
At the top of Activity Monitor, you’re offered five tabs that reveal intimate details about your Mac and its behind-the-scenes efforts (Figure 11-48):
CPU. As you go about your usual Mac business, opening a few programs, playing QuickTime movies, playing a game, and so on, you can see the CPU graphs rise and fall, depending on how busy you’re keeping the central processing unit. You see a different graph color for each of your Mac’s cores (independent subchips on your processor), so you can see how efficiently macOS is distributing the work among them.
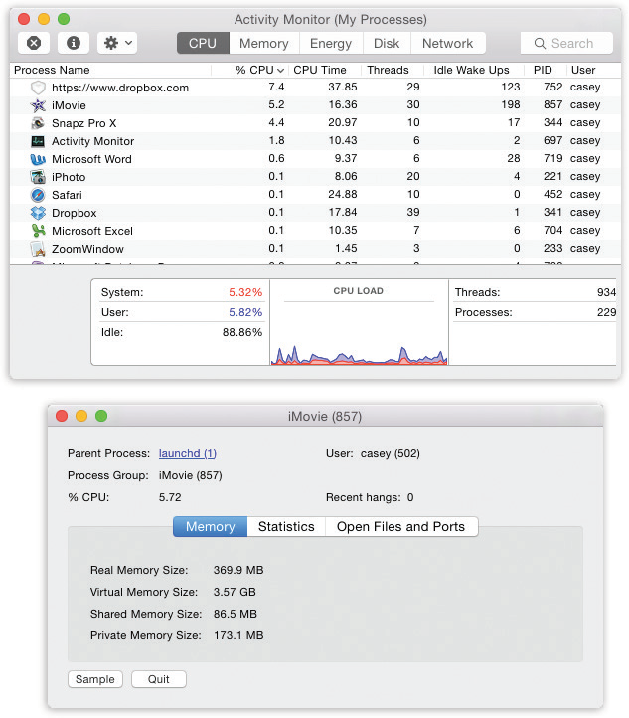
Figure 11-48. The many faces of Activity Monitor.
Top: It can be a graph of your processor (CPU) activity, your RAM usage at the moment, your disk capacity, and so on. Usually, only the processes listed here with tiny icons beside their names are actual windowed programs—those with icons in the Finder, the ones you actually interact with.
The top-left Quit Process button ( ) is a convenient way to jettison a locked-up program when all else fails.
Bottom: If you double-click a process’s name, you get a dialog box that offers reams of data (mostly of interest only to programmers) about what that program is up to. (The Open Files and Ports tab, for example, shows you how many files that program has opened, often invisibly.)Tip
You may also want to watch this graph right in your Dock (choose View → Dock Icon → Show CPU Usage) or in a bar at the edge of your screen (choose Window → CPU Usage).
Finally, there’s the Window → CPU History command. It makes a resizable, real-time monitor window float on top of all your other programs, so you can’t miss it.
Memory. Here’s a glorious revelation of the state of your Mac’s RAM at the moment.
The graph shows “memory pressure”—how much your programs are straining the Mac’s memory. If, when your Mac is running a typical complement of programs, this graph is nearly filled up, then it’s time to consider buying more memory. You’re suffocating your Mac.
Energy. How much battery power is each of your programs responsible for sucking away? This fascinating tab tells all.
Disk. Even when you’re not opening or saving a file, your Mac’s hard drive or flash storage is frequently hard at work, shuffling chunks of program code into and out of memory, for example. Here’s where the savvy technician can see exactly how frantic the disk is at the moment.
Network. Keep an eye on how much data is shooting across your office network with this handy tsunami of real-time data.
AirPort Utility
You use the AirPort Utility to set up and manage AirPort base stations (Apple’s wireless Wi-Fi networking routers).
If you click Continue, it presents a series of screens, posing one question at a time: what you want to name the network, what password you want for it, and so on. Once you’ve followed the steps and answered the questions, your AirPort hardware will be properly configured and ready to use.
Audio MIDI Setup
This program has a split personality; its name is a description of its two halves:
Audio. When you first open Audio MIDI Setup, you see a complete summary of the audio inputs and outputs available on your Mac right now. It’s a like the Sound pane of System Preferences, but with a lot more geeky detail. Here, for example, you can specify the recording level for your Mac’s microphone, or even change the audio quality it records.
For most people, this is all meaningless, because most Macs have only one input (the microphone) and one output (the speakers). But if you’re sitting in your darkened music studio, humming with high-tech audio gear whose software has been designed to work with this little program, you’ll smile when you see this tab.
There’s even a Configure Speakers button, for those audiophilic Mac fans who’ve attached stereo or even surround-sound speaker systems to their Macs.
Tip
Using the
 menu at the bottom of the window, you can turn your various audio inputs (that is, microphones, line inputs, and so on) on or off. You can even direct your Mac’s system beeps to pour forth from one set of speakers (like the one built into your Mac), and all other sound, like music, through a different set.
MIDI. MIDI stands for Musical Instrument Digital Interface, a standard “language” for inter-synthesizer communication. It’s available to music software companies who have written their wares to capitalize on these tools.
When you choose Window → Show MIDI Window, you get a window that represents your recording-studio configuration. By clicking Add Device, you create a new icon that represents one of your pieces of gear. Double-click the icon to specify its make and model. Finally, by dragging lines from the “in” and “out” arrows, you teach your Mac and its MIDI software how the various components are wired together.
Bluetooth File Exchange
One of the luxuries of using a Mac that has Bluetooth is the ability to shoot files (to colleagues who own similarly clever gadgets) through the air, up to 30 feet away. Bluetooth File Exchange makes it possible, as described in “Via Bluetooth”.
Boot Camp Assistant
Since 2006, Macs have come with Intel chips inside, meaning that Macs and PCs use exactly the same memory, hard drives, monitors, mice, keyboards, networking protocols, and processors. With just a little bit of setup, therefore, your Mac can run Windows and Windows programs!
Think of all the potential switchers who are tempted by the Mac’s sleek looks, yet worry about leaving Windows behind entirely. Or the people who love Apple’s productivity programs but have jobs that rely on Microsoft Access, Outlook, or some other piece of Windows corporateware. Even true-blue Mac fans occasionally look longingly at some of the Windows-only games, websites, or movie download services they thought they’d never be able to use.
Today, there are two ways to run Windows on a Mac:
Restart it in Boot Camp. Boot Camp Assistant lets you restart your Mac into Windows.
At that point, it’s a full-blown Windows PC, with no trace of the Mac on the screen. It runs at 100 percent of the speed of a real PC, because it is one. Compatibility with Windows software is excellent. The only downsides: Your laptop battery life isn’t as good, and you have to restart the Mac to return to the familiar world of macOS.
Tip
What’s cool, though, is that even when you’re running Windows, you can still access your Mac files and folders, as described next.
Open Parallels or Fusion. The problem with Boot Camp is that every time you switch to or from Windows, you have to close down everything you were working on and restart the computer. You lose two or three minutes each way.
There is another way: an $80 utility called Parallels Desktop for Mac (parallels.com), or its rival, VMware Fusion (vmware.com). These two programs let you run Windows and macOS simultaneously; Windows hangs out in a window of its own, while the Mac is running macOS. You’re getting about 90 percent of Boot Camp’s Windows speed—which is plenty fast for everything but 3D games.
Having virtualization software on your Mac is a beautiful thing. You can be working on a design in iWork, duck into a Microsoft Access database (Windows only), look up an address, copy it, and paste it back into the Mac program.
You can even install Boot Camp and Parallels/Fusion. They coexist beautifully on a single Mac and can even use the same copy of Windows.
Both techniques require you to provide your own copy of Windows. Since Boot Camp comes with the Mac, here’s a quick rundown.
Installing Boot Camp
To set up Boot Camp, you need the proper ingredients:
A copy of Windows 8 or later. It has to be the 64-bit version of Windows, and it has to be a full installation copy—not an upgrade version. And you need the ISO (disk image) of the Windows installer. (If you got Windows on a flash drive instead, then download the ISO from Microsoft and use the serial number that came with the flash drive.)
At least 55 gigs of free hard drive space on your built-in hard drive, or a second internal drive. Windows is not svelte, and you can’t install Windows on an external drive using Boot Camp.
The keyboard and mouse that came with your Mac. You can also use a generic USB keyboard and mouse; what you can’t use is a non-Apple cordless keyboard and mouse.
A USB flash drive, 16 GB or bigger. The Boot Camp installer may require this, depending on your Mac model.
Before you install, Apple strongly recommends that you back up your Mac, make sure it’s running the latest version of macOS, and acquire the latest version of Boot Camp (visit apple.com/support/bootcamp). If you’re using a laptop, plug it in for the surgery.
The step-by-steps for installation are long, and they vary according to your Mac model and whether you’re doing a fresh installation of Windows or upgrading to a newer version.
Fortunately, Apple has written out detailed instructions for you here: support.apple.com/en-us/HT201468.
When it’s all over, a crazy, disorienting sight presents itself: your Mac, running Windows. There’s no trace of the desktop, Dock, or ![]() menu; it’s Windows now, baby.
menu; it’s Windows now, baby.
Walk through the Windows setup screens, creating an account, setting the time, and so on.
Using Boot Camp
At this point, your Mac is actually a true Windows PC. You can install and run Windows programs, utilities, and even games; you’ll discover that they run really fast and well.
Most of your Mac’s features work in Windows: Ethernet and Wi-Fi networking, audio input and output, built-in camera, brightness and volume keys, ![]() key, multitouch trackpad gestures, Bluetooth, and so on. You’ll also discover a new Control Panel icon and system-tray pop-up menu, as described later in this section.
key, multitouch trackpad gestures, Bluetooth, and so on. You’ll also discover a new Control Panel icon and system-tray pop-up menu, as described later in this section.
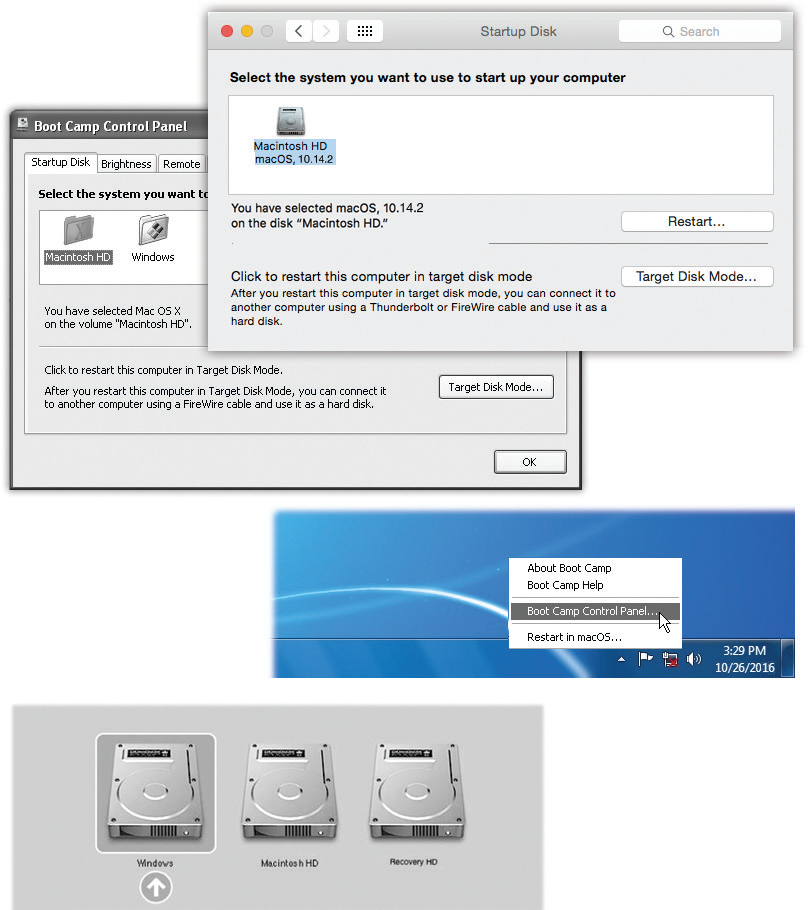
Figure 11-49. Top: To choose your preferred operating system—the one that always starts up unless you intervene—choose  → System Preferences. Click Startup Disk, and then click the icon for either macOS or Windows. Next, either click Restart (if you want to switch right now) or close the panel. The same controls are available when you’re running Windows.
Middle: To open the Boot Camp Control Panel, choose its name from its icon in the Windows system tray.
Bottom: This display, known as the Startup Manager, appears when you press Option during startup. It displays all the disk icons or partitions that contain bootable operating systems. Click the one you want, and then click the up-arrow button.
Note
Once you’re running Windows, you might wonder: How am I supposed to right-click? I don’t have a two-button mouse or two-button trackpad!
Yes, you do. See “Notes on Right-Clicking” for a panoply of options.
Forth and back, Windows/Mac
From now on, your main interaction with Boot Camp will be telling it what kind of computer you want your Mac to be today: a Windows machine or a Mac.
Presumably, though, you’ll prefer one operating system most of the time. Figure 11-49 (top and middle) shows how you specify your favorite.
Tip
If you’re running Windows and you just want to get back to macOS right now, you don’t have to bother with all the steps shown in Figure 11-49. Instead, click the Boot Camp system-tray icon and, from the shortcut menu, choose Restart in macOS.
From now on, each time you turn on the Mac, it starts up in the operating system you’ve selected.
If you ever need to switch—when you need Windows just for one quick job, for example—press the Option key as the Mac is starting up. You’ll see something like the icons shown in Figure 11-49 (bottom).
Keyboard translation guide
Now, if you really want to learn about Windows, you need a book like Windows 10: The Missing Manual.
But suggesting that you go buy another huge book would be tacky. So here’s just enough to get by.
First of all, a Mac keyboard and a Windows keyboard aren’t the same. Each has keys that would strike the other as extremely goofy. Still, you can trigger almost any keystroke that Windows is expecting by substituting special Apple keystrokes, like this:
| Windows keystroke | Apple keystroke |
|---|---|
| Ctrl+Alt+Delete | Control-Option-Delete |
| Alt | Option |
| Ctrl key | |
| Backspace | Delete |
| Delete (forward delete) | |
| Enter | Return |
| Num Lock | Clear (laptops: fn-F6) |
| Print Screen (PrtScn) | F14 (laptops: fn-F11) |
| Print Active Window (Alt+PrtScn) | Option-F14 (laptops: Option-fn-F11) |
The keyboard shortcuts in your programs are mostly the same as on the Mac, but you have to substitute the ![]() key for the Ctrl key. So in Windows programs on the Mac, Copy, Save, and Print are now
key for the Ctrl key. So in Windows programs on the Mac, Copy, Save, and Print are now ![]() -C,
-C, ![]() -S, and
-S, and ![]() -P.
-P.
Tip
You know that awesome two-finger scrolling trick on Mac laptops? It works when you’re running Windows, too.
If you really want to understand how your Mac keyboard corresponds to a PC keyboard, don’t miss Apple’s thrilling document on the subject at support.apple.com/kb/HT1167.
Accessing Mac files from the Dark Side—and vice versa
When you’ve started up in one operating system, it’s easy to access documents that “belong” to the other one. For example:
When you’re running macOS, you can get to the documents you created while you were running Windows, which is a huge convenience. Just double-click the Windows disk icon (called NO NAME or Untitled), and then navigate to the Documents and Settings → [your account name] → My Documents (or Desktop).
You can only copy files to the Mac side, or open them without the ability to edit them.
Tip
You can rename the Windows disk, if you want, so it doesn’t say NO NAME the rest of its life—as long as you do it while you’re running Windows.
When you’re running Windows, you can get to your Mac documents, too. Click Start → Computer. In the resulting window, you’ll see an icon representing your Mac’s hard drive partition. Open it up.
You can see and open these files. But if you want to edit them, you have to copy them to your Windows world first—onto the desktop, for example, or into a folder. (The Mac partition is “read-only” in this way, Apple says, to avoid the possibility that your Mac stuff could get contaminated by Windows viruses.)
Tip
If you did want to edit Mac files from within Windows, one solution is to use a disk that both macOS and Windows “see,” and keep your shared files on that. A flash drive works beautifully for this. So does a shared drive on the network, or an internet-based disk like Dropbox, Microsoft’s OneDrive, or even Apple’s iCloud Drive (“Revert”). You can make each of these show up in both Mac and Windows.
ColorSync Utility
If you use ColorSync, then you probably know already that this utility is for people in the high-end color printing business. Its tabs include these two:
Profile First Aid. This tab performs a fairly esoteric task: repairing ColorSync profiles that may be “broken” because they don’t strictly conform to the ICC profile specifications. (International Color Consortium profiles are part of Apple’s ColorSync color management system.) If a profile for your specific monitor or printer doesn’t appear in the Profiles tab of this program when it should, then Profile First Aid is the tool you need to fix it.
Profiles. This tab lets you review all the ColorSync profiles installed on your system. The area on the right side of the window displays information about each ColorSync profile you select from the list on the left.
For more information on ColorSync, see “ColorSync”.
Console
Console is a viewer for all of macOS’s logs—the behind-the-scenes, internal Unix record of your Mac’s activities.
Opening the Console log is a bit like stepping into an operating room during a complex surgery: You’re exposed to stuff the average person just isn’t supposed to see. (Typical Console entries: “kCGErrorCannotComplete” or “doGetDisplayTransferByTable.”) You can adjust the font and word wrapping using Console’s Font menu, but the truth is that the phrase “CGXGetWindowType: Invalid window -1” looks ugly in just about any font!
Console isn’t useless, however. These messages can be of significant value to programmers who are debugging software or troubleshooting a messy problem, or, occasionally, to someone you’ve called for tech support.
For example, your crash logs are detailed technical descriptions of what went wrong when various programs crashed, and what was stored in memory at the time.
Unfortunately, there’s not much plain English here to help you understand the crash, or how to avoid it in the future. Most of it runs along the lines of “Exception: EXC_BAD_ACCESS (0x0001); Codes: KERN_INVALID_ADDRESS (0x0001) at 0x2f6b657d.”
DigitalColor Meter
DigitalColor Meter can grab the exact color value of any pixel on your screen, which can be helpful when matching colors in web page construction or other design work. After launching the DigitalColor Meter, just point anywhere on your screen. A magnified view appears in the meter window, and the RGB (red-green-blue) color value of the pixels appears in the meter window.
Here are some tips for using the DigitalColor Meter to capture color information from your screen:
To home in on the exact pixel (and color) you want to measure, drag the Aperture Size slider to the smallest size: 1 pixel.
Press
-X (View → Lock X) to freeze your cursor at its current horizontal position; you can now move it only horizontally. Or press -Y (View → Lock Y) to freeze your cursor at its current vertical position. You can also lock the cursor in both directions by pressing -L (View → Lock Position). (Press the keystroke again to unlock.) The idea is to make it easier for you to snap to exactly the pixel you want.When the Aperture Size slider is set to view more than one pixel, DigitalColor Meter measures the average value of the pixels being examined.
Disk Utility
This important program has two key functions:
It serves as macOS’s own disk-repair program: a powerful administration tool that lets you repair, erase, format, and partition disks. You’ll probably use Disk Utility most often for its First Aid feature, which solves a number of weird little Mac glitches. But it’s also worth keeping in mind in case you ever find yourself facing a serious disk problem.
Disk Utility also creates and manages disk images, electronic versions of disks or folders that you can exchange electronically with other people.
Note
In 2015, Apple put Disk Utility on a bit of a diet. A few features are no longer part of the program, including burning a CD from a disk image and formatting RAID drives. Most shocking of all, there’s no longer a Repair Permissions button, a powerful troubleshooting tool that used to be one of Disk Utility’s most important functions; it could fix all kinds of weird Mac glitches. Apple says macOS now checks and repairs disk permissions automatically every time you install a system update.
The following discussion tackles the program’s two personalities one at a time.
Disk Utility, the hard drive repair program
When you first open Disk Utility, you see, at a glance, what kinds of files are eating up your disk space (see Figure 11-50).
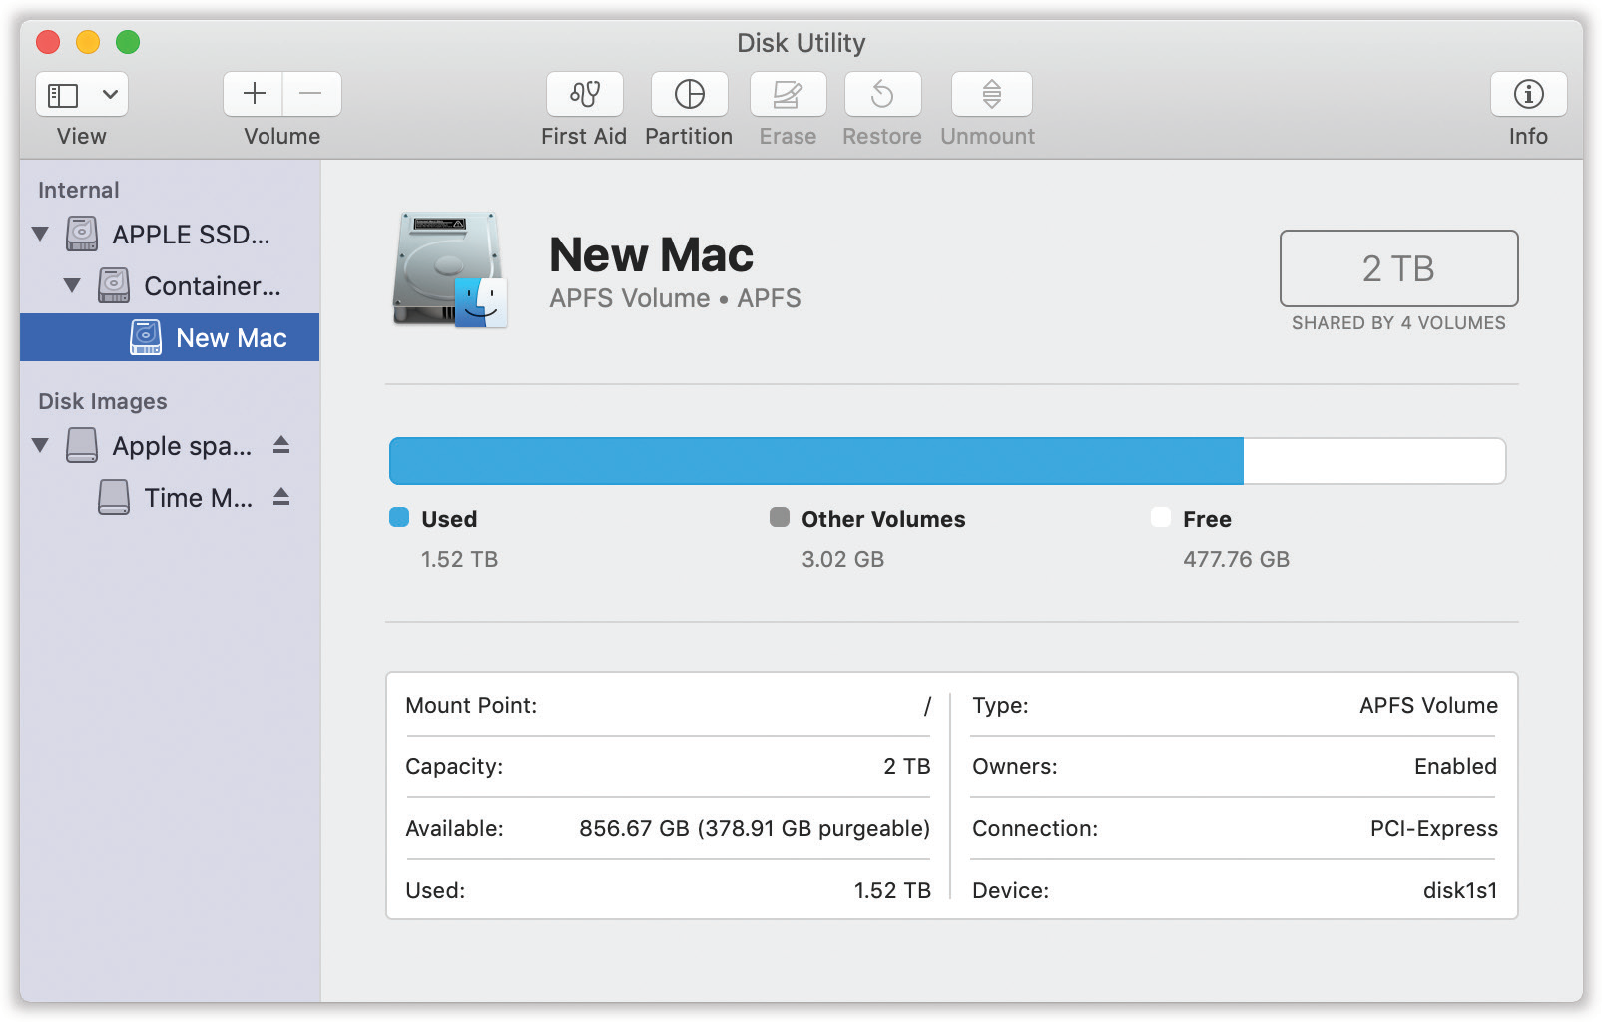
Figure 11-50. The left Disk Utility panel lists your hard drive and any other disks in or attached to your Mac at the moment.
The main welcome screen shows where all your disk space is going, color coded by category.
When you click the name of your hard drive’s mechanism, like “500 GB Hitachi iC25N0…” (not the “Macintosh HD” volume label below it), you see a cluster of buttons, one for each of the main Disk Utility functions:
First Aid. This is the disk-repair part of Disk Utility, and it does a terrific job at fixing many disk problems. When you’re troubleshooting, Disk Utility should be your first resort.
To use it, click the icon of a disk and then click First Aid. After asking for confirmation (click Run), this function scours every single file on your drive, checking for corruption, flakiness, or trouble spots on the disk.
If Disk First Aid reports that it’s unable to fix the problem, then it’s time to invest in a program like DiskWarrior (alsoft.com).
Partition. With the Partition tools, you can erase a hard drive in such a way that you subdivide its surface. Each chunk will be represented on your screen by another hard drive icon (Figure 11-51).
There are some very good reasons not to partition a drive these days: A partitioned hard drive is more difficult to resurrect after a serious crash, requires more navigation when you want to open a particular file, and offers no speed or safety benefits. And if you’re using APFS (see the box on the previous page), of course, creating new volumes is a much more modern, flexible way of subdividing your drive.
On the other hand, there’s one very good reason to do it: Partitioning is the only way to use Boot Camp, described starting in “Bluetooth File Exchange”. When you’re using Boot Camp, your Mac is a Mac when running off of one partition, and a Windows PC when starting up from another one. (But you don’t use Disk Utility in that case; you use Boot Camp Assistant.)
Note
Partitioning is not the same thing as creating APFS volumes, described in the box on the previous page.

Figure 11-51. To add each new partition, click +.
Now drag the tiny, round handles to adjust the dividers in the pie chart; that’s how you specify the relative sizes of the partitions you want. Assign a name and a format for each partition in the Partition Information area, and then click Apply.Erase. Select a disk, choose a format—always APFS or macOS Extended (Journaled), unless you’re formatting a disk for use on a Windows PC—give it a name, and then click Erase to wipe a disk clean. See the box on the previous page for more on APFS.
Tip
Click Security Options to view a slider. It can strike four spots on the spectrum from the speed of the disk erasing to the security of it. At the far-left position, macOS erases the drive quickly, but a recovery app could recover the files. At the more secure settings, macOS performs various additional time-consuming scrubbing tasks, writing over your old files with randomized gibberish, making file recovery impossible. Something to remember if you sell your Mac!
Restore. You can create an exact replica of a volume. From the Sidebar, choose the target volume—the one that will become a replica of some other one—and then click Restore. Choose the volume you want to replicate, click Restore again, and then Done.
Unmount. This button ejects whatever disk you’ve selected in the left-side list.
Info. Click to view a little table of super-technical details about the selected drive.
Disk Utility, the disk-image program
Disk images are very cool. Each is a single icon that behaves precisely like an actual disk—a flash drive or hard drive, for example—but can be distributed electronically. For example, a lot of macOS apps arrive from your web download in disk-image form.
Disk images are popular for software distribution for a simple reason: Each image file precisely duplicates the original master disk, complete with all the necessary files in all the right places. When a software company sends you a disk image, it ensures that you’ll install the software from a disk that exactly matches the master disk.
As a handy bonus, you can password-protect a disk image, which is the closest macOS comes to offering the ability to password-protect an individual folder.
It’s important to understand the difference between a disk-image file and the mounted disk (the one that appears when you double-click the disk image). If you flip back to Figure 5-2 and consult Figure 5-2, this distinction should be clear.
Tip
After you double-click a disk image, click Skip in the verification box that appears. If something truly got scrambled during the download, you’ll know about it right away—your file won’t decompress correctly, or it’ll display the wrong icon, for example.
You can create disk images, too. Doing so can be very handy in situations like these:
You want to create a backup of a CD. By turning it into a disk-image file, you’ll always have a safety copy, ready to burn onto a new CD. (This is a good practice for educational CDs that kids will be handling soon after eating peanut butter and jelly.)
You want to replicate your entire hard drive—complete with all its files, programs, folder setups, and so on—onto a new, bigger hard drive (or a new, better Mac), using the Restore feature already described.
You want to back up your entire hard drive, or maybe just a certain chunk of it, onto an iPod or another disk. (Again, you can later use the Restore function.)
You want to send somebody else a copy of a disk via the internet. You simply create a disk image, and then send that—preferably in compressed form.
Here’s how to make a disk image:
To image-ize a disk or partition. Click the name of the disk in the list, where you see your currently available disks. (The topmost item is the name of your drive, like “484.0 MB MATSHITA DVD-R” for a DVD drive or “74.5 GB Hitachi” for a hard drive. Beneath that entry, you generally see the name of the actual partition, like “Macintosh HD,” or the CD’s name as it appears on the screen.)
Then choose File → New Image → Disk Image from [the disk or partition’s name].
To image-ize a folder. Choose File → New Image → Image from Folder. In the Open dialog box, click the folder you want, and then click Choose. Either way, the next dialog box (Figure 11-52) offers some fascinating options.
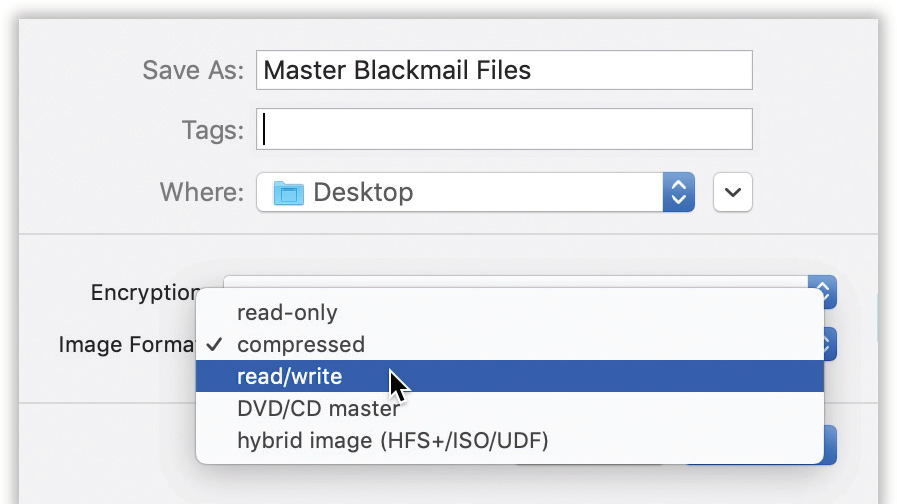
Figure 11-52. These two pop-up menus let you specify (a) whether you want your disk image password-protected, and (b) what kind of disk image you want. The latter option is great when you want to password-protect one folder without bothering with your entire Home folder.
Encryption. Here’s an easy way to lock private files away into a vault that nobody else can open. If you choose one of these two AES encryption options (choose AES-128, if you value your time), you’ll be asked to assign a password to your new image file. Nobody can open it without the password—not even you. On the other hand, if you save it into your Keychain (“The Keychain”), then it’s not such a disaster if you forget the password.
Image Format. If you choose “read/write,” your disk image file, when double-clicked, turns into a superb imitation of a hard drive. You can drag files and folders onto it, drag them off of it, change icons’ names on it, and so on.
If you choose “read-only,” however, then the result behaves more like a CD. You can copy things off of it but not make any changes to it.
The “compressed” option is best if you intend to send the resulting file by email, post it for web download, or preserve the disk image on some backup disk for a rainy day. It takes a little longer to create a simulated disk when you double-click the disk image file, but it takes up a lot less disk space than an uncompressed version.
Choose “DVD/CD master” if you’re copying a CD or a DVD. The resulting file is a perfect mirror of the original disc, ready for copying onto a blank CD or DVD when the time comes. Finally, “hybrid image” is a combo format that can be used with file system standards such as HFS+, ISO, and UDF.
Save As. Choose a name and location for your new image file. The name you choose here doesn’t need to match the original disk or folder name.
When you click Save (or press Return), if you opted to create an encrypted image, you’re asked to make up a password at this point.
Otherwise, Disk Utility now creates the image and then mounts it—that is, turns the image file into a simulated, yet fully functional, disk icon on your desktop.
When you’re finished working with the disk, eject it as you would any disk (right-click or two-finger click it and choose Eject, for example). Hang on to the .dmg disk-image file itself, however. This is the file you’ll need to double-click if you ever want to recreate your “simulated disk.”
Grapher
This little unsung app is an amazing piece of work. It lets you create 2D or 3D graphs of staggering beauty and complexity.
When you first open Grapher, you’re asked to choose what kind of virtual “graph paper” you want: two-dimensional (standard, polar, logarithmic, and so on) or three-dimensional (cubic, spherical, cylindrical, and so on). Click a name to see a preview; when you’re happy with the selection, click Open.
Now the main Grapher window appears (Figure 11-53). Do yourself a favor. Spend a few wow-inducing minutes choosing canned equations from the Examples menu and watching how Grapher whips up gorgeous, colorful, sometimes animated graphs on the fly.
When you’re ready to plug in an equation of your own, type it into the text box at the top of the window. If you’re not such a math hotshot, or you’re not sure of the equation format, work from the canned equations and mathematical building blocks that appear when you choose Equation → New Equation from Template or Window → Show Equation Palette (a floating window containing a huge selection of math symbols and constants).
Tip
If you don’t know the keystroke that produces a mathematical symbol like π or θ, you can just type pi or theta. Grapher replaces it with the correct symbol automatically.
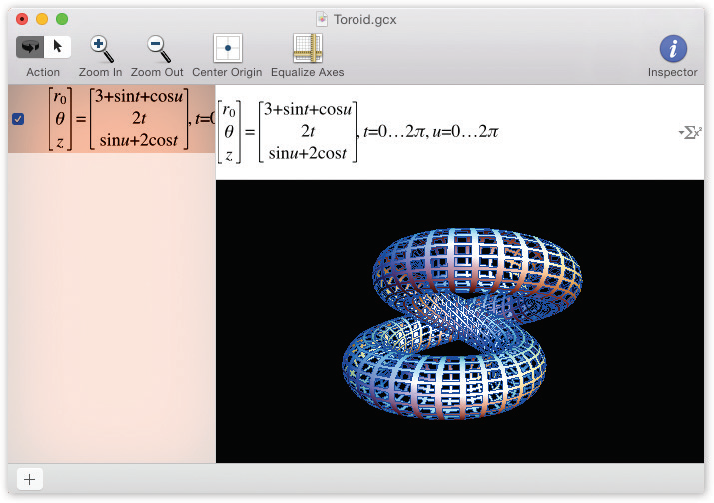
Figure 11-53. In general, you type equations into Grapher just as you would on paper (like z=2xy). If in doubt, check the online help, which offers enough hints on functions, constants, differential equations, series, and periodic equations to keep the A Beautiful Mind guy busy for days.
Once the graph is up on the screen, you can tailor it like this:
To move a 2D graph in the window, choose View → Move Tool and then drag; to move a 3D graph,
-drag it.To rotate a 3D graph, drag in any direction. If you add the Option key, you flip the graph around on one axis.
To change the colors, line thicknesses, 3D “walls,” and other graphic elements, click the
button (or choose Window → Show Inspector) to open the formatting palette. The controls you find here vary by graph type, but rest assured that Grapher can accommodate your every visual whim.To change the fonts and sizes, choose Grapher → Preferences. On the Equations panel, the four sliders let you specify the relative sizes of the text elements. If you click the sample equation, the Fonts panel appears, so you can go to town fiddling with the type.
When it’s all over, you can preserve your masterpiece using any of these techniques:
Export a graphic by choosing File → Export.
Copy an equation to the Clipboard by right-clicking or two-finger clicking it and choosing Copy As → TIFF (or EPS, or text, or whatever) from the shortcut menu. Now you can paste it into another program.
Export an animated graph by choosing Equation → Create Animation. The dialog box lets you specify how long you want the movie to last (and a lot of other things).
Tip
If you click the Orientation tab, you can Shift-drag the starting or ending images at the bottom to change their size.
Finally, click Create Animation. After a moment, the finished movie appears. If you like it, choose File → Save As to preserve it on your hard drive for future generations.
Keychain Access
Keychain Access memorizes and stores all your secret information—passwords for network access, file servers, FTP sites, web pages, and other secure items. For instructions on using Keychain Access, see “The Keychain”.
Migration Assistant
This little cutie automates the transfer of all your stuff from another Mac, or even a Windows PC, to your current Mac: your Home folder, network settings, programs, and more. This comes in extremely handy when you buy a newer, better Mac—or when you need Time Machine to recover an entire dead Mac’s worth of data. (It can also copy everything over from a secondary hard drive or partition.) The instructions on the screen guide you through the process (see Appendix A).
Screenshot
You know the fancy new screen-capture feature Apple added to macOS Mojave? (If not, you can read up in “Screen-Capture Keystrokes”.) Well, behind the scenes, it’s just this application at work. It opens when you press that Shift-![]() -5 keystroke.
-5 keystroke.
Script Editor
This little program, formerly called AppleScript Editor, is where you can type up your own AppleScripts. You can read about these programmery software robots in the free online appendix to this chapter, “Automator & AppleScript.” It’s available on this book’s “Missing CD” page at missingmanuals.com.
System Information
System Information (formerly called System Profiler) is a great tool for learning exactly what’s installed on your Mac and what’s not—in terms of both hardware and software. The people who answer the phones on Apple’s tech-support line are particularly fond of System Information, since the detailed information it reports can be very useful for troubleshooting nasty problems.
There are actually two versions of System Information: a quick, easy snapshot and a ridiculously detailed version:
Snapshot. Choose
→ About This Mac. You get a concise, attractive summary info screen that reveals your macOS version, your Mac’s memory amount, its serial number, what processor it has inside, and so on (Figure 11-54, top).Tip
If you click your macOS version number in the Overview box, you get to see its build number—something primarily of interest to programmers and people who beta-test macOS.
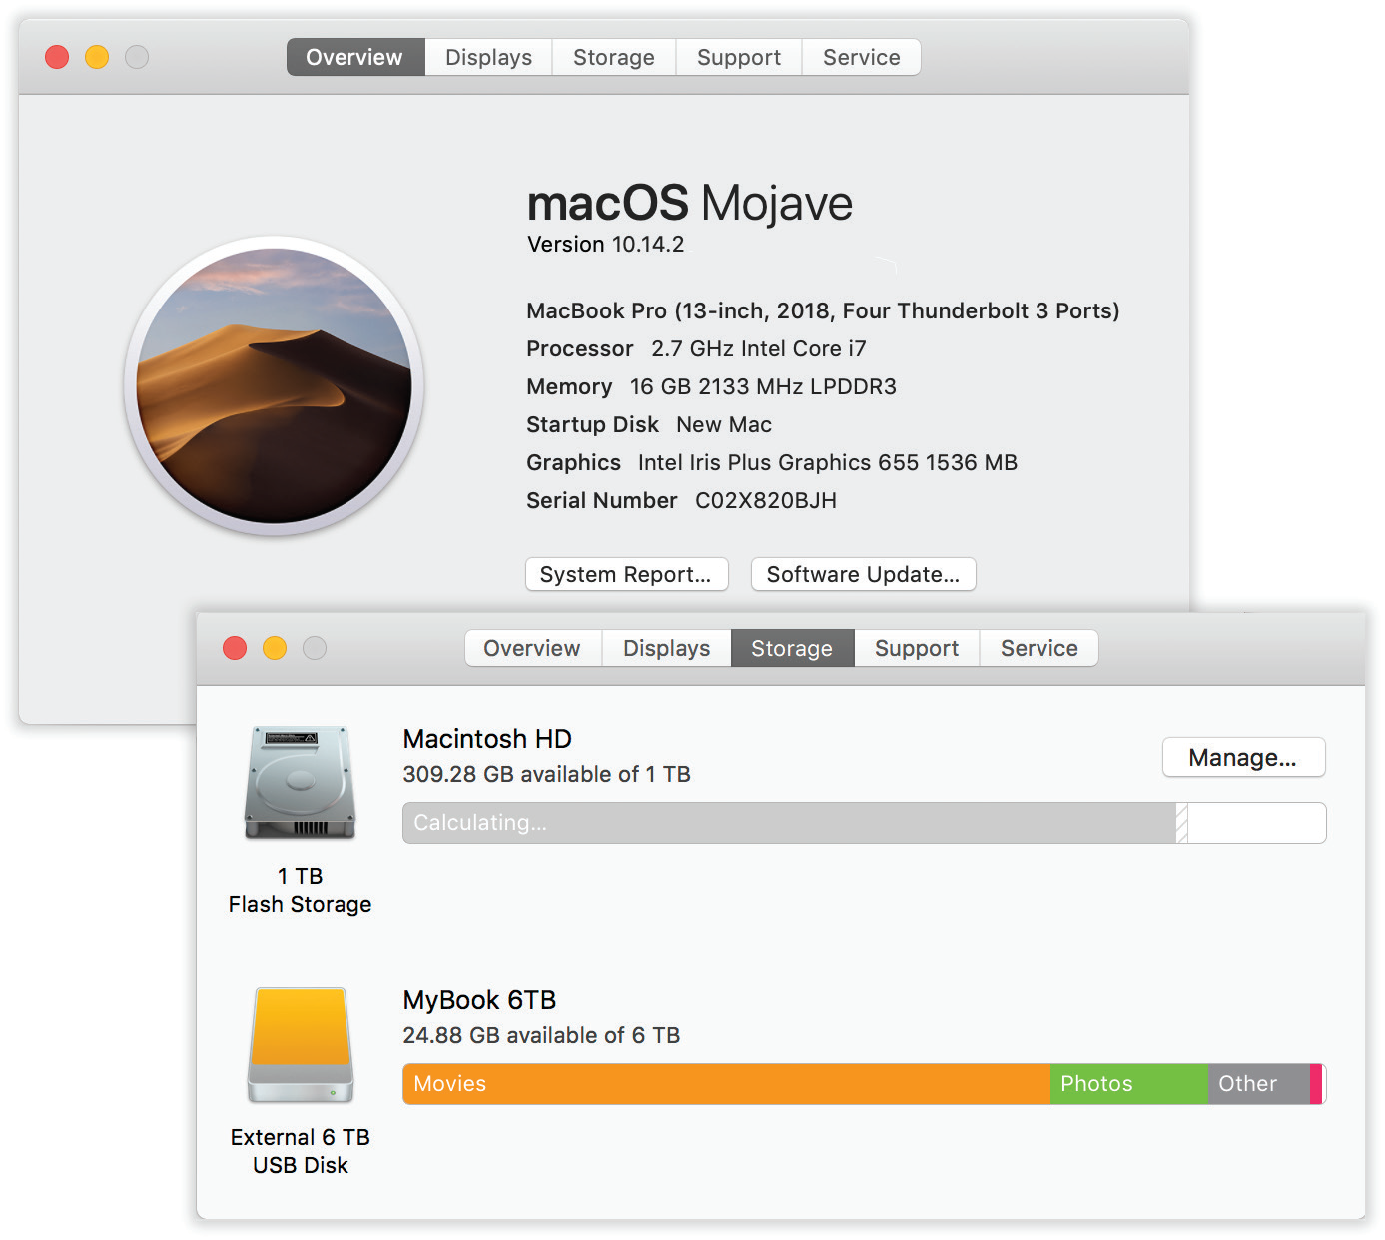
Figure 11-54. This dialog box gives you a plain-English display of the Mac details you probably care the most about: memory, screen, storage, serial number, macOS version, and so on. (Click the tabs across the top for more details.) To proceed from here to the full System Information program, click System Report.
The tabs across the top reveal similarly precise details about your Displays and Storage. The Support tab offers links to various sources of online help, and the Service tab reveals your options for getting the Mac fixed.
Ridiculously detailed. Open Applications → Utilities; double-click System Information. (You can also open the System Information program from inside the About This Mac dialog box shown in Figure 11-54 at top; just click System Report.)
When System Information opens, it reports information about your Mac in a list down the left side (Figure 11-55). The details fall into these categories:
Hardware. Click this word to see precisely which model Mac you have, what kind of chip is inside (and how many), how much memory it has, and its serial number.
If you expand the flippy triangle, you get to see details about which Memory slots are filled and the size of the memory module in each slot; what kind of Disc Burning your Mac can do (DVD-R, DVD+R, and so on); what PCI cards are installed in your expansion slots; what Graphics/Displays circuitry you have (graphics card and monitor); what’s attached to your SATA bus (internal drives, like your hard drive); what’s connected to your Thunderbolt, USB, and FireWire chains, if anything; and much more.
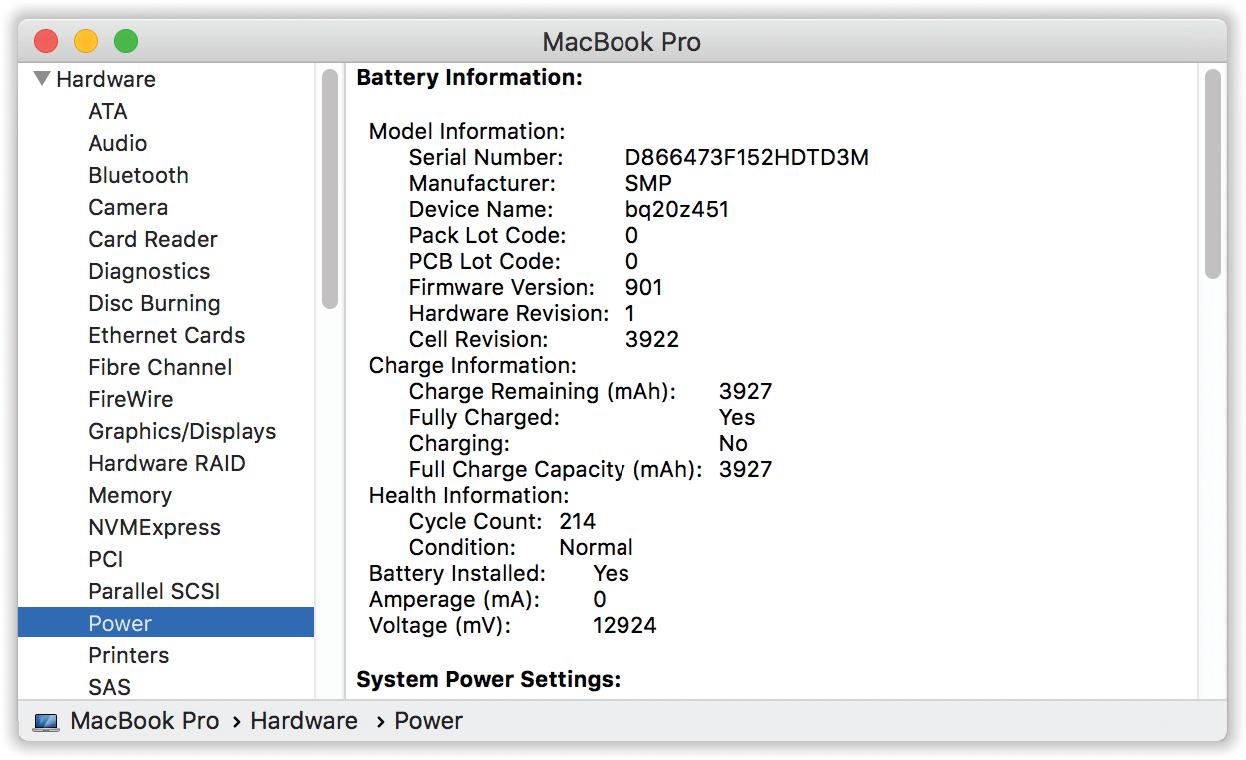
Figure 11-55. Does your MacBook’s chip run at 2 GHz or 2.6? What percentage of your external hard drive is filled up? What are the version numbers of every program installed on your Mac? Can your DVD burner burn dual-layer discs? Does your laptop have any open slots for extra RAM?
Network details what Wi-Fi components you have, what internet connection Locations you’ve established, and so on.
Software shows which version of macOS you have and what your computer’s name is, as far as the network is concerned (“Pat’s Computer,” for example).
The Applications list documents every program on your system, with version information. It’s useful for spotting duplicate copies of programs.
Similar information shows up in the Extensions panel. Extensions are the drivers for the Mac’s various components, which sit in the System → Library → Extensions folder. Whatever is in that folder is what you see listed in this panel. Other categories include self-explanatory lists like Fonts, Preference Panes, and Startup Items.
Finally, the Logs panel reveals your Mac’s secret diary: a record of the traumatic events it experiences from day to day. (Many of these are the same as those revealed by the Console utility; see “Console”.)
Terminal
Underneath its shiny skin, macOS is actually Unix, one of the oldest and most respected operating systems in use today. But you’d never know it by looking; Unix is a world without icons, menus, or dialog boxes. You operate it by typing out memorized commands at a special prompt, called the command line. The mouse is almost useless here.
Wait a minute—Apple’s ultramodern operating system, with a command line? What’s going on? Actually, the command line never went away. At universities and corporations worldwide, professional computer nerds still value the efficiency of pounding away at the little C: or $ prompts.
You never have to use macOS’s command line. In fact, Apple has swept it pretty far under the rug. There are, however, some tasks you can perform only at the command line.
Terminal is your keyhole into macOS’s Unix innards. There’s a whole chapter on it waiting for you on this book’s “Missing CD” page at missingmanuals.com.
VoiceOver Utility
For details on this screen-reader software, see “VoiceOver Tab”.
Core Services: The Island of Misfit Apps
You thought the apps in Utilities were geeky? Wait till you meet the ones Apple has hidden away in the System → Library → Core Services → Applications folder. (That’s the Library folder in your main hard drive window, not the hidden one in your own User folder.)
These are very specialized gizmos; most are primarily of interest to network administrators or Unix geeks obsessed with knowing what kind of computer-code gibberish is going on behind the scenes. In any case, here’s what you’ll find there.
About This Mac
Turns out that the information screen shown in Figure 11-54, which opens when you choose ![]() → About This Mac, is actually a standalone app. It’s in your the Library → Core Services → Applications folder.
→ About This Mac, is actually a standalone app. It’s in your the Library → Core Services → Applications folder.
Archive Utility
Here is the actual app that performs the zipping and unzipping functions described in “Optimized Storage”.
Directory Utility
On a corporate network, a highly paid network administrator may use this little app to access and manage the corporate directory servers—centralized databases and drives. If you are that highly paid network administrator, you should read Apple’s guide without delay: support.apple.com/guide/directory-utility/.
DVD Player
For the six people whose Macs still have physical DVD drives, Apple offers this ancient relic of a playback program.
Feedback Assistant
Apple tests out new versions of its operating systems on willing volunteers. Anyone who’s interested can sign up for Apple’s public beta-testing program at beta.apple.com. If you join, you’ll get to try out upcoming versions of macOS before they’re released to the teeming masses. Along the way, you’ll probably encounter bugs, crashes, and other unfinished business.
When that happens, Apple hopes you’ll use this app to submit reports of the problems you find. On its end, Apple’s programmers collect all these bug reports, organize them, and set about fixing as many as they can in time for the public release of the software.
Folder Actions Setup
This app opens up when you right-click or two-finger click a desktop folder and, from the shortcut menu, choose Folder Actions Setup. You’re offered a list of folder actions—canned processes that run automatically every time you drop a file into this folder.
For example, maybe you want every graphics file in this folder automatically converted into PNG format. Or maybe you want every PDF document rotated 90 degrees. Or maybe you want the Mac to alert you every time someone puts a file into this folder.
All of this is part of Apple’s ancient, technical, but (in some circles) beloved AppleScript programming system. You can read more about it on this book’s “Missing CD” at missingmanuals.com, in a document called “AppleScript & Automator.”
Network Utility
You can find and open Network Utility with a Spotlight search, or from within System Information, described in “Keychain Access” (choose Window → Network Utility).
In any case, it gathers information about websites and network citizens. It offers a suite of standard internet tools like netstat, ping, traceroute, DNS lookup, and whois—advanced tools, to be sure, but ones that even Mac novices may be asked to fire up when calling a technician for internet help.
Otherwise, you probably won’t need to use Network Utility to get your work done. However, Network Utility can be useful when you’re doing internet detective work:
Use ping to enter an address (either a web address like google.com or an IP address like 192.168.1.110), and then “ping” (send out a “sonar” signal to) the server to see how long it takes for it to respond to your request. Network Utility reports the response time in milliseconds—a useful test when you’re trying to see if a remote server (a website, for example) is up and running. (The time it takes for the ping to report back to you also tells you how good your connection to it is.)
Traceroute lets you track how many “hops” are required for your Mac to communicate with a certain server (an IP address or web address). You’ll see that your request actually jumps from one trunk of the internet to another, from router to router, as it makes its way to its destination. You’ll learn that a message sometimes crisscrosses the entire country before it arrives. You can also see how long each leg of the journey took, in milliseconds.
Whois (“who is”) can gather an amazing amount of information about the owners of any particular domain (such as apple.com)—including name and address info, telephone numbers, and administrative contacts. It uses the technique shown in Figure 11-56.
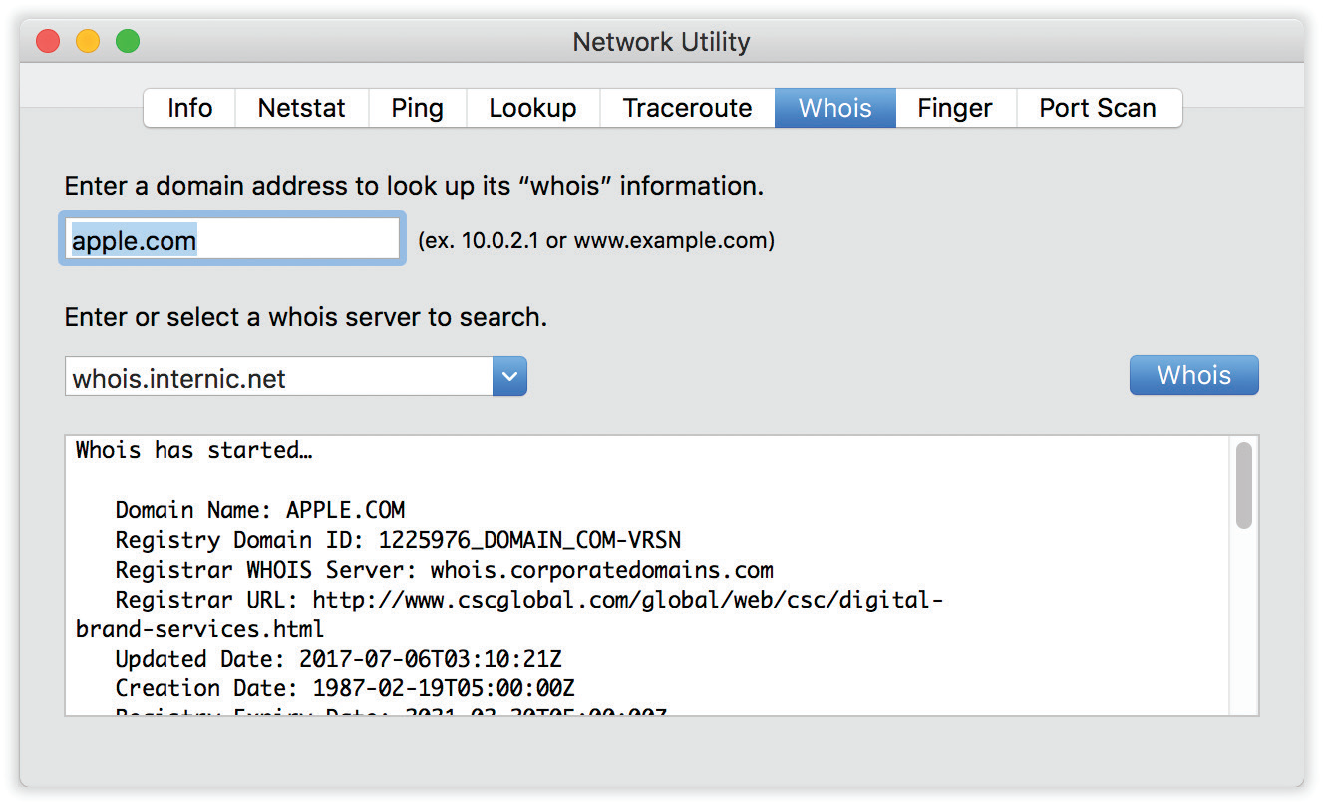
Figure 11-56. The whois tool is a powerful part of Network Utility. First enter a domain that you want information about, and then choose a whois server (you might try whois.internic.net). When you click the Whois button, you get a surprisingly revealing report about the owner of the domain, including phone numbers and contact names.
RAID Utility
If you’re a hard-core Mac nerd, you know what a RAID drive is. It’s a hard drive that, behind the scenes, is made up of multiple spinning disks. Depending on the choices you make in RAID Utility, you can set them up so they all appear to the Mac as one giant disk—or you can set things up so that it’s one half-sized hard drive, and the other half is a real-time mirror, a backup.
Apple’s techie details for techie people are here: images.apple.com/xserve/pdf/RAID_Utility_User_Guide.pdf.
Screen Sharing
This app does the heavy lifting for the Screen Sharing feature described in “Screen Sharing”.
Storage Management
The “how to free up more space on your hard drive” feature described in “Optimized Storage” is actually this little app at work.
System Image Utility
Here’s another obscure app intended exclusively for professional corporate network administrators. It’s for creating “disks” on the network that all Macs can access. Details at support.apple.com/guide/system-image-utility/welcome/mac.
Wireless Diagnostics
If you’re having Wi-Fi problems, here’s a handy troubleshooting trick: While pressing the Option key, open the ![]() menu and choose Open Wireless Diagnostics. This app opens. It walks you through some Wi-Fi troubleshooting steps.
menu and choose Open Wireless Diagnostics. This app opens. It walks you through some Wi-Fi troubleshooting steps.
A full guide is online at support.apple.com/en-us/HT202663.