Chapter 18. Safari
Safari is the Mac’s web browser. It’s superfast and filled with great features. Here and there, you’ll find certain sites or services that don’t work in Safari (grrrr), which is why many Mac fans keep another browser, like Chrome or Firefox, on board just in case. Overall, though, Safari makes a slick, responsive window to the web.
The Unified Address/Search Bar
There are all kinds of ways to begin your web surfing session. Perform a search. Click a bookmark. On the following pages: a rundown of these starting points. Often, of course, you’ll want to type in a web address; that’s the purpose of the address/search bar identified in Figure 18-1. In macOS, a single, unified box serves as both the address bar and the search bar.
If you type a web address there, like amazon.com, then pressing Return takes you to that website; if you type anything else, like cashmere sweaters or just amazon, then pressing Return gives you the Google search results for that phrase, as described next.
Note
The address/search bar doesn’t show the full address of the page you’re on. You may be reading http://www.nytimes.com/2019/2/28/us/politics/house-vote-moves-budget-deal-closer-to-approval.html, but the address bar shows only nytimes.com. If you’d rather see the full address, then choose Safari → Preferences → Advanced and turn on “Show full website address.”
A few important buttons come installed on the toolbar:
Back, Forward. Click the Back button (
 ) to revisit the page you were just on. Keyboard shortcut:
  -
- or -[, or a two-finger swipe left on the trackpad. (On an Apple Mouse or older Mighty Mouse, that’s a one-finger swipe.)
Once you’ve clicked
, you can then click  (or press -
 , or -], or use a two-finger swipe to the right) to return to the page you were on before you clicked the Back button. Click and hold the or button for a pop-up menu of all the web pages you’ve visited during this online session.
That pop-up menu lists the sites by name, as in “The New York Times—Breaking News, World News & Multimedia.” To view the actual addresses instead, Option-click (and hold the mouse down on) the
or button.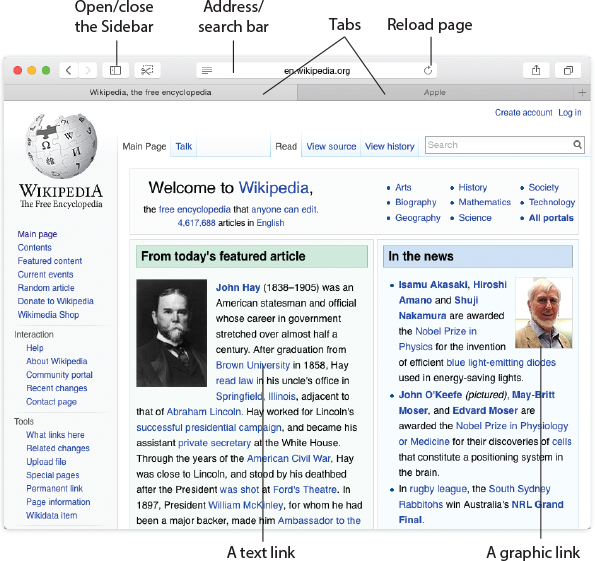
Figure 18-1. The Safari window offers tools and features that let you navigate the web almost effortlessly. These toolbars and buttons are described in this chapter.
Sidebar (
 ). Click to show or hide the Sidebar, which offers lists of your bookmarks, Reading List, and RSS feeds. (All of this is described on the following pages.)
Reader View (
 ). This button appears at the left end of the address/search box, only when you’re reading a web page article—a decent-sized block of text. See “Status Bar” for more.
Add to Reading List (
 ). This button appears only when you move your cursor to the far-left end of the address/search box. With one click, you add the current page to your Reading List (“Tips for Better Surfing”). Or, if you hold down the mouse, you can add this page as a bookmark.
Stop/Reload. Click the
 (or press Esc, or -period) to interrupt the downloading of a web page you’ve just requested—if you’ve made a mistake, for instance.
Once a page has finished loading, the Stop button turns into a Refresh button (
 ). Click it (or press -R) if a page doesn’t look or work quite right, or if you want to see the updated version of it (like for a breaking-news site that changes constantly). Safari re-downloads the web page and reinterprets its text and graphics.
Share (
 ) lets you send the current web page to the Reading List, install it as a bookmark, send it by email or text message, or post it to Twitter or Facebook. See “Does the file have the correct file name suffix?” for details.
Show All Tabs (
 ) displays all your open tabs at once, attractively arrayed as miniatures; see “Tab View”.
Downloads (
 ). Here’s Safari’s awesome Downloads button (“Keyboard Control”). Click to see everything you’ve downloaded, or are downloading.
Searching the Web
Press ![]() -L to deposit your insertion point inside the unified toolbar, type something you’re looking for—phony baloney, say—and then press Return. Safari takes you directly to the results page of Google or whatever search site you’ve selected.
-L to deposit your insertion point inside the unified toolbar, type something you’re looking for—phony baloney, say—and then press Return. Safari takes you directly to the results page of Google or whatever search site you’ve selected.
As Figure 18-2 makes clear, Safari offers plenty of assistance as you type, in the form of Google suggestions, matching listings from your Bookmarks and History list, and suggestions from Maps, Wikipedia, iTunes, and other sources.
For example, if you type empire state building into the address bar, the first suggestion may not be from the web—but instead from Maps. Click it to open the Empire State Building’s page in the Maps program. And if you type small mouthed salamander, the first hit is likely to be a link to that critter’s Wikipedia page, complete with a tiny photo and the first lines of text.
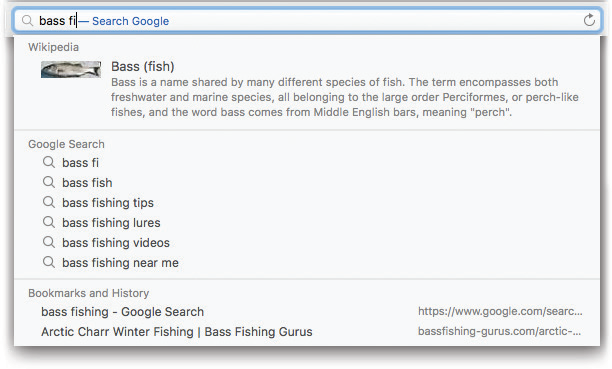
Figure 18-2. As you type, Safari offers autocomplete suggestions from Wikipedia; Google’s own Suggest feature; and matching pages that you’ve either bookmarked or visited recently.
To save typing, click the correct complete address with your mouse, or use the  key to reach the desired listing and then press Return.
Address/Search Bar Tips
Because typing internet addresses and searching for things are so central to the internet experience and such a typo-prone hassle, the address/search bar is rich with features that minimize keystrokes. For example:
You don’t have to click there before typing; just press
-L.You can highlight the entire address (so it’s ready to be typed over with a new one) by clicking anywhere inside the bar. Or press
-L.You don’t have to type out the whole internet address. You can omit the http:// and www portions; Safari fills in those standard address bits for you. To visit http://www.nytimes.com, for example, a speed freak might press
-L to highlight the address bar, type nytimes.com, and then press Return.You don’t have to use Google. If you prefer to use Bing, Yahoo, or DuckDuckGo for searching instead of Google, then open Safari → Preferences → Search and use the “Search engine” pop-up menu. (DuckDuckGo is more limited than Google and its rivals. But it has gained a following among privacy fans because it doesn’t store any information about its visitors or the searches they conduct.)
You can look up a word on a page. If you right-click or two-finger click a highlighted word or phrase on a web page, you can choose Search with Google (or whatever your chosen search site is) from the shortcut menu to search for that text. And, even cooler, this trick works in all Cocoa programs—not just Safari.
Bookmarks, Favorites, and Top Sites
Another way to begin your web session is to click a bookmark. In any web browser, bookmarks are essential. They represent sites you want to visit again later. By picking one from a list, you save yourself the trouble of searching the web or typing out an address.
Safari happens to be overrun with systems of adding and choosing bookmarks; you can’t move your cursor without bumping into one. Read on.
Adding a Bookmark
When you find a web page you might like to visit again, do yourself a favor: Bookmark it. Here’s how:
Press
-D, or choose Bookmarks → Add Bookmark. Proceed as shown in Figure 18-3.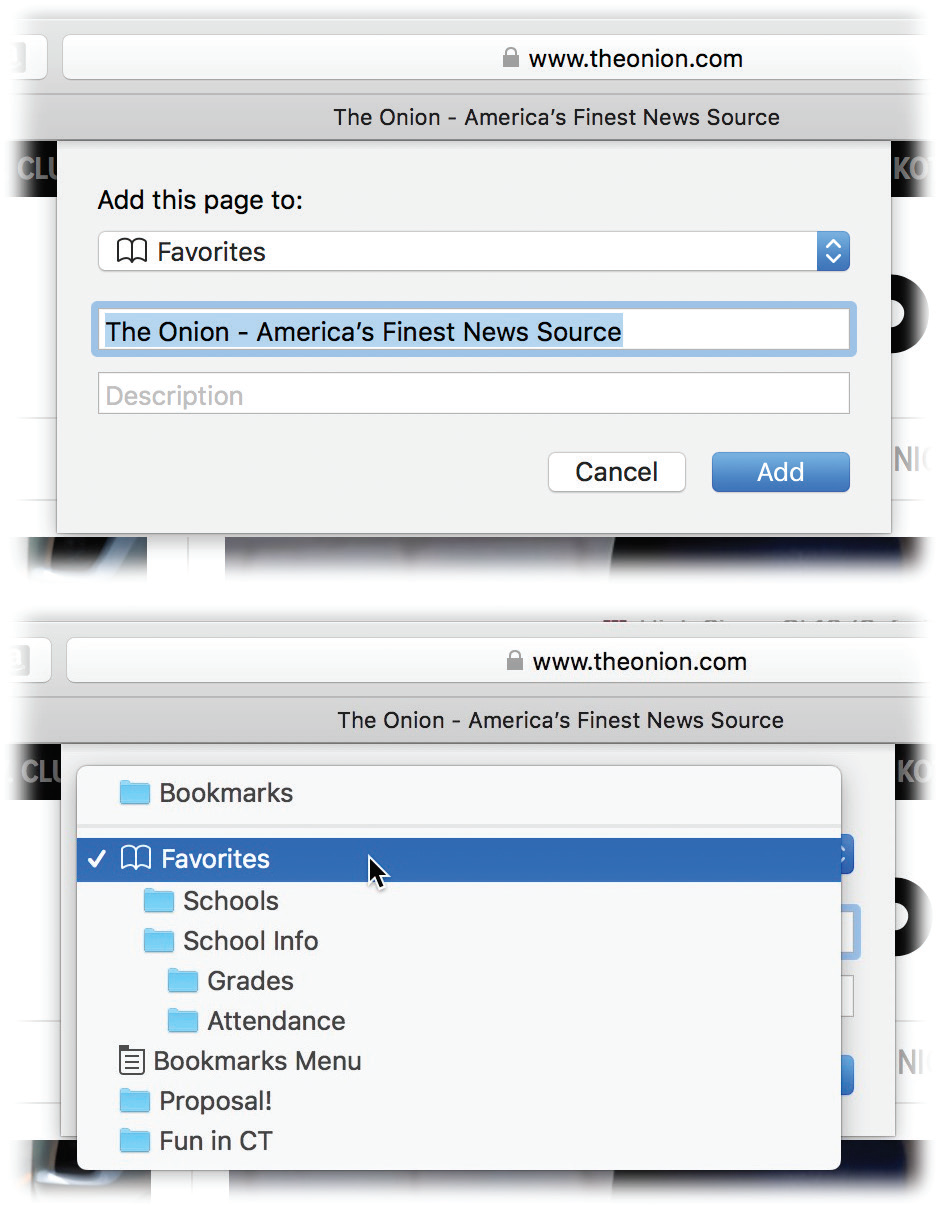
Figure 18-3. When you add a bookmark, Safari offers to memorize this web page’s name, or a shorter name that you specify for it.
You also have to specify where you want to save your new bookmark; Safari offers several options.
There’s the Bookmarks menu, or any folders you’ve set up inside it.
There are the Favorites, a special set of bookmarks that you think you’ll use a lot. They get their own special screen and their own special bar, as you’ll read in a moment.
There are the Top Sites (“Top Sites”).
Finally, there’s the master list, the Bookmarks list in the Sidebar; as you can see by (a) in Figure 18-4, this list lets you further categorize your bookmarks by putting them into folders.Press Shift-
-D to add the page to the Reading List.Point to the far-left edge of the address bar; hold your cursor down on the
 button that appears. This time, you get a pop-up menu of the standard locations (Reading List, Favorites, Bookmarks Menu, and so on); choose where you want this bookmark stored. This is a quick method, but it doesn’t offer you the chance to rename the bookmark.
Organizing Bookmarks in the Sidebar
See the ![]() button on the toolbar? It opens the Sidebar, the left-side panel shown at left in Figure 18-4. (You can also choose Bookmarks → Show Bookmarks, or choose View → Show Bookmarks Sidebar, or press Control-
button on the toolbar? It opens the Sidebar, the left-side panel shown at left in Figure 18-4. (You can also choose Bookmarks → Show Bookmarks, or choose View → Show Bookmarks Sidebar, or press Control-![]() -1.)
-1.)
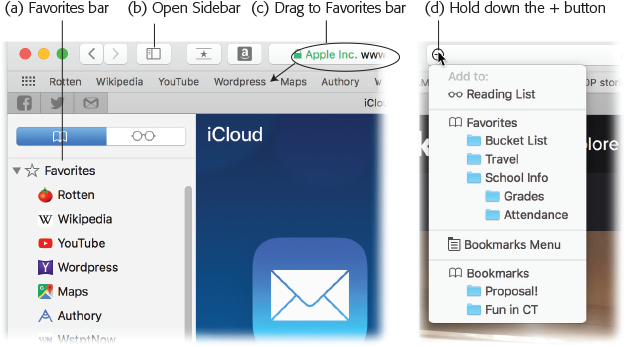
Figure 18-4. Here’s “Bookmarks: The Missing Manual.”
(a) Drag your favorite bookmarks here, for one-click access.
(b) The Sidebar lets you organize your bookmarks.
(c) Drag a website’s logo to the Favorites bar to install it there.
(d) You can create and file a bookmark in one step.
At the top of this panel, two tabs await. On the first one, the ![]() tab, you can really go to town with bookmark management. For example:
tab, you can really go to town with bookmark management. For example:
Rearrange bookmarks or folders by dragging them up or down.
Create a folder by choosing Bookmarks → Add Bookmark Folder. Or right-click or two-finger click anywhere in the list; from the shortcut menu, choose New Folder.
Type a name for the folder, press Return, and then start filling it up by dragging existing bookmark names onto it.
To delete a bookmark or a folder, right-click or two-finger click its name. From the shortcut menu, choose Delete.
To edit a bookmark’s name, right-click or two-finger click it, or hold your cursor down in it. From the shortcut menu, choose Rename.
To edit the web address a bookmark opens, right-click or two-finger click its name. From the shortcut menu, choose Edit Address.
While you’re poking around, you might notice a special folder that was here before you arrived. The Favorites folder lists the bookmarks you’ve installed on the Favorites screen described on the following pages; it’s just another way to see, choose, and organize those same items. The Bookmarks Menu folder performs that same function for the Bookmarks menu; it gives you an easy way to organize what’s listed there.
Organizing Bookmarks in the Editor
Before the slick new Sidebar came along, there was an earlier way to organize bookmarks: the bookmarks editor. You can open this special, spreadsheety window by choosing Bookmarks → Edit Bookmarks or by pressing Option-![]() -B.
-B.
In the bookmarks editor window, drag the bookmarks up and down to rearrange them. You can edit a bookmark’s name or underlying address by clicking it. Delete one by clicking it and then pressing Delete. There’s a New Folder button at top right, too.
Tip
Safari is equipped to help you move out of other web browsers. If you’ve been using Chrome or Firefox, for example, then the first time you use Safari, your bookmarks and browsing history get imported from the other browser automatically. (You’ll see a note to that effect at the bottom of the Favorites or Top Sites view; you can click either Keep or Don’t Keep. You can always import them later, using the File → Import From → Google Chrome or File → Import From → Firefox commands.)
If you have some other weirdo browser, like Internet Explorer or OmniWeb, then importing your bookmarks is only a little more complicated. Use that browser’s Export feature to save them to a file, and then use Safari’s File → Import Bookmarks command to save you the time of reentering the bookmarks by hand.
Favorites Bar
Some people amass dozens or hundreds of bookmarks—so many that, in day-to-day surfing, it’s an unwieldy list.
Fortunately, Safari lets you elevate a few special bookmarks to Favorites status. These are the sites you figure you’ll open the most. And Safari gives you two ways to see them.
First, the Favorites bar is a horizontal strip just beneath the address bar (visible in Figure 18-4). If you leave this bar open all the time, you have instantaneous, one-click access to a few very special sites.
To make this bar appear or disappear, choose View → Show Favorites Bar. Or press Shift-![]() -B.
-B.
Tip
You can jump to the first nine bookmarks on your Favorites bar by pressing Option-![]() -1 through 9. That’s one key more complicated than it used to be (in Yosemite, it was just
-1 through 9. That’s one key more complicated than it used to be (in Yosemite, it was just ![]() -1,
-1, ![]() -2, and so on)—but those simpler keystrokes now switch to the first nine tabs.
-2, and so on)—but those simpler keystrokes now switch to the first nine tabs.
Then:
Add a favorite. You add a bookmark to this bar exactly as described in “Adding a Bookmark”—but for the new bookmark’s destination, choose Favorites.
You can also drag your current web page’s name from the address/search bar directly onto the Favorites bar. (Don’t click first—just start dragging directly downward on the address bar.) You’re offered the chance to type a shorter name for your new Favorite.
Tip
You can also drag a link from a web page (not just the tiny website logo) onto your Favorites bar. In fact, you can also drag a link directly to the desktop, where it turns into an internet location file. Thereafter, to open Safari and visit the associated web page whenever you like, just double-click this icon.
Better yet, stash a few of these icons in your Dock or Sidebar for even easier access.
Remove a button from the Favorites bar by dragging it down and away.
Rearrange the buttons by dragging them horizontally.
Edit a button by right-clicking or two-finger clicking its name. From the shortcut menu, choose Rename or Edit Address.
Tip
Actually, you can rename a bookmark on the Favorites bar just by click-and-holding on its name. You’ll see it highlighted; you can just retype. No right-clicking necessary!
Favorites View
Apple figures that, many times, you’ll want to begin your surfing session with one of your Favorites. So whenever you open a new window, create a new tab, or click in the address bar (and don’t type anything), you’re shown the Favorites page (Figure 18-5). Or just click the ![]() icon at the far left of the Favorites bar. (If that’s not what you see when you open a new window or tab, you must have changed the settings in Safari → Preferences → General → “New pages open with” or “New tabs open with.”)
icon at the far left of the Favorites bar. (If that’s not what you see when you open a new window or tab, you must have changed the settings in Safari → Preferences → General → “New pages open with” or “New tabs open with.”)

Figure 18-5. Here’s Favorites View. It’s a good starting point—a page of icons for your favorite bookmarks.
If you turn on Bookmarks → Show Frequently Visited in Favorites, you get a second section that lists the websites you visit often.
The beauty of the Favorites page is that it has lots of room both horizontally and vertically. And it doesn’t eat up any space—it’s completely hidden until you click in the address bar.
You can edit the icons on the Favorites page, of course:
Rearrange them. You can drag any icon to a new spot.
Remove them. Drag an icon out of the main Favorites view window to make it disappear in a puff of cartoon smoke.
View them as folders. If you put several bookmarks into a folder, it appears on the Favorites panel as a single icon filled with even tinier icons.
Add an icon. When you find a page you’d like to add to the Favorites screen, choose Bookmarks → Add Bookmark (
-D); on the “Where” sheet that appears, choose Favorites. Click Add.
Top Sites
The Top Sites window (Figure 18-6) used to be the starting-out page in Safari. It’s exactly the same idea as the Favorites view—it’s a screen full of website icons—except that Safari chooses them, not you. It calculates which are your favorite websites according to how often and how recently you’ve visited them. The idea, again, is to save you time; the sites you’re most likely to want to revisit are one click away.
Ordinarily, the Top Sites change over time, as your activities change. But you can override Safari’s attempt to curate this page in various ways. For example, you can pin a certain site so that it never leaves the Top Sites screen, or you can manually add a page.
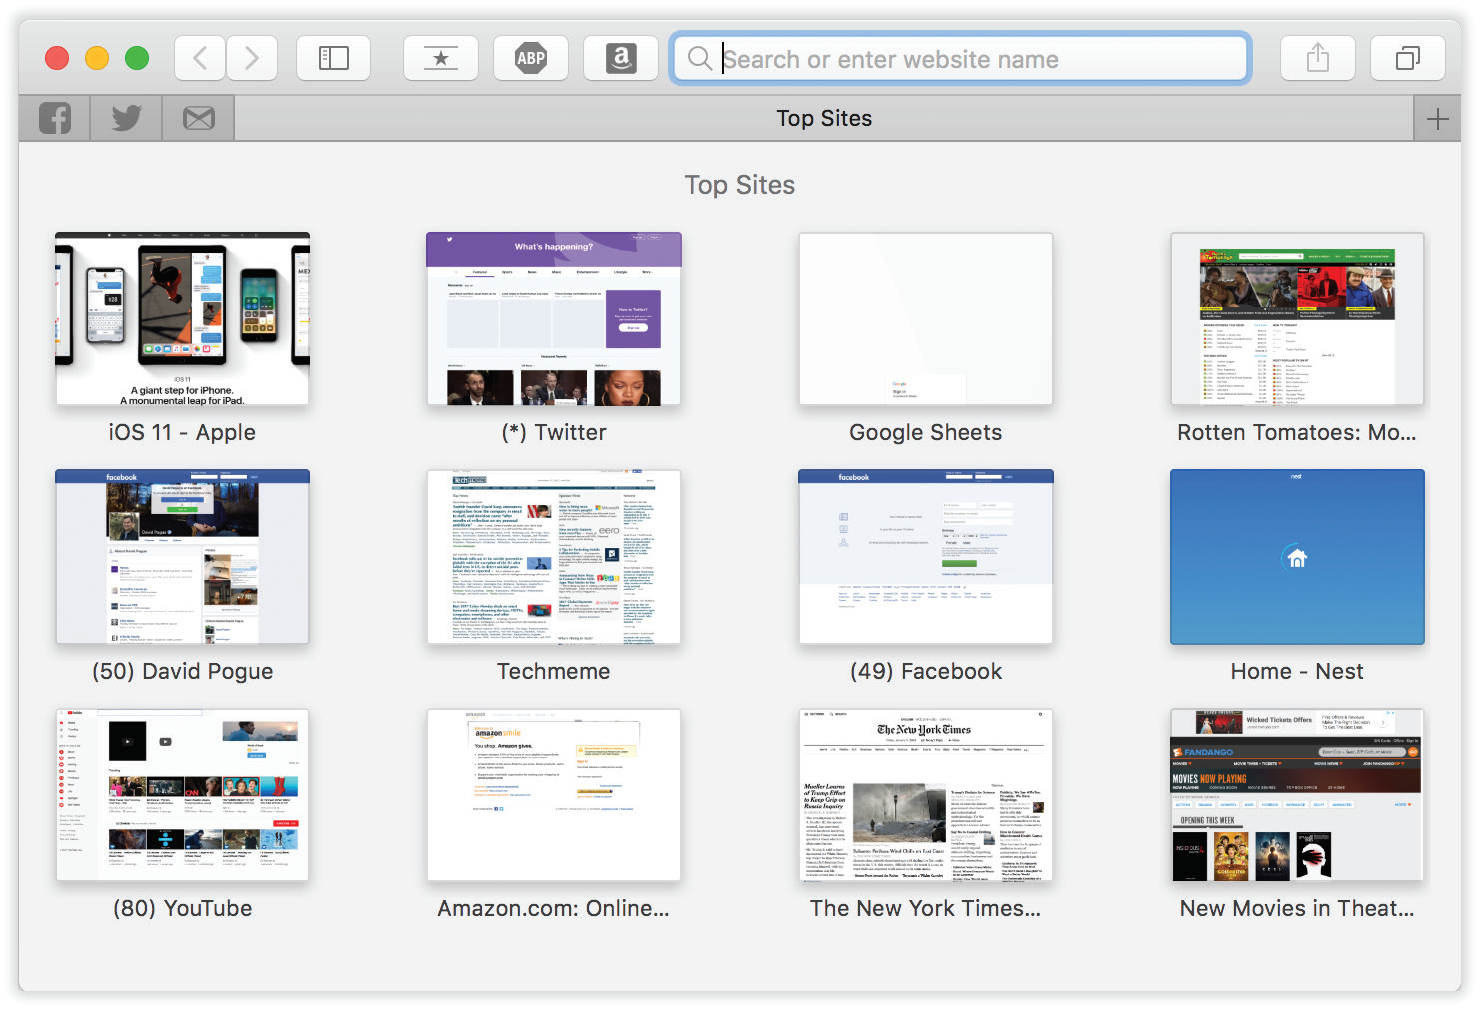
Figure 18-6. The Top Sites display is a little harder to get to than it was in previous versions of macOS. But if you’ve turned the feature on in Safari → Preferences → General → New windows open with → Top Sites, then you’ll see it every time you open a new window or tab.
Here’s some of the other fun you can have:
Rearrange the thumbnails by dragging them around.
Delete a thumbnail by pointing to it; click the
 button that appears in the top-left corner after a couple of seconds. This page will never again appear in Top Sites.
Pin a site so that it’s always in Top Sites, even if you don’t visit it much: Point to it and click the pushpin icon that appears in the top-left corner after a moment.
Add a new page to the Top Sites display. You can drag a bookmark from the Sidebar (“Windows and How to Work Them”) into the Top Sites window, or even onto the Top Sites icon (
 ) on the toolbar, if you’ve installed it there. Or, when you choose Bookmarks → Add Bookmark (-D) to bookmark an open web page, choose Top Sites as the location. You can also drag a web address wherever it may appear—an email, web page, or document, for example—into the Top Sites window or onto its toolbar icon.
Tip
If your Mac has a Touch Bar (“The Complicated Story of the Function Keys”), it shows the first few Top Sites icons, too. Handy!
Full Screen and Gestures
Once you enter Full Screen mode by clicking the green ![]() at upper left (see “Full Screen Button”), using Safari is almost exactly like surfing the web on the iPad.
at upper left (see “Full Screen Button”), using Safari is almost exactly like surfing the web on the iPad.
Zoom in and out with pinch and spread. That is, put two fingers on your trackpad and spread them to magnify the web page, or pinch to zoom out. Great when the type is a little too small.
Magnify just a block with a two-finger double-tap. Most web pages are subdivided into various rectangles of text and graphics. Just as on the iPhone/iPad, you can double-tap (with two fingers on your trackpad) to magnify a single block of text or graphics. Repeat the process to zoom back out to regular size. (Note that this is tapping, not clicking.)
Use a two-finger swipe for Back and Next. This one’s really juicy. With two fingers on your trackpad, swipe left or right instead of clicking the
or buttons. The great part is that if you do this slowly, you pull the previous or next page onto the screen gradually, giving you a chance to peek at it without actually moving to it.
Tip
Each time you open Safari, it brings up whatever pages you had open last. It’s part of macOS’s auto-resume feature.
There’s a grace note to all of this. Ordinarily, in Full Screen mode, the menu bar isn’t the only thing that disappears; the main toolbar does, too (containing the Back/Forward buttons, the address bar, and so on). Every time you wanted to click one of its buttons, you had to move your mouse to the top of the screen so that the bar reappeared.
No more! Now you can choose View → Always Show Toolbar in Full Screen to keep it visible all the time. Life is good again.
Scrolling
You’ll rarely do more page scrolling than you do in a web browser. Scrolling is a constant activity.
Fortunately, Apple gives you about 11,339 different ways to do it.
You can use the regular scroll gesture (two fingers on the trackpad). You can also press your ![]() and
and ![]() keys to scroll one line at a time. Page Up and Page Down scroll in full-screen increments, while Home and End whisk you to the top or bottom of the current web page. And if your mouse has a scroll wheel, it works, too. (Hold Shift while you’re rolling the wheel to scroll horizontally.)
keys to scroll one line at a time. Page Up and Page Down scroll in full-screen increments, while Home and End whisk you to the top or bottom of the current web page. And if your mouse has a scroll wheel, it works, too. (Hold Shift while you’re rolling the wheel to scroll horizontally.)
But maybe the best way of all is to tap the space bar each time you want to see more. Press Shift-space to scroll up. (The space bar serves its traditional space-making function only when the insertion point is blinking in a text box or the address bar.)
Five Ways to Magnify a Page
If it seems as though a lot of websites are designed with type that’s too small to read, it’s not just you and your aging eyes. Often it has to do with the high resolution of today’s screens, which work by packing their pixels together more tightly—and making everything look smaller.
Fortunately, Safari is well equipped to help you with this problem. In fact, it offers many solutions:
Enlarge the screen. Press
-plus or -minus to enlarge or reduce the entire web page. Or use the two-finger “spread” gesture on your laptop trackpad. Or use the Zoom button, if you’ve added it to your toolbar. The advantage of this method is that the whole web page’s layout remains proportional.Magnify a block. Lightly double-tap (don’t fully click) with two fingers on your trackpad to zoom in to one block of text or graphics on a page, as already described.
Blow up just the text. If you add the Option key to
-plus and -minus, the Zoom In and Zoom Out options become Make Text Bigger and Make Text Smaller, magnifying or shrinking only the text on your page. Graphics remain at their original size. You’re now distorting the original layout, but you’re maximizing the amount of reading you can do before you have to scroll.Zoom in the usual way. Remember the Control-key zooming technique described in “Customizing your zoom”? It’s not the same thing as the
-plus or -minus tricks, which keep the window frame and menu at normal size. The Control-key zooming technique magnifies everything—the entire screen, menus and all. It also doesn’t keep text as sharp as the -plus/-minus trick.Specify a minimum type size. This may be the best option of all, because it saves you all that zooming. Open Safari → Preferences → Advanced and set the “Never use font sizes smaller than” option to, for example, 14 points. Now every web page shows up with legible text. (Except a few oddballs that use weird coding to prevent text-size changing.)
Customizing the Toolbar
There’s no title bar in Safari. So the real estate on the bar that remains—the address/search bar, the one Apple calls the toolbar—is precious. Fortunately, you can summon or dismiss individual buttons on the toolbar, in effect customizing it (Figure 18-7).
Here’s a catalog of your options:
Back/Forward. Click the Back button (
) to revisit the page you were just on, or to return to the page you were on before you clicked the Back button. See Chapter 18 for more details.iCloud Tabs open whatever browser windows and tabs you had open on your other Apple gadget, like an iPhone or iPad or another Mac (running Mountain Lion or later). Thanks to the miracle of iCloud syncing, the last windows and tabs you had open on that other gadget (even if the gadget is turned off) show up here. (This is visible in Figure 18-13.)
Share. Here’s the standard macOS Share menu, for sending a web page to another person, or to your Notes app, for example.
Show All Tabs. See “Tab View”.
Top Sites opens, of course, the Top Sites window (“Top Sites”).
Home. Click to bring up the web page you’ve designated as your home page (in the Safari → Preferences → General tab).
History. Click to open the list of websites you’ve visited recently in a window—a much easier-to-navigate display than the History menu.
Sidebar shows or hides the Sidebar, the left-side column of bookmarks, saved articles, or RSS feeds.
Favorites Bar. Hides or shows the horizontal toolbar that lists your favorite bookmarks (the equivalent of choosing View → Favorites Bar).
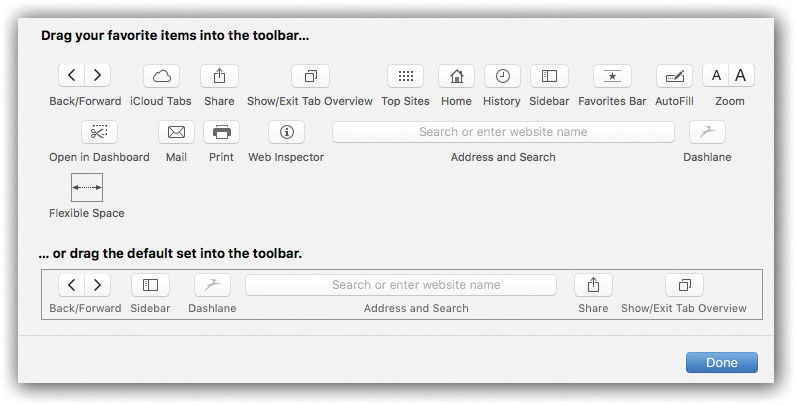
Figure 18-7. To summon this toolbar-tailoring screen, choose View → Customize Toolbar. Drag the buttons you want directly onto the address bar.
There’s no way to summon text labels for these icons once they’re on the toolbar. But all offer tooltip labels.AutoFill. Click this button to make Safari fill in web order forms with your name, address, and other information. See the next section.
Zoom. These handy buttons make the current page smaller or bigger each time you click. The keyboard shortcuts are
-plus or -minus.Open in Dashboard. This icon is the key to creating a Dashboard web clip, which is a snippet of web content that you can keep available in your Dashboard. Click this button, and then select the part of the page you want to widgetize.
Mail. Opens a new, outgoing message in your email program. The subject line contains the name of the site you were visiting; the body contains the actual web page. But in the Send Web Content As pull-down menu, you can choose from three other ways to send the page: in Reader view, as a PDF, or a link only. You can address the message, add a comment (“Re: your claim that ‘no expert’ recommends trampolines for children”), and send it.
Website Preferences. This button offers you some great options to configure how you interact with individual websites. See “Per-Website Settings”.
Print. You can add a printer icon to Safari for point-and-click paper action if you don’t want to bother with
-P.Tip
Safari automatically shrinks your printouts, if necessary, by up to 10 percent, if doing so will avoid printing a second page with just one or two lines of text on it. Nice.
Address/search bar. Yep, it’s the toolbar, where you type in the web address you want to call up.
Flexible Space. This isn’t really a button. It’s an invisible “tile” you can drag between other buttons to adjust the button spacing on your toolbar.
Autofill: Your Name and Info
Every time you buy anything online or sign up for anything online, you have to type your name, address, and phone number. Over and over and over. This info doesn’t change often—why can’t someone invent a system to memorize it?
Someone has. Visit the Safari → Preferences → AutoFill tab. Turn on “Using info from my contacts.” Click Edit. From Contacts, find your own listing. You’ve just told Safari which name, address, city, state, zip code, and phone number belong to you.
From now on, whenever you’re asked to input your details, you’ll see a ![]() icon in the typing box. Click it for a menu of your addresses (like Home and Work—see Figure 18-8, top), saving you no end of typing. (It works on most sites.) If there are extra blanks that AutoFill doesn’t fill, you can press Tab to move your cursor from one to the next instead of tapping and scrolling manually.
icon in the typing box. Click it for a menu of your addresses (like Home and Work—see Figure 18-8, top), saving you no end of typing. (It works on most sites.) If there are extra blanks that AutoFill doesn’t fill, you can press Tab to move your cursor from one to the next instead of tapping and scrolling manually.
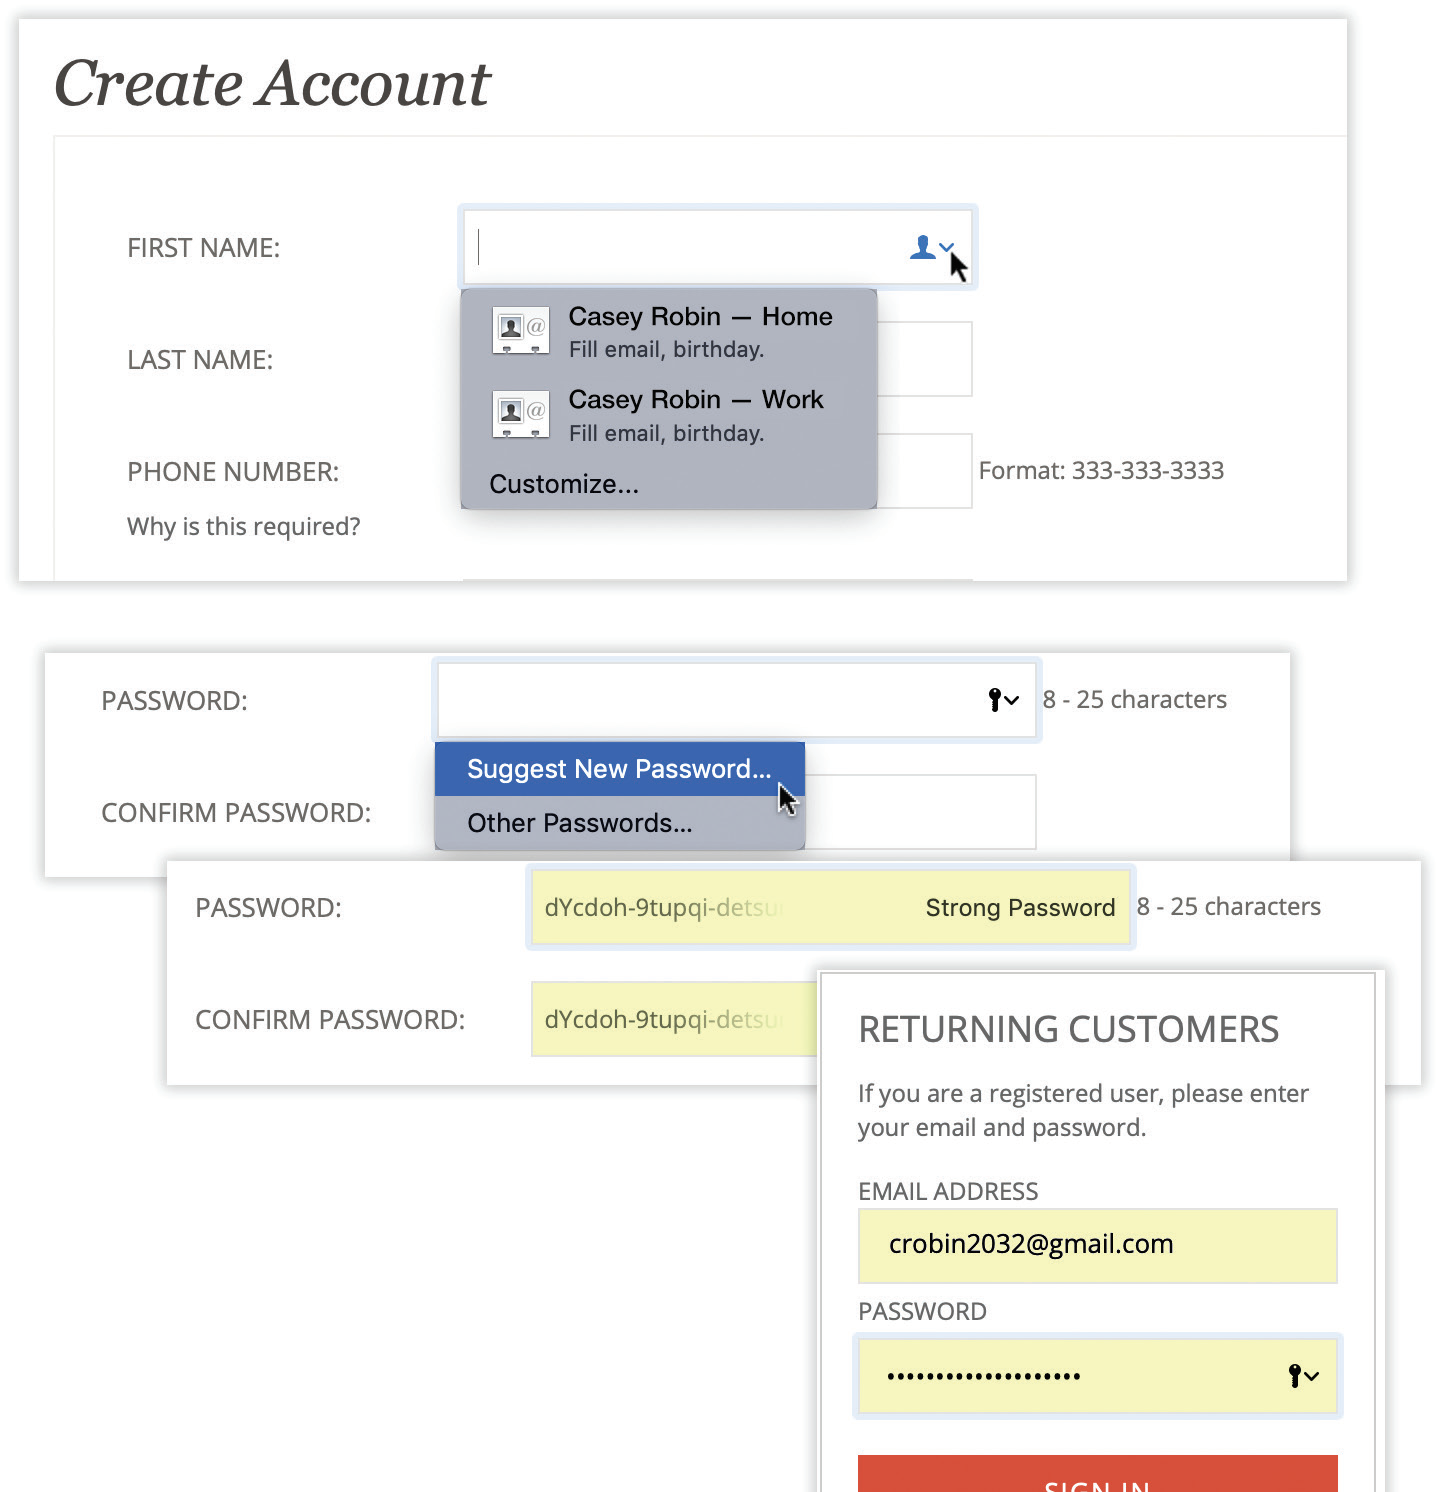
Figure 18-8. Top: Safari can autofill your name and contact info.
Second from top: Safari can make up and memorize passwords, too. Click the  in any empty New Password box; click Suggest New Password.
Third from top: Here’s Safari’s proposed password. You won’t care that all your passwords are gibberish like this; iCloud autosyncs them to all your other gadgets, where it fills them in there, too.
Lower right: When you return to this site, Safari can autofill both your login name and password.
Autofill: Your Passwords
Most of us are familiar with password hell. You’re supposed to create a long, complex, unguessable password—capital and lowercase letters, numbers, and symbols, with a few Hindi characters thrown in if possible. For each site. And you can’t reuse a password. Oh, and you have to change them all every month.
It’s not possible. Not even security experts have that kind of memory.
Fortunately, Apple has come up with a system that comes very close to the ideal: complex, secure passwords—without your having to remember any of them!
When you’re signing up for an account on some website, and you tap in the box where you’re supposed to enter a password, Safari offers to make up a password for you. It’s a doozy, too, along the lines of 23k2k4-29cs8-58384-ckk3322 (Figure 18-8, bottom left).
You’re not expected to remember that. Safari saves this password, so that it can enter it automatically on your next visit (Figure 18-8, lower right).
And if System Preferences → iCloud → Keychain is turned on, then your memorized passwords will be available on your other Apple machines (phones, tablets, Macs), too.
Note
If you have several accounts for the same site, you’ll see a button for each one.
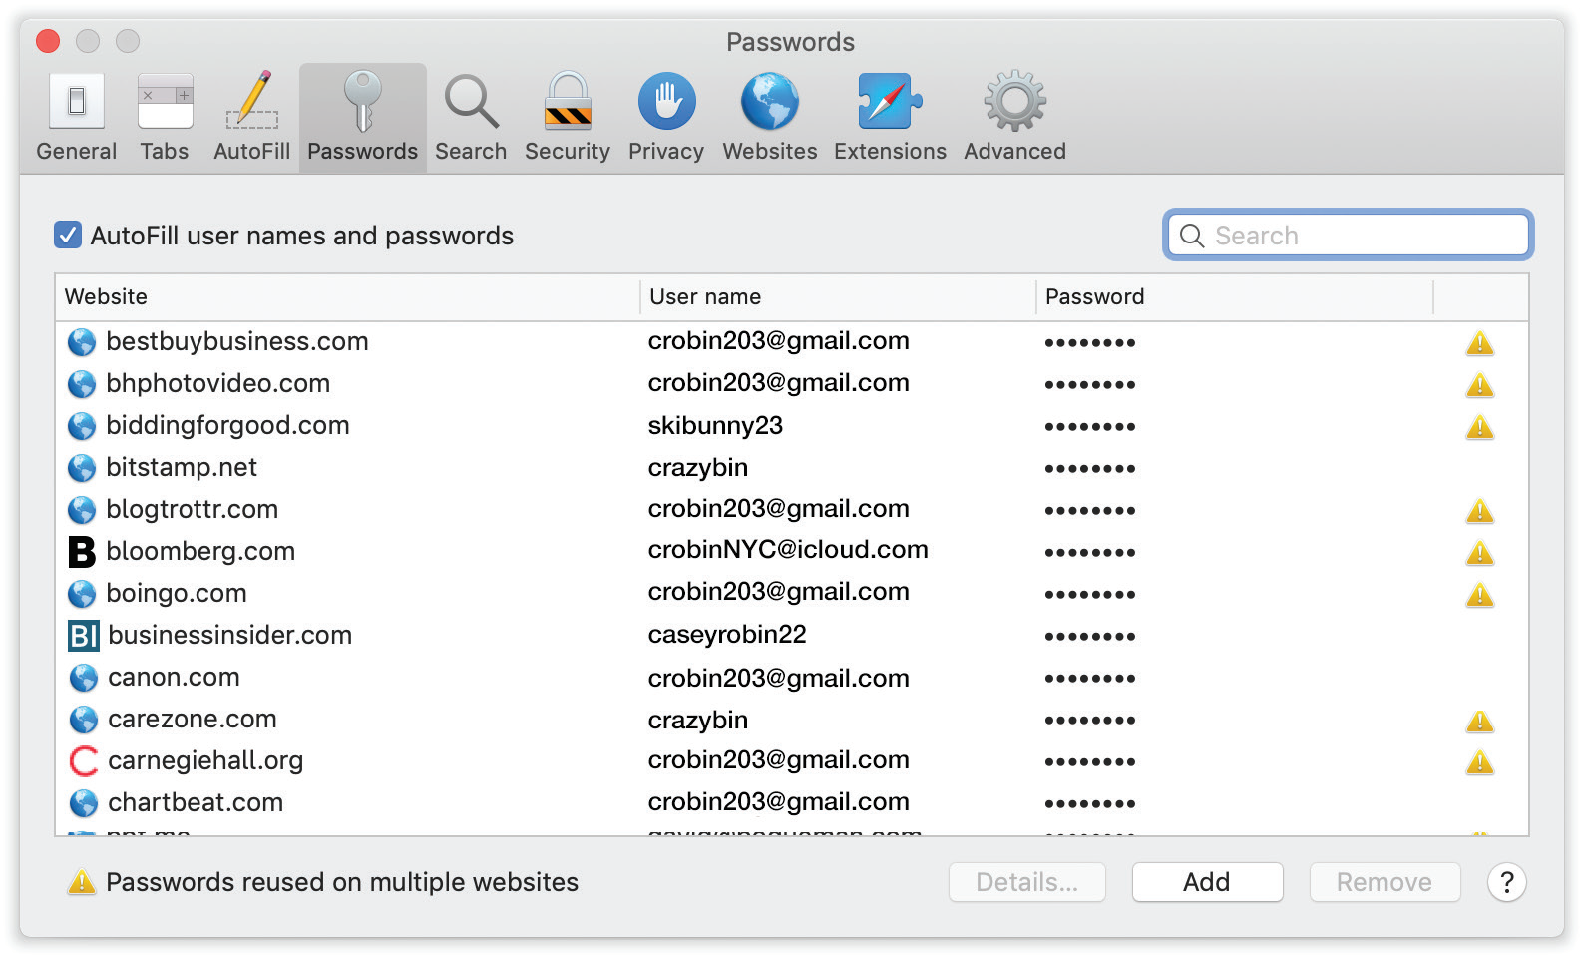
Figure 18-9. Choose Safari → Preferences → Passwords (and then enter your Mac password) to see the passwords Safari has memorized. Click a row to view the corresponding password.
The master password list
You can view a master list of the actual memorized names and passwords. It waits for you at Safari → Preferences → Passwords. You have to prove your identity with your Mac password or Touch ID before you’re allowed to see them.
On this screen, you can view a password by clicking its row (Figure 18-9). You can change any saved password, too; double-click it. To add a password manually, click Add. Or, if a login no longer pleases you, click it and hit Remove.
This list, by the way, might display the occasional ![]() symbol. That’s flagging passwords you’ve used more than once, for different sites. Almost everyone does that, because who’s really going to memorize 300 different passwords? But security experts frown on the practice, because it means once a hacker gets the password for one of your accounts (from some corporate data breach, for example), then he’s got access to your other accounts, too. Since macOS can remember and fill in your passwords all by itself, you might as well avoid that fate.
symbol. That’s flagging passwords you’ve used more than once, for different sites. Almost everyone does that, because who’s really going to memorize 300 different passwords? But security experts frown on the practice, because it means once a hacker gets the password for one of your accounts (from some corporate data breach, for example), then he’s got access to your other accounts, too. Since macOS can remember and fill in your passwords all by itself, you might as well avoid that fate.
Autofill: Credit Cards
When you buy something online, Safari can enter your credit-card information with one click, making shopping infinitely easier. It’s as easy as 1, 2. Figure 18-10 shows you how to store your credit cards in Safari and how to use them to buy things online.
This feature is a lot like the popular password/credit card keeper programs 1Password and Dashlane—better, really, because it’s free, and because iCloud Keychain autosyncs your credit card information to your iPhones, iPads, and iPod Touches, too.
But in one way, it’s worse: As yet another security layer, Safari doesn’t memorize the security code, also known as the CVV or CV2 code, that you need to complete a credit card transaction. You have to fill that in yourself every time you buy something.
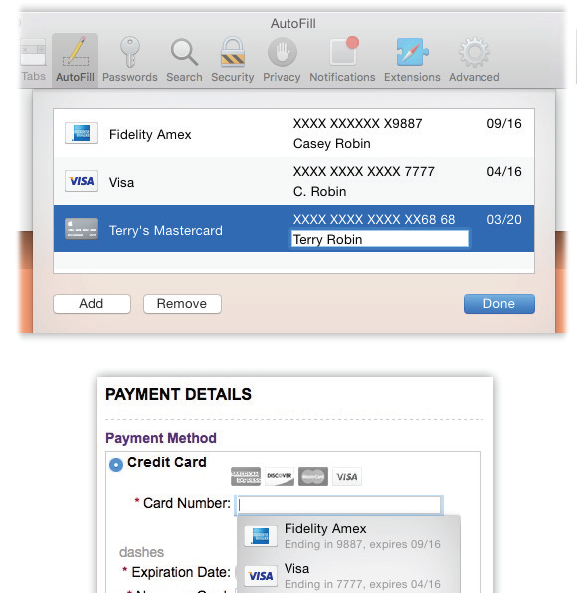
Figure 18-10. Top: Teach Safari your credit card details by choosing Preferences → AutoFill. Click Edit to arrive at this list.
Click Add. Fill in a description for your card, the number, your name, and the expiration date. Click Done.
Bottom: Next time you’re about to buy something, click inside the Credit Card Number box). Safari shows this menu of your cards; click one to fill in all the boxes (except Verification Code).
Autofill: Text-Message Authentication Codes
You know how, when you try to log onto certain websites, they first send your phone a text message to prove that you’re you? (It’s called two-factor authentication. Security experts love it. People hate it.)
Yeah, you get the notification that a text has come in. But then you had to either memorize the six-digit code they just sent you, or switch into Messages, find the text they sent you, and copy the code to your Clipboard. And then go back to Safari, tap in the “Enter code here” box, and paste it. Augh.
Not anymore! See Figure 18-11.
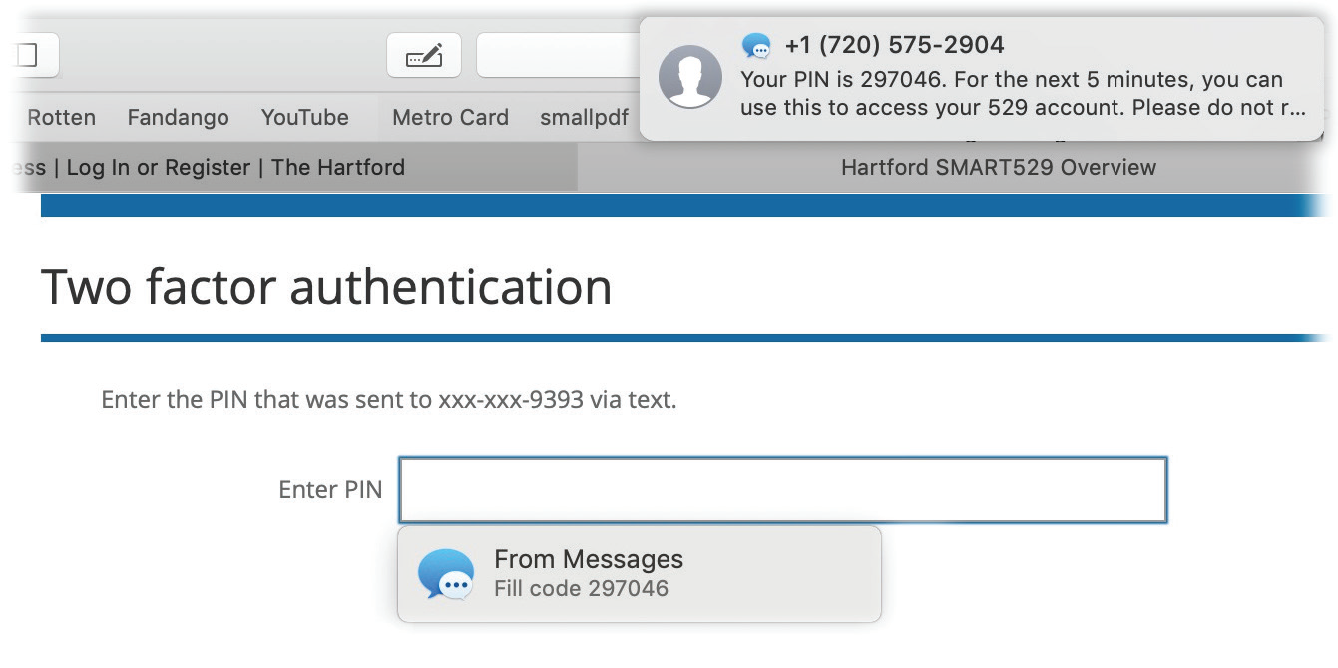
Figure 18-11. Now, whenever a site sends a “two-factor authentication” code by text, your Mac finds it in the text message, identifies it, and offers to paste it directly into the site. It’s fantastic. (This presumes, of course, that your Mac receives your text messages, as described in Chapter 19.)
Tabbed Browsing
Beloved by hard-core surfers the world over, tabbed browsing is a way to keep a bunch of web pages open simultaneously—in a single, neat window. Figure 18-12 illustrates.
Turning on tabbed browsing unlocks a whole raft of Safari shortcuts and tricks, which are just the sort of thing power surfers gulp down like Gatorade:
When you
-click any link on any page, it opens into a new tab. (If, of course, the first checkbox in Safari → Preferences → Tabs is turned on.)If there’s a certain set of websites you like to visit daily, put the bookmarks into one folder, using Bookmarks → Add Bookmark Folder and the Bookmarks organizer window. You can then load all of them into a single tabbed window, simply by selecting the resulting “folder” in the Bookmarks menu and choosing Open in Tabs from the submenu.
The beauty of this arrangement is that you can start reading the first web page while all the others load into their own tabs in the background.
A variation on a theme: When you have a bunch of pages open in tabs, you can drag the tabs across the window to rearrange the order. When you have them the way you want them, right-click or two-finger click a tab and then choose Add Bookmarks for “These [number] Tabs” from the shortcut menu. You can save your tabs to the Bookmarks bar and load all those pages with one click.
If you Option-click a tab’s
button, you close all the tabs except the one you clicked. The same thing happens if you hold down Option and choose File → Close Other Tabs, or if you press Option--W.If you Option-
-click a link, it opens in a separate window, rather than in a new tab. (When tabbed browsing is turned off, just -click a link to open a new window.) If you find yourself with a bunch of separate browser windows all over your screen, you can consolidate them into one nicely tabbed Safari window by choosing Window → Merge All Windows.If you Shift-
-click a link, Safari opens that page in a tab behind the one you’re reading. That’s for when you’re reading a web page and see a reference you want to set aside for reading next, but you don’t want to interrupt what you’re reading now.If you have a lot of tabs open on your laptop—so many that they don’t all fit and some of them are getting stacked up at the right end—check out this trick: You can scroll through the open tabs on your trackpad. Position the cursor on the tab bar, and then swipe horizontally with two fingers.
If your Mac has a Touch Bar (“The Complicated Story of the Function Keys”), it shows tiny photos of all your open tabs. You can tap to jump to a tab, or just run your finger across them like a harpist.
Turn on favicons! In macOS Mojave, at last, you can view favicons (tiny website logos) on each tab for quick visual identification. You can see them in Figure 18-12). To make them appear, visit Safari → Preferences → Tabs and turn on “Show website icons in tabs.”
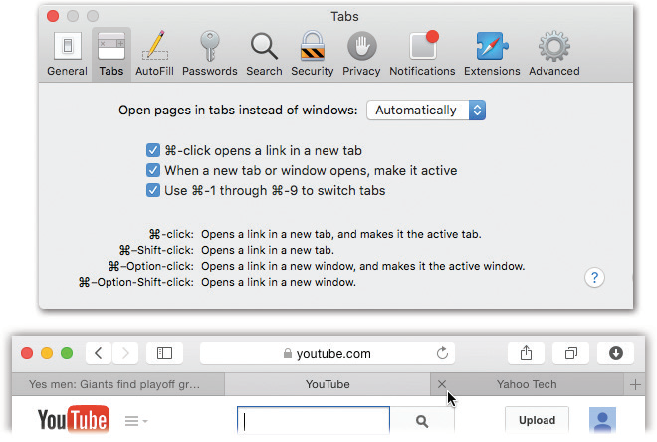
Figure 18-12. Top: You can pop from one open tab to another by clicking the tabs, or close one by clicking its button (or pressing -W).
Bottom: You set up tabbed browsing in Preferences → Tabs. (For best results, turn on “When a new tab or window opens, make it active.”)
Tab View
When you’ve opened a few tabs, their names, in titles across the top of your Safari window, get pretty cramped. Fortunately, there’s also Tab view: Miniatures of all your open tabs. To see it, click the Show All Tabs button on the toolbar (![]() )—or how about this? Just pinch two fingers on your trackpad. Figure 18-13 explains all.
)—or how about this? Just pinch two fingers on your trackpad. Figure 18-13 explains all.
Tip
Once you’ve opened Tab view, you can perform a cool trick: You can search all the open tabs at once (either for words in the web page’s names, or text in their addresses). You don’t have to click into any search box first; just type. As you type, Safari hides all but the matching tabs.
iCloud tabs
At the bottom of Show All Tabs view (Figure 18-13), a special treat awaits: A list of whatever browser windows and tabs you had open on your other Apple gadgets, like iPhones or iPads. Thanks to the miracle of iCloud syncing, the last windows and tabs you had open on that other gadget (even if the gadget is turned off) show up here.
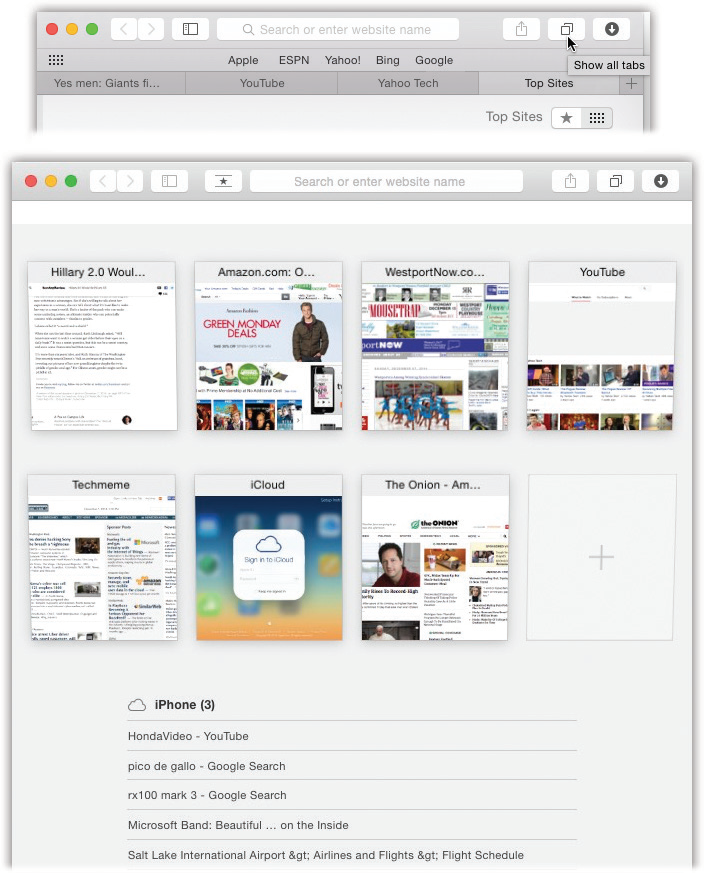
Figure 18-13. Tab view gives you a horizontally scrolling parade of miniatures so you can easily spot what’s in your open tabs.
To get here, pinch with two fingers on your trackpad, or click the Show All Tabs button (shown by the cursor here).
In Tab view, you can scroll among the tabs in the usual way (drag two fingers on your trackpad, for example). Sites with multiple pages open appear as stacked thumbnails. When you find the tab you want, click or press Return.
You can also back out of Tab view without switching tabs at all, just by spreading two fingers on the trackpad.
The concept is to unify your Macs and i-gadgets into one glorious, seamless web-browsing experience. You’re reading three browser windows and tabs on your phone—why not resume on the big screen when you get home and sit down in front of your Mac?
Amazingly enough, you can even close the tabs and windows on your other gadgets, by remote control—by clicking the ![]() button next to each one.
button next to each one.
You won’t see these tabs unless the Macs have Mountain Lion or later. And, of course, Safari has to be turned on in System Preferences → iCloud (on the Mac), or Settings → iCloud (on the phone or tablet).
Pinned Tabs
This feature is hard to describe but handy to have: pinned tabs. These are special, square, icon-only tabs at the far left end of your window that never go away, even when you close the window or quit Safari. (You can see three of them at the left end in Figure 18-14.)
That might sound like the same thing as a bookmark, but there’s a difference: When you click a bookmark, Safari takes a couple of seconds to fetch that web page and then display it. A pinned tab, on the other hand, is already loaded; Safari keeps its underlying page constantly updated.
That effect is especially useful for sites you check often throughout the day—sites like Facebook and Twitter, or mail sites like Gmail. Every time you click that pinned tab, the corresponding page appears, already loaded and up to date.
As a bonus, clicking a link on a pinned page opens up in a new tab, so the original page is waiting for you when you’re done. When you’re reading your Twitter feed, for example, you can click a link in someone’s tweet to open the page he wanted you to see…you read it…you hit ![]() -W to close the tab…and you’re right back in your Twitter feed, ready to click another link.
-W to close the tab…and you’re right back in your Twitter feed, ready to click another link.
See Figure 18-14 for details on creating (and removing) pinned tabs.
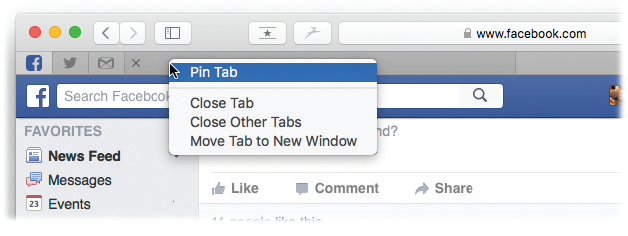
Figure 18-14. To pin a site, drag an existing tab all the way to the left. Or choose Window → Pin Tab. Or right-click a tab and choose Pin Tab. To remove a pinned tab, drag it to the right, or choose Window → Unpin Tab.
Tips for Better Surfing
Safari is filled with shortcuts and tricks for better speed and more pleasant surfing. For example:
The Reading List
The Reading List (![]() ) stores entire web pages that you want to read later (Figure 18-15). These aren’t just bookmarks (links); the Reading List downloads and stores the full contents of each page you’ve requested so you can read them when you don’t have an internet connection. Better than that, actually: It stores that page and any other pages necessary to continue reading an article you’ve flagged.
) stores entire web pages that you want to read later (Figure 18-15). These aren’t just bookmarks (links); the Reading List downloads and stores the full contents of each page you’ve requested so you can read them when you don’t have an internet connection. Better than that, actually: It stores that page and any other pages necessary to continue reading an article you’ve flagged.
The Reading List also makes it faster to flag a web page you like—you don’t have to make up a name or a location for it, as with a bookmark. Also, the Reading List keeps track of what you’ve read; you can use the All/Unread buttons at the top of the list to view everything or just what you haven’t yet read.
You might treat the Reading List as a list of pages you’ll want to read once later, and use bookmarks for pages you like to revisit frequently.
To make matters even sweeter, iCloud synchronizes your Reading List among your Mac, iPhone, iPad, and so on (if you’ve turned on Safari syncing in System Preferences → iCloud). It’s as though the web keeps your place as you move from gadget to gadget.
To add a page to the Reading List, use one of these techniques:
Shift-click a link. That simple trick adds the linked page to the Reading List. You don’t have to visit the page itself (only the link to it), or even to open the Reading List first.
Click the
button. This button appears only when you move your cursor to the left end of the address box.Use the menu. Choose Bookmarks → Add to Reading List, or press Shift-
-D.Use the Share button. You can also click
on the toolbar and choose Add to Reading List.
To view your saved pages, open the Sidebar (click ![]() ); then click the Reading List (
); then click the Reading List (![]() ) tab. Or just choose View → Show Reading List Sidebar (Control-
) tab. Or just choose View → Show Reading List Sidebar (Control-![]() -2).
-2).
To read the pages in the Reading List, you can press Option-![]() -
-![]() or Option-
or Option-![]() -
-![]() to move up and down your list.
to move up and down your list.
Tip
If you’re reading one article in your Reading List using the Reader feature (described in a moment), and then select another article, then it, too, will appear in Reader.
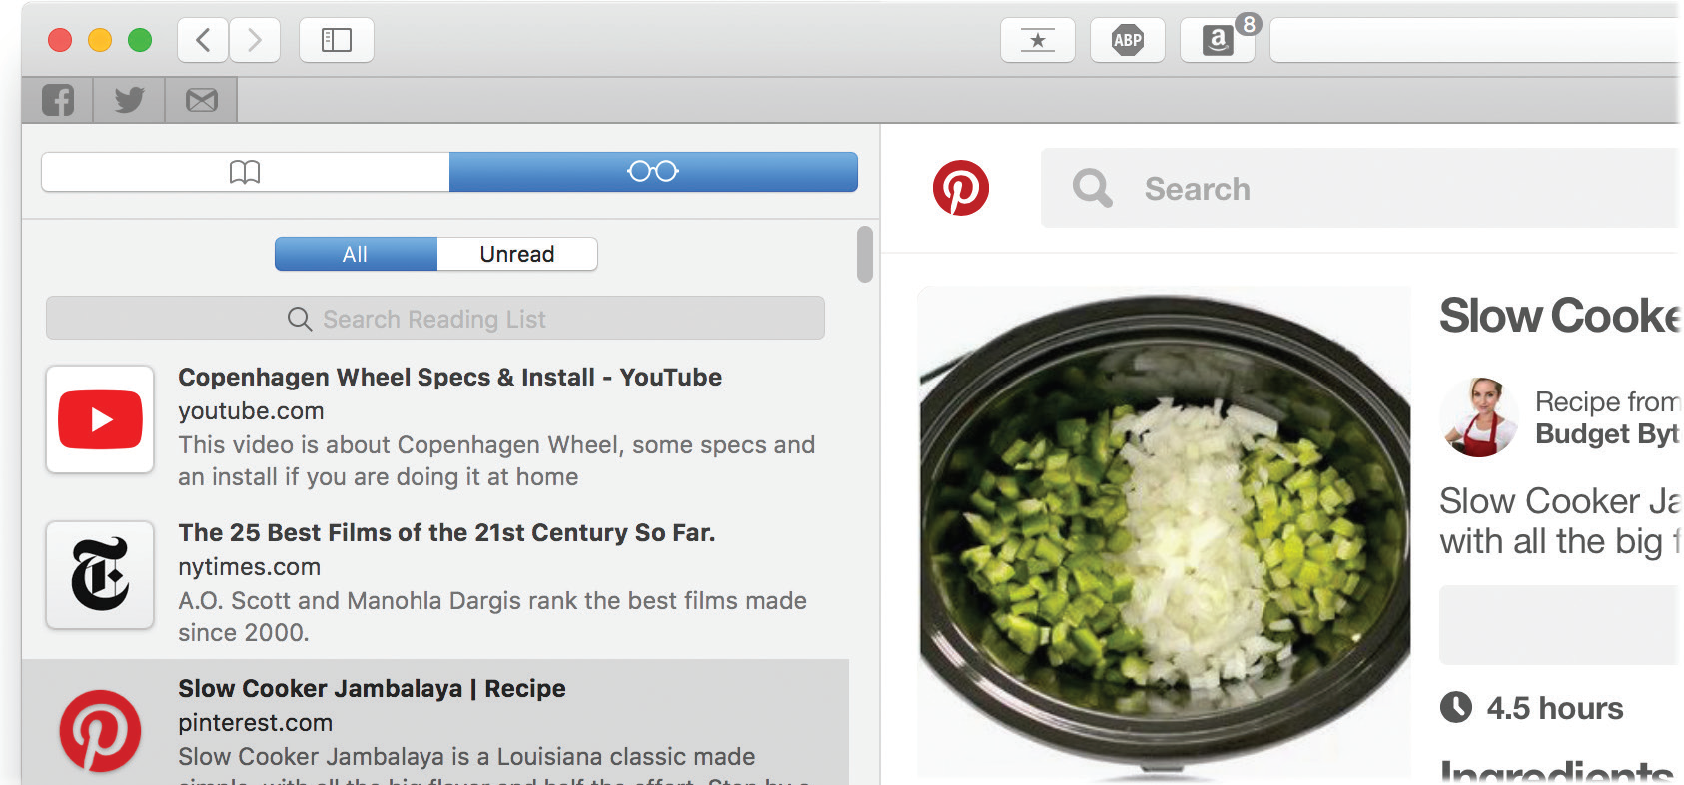
Figure 18-15. To revisit a page in the Reading List, just click it. Screen out the pages you’ve already read by clicking the Unread tab at the top. Delete an entry by right-clicking or two-finger clicking it and choosing Remove Item from the shortcut menu.
Keyboard Control
Efficiency freaks generally prefer keyboard shortcuts to using the mouse, so Safari is filled with them.
Press Tab to jump from one text box or pop-up menu to the next on your web page. Add the Option key to jump from one link to another (and when you highlight a link, press Return to “click” it).
Tip
For a shockingly complete list of Safari’s keyboard shortcuts, open the Help menu. In the search box, type safari shortcuts. Wait a moment. Click “Safari keyboard and other shortcuts” in the list of Help topics.
The Download Manager
No browser has ever made tracking downloads simpler.
When you click a link to download something from a web page, it visibly flies to the upper-right corner of the Safari window, where the Downloads button (![]() ) appears. You can then monitor the progress of the download at a glance—because the Downloads button fills up with blue as the download completes.
) appears. You can then monitor the progress of the download at a glance—because the Downloads button fills up with blue as the download completes.
As Figure 18-16 shows, you can also view and manipulate a list of everything you’ve downloaded recently, all without leaving the comfort of whatever page you’re on.
To pause downloading, click the ![]() button next to the download’s name. Later, you can generally pick up from where you left off by clicking the Resume (
button next to the download’s name. Later, you can generally pick up from where you left off by clicking the Resume (![]() ) button.
) button.
Tip
In Safari → Preferences → General, you can opt to have your download listings removed from the Downloads window as soon as they’ve been successfully downloaded, maybe for privacy reasons.
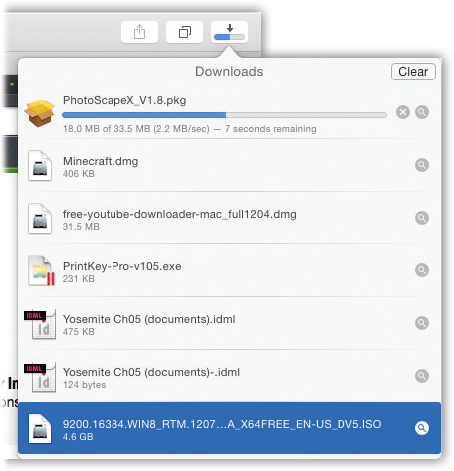
Figure 18-16. Click the Downloads ( ) button to view this list of recent downloads. Double-click an icon to open the download. Drag it out of the list onto your desktop, or onto a folder on the desktop. You can even drag it onto a Dock icon to open that file with a particular program.
Click the  button to jump to the file wherever it’s sitting in the Finder. To remove an item from the list, click it and then press Delete. (The Clear button erases the whole list.)
Status Bar
The status bar at the bottom of the window tells you what Safari is doing (such as “Opening page…” or “Done”). When you point to a link without clicking, the status bar also tells you which URL will open if you click it.
For those two reasons, it’s a useful strip, but it doesn’t appear when you first run Safari. You have to summon it by choosing View → Show Status Bar.
Reader
How can people read web articles when there’s Times Square blinking going on all around them? Fortunately, you’ll never have to put up with that again.
The Reader button (![]() ) in the address/search bar is amazing. With one click (or press of Shift-
) in the address/search bar is amazing. With one click (or press of Shift-![]() -R), it eliminates everything from the web page you’re reading except the text and photos. No ads, blinking, links, banners, promos, or anything else.
-R), it eliminates everything from the web page you’re reading except the text and photos. No ads, blinking, links, banners, promos, or anything else.
The text is also changed to a clean, clear font and size, and the background is made plain white. Basically, it makes any web page look like a printed book page or a Kindle page, and it’s glorious (Figure 18-17).
To exit Reader, press the same keyboard shortcut, or click ![]() again. Best. Feature. Ever.
again. Best. Feature. Ever.
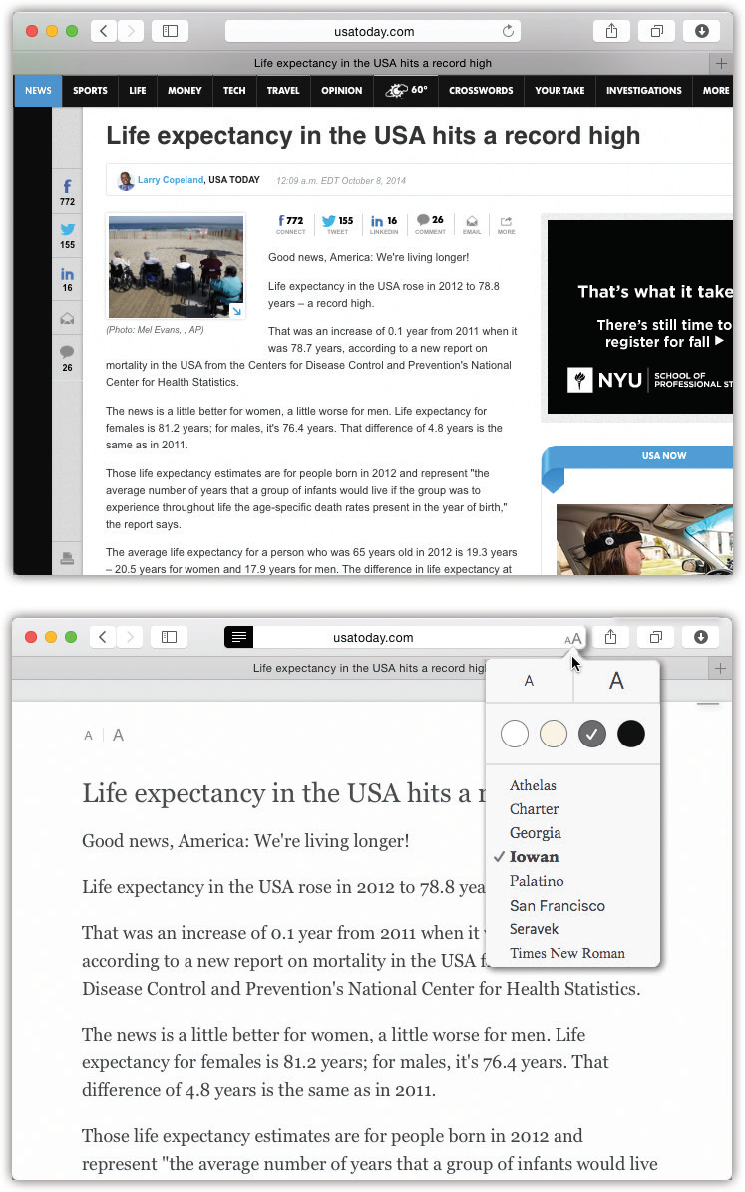
Figure 18-17. Seriously, which way would you rather read an article? Like this (top)? Or in the calm peace of this (bottom)? Not only does Reader get rid of all the ads and clutter and blinking, it even knits multipage articles together into one seamless, scrolling page. Use the space bar or two fingers to scroll, as usual.
Using the  button as a pop-up menu, you can change the typeface for your Reader view—or click one of the four circles to change the background color. Some people find that light text against a dark background is especially soothing.
Graphics Worth Saving
When you see a picture you’d like to keep, right-click or two-finger click it and choose Save Image to Downloads (or Add Image to Photos Library, or just Save Image As) from the shortcut menu. Safari stores it as a new graphics file, freed from its birthplace on the web. (You can specify where Safari saves downloaded pictures on the Safari → Preferences → General tab. In that case, the shortcut menu’s wording changes to say, for example, “Save Image to ‘Pictures.’ ”)
Tip
You can also save a graphic to the desktop just by dragging it there, right out of the Safari window.
Expanding Web Forms
If the customer-service comment form on that corporate website doesn’t give you enough room to rant properly, you can resize the text box right on the page—a very welcome feature. Figure 18-18 tells all.
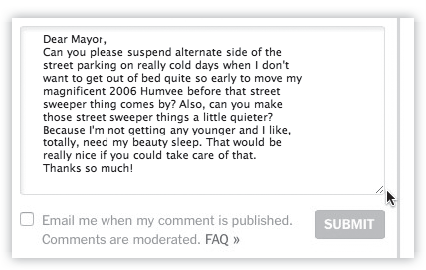
Figure 18-18. This trick works on a web page’s text fields—comment boxes, forms to send a letter to the mayor, and so on. You can resize such boxes by dragging the three diagonal ribbed lines in the lower-right corner of the text field. The rest of the page adjusts itself to the new text-box size, and you have room to say what you need to say.
Saving Web Pages to Disk
You don’t have to be online to read a favorite web page; you can tuck it away for later, thanks to the Reading List feature described earlier in this chapter.
The old way of saving a page, though, is still around. You can save it to your hard drive—to archive it for good, or to send it to somebody, for example—by choosing File → Save As.
At that point, to save the entire page, along with all its images, movies, and so on, choose Web Archive from the Format pop-up menu. (Choose Page Source only if you intend to edit the raw HTML web documents and repost them, or if you just want to study the underlying code.)
Tip
When you buy something online, don’t waste paper by printing out the “This is your receipt” page. Instead, just choose File → Print and, from the PDF pop-up button, choose Save PDF to Web Receipts Folder. Safari saves the page as a PDF file into a tidy folder (in your Home → Documents folder) called Web Receipts. Nice touch!
Sending a Page to a Friend
When you come across a particularly interesting news story, op-ed piece, or burrito recipe online, Safari is ready to help you tell a friend about it. While looking at a page, click ![]() and choose Email This Page. Or, if you’ve installed the Mail button (
and choose Email This Page. Or, if you’ve installed the Mail button (![]() ) onto the toolbar, as described in “Customizing the Toolbar”, click that instead. Once Safari has prepared your outgoing email message, you can add a comment if you want and then choose Reader (if it’s available), Web Page, PDF or Link Only to determine how your buddy will receive the page.
) onto the toolbar, as described in “Customizing the Toolbar”, click that instead. Once Safari has prepared your outgoing email message, you can add a comment if you want and then choose Reader (if it’s available), Web Page, PDF or Link Only to determine how your buddy will receive the page.
Note that links take only a split second for your recipient to download, and they’re guaranteed to display properly in all email programs. All your recipients have to do is click the link to open it in their web browsers.
Tip
You can also just press ![]() -I. That keystroke sends a link to an outgoing email message.
-I. That keystroke sends a link to an outgoing email message.
By the way, here’s a handy feature: At the bottom of the ![]() menu, you see the names of people to whom you’ve recently sent web pages, and by which method. For example, you might see “Casey Robin, email” or “Kelly Switt, Messages.” Those shortcuts make it incredibly easy to send more pages the same way, to the same people, again later.
menu, you see the names of people to whom you’ve recently sent web pages, and by which method. For example, you might see “Casey Robin, email” or “Kelly Switt, Messages.” Those shortcuts make it incredibly easy to send more pages the same way, to the same people, again later.
Designate Your Start Page
What’s the first thing you see when you open Safari? Is it the Apple news website? Is it the Top Sites display (Figure 18-6)?
Actually, that’s up to you.
Choose Safari → Preferences → General tab. Here the “New windows open with” pop-up menu offers choices like these:
Favorites. The Favorites screen (“Favorites View”) makes a great starting point.
Homepage. If you choose this option, Safari will open up with whatever page you’ve specified in the “Homepage” box. Google—or its news page, news.google.com—is a good starting place. So is your favorite newspaper home page.
If you’re already on the page you like, just click Set to Current Page.
Empty Page. Some people prefer this setup, which makes Safari load very quickly when you first open it. Once this empty window opens, then you can tell the browser where you want to go today.
Same Page opens a new window that’s a duplicate of whatever window you just had open.
Finding Text on Web Pages
The address/search bar can help you find websites that match your keywords. But some pages are so long, dense, or poorly designed that finding the words on the page takes a whole ’nother search engine. Fortunately, Safari’s search-within-the-page function shines a light on the word or phrase you’re seeking.
To use it, press ![]() -F and then type your search word into the Find box (Figure 18-19). As Safari locates the word or words, it displays them within a bright-yellow box and dims the background of the rest of the page. The Find bar also tells you how many times the word or phrase occurs on the page; you can jump to each instance. Click the
-F and then type your search word into the Find box (Figure 18-19). As Safari locates the word or words, it displays them within a bright-yellow box and dims the background of the rest of the page. The Find bar also tells you how many times the word or phrase occurs on the page; you can jump to each instance. Click the ![]() to start over with new search terms, or click Done to close the Find box and return to your normal browsing activity.
to start over with new search terms, or click Done to close the Find box and return to your normal browsing activity.
Tip
When you use the Find command, are you looking for words on the page that begin with your search term, or that contain it anywhere? You can specify. Click the very tiny ![]() in the search box and choose either Contains or Starts With from the very tiny pop-up menu.
in the search box and choose either Contains or Starts With from the very tiny pop-up menu.
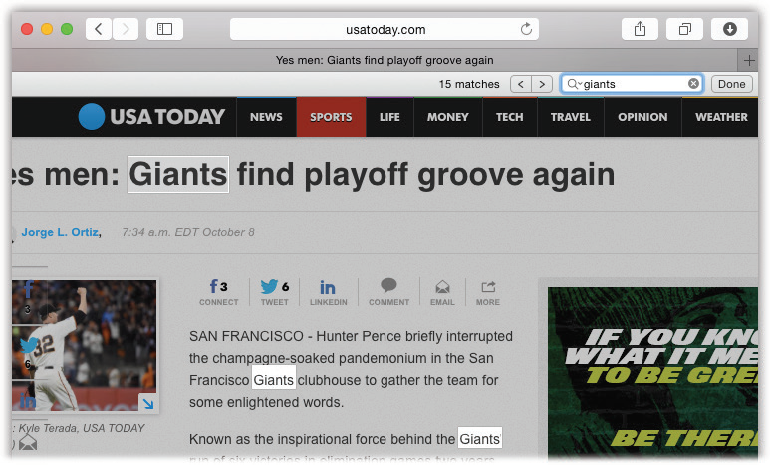
Figure 18-19. Once you enter your search word (“giants,” in this case), the browser dims the page and highlights every instance of that word—making it much easier to find what you’re looking for across a crowded web page.
The History Menu
The History menu lists the websites you’ve visited in the past week or so, neatly organized into subfolders like Earlier Today and Yesterday. (A similar menu appears when you click and hold the ![]() or
or ![]() button.) These are great features if you can’t recall the URL for a website you remember having visited recently.
button.) These are great features if you can’t recall the URL for a website you remember having visited recently.
Tip
See Safari’s Help menu? It features a search box that lets you search all the menu commands in Safari—including Safari’s History menu. That’s just a crazy powerful feature. It means you can re-find a site without having to hunt through all the History submenus manually; just search for any word you remember from the title.
PDF Pages Online
PDF files are all over the web as, among other things, forms to download, online brochures, and scanned book pages. But they aren’t always especially readable in a browser window.
Unless, that is, you’re using Safari. The next time you’re squinting at a PDF in a window, point to the bottom edge of the document; you’ll see a toolbar like the one in Figure 18-20 appear. With these four icons, you can zoom out, zoom in, open the file in Preview, or save the PDF file to your Downloads folder.
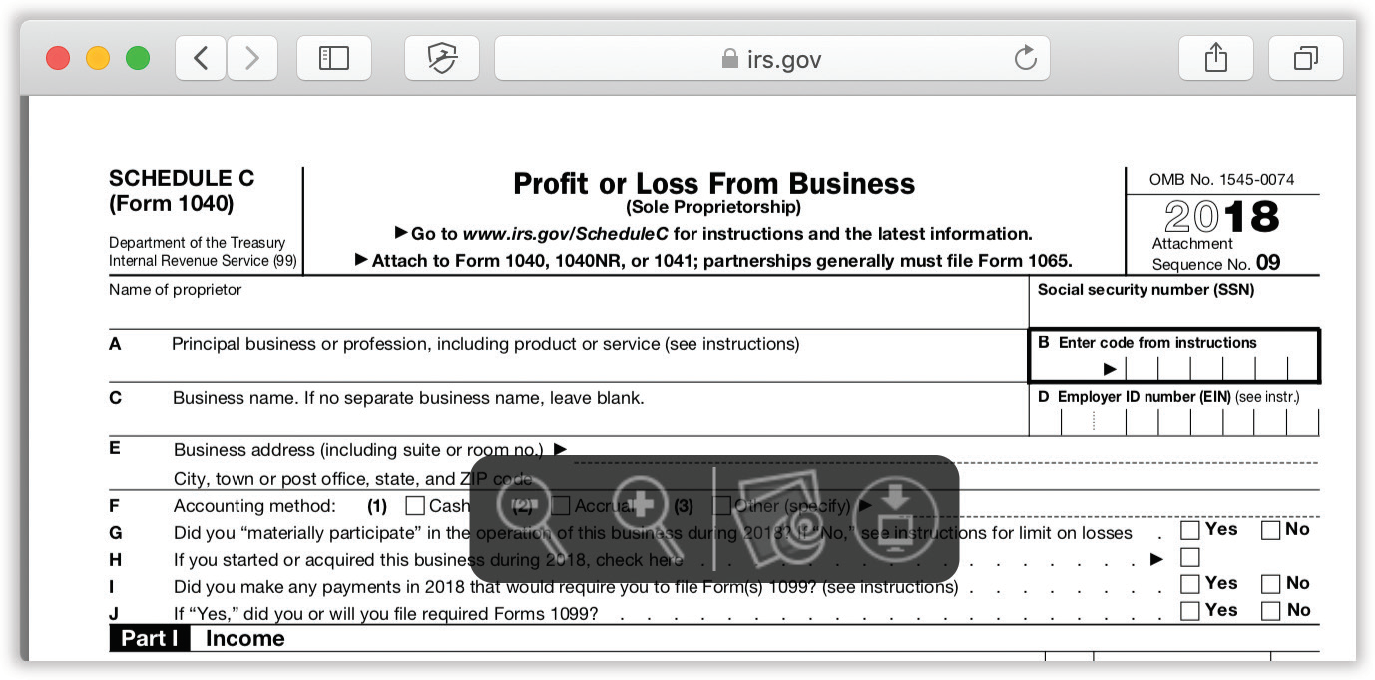
Figure 18-20. If you’re having trouble reading the tiny type in a PDF, point your mouse to the bottom of it to invoke Safari’s PDF toolbar. You can zoom out, zoom in, open the file in the Mac’s Preview program, or even download it from the website with a well-placed click.
Picture-in-Picture Video
Apple recently added a feature to Safari: picture-in-picture video (Figure 18-21).
When you’re watching a video, you can click a PIP icon (![]() ) to detach it into a small, floating, movable window, so that you can keep watching as you do other work. That floating mini-video window even hangs around when you switch Spaces (“Spaces (Virtual Desktops)”).
) to detach it into a small, floating, movable window, so that you can keep watching as you do other work. That floating mini-video window even hangs around when you switch Spaces (“Spaces (Virtual Desktops)”).
Once it’s on the screen, you can resize it (drag by the lower-right corner), move it to a different corner of the screen (drag the picture), pause it, or pop it full-screen (those buttons appear when you point to the video without clicking).
This feature works in Safari and iTunes—but not, alas, on any video you come across. It works only on videos that use HTML5, like those on Vimeo and ESPN.
It does work on YouTube videos, but there’s a trick to it (see Figure 18-21, bottom).
Assessment: neat when it works—and if you notice that tiny icon.
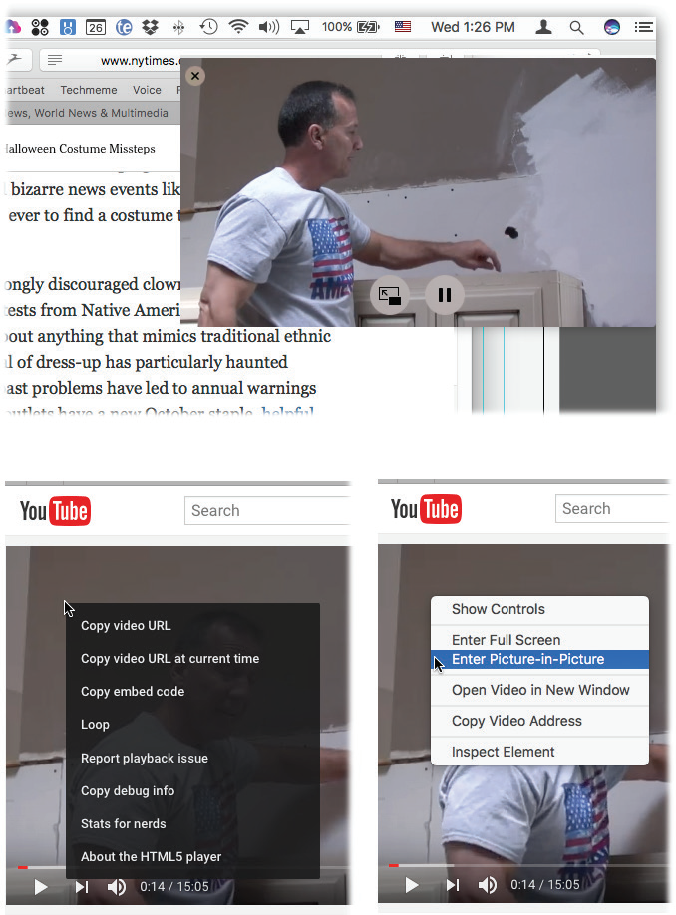
Figure 18-21. Top: Picture-in-picture! Now you can keep half your brain distracted by a running video while you try to get your work done.
Bottom: In YouTube, the picture-in-picture icon doesn’t appear—but the feature is still available. The trick is to right-click or two-finger click twice! The first time, you see the pop-up menu shown here at left; the second time, a different pop-up menu appears (right), with the PIP command at the ready.
Per-Website Settings
Here’s one of the most useful features in Safari—and most people will probably never even know it’s there.
Turns out you can now create different viewing settings for different sites. That is, each site can memorize your preferred page zoom, location services, notifications, and ad blocker preferences. You might like The New York Times site to appear with larger text, Dilbert.com to have ad blocking turned on, and so on.
To view your options, right-click or two-finger click in the address bar of the page you’re on. A panel of options appears (Figure 18-22, right). You can choose to have this site open up in Reader view automatically (“Status Bar”); to turn on your ad blocker; to appear at a certain magnification size (Page Zoom); to prevent videos from auto-playing; from allowing the site access to your Mac’s camera, microphone, or current location; and to block, permit, or ask your permission to use Adobe Flash, a famously unstable and battery-hungry plug-in.
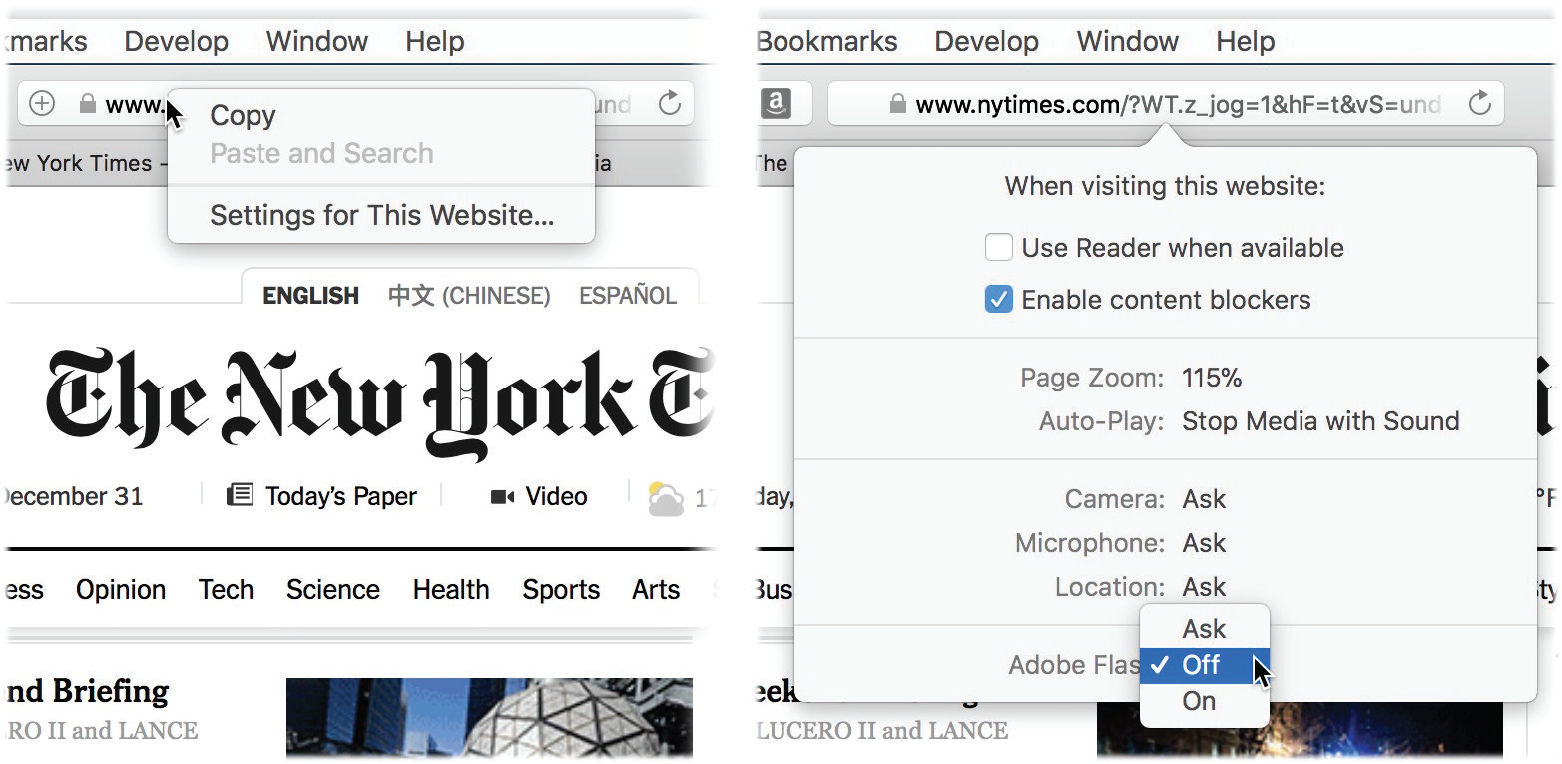
Figure 18-22. To view the settings Safari can store for each site (right), right-click or two-finger click in the address bar (left).
All of that is useful, but Auto-Play is fantastic. Its pop-up menu offers three options:
Allow All Auto-Play. What you’re used to: You open a web page, and some video starts blaring at you, unbidden.
Stop Media with Sound. Videos can play automatically, but only if they have no soundtrack or if the sound starts out muted. (If it’s muted, you’re supposed to click the little speaker icon on the video controls to make it start playing.)
Never Auto-Play. No videos will ever start playing automatically. That may be too strict for some sites—like when the site is designed for playing videos, like YouTube.
As you change these per-site settings, Safari thoughtfully logs them in Safari → Preferences → Websites, so that you can, at any time, change your mind about what you’ve done.
Privacy and Security Features
Every couple of months, there’s another headline about some break-in where millions of credit card numbers are stolen by a hacker, sending panic into the hearts of the world’s innocent web audiences. In macOS, Apple strikes back with some very clever privacy and security features indeed.
Erasing Your History
Some people find it creepy that Safari maintains a complete list of every website they’ve seen recently, right there in plain view of any co-worker who wanders by.
To delete just one particularly incriminating History listing, choose History → Show All History. In the resulting organizer window, highlight the offending address, and then press your Delete key. Choose History → Hide History to return to normal browsing. You’ve just rewritten History!
Or, to erase the entire History menu, choose History → Clear History. In the resulting box, you can specify that you want to erase only the last hour’s worth of history, only today’s history, the last two days’ worth—or your entire history.
Of course, the History list isn’t the only set of footprints you leave as you surf. But the Clear History command erases all other shreds of your activities: any cookies (web page preference files) you’ve accumulated, your list of past downloads, the cache files (bits of the web pages that a browser stores on your hard drive to save time when you return to the page they came from), and so on. This is good information to know; you might be nominated to the Supreme Court someday.
Private Browsing
Of course, that’s a lot of work just to cover your tracks; it also erases a lot of valuable cookies, passwords, and History entries you’d probably like to keep. Is all that really necessary just so you can duck in for an occasional look at the Hot Bods of the Midwestern Tax Preparers’ Association website?
No, it’s not. Private browsing lets you surf without adding any pages to your History list, searches to your Google search suggestions, passwords to Safari’s saved password list, or autofill entries to Safari’s memory. (Apple says this feature is intended for use at public Macs, where you don’t want to reveal anything personal to subsequent visitors. Ha!)
The trick is to choose File → New Private Window before you open the naughty site. (Your other Safari windows can stay open, in non-private mode.) A banner across the top of your new private window explains what’s happening: Within this window, Safari records nothing while you surf. When you’re ready to browse “publicly” again, just close the window.
In other words, what happens in Private Browsing stays in Private Browsing.
Cookie Control—and Privacy Control
Cookies are something like web page preference files. Certain websites—particularly commercial ones like Amazon.com—deposit them on your hard drive like little bookmarks so they’ll remember you the next time you visit.
Most cookies are perfectly innocuous—and, in fact, helpful, because they let websites remember your tastes, your name, and so on. But fear is widespread, and the media fan the flames with tales of sinister cookies that track your movements on the web.
To take some control, choose Safari → Preferences → Privacy tab (Figure 18-23), where your cookie preference settings await. “Block all cookies” means no cookies can come in, and no cookie information can go out. You’ll have to reenter your information upon every visit to every web page.
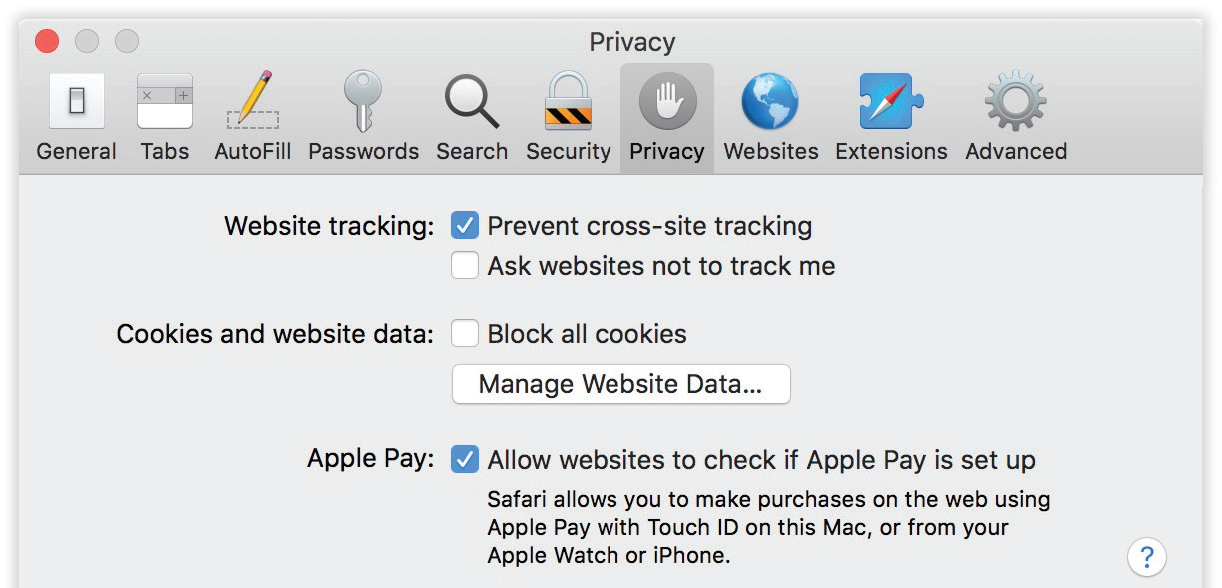
Figure 18-23. Cookies: the web’s mysterious double-edged sword. Here, you can specify whether or not you like them, although blocking all of them makes the web a pretty miserable experience.
If you don’t use that checkbox, then Safari works as though you had the old “Only from websites I visit” option turned on. That is, you get cookies from sites you want to open, but not cookies deposited on your hard drive by sites you’re not actually visiting—cookies that an especially evil banner ad gives you, for example.
The Manage Website Data button here reveals the complete list of all your cookies, and you can delete any scary ones. While you’re in there, notice that there’s other stuff websites have dumped onto your Mac. There are things like cache files and local storage files (data that web applications leave behind on your hard drive—a bit like cookies, except that websites can’t retrieve this information later). All of it is available for your removal with a click on the Remove All button.
Also while you’re in this box: “Prevent cross-site tracking”doesn’t affect how many ads you see—but it does prevent advertisers from delivering ads based on your interests (as exhibited by your other web surfing). You’ll just get generic ads.
“Ask websites not to track me” signs you up for an online “Do not track” program. The problem is that this program is voluntary—so the sleazy operators just ignore it.
Finally, “Allow websites to check if Apple Pay is set up” appears only if your Mac has a Touch ID fingerprint reader, or if you have an iPhone or Apple Watch that works with Apple Pay. It permits shopping sites to show the Pay with Apple Pay button on product detail pages only if you do, in fact, have Apple Pay set up.
Stifle Pop-Ups and Pop-Unders
The world’s smarmiest advertisers inundate us with pop-up and pop-under ads—nasty little windows that appear in front of the browser window or, worse, behind it, waiting to jump out the moment you close your current window.
If this kind of thing is driving you crazy, choose Safari → Preferences → Security → Block Pop-Up Windows. It’s a war out there—but at least you now have some ammunition.
Tip
This feature doesn’t block windows that appear when you click a link—only those that appear unbidden.