CHAPTER FOUR
3D MODELING, SCULPTING, AND MORE
___________
“3D modeling and 3D printing is as much of a revolution as a creative tool for artists as the invention of perspective at the beginning of the Renaissance period in Italy. It has changed forever the paradigm of artistic expression.”
Gil Bruvel

Many artists who use digital techniques such as CNC milling, 3D printing, and digital scanning may never need to use digital sculpting, modeling programs, or 3D models. They will simply create their work in a traditional manner, then they will have it 3D scanned. The digital file may be required for enlargement or repurposing of the art. The artist can choose between the subtractive process of CNC milling and the additive process of 3D printing to create the artwork into a physical form. For others, sculpting in the computer may be the beginning of their creative process. They will create their designs in the computer without ever physically touching the design. Other artists may work with nothing but code to create their art. Some artists use a mixture of all of these processes. They may become adept at both traditional and digital and tweak code to get their final results. Or artists may use the digital part of their toolset as the steps before production where they can tweak the designs a bit further to obtain their desired results. They may experiment with something in the real world and then translate it to the digital world or vice versa. The combinations and possibilities are endless.
As you will see in Chapters 5, 7, and 8, some of the ways that are available to create artwork in physical form using 3D technology have limitations. Some of the processes of output are expensive, although they are changing and quickly becoming more affordable. The limitations and considerations for artists who want to realize their work in physical form revolve around what this book refers to as “the big three.” This criterion consists of; the cost, build envelope or size, and the detail available in the desired material. The growing technology of 3D offers much, but as we will see, the costs of creating digitally can sometimes be more expensive than creating the art in a traditional process. By “build envelope,” we are referring to the maximum size in which the artist wishes their object created. The final decisive factor is the quality of detail that may or may not be available for the desired material. The big three criteria are changing.
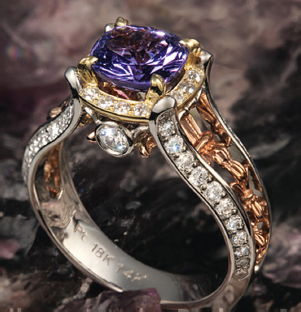
Jewelry by Lisa Krikawa, Krikawa Jewelry and Design.
We will also see that what material you want to create your artwork in may help to determine the type of software that you purchase. For example, Krikawa Jewelry—featured in Chapter 7 and interviewed in the Art and Technology podcasts—need to have precise measurements in their designs. They work with the CAD software Rhinoceros.
Many artists find that as the materials, processes, and tools of technology become more readily available, they may float back and forth between digital and traditional until they achieve the end results they are looking for. It is the author’s hope that this book will prompt creative people to explore the processes and their limitations. Fine artists are using software and hardware intended for use in other industries such as animation, film, industry, architecture, and engineering. They combine that with a spirit of exploration and they achieve an original result that no one has seen before.
You may be starting out with incorporating 3D technology in your traditional workflow, or are entertaining the idea of making this technology a part of your creative process. If this is the case, then deciding on what programs to work in can feel overwhelming. Unfortunately, using 3D tools takes a bit of commitment. It is not like buying a pad of watercolor paper and watercolors and sitting down to work. It will take some dedicated time to learn these new tools of the trade. How do you know which tool is the right one for you and your process? Throughout this book, artists share their software preferences. This may help in making a decision on software. Cost of software may be an important determining factor. One must also weigh in other determining factors mentioned in Chapter 1, such as your computer, operating system, video card, memory, etc.
This chapter is by no means designated as a “how to” guide to sculpting or modeling in 3D. There is a generous amount of free information on the Internet for just about any program that you would like to learn. If a certain 3D sculpting, modeling, or design program interests you, begin learning by watching online tutorials. Links are available on this book’s accompanying website. The videos will help you to see the interface of the program as well as its usability. Many of the software programs also have user forums. If a program catches your attention, join the user forum. Lurk and listen in on the conversations of the users. Searching out your questions in the forum search engines will go a long way to getting answers. If you have a project in mind, post that idea and ask the users for help in directing you. Do note that many of these individuals will be using the program with their agenda in mind. Your agenda will be different; you are using the program for fine art, not for animation, movies, or renders. Finally, you can’t determine if the program is right for you until you try it out. Many programs are available on a free 30-day trial. Carve some time out and play.
There are many different types of programs, as you will see by the work in this book and the artists that are using the different software programs. Some do a specific thing, such as digital sculpting that feels like pushing around clay. Other software programs do more than just sculpting or modeling. The software’s toolset may also include items you will never use, for example, animation. Some programs are free, others cost thousands of dollars. The Appendix has a list of the programs that many of the featured artists in this book are using to create their work.
Don’t let the lack of a computer and software keep you from investigating. Try your hand at some free online resources for creating; there are many sites that offer you the ability to play with design in a variety of ways. Some websites also link many of these free software programs to an online service bureau so that you can then realize your artwork in a physical form. Perhaps you would like to learn how to create your art using code; this information is also available. A list of these resources is in the Appendix.
Digital Compared to Traditional
The author compiled this book in the hope of introducing individuals to new processes. In light ofthat, there will be readers who are considering adopting digital sculpting/modeling into their workflow. Let’s compare and contrast digital sculpting/modeling to traditional.
Additive and Subtractive
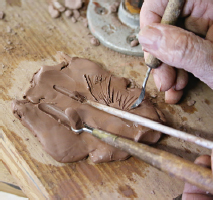
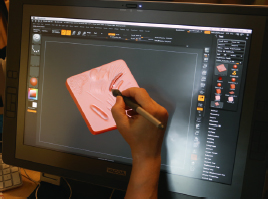
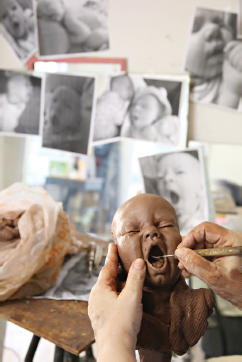
Within traditional sculpture, there are two categories of sculpting—additive and subtractive. In additive sculpting, the sculptor will add material, building up layers to bring to life the object that they are seeking. For example, facial features are often created using different sculptural masses consisting of muscles and fat.
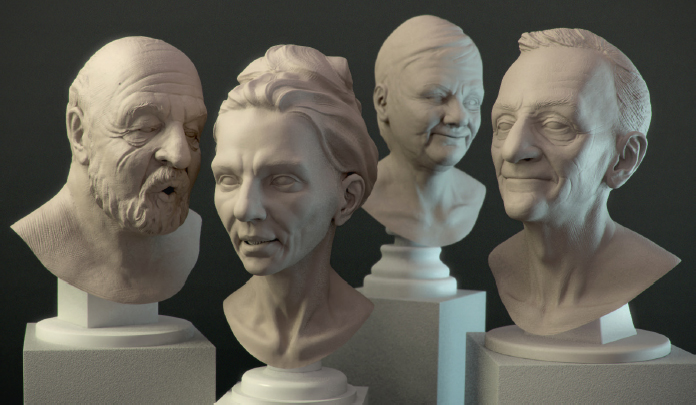
Sculptural masses make up the intricate details of facial features. From Digital Sculpting with Mudbox: Essential Tools and Techniques for Artists, Mike de la Flor and Bridgette Mongeon.

The sculptor may still carve away at areas or subtract clay from the mass that they begin with, but on the whole, it is a malleable process that starts with the addition of a material. Works such as Bruce Beasley’s, featured in Chapter 1, could also be considered additive. The metals may not be malleable, but Bruce adds one piece to the next to form a specific shape.
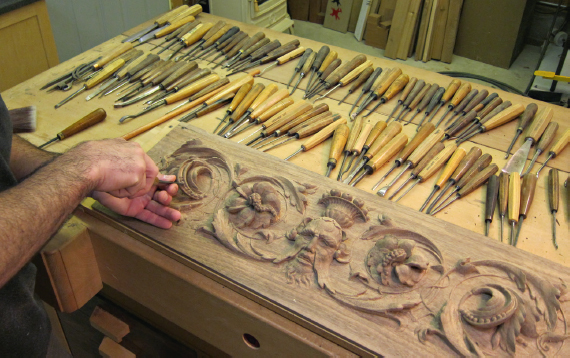
In contrast, artwork created with a subtractive process is the removal of material. A stone-carver takes away material. He or she reveals the shape beneath, as does a woodcarver. The subtractive process of sculpting is far less forgiving as the wrong move or the wrong amount of pressure can be disastrous. There is also the unknown behavior of the material. Hit a knot in wood or the grain in stone and the creative subtractive process of sculpting can be temperamental and require a real master to achieve it.
Most of the artwork created using the digital sculpting tools is more closely associated with the additive process of sculpting. It does not mean that a digital sculptor could not use the subtractive process; it is just not a primary process of sculpting.
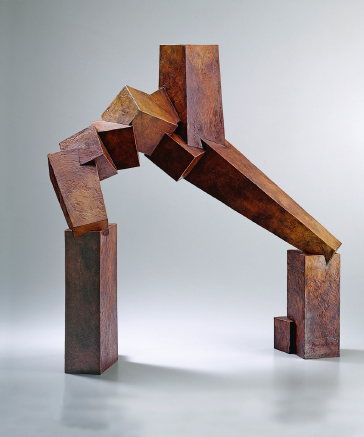
Arpeggio by Bruce Beasley. Photograph by Lee Fatheree.
Although they may not use the subtractive process of sculpting within the digital world of sculpting, subtraction of material in production certainly plays a part in many of the final designs, as we will see in Chapter 5. In fact, incorporating digital processes with traditional processes can relieve the artist of the difficulties of using temperamental material. Barry X. Ball states that he believes CNC milling allows him to use stone with natural artifacts that would not easily carve with traditional methods.
The Traditional/Digital Studio
A sculpture is not created as a painter creates a painting. A painter stands in one position and the subject is in one position. The stance allows the painter to create a two-dimensional image, as it would appear flat; the color, shading, and contrast in the paint fool the eye to create a three-dimensional quality. Sculpture is by its very nature three-dimensional. A sculptor is much more physically active with the creative process. A sculptor who works in clay on such things as portraits or figures is working in three dimensions. In this traditional sculpting studio, an artist works on a rotating sculpture stand. Movement is a dance that happens between the artist, the clay, and the subject. The artist takes measurements and orbits around the stationary model, carving, adding, and moving clay as they also rotate their clay figure. The artist performs all of this dance and rotation many times as they interpret the model before them and translate that interpretation to the clay.
Digital sculptors do the same movement, but they do it in the computer. The digital sculptor can rotate an object, move in close to an object, or see what their sculpture will look like from 20 feet overhead. The artists might not get the same amount of exercise as they do in a traditional studio, but all of the navigation is possible.
Of course, a clay-sculpting studio is only one type of sculpting studio. There are metal sculptors who take large heavy pieces of equipment, hoist them on cranes and weld them together. Stone sculptors chip away at large slabs of stone in their studios. The variety of sculptors and studio space is as vast as the variety of media. There is a variety of media in which a sculptor can work, each medium and material depicting their process. Whether following an additive or a subtractive process of sculpting, each artist will look at their work from all sides, checking composition, light, and how the sculpture may interact with its surroundings.
Besides moving around the subject and back to the clay, the artist may need measurements. B.B. King by Bridgette Mongeon.

The very nature of the digital studio may at first feel contrary to the traditional process. The digital process tethers an artist to the computer, and they can’t easily move around the model. (A digital sculpting class with a live model, one in which the tables and artists could rotate around the live model, would be a class to experience.) In the computer, the dance of the rotation of the sculpture is still done; however, the artist does it within the confines of the navigation on a computer screen.
Comparisons
There are many comparisons between the tools of digital and traditional processes of sculpting. There are strengths and weakness of both. Let’s look at some tools and processes.
The tools of both traditional and digital sculpting are similar. As the technology advances, it moves more towards the traditional feel of sculpting—although nothing can replace the touch and smell of a traditional studio. Still, programs like Mudbox, ZBrush, Sculptris, and 3D-Coat have that organic feel of sculpting.
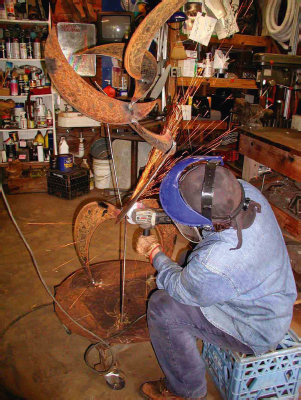
The traditional sculpting is tactile and physical. Sculptor Michelle O’Michael works in her metal shop creating Blue Moons.
The downfall of the digital software is that it changes. Software companies revise them often. Many of these revisions give the user more usability and features, but with each step there is a new learning curve. Many software programs offer more tools than one would ever use in a single sitting; there are tools to mimic each traditional tool.
Digital tools often feel like traditional sculpting tools.
Tools in Mudbox and ZBrush are similar to the tools in a traditional sculptor’s studio.
Gravity Works
Traditional artists understand that the final material affects the design. For example, the way you create a design to be cast in bronze as compared to how you would create a design that is in terra-cotta clay is different. Unlike a virtual world where there are no real world limitations and gravity does not exist, it does exist in the real world. In the real world, the artist could not create a sculpture in a material that would not support the real-world limitations. For example, a sculpture of a child balancing on one foot, with thin ankles supporting the weight, may be possible, but not advisable. If the sculpture could make it through the sculpting and firing process it would always be a very fragile object where one bump would break and ruin the integrity of the sculpture. Breakage may not happen in another material. An artist can make that same sculpture in bronze (although, most foundries will suggest three points of contact in a bronze sculpture unless the artist engineers a substructure within the piece to accommodate the possibilities of balance and breakage). Foundries realize the demands that the real world can put on design. The traditional artist is familiar with gravity, if for no other reason than having a sculpture or armature collapse in the process of creating.
Real World
We have already spoken about some real-world concerns. In traditional clay sculpture, you will create an armature for your work. The armature is what will hold up the artwork, and they come in all shapes and sizes. It might be lightweight aluminum wire used inside a small figure, plumbing pipe, or welded rebar. It might also be CNC milled foam, as we will see in Chapter 5. Whether it is a portrait bust or a monumental sculpture, the armature is pivotal in the creative process. If the armature is not sufficient then the laws of physics will take place while the artist is sculpting. Adding a mass of clay to one area without support can bring on disasters. The clay may slide off of the sculpture; it may break at the weakest point. When it does, it takes everything else along with it, or it could just cause the entire internal structure to collapse, taking weeks or months of work with it.
In contrast, a virtual object has no physical bounds like gravity or the weight of the clay. An artist can add, subtract, and create parts hanging off other parts. In the computer, the artist can create objects in midair such as a splash coming off of a dog’s wagging tail. However, to bring these virtual designs into the real world, one has to consider constraints such as gravity. Artists then have to find or invent a 3D process that is available to make their art a physical object.
Experimentation
In a traditional sculpture studio with a traditional sculpture, if the design is small enough and has an internal moveable armature, a sculptor can move appendages around to obtain just the right pose. However, the sculpture may suffer some damage, and an artist can only reposition a small figure easily. A larger figure with rebar as an internal armature will take muscle, a sledgehammer, and some power tools to move and bend. Needless to say, changes cause much more damage.
With digital processes, whether you are
• posing a figure, using models from DAZ and Poser for design possibilities for a life-size or monumental sculpture;
• manipulating primitives intended for large sheets of metal created in the software program Blender;
• sculpting organic shapes in such programs as ZBrush or Mudbox for 3D printing or CNC milling…
an artist can easily experiment. They can even save versions and compare.

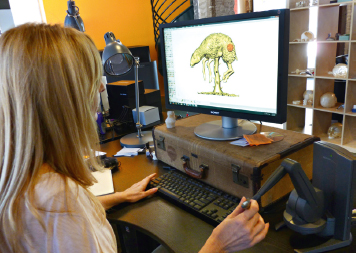
Working out designs in 3D sculpting, modeling, or posing software is helpful. Bridgette Mongeon art directs Mike de la Flor as they work out a running pose using Poser’s run program and DAZ models for a sculpture titled Lucas by Bridgette Mongeon.

Lucas by Bridgette Mongeon.
Symmetry
We mentioned symmetry in Chapter 2. Many programs allow you to sculpt using symmetry. This means if you are sculpting a face, you can sculpt both sides at the same time. Because faces are never completely symmetrical, the artist simply turns off the symmetry feature and manipulates the digital clay to give the specific non-symmetrical characteristics of their model. But sculpting on two sides at the same time is not all some programs can do. They can sculpt radial symmetry or they can sculpt in symmetry on different axes as shown in Chapter 1.
Mirror Objects
In traditional sculpture, if you create an eyeball on one side you must then spend the same amount of time sculpting the same thing on the other side. When you are working digitally, you can mirror objects.
Erase Mistakes and Undo
Wouldn’t it be great if we had an “undo” button in traditional sculpture studio? If you happen to be carving in stone and accidentally lopped off a specific body part, you could press “undo.” “Undo” in digital sculpture is a part of the process. If an artist needs to change a sculpture in the traditional studio, they scrape the clay off and start again, sometimes destroying the underlying work that they don’t want to change. In a sculpting program, you can simply “undo” and go back in history until you reach a place where you want to start again.
Extension of a Career—Physical
Traditional processes of sculpting are very physical. For an artist creating a monumental piece of sculpture, they are climbing up and down scaffolding and ladders, they are crouching to reach difficult areas, and often acting more like an acrobat in Cirque du Soleil than a sculptor. Their job consists of hoisting tools, materials, and armatures, and always working with their hands. Injuries and hazards of a traditional sculptor’s studio can be many, including: pulmonary problems from breathing in dust, burns from chemicals, eye injuries, muscle strains, and—because they work with their hands in repetitive motions—hand injuries.
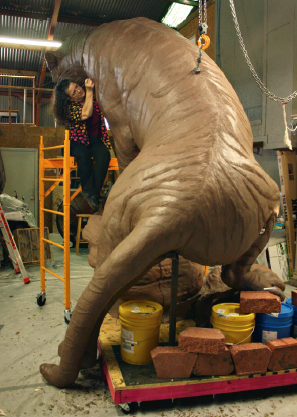
A traditional sculptor’s workflow is very physical.
Artists that work with large sheets of metal and welding will find that putting together and changing the design in the computer is much easier than welding hundreds of pounds of metal. They may also find comfort in that they can fit everything together prior to fabrication instead of grinding it off later because the design doesn’t quite fit, or does not look the way the artist intended as it is further reviewed from all sides.
Digital processes assist the artist in extending or even saving a career, depending on their physical capabilities. It is much easier to sit at a computer in front of a graphics tablet and push around a stylus pen than hauling material.
Just Like Real World Sculpting?
Whether the digital process is just like real-world sculpting or not is debatable. Software companies promote it as such, and digital sculpting has come a long way over the years. For example, let’s take a look at the metamorphosis of one program, ZBrush, and its commitment to be like “real sculpting.” ZBrush was released in 2007 and available for Mac in 2009. When ZBrush first came out, the process of creating your sculpture came from creating ZSpheres. ZBrush intended the creation of ZSpheres to give the artist a clean base mesh for their model. By moving ZSphere tubes, the artist created simple or complex armatures and base meshes of their design. With a few clicks, the ZSphere sculpture turns into a polygonal model for sculpting.
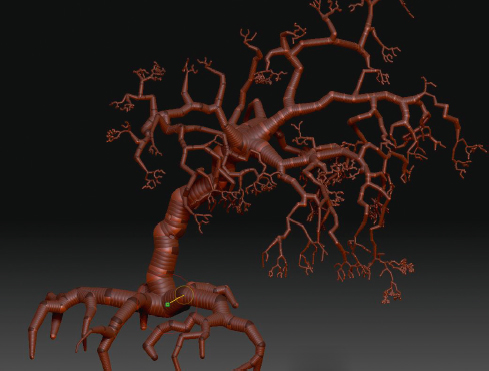
Sculpting with ZBrush ZSpheres.
The difficulty with the process of sculpting in ZBrush was also the case in Mudbox. Once the artist created the polygonal model, if they pushed and pulled on the clay, as one would in the traditional processes of sculpting, it destroyed the underlying topology. With a distorted geometry, the user could no longer sculpt smoothly without having to stop and fix the topology. The artist would have to recreate or retopologize the underlying mesh to be able to continue to sculpt.
Of course, it was possible to take the sculpture out of a sculpting program and bring it into a retopologizing program like 3DCoat, but this made the process less organic and fluid.
ZBrush’s next transition was from spheres to a process called ZSketching in version 3.5R3 2009/2010. Remember how we said that there were continuous improvements and learning curves? ZBrush’s improvements are a great example. With ZSketching one still had to use a ZSphere skeleton, but an artist could flesh out the sculpture using the ZSketch tools. ZSketch was more intuitive for the traditional artist. It was more like rolling out tubes of clay and adding them to their form as sections of mass.
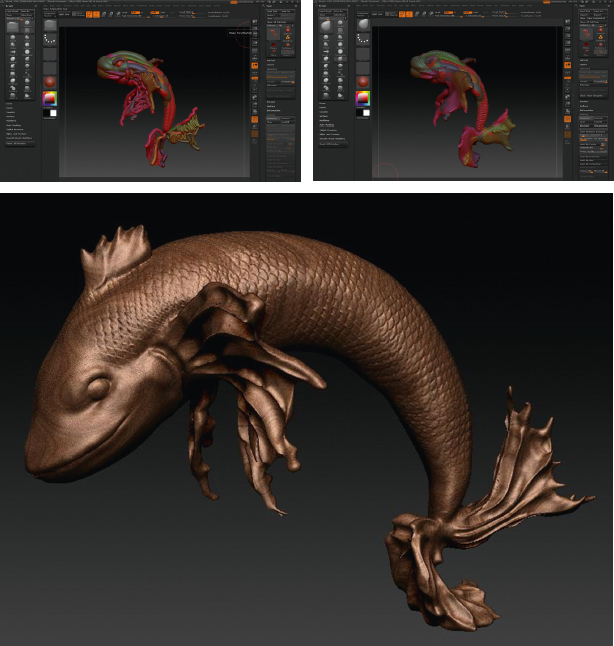
ZBrush introduced Dynamesh in 4R2, which was a huge leap. The process of using Dynamesh finally became more like sculpting with a ball of clay in the traditional studio. Pushing and pulling and adding to the clay may still distort the underlying topology; however, the artist drags on the screen with Dynamesh turned on and the program will remove the artifacts and give additional geometry where needed. There is no interfering in the sculpting process. It is continuous. Dynamesh is different than ZRemesher, another tool in ZBrush that allows the artist to recreate the underlying topology with controlled polygon groups, directions, and even edge loops.
The digital sculpting programs are becoming increasingly more powerful and more intuitive. The technical aspect of creating in 3D is more fluid and more in tune with traditional sculpture. Do remember that each revision of a software program has a new learning curve. It is not like working in the traditional studio. Clay and calipers do not change.
Control
Though there are many things that you can do with digital technology, when an artist is working in the computer they don’t have full control. They have to wait on a computer to process the art.
No Touch
We have already discussed the importance of touch in previous chapters. Some artists feel that haptic devices help them feel more connected to their work. Other artists find that the lack of touch in the digital process is one of the hardest things to overcome.
Heather Gorham works on Flowering Lamb of Odd using touch haptics and Geomagic Freeform.
Losing Your Work
Never in the entire time of the history of traditional sculpture has anyone claimed that, in the middle of the project, their work disappeared. Alas, with all of the things that we have discussed about digital sculpture, such a loss is a possibility. So are corrupt files. The remedy is to save your work and save your work often. You might also periodically save in different formats.
Visibility
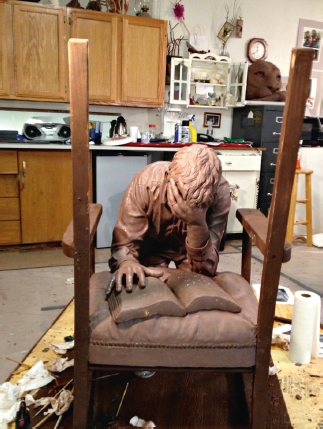
In a digital sculpting program you can hide certain areas to reach and sculpt other areas. So, if you were sculpting the inside of the mouth you could hide portions of the lips.
Yawn by Bridgette Mongeon. Photograph by Christina Sizemore.
Finding Software for Those Special Problems
As an artist creates using digital and traditional means, they will gather the best tools for each part of the job. With each project or design, new obstacles or challenges may arise. As they begin to incorporate digital tools in the process, they will start with one program. However, when the present software reaches the design limitation and does not have the capabilities the artist needs, they will seek out other programs that will fill in the gap. This scenario is a constant with all of the artists interviewed for this book and the artists interviewed for the Art and Technology podcasts.
One such incident for sculptor Bridgette Mongeon was incorporation of text in a digital model intended for reproduction in the real world. Mongeon found this challenge of creating and incorporating three-dimensional text in such art as medallions and memorials a challenge. Visit this book’s accompanying website to follow the tutorial on how Mongeon experimented with traditional and digital processes of creating text in sculpture. She found Vectric Aspire, software designed for CNC (computer numerically controlled) machining, to assist her with her projects. She documents the process of creating text for a Bible in her sculpture Called to Pray.
When sculptor Bridgette Mongeon runs across a problem or a challenge in the sculpting process, she considers both traditional and digital processes that she may use in solving the problem. When sculpting Called to Pray and other pieces of art such as medallions and memorials, the incorporation of three-dimensional text for art is often a challenge. Visit www.digitalsculpting.net for the tutorial “Creating 3D Text For Sculptures.”
_________________
There are many different ways to obtain a 3D model. We have looked at scanning artwork that artists have sculpted using traditional processes and even manipulating scans within the computer to repurpose artwork. There are also numerous free programs for artists to try. These programs help the traditional artists get their feet wet in a virtual world of creating before investing into expensive hardware and software. There are also programs for artists to learn and design with code. Check the Appendix and this book’s accompanying website for software suggestions.
As you experiment, you will most likely find that you will need a variety of digital tools to get to the results you desire. If the program you chose is not giving you exactly what you need, don’t despair. There may be a plug-in or additional programs that will help you fill the gap in your artistic process. Sometimes the needs of the artist will push the manufacturers of the software to change the software and provide the artist with their “wish list.” Just look at how ZBrush morphed into a program that is more like traditional sculpting.
Whatever ways you decide to put creative inspiration into a digital form, you will eventually want to get it out of the computer and share it with others. In the following chapters, we will explore the many possibilities and resources of making your 3D artwork that is in the computer into a physical form. Combine these resources of creating and realizing artwork with the resources listed in the Appendix, and the tutorials and other information on the book’s accompanying website. You will be well on your way to creating incredible artwork combining traditional and digital processes.
DAVID C. MORRIS
A pioneer of incorporating 3D technology into fine art, David C. Morris writes his own code to create his incredible art.

Columbia River Crystal by David C. Morris. Welded bronze, 12 foot. Built at Milgo-Bufkin, Brooklyn, 1997.

Matador’s Cape by David C Morris. Cast bronze, 6 foot. Cast at Polich-Tallix, Rock Creek, New York, 2010.
KEVIN MACK
Kevin Mack creates his works of art using custom tools developed in Houdini for constrained random implicit surfaces, procedurally derived structures, and articulated turbulent noise advection. Shapeways is the vendor who created these works.

Standing Mind Over Matter by Kevin Mack, 14 × 19 × 7 inches. Selective laser sintered nylon print.
JOEL MONGEON
Joel works in ZBrush and Modo with a bit of Photoshop for final compositing.
The Gallery by Joel Mongeon.
GIL BRUVEL
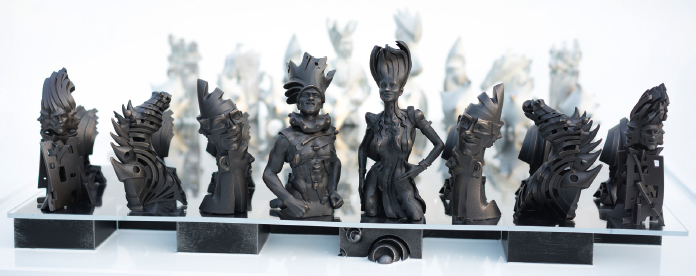
Check Mate by Gil Bruvel, 37½ × 37½ × 3¼ inches, mixed media: stainless steel and bronze, wood, and resin

Rain by Gil Bruvel. 20 × 17 × inches, stainless steel.
On the book’s website at www.digitalsculpting.net you will find:
* Links to further descriptions on the process of creating the artwork featured in the galleries.
* Podcasts with the artists.
* Videos featuring the artists at work.