6
Optimizing Compute
Compute generally refers to power used by machines to process data and execute tasks as defined by a software program. Cloud computing delivers this compute power over the internet to consumers on demand. And while pay-as-you-go is the de facto means of paying for these resources, AWS provides other means to pay that can help lower costs. You can also configure these compute resources to perform optimally, which helps lower costs.
We now focus on the mechanisms and levers you can pull to reduce waste in the compute domain on AWS. We will look at AWS’ different pricing models and how you should be thinking about your workload to take advantage of them. We also explore ways to size your compute resources appropriately to minimize the waste associated with overprovisioned resources.
In this chapter, we’re going to cover the following main topics:
- Leveraging steady state discounts
- Maximizing savings for flexible workloads
- Right sizing compute
Technical requirements
To complete the exercises in this chapter, we will continue with the same components we’ve been using in the previous chapter.
Leveraging steady state discounts
Paying for the IT services you need when you need them is the very nature of paying for AWS cloud resources. This embodies the on-demand nature of the cloud and essentially comprises the trade-off of capital expenses for variable expenses. However, this isn’t the only way you can pay for what you use. In fact, Amazon EC2 instances provide you with several choices: on-demand, reserved instances (RIs), Savings Plans (SPs), and Spot.
On-demand pricing is just as it sounds – you pay for however long the instance runs at an hourly rate. AWS provides the on-demand hourly rate for each of their numerous instance types on their Amazon EC2 pricing page. The hourly rate will depend on several instance parameters such as the Region where you launch your instance, the operating system (OS), the type of instance, and the size. Intuitively, you will be charged at a higher hourly rate for a larger instance than a smaller instance.
How RIs work
On-demand pricing makes sense – you pay for what you use when you use it and the pricing for the on-demand rate is publicly available to view. But is there any way to pay at a lower rate? There are two ways, as a matter of fact. One is by way of RIs and SPs, and the other is through Amazon EC2 Spot. We will focus on RIs and SPs first. Although technically different, we’ll group them together because they have the same discount rate and are both meant for steady state use. We’ll focus on reserved instances in this section.
RIs provide a discounted hourly rate for running EC2 instances given several agreed upon terms. There are two types of RIs: standard and convertible.
Standard RIs have stricter terms than convertible instances but the discount rates are greater. When you commit to a standard RI for a term of either one or three years, you are committing to the Region that you’ll deploy the instance to, the instance type, the OS, and the tenancy. For example, if you purchase a standard RI for a single t2.small, Windows-based OS under shared tenancy in the US-EAST-1 Region, whenever you launch an instance with those specific parameters, you will be billed at the standard RI discount rate, rather than the on-demand rate. If you launch a t2.small, Linux-based instance under shared tenancy in the US-EAST-1 Region, you will not get the discount because the OS does not match the parameters of your reserved instance.
Figure 6.1 illustrates an example of the RI configuration mentioned earlier, applying to one specific instance because it matches the RI configuration. Instance 3 receives the discount rate given the standard reserved instance purchases, as it’s the only instance configuration that matches the commitment parameters. Instance 1 is in the different Region. Instance 2 and Instance 4 do not match the instance type:

Figure 6.1 – Instance 3 receiving the RI rate
Convertible RIs offer more flexibility at a smaller discount rate compared to standard RIs. During the convertible RI term, you may change the commitment parameters at any time given that the new RI commitment is of equal or greater value. From the preceding example, if you first purchase a t2.small convertible RI and, given your business needs, want to change that to a m5.large convertible RI, with everything else staying the same, you will be able to do so, assuming that m5.large instance types will be more expensive than t2.small instance types. Keep in mind that when converting to a new instance type, you should launch instances that match the new configuration; otherwise, you will be adding to your waste! In other words, once you convert to an m5.large instance, be sure to actually deploy an m5.large instance for your workloads; otherwise, you’ll be paying for something you’re not using.
Billing for RIs comes in three forms: all upfront, partial upfront, or no upfront payments. When you elect the all upfront payment, you pay for the total amount of the RI cost at your next billing cycle. You get the best discount compared to the other payment options, but you put up more cash upfront to pay for that RI. Partial upfront is similar in that you can pay a portion upfront but the remainder of the cost is amortized monthly. You cannot choose how much you want to put upfront for the partial upfront payment type. You can with SPs, but more on this later. No upfront is just as it sounds – you don’t need to pay anything upfront. You will be billed monthly instead for the duration of the RI term.
All three options indicate paying for a resource at a discounted rate whether you use it or not. If you had not purchased an RI and instead used on-demand pricing, you would see the bill for the on-demand instance charged based on the number of hours used. But with RIs, you’ll see the RI charge on the bill even if you don’t launch an instance matching that configuration. But when you do launch an instance matching that configuration, you’re not charged the on-demand rate, but a monthly discount rate covers that usage instead.
A simple example of the RI billing mechanism is gym membership. Most gyms offer two methods of payment to use the facility: you can either pay every time you go (on-demand), or pay a yearly membership and go as many times as you want during the year (RI). Perhaps you do the math in your head and determine that if you pay for the membership, as long as you go to the gym three times a week, you’ll be getting a better rate than paying every time you go. Now, it’s up to you to actually go to the gym. I’m not one to give motivational speeches, so we can stop here.
RIs act in the same way – it’s use it or lose it. If you don’t use it, you are in fact contributing to your waste. In other words, if you don’t launch instances that match your RI commitment, it would have been better to pay the on-demand rate, because now you’re paying for the on-demand rate for running instances in addition to a year-long (or 3 year-long) commitment for something you’re not using. The way to remedy this is to ensure that your running instance configurations match the RI configurations. By doing so, your running instances won’t be charged the on-demand rate since they’ll be covered by your RI commitment.
Now with a better understanding of how RIs work, the challenge then becomes knowing how well you are utilizing the RIs that you’ve purchased. You can find the answer in Cost Explorer.
Understanding RI performance
You can access the RI utilization report in Cost Explorer. This report helps you minimize wasteful use of reserved instances by showing you how well you’re taking advantage of any RIs owned by the account, or for the entire AWS organization if viewing from the management account. The report shows what you would have paid, whether you used on-demand instances, and compares this to your actual RI costs. It then summarizes your net savings by subtracting these values. Ideally, you want the total net savings to equal total potential savings to achieve 100% utilization. I show a bad example of this in Figure 6.2.
Low utilization is just as it sounds. You’re not using the RIs that you paid for — you’re not going to the gym even though you paid for yearly membership. An RI utilization report showing low utilization means that you would have saved money if you had just used on-demand instances and paid for those instances when you used them. In gym terms, you should have not purchased the membership and just paid to use the facility since you only went to the gym twice that year. Used in this way, RIs that were intended to be cost-saving tools turn out to be waste-inducing tools.
Figure 6.2 shows how well you used the RI (i.e., how often you went to the gym) visually. This is an example of poor utilization. The RI costs exceed the on-demand cost equivalent, which reflects wasteful use of RIs. In other words, you paid for gym membership, but you never went:

Figure 6.2 – Poor RI utilization
To avoid these situations, use this report to match the purchased RI configurations to the launched instance configurations. If you happened to make a mistake and launched t3.small instances when you purchased RIs for t2.small instances, then change the instance configurations for your workload to match the RI instance configurations. This will be difficult for standard RIs because you are unable to change the RI configurations for the length of the standard RI terms.
We’ve seen how you want to ensure you are maximizing the use of your RIs. The RI utilization report in Cost Explorer can help you track how well you are using your RIs. But in some cases, you might need to change your RI configurations. So, what can you do if you need to change your standard RI?
Modifying RIs
One of the ways to modify standard RIs is to change their scope. A standard RI can either be Regional or Zonal. When you select a Zonal RI, you specify which Availability Zone (AZ) you want to reserve for your instance(s). If you specify an RI for US-EAST-1A, then you’d selected a Zonal RI. To get the discounted rate, you must launch the instance in US-EAST-1A. Assuming you have no other RIs, if you launch an instance in US-EAST-1B, your instance will be charged the on-demand rate.
Zonal RIs have the additional benefit of reserving capacity in the specified AZ. If there was only one instance left, and you and another AWS customer happened to choose the same remaining last instance to deploy, then the customer with the Zonal RI for that specific instance would have the priority to use it (if you both own the RI, then whoever requested the instance first would win). You can choose Zonal RIs if your workload requires specificity in choosing an AZ to launch instances and when reserving capacity is important.
You can also change the instance size for standard RIs using the Linux/UNIX OS. Each RI has an instance size footprint that defines its normalized size. For example, a small instance has a normalization factor of 1, while a medium-sized instance has a normalization factor of 2. If you started off with a single medium-sized Linux/UNIX RI but wanted to change to two small-size Linux/UNIX instances, you could do so because it’s a Linux/UNIX OS.
Figure 6.3 provides an example of this in the Amazon EC2 page. Here we see an RI modification from a t3.micro, Linux/UNIX, Regional RI to two t3.nano, Zonal RIs applicable to US-EAST-1a:

Figure 6.3 – Modifying an RI in the Amazon EC2 console
Modifying the zone and/or size does not provide too much flexibility because you still need to use a particular instance type, OS, and tenancy. However, you cannot change these configurations with a standard RI. If you find that you have no further need for a standard RI and there is still a significant amount of time left in the term, you can try to sell the RI in the RI Marketplace to another customer that might be seeking an RI with your configuration. This is akin to another party taking over your lease. AWS will transact the change of ownership and payment to the new owner.
Although we learned that you could modify some aspects of your standard RI, there are some limitations. In the next section, we’ll see how we can exchange RIs for entirely new configurations with convertible RIs.
Exchanging reserved instances
Standard RIs provide minimal flexibility. The better way to deal with uncertainty and to increase the utilization rate of your reservations, and hence decrease waste, is to use convertible RIs.
The trade-off for a better discount with standard RIs is decreased flexibility. Conversely, you have increased flexibility with convertible RIs but at a lower discount rate than standard RIs. Arguably, convertible RIs may save you more costs in the long run if your workload configuration needs to change. From our previous example, we saw poor RI utilization over a 12-month period. Business can experience both internal and external changes such as new business requirements or new product and service launches from AWS. Sometimes, it’s worth paying the premium to have that flexibility to change the terms of a commitment given how quickly both business and technology changes.
When you purchase a convertible RI, you can exchange the RI to match a new workload requirement. As stated before, the new RI must be of equal or greater value than the existing RI. If you need to change to a cheaper RI configuration, you may need to purchase additional convertible RIs to cover the difference.
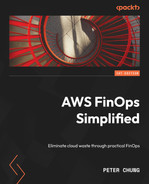
Figure 6.4 and Figure 6.5 demonstrate exchanging an existing convertible RI for a new reservation. You can exchange a convertible RI for a new RI on the Amazon EC2 page:
- Select the RI you want to exchange. Select Exchange Reserved Instances from the Actions menu. You can then select the desired RI configuration that you want to exchange to. The new RI expires on the same day as the old RI but with different configurations:
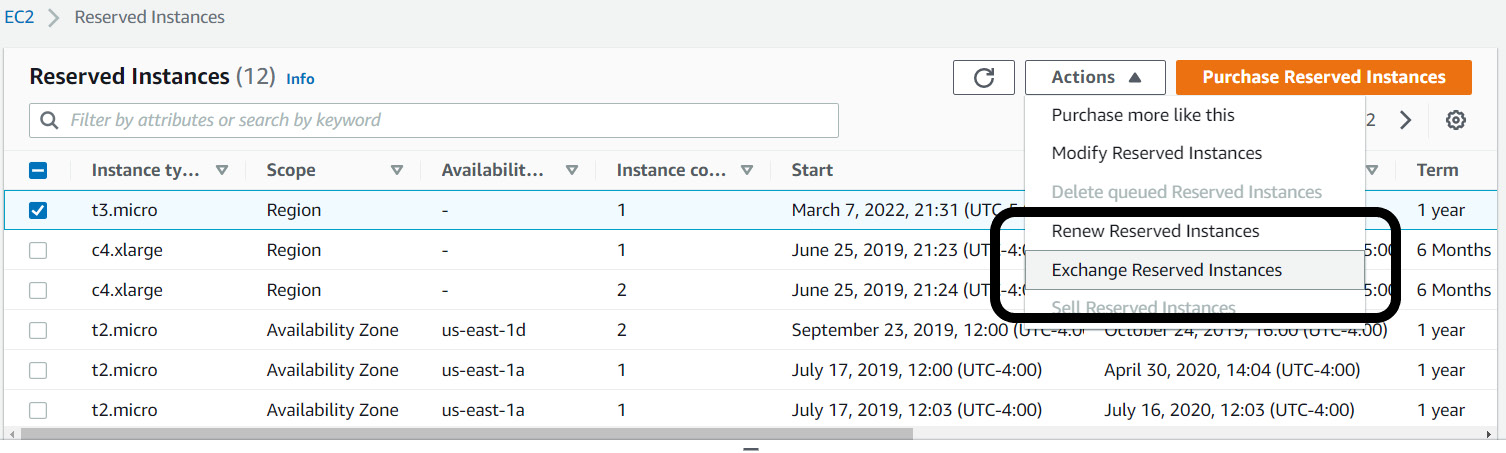
Figure 6.4 – Selecting the RI to exchange
- Select the desired target RI configuration.
- Select Find offering to find new RIs to match your configuration.
- Select Review, then Exchange to execute the change.

Figure 6.5 – Exchanging a convertible RI for a new RI
There will be a cost involved for the exchange unless you exchange for an RI with the same value. As with standard RIs, convertible RIs can also be modified from Regional to Zonal (and vice versa) and by instance size at no charge, assuming it’s Linux/UNIX. You can imagine things get complicated quickly when you exchange RIs at scale. The operational burden to purchase, monitor, and manage your reservation fleet and coordinate with teams to ensure that they are using the right instance types to match your reservations can overwhelm the team.
Managing RIs to maximize your savings necessitates time and resources, which are difficult to spare especially if you’re a large organization. Fortunately, at the time of writing this book, AWS is moving to a different approach with the same mechanisms and discount rates, but much less management on your part. The approach is to use SPs.
Improving utilization with SPs
SPs provide the same discounts as RIs but require less management, such as the need to exchange or modify RIs. SPs still come in two types, EC2 Instance SPs and Compute SPs, and the discount rates are equivalent to standard RIs and convertible RIs, respectively. Where they excel is in their flexibility. Remember, with standard RIs, you are committed to specific instance configurations tying you down to using instances to match the RI configuration for many months. With EC2 Instance SPs, you are only committed to the Region and instance family. This means you can change the OS, tenancy, and instance size and still get the discount rate.
Compute SPs provide even greater flexibility at the same discount rate as convertible RIs. Compute SPs don’t even require a Region or instance type selection. Instead, you commit to an hourly dollar rate. Based on the instances you used, AWS will apply the discount rates to your launched instances until it reaches your committed hourly dollar rate. AWS does this automatically for you, removing the need to modify and exchange your RI fleet to optimize savings.
As a simple example, say you commit to a $10 hourly rate for a Compute SP. Figure 6.6 shows a hypothetical pricing chart for different instance types for demonstration purposes. Given your $10 per hour commitment, AWS will rank your instances based on the savings percentage, and then draw down the SP hourly rate from your commitment amount. For this given hour, Instance 1 was running with a savings rate of 60%. Since this is the highest savings percentage out of the five instances, it is ranked first. The instance consumes $2 from the $10 commitment. Now, you have $8 left. AWS then sees Instance 2 as the next greatest savings percentage and subtracts $3 from the remaining $8. By the time it reaches Instance 5, you’ve exhausted your hourly commitment. Thus, Instance 5 will be billed at the on-demand rate. All the instances before Instance 5 were billed at the SP discounted rate instead of the on-demand rate. In other words, you saved on those instance costs automatically without needing to match your launched instances to an RI configuration:

Figure 6.6 – Applying SP rates to usage
The purchase options for SPs are the same as the purchase options for RIs, with one slight difference. You can still choose between three payment options. However, for SPs, you can choose your partial upfront amount to be 50% due upfront. The total amount of the SP is based on the term, either one or three years.
What differs between RIs and SPs is how AWS applies the discount on your behalf. With RIs, essentially AWS would see EC2 instance usage, then see whether you have any RIs with configurations that match that usage, and finally, apply the discount rate if there’s a match. If there’s no match, it charges the on-demand rate. With SPs, rather than matching usage to an RI instance configuration, AWS simply takes your dollar commit and applies it to all applicable instances.
SPs and RIs can be shared across accounts within your organization, which can help reduce the overall expenditure. SPs and RIs prioritize the account that purchased them. For example, if you purchase an SP at the management (payer) account, then AWS will prioritize the SP rate to any compute use within the management account first before applying the discount rate to any other compute use in the other accounts.
If you develop your account strategy so that you don’t have any compute resources running in the management account, or perhaps a dedicated SP/RI purchasing account, then the discounts can disseminate freely across all your accounts. In this way, AWS will rank savings percentages for all compute use across all accounts as in Figure 6.6 and apply discounts accordingly.
You can elect to turn off sharing for specific accounts if your business requires you to do so. Or, you can purchase SPs/RIs in a specific account if you want to prioritize discounts for that account. This may be desirable to ensure that certain workloads get a discount. By purchasing SPs/RIs in an account, AWS will first do the ranking exercise within that account before seeing whether any remaining commitment can be applied to other accounts. For example, even if a savings percentage is greater for an instance in account B than an instance in account A, if account A purchased the SP, AWS ensures that account A uses the same amount of the hourly commitment before applying the discounted rate to instances running in account B.
Figure 6.7 shows sharing options in the AWS Billing console. Once you navigate to the AWS Billing dashboard in the AWS Management Console, you can select Billing preferences from the left-hand menu. The accounts in the left-hand box will share RIs and SPs, while the accounts listed in the right-hand box will be excluded from sharing:

Figure 6.7 – RI and SP discount sharing in the AWS Billing console
Consequently, achieving high utilization with SPs is easier than with RIs. Because now, instead of the question being “are you using this instance type?”, the question simply becomes, “are you using compute?” Compute SPs also provide discounted rates on AWS Lambda and AWS Fargate usage as well. Lambda is a serverless compute service in which the underlying server is abstracted from you entirely. By using Lambda, developers tell AWS what to do via code, and let AWS handle how to do it. Fargate is also serverless and tasks AWS with the same level of responsibility but is specifically used for containers. With Compute SPs covering these types of compute uses and instances regardless of Region, they provide better coverage with less management than convertible RIs.
Cost Explorer can provide suggestions if you’re unsure of what your hourly commitment should be. Cost Explorer assumes your historical usage will continue, and provides recommendations from a 7-, 30-, or 60-day lookback period. You can use these suggestions as a baseline if you want to further refine your analyses.
Figure 6.8 shows the console view with options to tailor the recommended amount. Here we see Cost Explorer SP recommendations for a Compute Savings Plans type at the Payer account level for a 1-year term:

Figure 6.8 – Savings Plans recommendations
Once you’ve selected a desired SP configuration, Cost Explorer provides details of the SP terms, as shown in Figure 6.9. Here, we see that after committing to a $0.19 per hour amount to compute, the estimated savings is around $136 per month. AWS will apply the discount rate to all eligible compute uses, removing any need for you to manage it yourself.

Figure 6.9 – SP terms
SPs offer greater flexibility than RIs. We saw how AWS applies the SP rate discount to your instance usage automatically, saving you the time it takes to exchange convertible RIs. We also learned how to enable and disable RI/SP sharing across accounts, and how to get SP recommendations from Cost Explorer. We’ll learn more about another useful SP report in Cost Explorer next, namely the SP Coverage report.
Knowing when to buy more SPs
You can find the SP (and RI) Coverage report in Cost Explorer, which provides insight into how much of your instance costs were at the SP discounted rate for a given period. A coverage of 0% means that you did not benefit from a SP discounted rate, while a coverage of 100% means that AWS applied the SP discounted rate to all your instance usage. In other words, you didn’t pay the on-demand rate for any instance usage under a 100% coverage rate; all instance usage was optimized.
Achieving a 100% coverage rate should be the goal to maximize your cost savings potential. However, not all organizations can obtain and sustain that goal due to competing priorities, lack of personnel, and different levels of FinOps maturity. From my experience, aiming for a coverage rate between 60% to 80% is a good start and reasonable to attain. I find that many AWS customers that act on the SP recommendations in Cost Explorer reach that range.
In practice, use SP Coverage report to help analyze your SP commitment amounts before a SP purchase, and use SP utilization reports to quantify how well you optimize from the purchase. You can also start with a small SP commitment and purchase additional ones incrementally. With SPs, you can immediately start reducing waste by optimizing your compute expenditure without a significant upfront financial cost when choosing the no upfront option. Moreover, there isn’t the need to manage them as much as with RIs since AWS takes care of the billing and applies the discounts to your instance use during the month.
You can also use SPs and reservations budgets to track coverage and utilization rates over time. With these budgets, AWS will notify when a target coverage rate goes below a threshold. This can be a signal to purchase more SPs, assuming continued use of compute resources. AWS will also notify you when you set a utilization target to inform you when a SP or RI is being underutilized.
Figure 6.10 shows a user setting a utilization rate of 75% for a SP when creating a utilization budget. This means you will be notified if your utilization rate is less than the target 75%:

Figure 6.10 - Setting a utilization rate of 75%
RIs are ideal for steady-state workloads such as instances that need to be available and running 24/7. The on-demand price for these types of instances makes little financial sense when you can be paying for them at a lower price. Even if they don’t run 24/7 for the entire length of the committed term, the break-even point tends to be around 8 to 9 months in a 1-year commitment or around 18 months in a 3-year commitment. In other words, even if you only use the reserved instances for 10 months out of the 12 months you paid, you’re still getting a better rate than paying the on-demand price and hence, still saving money. Compute SPs make this even easier because you are no longer tied down to an instance type. AWS will apply the discount rate to any form of compute you use during the term.
Though not all workloads are steady-state, organizations commonly run batch workloads that require compute for short periods of time, or teams need to temporarily use compute to run some experiments for testing purpose. It may not be a big deal if the compute isn’t available for some reason because teams can just restart the job or relaunch an instance with a different instance type. Amazon EC2 Spot is ideal in cases such as these where you can sacrifice availability for an even cheaper price.
Purchasing SPs at VidyaGames
Jeremy speaks with Ezra to learn more about VidyaGames’ RI purchasing strategy. During their meeting, Ezra shares with Jeremy that his team has been the lead when it comes to purchasing RIs for the organization. Some application teams purchase RIs themselves while others do not. Ezra and his team work to fill in gaps where VidyaGames can benefit from increased coverage.
Jeremy and Ezra agree that the current operating model is inefficient and does not lead to long-term optimization. Purchasing RIs should not be a concern for applications teams. They should rather be focused on building software for customers. Ezra states that centralizing RI purchases makes sense, but his team needs more information from the application teams to know which RIs to purchase.
Ezra: We need to know what the developers’ plans are so that we can buy the right RIs. There have been many cases where they say they are going to use a certain instance type but after a few months, they end up changing it. Then, it’s up to me and my team to exchange them for the right RIs, which is a daunting task.
Jeremy: How many RIs do we have now and when are they expiring?
Ezra: I don’t know how many we have off the top of my head, but I do know that they are expiring at the end of this month because I have a purchase queued up for a new fleet.
Jeremy: Have you considered using SPs instead? I heard they’re much more flexible and you don’t have to spend time doing exchanges.
Ezra: I haven’t. What are they?
Jeremy enlightens Ezra on SPs. Ezra heaves a sigh of relief, as he’s hopeful that SPs can eliminate his need to exchange RIs on a regular basis. They decide that at the end of the month, they will purchase a small Compute SP to see how it works.
In this section, we unpacked how RIs and SPs work as billing mechanisms. We saw how SPs can improve your utilization and thus optimize your AWS expenditure by removing a lot of the operational work of matching the instance launches to the RI configuration. We looked also at related reports in Cost Explorer that tell you how much you’re benefitting from these mechanisms and how you can benefit further by purchasing more to improve your coverage. In the next section, we’ll look at another way for paying for Amazon EC2 compute resources using Spot.
Maximizing savings for flexible workloads
As with RIs and SPs, Spot provides you a discount on EC2 usage but with a different rate. Unlike RIs and SPs, Spot is ideal for workloads that can withstand interruption and can be instance-flexible, meaning you generally don’t care which instance type you use to complete a task. For these trade-offs, Spot provides steeper discounts than SPs.
AWS first offered the m1.small instance type back in 2006. At the time of writing, AWS now provides over 400 different types of instances to use. We can safely assume that AWS has a lot of spare capacity. AWS offers this spare capacity to customers with a steep discount compared to on-demand instances on the condition that AWS can retake that spare capacity back when needed. AWS provides a 2-minute warning, so this process doesn’t abruptly terminate your running workload.
Spot terminations were more prevalent in the earlier years of AWS. Today, given the growing number of instances available, Spot terminations are becoming less likely but they still can occur. But think of choosing the instance types as though you were choosing a parking spot in a shopping mall. Everyone will want to choose the parking spot closest to the mall (they want to walk less.) If you also choose to minimize walking, you’ll be waiting for capacity to become available, potentially circling the lot several times to find that ideal spot. If instead you choose less desirable spots, you’ll likely encounter interruptions (sometimes it’s just worth parking far away so you’re not near anyone else.)
Although parking spots and EC2 Spot aren’t necessarily the same other than being linked by the word itself, the idea is applicable. If you architect your environment so that you can run your application whether it’s on an r5, or an m5, or an m4, or a C5, or a C6g instance type, then you’ll be less likely to encounter interruption. You can create a Spot Fleet, configuring the instances types that constitute your Fleet. The more diversely you create your Fleet, the less chance there is of interruption because the chances of AWS taking capacity back for six different instance types are lower than taking capacity back for one instance type.
You also define an allocation strategy as part of your Spot Fleet configuration. This strategy tells AWS how to fulfill your instance requests from the specified Spot capacity pool. Say your pool consists of the following instance types: c3.large, m3.large, t2.large, c4.large, and r3.large. The (default) lowest price strategy chooses instances based on the lowest price from your pool, whereas the capacity-optimized strategy chooses based on the available capacity and hence, minimizes chances of interruption. Choosing the lowest price may be desirable from strictly a cost perspective, but you may want to choose another strategy based on the workload at hand, particularly if availability is more important than cost savings.
When you request Spot, you indicate the maximum price you are willing to pay. This is not a bidding system. You are not bidding against other customers and it’s not a system where the bidder with the highest price wins. Rather, Spot prices fluctuate based on demand, and the prices can be different depending on which AZ you choose. Figure 6.11 shows a Spot price history for a c5.large instance type to show the variance in price. If the price for an instance goes above your price threshold, then that triggers an interruption. Spot will then give you 2 minutes before taking the capacity back. By default, the maximum Spot price is the on-demand price for the instance.
Figure 6.11 shows the price history for c3.large, Linux instances over a 3-month span in the EC2 console. The price history chart also shows Spot prices by AZ:

Figure 6.11 – Spot Instance pricing history
Using Spot with your compute is a great tool to utilize for your optimization efforts. Mixing Spot and on-demand instances within a Fleet is another quick way to reduce costs since by mixing these pricing models, you get the best of both worlds, maintaining availability through on-demand instances, while reducing costs where you can with Spot.
Choosing the right pricing model will depend on the type of workload. Figure 6.12 shows typical usage patterns where each pricing model may be applicable. Choose SPs for steady-state workloads that are presented. This allows you to pay at a consistently lower price. Then, for workloads that are unpredictable and cannot tolerate interruptions, choose on-demand because using SPs would otherwise result in lower utilization and therefore wasteful expenditure. Finally, use Spot for workloads that can be interrupted, such as batch workloads, which may run over the weekend.

Figure 6.12 – Amazon EC2 pricing models
Many customers see Spot as a risky choice due to the likelihood of interruption. However, AWS has helped alleviate this fear in several ways, including increasing the total number of instances available, increasing the number of AZs steadily, and providing mechanisms such as rebalance recommendations for Spot. A rebalance recommend signals when a Spot Instance is at a high risk of interruption. You can use this signal to proactively manage Spot Instances prior to the 2-minute warning. You can also use the Capacity Rebalancing feature in Spot Fleets that helps you augment your Spot Fleet with new Spot Instances.
The best way to test the stability of Spot is to actually use them. You can follow AWS best practices to minimize risk of interruption by testing Spot with smaller projects, in sandbox environments, or time-insensitive batch processing. Using on-demand instances for these workloads at scale contributes to waste since they are not critical to your business. Be sure to include Spot in your compute workloads, as they can significantly lower costs.
EC2 Spot and RIs/SPs are great tools to optimize your compute usage. But we also want to reduce waste when choosing the right amount of compute. This is called right-sizing and is the topic of the next section.
Right sizing compute
An important question that arises is “do I first need to right-size my instances before reserving them?” Indeed, we don’t want to reserve an instance when it turns out it wasn’t the right instance to reserve in the first place! Doing so would contribute to waste. With SPs, this question becomes less relevant because with Compute SPs, you have more flexibility in the type of instances you launch. Even if you’re launching one instance type today, and you launch a different instance type tomorrow, you still benefit from the SP rate on the new instance type as long as you have enough in your cumulative hourly commitment to cover usage.
Right sizing is still a critical component of cloud waste management. Right sizing leverages the elasticity of the cloud. When you provisioned servers in a data center, you provisioned for peak. To maintain your service, you purchased enough servers (and beefy servers at that) to handle maximum capacity, even if this only constituted a few hours in a year. For other times during the year, the beefier machines would run overutilized. You would not efficiently use your resources. On the other hand, the trade-off was to provision appropriately sized servers that ran efficiently during most of the year, but during times of high requests, you would just deal with an outage when needs exceeded capacity. With right sizing, you can dynamically provision compute to meet demand as and when needed. There’s no need to guess your capacity requirements and be locked in to a specific server and fleet size for the lifetime of the machines.
AWS provides you with a wide range of different instance types to meet your workload requirements. General purpose instances provide a balance of compute, memory, and networking power, and are a good fit for flexible workloads, or if you’re unsure about where to start. You can also choose between compute-, memory-, or network-optimized instances. There are also accelerated computing instances as well for specialized workloads. Given the wide range of instance types to choose from, it’s likely that you will iterate on different instance types and sizes to choose the optimal one. Fortunately, Cost Explorer can help with this.
Cost Explorer provides right sizing recommendations to help you efficiently run your resources. This helps reduce your overall waste when the resources meet your computing needs. Similar in its approach to recommending RIs and SPs, right-sizing recommendations will analyze your historical EC2 usage and identify idle and underutilized instances. For example, if Cost Explorer identified a number of c5.xlarge instances that were running at less than 5% CPU consistently for 2 weeks, you could consider changing those instances to a smaller instance type and benefit from the savings.
You can select from two finding types with right-sizing recommendations. You can select between idle and/or underutilized instances. Figure 6.13 chooses both. Cost Explorer recommends changing instance size from t2.small to t2.micro:
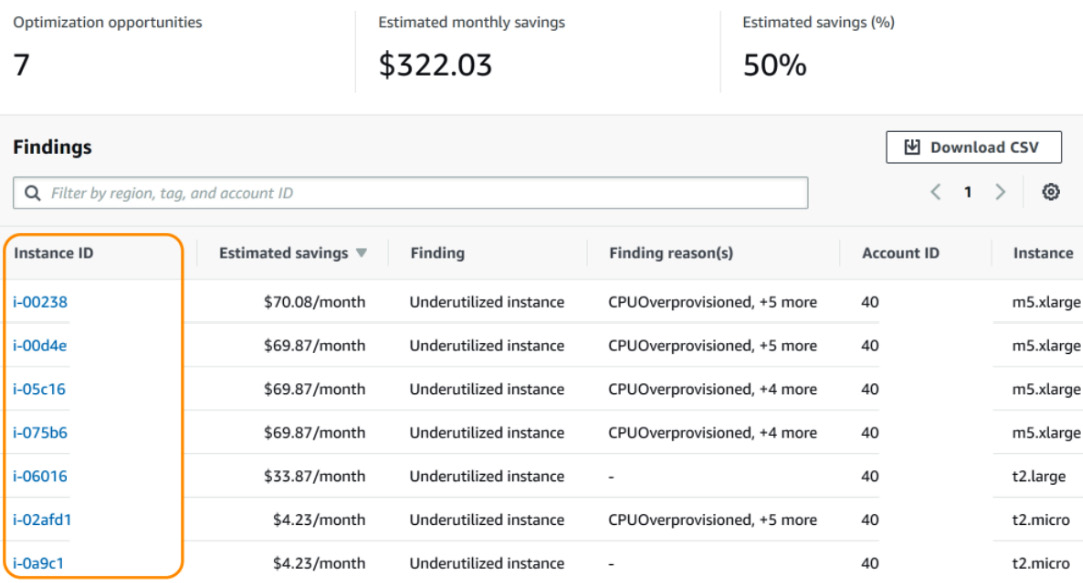
Figure 6.13 – Right-sizing recommendations in Cost Explorer
AWS Compute Optimizer performs a similar function as right-sizing recommendations. However, while right-sizing recommendations only suggest actions that size down, Compute Optimizer also suggests actions that size up. Perhaps this works against cost savings efforts but the trade-off may be necessary depending on the business requirements.
Figure 6.14 shows the AWS Compute Optimizer dashboard reflecting one optimized EC2 instance. You can access Compute Optimizer from the management account to view optimization recommendations for all the accounts in your organization. Although Compute Optimizer doesn’t provide an aggregate view, you can select an account individually from the drop-down menu in the AWS Management Console to view recommendations per account. Compute Optimizer also helps you rightsize your EBS volumes, which we will look closely at in the next chapter.
Figure 6.14 – The AWS Compute Optimizer dashboard
Compute Optimizer suggests optimizing EBS volumes using Auto Scaling groups. We will learn more about EBS volumes in Chapter 7, Optimizing Storage, and Auto Scaling groups in Chapter 9, Optimizing Cloud-Native Environments. Finally, Compute Optimizer looks at ways to optimize your AWS Lambda functions. Let’s learn more about Lambda in the next section.
Optimizing AWS Lambda
AWS Lambda is a serverless compute service that allows you to simply write or upload code, and AWS takes care of managing the underlying infrastructure to execute your code. Compared to Amazon EC2, you don’t have to worry about changing to different instance types, ensuring your instances are highly available, and securing your instances. Lambda integrates with over 200 AWS services and is great for building event-driven architectures.
To optimize Lambda, we must first understand the cost factors behind the service. The first is the execution time of your Lambda function. AWS charges your Lambda usage based on milliseconds of execution time. So, the shorter the Lambda execution time, the less you will pay.
Lambda lets you choose between several languages to execute your code. Generally, a compiled language such as C++, Rust, and Go will run faster but will take longer to initialize. Therefore, a compiled language typically works better with applications that require heavy computational complexity. Otherwise, for simple functions, choose integrated languages such as Python and Node.
You can also use provisioned concurrency with a compiled language to reduce its runtime. Provisioned concurrency is a feature that keeps functions initialized (or warmed up) to respond quickly. When you invoke a Lambda function, the request is routed to an execution environment. When the function hasn’t been invoked for a while, AWS needs to create a new execution environment. This takes time. And the function’s dependencies, such as having to install code and packages, can prolong the time it takes to run. This is called a cold start, as with having to warm up your car in cold weather. Provisioned concurrency seeks to reduce the cold start problem by initializing the requested number of execution environments so that they are ready to respond quickly. This ensures that the car is warmed up and the inside is nice and toasty before you start driving.
Figure 6.15 shows how you can configure provisioned concurrency in the Lambda console. To do so using the AWS Management Console, do the following:
- Select your function within the Lambda console.
- Select the Configuration tab.
- Select Concurrency on the left-side menu.
You can select several options on this page and add or edit your provisioned concurrency configurations:

Figure 6.15 – The AWS Lambda console
What logically follows is to try and minimize the number of dependencies and libraries in your initialization code. This is a major contributor to latencies and longer execution times before you start running the code that needs to perform the task at hand.
Another cost aspect of Lambda is memory configurations. If you overprovision your Lambda function, it will bring additional costs such as those incurred by overprovisioning EC2 instances. You can set the Memory configuration for your Lambda function, as shown in Figure 6.16:

Figure 6.16 – Configuring Lambda memory settings
Don’t think that overprovisioning is a poor choice. You might be tempted to automatically configure the smallest memory amount to maintain low costs, but a low memory configuration can contribute to longer execution times. The increase in memory may be negligible in terms of cost but can potentially have a greater impact on reducing your execution times. Be sure to monitor your functions and adjust them accordingly to optimize their usage. Use the Compute Optimizer tool to help you gain this visibility.
Recall that Compute SPs apply to Lambda usage as well. Not only will your EC2 instances benefit from a discounted hourly rate with Compute SPs, but your Lambda execution times will experience a lower millisecond cost if you have enough hourly commitment to cover these compute services.
We looked at ways to optimize Lambda costs in this section. Primarily, we want to reduce the execution time and configure enough memory to ensure the Lambda function runs optimally. Compute SPs and provisioned concurrency can help reduce Lambda costs as well.
Summary
Our focus in this chapter was optimizing compute services on AWS. We spent the first section of the chapter diving deep into billing mechanisms that benefit steady-state workloads. RIs and SPs are perfect for covering workloads that require compute resources to be on consistently throughout the year.
We unpacked how billing works for both options and concluded that SPs are preferable to RIs because of their flexibility and lower maintenance requirements. Because both options offer the same discount rates, there is little reason to choose RIs over SPs. Cost Explorer provides reports and recommendations to help you with your RI/SP purchasing strategy.
We also explored Spot as another option for compute services. Spot is ideal for flexible and interruptible workloads because of the deep discount AWS provides. However, we must be mindful of how we architect workloads using Spot due to the interruptible nature of Spot resources. We reviewed mechanisms to keep our workload resilient against Spot interruptions, such as the capacity-optimized allocation strategy and capacity rebalancing.
Finally, we looked at ways to right-size our compute resources through right-sizing recommendations and Compute Optimizer. We learned Lambda’s mechanisms and discussed strategies to reduce its execution time to save on costs.
In the next chapter, we turn our focus toward storage. As with optimizing compute, all applications require storage to persist data. We’ll find ways to optimize our storage costs on AWS.
Further reading
Have a look at the following resources:
- Amazon EC2 Instance Types, 2022: https://aws.amazon.com/ec2/instance-types/
- Amazon EC2 On-Demand Pricing, 2022: https://aws.amazon.com/ec2/pricing/on-demand/
- EC2 Instance History, 2015: https://aws.amazon.com/blogs/aws/ec2-instance-history/
- Best practices for EC2 Spot, 2022: https://docs.aws.amazon.com/AWSEC2/latest/UserGuide/spot-best-practices.html