7
Optimizing Storage
While compute focuses on the doing of things, storage focuses on the keeping of things. You need a place to store your data. Given the volume, velocity, and veracity of data, today’s technology landscape commonly refers to data as the new oil. Enterprises are looking at ways to leverage their data as assets, monetize them, and draw meaningful insights from them. Although directly monetizing data is outside the scope of this book, we can at least optimize our stored data to make it readily available if or when you ever venture down that path.
AWS provides several ways to store your data, and we’ll focus on optimizing object and block storage. We also look at optimizing databases. Some of the topics we covered in the last chapter will reappear here.
In this chapter, we’re going to cover the following main topics:
- Optimizing object storage
- Optimizing databases
- Optimizing block and file storage
Technical requirements
To complete the exercises in this chapter, the requirements are the same as the previous chapters.
Optimizing object storage
We’ve discussed in great detail the on-demand provisioning of compute resources in the previous chapter. With all that compute capacity, whether you’re using EC2 instances or Lambda functions, you need somewhere to store your data. Fortunately, storage is just as easily and readily available on AWS as compute.
Amazon Simple Storage Service (Amazon S3) is widely used as a storage medium on AWS. But reducing waste on storage costs with Amazon S3 is going to depend on the application, because an application used for backup and archive is going to have different needs from an e-commerce site or a streaming video service.
Reducing Amazon S3 costs boils down to three concerns:
- Where you store the data in S3
- How often you retrieve that data
- Where you move that data to
These concerns will differ based on the workload. For example, a backup workload will be less likely to have requests and retrieval requests than a video streaming service. Even for the video streaming service, access patterns will change over time, as new content will likely be requested more than older content.
We’ll focus on optimizing Amazon S3 in three ways. First, we’ll discuss Amazon S3 hygiene since keeping our data storage clean and manageable is critical to our optimization efforts. Then, we’ll learn about the different storage classes and how you can use them to maximize savings. Lastly, we’ll discuss operationalizing Amazon S3 at scale so that you can manage your storage costs even when your storage volume increases exponentially over time.
Establishing clean S3 hygiene
The first thing you need to decide is how you’re going to organize the data that you store in Amazon S3. This is the same approach we took when we started. We first talked about organizing your accounts in the right multi-account structure and creating logical boundaries that reflected your business hierarchy or application domains (see Chapter 2, Establishing the Right Account Structure). The same goes for your data in Amazon S3. What we want to avoid is creating a kitchen sink of data that you’re unable to optimize simply because you don’t even know what to look for.
First, you organize your data with buckets. Buckets act as a logical container that holds objects, whether those objects are CSV files, ZIP files, MP3 files, or plain text files. You can certainly create one bucket and put everything in there. S3 will automatically scale to meet your requirements. However, it will very likely become burdensome later because you’ll have to search through your entire bucket to find what you’re looking for.
To minimize this risk, use prefixes as layers of hierarchy to organize your objects within an S3 bucket. Prefixes mimic a folder structure that you can find your data within, just as you put objects or files within a folder path. For example, if you had data representing objects in a house, a bed object with a prefix of house/master/bed would be distinct from a bed object with a prefix of house/guest/bed. Although the bed object may appear to be the same, the prefix allows you to not only differentiate between them but also know where to find them.
You can also associate tags with specific objects, in addition to applying tags to a bucket. We’ve already covered the importance of tagging in previous chapters, but it’s worth reiterating its value here. Tagging not only improves your cost visibility but also allows more granular control on where you want to store objects. S3 offers several different storage classes each with a different storage price. By deciding on the appropriate storage class based on the objects’ access patterns, you will reduce storage cost waste.
Now that we’ve set the right foundations for maintaining proper S3 hygiene, let’s see how we can choose the right storage class for our data to maximize our savings potential.
Optimizing with S3 storage classes
You can choose to sacrifice durability, availability, and performance for lower storage costs. However, when you pay for a lower storage cost, you pay for a higher object retrieval cost. S3 provides a total of eight different storage classes at the time of writing, of which six are shown in Figure 7.1. Here we see prices for the US-EAST-2 (OHIO) Region. These percentages show the change relative to the Amazon S3 Standard storage tier. For example, Amazon S3 Glacier Instant Retrieval is 83% cheaper than Amazon S3 Standard, but 300% more expensive for retrieval requests:

Figure 7.1 – Amazon S3 storage class comparison
The optimal storage class will depend on an object’s access pattern. As a simple example, referring to Figure 7.2, say you serve a 1 GB video file to clients. Storing that file in S3 Standard would cost $0.023 per month, while storing it in Glacier Instant Retrieval would cost $0.004 per month, representing an 83% savings in storage. What a dream! Let’s put it in S3 Glacier Instant Retrieval to save on costs. However, it’s a popular file. A million (1,000 x 1,000) clients have requested to view it. Now, it costs $20 that month to retrieve that file a thousand times, when it would have cost $5 to retrieve it from S3 Standard otherwise:

Figure 7.2 – S3 cost comparison
What if you don’t really know an object’s access pattern, but still want to take optimize storage costs? S3 provides the Intelligent-Tiering storage class to run those calculations for you. Intelligent-Tiering automatically reduces your storage costs by transferring data to the most cost-effective access tier based on your access patterns. Moreover, Intelligent-Tiering has no retrieval charges. If Intelligent-Tiering detected that the video wasn’t accessed for a month (a far more interesting video is trending, by the way), it would move the now-obsolete video to a lower-cost tier optimized for infrequent access. If that video became popular again and was accessed later (oh wait, it’s popular again), it would automatically be moved back.
In cases where you do understand your access patterns due to recurring application processes or domain expertise, you can use lifecycle policies to automatically move objects to the optimal class. A textbook example is to set a lifecycle policy to move objects to colder storage tiers a said number of days after object creation. Figure 7.3 shows an example lifecycle policy transitioning objects after 30 days since creation to Standard-IA, One Zone-IA after 60 days, and Glacier Deep Archive after 90 days.

Figure 7.3 – An example of an Amazon S3 lifecycle policy
Important note
Amazon S3 Lifecycle Transition requests cost $0.01 per 1,000 requests at the time of writing. Therefore, it’s always a good practice to use the AWS Pricing Calculator to estimate your costs and consider the transition cost before moving objects into any storage class.
You can use tags and prefixes for additional granularity. You may specify objects with tags and apply different lifecycle policies depending on those tags. You may also decide to apply lifecycle policies to objects contained in specific prefixes (or folders) within an S3 bucket. Or you, may choose to use a combination of both – Figure 7.4 shows this in the Amazon S3 console view.
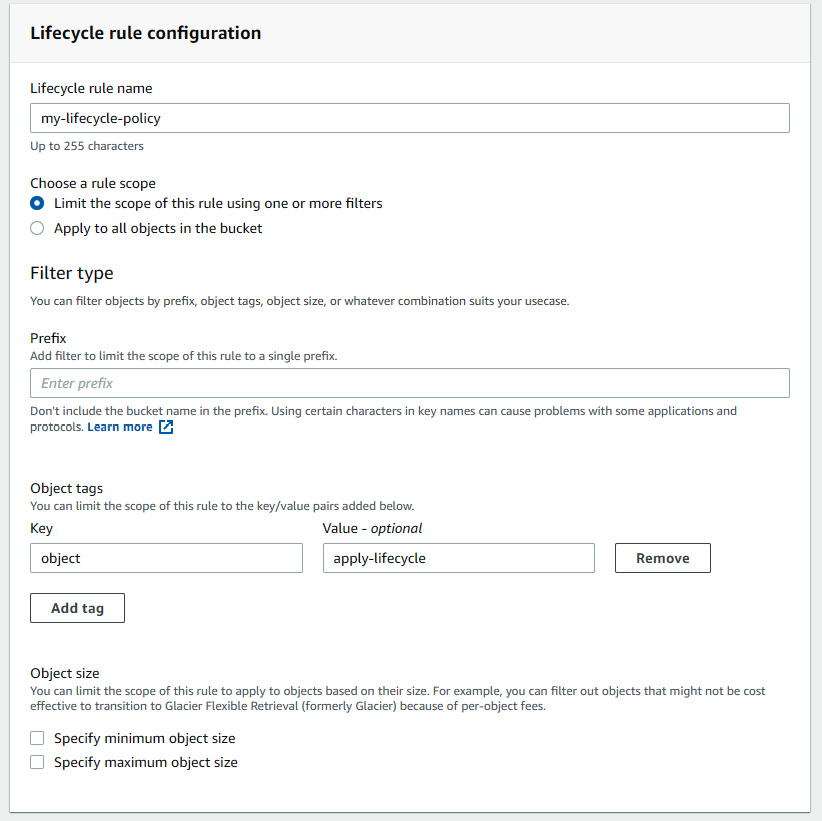
Figure 7.4 – Applying lifecycle policies to objects tagged with specific object tags
VidyaReviews, a key application at VidyaGames
VidyaReviews is the core business application for VidyaGames. It is a social media platform where users share video game experiences. It was originally designed for users to share video game reviews to help other users determine whether to purchase a specific game or not. The application aggregates reviews but also allows users to follow specific profiles and popular influencers for their opinions. Users can pay a monthly premium to gain access to exclusive content and remove all digital ads from the online and mobile experience.
The application product team for VidyaReviews uses Amazon S3 to store users’ video and image files. To keep things simple, the team placed all media files in the Standard storage class. However, as users grew and the amount of content uploaded and downloaded from the site increased, the team knew that this would not be a sustainable option.
The team analyzed two years of data about user access patterns. They found that once a studio releases a game on the market, demand for the game’s media content on VidyaReviews usually last between one to two months. Sometimes game content demand will last three to six months, which happens for games that receive critical acclaim.
The team also found that when game studios launched a sequel to a game, demand for the previous installment of the game increases. This is likely because users want to experience or revisit a game before a highly anticipated sequel. The last finding was that demand for content can have unexpected spikes for no apparent reason. At random, demand for content for a specific game can dramatically increase even without announced sequels. A part of this can be explained because a sudden hit game within a specific genre may spark demand for other games in the same genre, or a movie release related to a game may suddenly spark demand for its content. Due to the unexpected nature of video game demand, the application team finds it difficult to generalize a pattern that they can apply to all content in S3, but they do identify two key patterns and formulate a strategy based on this.
The team decides on a two-prong strategy. Games with high aggregate reviews will have a certain tag, while games with lower aggregate reviews will have a different tag. Games with higher aggregate reviews tend to produce more content and have a higher likelihood to get a sequel in the future, whereas games with lower reviews tend to become obsolete within 30 days of their release. For games with higher aggregate reviews, the team plans to use Intelligent-Tiering. For games with lower aggregate reviews, they will implement a lifecycle policy to move the content to a colder storage tier. They will use tags to differentiate between higher and lower reviewed content.
Although they can use scrapers to analyze web content, capture trending social media topics, and use publicly available data to anticipate user demand, the team has other priorities and plans to revisit this later.
Organizing your objects in Amazon S3 will help you access them easily using separate buckets, prefixes, and tags. Save on costs by using colder storage tiers if the access patterns justify their use. You can upload them to a default colder tier or transition them to colder tiers using lifecycle policies. If you are unsure of the access patterns, you can use Intelligent-Tiering to automate the process. Next, we’ll explore how to manage your data in S3 across multiple buckets and accounts.
Managing S3 at scale
Managing waste on a few S3 buckets and the objects within them is one thing, but doing this at scale with thousands of buckets can get complicated. Ideally, we’ve already set good practices in place so that your Cloud Center of Excellence and your teams know the purpose of those buckets and the objects within them. Having good S3 inventory hygiene reduces the headaches that come with the feeling of being overwhelmed by not knowing what you’re in fact storing in S3.
Amazon Storage Lens can help with organization-wide visibility into object storage as a tool to supplement your storage hygiene. Storage Lens provides usage and activity metrics and reporting dashboards for your buckets across all your accounts within your Organization. Use Storage Lens metrics to see the access patterns for your objects so you can make data-driven choices about which storage class to choose. Figure 7.5 shows an overview of the default Storage Lens dashboard in the AWS Management Console:

Figure 7.5 – The Storage Lens dashboard
Use the metrics in Storage Lens to your advantage. For instance, a 1 GB video is a good candidate for multipart upload (MPU) to S3. MPU allows you to upload objects to S3 in parts so that if the upload fails, you can continue uploading the other parts of the object without having to start all over again. However, when the MPU doesn’t complete, the parts remain in S3 even when the task is aborted. You can see in Figure 7.6 that there are 750 MBs of incomplete MPU. Storage Lens provides this view:

Figure 7.6 – The findings of Storage Lens
Storage Lens shows failed multi-part uploaded objects that can and should be cleaned up to reduce waste.
Important note
It is good practice to use multipart upload when your object sizes are at least 100 MB. Also, consider multipart upload over a stable high-bandwidth network to maximize the use of your networking by uploading objects in parallel.
Include Storage Lens as part of your toolkit to optimize storage across your AWS Organization. Storage Lens aggregates usage and activity metrics to the bucket and prefix level. This can help strengthen your sense of control over your AWS resources. Sometimes, overcoming the feeling of being overwhelmed by what you don’t know is the first step in reducing your waste.
In this section, we covered proper Amazon S3 hygiene, choosing the right storage class, and leveraging organizational-wide visibility tools such as Storage Lens to manage your Amazon S3 storage at scale. In the next section, we’ll continue our discussion on optimizing storage on AWS but focus on a different type of storage medium: the database.
Optimizing databases
We spent some time discussing RIs in the previous chapter. We concluded that compared to RIs, SPs offer less management overhead and better cost savings. Unfortunately, at the time of writing, SPs only provide discounted rates for compute services. Fortunately, though, RIs apply to database services, namely, Amazon Relational Database Service (Amazon RDS), Amazon ElastiCache, Amazon Redshift, Amazon OpenSearch Service, and Amazon DynamoDB.
I won’t go into the details of how each service works, although AWS documentation has plenty of information on that front (see the Further reading section at the end of the chapter for links). The mechanism for reserving database instances works the same as with EC2 instances. You still choose the term and payment option. You can still get recommendations in Cost Explorer for these types of reserved instances. The way AWS applies the discount works in the same way as well; if you purchased an RI, AWS would apply the discounted rate to any databases that match the configuration of the RI.
Figure 7.7 shows you several RI options for various AWS database services including Amazon RDS, ElastiCache, Redshift, and OpenSearch. You can also choose different payment options and a historical look-back period for recommendations:

Figure 7.7 – Selecting RI recommendations for Amazon RDS in Cost Explorer
Let’s now focus on how RIs work for Amazon RDS. The pricing mechanism is similar to how RIs work for Amazon EC2 instances, but there are some differences due to the nature of the service.
RDS-reserved instances
There are some RI nuances for RDS since, architecturally, databases aren’t typically seen as cattle the way that servers in the cloud are. The phrase treating servers as ‘cattle’ gloomily refers to servers being easily dispensable for architects since they can quickly be replaced when running in the cloud. Databases, for better or worse, aren’t as easily expendable because they can store critical data several applications may depend on.
To ensure that data is available, AWS recommends deploying an RDS instance with a multi-AZ instance configuration. Figure 7.8 shows a logical representation of a multi-AZ RDS instance where, in fact, you have two databases running, one in AZ 1 and the second in AZ 2:
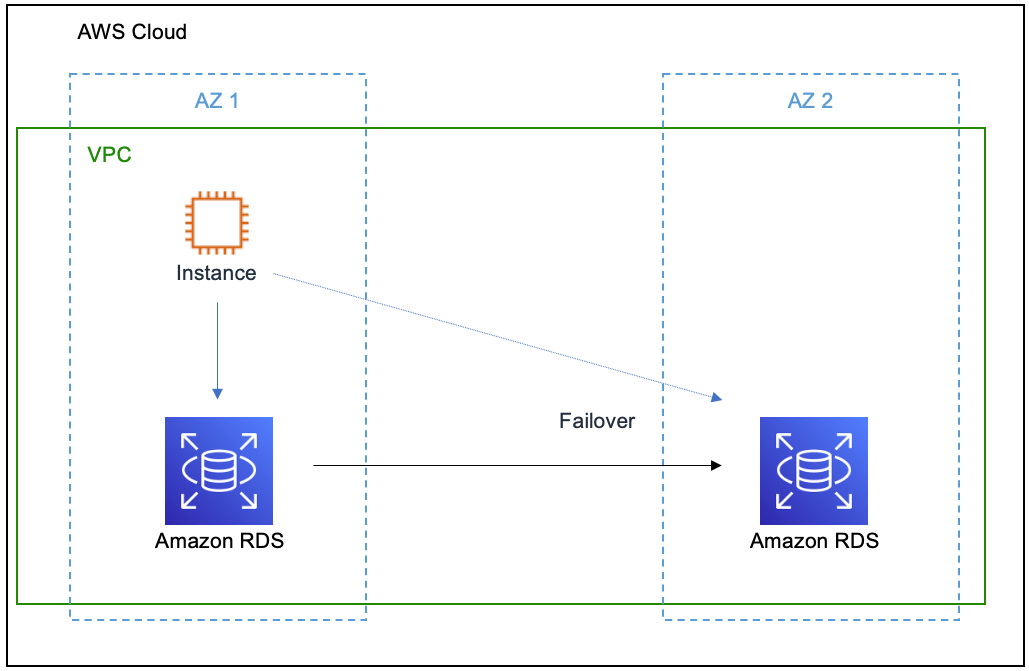
Figure 7.8 – A multi-AZ deployment of Amazon RDS
When the RDS instance in AZ 1 fails, AWS automatically failovers to the instance in AZ 2, allowing an upstream instance server to continuously access data without downtime.
Because RDS is a managed service, AWS takes care of the failover by automatically switching to the standby. Hence, with this configuration you have two instances running.
Important note
Multi-AZ refers to multiple Availability Zones (AZ). In other words, RDS database instances are provisioned in more than one AZ.
If this is how you design your application, and you want to reserve the instances, then you should consider purchasing a multi-AZ deployment. If the preceding diagram matches your design and you only purchase a single-AZ reserved instance, then the discount rate will only apply to one of your RDS instances. For example, the RDS instance in AZ 1 will be priced at the discounted rate, while the standby in AZ 2 will be charged the on-demand price. Therefore, purchasing a multi-AZ deployment can reduce wasteful on-demand spending if you plan to have RDS instances running on a consistent basis.
RDS RIs also provide size flexibility for most database engines. When you provision an RDS instance, you choose the engine and size of the instance, among other things. The size essentially doubles as you increase incrementally. For instance (no pun intended), an xlarge is twice the size of a large, a 2xlarge is twice the size of an xlarge, and so on (refer to our discussion on instance size flexibility in Chapter 6, Optimizing Compute). When you purchase an RDS-reserved instance that’s enough to cover the size of a 2xlarge, you will get the discount rate if you launch either four large instances, or two xlarge instances, or one 2xlarge instance. In addition, if you launched a 4xlarge instance, half the cost will be at the on-demand rate with the other half being at the RI rate. Take advantage of the size flexibility because, where applicable, even a small reservation can cut costs even if you increase the size later.
Important note
Amazon EC2 also provides size flexibility but they only apply to Linux/Unix type instances at the time of writing. Size flexibility doesn’t matter towards SPs, which should be the preferred approach.
Reserving RDS instances is an immediate way to save money since, as a billing mechanism, AWS will apply the discount on your behalf as long as the instance you launch matches the configuration of the reservation. Consider reserving multiple instances if you plan on launching several instances that have particular relevance for a HA configuration.
Using a managed service such as Amazon RDS can help optimize cost in another way, namely, to maximize the efficient use of a database. Amazon RDS supports Storage Auto Scaling, which automatically scales storage capacity in response to your workload demand. If you are running databases on Amazon EC2, you must consider the management implications of scaling out and scaling up the database when demand for storage increases or decreases. Without proper monitoring and automation, you may run into situations where you are overprovisioned to ensure the availability of your application, which can lead to cost increases. With RDS Storage Auto Scaling, AWS continuously monitors storage consumption to scale up capacity, automatically removing this management burden away from you and your teams. This improves your cost as you only pay for the storage you need when you need it. Because this feature has no additional cost, it is a benefit you can easily leverage to optimize your use of AWS database resources.
Now that we have a good understanding of optimizing Amazon RDS, let’s explore how to optimize another database offering, Amazon OpenSearch Service.
Optimizing OpenSearch clusters
Amazon OpenSearch Service is a managed service for running OpenSearch clusters in the AWS Cloud. OpenSearch Service supports OpenSearch and the legacy, open source search, and analytics suite from ElasticSearch OSS.
For cost purposes, there are two main things to know about cost optimization with OpenSearch clusters. The first is reserving OpenSearch clusters. The mechanisms for reserved OpenSearch cluster instances are the same as reserved instances for Amazon RDS and Amazon EC2 instances. You still choose the payment option, the number of instances, instance type, and term length – nothing new here.
The second, more specific to OpenSearch Service, is the UltraWarm node storage option. Conceptually, this is similar to the colder storage classes within S3. For data stored in OpenSearch Service that you don’t need as great a performance level for perhaps, and for less frequently queried or written data, UltraWarm provides a lower storage price. Figure 7.9 shows the architecture of an Amazon OpenSearch Service cluster with both hot data and UltraWarm nodes. You can see that UltraWarm nodes are backed by Amazon S3:

Figure 7.9 – The architecture of an OpenSearch Service cluster
While OpenSearch Service stores the hot data in EBS storage volumes, it uses S3 to store data in UltraWarm nodes. This gives you a better storage price, but still provides the durability and availability of S3. Note that UltraWarm can only store read-only indices. If you need to write to them, you must transition them to the hot nodes. An example use case would be to store your applications’ log data in a search-focused data store such as OpenSearch Service. If you’re planning on using OpenSearch Service to aggregate your logs, then it makes sense to store older, immutable log data in the UltraWarm tiers to reduce storage costs.
Amazon OpenSearch Service is a great place to store your applications’ log data. You can respond quickly to changes in your application state and efficiently store data by moving older data to colder storage tiers to save on costs. However, you need to pick the right database for the job. We’ll continue our discussion on databases by looking at a NoSQL offering from AWS, namely Amazon DynamoDB.
Optimizing DynamoDB
DynamoDB is AWS’ NoSQL database. As a fully managed service, AWS takes care of the scaling, software patching, hardware provisioning, setup and configuration, and replication. When you use DynamoDB, you create database tables that store and retrieve any amount of data that scales automatically to any level of request. As a NoSQL database, DynamoDB is schemaless, meaning you don’t have to define the data attributes for each column as you would in a relational database. This makes DynamoDB a great database when you need low latency and your access patterns are simple, key-value-based queries.
For optimizing DynamoDB costs, it helps to understand the different capacity modes that the service offers. You want to choose the right capacity mode based on your application’s traffic patterns. The three capacity modes are provisioned, on-demand, and reserved:
- Provisioned mode: When you select provisioned mode, you define the number of reads and writes requests per second. You will be billed by the hour based on your specifications. Figure 7.10 shows setting up a DynamoDB table with Provisioned mode selected and Auto scaling turned Off.

Figure 7.10 – The selected DynamoDB-provisioned mode in the AWS Console read/write capacity settings
The DynamoDB-provisioned mode also works with auto scaling (something we’ll look at more in the next chapter). Auto scaling helps you adjust your database cluster automatically. You set the minimum and maximum read/write capacity units, and a target utilization percentage. This target utilization tracks the consumed, provisioned throughput at a point in time and adjusts the provisioned throughput upward or downward in response to demand, similar to how a home thermostat maintains a target temperature for the house. Unlike a home thermostat, however, rather than setting a temperature for your DynamoDB cluster, you can set a target utilization value between 20 and 90 percent of your read/write capacity. Use provisioned mode when you have a steady state or predictable workload.
- On-demand mode: The second type is on-demand. At this point, we’re very familiar with how on-demand pricing works. On-demand is great for workloads that are unpredictable where you don’t have to or want to predefine the throughput that you need for DynamoDB. DynamoDB will still automatically adjust to your traffic and increase or decrease the throughput accordingly. Use on-demand mode when you are testing small development, test workloads, or you have unpredictable or changing workloads that you want to test quickly.
- Reserved capacity mode: Reserved capacity, the last mode, is ideal for when you can predict how much throughput you need. Reserved capacity provides you with the best discount compared to the other modes mentioned here. Although DynamoDB reservation recommendations don’t appear in Cost Explorer as with the other databases, you can still reserve the capacity. You still commit to an hourly rate, and as with other RIs and SPs, you will pay the hourly rate whether you use it or not. Unlike the other reservation types, you only have the upfront payment option. Figure 7.11 shows the reserved capacity mode in use in the AWS Console:

Figure 7.11 – Reserving DynamoDB capacity in the AWS Console
Purchase reservations to optimize your DynamoDB storage costs when you have predictable application traffic or can forecast capacity requirements in advance. Be mindful, though, that you pay upfront and you’re committing to the minimum usage for the term, which can be either one or three years. If you’re unsure of committing to the commitment term, choose provisioned mode instead because you can change between provisioned mode and on-demand mode at will.
A cost-saving feature that you can use with DynamoDB regardless of your provisioned mode is Standard-Infrequent Access (S3 Standard-IA). As with Amazon S3 storage classes, if you have DynamoDB tables that are less frequently accessed, then you can use the S3 Standard-IA table class to reduce your storage costs. Because your table choice is not permanent, choose the right table class based on your requirements to optimize costs. You can update the table class easily in the Console, so don’t feel as though you’re locked into a certain table class.
We covered optimizing databases in this section and object storage with Amazon S3 in the section before. The last storage mediums we need to discuss for optimization are block and file storage. We will turn to these in the next section.
Optimizing block and file storage
File storage is similar to the way that a user would organize files on their personal computer. With file storage, you organize and represent data as a hierarchy of files in folders. Separately, block storage groups data into organized but evenly sized volumes. You can think of this in the same way as copy-pasting a bunch of files, images, videos, and other media files into an external hard drive. That hard drive functions as a block store. We’ll explore how to optimize block and file storage next.
Optimizing EBS
For many EC2 instances that you spin up, you can associate a block storage volume to that instance. You can imagine these storage volumes as attached hard drives on your local computer; you can purchase a 1 TB hard drive, attach it to your computer, and expand your storage space. Amazon Elastic Block Store (EBS) volumes are similar in this regard but have additional bonuses, such as the ability to elastically change the volume size (increase or decrease the amount of storage at will), or take snapshots of these volumes and save your data redundantly.
Important note
Some EC2 instances only provide temporary block-level storage for your instances. These are called instance storage volume types. Be sure to check the instance storage configuration for your instance so you don’t accidentally lose data!
As with Amazon S3, EBS provides you with several EBS volume types to meet your price and performance requirements. Generally, you categorize EBS into two volume types: solid-state drives (SSDs) or hard disk drives (HDDs). HDD volumes have a lower storage cost than SSD, but both depend on provisioned storage. Unlike S3, where you pay for the amount stored, EBS requires you to provision the storage amount ahead. For example, you need to specifically create a volume of 40 GB. You can then use up to 40 GB of storage space on that volume, but you pay for the entire 40 GB amount even if you use less than that. But not to worry, you can elastically resize the 40 GB to 30 GB if that’s all you really need.
Hence, monitoring your EBS volumes is important. The EBS volume size impacts performance. So, even if it appears that an EBS volume is overprovisioned, it may have been done on purpose. Overprovisioning is, in fact, a pattern – there are times that an EBS volume may be overprovisioned on purpose to gain the additional IOPS. For example, a team using the GP2 (for general purpose 2nd generation) volume type in EBS may initially provision 20 GB, resulting in 100 IOPS (3 IOPS/GB * 20 GB). However, if the application requires 300 IOPS, the team will resize the volume to 100 GB (3 IOPS/GB * 100 GB), even if the storage isn’t fully utilized.
To make things easier, use AWS Compute Optimizer for EBS rightsizing recommendations. Monitoring your own metrics will likely be the most accurate method since you know your application needs better than anyone else (hopefully!), but Compute Optimizer provides a good starting point to have those conversations with the right teams.
Within EBS, you can choose between several EBS volume types. EBS GP2 volume types are generally recommended for most workloads. The idea behind GP2 is that the larger the capacity you provision, the higher IOPS you can expect to get. So, sometimes, you may end up provisioning more storage capacity than you need because you want the higher IOPS. However, AWS continues to launch and promote newer generation features by incentivizing them with lower costs.
At the time of writing, EBS GP3 is the most recent (latest generation) storage type to support general-purpose workloads. EBS GP3 aims to address the overprovisioning problems with GP2 that we touched upon in the previous paragraph. You can provision performance independently from storage capacities with EBS GP3 and still provide up to 20% financial savings compared to the previous generation. Consider migrating to GP3 (and subsequent newer generations in the future) if you want to get a boost in performance at a lower rate and if it’s not too troublesome to change.
Important note
If you are planning on using AWS’ auto scaling capabilities, be sure to consider your strategy for deleting EBS volumes during scale-in events. Otherwise, you will find yourself paying for a fleet of unused EBS volumes when auto scaling automatically terminates the EC2 instances, but not the EBS volumes. We’ll learn more about auto scaling in Chapter 9, Optimizing Cloud-Native Environments.
Now that we have a better understanding of how EBS works and which type to choose, let’s see how to optimize costs once you’ve made these decisions.
Optimizing EBS snapshots
Snapshots are an important component of EBS because they serve multiple purposes such as backup, disaster recovery, ransomware protection, and data transfer to other Regions. Snapshots are just as they sound; you take a snapshot of your EBS volume and that snapshot represents a point-in-time record of your data.
A common use case with snapshots is to create a snapshot policy to meet a business requirement. Say that your company has mandated that it should never lose more than five minutes of data at any given time – you can set a schedule to take snapshots of your application data every five minutes. Now, you can recover at any five-minute interval. However, those snapshot costs can become unruly.
AWS provides tools such as EBS Snapshots Archive and EBS Recycle Bin for Amazon EBS snapshots to ease the burden of managing them. EBS Snapshots Archive is a storage tier on Amazon EBS. You can save snapshot-storage-related costs by saving snapshots in the archive. You can also run a process to automatically delete snapshots that are older than a defined time range. Deleting snapshots that you don’t need is exactly the type of waste reduction that we aim for. Stale EBS snapshots can accumulate over time, but AWS Trusted Advisor can help identify snapshots for you to clean later. Subsequently, if you happen to accidentally (or on purpose) delete a snapshot and then need to recover it, EBS Recycle Bin insures against accidental deletion. With Recycle Bin, EBS snapshots are placed in a recoverable state, and you can restore them within a certain time period before they are deleted permanently.
AWS will retain deleted snapshots for a time period that you specify. After this period, the EBS snapshots are deleted permanently. Figure 7.12 shows an EBS Recycle Bin retention rule that applies to all EBS snapshots. In this example, the user specifies the retention period for 30 days. You can set the period to a maximum of 365 days.

Figure 7.12 – An EBS Recycle Bin retention rule
Use EBS Snapshots Archive and Recycle Bin to apply similar policies to your snapshots as you would life-cycling your S3 objects. These may appear to be small steps that have a negligible impact on overall costs but, remember, the goal for us is to reduce waste. Any and all steps taken in this direction will positively impact your organization.
Optimizing EFS
The last type of storage type that we can optimize on AWS is file storage with Amazon Elastic File System (EFS). Amazon EFS is a shared file system used with Amazon EC2 instances and on-premises servers. It provides a file system interface for file-based workloads that scales automatically depending on how much you store.
As with Amazon S3, EFS has different storage classes. The default storage class is EFS Standard, which has the highest storage cost compared to the other classes. EFS Standard-Infrequent Access (Standard-IA) is the cost-optimized version of EFS Standard for less accessed files. You sacrifice a bit of performance for cost – while you get single-digit millisecond latency with EFS Standard, you can expect double-digit millisecond latency with EFS Standard-IA. As long as your workload can afford this dip in performance, optimize with EFS Standard-IA.
The cheaper versions of EFS are EFS One Zone and One Zone-IA. As the name implies, EFS One Zone maintains your data within just one AZ. If it’s not business-critical to maintain redundant copies of your data in EFS across multiple AZs, then consider using EFS One Zone and the cheaper EFS One Zone-IA for cost optimization reasons.
If you are unsure on which class to use, you can always use EFS Intelligent-Tiering, as a similar concept to Amazon S3’s version. EFS also has lifecycle management. You can use it to move files from one class to another. I won’t go into the details on these capabilities since they mirror Amazon S3’s capabilities, which I outlined in earlier sections of this chapter. Know that the same strategies that you use to manage and life-cycle your S3 objects can be used for your files with Amazon EFS.
Summary
Storage is critical for any cloud-based workload. How and where you store your data will largely depend on the application and on the form of the data itself. AWS provides many storage technologies to support your workload, each with its own cost optimization strategies.
Use Amazon S3 for object storage. Once you have an idea of how you want to organize and partition your data in S3, choose the optimal storage class to lower your storage costs. You don’t have to get it right the first time. You can use lifecycle policies to transition objects from one storage class to another. You can get AWS’ help by using Intelligent-Tiering, which allows AWS to move objects to the optimal storage class for you. The same principles apply to file-based storage with Amazon EFS and UltraWarm storage for Amazon OpenSearch.
Use Amazon EBS for block storage of your Amazon EC2 instances, but also your on-premises servers if needed. Leverage the latest generation EBS volume types for optimal use. Archive EBS snapshots for cost savings and be sure to monitor your volume performance so that you use your available space efficiently.
Purchase RIs for your databases and cloud-based data warehouses (with Amazon Redshift) if you plan to keep these databases up and running for a long time. The discounted rate will pay off in months, which will help you get a lower price compared to the on-demand rate.
We’ve covered compute and storage. In the next chapter, we’ll find ways to optimize the components that tie these together: networking.
Further reading
Have a look at the following resources:
- Amazon S3 Storage Classes, 2022: https://aws.amazon.com/s3/storage-classes/
- Managing your storage lifecycle, 2022: https://docs.aws.amazon.com/AmazonS3/latest/userguide/object-lifecycle-mgmt.html
- Introducing Amazon S3 Storage Lens – Organization-wide Visibility Into Object Storage, 2020: https://aws.amazon.com/blogs/aws/s3-storage-lens/
- Reserved DB instances for Amazon RDS, 2022: https://docs.aws.amazon.com/AmazonRDS/latest/UserGuide/USER_WorkingWithReservedDBInstances.html
- Read/write capacity mode, 2022: https://docs.aws.amazon.com/amazondynamodb/latest/developerguide/HowItWorks.ReadWriteCapacityMode.html
- UltraWarm storage for Amazon OpenSearch Service, 2022: https://docs.aws.amazon.com/opensearch-service/latest/developerguide/ultrawarm.html
- AWS. “Recycle Bin”. 2022. https://docs.aws.amazon.com/AWSEC2/latest/UserGuide/recycle-bin.html