
In Chapter 1, you took your first look at the datasheet—a straightforward way to browse and edit the contents of a table. As you’ve learned since then, the datasheet isn’t the best place to build a table. (Design view’s a better choice for database control freaks.) However, the datasheet is a great tool for reviewing the records in your table, making edits, and inserting new data.
Based on your experience creating the Dolls table (Section 1.2.3), you probably feel pretty confident breezing around the datasheet. However, most tables are considerably larger than the examples you’ve seen so far. After all, if you need to keep track of only a dozen bobbleheads, then you really don’t need a database—you’ll be just as happy jotting the list down in any old spreadsheet, word processor document, or scrap of unused Kleenex.
On the other hand, if you plan to build a small bobblehead empire (suitable for touring in international exhibitions), you need to fill your table with hundreds or thousands of records. In this situation, it’s not as easy to scroll through the mass of data to find what you need. All of a sudden, the datasheet seems more than a little overwhelming.
Fortunately, Access is stocked with datasheet goodies that can simplify your life. In this chapter, you’ll become a datasheet expert, with tricks like sorting, searching, and filtering at your fingertips. You’ll also learn a quick-and-dirty way to print a snapshot of the data in your table.
Note
It’s entirely up to you how much time you spend using datasheets. Some Access experts prefer to create forms for all their tables (as described in Part Four). With forms, you can design a completely customized window for data entry. Designing forms takes more work, but it’s a great way to satisfy your inner Picasso.
Getting tired of the drab datasheet, with its boring stretch of columns and plain text? You can do something about it. Access lets you tweak the datasheet’s appearance and organization to make it more practical (or suit it to your peculiar sense of style). Some of these customizations—like modifying the datasheet font—are shameless frills. Other options, like hiding or freezing columns, can genuinely make it easier to work with large tables.
Note
Access doesn’t save formatting changes immediately (unlike record edits, which it stores as soon as you make them). Instead, Access prompts you to save changes the next time you close the datasheet. You can choose Yes to keep your customizations or No to revert to the table’s last look and feel (which doesn’t affect any edits you’ve made to the data in that table).
Access lets you format the datasheet with eye-catching colors and fonts. Do these options make any difference to the way the datasheet works? Not really. But if your computer desktop looks more like a ’60s revival party than an office terminal, then you’ll enjoy this feature.
To find the formatting features, look at the ribbon’s Home → Font section (see Figure 3-1).

Figure 3-1. The Home → Font section lets you change the text font and colors in the entire datasheet. The most practical frill is the ability to turn off some or all of the gridlines and use alternating row colors to highlight every other row, as shown here.
Every formatting change you make affects the entire table. You may think it’s a nifty idea to apply different formatting to different columns, but Access doesn’t let you. If this limitation’s frustrating you, be sure to check out forms and reports later in this book. Both are more complicated to set up, but give you more formatting power.
Note
There’s one other way you can use the ribbon’s Home → Font section. If you have a field that uses the Memo data type and you’ve set your field to use rich text (Section 2.3.2.1), then you can select some text inside your field, and change its formatting using the ribbon.
The fields in the datasheet are laid out from left to right, in the order you created them. Often, you’ll discover that this order isn’t the most efficient for data entry.
Imagine you’ve created a Customers table for a novelty pasta company. When a new customer registration ends up on your desk, you realize that the registration form starts with the name and address information, and then includes the customer’s pasta preferences. Unfortunately, the fields on the datasheet are laid out in a completely different order. From left to right, they’re arranged like this: ID, FreshPastaPreference, DriedPastaPreference, FirstName, LastName, Street, City, State, Country. (This organization isn’t as crazy as it seems—it actually makes it easier for the people filling pasta orders to quickly find the information they want.) Because of this ordering, you need to skip back and forth just to enter the information from a single registration.
Fortunately, you can solve this problem without redesigning the table. Drag the columns you want to move to new positions, as shown in Figure 3-2.
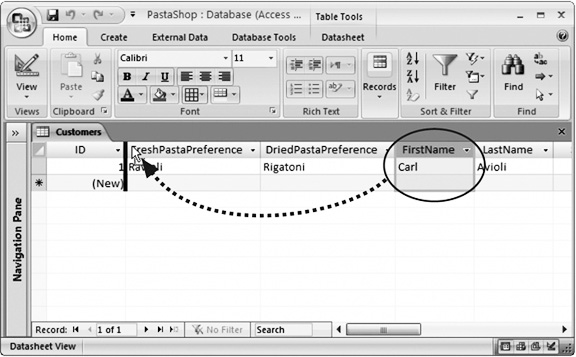
Figure 3-2. To move a column, click the column header once to select that column. Then, drag the column header to its new location. In this example, the FirstName field is about to be relocated that it’s just before the FreshPastaPreference field.
The best part of this approach is that you don’t need to modify the database’s actual structure. If you switch to Design view after moving a few columns, you’ll see that the field order hasn’t changed. In other words, you can keep the exact same physical order of fields (in your database file) but organize them differently in Datasheet view.
Tip
Rearranging columns is a relatively minor change. Don’t worry about shifting columns around to suit a specific editing job and then switching them back later on. Your changes don’t affect the data in the database. If you want to use a particular column order for a one-time job, simply refrain from saving your changes when you close the datasheet.
As you cram more and more information into a table, your datasheet becomes wider and wider. In many cases, you’ll be frustrated with some columns hogging more space than they need and others being impossibly narrow.
As you’d expect, Access lets you tweak column widths. But you probably haven’t realized how many different ways you can do it:
Resize a single column. Move the mouse to the column’s right edge. Drag to the left (to shrink the column) or to the right (to make it larger).
Resize a column to fit its content. Double-click the column edge. Access makes the column just wide enough to fit the field name or the largest value (whichever’s larger). However, it doesn’t make the column so wide that it stretches beyond the bounds of the window.
Resize several adjacent columns. Drag the first column’s header across the columns until you’ve selected them all. Then, drag the right edge of your selection to the left or the right. All the selected columns shrink or expand to fit the available space, sharing it equally.
Resize a column with pinpoint accuracy. Right-click the column header, and then choose Column Width. You’ll see the Column Width dialog that lets you set an exact width as a number (Figure 3-3).
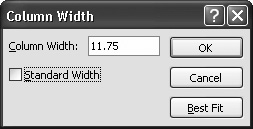
Figure 3-3. The Column Width dialog box lets you set an exact width as a number. (The number doesn’t actually have a concrete meaning—it’s supposed to be a width in characters, but because modern Access uses proportional fonts, different characters are different sizes.) You can also turn on the Standard Width checkbox to reset the width to the standard narrow size, or click Best Fit to expand the column to fit its content (just as when you double-click the edge of the column).
Note
Remember, a column doesn’t need to be wide enough to show all its data at once. You can scroll through a lengthy text field using the arrow keys, and if that’s too awkward, use the Shift+F2 shortcut to show the full contents of the current field in a Zoom box.
Just as you can resize columns, you can also resize rows. The difference is that Access makes sure all rows have the same size. So when you make one row taller or shorter, Access adjusts all the other rows to match.
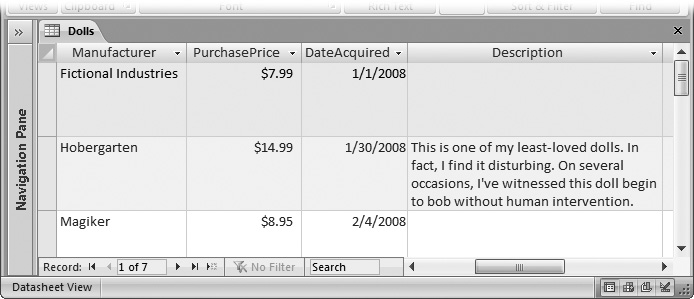
You’ll mainly want to shrink a row to cram more rows into view at once. You’ll want to enlarge a row mostly to show more than one line of text in each text field (see Figure 3-4).
Many tables contain so many columns that you can’t possibly fit them all into view at the same time. This quality’s one of the drawbacks to the datasheet, and often you have no choice but to scroll from side to side.
However, in some situations, you may not need to see all the fields at once. In this case, you can temporarily hide the columns that don’t interest you, thereby homing in on the important details without distraction. Initially, every field you add to a table is out in the open.
To hide a column, select the column by clicking the column header. (You can also select several adjacent columns by clicking the column header of the first, and then dragging the mouse across the rest.) Then, right-click your selection, and then choose Hide Columns. The column instantly vanishes from the datasheet. (This sudden disappearance can be a little traumatic for Access newbies.)
Fortunately, the field and all its data remain just out of sight. To pop the column back into view, right-click any column header and choose Unhide Columns. Access then shows the Unhide Columns dialog box (Figure 3-5).
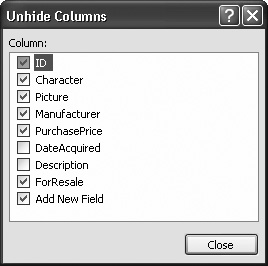
Figure 3-5. Using the Unhide Columns dialog box, you can choose to make hidden columns reappear, and (paradoxically) you can hide ones that are currently visible. Every column that has a checkmark next to it is visible—every column that doesn’t is hidden. As you change the visibility, Access updates the datasheet immediately. When you’re happy with the results, click Close to get back to the datasheet.
Note
At the bottom of the field list, you’ll see an entry named Add New Field. This “field” isn’t really a field—it’s the placeholder that appears just to the right of your last field in datasheet view, which you can use to add new fields (Section 2.2.1). If you’re in the habit of adding fields using Design view (Section 1.2.3), then you can hide this placeholder to free up some extra space.
If you add a new record while columns are hidden, you can’t supply a value for that field. The value starts out either empty or with the default value (if you’ve defined one for that field, as described in Section 4.1.2). If you’ve hidden a required field (Section 4.1.1), you receive an error message when you try to insert the record. All you can do is unhide the appropriate column, and then fill in the missing information.
Even with the ability to hide and resize columns, you’ll probably need to scroll from side to side in a typical datasheet. In this situation, you can easily lose your place. You might scroll to see more information in the Contacts table, but then forget exactly which person you’re looking at. Access has one more feature that can help you by making sure important information is always visible—frozen columns.
A frozen column remains fixed in place at the Access window’s left side at all times. Even as you scroll to the right, all your frozen columns remain visible (Figure 3-6). To freeze a column (or columns), select them, right-click the column header, and then choose Freeze Columns.
Tip
If you want to freeze several columns that aren’t next to each other, start by freezing the column that you want to appear at the very left. Then, repeat the process to freeze the column that you want to appear just to the right of the first column, and so on.
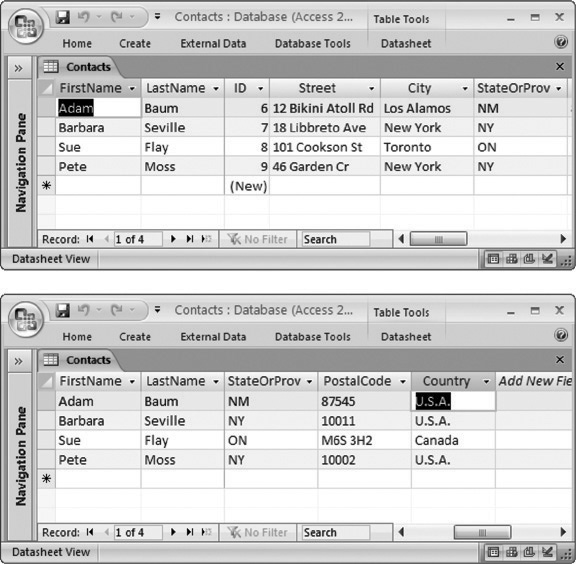
Figure 3-6. Top: In this example, the FirstName and LastName field are frozen. They appear initially at the left. (The ribbon’s collapsed in this figure to make more room, as described in Section 1.4.2.) Bottom: When you scroll to the side to see more information, the FirstName and LastName columns stay put.
Frozen columns must always be positioned at the left side of the datasheet. If you freeze a column that’s somewhere else, Access moves it to the left side and then freezes it. You can move it back after you unfreeze the column using the column reordering trick in Section 3.1.2. Keep in mind that while a column’s frozen, you can’t drag it to a different place.
To unfreeze columns, right-click a column header, and then choose Unfreeze All Columns.
Note
Eventually, you’ll discover that the customizations provided by the datasheet aren’t enough, or you’ll need to customize the same table different ways for different people. These signs tell you that you need to step up to forms, a more advanced data display option described in Part Four.
In Chapter 1, you learned the basics of moving around the datasheet. Using your mouse and a few select keystrokes, you can cover a lot of ground. (Refer back to Section 1.2.4.2 for a review of the different keys you can use to jump from place to place and perform edits.)
However, you haven’t seen a few tricks yet. One’s the timesaving record navigation buttons at the bottom of the datasheet (Figure 3-7).
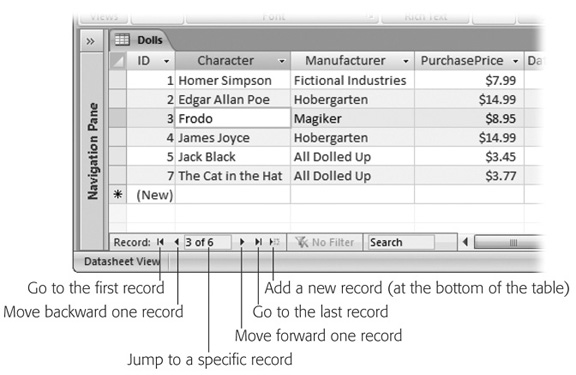
Figure 3-7. You could easily overlook the navigation buttons at the bottom of the datasheet. These buttons let you jump to the beginning and end of the table, or, more interestingly, head straight to a record at a specific position. To do this, type the record number (like “4”) into the box (where it says “3 of 6” in this example), and then hit Enter. Of course, this trick works only if you have an approximate idea of where in the list your record’s positioned.
Several more datasheet features help you orient yourself when dealing with large amounts of data, including sorting (which orders the records so you can see what you want), filtering (which cuts down the data display to include only the records you’re interested in), and searching (which digs specific records out of an avalanche of data). You’ll try all these features out in the following sections.
In some cases, you can most easily make sense of a lot of data by putting it in order. You can organize a customer list by last name, a product catalog by price, a list of wedding guests by age, and so on.
To sort your records, pick a column you want to use to order the records. Click the drop-down arrow at the right edge of the column header, and then choose one of the sort options at the top of the menu (see Figure 3-8).
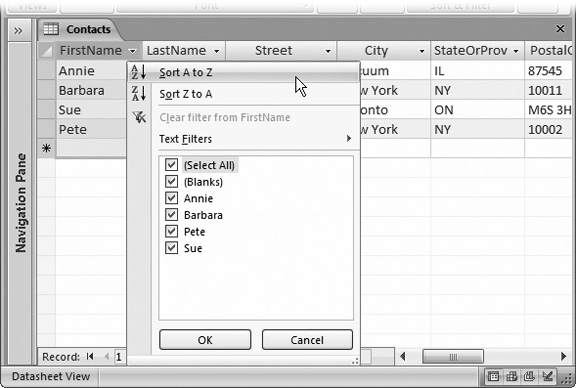
Figure 3-8. This text field gives you the choice of sorting alphabetically from the beginning of the alphabet (A to Z) or backward from the end (Z to A). The menu also provides filtering options, which are described in Section 3.2.2.
Depending on the data type of field, you’ll see different sorting options, as explained in Table 3-1. (You can also apply the same types of sort using the commands in the ribbon’s Home → Sort & Filter section.)
Table 3-1. Sorting Options for Different Data Types
|
Data Type |
Sort Options |
Description |
|---|---|---|
|
Text, Memo, and Hyperlink |
Sort A to Z Sort Z to A |
Performs an alphabetic sort (like the dictionary), ordering letter by letter. The sort isn’t case-sensitive, so it treats “baloney” and “Baloney” the same. |
|
Number, Currency, and AutoNumber |
Sort Smallest to Largest Sort Largest to Smallest |
Performs a numeric sort, putting smaller numbers at the top or bottom. |
|
Date/Time |
Sort Oldest to Newest Sort Newest to Oldest |
Performs a date sort, distinguishing between older dates (those that occur first) and more recent dates. |
|
Yes/No |
Sort Selected to Cleared Sort Cleared to Selected |
Separates the selected from the unselected values. |
In an unsorted table, records are ordered according to when they were created, so that the oldest records are at the top of the datasheet, and the newest at the bottom. Sorting doesn’t change how Access stores records, but it does change the way they’re displayed.
Tip
Use the Home → Sort & Filter → Clear All Sorts command to return your table to its original, unsorted order.
Sorting is a one-time affair. If you edit values in a sorted column, then Access doesn’t reapply the sort. Imagine you sort a list of people by FirstName. If you then edit the FirstName value for one of the records, changing “Frankie” to “Chen,” Access doesn’t relocate the row to the C section. Instead, the changed row remains in its original place until you resort the table. Similarly, any new records you add stay at the end of the table until the next sort (or the next time the table is opened). This behavior makes sense. If Access relocated rows whenever you made a change, you’d quickly become disoriented.
Note
The sorting order’s one of the details that Access stores in the database file. The next time you open the table in Datasheet view, Access automatically applies your sort settings.
If a sort finds two duplicate values, there’s no way to know what order they’ll have (relative to one another). If you sort a customer list with two “Van Hauser” entries in it, then you can guarantee that sorting by last name will bring them together, but you don’t know who’ll be on top.
If you want more say in how Access treats duplicates, then you can choose to sort based on more than one column. The traditional phone book, which sorts people by last name and then by first name, is a perfect example of this. People who share the same last name are thus grouped together and ordered according to their first name, like this:
	…
	Smith, Star
	Smith, Susan
	Smith, Sy
	Smith, Tanis
	…
In the datasheet, sorts are cumulative, which means you can sort based on several columns at the same time. The only trick’s getting the order right. The following steps take you through the process:
Choose Home → Sort & Filter → Clear All Sorts.
Access reverts your table to its original, unsorted order.
Use the drop-down column menu to apply the sub-sort that you want for duplicates.
If you want to perform the phone book sort (names are organized by last name, then first name), you need to turn on sorting for the FirstName field. Section 3.2 explains the sorting options you’ll see, depending on the data type.
Use the drop-down column menu to apply the first level sort.
In the phone book sort, this is the LastName field.
You can extend these steps to create sorts on more fields. Imagine you have a ridiculously large compendium of names that includes some people with the same last and first name. In this case, you could add a third sort—by middle initial. To apply this sort, you’d switch sorting on in this order: MiddleInitial, FirstName, Last-Name. You’ll get this result:
	…
	Smith, Star
	Smith, Susan K
	Smith, Susan P
	Smith, Sy
	…
In a table with hundreds or thousands of records, scrolling back and forth in the datasheet is about as relaxing as a pneumatic drill at 3:00 a.m. Sometimes, you don’t even need to see all the records at once—they’re just a finger-tiring distraction from the data you’re really interested in. In this case, you should cut the datasheet down to just the records that interest you, with filtering.
In order to filter records, you specify a condition that the record must meet in order to be included in the datasheet. For example, an online store might pick out food items from a full product catalog, a shipping company might look for orders made last week, and a dating service might hunt down bachelors who don’t live with their parents. When you apply a filter condition, you end up hiding all the records that don’t match your requirements. They’re still in the table—they’re just tucked neatly out of sight.
Access has several different ways to apply filters. In the following sections, you’ll start with the simplest, and then move on to the more advanced options.
A quick filter lets you choose what values you want to include and which ones you want to hide, based on the current contents of your table. To apply a quick filter, choose the column you want to use, and then click the drop-down arrow at the column header’s right edge. You’ll see a list of all the distinct values in that column. Initially, each value has a checkmark next to it. Clear the checkmark to hide records with that value. Figure 3-9 shows an example where a sort and filter are being used at the same time.
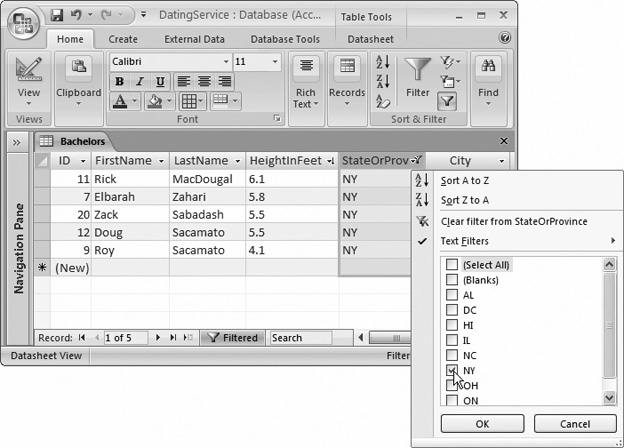
Figure 3-9. This list of eligible bachelors is sorted first by height (in descending largest-to-smallest order), and then filtered to include only those hopefuls who live in the state of New York. A checkmark indicates that records that have this value are included in the datasheet. Others are hidden from view.
Note
To remove all the filters on a column (and show every record in the datasheet), click the drop-down button at the right edge of the column header, and then choose “Clear filter.”
Not all data types support filtering. Data types that do include Number, Currency, AutoNumber, Text, Hyperlink, Date/Time, and Yes/No. Memo fields don’t support quick filters (because their values are typically too large to fit in the drop-down list), but they do support other types of filters.
You can apply quick filters to more than one column. The order in which you apply the filters doesn’t matter, as all filters are cumulative, which means you see only records that match all the filters you’ve set. You can even use quick filters in combination with the other filtering techniques described in the following sections. To remove your filters, choose Home → Sort & Filter → Remove Filter.
Tip
Quick filters work best if you have a relatively small number of distinct values. Limiting people based on the state they live in is a great choice, as is the political party they support or their favorite color. It wouldn’t work as well if you wanted to cut down the list based on birth date, height, or weight, because there’s a huge range of different possible values. (You don’t need to give up on filtering altogether—rather, you just need to use a different type of filter.)
Filter by selection lets you apply a filter based on any value in your table. This choice is handy if you’ve found exactly the type of record you want to include or exclude. Using filter by selection, you can turn the current value into a filter without hunting through the filter list.
Here’s how it works. First, find the value you want to use for filtering in the datasheet. Right-click the value, and then choose one of the filter options at the end of the menu (see Figure 3-10).
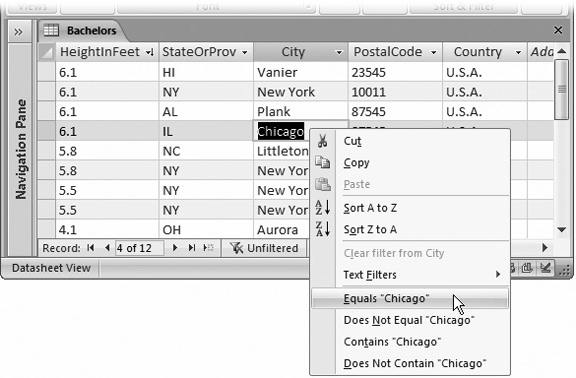
Figure 3-10. Depending on the data type, you see slightly different filtering options. For a text field (like the City field shown here), you have the option to include only the records that match the current value (Equals “Chicago”), or those that don’t (Does Not Equal “Chicago”). You also have some extra filtering options that go beyond what a quick filter can do—namely, you can include or exclude fields that simply contain the text “Chicago.” That filter condition applies to values like “Chicagoland” and “Little Chicago.”
All data types that support filtering allow you to filter out exact matches. But many also give you some additional filtering options in the right-click menu. Here’s what you’ll see for different data types:
Text-based data types. You can filter values that match exactly, or values that contain a piece of text.
Numeric data types. You can filter values that match exactly, or numbers that are smaller or larger than the current number.
Date data types. You can filter values that match exactly, or dates that are older or newer than the current date.
Finally, to get even fancier, you can create a filter condition using only part of a value. If you have the value “Great at darts” in the Description field in your table of hopeful bachelors, you can select the text “darts,” and then right-click just that text. Now you can find other fields that contain the word “darts.” This ability is what gives the filter “by selection” feature its name.
Access makes it easy to switch filtering on and off at a moment’s notice. Figure 3-11 shows how.

Figure 3-11. Right next to the navigation controls at the bottom of your datasheet is a Filtered/Unfiltered indicator that tells you when filtering’s applied. You can also use this box to quickly switch your filter on and off—clicking it once removes all filters, and clicking it again reapplies the most recent set of filters.
So far, the filters you use have taken the current values in your table as a starting point. But if you’re feeling confident with filters, you may be ready to try a more advanced approach: filtering by condition. When you use a filter by condition, you can define exactly the filter you want.
Imagine you want to find all the rare wine vintages in your cellar with a value of more than $85. Using the filter-by-selection approach, you need to start by finding a wine with a value of $85, which you can use to build your condition. But what if there isn’t any wine in your list that has a price of exactly $85, or what if you just can’t seem to find it? A quicker approach is defining the filter condition by hand.
Here’s how it works. First, click the drop-down arrow at the right edge of the column header. But instead of choosing one of the quick filter options, look for a submenu with filtering options. This menu’s named according to the data, so text fields include a Text Filters option, number fields have a Number Filters option, and so on. Figure 3-12 shows an example.
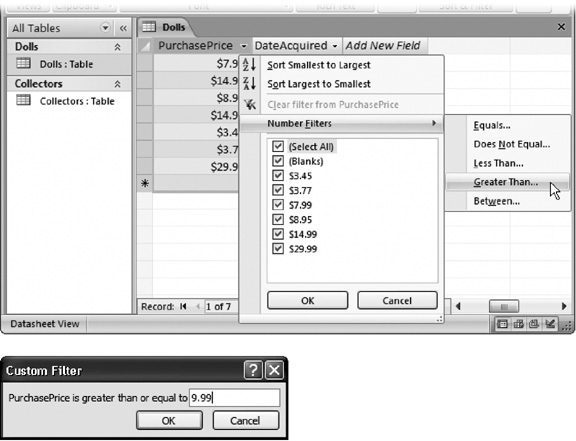
Figure 3-12. Top: With a numeric field like this PurchasePrice field, filtering by condition lets you look at values that fall above a certain minimum. Bottom: Once you’ve chosen the type of filter you want, you need to supply the information for that filter. If you choose Greater Than, then you need to supply the minimum number. Records that are equal to or larger than this value are shown in the datasheet.
Here’s a quick overview that describes the extra options you get using filter by condition, depending on your data type:
Text-based data types. All the same options as filter by selection, plus you can find values that start with specific text, or values that end with certain text.
Numeric data types. All the same options as filter by selection, plus you can find values that are in a range, meaning they’re greater than a set minimum but smaller than a set maximum.
Date data types. All the same options as filter by selection, plus you can find dates that fall in a range, and you can chose from a huge list of built-in options, like Yesterday, Last Week, Next Month, Year to Date, First Quarter, and so on.
Access also provides a quick search feature that lets you scan your datasheet for specific information. Whereas filtering helps you pull out a batch of important records, searching’s better if you need to find a single detail that’s lost in the mountains of data. And while filtering changes the datasheet view by hiding some records, searching leaves everything as is. It just takes you to the data you want to see.
The quickest way to search is through the search box next to the record navigation controls (see Figure 3-13). Just type in the text you want to find. As you type, the first match in the table is highlighted automatically. You can press Enter to search for subsequent matches.
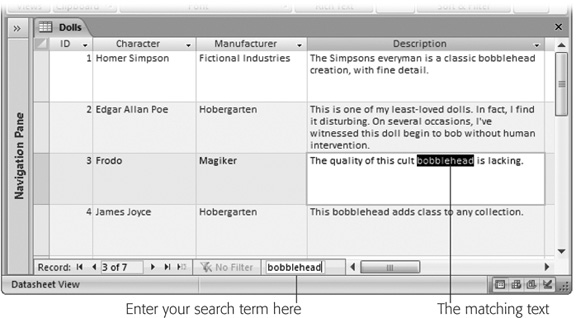
Figure 3-13. Here, a search is being performed for the word “bobblehead.” If you find a match, you can keep searching—just press Enter again to jump to the next match. In this example, pressing Enter sends Access to the next record’s Description field.
When performing a search, Access scans the table starting from the first field in the first record. It then goes left to right, examining every field in the current record. If it reaches the end without a match, then it continues to the next record and checks all of its values, and so on. When it reaches the end of the table, it stops.
If you want to change the way Access performs a search, you’ll need to use the Find feature instead:
Choose Home → Find → Find. (Or, just use the shortcut Ctrl+F.)
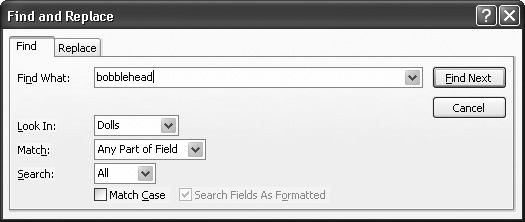
The Find and Replace dialog box appears (Figure 3-14).
Specify the text you’re searching for in the Find What box, and then set any other search options you want to use:
Find What. The text you’re looking for.
Look In. Allows you to choose between searching the entire table or just a single field.
Match. lets you specify whether values need to match exactly. Use Whole Field to require exact matches. Use Start of Field if you want to match beginnings (so “bowl” matches “bowling”), or Any Part of Field if you want to match text anywhere in a field (so “bowl” matches “League of extraordinary bowlers”).
Search. Sets the direction Access looks: Up, Down, or All (which loops from the end of the table to beginning, and keeps going until it has traversed the entire table).
Match Case. If selected, finds only matches that have identical capitalization. So “banana” doesn’t match “BANANA.”
Search Fields as Formatted. If selected, means Access searches the value as it appears on the datasheet. For example, the number 44 may appear in a Currency field as $44.00. If you search for 44, you always find what you’re looking for. But if you search for the formatted representation $44.00, you get a match only if you have Search Fields as Formatted switched on. In extremely large tables (with thousands of records), searches may be faster if you switch off Search Fields as Formatted.
Click Find Next.
Access starts searching from the current position. If you’re using the standard search direction (Down), Access moves from left to right in the current record, and then down from record to record until it finds a match.
When Access finds a match, it highlights the value. You can then click Find Next to look for the next match, or Cancel to stop searching.
In Chapter 1, you learned the essentials of editing, including how to add, delete, and modify records. However, Access has a few finer points that you haven’t seen yet. In the following sections, you’ll tackle two great conveniences in Access—the spell checker and AutoCorrect—and you’ll learn a simple way to insert special characters in your fields.
The spell checking functionality in Access is almost exactly the same as in other Office applications like Word—it uses the same dictionary, catches the same sorts of errors, and gives you the option to ignore things it doesn’t recognize, or add them to the dictionary.
The difference is that when you perform a spell check with Access, it examines only the content in text and memo fields. Numbers, dates, and everything else get a pass. Of course, many of your fields are likely to contain text you don’t want to spell check—like names, places, or product titles. You have two ways to handle this. You can perform a spell check on a single field, thereby ignoring everything else. Or, you can start a datasheet-wide spell check, but choose to ignore certain fields on the fly.
Here’s how it works:
Move to the field where you want to start the spell check.
If you want to check the entire datasheet from start to finish, then move to the first field in the first record.
If you want to check part of the datasheet, then move to the location where you want to start checking. Keep in mind that when Access reaches the end of your datasheet, it loops around and starts again at the top, continuing until it’s reviewed every field in every record. (Of course, you can cancel a spell check at any time.)
If you want to check just a single field, then select that field before continuing by clicking the column header.
Choose Home → Records → Spelling (or just press F7).
The Check Spelling button looks like a small checkmark with the letters ABC above it.
If you’re performing a datasheet-wide spell check, then Access examines the current record and moves through the fields from left to right. When it finishes, it moves to the next record and repeats the process. If you’ve selected a single column, then Access scans only the values in that field, from top to bottom.
When the spell check finishes, a dialog box informs you that all your data’s been checked. If your table passes the spell check, then this dialog box is the only feedback you receive. On the other hand, if Access discovers any potential spelling errors during its check, then it displays a Spelling window (as shown in Figure 3-15), showing the offending word and a list of suggestions.
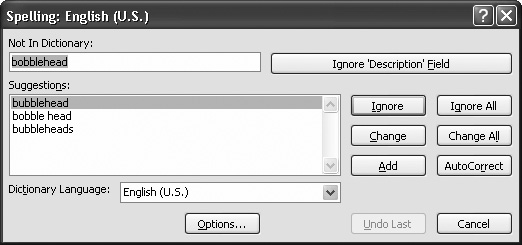
Figure 3-15. When Access encounters a word it thinks is misspelled, it highlights the word. Unlike Microsoft Word, Access doesn’t let you edit your file while the Spelling window’s active. You have to either click one of the options on the Spelling window—for example, clicking Change to replace the misspelled word with the first suggested spelling—or cancel the spell check.
The Spelling window offers a wide range of choices. If the spell checker’s complaining about a word that really is misspelled, you have three options:
Fix it once. Click one of the words in the list of suggestions, and then click Change to replace your text with the proper spelling. You can also double-click the word in the list of suggestions, which has the same effect.
Fix it everywhere. Click one of the words in the list of suggestions, and then click Change All to replace your text with the proper spelling. If Access finds the same mistake elsewhere in your datasheet during the spell check, then it automatically repeats the change, without bothering to alert you about the problem.
Fix it forever. Click one of the words in the list of suggestions, and then click AutoCorrect. Access makes the change for this field, and for any other similarly mistaken words. In addition, it adds the information for the change to the AutoCorrect list (described in Section 3.3.3). If you type the same unrecognized word into another record (or even another table), Access automatically corrects your entry. This option’s useful if you’ve discovered a mistake that you make frequently.
On the other hand, if the spell checker’s complaining about a word that you don’t want to change, you have a few more possibilities available, by clicking the following options:
Ignore skips this problem and keeps checking. If Access finds the same mystery word elsewhere in your spreadsheet, then it prompts you again for a correction.
Ignore All skips this problem and keeps checking. If Access finds the same mystery word elsewhere in your spreadsheet, then it ignores the word. You might use Ignore All to force Access to disregard something you don’t want to correct, like a person’s name.
Ignore Field ignores any errors in that field for the remainder of the spell check. This way’s handy to filter out fields that contain a lot of names, places, or titles, so you don’t waste your time reviewing bogus spell checker suggestions.
Add adds the word to the custom spell check dictionary. This step’s a great one to take if you plan to keep using the word in this datasheet and many more. (A company name makes a great addition to the custom dictionary.) Not only does Access ignore any occurrences of this word, but if it finds a similar but slightly different word in a field, it provides the custom word in its list of suggestions, letting you quickly clear up minor typos.
Cancel stops the operation altogether. You can then correct the field, and resume the spell check later.
Note
Every Office application on your computer shares the same custom dictionary. If you add a word in Access and then perform a spell check in Word, the same word’s allowed. This convenience is timesaving, as long as you don’t go overboard adding words that don’t really belong.
You can control how the spell checker works by setting a few straightforward options. To set these options (or just take a look at them), choose Office button → Access Options to show the Access Options window. Then, choose Proofing in the list on the left (Figure 3-16). You can also find the same page of options if you click the Spelling window’s Options button while a spell check’s underway.
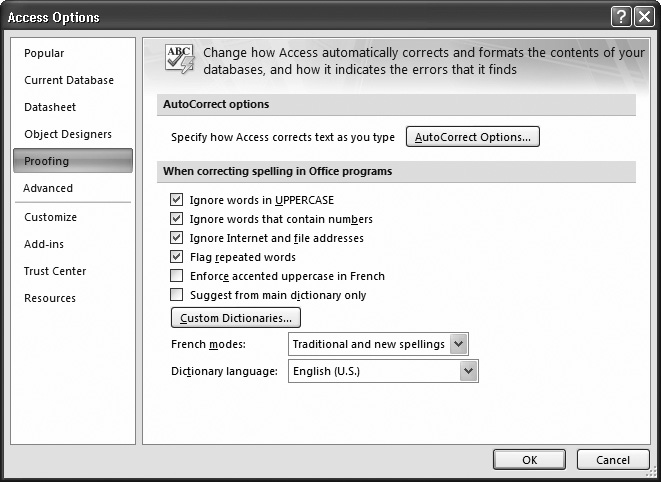
Figure 3-16. The spell checker options let you specify the language and a few other miscellaneous settings. All spell check settings are language-specific; the last box in the window indicates the language you’re currently using.
Here are the most common spelling options:
Ignore words in UPPERCASE. If you choose this option, then Access doesn’t bother to check any word in all capitals (which is helpful when your text contains lots of acronyms).
Ignore words that contain numbers. If you choose this option, then Access doesn’t check words that contain numeric characters, like Sales43 or H3ll0. If you don’t choose this option, Access checks these entries and flags them as errors, unless you’ve specifically added them to the custom dictionary.
Ignore Internet and file addresses. If you choose this option, then Access ignores words that appear to be file paths (like c:Documents and Settings) or Web site addresses (like http://FreeSweatSocks.com).
Flag repeated words. This search finds errors where you inadvertently repeat the same word twice, like like this this.
Enforce accented uppercase in French. Forces French words to take the accents they should have, even for capital letters (where they look a little weird). English speakers don’t need to worry about this setting.
Suggest from main dictionary only. If you choose this option, then the spell checker doesn’t use words in the custom dictionary as suggestions if it finds an unrecognized word. However, it still accepts a word that matches one of the entries in the custom dictionary.
You can also choose the file that Access uses to store custom words—the unrecognized words that you add to the dictionary while a spell check’s underway. To do so, click the Custom Dictionaries button, which shows the Custom Dictionaries dialog box (Figure 3-17).
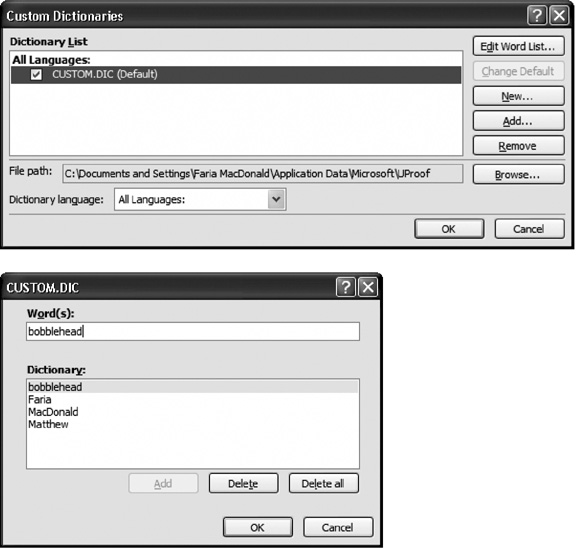
Figure 3-17. Top: Using the Custom Dictionaries dialog box, you can delete the current custom dictionary, add new ones, or edit the word list by hand. Bottom: If you click Edit Word List, then you see all the words in your custom.dic file. You can add new ones or remove entries that no longer apply.
Note
Custom dictionaries are stored in an account-specific section of your hard drive. For example, if you’re logged in under the user account Dan_Quayle, you’ll probably find the custom dictionary in the folder C:Documents and SettingsDan_QuayleApplication DataMicrosoftUProof. One side effect of this system’s that custom dictionaries aren’t shared between two people who use different accounts on the same computer (unless you manually add the other user’s dictionary in the Custom Dictionaries dialog box).
As you type text in a field, AutoCorrect cleans up behind you, correcting things like miscapitalized letters and common misspellings. AutoCorrect is such a subtle feature that you might not even realize it’s monitoring your every move. To get a taste of its magic, look for behaviors like these:
If you type HEllo, then AutoCorrect changes it to Hello.
If you type friday, then AutoCorrect changes it to Friday.
If you start a sentence with a lowercase letter, then AutoCorrect uppercases it.
If you scramble the letters of a common word (for example, typing thsi instead of this, or teh instead of the), then AutoCorrect replaces the word with the proper spelling.
If you accidentally hit Caps Lock, and then type jOHN sMITH when you really wanted to type John Smith, then Access not only fixes the mistake, it also switches off Caps Lock.
For the most part, AutoCorrect’s harmless and even occasionally useful, as it can spare you from delivering minor typos in a major report. But if you need to type irregularly capitalized words, or if you have a garden-variety desire to rebel against standard English, you can turn off some or all of the AutoCorrect actions.
To set AutoCorrect options, choose Office button → Access Options to show the Access Options window. Then, choose Proofing in the list on the left. In the page of settings on the right side, click the “AutoCorrection settings” button.
Most of the settings are self-explanatory, and you can turn them off by unchecking them. Figure 3-18 explains the “Replace text as you type” option, which is not just for errors.

Figure 3-18. Under “Replace text as you type” is a long list of symbols and commonly misspelled words (the column on the left) that Access automatically replaces with something else (the column on the right). But what if you want the copyright symbol to appear as a C in parentheses? You can remove individual corrections (select one, and then click Delete), or you can change the replacement text. And you can add your own rules. You may want to be able to type “PESDS” and have Access insert “Patented Electronic Seltzer Delivery System”. Simply type in the “Replace” and “With” text as shown here, and then click Add.
Tip
For really advanced AutoCorrect settings, you can use the Exceptions button to define cases where Access doesn’t use AutoCorrect. When you click this button, the AutoCorrect Exceptions dialog box appears with a list of exceptions. This list includes abbreviations that include the period but shouldn’t be capitalized (like pp.) and words where mixed capitalization’s allowed (like WordPerfect).
Text content isn’t just about letters, numbers, and punctuation. You also have special symbols that you can’t type directly on your keyboard. One example’s the copyright symbol (©), which you can insert into a field by entering the text (C), and letting AutoCorrect do its work. Other symbols, like the Greek theta (θ), aren’t as readily available. To use a symbol like this, you’ll need the help of the Character Map utility.
The Character Map is an often-overlooked tool that lets you see all the characters that a font provides. It’s great for digging out the odd accented é and other non-English characters.
Note
Other Office applications, like Word and Excel, provide far more special characters for you to use. They support all sorts of fonts, including the nifty Wingdings font that’s included with Windows and packed with icons. However, Access has a more rigorous way or working. It accepts only plain-vanilla characters that are supported in any font. Databases store unformatted information, and, as a consequence, text fields don’t include font and formatting details. The only exception’s the seldom-used rich text feature for memo fields (Section 2.3.2.1).
Here’s how you can use the Character Map to add a special character:
Click the Windows Start button, and then choose Run.
The Character Map utility’s a part of Windows, not Access. As a result, you need to launch it outside of Access.
In the Run dialog box, type charmap, and then click OK.
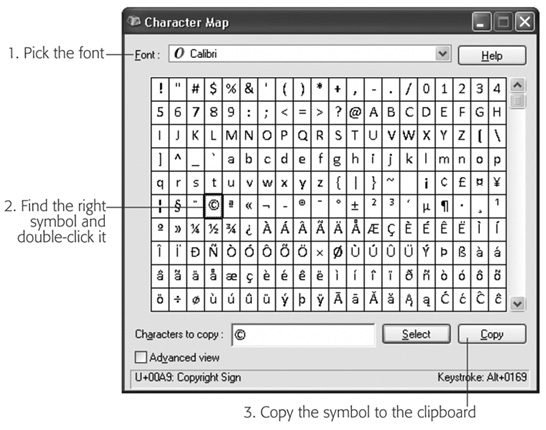
The Character Map window appears (Figure 3-19).
In the Font list, select the Calibri font.
There’s no point using an exotic font, because Access doesn’t support it. However, you can find the supported special characters using any common font, including Arial, Times, and Tahoma. Calibri’s the standard font that Access uses to display information in the datasheet, unless you’ve customized it (as described in Section 3.1.2).
Scroll through the list of characters until you find the one you want.
If you need a letter character from another language, look hard—you’ll almost certainly find it. If you want something a little more exotic but can’t find it, you’re probably out of luck. You’ll need to use ordinary text instead.
Double-click the character.
It appears in the “Characters to copy” box at the bottom of the Character Map window. You can repeat steps 4 and 5 as many times as you need to copy several characters in a row.
Click Copy.
Windows copies the symbols in "Characters to copy” to the clipboard.
Switch back to the Access window.
If you aren’t in the right field—the place where you want to insert the copied text—move there now. If you want to place the symbol between existing characters, then make sure you move the cursor to the right place inside the field.
Press Ctrl+V to paste the symbol.
If you want to study your data at the dinner table (and aren’t concerned about potential conflicts with non-Access-lovers), nothing beats a hard copy of your data. You can dash off a quick printout by choosing File → Print from the menu while your datasheet’s visible. However, the results you get will probably disappoint you, particularly if you have a large table.
The key problem’s that Access isn’t bothered about tables that are too wide to fit on a printed page. It deals with them by splitting the printout into separate pages. If you have a large table and you print it out using the standard Access settings, you could easily end up with a printout that’s four pages wide and three pages long. Assembling this jigsaw is not for the faint of heart. To get a better printout, it’s absolutely crucial that you preview your table before you print it, as described in the next section.
The print preview feature in Access gives you the chance to tweak your margins, paper orientation, and so on, before you send your table to the printer. This way, you can make sure the final printout’s genuinely usable. To preview a table, open it (or select it in the navigation pane), and then choose Office button →Print →Print Preview.
The print preview shows a picture of what your data will look like once it’s committed to paper. Unlike the datasheet view, the print preview paginates your data (Figure 3-20). You see exactly what fits on each page and how many pages your printout requires (and what content shows up on each page).

Figure 3-20. This table’s too wide to fit on one sheet of paper, so some of the columns are relocated to a second page.
If you decide you’re happy with what you see, then you can fire off your printout by choosing Print Preview → Print → Print from the ribbon. This opens the familiar Windows Print dialog box, where you can pick a printer and seal the deal.
When you’re finished looking at the print preview window, choose Print Preview → Close Preview → Close Print Preview, or click one of the view buttons at the Access window’s bottom-right corner to switch to Datasheet view or Design view.
You can’t change anything in the print preview window. However, you can browse through the pages of your virtual printout and see if it meets your approval.
Here’s how you can get around in the preview window:
Use the scroll buttons to move from one page to another. These buttons look the same as the scroll buttons in the datasheet, but they move from page to page, not record to record.
To move from page to page, you can use the scroll bar at the side of the window or the Page Up and Page Down keys.
To jump in for a closer look, click anywhere on the preview page (you’ll notice that the mouse pointer has become a magnifying glass). This click magnifies the sheet to 100 percent zoom, so you can more clearly see the text and details. To switch back to full-page view, click the page or click the mouse pointer again.
To zoom more precisely, use the zoom slider that’s in the status bar’s bottom-right corner. Slide it to the left to reduce your zoom (and see more at once), or slide it to the right to increase your zoom (and focus on a smaller portion of your page).
To see two pages at once, choose Print Preview → Zoom → Two Pages. To see more, choose Print Preview → Zoom → More Pages, and then pick the number of pages you want to see at once from the list.
Access provides a small set of page layout options that you can tweak using the ribbon’s Print Preview → Page Layout section in the print preview window. Here are your options:
Size. Lets you use different paper sizes. If you’re fed up with tables that don’t fit, you might want to invest in some larger stock (like legal-sized paper).
Portrait and Landscape. Let you choose how the page is oriented. Access, like all Office programs, assumes you want to print out text using standard portrait orientation. In portrait orientation, pages are turned upright so that the long edge is along the side and the short edge is along the top. It makes perfect sense for résumés and memos, but it’s pure madness for a wide table, because it guarantees at least some columns will be rudely chopped off and relocated to different pages. Landscape orientation makes more sense in this case, because it turns the page on its side, fitting fewer rows per page but many more columns.
Margins. Lets you choose the breathing space between your table and the edges of the page. Margins is a drop-down button, and when you click it, you see a menu with several common margin choices (Normal, Narrow, and Wide). If none of those fit the bill, then click the Page Setup button, which opens a Page Setup dialog box where you can set the exact width of the margin on each side of the page.
Based on the limited page layout options, you might assume that there’s not much you can do customize a printout. However, you actually have more control than you realize. Many of the formatting options that you’ve learned about in this chapter also have an effect on your printout. By applying the right formatting, you can create a better printout.
Here are some pro printing tips that explain how different formatting choices influence your printouts:
Font. Printouts use your datasheet font and font size. Scale this down, and you can fit more in less space.
Column order and column hiding. Reorder your columns before printing out to suit what you want to see on the page. Even better, use column hiding (Section 3.1.4) to conceal fields that aren’t important.
Column widths and row height. Access uses the exact widths and heights that you’ve set on your datasheet. Squeeze some columns down to fit more, and expand rows if you have fields with large amounts of text and you want them to wrap over multiple lines.
Frozen columns. If a table’s too wide to fit on your printout, then the frozen column is printed on each part. For example, if you freeze the FirstName field, you’ll see it on every separate page, so you don’t need to line the pages up to find up who’s who.
Sort options. They help you breeze through data in a datasheet—and they can do the same for a printout. Apply them before printing.
Filter options. These are the unsung heroes of Access printing. Use them to get just the important rows. That way, your printout has exactly what you need.
The only challenge you face when using these settings is the fact that you can’t set them from the print preview window. Instead, you have to set them in the datasheet, jump to the print preview window to see the result, jump back to the datasheet to change them a little bit more, jump back to the print preview window, and so on. This process can quickly get tiring.
Tip
Don’t spend too much time tweaking the formatting options to create the perfect printout. If you have a large table that just can’t fit gracefully into a page, you probably want to use reports, which are described in Part Three. They provide much more formatting muscle, including the ability to split fields over several lines, separate records with borders, and allow large values to take up more space by gently bumping other information out of the way.