The secret to a long and happy relationship with Access is learning how to make it work the way you want.
As you’ve already seen, true Access fanatics don’t use the ordinary datasheet to enter information. Instead, they create their own customized data entry forms. Similarly, Access fans don’t print their data using basic yawn-inspiring tables. Instead, they create richly formatted reports that are just right for presenting their data. And Access pros definitely don’t struggle through the same tedious series of steps to accomplish a common task—instead, they create macros that make Access do the work for them.
A macro is a miniature program that you create and store in your database. Macros can range from the exceedingly simple (like a command that shows a form) to the mind-bendingly complex (like a conditional macro that checks how much raw meat you have in stock, and automatically prints out an order in triplicate if your fridge is empty).
In this chapter, you’ll learn how to create basic macros. Then, you’ll learn how to make them smarter. By the end of the chapter, you’ll be able to put together macros that can fire themselves up when needed, perform an entire sequence of steps, and even make decisions. You’ll also be ready to head on to the next chapter, where you’ll step up to full-fledged Visual Basic programming.
Although you may not realize it, you’ve already used macros. In Chapter 14, you created buttons that could perform useful tasks, like opening another form or navigating to a specific record. To create these actions, you used the Command Button wizard, which asks a few simple questions, and then generates a made-to-measure macro.
Although the Command Button wizard’s easy to use, it’s not all that flexible. Now, you’re ready to get more power by building your own macros.
In the following example, you’ll start slow, with a simple macro that opens a table, and then heads straight to the last row. Here’s how to create it:
Choose Create → Other → Macro.
A new window appears for you to create your macro. Unofficially, this window’s known as the macro builder.
Every macro’s made up or a sequence of one or more steps, or actions. To create a macro, you supply this list of actions, putting each one in a separate row (see Figure 15-1). Initially, this list’s empty, and your macro doesn’t do anything at all.
Choose the first action.
Access has a predefined list of actions you can use to cook up a macro. When you add an action, you simply choose it from this list, as shown in Figure 15-2. For this example, begin by choosing the OpenTable action.
Figure 15-1. This macro consists of two actions. The first action opens a table, and the second goes to a specific record. When you run the macro, Access starts at the top of the list and moves down, performing each action in sequence.
Figure 15-2. Click the drop-down arrow (circled) to see all the actions you can use, in alphabetical order. Once you pick an action, a concise but helpful description appears in the window’s bottom-right corner.
Note
Right now, you’re working with only the actions that Access considers safe for all databases. A little later (in Section 15.2), you’ll consider how you can use a few actions that Access considers risky business.
Choose the arguments for your macro at the bottom of the Macro tab, in the Action Arguments section (see Figure 15-3).
Most actions need some information from you in order to carry out their business. An OpenTable action doesn’t have much meaning unless you tell Access exactly what table you want it to open. These extra bits of information are called arguments.
Figure 15-3. When you select an action in the list, all the arguments appear at the bottom of the window. As this example shows, the OpenTable action has three arguments (Table Name, View, and Data Mode). Every time you click one of these boxes, a brief description of the argument appears in the box on the right. For quick reference, your argument values also appear in a comma-separated list in the Arguments column next to your action.
The OpenTable action actually has three arguments:
Table Name is the table you want to open. You can choose it from a drop-down list of tables. For this example, you can use any table that isn’t empty.
View lets you pick the view mode that’s used. You can choose ordinary Datasheet view to enter information, Design view to change the table structure, Print Preview to get ready to print the data, or PivotTable and PivotChart to work with a pivot table summary (as described in Section 9.3). For this example, choose Datasheet view. (Of course, once the table’s open, you can still switch to a different view by right-clicking the tab title, or using the View button on the ribbon.)
Data Mode determines what type of changes are allowed. You can use the standard option, Edit, to allow all changes, Read Only to allow none, or Add to allow only record insertions. In this example, choose Read Only.
Optionally, type some extra information in the Comment column to help you remember what this action does.
Don’t use the Comment column to explain the obvious (as in “Opens the Products table”). Instead, use it to explain the significance of a step in a more complex operation. Right now, you don’t need comments, but later on, when you create macro groups and use conditions, you’ll see how they become useful.
Move to the next row, and then repeat steps 2 to 4 to add another action.
You can add a practically unlimited number of actions to a macro. (For Access trivia buffs, macros top out at 999 actions.) Each action takes a separate row, and Access runs your actions in order, from top to bottom.
To complete this example, add a GoToRecord action. This action moves through the table you just opened to get to the record you want.
Using arguments, you’ll need to point out the correct object (set the Object Type to Table, and the Object Name to whatever table you picked in step 3). Then, you can use the Record and Offset arguments to specify exactly where you want to end up. Using the Record argument, you can choose to head to the previous row (Previous), the next row (Next), the new row placeholder at the bottom of the table (New), a specific row (Go To), the first row (First), or—as in this example—the last row (Last). If you choose Go To, then you can use the Offset argument to point out a specific position—like setting it to 5 to jump to the fifth record.
Note
Some macro actions depend on previous macro actions. GoToRecord is a prime example—it assumes you opened a table, form, or query that has the record you want to see. If you use GoToRecord without having a suitable object open, you get an error message when you run the macro.
And just for fun, why not add one more macro action? Try the MsgBox action, which displays a message of your choosing in a small Message box window. You set the message in the Message argument. Try something like “Your first macro just finished doing its job.” You can also add an optional title (using the Title argument), warning beep (by setting the Beep argument to Yes), and predefined icon (using the Type argument).
Press Ctrl+S to save your macro, and then provide a macro name.
You could name the macro in this example ShowTheLastProduct. If you don’t save the macro explicitly, then Access politely asks you to when you close the macro window, or when you run your macro for the first time.
Macros appear in the navigation pane. If you’re grouping objects by type, you’ll see that macros get their own type. If you’re using the Tables and Related Views grouping, Access adds macros to an extra group at the bottom named Unrelated Objects.


Now that your macro’s finished, you’re ready to try it out. Access gives you four ways to run a macro:
You can run it directly. Just find the macro you want in the navigation pane, and then double-click it. (This method works only if the macro isn’t already open.) Or, if the macro’s open, choose Macro Tools | Design → Tools → Run.
Tip
If you’ve filtered the navigation pane (Section 14.1) so that macros don’t appear, you can still run your macros. Just select Database Tools → Macro → Run Macro. You’ll then get the chance to pick your macro out of a list.
You can trigger it using a keystroke. You can, for instance, set up a macro that opens your end-of-month financial report whenever you hit Ctrl+F. You’ll learn how in Section 15.4.2.
You can run it automatically when the database is first opened. You could create a macro that always starts you out by running your favorite query and showing you the results. You’ll try this out in Section 15.4.3.
You can attach it to a form. You could set your macro to spring into action automatically when a button’s clicked or new data’s entered. This way’s the most common way to use macros, and the way the Command Builder wizard works. You’ll explore this technique in Section 15.5.
In this chapter, you’ll get a chance to try out all these techniques. But right now, keep to the simplest option, and run the macro you created in the previous section using the Macro Tools | Design → Tools → Run command. Figure 15-4 shows the result.

Not all macros run without a hitch. If you’ve made a mistake—maybe your macro tries to open an object that doesn’t exist, or use an argument that doesn’t make sense—you get a detailed error message, as shown in Figure 15-5.

Figure 15-5. This error message occurs if you use the OpenTable action without filling in a value for the required Table Name argument.
Although macro error messages are quite descriptive, they don’t always give you enough information to pinpoint the problem. For example, the error message shown in Figure 15-5 has more than one possible cause—it could result from a failed OpenTable action (as it does in this example), or a TransferText or TransferSpreadsheet action. And even if you know it’s OpenTable that’s to blame, that information won’t help you if you call OpenTable more than once in the same macro.
To diagnose problems, you can use debugging—a programming technique that lets you put your macro under the microscope and see exactly what’s happening. The type of debugging that Access gives you with macros is called single-step debugging, because it lets you test your macro one action at a time. That way, you know exactly when the error occurs.
To use single-step debugging, follow these steps:
Open your macro in Design view.
All new macros begin in Design view. If you want to test a macro you created earlier, find it in the navigation pane, right-click it, and then choose Design View.
Choose Macro Tools | Design → Tools → Single Step.
Single Step’s a toggle button, which means it appears highlighted when it’s selected. After you click Single Step, it should be highlighted. (If not, single-step debugging was already switched on, and you just turned it off. Click Single Step again to switch it back on.)
Choose Macro Tools | Design → Tools → Run.
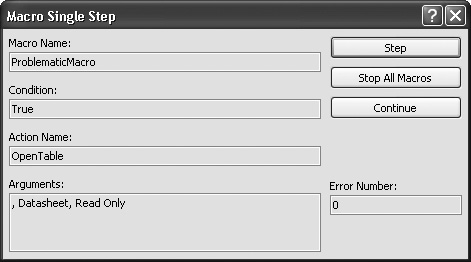
Your macro begins to run. But now there’s a difference. Before each action, Access shows you the relevant information in the Macro Single Step window. Figure 15-6 shows you how it works.
Click Step, Continue, or Stop All Macros, depending on what you want to do next.
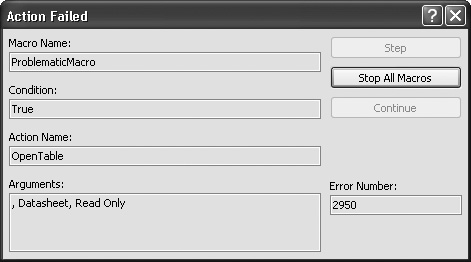
Step performs the action. If the action completes successfully, then Access pauses the macro again, and then shows you the Macro Single Step window with information about the next action. That’s why this process is called single-stepping—it lets you perform a single step at a time. If you click Step and the action fails, then you see the error information, as shown in Figure 15-7.
Figure 15-7. When an error occurs, you can’t go any further. The Macro Single Step window shows the Access error number for your problem (which is useful if you need to search for help in Microsoft’s online knowledge base), but it doesn’t let you keep going. You must click Stop All Macros, fix the problem, and then try again.
Continue switches off single-step mode and runs the rest of the macro without interruption. If an error occurs, it fails with an error message, just like before.
Stop All Macros stops the macro before it performs any more actions. The all in Stop All Macros indicates that if there’s more than one macro running at once, then Access aborts them all. You could create a macro that calls another macro. If you stop processing during this sequence of events, then both macros give up.
In recent years, the people at Microsoft have become paranoid about security. They’ve clamped down in Office programs like Access in a bid to lock out evil virus writers. And although these changes make Access a safer place to be, they also make it a bit inconvenient to use certain types of macros.
Access distinguishes between two types of macros: those that are always harmless, no matter how they’re used, and those that have the potential for abuse. The OpenTable macro’s harmless. It could open a table you don’t want to see, but it can’t cause any real mischief. On the other hand, the PrintOut macro isn’t as innocent. In the wrong hands, it could send 400 copies of your data to the printer in 80-point font. Similarly, DeleteObject could wreak real havoc in your database, and RunApp definitely isn’t safe—it could launch the latest spy ware or install a computer virus.
When you create a macro, the drop-down list of actions shows only actions that are 100 percent harmless. These actions are known as safe actions. Of course, there are valid reasons to use potentially unsafe macros. Maybe you really do want to print out a report, delete an object, or run another program. In that case, you need to use potentially unsafe macro actions—ones that Access doesn’t trust quite so readily.
Note
As long as you’re the one in control of your database, you know it doesn’t contain devious code and other trickery. There’s no good reason to stay away from potentially unsafe macro actions. However, if someone’s just sent you a database in an email message, or if you’ve downloaded a database from the Web, you may not be so sure. For that reason, Access automatically disables the unsafe macros in a database, unless you tell it otherwise. You’ll learn more about how this works in Section 15.2.2.
To see the full list of macro actions, including those that Access considers unsafe, create a new macro (or open an existing one), and then choose Macro Tools | Design → Show/Hide → Show All Actions. Now the drop-down list of actions includes several more possibilities. When you choose an unsafe action while building a macro, Access lets you know with a warning icon (Figure 15-8).

You’ve learned the difference between safe and unsafe macro actions, but you haven’t considered what Access does when it comes face to face with a risky action. Previous versions of Access pop up a stream of warning messages. Access 2007 handles the challenge on its own, by quietly disabling the unsafe macros whenever you open a database file.
As you’ve no doubt noticed by now, when you open a database, Access shows a security message, as shown in Figure 15-9. This message warns you that Access has switched off any potentially risky parts of your database.
Note
The message bar can be hidden. If you think Access has disabled some macros, but you don’t see the message bar, then choose Database Tools → Show/Hide → Message Bar.

Figure 15-9. The message bar gives you an ominous alert. To switch the unsafe macros back on in this database, click Options and then, in the window that appears (shown in Figure 15-10), select “Enable this content”. The permission you’re granting lasts only as long as the database is open, so you’ll need to click Enable Content every time you open the database. You could also click the “Open the Trust Center” link (shown in Figure 15-10) to adjust the security settings for a more permanent solution.
All this fuss about safe and unsafe macros might seem a little unnecessary, considering you can enable all your macros and get back to normal with a quick click of the Enable Content button. However, life isn’t always that easy. Here’s why:
Although you may not be bothered by a few unnecessary warning messages, other people won’t be as trusting. They’ll see the security warning and think twice, which means they won’t be able to use all your database’s features. Or they might not understand the question, or realize they need to click Enable Content.
In corporate environments, the system administrator can configure Access so it doesn’t show the security warning at all. Your macros are quietly disabled, and the person using the database won’t understand why certain features don’t work.
Clicking Enable Content for the one thousandth time gets annoying. Really.

Figure 15-10. When you click Options (as shown in Figure 15-9), Access explains the problem with this slightly intimidating Message box. Choose “Enable this content”, and then click OK, and you’re good to go.
So what if you don’t want to face the message bar every time you open a database? Access gives you three options to make it easier to work with databases that contain unsafe macros:
You can lower the Access security settings so that unsafe macros are allowed. This approach isn’t recommended, because it allows any code in your database. If you accidentally open a database that contains troublemaking code, you have no protection.
You can tell Access to trust the database files in certain folders on your computer (or on other computers). This way’s the most convenient way to go.
You can tell Access to trust databases that have been created by a trusted publisher . This option’s the most secure, but in order to set it up, you need to pay another company to get a security certificate. For that reason, only big companies with money to burn use this option.
All these actions take place in the same window: the Trust Center (Figure 15-11). To get to it, in the Microsoft Office Security Options dialog box (Figure 15-10), click the “Open the Trust Center” link. Or, use the following more roundabout approach:
Choose Office button → Access Options.
In the Access Options window, select Trust Center.
Click the Trust Center Settings button.

Figure 15-11. The Macro Settings section lets you decide how Access reacts to unsafe macros. You can choose to enable or disable unsafe macros, and you can choose whether or not Access should notify you when it disables something.
There are six sections in the Trust Center:
Trusted Publishers lets you tell Access to trust databases that are digitally signed by certain people. In order to use this feature, your company needs to buy a digital certificate from a company like VeriSign (http://www.verisign.com). Then, when you open a signed database, Access contacts the company that issued the certificate, and checks that it’s valid. If it is, everything’s kosher, the database is trusted, and all unsafe macros are allowed. Digital certificates are outside the scope of this book.
Note
If you dig around long enough, you’ll discover that Microsoft has a tool (named makecert.exe) for generating your own digital certificates. However, this tool’s for testing purposes only, as the certificates it generates doesn’t work on anyone else’s computer. Beware—some Access books and Web sites may lead you astray.
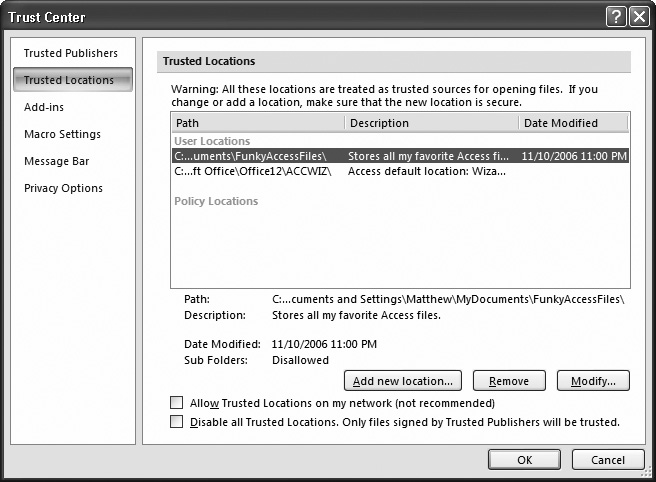
Trusted Locations lets you pick out the places on your hard drive where you store your databases. That way, Access knows to trust your database files, but not anyone else’s. You’ll learn how to set up a trusted location in the following section.
Add-ins lets you adjust whether Access add-ins (mini programs that extend the features in Access) should be supported even if they weren’t created by a supported publisher. Ordinarily, all add-ins are allowed. (After all, if you don’t trust a specific add-in, don’t install it!) People use this setting only in corporate environments where they need to lock down Access severely to prevent any chance of a problem.
Macro Settings lets you configure how Access deals with macros. You can make it more rigorous (so that no macros are allowed, unless they’re from a trusted publisher), or less (so that all macros are allowed, no matter what they might do). By far the best choice is to leave this option at the standard setting: “Disable all macros with notification.”
Message Bar lets you set whether Access shows the message bar when it blocks unsafe macros in an untrusted database.
Privacy Options lets you tweak a few options that aren’t related to macros at all. You can choose whether Access checks the Web for updated Help content, and whether it sends troubleshooting information to Microsoft when a problem occurs (so that Microsoft can spot bugs and learn how to improve Access in the future). If you’re paranoid about Internet spies, then you may want to disable some of these options. Most of the time, these settings are only for conspiracy theorists.
Wouldn’t it be nice to have a way to distinguish between your databases, which contain perfectly harmless code, and other databases? Access 2007 adds a new feature to make this easy. It lets you designate a specific folder on your hard drive as a trusted location. If you open a database in this location, then Access automatically trust it and allows unsafe macros.
Note
Of course, it’s still up to you to make sure that you don’t put potentially dangerous databases in the trusted location. If you do, then you won’t have any protection when you open it. However, this compromise is reasonable, because most Access fans are already in the habit of putting their databases in a separate folder.
Here’s how you can set up a new trusted location:
If you’re not there already, follow the steps in Section 15.2.3.
Choose the Trusted Locations section.
You see a window that lists all the trusted locations (Figure 15-12). Initially, you just see one trusted location: the ACCWIZ folder that Access uses to store its wizard.
Make sure the “Disable all Trusted Locations” options isn’t set.
If it is, you need to switch it off before you can use the trusted locations feature.
If you want to trust a folder on your company or home network, then choose “Allow trusted locations on my network”.
This setting’s a bit riskier, because a network location’s out of your control. A hacker could sneak a virus-laden database into that location without your noticing. However, if you’re reasonably certain that the network’s secure (and the other people who use the folder aren’t likely to download databases from the Web and place them there), you don’t need to worry.
Click “Add new location”.
Access asks you to fill in a few pieces of information (Figure 15-13).
Click OK to add the location to the list.
You can configure the location or remove it at any time by selecting it in the list, and then using the clear-as-a-bell Remove and Modify buttons.

So far, you’ve created a basic macro, tried it out, and thought deeply about macro security. It’s about time you got a payoff for all your work, and considered a few practical ways to use macros.
The full list of macro actions contains many actions that aren’t that interesting, or relate only to specific project types (like Access projects that front SQL Server databases, which you’ll consider in Chapter 18). The following sections highlight a few of the more useful macro commands. You can check them out in the downloadable content for this chapter, or try the shake-and-bake recipes in your own database.
The FindRecord action works just like the Datasheet Find feature you saw in Section 3.2.3. You fill in all the search information using arguments.
Let’s say you want to search the Diet field in the AnimalTypes table, looking for the word “hay.” Here are the actions you may use:
OpenForm to open the form that you’ll use to display the matching the record (in this case, AnimalTypes). You can substitute OpenTable to search using a datasheet.
GoToControl to move to the field you want to search (in this case, Diet). If you’re planning to perform a search that spans every field, then you can skip this step.
FindRecord to find the text. It’s up to you whether you want to start searching at the first record or the current one, as in this example. You can also choose whether you’ll search for the text anywhere inside the field, or require the whole field value to match the search text exactly.
Once you put together the complete macro, you’ll get something like this:
Table 15-1.
|
Action |
Important Arguments[1] |
Description |
|---|---|---|
|
1. OpenForm |
Form Name: AnimalTypes |
Opens the form. If it’s already open, then this switches to the existing window. |
|
2. GoToControl |
Control Name: Diet |
Jumps to the Diet field. |
|
3. FindRecord |
Find What: =“hay” Match: Any Part of Field Only Current Field: Yes Find First: No |
Finds the specified text anywhere in the Diet field, starting at the current record. |
[1] You can use the default values for all the other arguments. | ||
Note
You may have noticed that the Find What argument of the FindRecord action starts with an equal sign. It accepts an expression (Section 7.1). In this example, the expression’s nothing more than a fixed piece of text, which is wrapped in quotation marks. However, you could substitute a more complex expression that uses operators, functions, and other advanced techniques.
The neat thing about this macro is that you can use it several times in a row to look for more occurrences of the text. If the AnimalTypes form’s already open, then this macro just carries on to the next match.
Tip
For even more flexibility, you could create a macro that uses only the FindRecord action. That way, you could search for specific text in any field in any form or table. Of course, if you try to run such a macro and you don’t have any forms or tables open, FindRecord can’t do anything, and you get an error.
Do you need a helpful macro that automatically spits out a frequently used report? Access gives you several options. Here are two:
If you want to use the standard print settings, then you can print any report by using the OpenReport action, and setting the View argument to Print.
If you want to customize the print quality, number of copies, and starting and stopping page, you need to use a three-step approach. Start with Open Report, use PrintOut to send it off, and then wind up with Close to tidy up.
The following sequence of actions demonstrates the second approach. This macro prints two copies of a list of so-called customers who haven’t actually ordered a single thing, using the CheapskateCustomers report:
Table 15-2.
|
Action |
Important Arguments[2] |
Description |
|---|---|---|
|
1. OpenReport |
Report Name: Cheapskate-Customers |
Opens the report (but as you’ll see, it’s only around for a couple of seconds). |
|
2. PrintOut |
Copies: 2 |
You can use other arguments to print just a range of pages or change the quality. However, you can’t pick the printer. |
|
3. Close |
Object Type: Report Object Name: Cheapskate-Customers |
There’s no need to keep this report open, now that the printout’s sent off. |
[2] You can use the default values for all the other arguments. | ||
As soon as Access performs the PrintOut action, the pages start streaming out of the default printer on your computer. You don’t get a chance to confirm or cancel the operation. For even more fun, you can extend this macro with more steps so it prints several reports at once.
Tip
There’s one more option. You can open a table or a report with the View Argument set to Print Preview. This option doesn’t actually send the data to your printer, but it gets you one step closer. This option’s best if you want a final chance to choose a printer, make sure the data’s correct, and check that the report isn’t ridiculously long. It also works in untrusted databases.
One of the hidden gems of the Access macro language is SendObject—an all-purpose action for sending email messages.
SendObject is surprisingly versatile. You can use it in three ways:
To email a database object to another person. The database object’s converted to another format you choose, like an Excel spreadsheet, an HTML Web page, or even a print-read PDF file (if you’ve installed the free Save As PDF add-in, as described in Section 10.2.3). You specify the object you want to send, using the Object Type and Object Name arguments.
To email the current database object. This way gives you an infinitely flexible macro that can send off whatever data you’re currently looking at. The only limitation’s that you need to know what type of object you’re planning to send, whether it’s a full table, a query that highlights important information, or a report with grouping and subtotals. Just set the Object Type argument accordingly, and leave Object Name blank.
To send an ordinary email message. To send a message, you simply leave both the Object Type and Object Name arguments blank. You can fill in the message using the Message Text property. This method’s a handy way to let someone know when you’ve added some new data, or finished a hefty editing job.
Note
SendObject can send only a single database object at a time. If you want to send several database objects, you need to use SendObject several times. To send three reports, you need three email messages, with three attached files. In some cases, you may be able to get around this requirement by creating a clever query that fuses together all the information you want to send into one set of results. (For example, see union queries in Section 6.2.3.2.)
The nicest thing about SendObject is that you can use it in an untrusted database, provided you follow one rule: Set the Edit Message argument to Yes. That way, when the macro runs, you get a final chance to review the message, change any text, and cancel it if you’re unhappy. But if you set Edit Message to No, then the SendObject action fires the message off without giving you a chance to step in. That behavior’s considered risky, so Access doesn’t allow it in an untrusted database.
The following macro converts two queries with sales information into Excel spreadsheets. It then mails them off to the head honchos.
Table 15-3.
|
Action |
Important Arguments[3] |
Description |
|---|---|---|
|
1. SendObject |
Object Type: Query Object Name: MonthlySales-Totals Output Format: Excel Work-book (.xlsx) Subject: Monthly Update Message Text: Here are the most recent sales figures, straight from our macro-fied Access database. You’ll get the customer totals in a separate email. Edit Message: Yes |
Sends an email message to [email protected], with the data from the MonthlySalesTotals query converted to an Excel workbook. The message subject and message text are set by the Subject and Message Text arguments. You have a chance to tweak them before the message is sent. Figure 15-14 shows this action. |
|
2. SendObject |
Object Type: Query Object Name: CustomerSales-Totals Output Format: Excel Workbook (.xlsx) Subject: Monthly Update Message Text: Here are the totals by customer. Edit Message: Yes | |
|
Sends an email message to [email protected], with the data from the CustomerSalesTotals query. | ||
[3] You can use the default values for all the other arguments. | ||

Figure 15-14. When the Edit Message property’s set to Yes, you get a final chance to review (and change) the message before it’s sent.
If you’re crafty, you can mail huge numbers of people at once. The most straightforward option’s to supply a whole list of addresses for the To, Cc, or Bcc argument, separating each one with a semicolon (;). For an even better approach, use a mailing list. This technique may vary depending on your mail software, but in Outlook and Outlook Express, it’s easy—just put the name of the mailing list in the To field. If you’ve created a mailing list named FairweatherFriends, then just type the word FairweatherFriends for the To argument.
As you build more and more snazzy macros, you’ll need some way to keep them all organized, and make sure the macros you need are at your fingertips when you need them. Access gives you a few tools to help, including macro groups, which combine related macros into one object for easier storage, and macro shortcut keys, which let you trigger the right macro exactly when you need it.
The average macro’s only three to five actions long. However, the average database that uses macros quickly accumulates dozens of them. Managing these tiny programs can become quite a headache, especially when you need to remember what each macro does.
You could use a macro group. On the surface, a macro group looks like one macro, because it’s stored in a single database object. However, a macro group can contain a nearly unlimited number of individual macros, each with its own name. Once you put related macros together in a single group, you’ll have an easier time finding the macro you need when it’s time to edit it.
Tip
Access masters use macro groups to group together macros that you use on the same form, macros that work with the same table, or macros that perform a similar type of task (like printing or record editing).
To create a macro group, you simply create a macro that uses the Macro Name column. Ordinarily, the Macro Name column’s hidden because all actions are part of the same macro. But when creating a macro group, you must select Macro Tools | Design → Show/Hide → Macro Names to pop it into view.
Now here’s the trick. Each time you start a new macro, you fill in the name for that macro in the Macro Name column. This way, it’s possible to stack one macro on top of another, so long as you remember to keep changing the name. You can even use blank rows to help keep them separate and make the macro group easier to read and understand. The best way to understand it is to check out the sample group in Figure 15-15.

Figure 15-15. This macro group combines three macros by listing all their actions, one after another. Each time a new macro starts, the name appears in the Macro Name column. Notice that blank space and comments abound. Access ignores these details.
Tip
It’s easiest to use macro groups with short macros (macros that don’t have too many actions). When you need to edit your macros, you can use the ribbon’s handy Insert Rows command to make more space.
Every macro in a macro group has a two-part name. The first part’s the macro group, and the second part’s whatever text you put in the Macro Name column. The PrintCheapskates macro in the BasicMacros group that’s shown in Figure 15-15 has the full name BasicMacros.PrintCheapSkates. You need to use the full name when you want to run the macro.
One limitation to macro groups is that you can’t use them from the navigation pane. If you right-click a macro group in the navigation pane, and then choose Run, Access runs only the first macro in the group. To run a different macro, you need to choose Database Tools → Macro → Run Macro. You can then type in the right two-part name or pick it from a list (as shown in Figure 15-16).
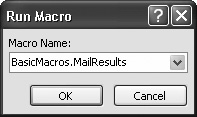
Figure 15-16. In this example, Access is poised to run the MailResults macro from the BasicMacros group.
Note
If this sounds like too much work, don’t worry. Most macros aren’t launched through the navigation pane, but linked to a form, in which case the two-part name doesn’t require any extra work. But if you have a macro that you do want to run from the navigation pane, grouped macros obviously aren’t the way to go.
Occasionally, you’ll create a macro that’s just so handy you want it at your fingertips at all times. You can make this happen by assigning your macro to a key combination. Then, instead of heading to the navigation pane, you hit something like Ctrl+M, and your macro springs into action right away.
Tip
Keys are valuable. Only assign a macro to a key combination if you know that you’ll use that macro often, and with many different forms or tables.
Oddly enough, the way you assign key combinations in Access is by creating another macro. This macro must be named AutoKeys, and its sole purpose in life is to assign keystrokes to other macros.
So how does AutoKeys work? It’s all in the name. When you add a macro to the AutoKeys group, you give it a specially coded name that’s really a keystroke combination. If you name the macro ^M, Access knows to trigger it when you press Ctrl+M on the keyboard. Figure 15-17 shows a few macro examples.
Note
In Figure 15-17, notice that each macro in the group runs a separately stored macro object using the RunMacro action. This design isn’t necessary (you could code each macro right inside the AutoKeys group by including all the necessary actions), but it improves organization. It also gives you better flexibility, because you can choose to use a different set of macros with the same key combinations without removing the macro from the AutoKeys group.

Figure 15-17. In this example, the AutoKeys macro group includes three macros, which are mapped to the keys Ctrl+Shift+M, Ctrl+Shift+P, and Ctrl+Shift+T, respectively.
The only trick to using the AutoKeys macro group is knowing how to name your macro so Access uses the key combination you want. Access lets you use letters and numbers, in combination with the Ctrl and Shift keys. (The Alt key is off-limits, because it lets you choose commands on the ribbon, as described in Section 3.2.1.) Additionally, you can use the function keys (F1 through F12), and the Insert and Delete keys, also in conjunction with Ctrl and Shift.
Here’s how you name your macros:
^ means Ctrl. So ^M means Ctrl+M.
+ means Shift. So ^+M means Ctrl+Shift+M.
{F1}means the F1 key. So +{F1} means Shift+F1. You can use all the other function keys in the same way.
{INS}means Insert and{DEL}means Delete. So ^{INS} is Ctrl+Insert.
Tip
Before you assign a macro to a key combination, you should check that the keystroke doesn’t already do anything useful. Your macro overrides any built-in Access commands. One example’s Ctrl+S, which saves the current object. To help reduce the chance of keystroke collisions, you can use keystrokes that involve the Shift key, which are less commonly used.
Every once in a while, you’ll create a macro that’s so important you want to call it into action as soon as you open a database. Perhaps this macro opens a few important forms and reports, imports data from another file, or runs a clean-up query. No matter what the reason, Access makes it easy to launch a startup macro. All you need to do is name your macro AutoExec.
Access also gives you a way to sidestep the AutoExec macro. If you hold down the Shift key while a database is first loading, then Access doesn’t run the AutoExec macro (and it doesn’t show any startup form you may have configured, as described in Section 14.2.2). However, don’t rely on this dodge, because it’s all too easy to forget to hold Shift down at the right time.
Tip
Remember, if your macro contains unsafe actions and your database isn’t trusted, Access doesn’t run it. If you open an untrusted database, and choose to turn on the database using the message bar (as described in Section 15.2.2), Access reloads the database, at which point it runs the AutoExec macro.
The slickest macros work with the forms in your database. Using this combination, you can create macros that fire automatically when something happens (like when a button’s clicked or a record’s changed). You can also build much more flexible macros that don’t have fixed argument values—instead, they can read the data they need from the text boxes on a form.
In the following sections, you’ll learn how to help macros and forms come together.
So far, you’ve been running macros the hard way: by finding the ones you want in the navigation pane, and then launching them by hand. But in a well-oiled database, macros seldom play an upfront role. Instead, they hide behind the scenes until they’re sparked into action. You could create a macro that’s triggered when you click a button, open a form, or make a change in a text box. These triggers are known as events.
A form has three types of events:
Control events. These events are the most useful. They happen when you do something with a control. For example, when you click a button, it fires an On Click event. (This is a great time to perform just about any action.) When you change a value in a text box, you get an On Change event. (This is a good time to check that the text makes sense using your crafty validation code.) You’ll notice that most event names start with the word “On”.
Section events. As you learned earlier, forms are divided into sections so you can separate the header and footer content from the rest of the record. Each section has a few of its own events, which fire when you move the mouse around (On Mouse Move), or click somewhere on a blank space (On Click). These events tend to be less useful for macro programmers.
Form events. A long list of more general events relate to the form. This list includes events that fire when the form’s first opened (On Open) and when it’s closed (On Close), when you move from one record to the next (On Current), and when you complete a data operation like an update (After Update).
To see the list of events for a form’s different parts, follow these steps:
Open your form in design mode.
If the Property Sheet isn’t visible, then show it by choosing Form Tools | Design → Tools → Property Sheet.
Select the item that has the events you want to examine.
You can select an individual control, a section, or a form. If you have trouble clicking on the design surface to select the item you want, then just choose it by name from the drop-down list at the top of the Property Sheet.
In the Property Sheet, choose the Event tab.
Now you’ll see the list of events that are provided by the control, as shown in Figure 15-18.

Figure 15-18. Here are the events for a typical text box. When you click one of the Event boxes, a one-line description of the event appears in the Status bar at the window’s bottom-left section. As you can see, right now all the Event boxes are empty, which means there aren’t any attached macros.
The biggest challenge in using events is figuring out which ones to employ. If you take a few seconds exploring the events on your form, you’ll find dozens of events, many that are rarely used or ridiculously specialized. That’s where Table 15-1 fits in—it highlights some of the most useful events for macro programming.
Table 15-4. Useful Events for Macro Programming
Note
The update, insert, and delete confirmation events (the last two rows in the table) also apply to any editable control. A text box also uses the Before Update and After Update events to indicate when its value has changed. In Chapter 17 (Section 17.1.3), you’ll see an example that uses this event to react immediately when a specific field’s changed (rather than wait until the entire record’s updated).
If you browse the Property Sheet’s Event tab, then you’ll find many more events, including ones that let you react when someone presses a key, clicks somewhere with the mouse, or moves from one control to the next. You don’t need to worry about all these options right now. Once you’ve learned how to respond to an event with a macro, you’ll be able to deal with just about any event.
Now that you’ve seen the events that forms and controls offer, it’s time to try hooking up a macro. The basic sequence of steps is easy:
Create and save a macro, as described in Section 15.1.1 .
Open your form in design mode, and make sure the Property Sheet’s visible.
Select a control, a section, or the entire form.
In the Property Sheet, choose the Events tab, and then find the event you want to use.
In the Event box, click the drop-down arrow, and then choose the macro you want to use.
Figure 15-19 shows an example.
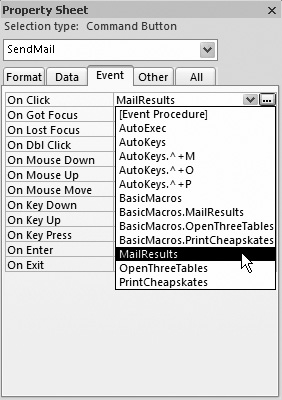
Figure 15-19. In this example, the On Click event of a button’s being connected to the MailResults macro you saw in Section 15.3.3. Now, whenever you click the button, the MailResults macro runs.
Earlier in this chapter, you saw macros that could search for records, print reports, and email data. In all of these cases, the macro arguments were fixed values—in other words, you type them in exactly, and they never change. in Section 15.3.1 you saw a macro that searched for the text “hay.” Convenient as this macro is, you can’t reuse it to search for anything else. If you want to dig up different text, then you need to create a whole new macro.
To make more flexible macros, you can use an expression instead of a fixed value. You’ve already used expressions extensively in the past (see Section 7.1 for examples with queries, 345 with reports, and 410 with forms), so you won’t have any problem building basic expressions that combine text, add numbers, and use Access functions. But when you’re creating a macro, the most useful expressions are those that can pull a value out of a form. All you need to know is the control’s name.
To see how this process works, you can revise the filtering example shown earlier and create a search form like the one shown in Figure 15-20.
To create this example, you need to start by adding the text box you need for searching. Here’s how:
Open the form in design mode.
Select Form Tools | Design → Controls → Text Box, and then draw the text box onto the form.
Once it’s there, select it, and then, in the Property Sheet, choose the Other tab.
At the top of the Other tab, change the Name property to something more descriptive, like SearchText.
Note
You don’t always have to create a new control. Macros can read the value in any control on your form, including those that are linked to the database record. However, in this example, you need a way to supply some text that isn’t part of a record, so it makes sense to add another text box for that purpose.

Figure 15-20. Instead of searching for the word “hay,” this example finds any text you want. The trick? You supply the search text in a text box at the top of the form.
Next, it’s time to build the macro. You no longer need the OpenForm action (which you used in the original macro), because you can assume that Access will launch this macro from the already open AnimalTypes form. So the first action you need is GoToControl, with the Control Name argument set to Diet.
The second action’s FindRecord. However, instead of setting the Find What argument to a fixed piece of text (=”hay“), you point it to the SearchText control using the control name (=SearchText). If there are any spaces or special characters in the control name, make sure you wrap the name in square brackets (=[SearchText]).
Note
If you’re referring to a field or control on the current form, all you need to do is use the field or control name. However, sometimes you may want to refer to a control on another form. In this case, you need a wacky-looking syntax that indicates the form name and the control name. If you want to refer to a control named SearchText on a form named SearchForm, you’d write =Forms!SearchForm!SearchText.
Once you’ve polished off the macro, the last step’s adding a button to the Animal-Types form to trigger it. Here’s how:
Select Form Tools | Design → Controls → Button, and then draw the button onto the form.
Hit the Esc key to cancel the Button wizard.
In the Property Sheet, choose the Events tab.
Click the drop-down arrow next to the On Click event, and then, from the list, choose the macro you’ve just created.
Now choose the Format tab, and, in the Caption field, enter the word Search. This descriptive text appears on the button.
This step completes the example. To try it out, switch to Form view, type some-thing in the SearchText text box, and then click the Search button. You’ll skip ahead to the next matching record.
Not only can you read form values, you can also change them. The trick’s a macro action called SetValue. SetValue is a remarkably powerful action, because it can change any property of a control. You can use it to change the text in a control, hide it, change its formatting, and so on. (For more about different control properties you may want to use, see Chapter 13.) The only catch is that Access considers SetValue to be an unsafe action, so it doesn’t let you perform it in an untrusted database (Section 15.2.2).
SetValue has only two arguments. The first argument, Item, identifies what you want to change. You can modify a form, section, field, or control. The second argument, Expression, sets the new value. You can use a fixed value, or you can read the value you want from another control using an expression.
If you want to create a macro that clears the search text from the SearchText text box, then you could add a SetValue action, and set the Item property to SearchText and the Expression property to “” (which represents a bit of text with nothing in it).
Note
This example assumes you’re using SetValue on the current form (for example, by pressing a button named Clear). If you’re running the macro from the navigation pane, you’ll need to change SearchText to the full name Forms!AnimalTypes!SearchText so it clearly tells Access which form you’re using.
If you like SetValue, then you may be interested in the related SetProperty action. The SetProperty action changes one of a control’s properties. (You choose what property you want to change with the Property argument.) You can use SetProperty to change a control’s color, position, or captioning. However, the most common way to use SetProperty is to modify the Enabled property (to lock down controls that shouldn’t be editable) or the Visible property (to hide controls that aren’t relevant). You can set both properties to True or False.
SetProperty’s nicest quality’s that Access always considers it a safe action. The only drawback’s that Access doesn’t let set the Text property of a control, because then you could use it to modify a table.
The macros you’ve seen so far are linear. They run all their actions from start to finish. If that seems a little boring, well, it is. But your macros don’t need to stay that way. You can give let them make decisions and perform conditional actions. As a bonus, you can easily set them up.
In order to create a conditional macro, you need to use the Condition column. Ordinarily, this column isn’t shown. To make it visible while you’re using the macro builder, choose Macro Tools | Design → Show/Hide → Conditions.
Unsurprisingly, the Condition column’s the place you put conditions. A condition’s a little like an expression, except it always produces one of two results: True or False. Access examines the condition, and uses it to decide whether or not to perform the corresponding action. (This is known as evaluating the condition in programmer-speak.)
Here’s how it works:
If you leave the Conditions column blank (as with the actions in an ordinary macro), Access always runs that action, unless it’s derailed by an error.
If you supply a condition, and the condition turns out to be True, Access runs the corresponding action.
If you supply a condition, and the condition turns out to be False, Access skips over the action and continues with the next one in the list.
Presto—you have a way to make an action run only sometimes, when you need it.
This discussion raises one excellent question—namely, how do you build a condition? The simplest types of conditions compare two different values. Here’s an example:
[ProductName] = "Baloney"
This condition compares the current value of the ProductName control with the word Baloney. If ProductName currently contains that text (and only that text), this condition’s True. If ProductName contains anything else, the condition’s False.
Tip
Sometimes you wind up with exactly the opposite of the condition you want. In a pinch, you can always reverse a condition by putting the word Not at the beginning. Not [ProductName]="Baloney" is True only if the current item isn’t everyone’s favorite meat product.
The equal sign (=) is one of the staples of conditional logic, but it’s not your only option. You can also use the greater than (>) and less than (<) symbols, and the “not equal to” (<>) operator. (You learned to use these operators with validation expressions in Section 4.3.2.2.) Here’s an expression that checks if a numeric field’s above a certain value:
[Price] > 49.99
For even more fun, you can throw your favorite Access functions into the mix. (Chapter 4 and Chapter 7 describe plenty of useful functions.) Here’s a condition that checks the length of a field, and then evaluates to True if the field’s less than three characters:
Len([FirstName]) < 3
Instead of using the operators you’ve seen so far to create your own conditions, you can use a function that gives you a True or False result. Programming nerds call a result that can be True, False, and nothing in between a Boolean value, after the British uber-mathematician George Boole.
Access has quite a few functions that return Boolean values, but the all-star most valuable one out of the bunch is named IsNull(). As you learned earlier (see Section 4.1.2), null fields are fields that don’t have any information in them. IsNull( ) checks if a given field or control’s empty. Here’s how you can use it to pick up a missing last name:
IsNull([LastName])
This condition evaluates to True if there’s no value in the current LastName field.
This technique’s a basic building block of validation logic (as you’ll see in the next section). You use IsNull( ) to spot missing information, and then warn the person using your macro that they’ve left out something important.
Finally, the last trick you may want to try with conditions is combining more than one to make still more powerful super-conditions. You have two keywords that can help you join conditions: And and Or.
And enforces two conditions at once, making your condition that much more stringent. The following condition evaluates to True only if both the FirstName and the LastName fields are shorter than three characters apiece:
Len([FirstName]) < 3 And Len([LastName]) < 3
Or gives you two alternate ways to satisfy a condition. The following condition evaluates to True if the FirstName or the LastName field’s empty. It evaluates to False only if both fields have text in them.
IsNull([FirstName]) Or IsNull([LastName])
With all these building blocks—conditional operators, functions, and the NOT, AND, and OR keywords—you can build conditions galore. In the next section, you’ll see an example that puts conditions to work.
Many Access gurus use macros to prevent bad edits and other suspicious data operations (like insertions and deletions). Now that you understand how to write conditions, you can easily create this sort of validation logic.
Note
As you learned in Chapter 4, Access has several tools that can help safeguard the data in your table, including input masks, validation rules, and lookups. You should always try to use these features before you resort to macro code. However, there are many types of errors that require macro logic. One common example is when the validity of one field depends on the value in another field.
The first step’s to react to the right events—mainly, the Before Insert, Before Update, and Before Del Confirm events of a form. When these events occur, you can perform your conditional logic to check for error conditions. If you see something you don’t like, then use the CancelEvent action to stop the process altogether (and thus cancel the insert, update, or delete operation).
Note
CancelEvent doesn’t use any arguments—it simply halts the process currently underway. CancelEvent works with any event that starts with the word “Before,” which indicates the actual operation’s just about to take place, but hasn’t happened yet.
Suppose you want to create a simple condition that stops certain record updates. Consider the form shown in Figure 15-21.

Figure 15-21. When you turn on the “Please notify me about special offers” checkbox, the WantsEmail field’s set to Yes. However, this record has a glitch—there’s no value in the Email field.
In this example, a missing email causes severe headaches. You could solve the problem by changing EmailAddress into a required field (Section 4.1.1), but what you really want is something a little more sophisticated. When WantsEmail is Yes, the EmailAddress field shouldn’t be empty. A conditional macro can implement exactly this sort of logic.
Here’s the condition you need:
WantsEmail = Yes And IsNull([EmailAddress])
This condition evaluates to True if WantsEmail is Yes and the EmailAddress is blank. When that happens, it’s time to cancel the update using the CancelEvent action.
Note
There’s another option. You could use the SetValue action to fix up invalid values. But it’s usually better to let the person who’s making the update try to fix the problem.
When you cancel an event, it doesn’t roll back the process altogether. Instead, it stops you from finishing the operation. If you modify a record, and then try to move to another record, the Before Update event fires. If a macro cancels the Before Update event, then Access doesn’t let you move on—instead, you’re locked in place. However, the current record stays in edit mode, with all the same edited values. It’s up to you to fix the problem or hit Esc to cancel the update attempt altogether.
The conditional CancelEvent action’s the heart of many validation macros. However, you still need one more finishing touch: an error message. Otherwise, the person who’s making the update or insert won’t have any idea what’s wrong. They’re likely to think that Access has gone completely off its rocker.
To show the error message, you can use the MsgBox action. Obviously, you want to show the error message only if the error’s actually occurred, so both the CancelEvent and the MsgBox actions need to be conditional.
Access has a fantastic shortcut to help you out when you need to use the same action twice. Rather than repeating the same condition next to each action (which is a bit messy), just put three dots (…) in the Condition column for each subsequent action. These three dots are a shorthand that tells Access to use the condition from the previous action.
Figure 15-22 shows the completed macro, and Figure 15-23 shows the macro in action.
As conditional macros get longer and more complex, they can become a little awkward to manage. You may have several conditions on the go at once, each requiring separate actions. If some conditions are true, then you may want to skip other conditions entirely. Or, you may want to stop running the macro.
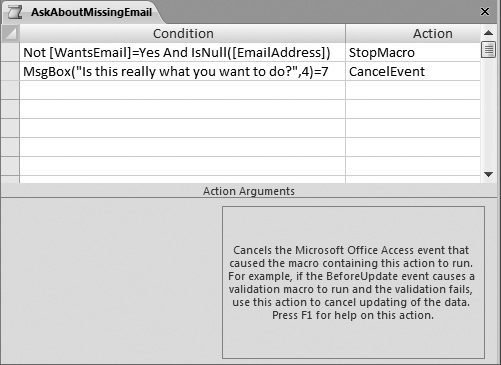
To see a typical example of the challenges you’ll face, it’s worth revisiting the StopMissingEmail macro you saw in the previous section. But this time, you’ll add a new wrinkle. Instead of canceling the update or insert, your macro will ask for confirmation that this really and truly is what you want to do, as shown in Figure 15-24.

Figure 15-22. This macro consists of two conditional actions. To lock out bad data, attach this macro to both the BeforeUpdate and the BeforeInsert event.


Figure 15-24. Now it’s up to you to decide whether to apply this apparently contradictory update: signing up for email updates, but not providing an email address. (Maybe you really do want regular emails, but you need to come back later to add the right email address.)
Creating a confirmation message is easy enough. You can do it all with this oddlooking condition:
MsgBox("Is this really what you want to do?", 4) = 7
The condition’s first part uses the MsgBox( ) function to show a Message box. The number 4 tells Access to that the Message box should include a Yes button and a No button. The MsgBox( ) function returns a result of 6 if you click Yes, and 7 if you click No, so this condition’s True only if you click No to cancel the change.
Note
You could easily confuse the MsgBox( ) function with the MsgBox macro action. The two are closely related. However, it’s the MsgBox( ) function that makes this example work, because you can trigger it from inside a condition. If you want to learn more about the MsgBox function (like what other options it provides for showing different buttons), click the Access Help button, and then search for “MsgBox function.”
To sum up, you need a macro that checks for invalid data and, if it exists, shows a confirmation Message box. Conceptually, this macro isn’t too tricky. But if you try to build the macro you need, you’ll find that there’s no good way to combine the conditions. You can check for invalid input easily enough, but how do you make sure the second condition (the Message box) is shown only if the first condition was met?
The best way to solve problems like these is to use the StopMacro and RunMacro actions. StopMacro ends the current macro, which makes it a handy way to skip out of a macro if you know the following actions don’t apply. RunMacro launches another macro, which makes it a good way to run a separate task when a specific condition’s met.
Using StopMacro, you can complete the AskAboutMissingEmail macro. Here’s what you need to do:
Use a condition to check if the data’s valid. If it is, you don’t need to take any more steps, so run the StopMacro action.
If the macro’s still running, there’s a missing email address. The next action uses the confirmation message as a condition. If No’s clicked, run CancelEvent to stop the edit.
Figure 15-25 shows the complete macro.