In Chapter 18, you considered how you to share your prize database with other people. For some, this is Access paradise. Teams of people can collaborate, businesses can take care of day-to-day workflow, and everyone works happily ever after. But for others, database sharing is a big-time headache, because Access just can’t keep up with everyone who wants to make changes at the same time.
In this chapter, you’ll learn another approach, which lets you break through the limits of Access and share your databases with much larger groups of people who can use it much more intensively. To do so, you’ll plug Access into SQL Server, Microsoft’s hard-core, server-side database. (Flip back to Section 3.1.2 for a refresher on the difference between client-side databases and server-side databases.)
This combination gives you the best of both worlds. You get to use a supremely reliable database engine (that’s SQL Server), without giving up the friendly user interface that makes it easy to get things done (that’s Access). Best of all, you can start using a version of SQL Server without shelling out a single cent.
As you learned in Section 18.1.1, there’s no absolute rule that decides who can use Access’s built-in sharing feature successfully and who can’t. You find extremes—a Fortune 500 company with thousands of workers probably can’t use Access sharing, while a five-person interior design team won’t face any problems—but for many people, many factors need to be considered. Successful sharing depends on how many people need to make changes at once, how extensive their changes tend to be, how long they keep their records in edit mode, and how much data you’re storing (for example, ginormous memo and attachment fields are much harder to manage in a multiuser database than plain text and number fields).
Some factors are beyond the control of Access—like a slow or unreliable company network—that can derail database sharing. Section 18.1.1 has some good guidelines that describe when sharing may fall short. However, if you’re setting up an Access database for a small business, you may need to test out database sharing yourself.
If you go ahead with database sharing, some typical symptoms will alert you if it’s not working out. Here are some key danger signs:
Your edits often overlap with someone else’s. In this situation, Access keeps asking you what to do about the conflict (Section 18.3.2). This problem is one of the most common, and while it won’t crash your database, conflicting edits can lead to legitimate changes getting blown out by someone else’s work.
You can’t edit the records you want. This problem occurs when Access uses locks (Section 18.3.3) to prevent simultaneous changes. Locks let Access dodge the overlapping edit problem but at a price: Every other process that uses the record grinds to a halt. Again, this occurrence isn’t dangerous—just a triple-Aspirin aggravation.
Data gets corrupted. This occurrence is both the least common and the most serious. But even though it’s rare (and it gets rarer with each new release of Access), it can still happen. You’ll know you have a problem when garbled data appears in a field, or Access gives you a bizarre error message (like “too many indexes”) when you try to open a database object. Section 18.4 explains the problem and gives some safety tips.
Note
Data corruption can happen through no fault of Access. For example, if Zoe loses her network connection while she’s in the middle of saving a change, Access can leave the shared database in an inconsistent state. The only way that you can prevent problems like these is to have a powerful database program running on the server that does all the work. (That’s the idea behind SQL Server. When you use SQL Server, no one changes the database directly. Instead, people make polite requests to the always-running SQL Server engine, which then does the work in a safe and controlled manner.)
So what can you do if you find that database sharing just doesn’t work for you? One of the best options is to use a high-powered server-side database product, like SQL Server. Using SQL Server obviously adds more complexity (meaning you’ll spend more time setting it up and making sure it’s running properly), but it gives you ironclad support for sharing data safely and efficiently.
Before you prance into the land of SQL Server, you need to know a little bit more about how it works. Figure 20-1 shows how SQL Server and Access interact. In this example, there are several people using the SQL Server database at once, each with their own copy of Access to help them out.
Note
This is actually how any server-side database works, including competing database products like Oracle and DB2. However, other server-side databases don’t have the nifty Access integration that you’ll learn about in this chapter, so clients need to use another front-end (usually, a custom-built application).
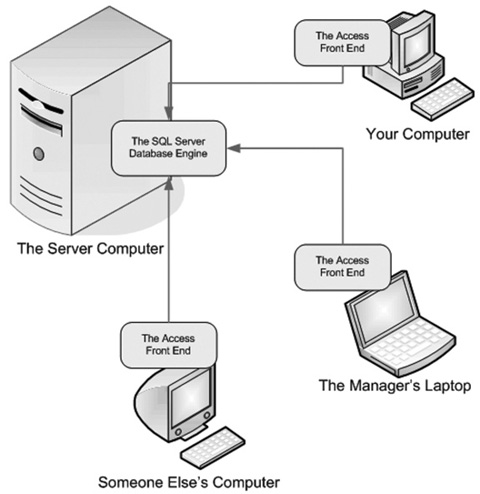
Figure 20-1. SQL Server hosts the database with its tables (and, optionally, some queries). Access runs the front end, which contains all other types of objects (reports, forms, macros, and code modules).
This figure just may look familiar—after all, this is more or less the same way that database sharing works. Each person gets a copy of the front end with the forms and reports, and the back end (which actually stores the data) is placed on another computer (the server) and made available to all.
However, there’s also a significant difference here. In SQL Server Land, the individual front ends do less work. Instead of modifying the database on their own, they contact SQL Server (which is really just a Windows program that runs in the background on the server computer). Essentially, you’ve given Access a demotion. It’s now responsible for eye candy, macros, and printouts, but it doesn’t do the heavy lifting (like inserting, updating, and deleting records) anymore.
At this point, you’re probably wondering how much that part in the center of Figure 20-1—the SQL Server database engine—actually costs. Microsoft sets the price using a complex licensing scheme that ratchets up the cost depending on how many people use the database at once. Usually, it runs into thousands of dollars, and it’s not uncommon for a big business to shell out $20,000 or more annually.
But before you skip this chapter in disgust, there’s something you should know: A completely free version of SQL Server is out there waiting for you. Amazingly enough, it’s almost as powerful as the one that costs thousands of dollars and requires you to pledge your first-born child to Microsoft.
This version is called SQL Server 2005 Express Edition, and you’ll learn how to download and install it in the next section. If you compare it with the full version of SQL Server, you’ll find it has three limitations:
It supports just one CPU (computer processor). More CPUs make for more powerful computers, and this limit prevents SQL Server Express from being quite as powerful as its big non-Express brother.
It can use only 1 GB of RAM memory. If your server has more, use it for something else.
Each database you create tops out at 4 GB. No problem here—Access itself tops out at 2 GB database files. If you avoid storing pictures and other large content in the database, you’ll be good for a while.
What’s more noteworthy is all the stuff that isn’t left out. SQL Server Express is a full-fledged version of SQL Server, with exactly the same high-powered engine under the hood. If you need to upsize your Access database, it’s a great deal.
Note
SQL Server Express also leaves out fancy tools to help you create tables and manage your databases. Although you can download a free management tool from Microsoft (see Figure 20-2), Access has already got you covered. It’s a capable front end that can help you do everything you need to do.
Before you can start using SQL Server Express, you need to install it. This process is fairly straightforward, but it’s long and it involves downloading some very big files—one that’s 22 MB (megabytes) and another that’s 54 MB. If you’re still using a dial-up connection, it could take you a few mind-numbing hours.
Note
Everything you learn in this chapter about Access and SQL Server Express also applies to the full version of SQL Server. However, if you have that version, you obviously don’t need to follow the down-load steps described here—instead, you can pop in your setup DVD and get going right away.
You install SQL Server on the computer where you plan to place the shared database. Typically, this is a computer on the network that no one uses for anything else. (If someone’s using the computer, there’s the risk that they’ll shut it down, restart it, tie it up with other work, or do something else that will affect everyone’s ability to get the information they need.) You don’t need to install SQL Server on the computers that run the Access front end, although obviously they all need to have a copy of Access.
However, if you’re still in the process of designing and fine-tuning your database, you may decide to try it out on your own computer first. In that case, you install SQL Server right on your own PC. Then, when you’re ready to start sharing, you install SQL Server on the server computer and move your database there (as described in Chapter 21). In fact, if you’re new to SQL Server it’s probably best if you try it out on your computer first. That’s because you need to tweak a few finicky settings in order to let other people access SQL Server from other computers. You’ll probably prefer to see how everything works before you start messing around with those details.
The system requirements for SQL Server are pretty modest. (Shockingly enough, they’re less stringent than the requirements for running Access.) You can find the exact specifications at http://www.microsoft.com/sql/editions/express/sysreqs.mspx. You’ll find that any relatively modern computer can run SQL Server, but you may need to make sure your operating system has the latest updates and service packs. For example, Windows XP computers need Service Pack 2.
Tip
To make sure a computer has the latest updates, click the Start button, and then choose Windows Update.
Once you’ve decided where to install SQL Server and you’ve verified that the computer can handle it, here’s what you need to do:
Open your favorite Web browser and go to the .NET download site.
Before you can install SQL Server, you need to install a component that SQL Server uses: the .NET Framework 2.0. You can find it by heading to http://msdn.microsoft.com/netframework and searching around. Or, better, use the secret shortcut URL http://tinyurl.com/drj86.
Note
If you have Windows Vista, you already have the .NET Framework 2.0. And even if you don’t have Windows Vista, another application may have already installed it on your computer. If you suspect it’s there, head to the Control Panel, go to the Administrative Tools section, and look for an icon named Microsoft .NET Framework 2.0 Configuration. If you find it, congratulations—you can skip straight to step 4.
Once you find the .NET Framework 2.0, download and install it.
The setup file is pretty big: about 22 MB.
Once you finish downloading the setup file, run it, and click through all the steps in the setup wizard.
Don’t worry—you don’t have any decisions to make.
When the setup is finished, head to http://www.microsoft.com/sql/editions/express .
This page has plenty of information about SQL Server Express. Hunt around for a link that lets you download SQL Server Express, and then click it. (It was last spotted with the text “Get SQL Server Express.”)
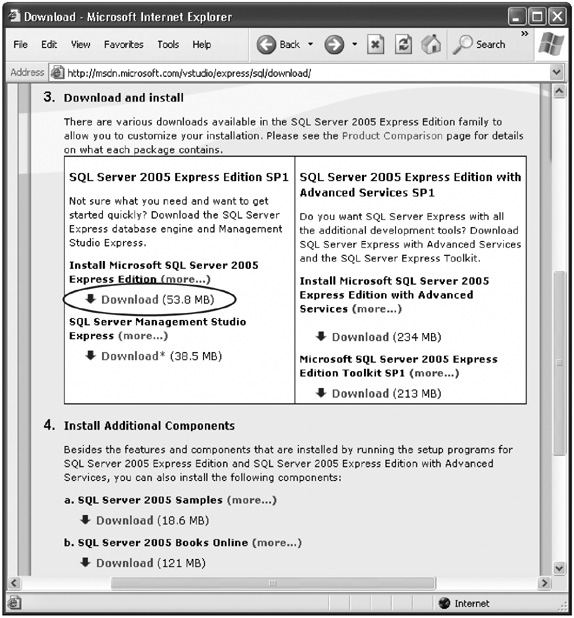
Click away to find the SQL Server Express download (Figure 20-2).
Along the way, Microsoft will ask if you want to register with Microsoft. If you register, you’ll get news from Microsoft (which is handy if you want to know about the latest SQL Server update). However, it’s purely optional.
Figure 20-2. You have options. Not only can you download SQL Server 2005 Express (the circled link), you can also get a slick management tool called SQL Server Management Studio (underneath), some samples, and the information-packed help file reference that’s known as the SQL Server 2005 Books Online (at the bottom).
When you find the download link for SQL Server (Figure 20-2), click to download and install it.
The SQL Server download is a whopping 54 MB.
After you finish downloading the setup file, run it.
Before the setup starts, you need to go through a few simple steps. Here’s what to expect:
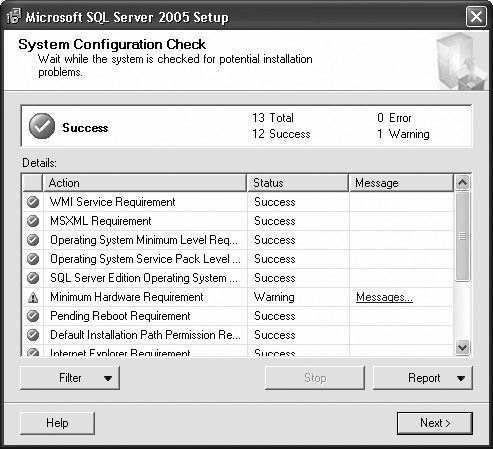
Before installing anything, the setup performs a system configuration check. The setup program examines your computer, and then reports to you whether it’s SQL-Server-worthy (Figure 20-3).
You’re asked to fill in your name. This part is pretty typical, but keep the “Hide advanced configuration options” checkbox turned on to avoid the low-level settings you don’t want to change.
You’re asked to pick the features you want to install. Keep the standard options—they install everything you need.
You’re asked if you want to automatically send error messages to Microsoft. No, don’t expect them to help you out. This feature is designed solely to help Microsoft improve future versions of SQL Server by determining what problems are currently afflicting its users.
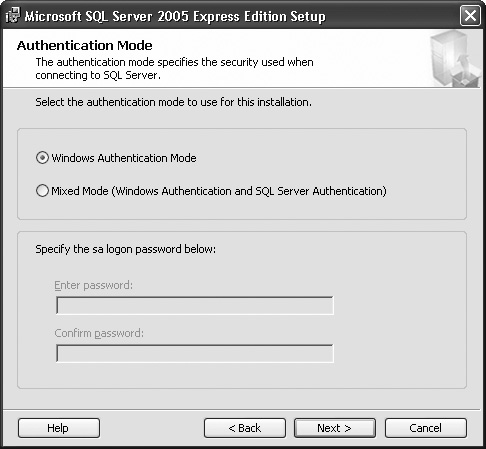
And the end of all this, you get to one tricky part. SQL Server will ask you what type of security you want to use.
Choose your authentication mode (Figure 20-4).
You have two options:
Windows Authentication Mode means that SQL Server decides whether someone’s allowed to use a database based on that person’s Windows user account. This approach is the best and most secure. Unfortunately, it also means you need to do a bit of extra work later on to make sure other people are allowed to use your database (Section 20.2.2).
Mixed Mode means that SQL Server lets people use the database if they have the right Windows account (as described above) or if they can supply a user name and password combination that you’ve defined. If you choose Mixed mode, you need to supply a password for a special SQL Server account known as sa (system administrator). Anyone who logs in with this user name and password is given complete control of every database on the server. Mixed mode saves you the hassle of doing any extra configuration, but it’s not as secure. (For one thing, you need to pass this information—the user name and password you want people to use—around the office.)
Note
If you aren’t familiar with concepts like Windows users and groups, and you don’t have a network administrator to help you out, you’d better choose the Mixed mode option. It’s not a very secure approach, but it’s the only easy way that you’ll be able to let other people log in to the database (Section 20.2.2).
After this point, the installation is long but straightforward. Now’s a good time to grab a cup of coffee.
Once the setup is finished, you should run Windows Update again (click the Start button, and then choose Windows Update). That’s because SQL Server Express has two service packs (at the time of this writing), and the Windows Update feature installs them automatically.
Note
The SQL Server Express service packs are critical for Windows Vista users. Without them, the super-strict Windows Vista security model will stop you from doing just about anything with your SQL Server databases.
Once you’ve finished this last round of updating, you’re finally ready to get to work. If you decided to install SQL Server on your computer, you can start using it right away. Jump ahead to Section 20.3.3 to return to the welcoming arms of Access.
If you decided to install SQL Server on another computer, you still have more setup steps to finish. The next section has the details.
When you first install SQL Server, it’s usable only from the current computer— that is, other computers can’t log in to the server and use any of its databases.
At first glance, this appears to defeat the whole purpose of using SQL Server. (On second glance, it does too.) However, Microsoft knows that if they release a product that’s wide open to the rest of the world, with its hackers, crackers, and all-around computer bad guys, someone somewhere will shout at them. For that reason, SQL Server takes the safest approach—it limits itself to the current computer until you give it the go-ahead to accept outside calls.
To open up SQL Server to the outside world, you need to change two configuration settings. If you’re using Windows XP or Vista, you also need to configure the Windows firewall so it lets SQL Server get through. You can find the latest setup instructions in a Knowledge Base article at http://support.microsoft.com/kb/914277.
Once you’ve made these changes, other people will finally be able to contact SQL Server and try to log in. However, the party’s not on yet. SQL Server may still refuse them. That’s because it won’t let anyone in that it doesn’t trust.
So who does SQL Server Express trust? Here’s the lowdown:
When you first install SQL Server, it’s set up to trust anyone who’s an administrator of the computer where SQL Server is installed. (Technically, being an administrator means your Windows user account is a member of the Administrators group.)
If you configured SQL Server to use Mixed mode authentication (Section 20.2.1), it also lets in anyone who supplies the user name sa and the password you specified during the install.
If you want SQL Server to trust more people, you have some extra work to do. Usually, you make sure that everyone who needs to use SQL Server belongs to a single Windows group (a group is a collection of users and has a descriptive name, like Guests, Administrators, DatabaseLovers, and so on). This job is a Windows setup task, so consult your network administrator to get it done. Once you’ve done that, you need to tell SQL Server to trust your group. You can use several approaches to take this step, but the easiest is to download the free SQL Server Management Studio tool (shown in Figure 20-2). For more information, check out the SQL Server Management Studio Help (which is fairly technical), or look for a dedicated book about SQL Server administration.
Note
By this point, you’re probably wondering why SQL Server makes life so difficult. The reason is because SQL Server is designed to be extremely flexible. Its security model seems ridiculously complex when you’re just trying to let people use your database, but it’s indispensable if you need to control exactly what different people are allowed to do.
You’ve suffered through the long and grueling installation process. Now it’s time to reap the rewards of your labor and create your first SQL Server database.
Access gives you two ways to create a SQL Server database:
You can take an ordinary Access database and upsize it. Access creates the tables you need and transfers all your information to SQL Server.
You can use Access to create a new SQL Server database from scratch.
Generally, upsizing a database is easiest because it lets you design your tables using the tools you’re most familiar with, and then transfer your data. (As you’ll see, creating a SQL Server table in Access is a similar, but subtly different process from creating an ordinary Access table. It’s a bit like you’d feel if you got up in the morning and found someone had swapped your sock drawer with your CD collection. Everything’s there—just not where you expect.)
The direct-creation approach also has its advantages. Most importantly, it gives you more control because you don’t have a conversion step. Access databases don’t line up exactly with SQL Server databases (for example, the field data types that you use are similar, but slightly different). If you create your database in SQL Server from the start, you’ll dodge any potential conversion issues.
It the following sections, you’ll learn about both approaches.
Access has a handy Upsizing wizard that can convert any Access database into a SQL Server database. The Upsizing wizard is similar to the database splitter (Section 18.2.2)—when you’re finished, you’ll have a front end and a back end. Your front end is an Access file that contains your forms, reports, macros, and code. Your back end is the data (and usually the queries), which are in SQL Server’s capable hands.
Here’s how to take the Upsizing wizard for a whirl:
Open the database you want to upsize.
The first window of the Upsizing wizard appears (Figure 20-5).
Choose “Create new database,” and then click Next.
If you’ve already created a SQL Server database in your SQL Server computer (for example, using another database management tool), you could choose “Use existing database” to transfer your Access tables into that database. However, it almost always makes sense to create a new database. After all, a database engine like SQL Server can store a virtually unlimited number of databases.
In the next step (Figure 20-6), you need to tell Access where to find your database server. First, supply the server name in the box at the top of the window.
The server name consists of the name of the computer that’s running SQL Server, followed by a backslash, followed by the word SQLEXPRESS. So, if the computer that’s running SQL Server is named FudgeServer, you’d find your database at FudgeServerSQLEXPRESS. If you’re connecting to the full version of SQL Server (not the Express edition), you usually don’t need the second part, so just FudgeServer would do. Consult with your database administrator for help.
Keep the Use Trusted Connection checkbox turned on.
This action tells Access to connect using your Windows account. However, if you need to supply a different user name and password connection, clear the checkbox, and then enter this information in the text boxes below.
Enter the name for your database, and then click Next.
Use the same rules you follow for naming database objects—be short and leave out spaces and other punctuation.
Note
When you create a database, SQL Server doesn’t tell you the name of the actual database file (and actually, it’s usually more than one file). That’s because the file names are just not that important. Instead, all you need to know is the name you’ve anointed your database with (BoutiqueFudge, for example). Behind the scenes, SQL Server stores your data in the appropriate files, so you don’t need to worry about it.
Choose the tables you want to transfer to your database (Figure 20-7), and then click Next.
Access doesn’t let you pick the queries you want to transfer. Instead, it transfers all the queries that are related to the tables you pick. Other objects, like forms and reports, are never transferred.
The next steps lets you control how SQL Server creates your tables (Figure 20-8). Change any options you want, and then click Next.
In Chapter 2 you learned about indexes, and in Chapter 4 you learned about default values and validation rules. Usually, if you’ve taken the time to define these ingredients in Access, you also want them in the exported SQL Server tables, so leave the checkboxes turned on. Here are the other options you can use:
Figure 20-7. Click > to move a single table to the “Export to SQL Server” list, or >> to move them all.
Figure 20-8. If you’re intimidated by all the options in this step, just click Next to breeze on by. The standard settings are usually what you want.
Table relationships. Keep this checkbox turned on, because it ensures that the relationships you’ve defined between your tables are enforced by SQL Server. You have two options here. “Use DRI” is short for “use data relational integrity—in other words, the standard practice of making sure you can’t create child records that link to a nonexistent parent (Section 5.2.3). “Use triggers” tells SQL Server to use the less common cascading deletes and cascading updates features (Section 5.2.3.1).
Add timestamp fields to tables. This setting lets you create a timestamp field—an extra field whose only purpose is to record each time a change is made. The timestamp field is sometimes used to prevent clashing edits, because it lets you check if someone else has made changes to a record since the last time you looked at it. Usually, you won’t add any timestamp fields. Instead, you’ll add them to specific tables later on if you decide you want this feature.
Only create the table structure. With this option you can create all the tables in SQL Server, but leave out the data. This option is useful if you’ve been using the Access database file for testing and it’s full of fake data.
The last step asks you what to do with the original Access file. Usually, you’ll choose “Create a new Access client/server application.”
Here’s what the three options mean:
Create a new Access client/server application. This option creates a special type of Access file called an Access project. You’ll recognize the difference because every Access project file has the file extension .adp. This file is a front end that has all your reports, forms, and code, and has a special set of links that lets you interact with your tables that are on the server. (The original Access database file remains, but you’ll probably just delete that now that all your data is in SQL Server.)
Link SQL Server tables to existing application. This option is similar to creating an Access project, except it modifies the current database to become the front end. All the tables that have just been transferred are renamed by adding the word “local” at the end (so the Products table becomes Products_ local). In addition, you’ll have a new set of linked tables that use the original table names. Each linked table lets you access the corresponding table in SQL Server. Once you’ve verified that these links work, you’ll probably decide to delete the “local” tables so you don’t get confused. (For more about linked tables, see the box “Access Projects vs. Linked Tables” in Section 20.3.2).
No application changes. With this option, the data is transferred, but your Access database isn’t modified. That means you’ll be left with two sets of data—one in your Access database file, and one in SQL Server (which you can’t see or modify in Access). This result usually isn’t what you want.
Click Next.
If you’re creating an Access project (as described in the previous step), Access asks if you want to open the new project front end right away or keep the old database open. Usually, you’ll want to open the new file so you can get to work.
Click Finish to start the upsizing process.
Access connects to SQL Server and starts transferring all the data. As it works, you see a progress indicator (Figure 20-9).
When Access is finished, it shows a report that summarizes how the whole process went. You can print it, or choose Print Preview → Close Preview → Close Print Preview to return to your database.
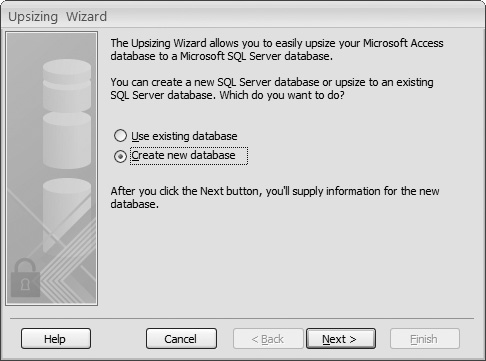
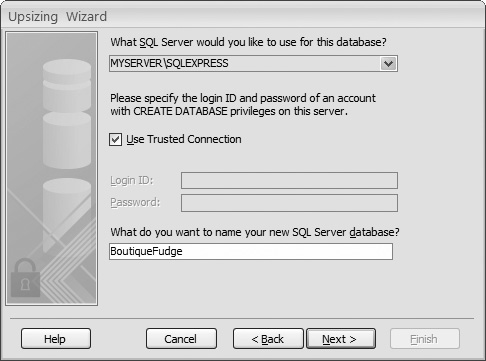
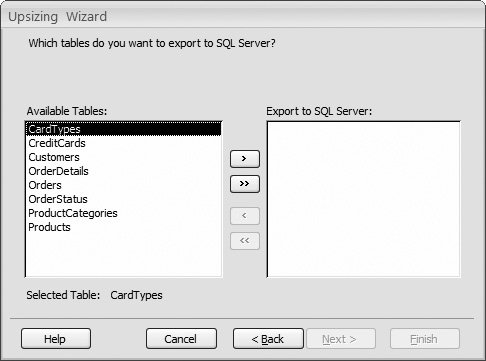
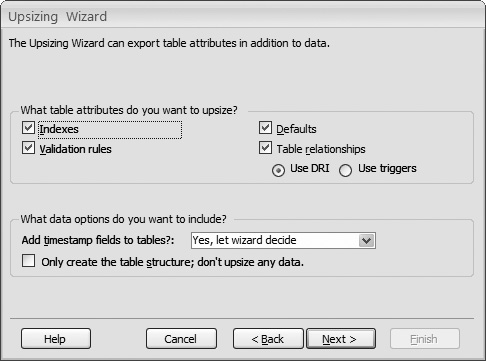

Figure 20-9. Depending on the amount of data you have, this upsizing process may take a bit of time.
The conversion process usually runs without a problem. However, not everything can survive the switch. Here are some ingredients that will be lost:
Hyperlink fields. They become ordinary text fields.
Attachment fields. They become ordinary text fields, but the only thing the text field stores are the names of the files that you originally put in the attachment.
Multivalue fields. You’re left with a semicolon-separated list of values. This result gives you the right information, but not in a way that SQL Server can use. Any relations and queries that use this information are out of luck.
If you’re creating an Access project (rather than just linked tables), your queries are also converted. As a result, you’ll lose the following ingredients, because SQL server doesn’t support them:
Action queries (Chapter 8) that use parameters (Section 7.4).
Crosstab queries.
Queries that reference values on a form. (The form is in your front end, so once you transfer the query, it has no way to access that information.)
Nonstandard queries that were created in SQL view rather than in Design view—for example, union queries (Section 6.2.3.2).
Tip
Want to go back the other way, and transfer some data from SQL Server into Access? If so, the trick is the import and export features in Access, which you learned about in Chapter 19.
Once you’ve finished the upsizing process, you can continue to work with your tables as you did before. For example, you can open your tables in the datasheet, edit records, and use your forms and reports. The difference is that now your copy of Access is communicating with SQL Server to get the information it needs and make changes.
When editing data and using forms and reports, you won’t notice any difference between the new upsized database and your original database (except for the fact that it may perform more slowly). However, you will notice a difference when you create a new table or query, or when you modify the design of an existing table or query. That’s because tables and queries are actually stored in the SQL Server database, and SQL Server databases are designed differently than their Access counterparts.
You’ll start looking at the differences in Section 20.3.3. But first, it’s worth considering how you can manage the SQL Server database you’ve just created.
In Access Land, it’s easy to delete, move, or back up a database. All you need to do is find the corresponding .accdb file and use a file management tool like Windows Explorer.
SQL Server doesn’t work this way. As you learned earlier, it handles files behind the scenes, without revealing their file names. And even if you know where to find the database files, you can’t accomplish much with them. For example, if you want to move a SQL Server database from one server computer to another, a simple cut-and-paste operation in Windows Explorer won’t work. The original server will keep looking for the database you moved, and the destination server will keep ignoring it.
If you want to perform management tasks like these—deleting, moving, and copying a database—you need to work with SQL Server so it can move the files and update its database catalog. One option is to download the free SQL Server Management Studio tool (see Figure 20-2), which helps you out with a wide range of administrative tasks. (For example, it’s the tool you’ll need to use if you get really ambitious and start configuring SQL Server’s security settings so it allows some people and rejects others.) However, you can also perform the most common management tasks right inside Access. The secret is using the Office button → Server menu (which appears only when you have an Access project open).
Your options there include:
Connection. Pops open a Data Link Properties dialog box where you can change the connection settings for your Access project file. Usually, you head here if you have a problem connecting to your SQL Server database. For example, if someone’s moved or renamed the SQL Server database, or they’ve changed the user name and password you need to log in, this window is where you can update your settings. Just supply the new server, database name, or password information, and then click OK to reconnect.
Server Properties. Shows a dialog box with a few basic details about your database, including the product you’re running (SQL Server), its version (SQL Server 2005 is version number 9), the server location, and the current database. You can’t change any of the information here.
Link Tables. Lets you add one or more linked tables to your current Access project. Usually, the idea here is to add links to the tables in another database (or even another database server), so you can see everything using one Access file.
Back Up SQL Database. Creates a backup of your SQL Server database in a .dat file, which you can choose to place anywhere you want (on the server computer or your computer). SQL Server gurus generally prefer to use a tool that lets them make automated backups, like SQL Server Agent (which is only included with the full version of SQL Server).
Restore SQL Database. Takes a .dat file that you created with the Office button → Server → Back Up SQL Database command and recreates the corresponding SQL Server database.
Transfer Database. Lets you move a database from one computer to another. (Both computers need to have the SQL Server software.) Access stores the new server location in your project file so you can keep using the database in its new location. This feature is handy if you’ve been testing a SQL Server database on your computer and now you want to move it to a network server where everyone can access it.
Copy Database File. If you’re running SQL Server on your computer, this option lets you create a copy of the database file that you can take to another computer. (If you’re connected to a copy of SQL Server on another server, this command won’t work.) Generally, the Office button → Server → Transfer Database command is easier to use because it gets everything done in one step.
Drop SQL Database. Removes the database from SQL Server and deletes it.
Set Logon Password. If you’re using Mixed mode authentication (Section 20.2.1), this option lets you change the SQL Server password.
Access also lets you create a new SQL Server database with nothing in it, and then add the tables you want. Here’s how to do it:
Choose Office button → New (or just launch Access without opening a database file and click Blank Database).
The Getting Started page appears.
On the right side of the window, click the folder icon next to the database file name.
In the “Save as type” list, choose “Microsoft Office Access Projects (*.adp).”
Pick the folder where you want to place the front end (the .adp file), type a name into the “File name” box (like ZooAnimals.adp), and then click OK.
Access returns you to the Getting Started page, with your information in the New Project pane on the right side of the window.
Click Create to seal the deal.
Access asks if you want to use an existing SQL Server database.
Click No to create a new one of your own.
A window appears that asks you where your server is and what database you want to create. You’ve seen this step before in the Upsizing wizard (Figure 20-6).
Enter the location of your database server and the name of the database you want to create, and then click Finish.
Access creates the blank SQL Server database (and your .adp project file). After a short delay, the Access window appears with an empty navigation panel.
When you’re ready to create your first table, jump ahead to the next section.
The nicest thing about the SQL Server support in Access is that it lets you work inside the familiar Access window, even though you’re dealing with a very different database engine. However, you pay a price for this convenience. As you’ll see in the following sections, creating database objects for SQL Server isn’t quite as intuitive as creating them for Access.
You can create a table in any Access project (.adp file), whether it’s a new database you created from scratch or an existing one that you’re working with. Either way, the process is the same.
First, choose Create → Tables → Table Design. You can’t create a SQL Server table in Datasheet view. Instead, you always need to start in Design view. You can also edit an existing table in Design view in the normal way. Just right-click it, and then choose Design View.
When the Design view appears, you’ll notice that it looks a bit different than the Design view for ordinary Access tables. Fortunately, it still works essentially the same way. You add a list of fields from top to bottom, and configure the name, data type, and size of each one. (SQL Server calls them columns instead of fields, but there’s really no difference.)
Each field has five columns of information (Figure 20-10) for you to fill out:
Column Name. This column identifies the field (just as it does in a normal Access table). To avoid headaches, don’t use spaces or special characters.
Data Type. This column indicates what type of information the field can store (just as it does in a normal Access table). However, the set of field types that SQL Server provides is different from the set that Access uses—more on that issue in Section 20.4.1.1.
Length. This column corresponds roughly to the Field Size property in Access (Section 2.3.1.1). For a text-based data type, the length is the number of allowed characters. But for most data types, the field size is for information only; it shows the number of bytes of space that the field uses, but it can’t be modified.
Allow Nulls. This column corresponds to the Required field property in Access (Section 4.1.1). If a checkmark is in this column, you’re telling SQL Server that blank values are acceptable, which means the database user can leave this field empty.
Description. This column gets a plain-English description of your field. Fill it in, or not—it’s up to you.
When designing a SQL Server table, you also need to specify the primary key (Section 2.4). Usually, you’ll use a field that stores an automatically generated ID number. To designate a field as a primary key, click to select the field, and then choose Table Tools | Design → Tools → Primary Key. You’ll see a key icon appear at the far left of the row.
When you’re done working with your table, close it. Access prompts you to save the table and pick a name. Then you can start entering data in the familiar Access datasheet, which hasn’t changed a bit.
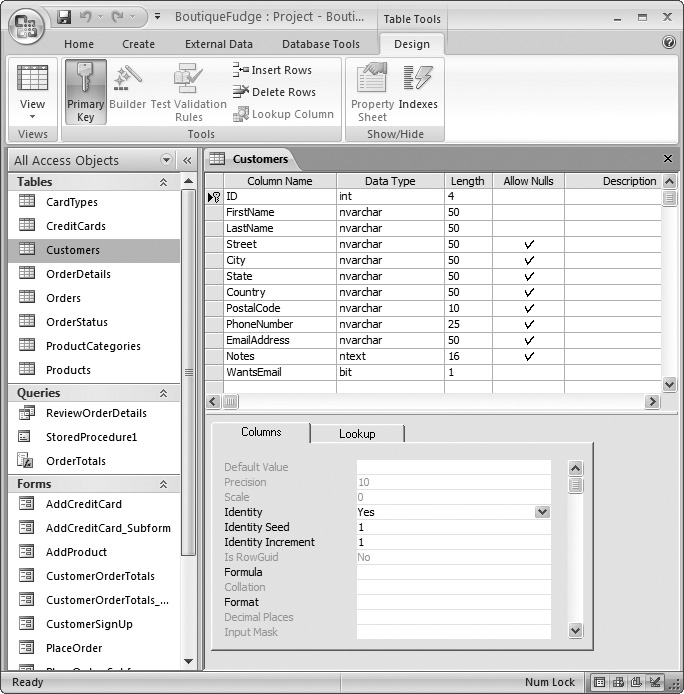
Figure 20-10. This example shows the Design view for the familiar Customers table from the BoutiqueFudge database, SQL Server style.
Note
You’ll probably notice that Access projects are slower than ordinary Access database files. That’s because Access needs to communicate with SQL Server behind the scenes, asking it to create tables, perform data operations, and so on.
It would be nice if SQL Server and Access used exactly the same set of data types. However, these applications come from different backgrounds and sometimes their differences show.
Fortunately, there’s a close mapping between most data types. That means most Access data types have a corresponding SQL Server data type that matches pretty closely. (And when you upsize a database, Access is usually able to pick a good match.) Table 20-1 shows the SQL Server data types that you get for various Access data types.
Note
SQL Server has still more data types that aren’t shown in this table and don’t map directly to Access data types. However, the data types shown here are by far the most common.
Table 20-1. SQL Server and Access Data Types Compared
|
Access Data Type | |
|---|---|
|
Text |
nvarchar (which can hold up to 4,000 characters, unlike the Access Text data type, which tops out at 255 characters) |
|
Memo |
ntext |
|
Number (with a Field Size of Integer) |
smallint |
|
Number (with a Field Size of Long Integer) |
int |
|
Number (with a Field Size of Single) |
real |
|
Number (with a Field Size of Double) |
float |
|
Number (with a Field Size of Decimal) |
decimal |
|
Number (with a Field Size of Byte) |
tinyint |
|
Number (with a Field Size of ReplicationID) |
uniqueidentifier |
|
Date/Time |
datetime |
|
Currency |
money |
|
AutoNumber |
int (with Identity set to Yes) |
|
Yes/No |
bit |
|
Hyperlink |
nvarchar |
|
Attachment |
nvarchar (but only the file name is kept) |
You may have noticed that SQL Server doesn’t have an AutoNumber data type. But don’t let that fool you into thinking that there’s no way to get this insanely useful feature (Section 2.3.9) in SQL Server. You just need to set it up a bit differently:
In the Columns tab underneath the field list, set Identity to Yes.
An identity value is the SQL Server name for an AutoNumber field. It’s a value that SQL Server assigns for you automatically, and is guaranteed to always be unique.
You can also set the Identity Seed and Identity Increment properties:
Identity Seed is the starting value. This property is a sorely missed feature in Access, which always starts its AutoNumber values at 1. (You may remember the complex workaround in Section 8.3.2.)
Identity Increment is the amount SQL Server increases in between values. For example, if the Identity Increment is 5, you may see numbers like 1, 6, 11, 16, and so on. Of course, SQL Server is free to skip over a number for a variety of reasons, just like Access does.
The SQL Server Design view lacks the convenient lookup wizard that Access uses. Instead, you need to select the field where you want to place the lookup, click the Lookup tab at the bottom of the design window (Figure 20-11), and then fill in all the lookup information. Here are the key settings you need to create a lookup:
Display Control should be set to Combo Box—that’s the drop-down list that lets you pick the value you want.
Row Source Type should be set to Tables/Views/Functions if you want to create a lookup that uses the data from a related table. (If you just want to supply a list of values, you would use the Value List option instead.)
Row Source provides the data for the lookup. If you’re drawing your data from another table, you’ll use a SQL SELECT command (Section 6.2.3) that pulls out two fields—the field with descriptive information, and the field with the ID value. For example, you could use the command SELECT ID,ProductName FROM Products ORDER BY ProductName to create a lookup list that gets the ID and the name of each product in the Products table, sorted by product name.
Tip
If you don’t want to write the SELECT statement on your own, click in this box, and then click the ellipsis button to open a query window where you can pick your table and fields. This query window is a bit different from the Access query designer you’ve used so far—see Section 20.4.2 for a quick tour.
Bound Column identifies which column (from the Row Source) should be inserted in the field when you pick a value from the lookup. For example, if the first field in your SELECT statement is the ID value (as in the previous example), you would set this value to 1.
Column Count sets the number of columns that show up in the lookup list. Usually, this option is set to 2 (which shows both columns), but the width of the first column with the ID number is given an infinitesimally small size so you don’t actually see it.
Column Heads determines whether titles are at the top of the columns in the lookup. Usually, this value is set to No. However, if you create a lookup that shows several pieces of related information, you can use column heads to make it easier to tell what’s what when you’re reading values in the lookup list.
Column Widths sets how big each column is in the lookup list. You separate each value (in inches) with a semicolon. For example, a setting of 0”;1” shrinks the first column out of sight and makes the second column one inch wide.
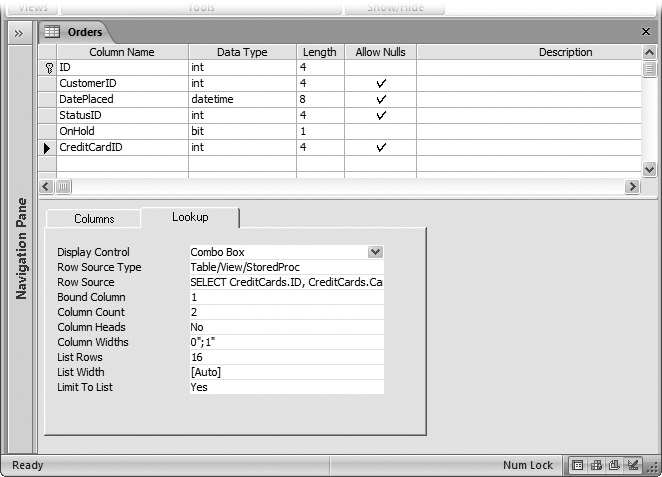
Unfortunately, creating a lookup doesn’t create a relationship between the two tables. If you want a relationship, you need to create it yourself, as described in the next section.
As you learned in Chapter 5, every respectable database has lots of table relationships. In Access, you have two speedy ways to build a relationship: using the database diagram tool, and creating a lookup on a field. But in an Access project, neither one of those features are available. Instead, you need to define the relationship by hand in the design window for your table.
Here’s how to do it:
Open the child table in Design view.
This table has the field that links to the parent table. (For example, Products is in the child table of ProductCategories. The tip-off is the ProductCategoryID field that appears in the Products table.)
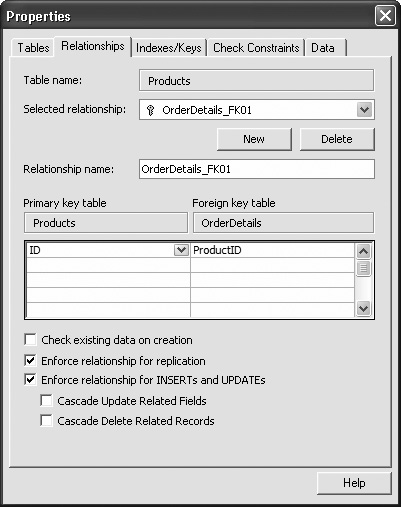
Choose Table Tools | Design → Show/Hide → Property Sheet.
This action pops open the Properties dialog box (Figure 20-12), which looks nothing like the Property Sheet you’ve used before with Access databases.
Click the Relationships tab.
Click New to define a new relationship.
In the list box under the heading “Primary key table,” pick the parent table.
In the first row underneath, pick the unique field in the parent table.
(You have several rows here because it’s possible to create relationships based on several fields, although it’s rarely done.)
In the list box under the heading “Foreign key table,” pick the child table.
In the first row underneath, pick the field in the child table that points to the linked parent record.
If you want to verify that existing data lives up to this relationship, turn on the checkbox for “Check existing data on creation.”
If you don’t want to check your existing records to make sure they live up to the rules of this relationship, (Section 5.2.3) leave this checkbox turned off. If you don’t have any data in the table yet, it doesn’t matter what you choose.
Turn on the checkbox next to “Enforce relationships for INSERTs and UPDATEs” if you want to enforce relational integrity when adding and changing records.
Doing so prevents you from breaking the relationship rules (Section 5.2.3) when adding or updating records. For example, you won’t be allowed to insert a child record that points to a non-existent parent record. If you choose not to use relational integrity, you can use one of the options below to switch on cascading updates or deletes (Section 5.2.3.1).
Close the window when you’re done.
Tables of data aren’t the only database object that’s stored in a SQL Server database. Your SQL Server database can also hold queries, those endlessly useful routines for finding (and changing) the records you want.
The objects that Access fans call queries have a whole different existence in SQL Server. Where you see queries, SQL Server sees three different types of objects:
View. A view is roughly equivalent to a select query—it grabs records (possibly from related tables) and displays them in a datasheet.
User-defined function. A user-defined function is similar to a select query that takes parameters. (As you learned in Section 7.4, parameters let you ask the user for a piece of information just before running the query. You can then use that information to filter records or perform a calculation.)
Stored procedure. A stored procedure is the heavyweight of SQL Server database objects. It can perform a whole batch of tasks, like selecting records, committing updates, and running transactions. You won’t use most of that power when you create a stored procedure in Access. Instead, you use stored procedures to create the SQL Server equivalent of an action query (Chapter 8) that commits a single update, insert, or delete operation.
In the following section, you’ll try your hand at creating a basic view.
Creating a view is a lot like creating a classic Access query that selects a bunch of records. The following steps show you how to create a view and equip it with all the essentials, including sorting, filtering, and expressions:
Choose Create → Other → Query Wizard.
The New Query dialog box appears, which offers to help you create a variety of SQL Server query types. In this case, you simply want to create an ordinary query that extracts some useful data.
Choose Design View, and then click OK.
Choose the table (or tables you want to use), and then click Add to include it in your query. When you’re finished, click Close.
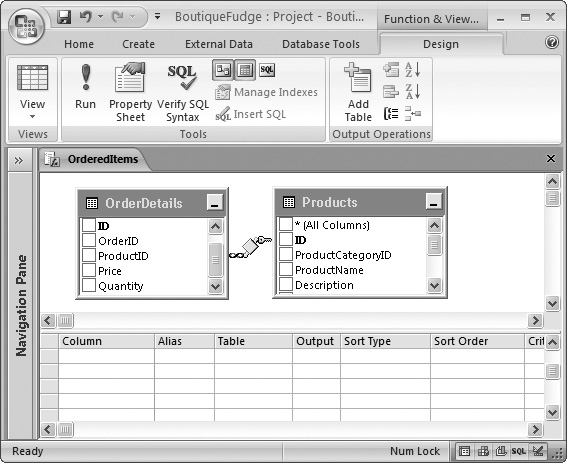
The query designer appears. Conceptually, it works more or less like the Access query designer, with the same features. However, it looks a bit different (Figure 20-13).
Figure 20-13. When you add more than one table to a query, and these tables have a relationship defined in the database, the query designer includes the join lines (Section 6.3.1). In this example, the query is showing a list of ordered items, with extra product information from the Products table.
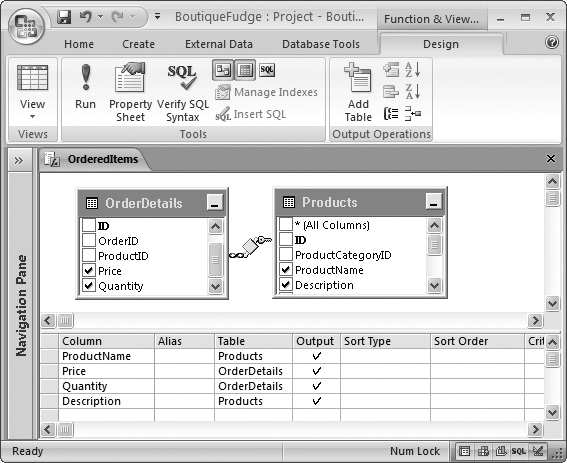
Choose the fields you want to include in your query results.
To include a field in your results, place a checkmark next to the field. Each field is added to the list at the bottom of the window in a separate row (Figure 20-14). This is similar to the Access query designer but flipped around. (Access creates one column for each field in a query.)
At this point, you have a fully functional query. But you may also want to add sorting, filtering, and calculated expressions, as described in the following steps.
If you want to sort on a field, choose Ascending or Descending in the Sort Type box.
If you want to sort by more than one field, set the Sort Type of every field you want to use. However, you also need to fill in a number in the Sort Order column to tell the query designer which sort to perform first. For example, if you want to sort a batch of names by last name and then first name, you would use the number 1 for the Sort Order of the LastName field and the number 2 for the FirstName field.
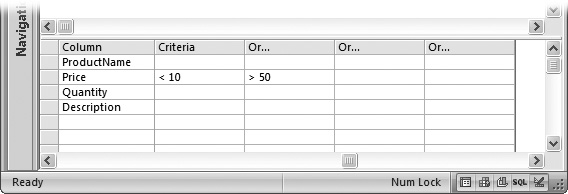
If you want to use filtering, set a filter expression in the Criteria box next to the appropriate field.
Performing this task is easy enough for numeric values, because the filter expressions are exactly the same as in Access. You can use the same operators (like the +, −, /, * signs to perform calculations, and the =, <, and > signs to compare numbers). However, if you want to work with text or dates, make sure you review the syntax differences between SQL Server and Access in the “Syntax Differences box in Section 20.4.3.
You can apply filtering to as many fields as you want. If you want to define several different criteria, and show records that match any of these criteria, you can define additional filter expressions in the Or column, as shown in Figure 20-15.
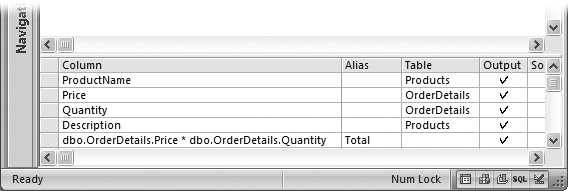
If you want to use a calculated field, add it to the bottom of the list by filling in the Column and Alias boxes (Figure 20-16).
The syntax for creating a calculated field is a bit different in the SQL Server query designer. Rather than using the ColumnName: Expression syntax, you put the column name in the Alias box, and you put the expression in the Column box.
Although you can type in your expression using simple field names, the query designer converts them to three-part names automatically. Figure 20-16 shows what you’ll see if you type in the simple calculated expression Price*Quantity, which calculates the cost of one line in an order.
If you want to create a calculated expression that uses text or dates, make sure you review the syntax differences between SQL Server and Access in the “Syntax Differences” box below.
Figure 20-16. You’ll notice that the field names use strange three-part names (so Price becomes dbo.OrderDetails. Price). This name indicates that the Price field is in a table named OrderDetails, which was created by the database owner (dbo). SQL Server uses these names in expressions to prevent possible ambiguity. But don’t worry—the query designer changes ordinary names into three-part names automatically.
When you’re finished designing your query, right-click the tab title, and then choose Datasheet View (or choose Function & View Tools | Design → Tools → Run).
Access will ask you to save your query. Once you do, you see your results in the familiar datasheet, just as you do when you run a query in an Access database. You can then print or edit the results.