An Access database is like a carefully built fort. It takes strictly organized and error-tested information, and locks it up tight. Very few programs guard their data as protectively as database software does. Word processors and spreadsheet programs accept just about any content and let you build your document structure on the fly. Databases aren’t nearly as freewheeling.
Most of the time, databases live in an independent world. But every once in a while, you need to bridge the gap in one of two ways:
You want to take the information from another program and import it—basically, stuff it into your database.
You want to take some of the information in an Access database and export it, so you can work with it in another program.
Access has several different options for transferring information. You can use the lowly clipboard, sophisticated import and export features, or the ever-popular XML standard. In this chapter, you’ll learn about all your options, including one new and pretty nifty trick: how to let people email you their updates to a database. This isn’t your father’s Access.
If you haven’t thought much about importing and exporting, it’s probably because you don’t need to use these features—yet. Many databases are completely happy living a quiet, solitary life. However, importing and exporting might come in handy for a few reasons. Sooner or later, one of these reasons will apply to you.
Exporting’s the easier part of the equation. Exporting’s simpler than importing, because it involves moving information from a stricter storage location (the database) to one with fewer rules (another type of document).
Note
Exporting’s a way to transfer a copy of your information to another location. The original copy always remains in Access. There’s no point in changing the exported copy. Instead, if you need changes, make them in the database, and then perform the export operation again.
Here are some of the most common reasons people decide to export information:
You want to email some information to a friend. You don’t want to send the Access database because your friend doesn’t have a copy Access, or you want him to see only some—not all—of the data
You’re creating a presentation in PowerPoint. The easiest way to dazzle and convince your peers is to show them some impressive information from your database.
Tip
Access stores huge volumes of information, which is often more than other programs can handle. You’d never be able to copy a table into a PowerPoint presentation—at most, a slide can fit a handful of records. However, you might choose to show the results of a totals query (Section 7.3) that uses grouping to boil down the results to a few subtotals.
You want to analyze the information in Excel. Access is great for storing and managing your data, but it doesn’t give you the tools to help you figure out what it all means. If you want to crunch the numbers with heavy duty formulas and slick charting features, it makes sense to move it to Excel.
Some programs are intelligent enough to pull the information out of an Access database all on their own. One example’s Word, which provides a mail merge feature that lets you take a list of names and addresses from a database, and then use them to create mailing labels, personalized forms, or any other sort of batch paper-work. When using this feature, you don’t need to perform any exporting—instead, you can just point Word to your Access database file. (For more information about Word’s mail merge feature, see Word 2007: The Missing Manual.)
You need importing whenever there’s information outside your database that belongs inside it. Suppose you create a state-of-the-art e-commerce database for your buffalo farm. However, some of your sales associates still fill out forms using an old Excel spreadsheet. Now, you need a way to get the information out of the Excel spreadsheet and into your database.
Tip
Your sales staff has let you down. They really shouldn’t enter data into a document for another program. Instead, they should use a form that’s designed for logging sales, as described in Chapter 12.
Import operations have two key challenges. The first’s making sure the data fits the database’s strict requirements. As you learned in Chapter 1, databases are rule-crazy, and they rudely toss out any information that doesn’t fit (for example, text in a date field). The second challenge is dealing with information that doesn’t quite line up—in other words, its representation in the database doesn’t match its representation in the external document. This headache’s more common that you may think.
In your database, you might use status codes (like 4302), while the spreadsheet you want to import uses status names (like High Priority). Or, you may need to break the information you’re importing into more than one linked table, even though it’s stored together in a single document. The customer order spreadsheet for your buffalo farm could include customer information (which corresponds to the Customers table) and order information (for the Orders table). Sadly, you don’t have any easy way to solve these problems. If the external data doesn’t match the representation in the database exactly, you’ll need to change it by hand before or after the import operation.
Experts occasionally try to solve problems like these by writing Visual Basic code that reads the data and creates the appropriate records. (To do this, you’d need to use the DAO objects described in Section 17.4.5.) While the code approach is infinitely flexible, it can quickly become a nightmare to write and maintain, so avoid it if at all possible.
Anyone who’s spent much time using a Windows computer is familiar with the clipboard—a behind-the-scenes container that temporarily stores information so you can transfer it from one program to another. Using the clipboard, you can copy a snippet of text in a Word document, and then paste it into a field in an Access table, or vice versa. That much is easy. But you probably don’t realize that you can copy an entire table of information.
Tip
Almost all Windows programs respect the same shortcut keys for the clipboard. Use Ctrl+C to copy information, Ctrl+X to cut it (copy and delete it), and Ctrl+V to paste it.
Before you try this trick out, you need to understand two key facts about the clipboard:
The clipboard can store many different types of information. Most of the time, you’re using it to copy plain text. However, depending on the program you’re using, you could also copy shapes, pictures, tables, and more.
Some types of information can convert themselves to other types. If you copy a selection of cells in Excel, then you can paste it as a formatted table in a word processing program like Word or WordPerfect. Of, if you copy a diagram in Visio, then you can paste it as a picture in Paint. In both examples, you copy a specialized type of object (Excel cells or a Visio diagram) to the Windows clip-board. However, this object can downgrade itself when it needs to. You can paste a full-fledged copy of the object in the original program without losing anything, or you can paste and convert it to something simpler in a less powerful program.
This flexibility’s the secret to transferring data to and from Access. The following sections explain how it works.
Note
The clipboard approach is simpler than the import and export features in Access. As a result, it’s a faster choice (with fewer steps). Of course, it also gives you fewer choices and doesn’t work with all programs.
Access lets you copy a selection of rows or an entire table to another program, without going through the hassle of the Export wizard. Access copies these rows to the clipboard as an intelligent object that can convert itself into a variety of software-friendly formats. You can paste them as Excel cells, HTML text (the formatting language of the Web), or RichText (a formatting standard created by Microsoft and supported by all major Word processors). Since HTML and Rich-Text are so widely supported, you’ll almost never have a problem copying your rows into another program when you use this technique.
Here’s how to try it out:
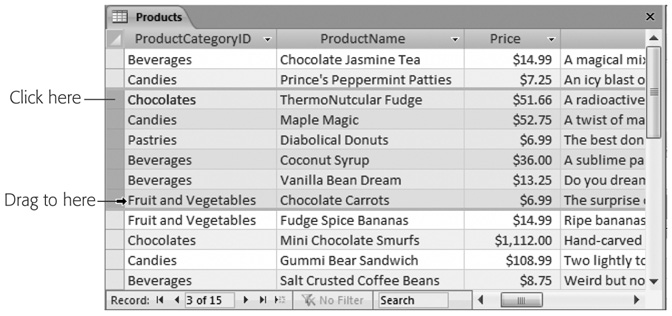
If you want to copy an entire table, then, in the navigation pane, select the table. If you want to copy only a few rows, then select them in the Datasheet view, as shown in Figure 19-1 .
You’re not limited to copying tables. You can also copy a query’s results. Just select the query in the navigation pane. You can’t copy reports or forms, however.
When you copy rows or an entire table, Access takes your column hiding settings (Section 3.1.4) into account. If you’ve hidden a column so it doesn’t appear in the datasheet (by selecting it, and then choosing Home → Records → More → Hide Columns), Access doesn’t copy it to the clipboard. This technique helps you leave out information you don’t want to copy.
Figure 19-1. When selecting rows in the datasheet, click the gray margin just to the left of the first row you want to select. Then, drag down to select as many rows as you want. If you don’t want to take your hand off the mouse, then you can copy these rows by holding down the Ctrl key, and right-clicking one of them. Then, from the pop-up menu, choose Copy.
Note
You can copy only a contiguous selection of rows, which is a fancy way of saying you can copy only rows that are right next to each other. If you have 10 rows in a table, then you can copy rows three to six, but you can’t copy just the first and last rows. (Of course, you can use several smaller copy operations to get the stragglers.)
Hit Ctrl+C to copy your selection.
This action places the records on the Windows clipboard. You can now paste it inside Access or in another program.
Switch to the program where you want to paste your information.
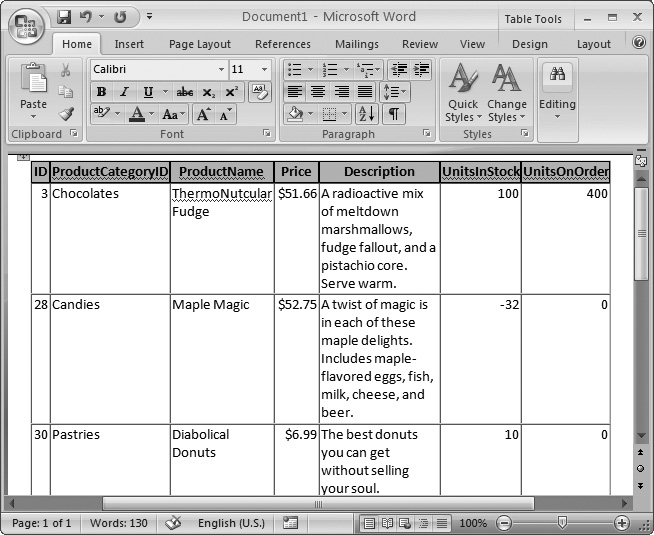
If you’re just trying this feature out for the first time, then take a whirl with Excel or Word (shown in Figure 19-2).
Hit Ctrl+V to paste your selection (see Figure 19-2).
Access pastes the rows from your selection, complete with column headers. If you’ve applied formatting to the datasheet (Section 3.1), then most of that formatting comes along.
Depending on the program where you paste your records, you might see a smart tag icon appear at your newly pasted content’s right-hand corner. In Office applications, you can use this smart tag to change options about how the data’s pasted (for example, with or without formatting).
You can copy information from Access into another program easily enough, but you probably don’t expect to be able to do the reverse. After all, a database is a strict, rigorously structured collection of information. If you try to copy a table from a Word processing program, then you’ll lack vital information, like the data types of each column. For that reason, Access doesn’t allow it.
However, Access makes a special exception for everyone’s favorite spreadsheet program, Excel. You can copy a selection of cells in Excel, and then paste them into Access to create a new table. This procedure works because Excel does distinguish between different types of data (although it isn’t nearly as picky as Access). For example, Excel treats numbers, dates, text, and TRUE/FALSE values differently.
Here’s how to use this feature:
In Excel, select the cells you want to copy.
If your spreadsheet includes column titles, then include those headers in the selection. Access can use the titles as field names.
Hit Ctrl+C to copy your selection.
Switch to Access.
Click anywhere in the navigation pane, and then press Ctrl+V.
Access notices that you’re trying to paste a group of Excel cells, and it tries to transform them into a table. First, it asks if the first row in your selection includes column titles.
If you selected the column titles in step 1, then choose Yes. Otherwise, choose No.
If you choose Yes, then Access doesn’t need to create random field names—instead, it can use your headers.
Access creates a new table to deal with the new data. This table’s named after the Excel sheet. If your sheet’s named Sheet1 (as so many are in Excel), you now have a Sheet1 table.
Once Access finishes the paste, it shows a confirmation message to let you know everything’s finished successfully.
Click OK.
Now you can refine your table to make sure the data types and field names are exactly what you want.
Although the clipboard cut-and-paste approach is neat, it doesn’t always work out. If you need to export data to a file and you don’t have the corresponding program installed on your computer (or you just don’t want to bother running it), then you need a different way to transfer your information. Similarly, if you’re downloading data from the Web or fetching information from a program that doesn’t support Windows cut-and-paste, you need the full-fledged Access import feature.
When Microsoft designed Access 2007, they spent a fair bit of time making the import and export features clearer and more straightforward. Nowadays, you can do all the importing and exporting you want from a single ribbon tab, which is named External Data (Figure 19-3).
Figure 19-3. The External Data tab’s Import section lets you pipe data into Access using a variety of formats. The Export section does the reverse—it takes your table, and exports it in a bunch of different flavors.
Note
The Import and Export sections have easy-to-access buttons for the most popular file formats. If you don’t see what you want, then click the More button to see an expanded list of choices.
Whether you’re importing or exporting data, the process is essentially the same. You answer a few questions about what file you want to use and how you want to make the conversion, and then Access does your bidding.
Once you finish performing an import or export operation, Access gives you the option of saving all your steps. If you do, you can reuse them later on (see Section 19.3.7). This method’s a great way to save time if you need to perform the same export or import process again (like if you need to import some data every day, or export a summary at the end of every month).
Most of the time, you’ll import data that’s in one of these five common formats:
Access. When you use this option, you aren’t performing a conversion. Instead, you’re taking a database object from another Access database file, and copying it into the current database. You used this option in Chapter 18 (Section 18.2.4) when building a front-end database.
Excel. Pulls the data from an Excel spreadsheet.
SharePoint List. Pulls the data from a list that’s hosted on a SharePoint server. You don’t need to import SharePoint information in order to work with it. Youcan also edit SharePoint lists directly in Access. Chapter 21 has much more about getting Access and SharePoint to work together.
Text File. Pulls the data out of a plain text file. Typically, plain text files use some sort of character (like a comma) to separate field values. This universally understood format’s supported by many programs, including just about every piece of spreadsheet software ever written. When using this option, Access takes a look at the text file as it tries to figure out how it’s organized. However, you get the chance to confirm or correct the hunch before you import any data, as described in Section 19.3.4.
XML File. Pulls the data out of a structured XML file. XML is a cross-platform format used to represent any type of information. However, you can’t successfully import all XML files—for the import feature to have any chance of success, the XML file must use a table-like structure. You’ll learn more about this option in Section 19.4.6.
Using the More button, you’ll find several other, more exotic import choices:
ODBC Database. Grabs information from just about any database product, provided it has an ODBC driver. This option works particularly well if you need to get data out of a high-end server-side database like Oracle, SQL Server, or MySQL.
HTML Document. Extracts information from a list or a table in an HTML Web page. Since HTML’s a standard that’s notoriously loose (and at times down-right sloppy), you should try to avoid this option. You’re likely to have importing problems.
Outlook Folder. Pulls information out of a folder in Outlook or Outlook Express.
dBase File, Paradox File, and Lotus 1-2-3 File. Pulls information out of a file created with one of these Paleolithic programs.
No matter what type of data you want to import, you’ll go through the same basic steps. Here’s an overview:
In the ribbon’s External Data → Import section, click the button that corresponds to the type of file you want to import.
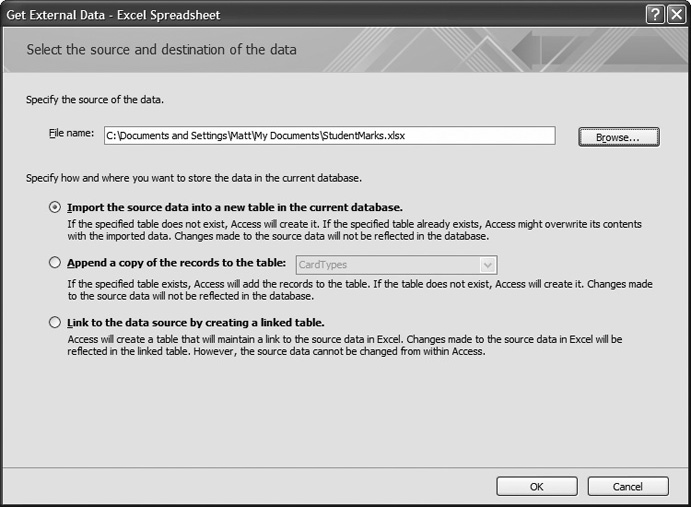
When you choose a format, Access launches the Import wizard (Figure 19-4).
Enter the name of the file you want to import.
If you don’t remember the file path (or you just don’t want to type it in by hand), then click Browse, and then navigate to the right place in the File Open window. Once you find the file, double-click it.
Choose where to place the imported content in your database.
You have three possible choices for placing your data. Depending on the file format you’re using, all these may not be available.
Create a new table. This option creates a fresh new table for the data you’re importing, which saves you the headache of worrying about conflicting records. However, if a table of the same name already exists in the Access database, then this option wipes it out.
Append to an existing table. This option takes the rows you’re importing and adds them to an existing table. In order for this option to work, the structure of the data you’re importing must match the structure of the table you’re using. For example, the field names much match exactly. However, the data you’re importing can leave out fields that aren’t required (Section 4.1.1) or have default values (Section 4.1.2).
Create a linked table. If you use this approach, then Access doesn’t actually transfer the information into your database. Instead, every time you view the linked table, Access checks the original file to get the most recent information. The neat thing here’s that your linked table always shows the most recent information. With any other option, the imported table’s left untouched if you change the original file. However, linked tables are also risky, because you don’t have any guarantee that the file won’t travel to another location on your hard drive (where Access can’t find it). You used linked tables to create a split database in Chapter 18.
Click OK.
A wizard launches that collects the remaining information that Access needs. If you’re importing an Excel file, then Access asks you which worksheet to use. If you’re importing a text file, then Access asks you how the fields are separated.
Answer all questions in the wizard to tell Access what it needs to know about the structure of the data you’re importing.
Once you’re finished with this stage, Access asks you its final question—whether or not you want to save your import steps.
If you want to perform this import again later on, then select “Save import steps”. Then, click Close.
Section 19.3.7 shows how to reuse a saved import.
Note
If Access finds any errors while importing your data, then it creates another table with the same name as the table you’re importing to, with_ImportErrors tacked on the end. Access adds one record to that table for each problem. If you try to import a bunch of information into a table named SalesData, and Access can’t convert the values to the data type you want (for example, there’s text in a column that should only hold numbers), you get a table named SalesData_ImportErrors.
The following sections walk you through the specifics for two common data formats that need a few extra steps: Excel workbooks and text files.
In order to import from an Excel file, your data should be organized in a basic table. Ideally, you have column headings that match the fields in your database. You should trim out any data that you don’t want to import (like other cells under the table that aren’t a part of the table). You should also remove values calculated using Excel formulas. (As you learned in Section 2.5.5, you shouldn’t store calculated values in a table, because they introduce the risk of inconsistent data.)
Note
Earlier in this chapter, you learned how to take Excel data, and cut and paste your way to an Access table. However, when you perform a full-fledged import, you get the opportunity to change field names, fine-tune data types, and use indexing.
Once you have a cleaned-up table of data in an Excel file, you’re ready to start the import process:
Choose External Data → Import → Excel, choose your Excel file, and then specify how you want to add the imported information to your database. Then, click OK.
You learned how to make these decisions in steps 1 to 3 in Section 19.3.2.
Choose the worksheet that houses your data (Figure 19-5).
Excel files, or workbooks, begin with three worksheets. Most people plop their data on the first one, which is initially named Sheet1. If you’re an Excel expert, then you might have designated a section of a more complex worksheet as a named range. If so, you can pick that named range from the list.
Click Next.
If your Excel data has a row with column headings, then choose First Row Contains Column Headings.
These headings become the starting point for your field names. If you don’t choose First Row Contains Column Headings, then Excel treats the first row as an ordinary record.
Click Next.
If you’re creating a new table for your imported records, then Access asks you to configure the fields you’re creating. If you’re appending the records to an existing table, then skip ahead to step 7.
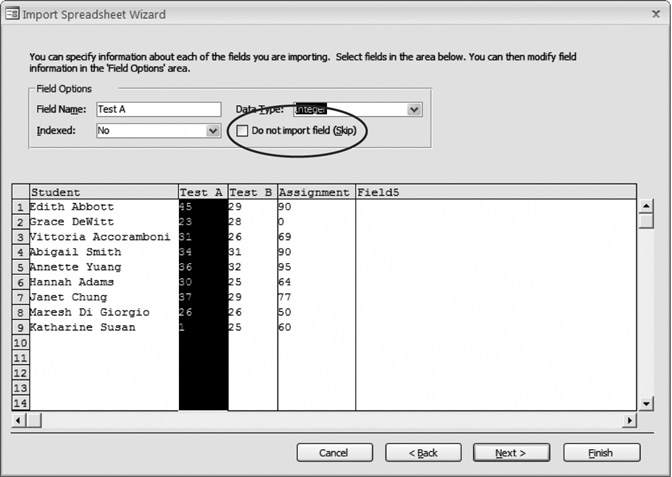
For each field, you can choose a field name, the data type, and whether or not the field should be indexed (Section 4.1.3). Then, click Next.
Access makes some intelligent guesses based on the data that’s there, but it’s up to you to fine-tune the details. For example, if you have a column with whole numbers, you may want to change the data type from Double (which supports fractional numbers) to Integer, as shown in Figure 19-6.
Choose whether you want Access to create the primary key.
Choose “Let Access add primary key” if you’d like Access to create an autonumbered ID field (which is generally a good idea). If the data you’re importing already includes a field you want to use as a key, then select “Choose my own primary key”, and then pick the right field.
In the Import to Table text box, type the name of the table you want to create or add your records to.
Click Finish to finalize your choices.
Once the import’s complete, you can choose whether or not to save your import steps for reuse.
You’ll find some potential stumbling blocks when importing data from Excel. Blank values and fields, the commonest problems, occur when the Import wizard assumes there’s data in a part of your worksheet that doesn’t contain any information. (This could happen if there’s a cell with just a space somewhere on your worksheet, or even if you have a cell that used to contain data but has since been deleted.) After you perform your import, you may need to clean up your table to fix problems like these by deleting empty fields and records.
Text files are the lowest common denominator for data exchange. If you’re using a program that creates files Access can’t import, then plain text may be your only avenue.
Once again, you start by choosing your file, and then choosing how you want to add the information to your database. Then, the Import wizard takes you through a few more steps:
Specify the type of text file.
Access can import from two types of text files:
Delimited text files use some sort of separator to indicate where each field ends. For example, Joe,Piscapone,43 is a line of text you may find in a delimited text file—it’s three field values separated by commas.
Fixed-width text files separates a record into separate fields by position. Each field has a certain number of characters allocated to it, and if you don’t use them all up, then Access fills the remaining space (up until the next field) with space characters.
Click Next.
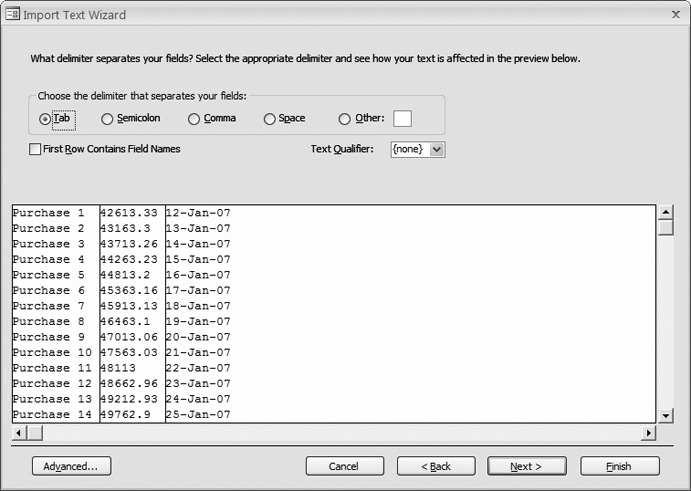
If you’re importing delimited text, Access asks you what character’s the delimiter—in other words, what character separates the fields (Figure 19-7). Commas and tabs are common delimiters.
If you’re importing fixed-width text, Access lets you set the field boundaries by dragging column lines to the right position in the preview window.
Complete the wizard.
The rest of the wizard unfolds in exactly the same way as it does for Excel data.
If you’re creating a new table to hold your imported data, then the next step asks you to configure the fields you want to create by setting their names, data types, and indexing options (Figure 19-6). Once you’ve finished this part, you can choose whether or not you want Access to create an autonumbered ID field, and then use it as the primary key.
Finally, in the last step, you need to enter the name of the table you want to create or add to. You can then click Finish (and, optionally, choose to save your import steps for later reuse).
Just as you can import information from other files and pop it in your database, you can also take the existing information and ship it out to another format. You’ll most often undertake this step to let some other person or program get their hands on your information without needing to go through Access.
When exporting your data, you can use all the same formats that you can use in an import operation, plus a few more. Here’s a rundown of the most popular choices:
Access. Transfers the Access table (or a different type of object) to another Access database file. This feature isn’t as powerful as importing Access objects, because you’re limited to one object at a time. For that reason, people don’t use it as often.
Excel. Puts the data into the cells of an Excel worksheet. Perfect if you want to use Excel’s tools to analyze a sales trend or plot a profit chart.
Word. Puts the data into a Word document, separating each column with tabs and each line with a hard return. This format leaves a lot to be desired, because it’s difficult to rearrange the data after the fact in Word. (A nicer export feature would put the report data into a Word table, which would make it far easier to work with.)
PDF or XPS. Creates a print-ready PDF file with the exact formatting and layout you’d see if you sent the table to your printer. Unlike Excel or Word documents, you can’t edit a PDF file—you’re limited to reviewing the report and printing it out.
Note
The PDF or XPS option appears only if you’ve installed a free add-in for Office. Section 10.2.3 describes how to get it.
HTML Document. Creates a web-ready HTML Web page that you can post to a Web site or a company intranet. The HTML format that Access generates looks remarkably like your real, printed report.
Text File. Dumps the data into a plain text file, with tabs and spaces used to arrange the data. You lose colors, fonts, borders, and other formatting details. This format isn’t very useful—think of it as a last resort to transfer data to another program if none of the other export options work.
XML File. Saves the data in a text .xml file, without any formatting. This option makes sense if you’re using some sort of automated program that can read the exported XML file and process the data. (See Section 19.4.3 for more information about XML and detailed export steps.)
To perform an export operation, follow these steps:
In the navigation pane, select the table you want to export.
Unfortunately, you can’t export more than one table at once. However, you can export just a portion of a table. One way to do this partial export is to open the table, and then select the rows you want to export. (Once you start the export process, you see an option that lets you export just the selected rows.) You can also create a query that gets just the rows you want. You can export the query results by selecting the query in the navigation pane instead of the underlying table.
Click the button that corresponds to the type of file you want to export.
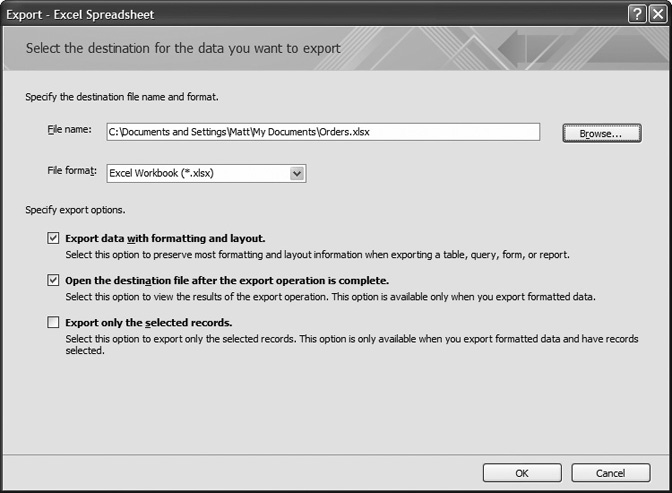
When you choose a format, Access launches the Export wizard (Figure 19-8).
Enter the name of the file you want to create.
Access creates this file during the export operation. In some cases, you may have a choice of file format. For example, if you’re exporting to Excel you can use the newer XML-based spreadsheet format (the .xlsx standard), or the older .xls standard that supports older versions, like Excel 97.
If you want to keep the formatting that’s in your database, then choose “Export data with formatting and layout”.
If you’ve tailored the datasheet with fancy fonts and colors (as described in Section 3.1), Access preserves these details in the exported file. Obviously, this option doesn’t work for all formats. For example, simple text files can’t handle any formatting.
If you want to double-check your exported document, then choose “Open the destination file after the export operation is complete”.
It’s always a good idea to make sure you got the data and the formatting you expect. If you use this option, then Access launches the exported file, opening it in the program that owns it (Excel for spreadsheets, Notepad for text files, and so on). Of course, this method works only if you have that application on your computer.
If you’ve selected only a few records in a table, then choose “Export only the selected records”.
This way, Access exports the current selection, not the entire table or query.
Click OK to perform the export.
Access may ask you for additional details, if it needs any more information about how to create the exported file.
Once you’re finished this stage, Access asks you its final question—whether or not you want to save your export steps.
If you want to perform this import again later on, select “Save export steps”. Then, click Close.
The following section explains how to use a saved export.
In some situations, you’ll find you need to perform regular import or export operations. You may need to dump the data from an Excel spreadsheet into your database once a week. Or maybe you need to produce a monthly PDF report with a sales summary. In these cases, it’s quite time-consuming to go through the entire wizard. This is especially true if you’re performing an import, because you might need to choose which columns you want to import, set the appropriate data types, and then adjust other settings the exact same way you did the first time you performed the operation.
Fortunately, Access has a solution for times like these. You can save all the settings you chose in the Import or Export wizard and store them in your current database. Then, when you need to repeat the process, you can use these settings to do it with just a couple of clicks (with no brainpower needed).
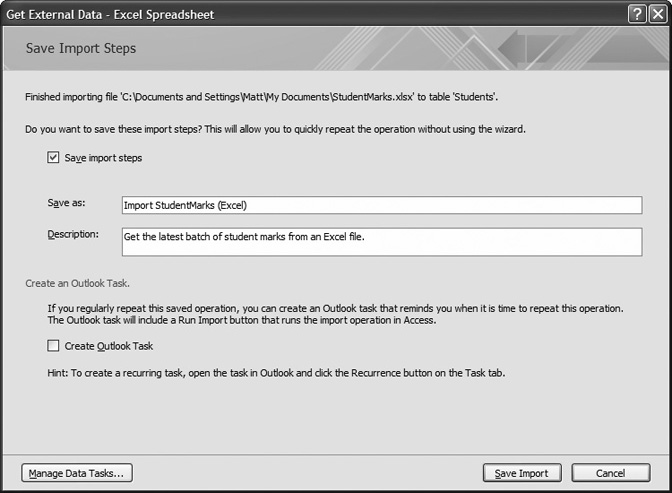
To save your steps, just turn on the “Save import steps” or “Save export steps” checkbox at the end of the process the first time you import or export your data. You’ll need to choose a descriptive name for your settings, as shown in Figure 19-9, and then click Save Import.
Tip
If you’re saving an import operation, think carefully about whether you choose to create a new table or append to an existing table (Section 19.3.3). If you create a new table, then every time you run the import, Access overwrites that table with a new table that has all new data. But if you append to an existing table, Access adds the new data to whatever data you’ve already got. (In this case, you need to be on the lookout for duplicate data; see the “The Danger of Duplicates” box in Section 19.3.3.)
Figure 19-9. Here, an import process is being saved for later use. You can fill in an optional description for this operation to help you remember what it’s all about. And if you’re using the popular Microsoft Outlook email program, then you can choose Create Outlook Task to create an automatic reminder that tells you when it’s time to perform your import or export.
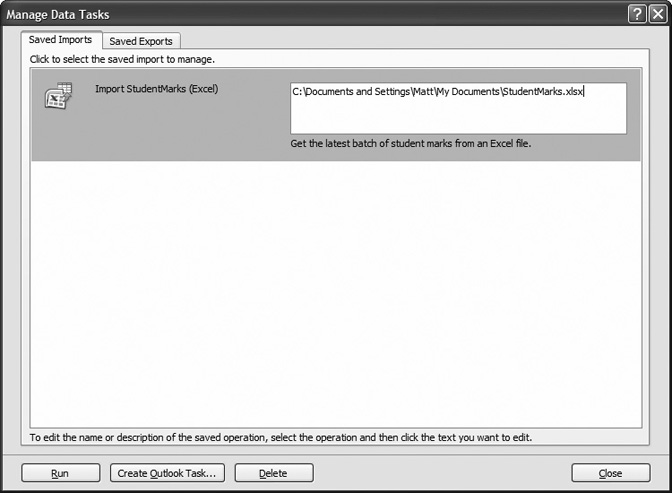
At some future point, you can rerun your import or export operation. If you want to repeat an import, then choose External Data → Import → Saved Imports. To repeat an export, choose External Data → Import → Saved Exports. Either way, you get to the Manage Data Tasks dialog box (Figure 19-10), at either the Saved Imports or Saved Exports tab. These tabs lists the import and export operations you’ve saved for this database.
Here’s what you can do in the Manage Data Tasks dialog box:
Run the operation again. Select it in the list, and then click Run. Access warns you if it needs to overwrite an existing table (in an import) or file (in an export). Other than that, the whole process happens in a flash.
Delete your saved operation. Just select it, and then click Delete.
Create an Outlook Task for the operation. You can use this feature to remind yourself to perform this operation at some future scheduled time (or at regular intervals). To do so, click Create Outlook Task to create the task, and then find and configure that task in Outlook. When the reminder occurs, it includes a handy Run Import button that you can click to launch the import operation in Access right away.
Figure 19-10. In this example, a single import operation has been saved. By clicking on the file name, you can change it to another file, but you’ll have to type in the new path by hand.
Change some aspects of your operation. You can modify the name, the description, and the file name by clicking the appropriate detail in the Manage Data Tasks dialog box (Figure 19-10). This way, you can start out importing c:My DocumentsFancyFilesWildExpenses.xlsx, but then use the same settings to import d:HankSmithEvenMoreExpenses.xlsx. You can’t change any other details, like the source or destination table in Access, or the field data types.
When you’re finished using the Manage Data Tasks dialog box, click Close to get back to Access.
One of the hottest buzzwords in the computer world is XML (the extensible markup language), an all-purpose way of exchanging information between different programs. Access 2007 supports XML with its import and export features, where XML shows up as just one more supported format. However, if you really want to understand how the Access XML features work—and whether or not they really add anything new—you need to dig a little deeper.
XML alone sounds pretty modest. People often describe it as a format for storing information. For example, instead of saving data in Word documents, Excel spreadsheets, or ordinary text files, you can save data in an XML file. This simplicity’s deceiving, and two factors make XML really special:
XML is flexible. You can tailor XML to store pretty much any type of information: pictures, product catalogs, invoice data, receipts, catalog listings, the maintenance specs for every Dodge Minivan ever built, and on and on.
XML is widespread. Computer applications written in different programming languages (like Java, Visual Basic, or C++), or running on different operating systems and computer hardware (like Windows, Mac, or Linux), can all use XML in exactly the same way. That quality makes XML a perfect solution for exchanging information between people, companies, and even computers that have been programmed to send data to one another automatically (it’s features like this last one that cause supply-chain management types to start drooling when they talk about XML).
Contrary to what many people believe, XML is not a data format (like HTML, the format used to create Web pages). If XML were an ordinary data format, it wouldn’t be nearly as useful because, no matter how good a format is, it can’t suit everyone. For example, even though almost every company needs to create invoices, most companies wouldn’t be happy with a generic format for storing invoice information. One company may need to track customer names, while another might track customer ID numbers. The bottom line is that most companies need to store slightly different data in slightly different ways. That means a one-size-fits-all solution is pretty much always doomed to failure.
So if XML isn’t a data format, what is it? Technically, XML is a meta-language, which is a fancy way of saying that XML is a language for creating other languages. XML does this creating by setting out a few simple rules that let you build your own data format that’s just right for your data.
For example, Acme Company can build an XML format for invoices, and call it AcmeInvoice. Meanwhile, Budget Company can build its own XML invoice format and call it BudgetInvoice. Even though both these formats are designed to store invoice information, they can contain completely different kinds of data. XML’s flexibility is its strength.
At the same time, XML’s flexibility can create problems. Suppose a bank named Worldwide Green sets up a system to automatically process XML invoices in a specific format. The system works smoothly until Acme Corporation sends along its own homegrown invoice. Even though Acme’s invoice uses XML, it doesn’t conform to the XML that the bank expects, and so it gums up the bank’s automated invoice-processing application. Suddenly, XML doesn’t look so useful.
The bottom line is: XML holds the promise of universal data sharing—but if you don’t create some rules and follow them, then you’re left with a bunch of incompatible formats.
Note
XML is really quite simple. However, there are a slew of other standards with names like XML Schema and XSLT that work in conjunction with XML and provide solutions for validating XML, searching XML, transforming XML, and so on. These other standards are quite complex and aren’t discussed in this book. For more information, refer to a book like Learning XML by Erik Ray (O’Reilly), or the Web site http://www.w3schools.com/xml.
To get a better understanding of how to configure Access to handle XML, look at a simple example. Technically, you don’t need to know what XML looks like in order to use the XML features in Access, but the more you understand, the less confusing life will be. In this section, you’ll learn the three most important rules that shape all XML documents. If you already know a little about XML, feel free to skip ahead.
By the way, good news before you even start: XML is written in a text-based, human-readable format. So you can use a program like Notepad to crack open an existing XML file, and get a basic idea of its format and structure. You can even write an XML file from scratch using Notepad. You can’t do the same with the average Access database, because it’s stored in a binary format that you can read only when you’re looking at the data in Access. (If you try to open a database in Notepad, you’ll see a jumble of indecipherable symbols.)
All respectable XML documents start with something called a document prolog. This bit simply announces that what you’re looking at is an XML document. It can also indicate the encoding of the document, which sometimes specifies that the document uses a special character set (like a non-English alphabet).
Here’s a typical document prolog, indicating that this document uses Version 1.0 of the XML standard (the most prevalent version):
<?xml version="1.0" ?>
If you’re creating an XML document by hand, then you should make sure you place the document prolog as the very first line of the file.
The basic building block of any XML document is the element. Elements are information containers. For example, if you wanted to store a person’s name, you could create an element called Name. (For more on the infinite variety of elements that anyone can create, see the box in Section 19.4.2.3.)
A typical element’s composed of a start tag and an end tag. The actual information goes between these two tags. You can easily recognize start tags and end tags because they use angle brackets <>. Here’s one possible start tag:
<Name>
This tag marks the start of the Name element. The end tag looks almost identical, except it begins with the characters </ instead of just <. Here’s what you need to end the Name element:
</Name>
To actually store some information in an XML document, you just insert the content between the start and end tag of an element. Here’s how you might store someone’s name in an XML document:
<Name>Patrick</Name>
You could create a list of names by putting one <Name> element after the other, or you could add other elements that store different types of information, like address, title, employer, and so on. You put all these tags together in a file to make an XML document.
So far, you’ve seen examples of XML elements that contain text. You can also create an element that contains one or more additional elements. This is a basic principle for organizing information in XML.
Suppose you want to keep track of several people’s names and ages. The following format isn’t especially clear because it’s hard to tell which person connects to which age:
	<Name>Lisa Chen</Name>
	<Age>19</Age>
	<Name>Bill Harrison</Name>
	<Age>48</Age>
A better solution is to group the <Name> and <Age> elements together for each person, and put them inside another element. Here’s an example:
	<Person>
	     <Name>Lisa Chen</Name>
	     <Age>19</Age>
	</Person>

	<Person>
	     <Name>Bill Harrison</Name>
	     <Age>48</Age>
	</Person>
Here, the two <Person> elements each represent a distinct individual. Information about each person’s stored in <Name> and <Age> elements that are nested inside the appropriate <Person> element.
There’s no limit to how many layers deep you can nest information, making this method of organizing information extremely flexible. In fact, it’s part of the reason that XML can work with so many different types of data.
XML imposes one more rule. Every document must start with a single element that you place right after the document prolog. You place all the other content inside this element, which is called the root or document element. So far, the examples you’ve seen are only excerpts of XML. The following listing shows a complete, valid XML document—a list with information about two people—that starts off with the document element <PeopleList>:
	<?xml version="1.0" ?>
	<PeopleList>
	     <Person>
	         <Name>Lisa Chen</Name>
	         <Age>19</Age>
	     </Person>

	     <Person>
	         <Name>Bill Harrison</Name>
	         <Age>48</Age>
	     </Person>
	</PeopleList>
You could enhance this document by adding more <Person> elements or different elements to track additional information about each person.
You’ve probably noticed that these XML examples indent each level of elements. That indentation makes the overall structure easier to read, but it’s not required. In fact, applications that read XML (including Access) ignore all the white space between elements, so it doesn’t matter if you add spaces, tabs, and blank lines. In fact, as far as computers are concerned, the document above is exactly the same as the following, much less human-friendly version:
	<?xml version="1.0" ?>
	<PeopleList><Person><Name>Lisa Chen</Name><Age>19</
	Age></Person><Person><Name>Bill Harrison</Name><Age>48
	</Age></Person></PeopleList>
As you’ve already learned, a file’s one place you can store XML documents. But you can just as easily place XML documents in databases or other storage locations. In fact, sometimes XML data isn’t stored anywhere—instead, people just use it to send information between applications over the Internet. However, when you use XML with Access, you’re always using XML files (unless your company has created a custom solution using the heavy-duty programming features in Access).
Most XML files have the extension .xml. For example, it makes perfect sense to take the person list document shown earlier and place it in a text file named PersonList.xml.
Another type of XML document’s extremely important: XML schemas. Schemas are designed to solve a common problem—namely, defining the rules for a specific XML-based format. For example, a schema indicates the element names you can use, how you can arrange the elements, and the type of information each element can contain. An XML-friendly application can use the schema to verify that an XML document uses the right structure and contains the appropriate content. In an ideal world, every time a company created an XML format, they’d write an XML schema that defines it. (You probably won’t be surprised to learn this doesn’t always happen.)
In order to use a schema, you simply need to have a copy of it in a file. (Schemas themselves are complex and ugly and beyond the scope of what a typical office needs—or wants—to learn.) Usually, schema files have the extension .xsd.
Note
For a more comprehensive beginner’s introduction to XML and XML schemas, check out the excellent online tutorial provided by W3 Schools at http://www.w3schools.com/xml.
XML is a great way to exchange data between different computer programs. But what does that have to do with Access, which already has its own perfectly good way of storing data? Here’s the deal: More and more companies today use XML to pass data back and forth. When companies exchange business orders, for instance, or news organizations post stories, or real estate firms list properties for sale, chances are they’re using an XML-based format. If you want to send your Access data to these systems, then you need a way to take it out of the specialized .accdb database format, and put it in clear-as-a-bell XML.
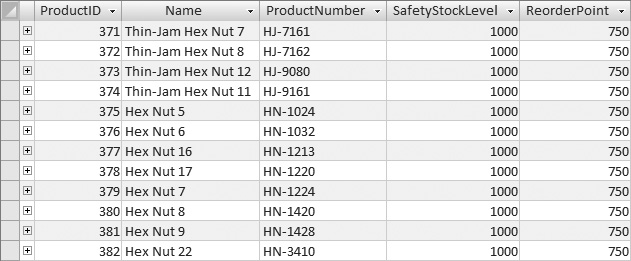
Unfortunately, the XML support in Access is still quite limited. The problem’s that Access doesn’t let you pick the XML format you want. Instead, it creates a custom format that closely matches your table. Consider the table in Figure 19-11. (When exporting XML, you always export a complete table.)
When you export this table, Access creates an XML document that looks like this:
	<dataroot>
	     <Product>
	         <ProductID>371</ProductID>
	         <Name>Thin-Jam Hex Nut 7</Name>
	         <ProductNumber>HJ-7161</ProductNumber>
	         <SafetyStockLevel>1000</SafetyStockLevel>
	         <ReorderPoint>750</ReorderPoint>
	     </Product>
	     <Product>
	         <ProductID>372</ProductID>
	         <Name>Thin-Jam Hex Nut 8</Name>
	         <ProductNumber>HJ-7162</ProductNumber>
	         <SafetyStockLevel>1000</SafetyStockLevel>
	         <ReorderPoint>750</ReorderPoint>
	     </Product>

	   …
	</dataroot>
No matter what table you export, Access always follows the same rules:
Access creates a separate element for each row in the table, using the table name. In this example, that system means you end up with one <Product> element for each record.
Inside each record, Access creates a separate element for each field. In this example, you end up with fields like <Name>, <ProductNumber>, and so on.
There’s nothing particularly wrong with structuring XML in this way. However, since you can’t change the structure, you’ll run into trouble if you want to use another program that expects XML in a different format. For example, your program may expect the root element to be named <ProductRecords> instead of <dataroot>, or it may assume a slightly different nesting. Minor quibbles like these can completely derail an XML-processing application.
Sadly, there’s no way around this problem. In order to use Access XML, you must specifically design a program that recognizes this structure, or you must use another tool to convert the XML to the standard you really want. Access’s XML export feature’s enough to get you started, but it doesn’t take your data all the way.
Note
If all you need to do is filter out records or fields that don’t interest you, or give fields different names, then you can solve the problem with a query. Just create a query that presents the information the way you want it, and then export its results (rather than the whole table).
The same limitations appear when you import XML content. Access expects to find XML content in the rigid table-like format it expects. If you try to feed it a different type of XML, then you get an error.
Now that you’ve learned about XML and considered its limitations in Access, you’re ready to try it out for yourself. The following steps lead you through the process:
Choose External Data → Export → More → XML File.
The familiar export process begins.
Supply the name of the file you want to create, and then click OK.
Access suggests you use the table name. For example, if you’re exporting the Orders table, it recommends an XML file named Orders.xml.
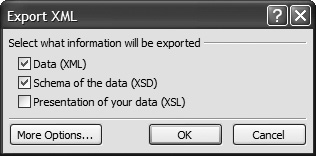
Choose what file types you want to create (Figure 19-12):
Data (XML) creates the XML file that has the actual content from all records in your table.
Schema (XSD) creates a .xsd schema file. The schema doesn’t contain any data, but it stores a concise definition that describes your table and the fields it contains. The schema has two purposes—you can pass it along to expert programmers so they know what type of XML to expect from Access, or you can use it to create a new, empty table in another Access database (see Section 19.4.6).
Presentation (XSL) creates a .xsl transform file. This file defines how a browser can convert the raw data in the XML file into an HTML Web page suitable for display in a browser. When you choose this option, Access also creates an .htm file that uses the .xsl file. For example, if you’re exporting the Products table, you wind up with a Products.htm Web page—open this in your browser, and it uses the Products.xsl file to display the data in Products.xml.
If you want to export related tables in the same XML document, then click More Options.
An Export XML window with additional options appears. Most of these options are best left for XML gurus. However, the Data tab’s more interesting—it lets you export related tables (Figure 19-13).
Figure 19-13. The Data tab shows a tree that starts with the table you’re exporting, and branches out to other related tables. If you want to include the data from these related tables, simply add a checkmark next to each one.
For example, if you’re exporting the Orders table, you have two options:
Export other child tables. You could also export the OrderDetails records for each order. Access nests the OrderDetails elements inside the corresponding Orders element in the XML.
Export the related records from a parent table. You could, for instance, also export records from the OrderStatus and CreditCards tables. These records appear under the heading [Lookup Data] because they provide more data that’s linked to an order (in this case, the current status of the order, and the credit card used to pay for an order).
Click OK.
Access creates the files you chose in step 3.
If you want to repeat the export process another time, then choose “Save export steps.”
Click Close to return to Access.
Access makes it just as easy to import XML data, provided it’s in the structure Access expects. To try it out, take the table you just exported, and then reimport it into a new database. Here’s how to do it:
Choose External Data → Import → XML File.
The familiar import process begins.
If you’re creating a new table and you have a schema for your data, then supply the schema file’s name. If you already have the tables that you want to use, or you don’t have a schema handy, then jump straight to step 6.
You can import straight from the XML file, but it’s always better to use the schema if you need to create the table for the first time, because the schema stores information about each field’s data types. This information ensures that the table you create is a closer match to the original table you exported.
Click OK.
Access scans the schema, and displays the structure of the tables it’ll create (Figure 19-14).
Click OK.
Using the schema information, Access creates a new, blank table with the correct structure. Now you’re ready to fill it with data.
Click Close to return to Access.
Choose External Data → Import → XML File.
Now that you’ve created your tables, you’re ready to import the actual data.
Supply the name of the XML file that has the data you want to import, and then click OK.
Access shows the structure of the table, based of the XML data in your file. This structure should exactly match the structure of the table you want to create or add to.
Choose one of the three import options:
Append Data to Existing Table(s) tells Access to find the table with the same name, and then add all the data to this table. Use this option if the table you’re using already exists.
Structure and Data creates the table, and then fills it with all the data.
Structure Only creates the table if it doesn’t already exist, but doesn’t import any data.
Click OK.
Access fills the tables with data from your XML file.
If you want to repeat the export process another time, then choose “Save export steps”.
There are many more dedicated email users than database mavens in the world. So it would be pretty nifty to have a way to get data from other people by just having them send you an email. The designers who work on Access think so too. They’ve added one other way to pull data into Access from other sources: You can collect it by email.
Here’s how it works:
You pick a table that needs information.
You pick a bunch of people who can provide that information. (You need a list of email addresses, which you can either type in by hand or pull out of a table in your database.)
Access sends an email message to all of them with a form they can fill out. The form lets them fill in the data for one record’s worth of information (although a recipient can fill out the same form multiple times if necessary). To see a quick preview of what this email message might look like, jump ahead to Figure 19-19.
The results of that form get emailed back to you.
For each email you receive, Access inserts a record in your table.
Often, this collect-by-email feature is used to get information about people. For example, you may have a table that has a list of contacts. You can send each person an email message and get them to supply their personal information (address, phone number, and so on). Of course, you can also use the feature to collect other types of information, like a list of items people want to bring to the company potluck.
The collect-by-email feature has a few ground rules:
You need to use Microsoft Outlook 2007 (the email software that’s included with Office 2007) to send your message and receive the responses. So if you haven’t configured Outlook yet with your email details, then you should do that before you go any further. Your recipients can use whatever kind of email program they want.
You can only insert information, not update it. (There’s one exception. You can update a table if each record has the recipient’s email address in a field, because Access can figure out which record to update by matching the email address of the responder to the email address in the table.)
If people fill in the wrong data (for example, putting text in a numeric field), Access can’t create the record. It’s then up to you to figure out what went wrong, and correct the problem.
You’ll probably need to spend some time reviewing the data other people have submitted. People are notoriously careless when filling out forms on a computer. They may type their names completely in lowercase letters, leave out important information, make spelling mistakes or off-color jokes, and so on.
In the following sections you’ll see how to create the email message you need, and then get the data into your table.
The first step (assuming you’ve already installed Outlook and configured your email account in it) is to identify the table where you want to insert data. In the following example, you’ll see how to add prospective candidates to Dating Service database’s Bachelors table. If you want to try this out with your friends, you can find the Dating Service database on the “Missing CD” page at http://www.missingmanuals.com.
Here’s how to do it:
Choose External Data → Collect Data → Create E-mail.
A wizard appears. The first step lists all the steps you need to go through to get your data.
Click Next to move on.
The second step lets you pick the type of form you want to use.
Choose “HTML form”, and then click Next.
This choice tells Access to use HTML tags in its email message. Using these tags, Access can create a form with attractive formatting and text boxes where the recipient can type in information.
The only other option (Microsoft Office InfoPath form) is turned off unless you have the InfoPath application installed on your computer. InfoPath is only included in certain editions of Office, and it’s most commonly used by big companies. Although it’s a great program for filling out forms, it has one serious drawback—in order to use an InfoPath form, all your recipients need to have the InfoPath software installed on their computers. For that reason, the HTML option’s usually better.
The next step asks whether you want to collect new information or update existing information. Choose an option, and then click Next.
Usually, you’ll choose “Collect new information only”. This option’s the one to use in the Dating Service database, because you want to get the information that you need to insert a record in the Bachelors table for each recipient.
If you choose “Update existing information”, your table must include the recipient’s email addresses. For example, you can use this approach if you have a set of records in the Bachelors table that you want to update. Each bachelor will receive an email that they can use to change their current details.
Tip
You can also use the update option if you have the email addresses in another table that’s related to the table you want to fill. For example, you could update a Projects table with the current status of every project if it includes a ProjectManagerID field that points to a record in a ProjectManagers table, which in turn contains the email address.
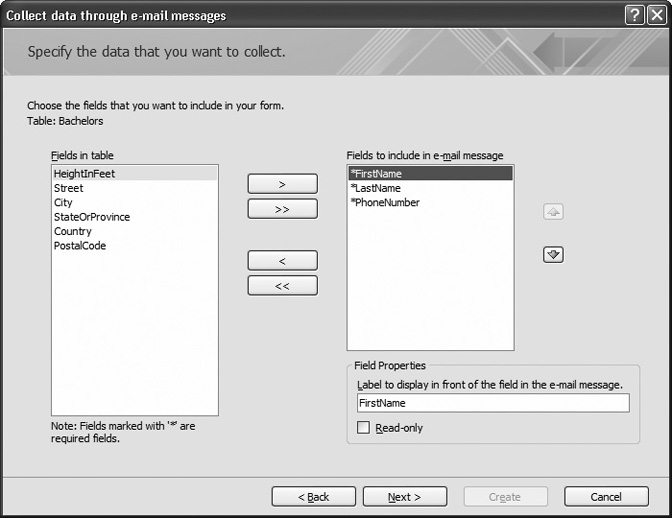
Pick the fields you want to collect (Figure 19-15).
To add a field, select it in the “Fields in table” list, and then click the > button. Or, click the >> button to transfer all the fields in one go.
Optionally, provide clearer names for your fields.
For example, the label “Your favorite food is” might be clearer than the field name FoodPreference. To change a label, select it in the list, and then change the text box that appears underneath.
You can also turn on the Read-only checkbox so that people can’t change a field value. This option makes sense only if you’re getting people to update records. In this situation, there might be some information you want them to see in the form but not change.
Optionally, rearrange the order of your fields.
To move a field, select it in the list of included fields, and then use the up or down arrow buttons. When Access creates the email form, it puts the fields in the same order.
Click Next.
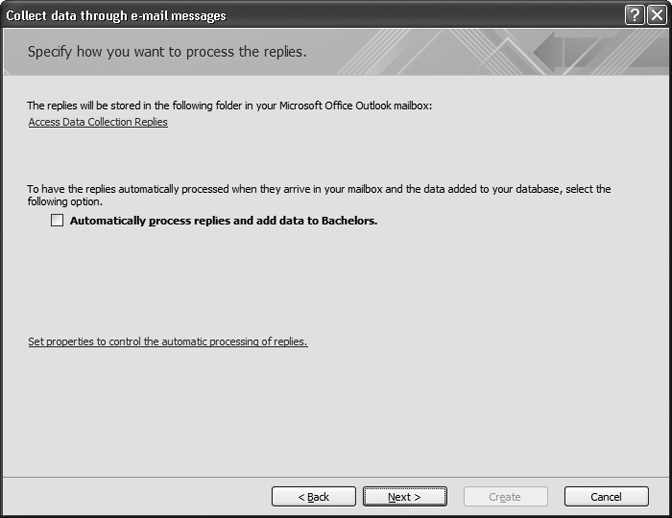
The final step appears (Figure 19-16).
Figure 19-16. Figure 19-16: In the next step, you pick the location where Access stores the replies, and you choose whether they’ll be processed automatically.
Choose the folder where Access stores the reply messages once it’s processed them.
Ordinarily, Access stores replies in an Outlook folder named Access Data Collection Replies. However, you can use any folder you want. To change the folder, click the Access Data Collection Replies link. Outlook launches, and shows you a Select Folder dialog box where you can pick any existing folder (or click New to create a new one.) Once you’ve picked the folder you want, click OK.
If you want to use automatic processing, then turn on the “Automatically process replies” checkbox. If you want to use manual processing, then skip to step 12.
If you use automatic processing, then Outlook communicates with Access whenever it receives a reply. Access then adds or updates the corresponding record right away. This system works as long as your database file remains in the same location, has the same name, and isn’t password-protected.
Manual processing’s more work, but it’s actually a safer choice. That way, you can review every reply before you add the record. You also know exactly how many replies you’ve received, and you can check for errors before the data gets into your table. For these reasons, manual processing’s the best bet.
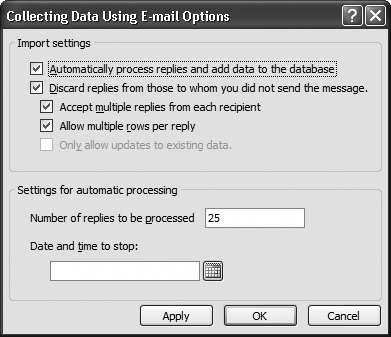
If you’re using automatic processing, then click the “Set properties to control the automatic processing of replies” link to show the Collecting Data Using E-mail Options dialog box (Figure 19-17). Choose the settings you want, and then click OK.
Figure 19-17. If you choose to process replies automatically, then you can control a number of settings in this dialog box.
You can control the following settings:
Discard replies for those to whom you did not send the message lets you ignore messages if they’re sent from people that you didn’t email.
Accept multiple replies from each recipient lets recipients respond as many times as they want. Each time Access receives a message, it adds a record to the table. This makes sense if, say, you’re collecting a list of items your friends want to sell at a group garage sale. It doesn’t make sense if you’re compiling the personal information of a bunch of bachelors, because each person gets just one record.
Allow multiple rows per reply works only if you’re using InfoPath. With InfoPath, you can fill in the information for more than one record in the same form (if this setting’s switched on).
Only allow updates to existing data works only if you’re performing an update (see step 4). If you are, then you can use this setting to prevent people from adding new records. Again, this setting’s an InfoPath-only option.
Number of replies to be processed lets you stop processing after you reach a certain number of replies. From that point on, Access ignores all replies (unless you choose to process them manually, as described in Section 19.5.2).
Date and time to stop lets you halt processing on a certain date and time. Replies that come in late are ignored, although you can process them manually.
Click Next.
The next screen asks how you want to supply email addresses.
Choose an email option, and then click Next.
Choose “Enter the email addresses in Microsoft Office Outlook” if you want to type in the email addresses for your recipients (or pick them from your Outlook address book). Then skip to step 15.
Choose “Use the email addresses stored in a field in the database” if you want to pull the email addresses out of a table.
If you’re performing a table update, then you don’t see this step. You always need to get email addresses out of a table.
If you’re supplying email addresses from a table, then you need to tell Access what table and field to use. Then click Next to continue.
You can pull email addresses out of a current table (if you’re performing record updates) or another linked table (which works if you’re performing record inserts or updates). If you’re updating the information in the Bachelors table, you could use the Email field in that table. Or, if you’re creating a list of projects, each of which is linked to a project manager record, you can pull email addresses out of the ProjectManagers table, and let people create related records in the Projects table.
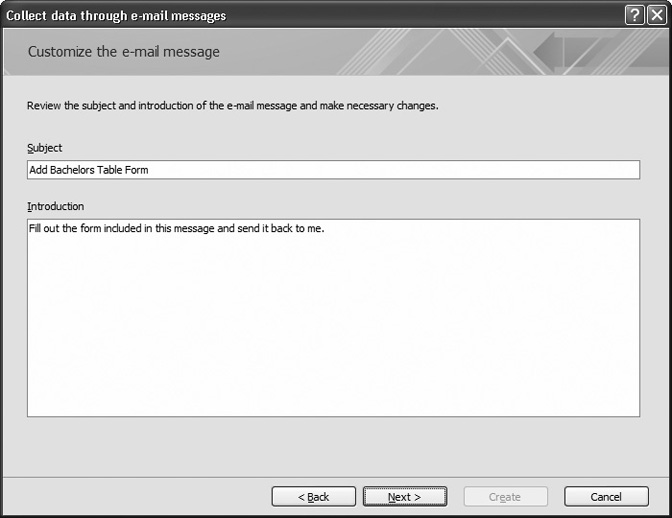
Fine-tune the email message that you’re sending, and then click Next.
You can modify the text in the subject line and introduction (Figure 19-18).
You’ve reached the final step. Click Create to fire up Outlook, and get ready to send your message.
When you click “Create”, Access creates the form and loads it up in a new message that’s just itching to be sent (Figure 19-19).
If you chose to pull email addresses out of a table, then you see those addresses appear in the To, Cc, or Bcc lines. Otherwise, the To line’s empty and it’s up to you to fill in the right addresses. (Add as many as you want, separated by semicolons.) If you’re an Outlook whiz, feel free to throw a mailing list into the mix. You can also perform any last minute edits to your message.
Once you have the correct recipient email addresses, click Send to send the message on its way.
That’s it. Your work’s done (until someone gets the message and fires back a response).
Figure 19-18. This example shows the standard subject line and text that Access fills in. You can add something that’s more meaningful to your recipients.
To fill out a reply, the recipient simply needs to click Reply, type the values in all the text boxes, and then click Send to send the completed form back to you.
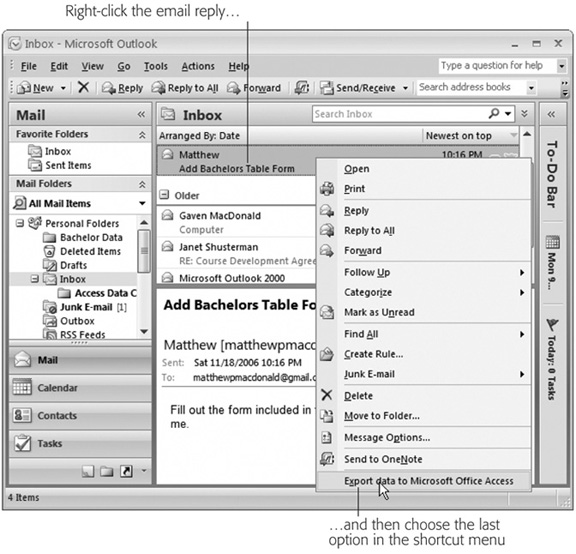
If you opted for manual processing, then you need to check your Outlook inbox periodically to look for replies. When you find a reply, right-click it, and then choose Export Data to Microsoft Access. This option appears only if you right-click a message that Outlook recognizes as a completed Access form (see Figure 19-20).
If Access successfully imports the message, then the email moves to the Access Data Collection Replies folder (or whatever folder you set up in step 9). Outlook shows a confirmation message telling you that all’s well.
If you find a message that Access can’t process, then you get to decide how you want to handle it. Possible problems include values that break field validation rules (Section 4.3), values that duplicate a value that’s already in the table when duplicates aren’t allowed (Section 4.1.3), and values that break data type or field length restrictions.
Here are some possible strategies for dealing with messages that Access can’t process:
Delete the message and forget about it. You could use this approach if you spot a message that’s obviously wrong, or one that duplicates a record that’s already in the table.
Ask for a correction. Send the form to the recipient, and ask them to try again.
Enter the correct information by hand. If you can figure out where the data went wrong, then you may be able to correct the problem yourself. In that case, use the datasheet in Access to add the record that it should’ve created.
If you chose to use automatic processing, then you don’t need to take any more steps. As replies arrive in your Inbox, Access adds the data to the table, without you even knowing that it’s happening. It’s a good idea to check your table frequently to make sure the data that’s being added doesn’t contain obvious errors. Also, you should review your Outlook inbox for messages that weren’t successfully processed—like those that contain bad data.
You’ll know a message couldn’t be processed if you see it in your inbox, and there’s a red square or a blank value next to it in the Categories column. In this situation, you can try all the solutions described in the previous section to fix the problem.
Figure 19-20. Choose this shortcut menu option, and the current message goes to Access, which places it in a new record in the Bachelors table.
Note
You can also try one other technique to remedy problematic emails. If the record wasn’t processed because of a temporary problem (for example, the database was open in exclusive mode at the time, or the drive where the database is stored wasn’t available), you can ask Access to try to process it again. To do so, right-click it, and then choose Export Data to Microsoft Access.
After you’ve sent your message, all the information—whom it’s been sent to, what it’s asking for, and so on—is stored in your database. Access needs this info so it knows how to process replies.
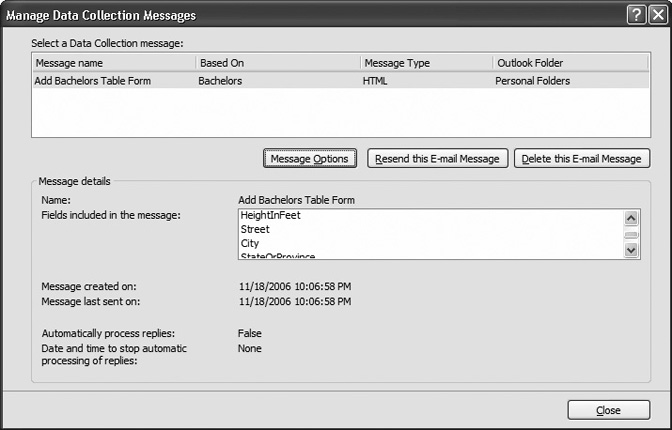
You can do a few things to make sure everything runs smoothly. For example, you can send the email to more people, switch automatic processing on or off, and remove the email information altogether. To perform any of these tasks, choose External Data → Collect Data → Manage Replies. This action shows the Manage Data Collection Messages shown in Figure 19-21. (The name of this command—Manage Replies—is a bit misleading. You’re not actually doing anything with the replies here. Instead, you’re tuning up your original email settings.)
Figure 19-21. Click Message Options to pop up the dialog box where you can switch automatic processing on or off, and adjust how it works (Figure 19-17). Click “Resend this E-mail Message” to send your form out to another batch of people. Finally, click “Delete this E-mail Message” when you’re done receiving data, and you don’t want to use this feature anymore.
