
Chapter 4
Table Tune Ups
In This Chapter
![]() Identifying your records uniquely with a primary key
Identifying your records uniquely with a primary key
![]() Understanding relationships
Understanding relationships
![]() Building relationships between your tables
Building relationships between your tables
![]() Indexing for faster queries
Indexing for faster queries
Life in today’s world is all about doing things faster and more efficiently to increase productivity. Isn’t that what your life is about? Oh, you have a life outside the office, too? (What a concept.) Maybe you have a relationship? This chapter is about making your databases faster and about building good relationships (the database kind, not the human kind!).
As with any good relationship, the end result is often harmony and happiness. Making your Access tables work well together will make things so much easier in so many ways as you move on to build your queries, forms, and reports. The good news is that building relationships in Access takes a lot less time than building human relationships.
How can you make Access work faster and more efficiently? With key fields and indexes, that’s how! Each table should have that one special field assigned as a primary key. A primary key prevents duplicate records from being entered into a table — hence more efficient data entry. (I love the word hence!) To retrieve your data faster, you need to create the proper balance of indexes for each table. Not enough indexes, and querying 100,000 records will take forever; too many, and the same could be true. So assigning indexes to the correct fields is an art form. You find out all about the art of indexes in this chapter.
The Primary Key to Success
A table’s primary key is a special field in your table. You use this field to uniquely identify each record in the table.
 Usually the primary key is a single field. In very special circumstances, two or more fields can share the job. The technical term for this type of key is a multifield key.
The lowdown on primary keys
Before we discuss how to create a primary key, you’ll need to know some rules and guidelines for using one. This section contains the when, where, and why of the primary key.
Uses
Almost every table you create needs a primary key. Here’s why:
![]() A primary key organizes your data by uniquely identifying each record.
A primary key organizes your data by uniquely identifying each record.
 That’s one reason why a primary key makes your database work a little faster. For an explanation of indexes and their creation, see the section Indexing for Faster Queries, later in this chapter.
For example, a Customer table typically contains a Customer Number field. This field is the primary key. If your Customer table contains a dozen Jane Smiths, you need a way to tell them apart. The Customer Number field for each record uniquely identifies each Jane Smith — and every other customer, too.
![]() Tables, by default, are sorted by primary key.
Tables, by default, are sorted by primary key.
A primary key helps Access find a particular record much faster.
![]() Your database could freak out if you don’t have a primary key.
Your database could freak out if you don’t have a primary key.
Without a primary key, finding the requested records can be difficult for Access. Think of the Jane Smith example just used. How does Access know which Jane Smith you want if multiple Jane Smith customers are in your database? Well, by the primary key. It is unique for each customer and therefore can be used to uniquely identify each Jane Smith. Problem solved!
Rules
Before you create a primary key, you need to know a few guidelines. Here’s a handy listing:
![]() Location: Access doesn’t care where the primary key field appears in the table design. The key can be the first field, the last field, or buried in the middle.
Location: Access doesn’t care where the primary key field appears in the table design. The key can be the first field, the last field, or buried in the middle.
Even if Access doesn’t care where you put things, I always recommend that you make the primary key field the first field in your table. It makes relationships easier to build (as you see later in this chapter).
![]() Defaults: Access tries to save you time and trouble with the default actions it gives to the primary key:
Defaults: Access tries to save you time and trouble with the default actions it gives to the primary key:
Access really, really wants you to have a primary key in your table.
If you create a new table in table design mode without a primary key, Access suggests adding a primary key field when you save the table.
Access gives this automatic primary key field a wildly creative name — ID — with an AutoNumber data type.
If the first field you add in a table is an AutoNumber type, Access automatically makes that AutoNumber field the primary key.
Access indexes the primary key field automatically.
![]() Restrictions: You can’t just create primary keys willy-nilly. Access imposes these limits:
Restrictions: You can’t just create primary keys willy-nilly. Access imposes these limits:
A table can have only one primary key.
You can’t use the Calculated, Attachment, Memo, Hyperlink, and OLE Object data types for a primary key.
 Avoid using the
 yes/no field type in a primary key. You can have only two records in such a table: Yes and No.
All primary key indexes must have a name (just as all fields must have a name).
Access automatically names all primary key indexes PrimaryKey.
Creating a primary key
To create a primary key, follow these steps:
1. Open the table in Design view.
If you just asked yourself “how do I do that?” then it might not be time for you to create a primary key. Chapter 3 shows you the table basics you need before you can create a primary key.
2. Click the field name for the primary key.
Don’t know which field to select for your primary key? See the sidebar, The key to table happiness. The preceding section, Rules, relates the guidelines for selecting a primary key.
3. On the Ribbon, click the Primary Key button (shown in Figure 4-1).
A key symbol appears on the button next to the field name you selected.
The primary key is set!

Figure 4-1: The completed primary key.
Making Tables Get Along
Relational databases split data among two or more tables. Access uses a linking field, called a foreign key, to tie related tables together. For example, one table may contain customer names and addresses while another table tracks the customer order history. The order information is tied to the customer information with a linking field, which (in this example) is probably a Customer number.
Why is this important? Well, suppose you need to print an invoice for customer Anita Cash’s latest order. By placing the Customer number in the Orders table and relating the Orders table to the Customer table via the Customer number, you can pull Anita Cash’s name and address information for the invoice without having to put that information in the Orders table.
Rules of relationships
Keep this in mind when relating tables:
![]() Tables you want to relate must have at least one field in common. While the field name need not be identical, its data type must be the same in each table. For example, you can’t relate a text field to a number field.
Tables you want to relate must have at least one field in common. While the field name need not be identical, its data type must be the same in each table. For example, you can’t relate a text field to a number field.
Keep key field names consistent between your tables. If you don’t, that ball of confusion will roll your way at some point down the road.
![]() Usually, the linking field is one table’s primary key but rarely the primary key in the other table.
Usually, the linking field is one table’s primary key but rarely the primary key in the other table.
The Customer table, for example, is probably arranged by Customer number, while order data is likely organized by Order number.
![]() After the two tables have been created and share a common field, you’re not done. You still have to build that relationship. (You’ll find out how to actually do that in the later section, Building Table Relationships.)
After the two tables have been created and share a common field, you’re not done. You still have to build that relationship. (You’ll find out how to actually do that in the later section, Building Table Relationships.)
Relationship types
There is more than one type of table relationship in Access. When you relate two tables, you can choose one of three possible relationship types.
Unless you want to be an Access expert, you only need to understand the one-to-many table relationship. It’s the most common one.
One-to-many
One-to-many relationships connect one record in the first table to many records in the second table. This is the default relationship type.
Typical example: One customer may make many purchases at the store, so one customer record is linked to many sales records in the Transaction table.
One-to-one
One-to-one relationships link one record in the first table to exactly one record in the second table.
One-to-one relationships aren’t common. Tables that have a one-to-one relationship can be combined into one table, which usually happens.
Many-to-many
Many-to-many relationships link many records in one table to many records in another table.
Here’s a common example of a many-to-many relationship:
![]() A customer-order database contains separate tables for
A customer-order database contains separate tables for
• Customers
• Individual products
![]() Every individual product needs to be available to every customer.
Every individual product needs to be available to every customer.
In other words, many customers need to be able to order many of the same products. The database needs to satisfy queries that look for both of these:
• Every customer who ordered the same product
• Every product that one customer ordered
In Access 2013, you can link many customers to many of the same products two ways: multivalued fields and junction tables.
Multivalued fields
Access 2013 allows the creation of many-to-many relationships between two tables via multivalued fields.
Multivalued fields were a new capability in Access 2007. Prior to Access 2007, many-to-many relationships between two tables were bad — so bad that Access didn’t allow them. Older versions of Access required creating a third table called a junction table (more on junction tables in a minute) to accomplish a many-to-many relationship.
A multivalued field can store many similar data items. Adding a multivalued field ends the need for creating multiple records to record multiple products ordered on one customer order. For example, you can add a multivalued field called ProductID to the Order Detail table. All products ordered can be stored in one field, so only one record per order is required.
Multivalued fields are not all peaches and cream. Use a junction table if you need to sort the data stored in the multivalued field or you think you’ll upsize down the road to SQL Server. Sorting these fields is quite cumbersome and multi-value fields don’t upsize to other platforms such as SQL Server. If you think you’ll upsize to a more robust database platform at some point, avoid multi-value fields.
Microsoft created multi-value fields as an easy alternative to junction tables — and to make Access more compatible with SharePoint. Unless you’re certain you’ll never need to sort the field or upsize your database, avoid multivalued fields.
Junction tables
A junction table is a special table that keeps track of related records in two other tables:
![]() The junction table has a one-to-many relationship with both tables.
The junction table has a one-to-many relationship with both tables.
![]() The result works like a direct many-to-many relationship between both tables.
The result works like a direct many-to-many relationship between both tables.
For example, a junction table called Orders can connect the customers to the order details for a particular order. The junction table has a one-to-many relationship with both the Customer and Order Details tables.
Building Table Relationships
If you can drag and drop, you can build a table relationship.
 Keep these three limitations in mind:
![]() You can only relate tables that are in the same database.
You can only relate tables that are in the same database.
![]() You can relate queries to tables, but that’s unusual.
You can relate queries to tables, but that’s unusual.
![]() You need to tell Access specifically how your tables are related.
You need to tell Access specifically how your tables are related.
When you’re ready to play the matchmaker between your amorous tables, here’s how to do it.
The Relationships window
To build a table relationship, first open the Relationships window. Follow these steps:
1. Click the Database Tools tab on the Ribbon.
The Relationships group appears on the Ribbon. (See Figure 4-2.)
2. From the Relationships group, click the Relationships button.
The Relationships window appears. The first time you set a relationship, the Show Table dialog box appears as well. More on that in the next section.
If some tables are already listed in the window, someone (or some wizard) has already defined relationships for this database. If you’re not sure how they got there and if more than one person is working on your database, stop and consult all database developers before changing the relationships. What might work for you could be disastrous for your colleagues.
When the Relationships window is open, you can select and relate tables.
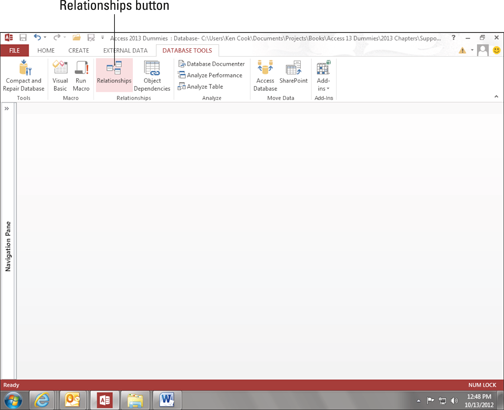
Figure 4-2: The Relationships button on the Database Tools tab.
Table relationships
For each pair of tables you relate, you must select the tables and then join their common fields. The following sections show you how.
Selecting tables
To select tables to relate, open the Relationships window (as described in the preceding section) and follow these steps:
1. Choose Show Table from the Ribbon’s Relationships group. (If you don’t see the Relationships group, select the Design tab on the Ribbon.)
The Show Table dialog box appears, listing the tables in the current database file.
2. For each pair of tables you want in the relationship, follow these steps:
a. Click the table.
b. Click Add.
In the big Relationships workspace, a little window lists the fields in the selected table. As you add tables to the layout, a separate window appears for each table. You can see these windows to the left of the Show Table dialog box in Figure 4-3.

Figure 4-3: Use the Show Table dialog box to add tables to the Relationships diagram.
Repeat Step 2 for each pair of tables you want to relate. If one of the tables in the pair is already present (because of an existing relationship it has with another table), you don’t have to add it again.
3. After you finish adding tables, click the Close button.
When you have all the tables present, you’re ready for these tables to get to know each other. The following sections show how to relate the tables.
Managing relationships
This section contains all the information you’ll need to create, edit, and delete your table relationships.
Creating relationships
After you select the tables (as shown in the preceding instructions), follow these steps to create a relationship between two tables:
1. Decide which two tables you want to relate.
Since the one-to-many relationship is the most common, these instructions pertain to it. The two tables in a one-to-many relationship are designated as fulfilling one of two roles:
• Parent: In the parent table, the related field is the primary key. Each record in the parent table is uniquely identified by this related field.
• Child: In the child table, the related field contains the same information as the field in the parent table. Typically, it has the same name as the corresponding field in the parent table — although this is not a requirement.
To make relating tables easier, put related fields near the beginning of the field list. In Access, you must see the related fields on the screen before you can make a relationship. If the related fields are not at the beginning of the field list, you have to do a lot of scrolling to find them.
2. Follow these steps to select the parent field from the list:
a. Put the mouse pointer on the field you want to relate in the parent table.
Usually the field you want to relate in the parent table is the primary key.
b. Hold down the left mouse button.
3. While holding down the left mouse button, follow these steps to join the parent field to the child field:
a. Drag the mouse pointer from the parent field to the child table.
A plus sign appears at the base of the mouse pointer.
b. Point to the related field in the child table.
c. Release the mouse button.
The Edit Relationships dialog box appears, detailing the soon-to-be relationship, as shown in Figure 4-4.
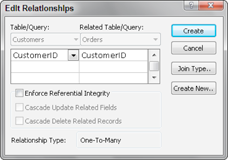
Figure 4-4: The Edit Relationships dialog box details how Access connects two tables.
Be very careful before releasing the mouse button. Put the tip of the mouse pointer directly on the child field before you let go.
• If you drag between the two fields correctly, the Edit Relationships dialog box displays the parent and child fields side by side, as shown in Figure 4-4.
• If you miss, click Cancel in the Edit Relationships dialog box and try Step 3 again.
4. In the Edit Relationships dialog box, select the Enforce Referential Integrity option.
5. Double-check that your field names are the correct ones and then click Create.
Access illustrates the new relationship in the Relationships window:
• A line between the related fields shows you that the tables are related.
• If you checked the Enforce Referential Integrity option in the preceding step, Access places a 1 next to the parent in the relationship and an infinity symbol next to the child, as shown in the full set of relationships in Figure 4-5.
To relate another pair of selected tables, repeat Steps 1 through 5.

Figure 4-5: A one-to-many relationship between two tables.
Access also provides tools for modifying and removing relationships. The following section shows how to use them.
Modifying relationships
After you relate tables, you can see, organize, and remove the relationships.
If you create a relationship you don’t want, open the Relationships window and follow these steps to delete the relationship:
1. Click the Relationship line connecting the two tables.
If you were successful, the line will thicken. That means the line is selected.
2. Press the Delete key on your keyboard and then Yes in the resulting message box.
Voilà! The relationship is gone.
If you’re relating many tables together, the Relationships window may look a little messy because Relationship lines will cross each other. This makes it difficult to determine which tables are related to each other. To rectify this situation, click and drag the title bar of a table window to another part of the screen. It’s good practice — although not always possible — to show parents either above or to the left of their children. Try to arrange the parent and child tables so the lines between the parent and child tables don’t cross over any lines that illustrate other table relationships.
Having trouble understanding your relationships? (Who isn’t?) Are you scrolling all over the place in the Relationships window to see everything? If so, the Relationship Report is just for you. To preview this report, click the Relationship Report button in the Ribbon’s Tools group. All the related tables in your database will display in an easy-to-read report. (Okay, easier to read!)
Indexing for Faster Queries
You may find yourself sitting for a minute or two waiting for a query or report to run. (I’ve sat longer than that for some reports during the development stage.) So what can be done to speed up your queries? Add indexes to your tables, that’s what.
A table index in Access works just like the index in a book. It helps Access find a record in a table just as a book index helps you find a topic in a book.
Indexes dramatically speed up queries and sorts. When you sort or query a table on an indexed field, the index has already done most of the work.
The benefit of an index depends on the number of records in the table:
![]() If you have 100 customers, an index won’t improve performance much.
If you have 100 customers, an index won’t improve performance much.
![]() If you have tens of thousands of customers, an index will improve performance significantly.
If you have tens of thousands of customers, an index will improve performance significantly.
Create your own index
Here’s the skinny on indexes:
![]() Each field in a table can be indexed if it isn’t one of these data types: calculated, attachment, hyperlink, or OLE object.
Each field in a table can be indexed if it isn’t one of these data types: calculated, attachment, hyperlink, or OLE object.
![]() As with the primary key, an index may have a unique name that’s different from the field name. It can also have the same name as the field name. Access won’t balk either way.
As with the primary key, an index may have a unique name that’s different from the field name. It can also have the same name as the field name. Access won’t balk either way.
![]() You don’t have to name your index; Access does that for you.
You don’t have to name your index; Access does that for you.
![]() Indexes either allow or prevent duplicate entries in your table.
Indexes either allow or prevent duplicate entries in your table.
How an index works
An index is essentially a copy of the table that’s already sorted on the indexed field.
When a table is indexed properly, queries run faster because the indexes help Access locate the data faster.
Here’s an example. Suppose you need to produce a list of all your Pennsylvania customers, and you often query your customer table by state:
![]() If you index the
If you index the State field in your Customers table, all the Pennsylvania customers will be in one place. When Access reaches the Pennsylvania customers, it can stop there and return them to you in your query.
![]() Without the index, Access must scan every record in the table to return the desired results.
Without the index, Access must scan every record in the table to return the desired results.
To duplicate or not to duplicate
When you create an index, you have two options for handling duplicate values:
![]() If records can have the same value in this field, click Yes (Duplicates OK).
If records can have the same value in this field, click Yes (Duplicates OK).
Yes (Duplicates OK) is the most common choice.
![]() If every record needs a unique value in this field (such as customer numbers in your Customer table), click Yes (No Duplicates), as shown in the figure included here.
If every record needs a unique value in this field (such as customer numbers in your Customer table), click Yes (No Duplicates), as shown in the figure included here.
The No Duplicates setting tells Access to make sure that no two records have the same value in the indexed field.
Access indexes primary key fields automatically as No Duplicates when you designate the primary key.

Here are some guidelines to help you decide which fields to index, presented in their recommended order:
1. Start by querying the table whose query performance you’d like to improve. Make note of the time it took to run the query.
2. Next, index each field that you know you’ll query frequently. For example, in a Contacts table, you might query by Contact ID, Contact Last Name, and Contact State.
3. Finally, query the newly indexed table. If the query time improves, your indexes are correct. If your query time worsens, try removing one index at a time, starting with the field you think you’ll query the least. Rerun your query and note performance.
When you’ve optimized performance, your indexing is complete.
4. Apply an index type.
The sidebar To duplicate or not to duplicate shows which index type to apply.
To list a table’s indexes, follow these steps:
1. Open the table in Design view.
2. On the Design tab, click the Indexes button in the Ribbon’s Show/Hide group. (See Figure 4-6.)

Figure 4-6: The Indexes window with the Indexes button above it on the Ribbon.
Building too many indexes in a table slows down some tasks. Adding records to a table with several indexes takes a little longer than adding records to an un-indexed table. Access spends extra time updating all those indexes behind the scenes. The trick is to get the right number of indexes assigned to the right fields. Sometimes it comes down to trial and error when you’re optimizing query performance via indexes.
Adding and removing indexes
After you decide on the correct fields to index (as outlined previously), creating an index is a snap.
In the following instructions, Step 4 can delete an existing field index. You may decide to delete a field index if it’s hindering data input more than it’s enhancing query performance.
To add or remove field indexes, open the table in Design view and follow these steps:
1. Click the name of the field you want to index.
The blinking cursor lands in the field name.
2. In the General tab of the Field Properties section, click the Indexed box.
Now the cursor moves into the Indexed box, and a down arrow appears on the right end of the box.
If the Indexed display has no entry, this field type doesn’t work with indexes. You can’t index Calculated, Attachment, Hyperlink, or OLE Object fields.
3. Click the down arrow at the end of the Indexed box.
A list of index options appears:
• Yes (Duplicates OK)
• Yes (No Duplicates)
• No
The previous sidebar To duplicate or not to duplicate shows how to determine the correct index setting.
4. Select the index type you want from the list.
To remove an existing index from the selected field, click No.
5. To make the change permanent, click the Save button on the Quick Access toolbar.
If your table contains thousands of records, Access may take a few moments to create the index.