
Chapter 6
Types, Masks, and Triggers
In This Chapter
![]() Locating your table settings (and I don’t mean flatware!)
Locating your table settings (and I don’t mean flatware!)
![]() Changing how data displays
Changing how data displays
![]() Keeping bad data out with input masks
Keeping bad data out with input masks
![]() Understanding required fields
Understanding required fields
![]() Performing detailed testing through validation
Performing detailed testing through validation
![]() Adding data automatically with default values
Adding data automatically with default values
If you have a sound table structure but poor data collection, your database won’t report anything of interest to its intended audience. You know the old saying, “garbage in, garbage out”? This chapter helps you limit the garbage that is put into your tables by detailing five tools Access puts at your disposal. (Access doesn’t call them tools; it calls them properties.)
 You don’t want the task of going back and cleaning up your data after it has all been typed. Better to type it correctly the first time. This chapter shows you how to use formatting, input masks, required fields, and validation to keep your data nice and tidy.
Access Table Settings
This chapter shows how to use the following five properties to help keep incorrect data out of your database:
![]() Format: Control how your data appears without changing the way it is stored.
Format: Control how your data appears without changing the way it is stored.
![]() Input mask: Force data entry to follow the correct structure, such as typing phone numbers in the (###) ###-#### format.
Input mask: Force data entry to follow the correct structure, such as typing phone numbers in the (###) ###-#### format.
![]() Required: Force the entry of data in the field before the record can be saved.
Required: Force the entry of data in the field before the record can be saved.
![]() Validation Rule: Require that data be typed in a field following a specific set of rules, such as a number between 0 and 100.
Validation Rule: Require that data be typed in a field following a specific set of rules, such as a number between 0 and 100.
![]() Default Value: Auto enter data when a new record is inserted.
Default Value: Auto enter data when a new record is inserted.
All five properties are in the same place: in Table Design view on the General tab in the Field Properties section. Use the following steps to access and modify the four properties:
1. Open the database file that contains the data you want to keep clean. From the Navigation pane, right-click the table you want to modify.
The shortcut menu appears.
2. Choose Design View from the menu, as shown in Figure 6-1.
The table flips into Design view, showing its fields and field properties.
 If the table you want is already on the screen in Datasheet view, just click the View button from the Home tab of the Ribbon. This toggles between Design and Datasheet views.
3. Repeat these steps for each field whose properties you want to alter:

Figure 6-1: You can see and edit a table’s structure, including its field properties, in Design view.
a. Click the name of the field.
The General tab in the Field Properties section (the bottom half of the window) displays the details of the current field, as shown in Figure 6-2. You’re ready to do your thing!
b. In the Field Properties section, click in the Format, Input Mask, Validation Rule, Required, or Default Value boxes, and type your changes.
In the remainder of this chapter, I delve into these properties in more detail to show you what they do and how to modify them to suit your needs.
The Format, Required, Validation, and Default Value properties can be modified in Datasheet view. Just click the Fields tab on the Ribbon and check out the Formatting, Properties, and Field Validation groups.
Validation Text has a box, too. It goes with the Validation Rule box (kind of like coffee and cream). The Making your data toe the line with validation section, later in this chapter, explains how these two properties work together to prevent the entry of unwanted data.

Figure 6-2: Working on the Order Date field.
4. When you’ve made all necessary property changes, click the Save button on the Quick Access toolbar to keep your changes.
To reject your changes, close the table (click the x in its upper-right corner) and click No in the resulting dialog box.
Using formats, masks, required fields, validations, and default values involves many more details, but use the preceding steps to get started. These steps are the same regardless of which property you apply.
The following sections tackle each property individually.
Field Data Formats
Formatting helps you see data in a recognizable, clear arrangement. Formats only change the way you see your data on the screen, not how your data is stored in the table.
Some field data types require different formatting codes than others. For example, text formatting uses different codes than numeric formatting. The following sections cover formats for the most common field data types.
If your format command doesn’t work the first time, follow these steps to troubleshoot it:
1. Double-check the data type.
For example, if you see left aligned numbers without a standard number of decimal places, you may have selected the Text data type for a numeric field. Just change the data type to Number or Currency and like magic, you have beautiful numbers!
2. Review the format commands and make any necessary changes.
For example, if you see percent signs and your intention was dollar signs, just flip the format from Percent to Currency by using the Format Property drop-down list.
Text fields
Text fields can be formatted in four ways that affect capitalization, spacing, and punctuation.
Access does not have predesigned formats for text fields, but you can make your own. Just string together some special characters to construct a formatting string that Access can use to display the text in a standardized way.
Apply formatting, minimize data-entry errors
Although formatting won’t stop inaccurate data entry, it can make data-entry errors more recognizable. Here’s how formatting can cut down on errors:
![]() Make errors more visible.
Make errors more visible.
For example, suppose you need to type the number one million into a numeric field. Without formatting, you see this: 1000000. (Uh, how many zeros are in that?) With standard formatting, you see this: 1,000,000.
![]() Cut down on typing during data entry.
Cut down on typing during data entry.
For example, phone numbers are often seen as (111) 222-3333. With text formatting applied to a phone number field, simply type 1112223333. Access displays the phone number with the parentheses and the dash. (Can you say “fewer keystrokes”?)
Table 6-1 lists the special characters that you can use to build your text formats.
Table 6-1 Formatting Codes for Text Fields
|
Character |
Display Option |
|
|
Show whole field as uppercase (capital letters). |
|
|
Show whole field as lowercase. |
|
|
Show a space in this position if there isn’t a data character. |
|
|
Display a character if there is one; otherwise, don’t do anything. |
Here’s what you need to know about the formatting codes in Table 6-1.
Capitalization
By default, Access displays text and memo fields with the actual capitalization of the stored data. However, Access can automatically display a field in all uppercase (capital) or lowercase letters, regardless of how the data is stored.
Set the Format property of a text or memo field to the greater-than or less-than symbol to affect the capitalization of the whole field.
Uppercase
The greater-than symbol (>) makes all the text in that field appear in uppercase (capital) letters, regardless of how the text was typed. To use this option, type a single greater-than symbol in the Format text box.
This format is great for abbreviating the names of U.S. states, whose abbreviations are normally seen as uppercase.
Lowercase
The less-than symbol (<) makes all the text in that field appear in lowercase, regardless of how the text was typed. To use this option, type a single less-than symbol in the Format text box.
Spacing and punctuation
Access allows you to format the spacing and punctuation of typed text. Through formatting, you can add extra spaces or special characters like dashes.
When using the @ or & character in a format, always include one @ or & to represent each typed character in the field.
Show filler spaces
The at sign (@) forces Access to display either a character or a space in the field. If the typed field data is shorter than the formatting code, Access adds extra spaces to fill the format.
For example, if a field uses @@@@@@ as its format, but the field’s data is only three characters long (such as Tim or now), Access displays three spaces and then the data. If the field data is four characters long, the format pads the beginning of the entry with two spaces.
Don’t show filler spaces
The ampersand (&) means “display a character if there’s one to display; otherwise, don’t do anything.”
You can use the ampersand to create special formats. For example, a Social Security number can use this format: &&&- &&- &&&&.
If someone types 123456789 in that field, Access applies the format and displays 123-45-6789, adding the dashes in the middle of the numbers by itself.
Formatting changes only the appearance of data, not the data itself. Therefore, if you intend to export the data to another program (such as Excel), the formatting won’t necessarily go with it. So if you type pa in a State field and apply the > formatting code to that field, the data will appear as PA in Access but will export to Excel as pa.
Make Access see red so you don’t
Here’s a great tip for highlighting missing text data in a record: When you’re typing data, sometimes you need to skip a text field because you don’t have that particular information at hand. Wouldn’t it be great if Access automatically marked the field as blank as a reminder for you to fill in the info later?
Access can create such a custom text format. For example, the following character string displays the word Unknown in red if the field doesn’t contain a value. Type the following command in the field’s Format text box exactly like this (there are no spaces between the characters in the string) and punctuation:
@;”Unknown”[Red]
It’s easy to customize the preceding formatting example to suit your needs:
![]() Text: Between the quotes, substitute any display text you want instead of
Text: Between the quotes, substitute any display text you want instead of Unknown.
![]() Color: Between the square brackets, substitute any display color you want instead of
Color: Between the square brackets, substitute any display color you want instead of Red.
Number and currency fields
Microsoft makes it easy for you to apply numeric formats to your numeric fields. They built the seven most common formats into a drop-down menu right in the Format text box.
To set a number or currency field format, follow these steps:
1. With your table in Design view, click the Format text box for the field you’d like to format.
2. Click the down arrow that appears at the right side of the box and select a format for your field.
Figure 6-3 shows the drop-down menu, which is divided in half:
• The left side shows each format’s given name.
• The right side shows a sample of how each format looks.
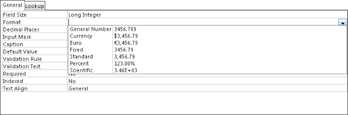
Figure 6-3: The number format list.
Numeric formats change only the appearance of the number, not the number as it is stored. So if you select the Single Field Size and choose Standard to format a field that contains the number 1.235678, you see 1.24 on the screen — but Access stores 1.235678 in the field. Any calculations done with the numbers in that field will use the actual typed-in number, not the formatted number seen onscreen.
The following sections describe the numeric formats built into Access.
General Number format
The General Number format is the Access default. It merely displays whatever you put in the field without making any editorial adjustments to it.
Currency formats
The currency formats make a standard number field look like a currency field.
Some numeric fields store decimal characters, and others do not — it all depends on the field size you select. So decimal formatting is irrelevant if you select a field size that doesn’t store decimal places (the long-integer size, for example). Chapter 3 covers number fields and field sizes in more detail.
These two formats show the data with two decimal places (the “cents” part of a dollar amount), substituting zeros if decimals aren’t already present:
![]() Currency: Show the local currency sign and punctuation (based on the Regional Settings in the Windows Control Panel).
Currency: Show the local currency sign and punctuation (based on the Regional Settings in the Windows Control Panel).
 Don’t assume that the Currency formats automatically perform an exchange-rate conversion for the selected currency. They don’t. They merely display the selected currency symbol in front of the value typed in the field.
![]() Euro: Use the Euro symbol (ε) regardless of the Regional Settings.
Euro: Use the Euro symbol (ε) regardless of the Regional Settings.
Scientific, Percent, and Decimal formats
The remaining built-in formats are used for a variety of purposes, from displaying a large number in scientific notation to showing decimals as percents:
![]() Fixed: Shows the decimal value without a comma as a thousands separator.
Fixed: Shows the decimal value without a comma as a thousands separator.
![]() Standard: Shows the decimal value with a thousands separator.
Standard: Shows the decimal value with a thousands separator.
For either Fixed or Standard format, you can adjust the number of decimal places that appear:
• By default, Fixed and Standard round the display to two decimal places via the Auto setting which is the default.
• To specify a different number of decimal places, type a number between 0 and 15 in the Decimal Places setting right below the Format setting.
![]() Percent: This format adds a percent sign after the number.
Percent: This format adds a percent sign after the number.
There’s no need to convert percentages to decimals for data entry. To enter 97%, type 97 in the field.
If your percentages are displayed only as 0.00% or 100.00%, the sidebar What happened to my percentages? has a solution.
![]() Scientific: Displays numbers in scientific notation (the first significant digits plus the number of places where the digits belong on the left or right side of the decimal point).
Scientific: Displays numbers in scientific notation (the first significant digits plus the number of places where the digits belong on the left or right side of the decimal point).
 Scientific notation is mostly for very big numbers (like the distance light travels in a year) and very small numbers (like the distance light travels in a trillionth of a second) that are hard to measure precisely or read at a glance.
Date/time fields
Microsoft provides you with a drop-down menu full of ready-to-use date and time formats. Here’s how to apply a date/time format to a field:
1. With your table in Design view, click the Format text box for the field you’d like to format.
2. Click the down arrow that appears on the text box’s right side.
The menu shown in Figure 6-4 drops down to serve you.
3. Select the format you want to use.
Keep these tips in mind when you apply a date/time format:
![]() When you use one of the longer formats, such as General Date or Long Date, make sure that the datasheet column is wide enough to display all the information. Otherwise, you’ll see a wacky date that makes no sense.
When you use one of the longer formats, such as General Date or Long Date, make sure that the datasheet column is wide enough to display all the information. Otherwise, you’ll see a wacky date that makes no sense.
![]() If more than one person uses the database, choose a format that provides more information, not less information.
If more than one person uses the database, choose a format that provides more information, not less information.
What happened to my percentages?
When you create a field with the Number data type, Access assigns the Long Integer field size by default. Because integers are by definition whole numbers, Access rounds any decimal number entered in such a field. So if you enter 25 in a field with the Percent format and Access displays your entry as 0.00%, your entry
![]() Automatically rounds to the nearest whole number (in my example, 0).
Automatically rounds to the nearest whole number (in my example, 0).
![]() Always displays zeros in the decimal places.
Always displays zeros in the decimal places.
The solution? Change the Field Size setting (pictured in the following figure) from Long Integer to Single. This setting tells Access to remember the decimal part of the number.
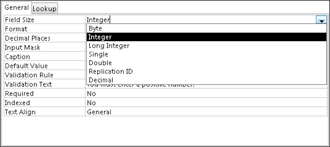

Figure 6-4: The ever-popular date/time format list.
My clients often ask me to provide a date in the m/d/yy format with a two-digit year (such as 1/1/09 instead of 1/1/2009). To display a date with a two-digit year, type the following in the format box: m/d/yy.
Yes/No fields
You can say only so much about a field with three options. Oddly, Yes/No fields are set to the Yes/No formatting by default.
If you want the ability to type Yes/No, True/False, or On/Off in the field, make sure that Display Control in the Lookup tab (next to the General tab) is set to Text Box. Otherwise, you’ll have check boxes in your field (because Check Box is the default display for a Yes/No field).
Allowable Yes/No field entries
Here’s what you can type in a Yes/No field (see Figure 6-5):
![]() Yes and No (this is the default)
Yes and No (this is the default)
![]() On and Off
On and Off
![]() True and False
True and False
Yes and No is the default, but you can change how a Yes/No field formats its content. Here’s how:
1. With your table in Design view, click the Format text box for the field you’d like to format.
2. Click the down arrow that appears on the text box’s right side.
The menu of three Yes/No formats drops down for your inspection.
3. Select the format you want to use.

Figure 6-5: Not much to talk about with Yes/No formatting.
Create your own Yes/No format
To display your own choices instead of a boring Yes and No, type a customized entry in the Format box. A good example format looks something like this:
”REORDER”[Red]; “In stock”[Green]
The No and Yes parts of the format are separated by a semicolon (;)
![]() The part on the left appears if the field is equal to No.
The part on the left appears if the field is equal to No.
![]() The part on the right appears if the field is equal to Yes.
The part on the right appears if the field is equal to Yes.
With the preceding example, type Yes in the field, and the text In stock appears in green. Type No in the field, and REORDER screams a warning in bright red.
A custom Yes/No format simply changes the way the typed data appears. A Yes/No field will still accept only the entries as outlined in the previous section Allowable Yes/No field entries, regardless of the custom format applied to it.
You can type any words between the quotes and any Access-allowed color names between the square brackets. Who knew that formatting could be so much fun!
Gaining Control of Data Entry
The remaining sections in this chapter explore Access field properties that allow you to control what data is entered in a field. The more you control the data that goes into your tables, the less you’ll need to clean it up after it’s been entered.
You really need to put a mask on those fields
An input mask is a series of characters that tells Access what data to expect in a particular field — and actually prevents users from typing data that does not fit the mask. If you want a field to contain all numbers and no letters, an input mask can do the job. It can also do the reverse (all letters and no numbers) and almost any combination in between.
Formatting (shown previously in this chapter) can make some data entry errors visible, but formatting doesn’t block errors. Input masks, on the other hand, keep that bad data out.
Input masks are stored in the Input Mask property box of the field’s General tab. (The beginning of this chapter shows the steps to follow to access the General tab.)
Add these masks to fields that contain dates, times, phone numbers, Social Security numbers, and zip codes, among other things. You’ll be so glad you did. If you don’t, expect to see plenty of phone numbers like 111-123 and zip codes like 0854.
Input masks work best with short, consistent data. Numbers and number-and-letter combinations that follow a consistent pattern are excellent candidates. Phone numbers, dates, and zip codes are common examples of data items that follow a consistent pattern.
You create an input mask in one of two ways:
![]() Ask the Input Mask Wizard for help.
Ask the Input Mask Wizard for help.
The Input Mask Wizard can’t possibly contain every mask for every situation. It only knows about text and date fields, and offers just a few options.
Always start with the wizard. If it doesn’t have your solution, then you need to manually build the mask.
![]() Type the mask manually.
Type the mask manually.
Create the mask manually if your data follows a consistent pattern (such as a six-digit part number) that isn’t a choice offered by the Input Mask Wizard.
Using the Input Mask Wizard
The Input Mask Wizard gladly helps if you’re making a mask for text fields (such as those containing phone numbers, Social Security numbers, and United States zip codes) or simple date and time fields.
If your data doesn’t fit one of the masks that the wizard provides yet follows a consistent pattern, check the next section, which shows how to create a mask manually.
To ask for the wizard’s help, follow these steps:
1. Open the database file that contains the data you want to mask. From the Navigation pane, right-click the table you want to modify and choose Design View.
The table flips into Design view.
2. Click the name of the field that will receive the input mask.
You can use the wizard only with text and date/time fields.
The General tab in the Field Properties section (the bottom half of the window) displays the details of the current field.
3. Click the Input Mask box.
The cursor monotonously blinks away in the Input Mask box. To the right of the box, a small button with three dots appears. That’s the Builder button, which comes into play in the next step.
![]() 4. Click the Builder button.
4. Click the Builder button.
The wizard appears, offering a choice of input masks, as shown in Figure 6-6.
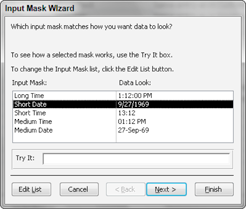
Figure 6-6: The Input Mask Wizard.
5. Scroll through the list of input masks to find what you want.
6. Click the input mask you want.
To play with the mask a bit and see how it works, click the Try It area at the bottom of the dialog box and then type a sample entry.
7. Click Finish to close the wizard and use the mask with your field.
If you click Next instead of Finish, the wizard gives you more options, but we recommend avoiding them. (The sidebar The rest of the Input Mask Wizard has the details.)
The chosen mask appears in the Input Mask text box in the table’s Field Properties section, as shown in Figure 6-7.

Figure 6-7: The Input Mask Wizard completes its masterpiece.
The rest of the Input Mask Wizard
This sidebar shows my recommendations for the last two steps of the Input Mask Wizard. If you click Next instead of Finish at the end of my steps, the Input Mask Wizard continues asking you about changing some obscure settings that are best left at the defaults:
![]() The placeholder character for the input mask
The placeholder character for the input mask
The placeholder character in the mask represents the actual typed character by the user. The default is a dash. You can change from the default to a #, @, !, $, %, or *.
![]() Storing the data with the symbols included within the input mask
Storing the data with the symbols included within the input mask
For example, a Social Security number could be stored with or without the dashes.
The default is Without the Symbols in the Mask (for don’t store the symbols). I recommend you keep it that way. The mask takes care of the data display. Why store extra characters in your database?
Making a mask by hand
It’s not uncommon to need a mask that the Input Mask Wizard doesn’t provide. If your fingers can string together a seemingly nonsensical string of characters on the keyboard, then you can make your own input masks. The trick is making sense out of all the nonsensical characters.
Table 6-2 shows the codes you can use in an input mask; each code has an explanation of the character(s) that it represents:
![]() Required Code: Users must type that type of character (whether they actually want to or not).
Required Code: Users must type that type of character (whether they actually want to or not).
![]() Optional Code: Users can type or not type the kind of character mentioned in the first column.
Optional Code: Users can type or not type the kind of character mentioned in the first column.
Table 6-2 Codes for Input Masks
|
Kind of Characters |
Required Code |
Optional Code |
|
Digits (0 to 9) only. |
|
9 |
|
Digits and + and -. |
(not available) |
|
|
Letters (A to Z) only. |
|
|
|
Letters or digits only. |
|
|
|
Any character or space. |
|
|
|
Any character typed into the mask fills it from right to left. |
|
None |
|
Any literal character. |
|
None |
|
All characters typed into the mask are forced to lower case. |
|
None |
|
All characters typed into the mask are forced to upper case. |
|
None |
You must use the input mask codes to design an input mask.
Designing an input mask
Before you can create a mask, you must determine what mask codes you’ll need to build the mask. Here’s how:
1. On a piece of paper, write several examples of the data that the mask should let into the table.
If the information you’re storing has subtle variations (such as part numbers that end in either a letter/number or letter/letter combination), include examples of the various possibilities so that your input mask accepts them all. You can’t build a mask if you don’t know your data.
2. Write a simple description of the data, including which elements are required and which are optional.
For example, if your sample is a part number that looks like 728816ABC7, write six numbers, three letters, one number; all parts are required.
Remember to allow for the variations, if you have any. The difference between one number and one letter or number can be crucial.
If you need to include a special character in your mask, like a dash or parentheses or a combination of static characters, use this list for guidance:
• Dash, slash, or parenthesis characters: Put a backslash () in front of it, like - for a dash.
• Multiple characters: Put quotation marks around them.
For example, an area code may be separated from the rest of the number by both a parenthesis and a space, like this:
(567) 555-2345
The corresponding mask has quotes around the parenthesis and the space, like this: !(999”-) “000-0000.
The phone-number mask also begins with an exclamation point. The exclamation point forces the typed data to fill the mask from right to left instead of left to right (the default). What’s the big deal about that? Some phone numbers don’t require an area code; others do. Suppose you have to type a seven-digit phone number. If not for the right-to-left entry, you’d have to move the cursor past the area code (___) placeholder part of the mask to get to the beginning of the seven-digit part.
If your field includes letters and you want them to be stored as all-uppercase, add a greater-than symbol (>) to the beginning of your mask. To store the letters as all-lowercase, use a less-than symbol (<) instead.
3. Write the mask codes that represent the elements you’ve written in Step 2.
If (for example), you wrote “six numbers, three letters, one number; all parts are required” in Step 2, then you need the mask codes 000000LLL0. Refer to Table 6-2.
Putting on your input mask
Now that you have your mask written on paper, it’s time to enter it in Access. Here’s how:
1. With the database file open, right-click the table you want to work with and then choose Design View from the shortcut menu.
The table flips into Design view.
2. Click the name of the field you want to adjust.
3. Click the Input Mask box.
The cursor blinks in the Input Mask box.
4. Carefully type your finished mask into the Input Mask area of the Field Properties (as shown in Figure 6-8).
If you don’t know what to type here, see the preceding section.

Figure 6-8: Manually adding a capitalization mask.
5. Click the View button on the Ribbon to switch to Datasheet view and place the cursor in the masked field to check out your new mask.
When prompted to Save, click Yes so you don’t lose your work.
When you’ve entered the mask and have saved the table, try these tests:
a. Type something unacceptable into the masked field.
The input mask should prevent you from typing an incorrect value (see Figure 6-9).
b. Try an acceptable entry.
The mask should accept your entry.
c. Try all the variations you identified in the mask-planning process.
All should be accepted by the mask. If they are not, switch back to Design view and tweak your mask until all possible variations of your entry are acceptable to the mask.

Figure 6-9: I have violated the input mask.
If you’re adding a mask to an existing table with data, Access doesn’t report to you on existing records that fail the mask; it gives that data a free pass to exist as typed. To enforce the mask on existing records, you’ll need to repeat these steps for each record:
1. Click the field in the record.
2. Edit the data.
You can delete the last character and then retype it.
When you move the cursor out of the field, you’ll see the warning if the data doesn’t comply with the mask.
To require or not to require
On many occasions, you will not want a record typed until all the facts are in. For example, you certainly wouldn’t want an order typed without an order date, customer, and product information. The Required property prevents records that are missing essential data from being saved to a table.
The Required property has two settings:
![]() Yes: The user cannot save the record without putting something in the field.
Yes: The user cannot save the record without putting something in the field.
![]() No: Anything goes. (This is the default.)
No: Anything goes. (This is the default.)
To require data entry in a field, follow these simple steps:
1. While in a table’s Design view, click the field in which you want to require data entry.
2. Click in the Required box on the General tab in the Field Properties section.
An arrow appears at the end of the box. By default, the box reads No.
3. Click the arrow and select Yes from the list that appears, as shown in Figure 6-10.
Watch out, the field is now required!
4. Click the View button on the Ribbon to switch to Datasheet view and then test your work.
Type a new record, omitting data entry in the required field. You should see a message box admonishing you for forgetting the required data.
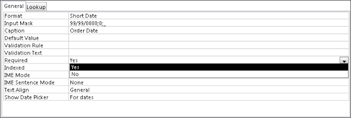
Figure 6-10: The Required property is set to Yes.
Don’t get overzealous with the Required property and set it to Yes for nonessential fields. For example, a contact without a fax number and job title is usually better than no contact at all.
Making your data toe the line with validation
With a validation, Access tests the incoming data to make sure that it’s what you want in the table. If the data isn’t right, the validation displays an error message (you get to choose what it says) and makes the user try the entry again.
Like the other options in this chapter, validations are stored in the General tab of the Field Properties area. Two options relate to validations:
![]() Validation Rule: This rule is the validation itself.
Validation Rule: This rule is the validation itself.
![]() Validation Text: The text is the error message you want Access to display when some data that violates the validation rule is typed.
Validation Text: The text is the error message you want Access to display when some data that violates the validation rule is typed.
Validations work best with number, currency, and date fields. Creating a validation for a text field is possible, but the validations tend to get very complicated very fast.
Tables 6-3 and 6-4 contain some ready-to-use validations that cover the most common needs. These are ready for you to type into the General tab of the Field Properties area.
Table 6-3 Common Number-Field Validations
|
Validation Rule |
What It Means |
|
|
Must be greater than zero. |
|
|
Cannot be zero. |
|
|
Must be between 0 and 100 (noninclusive). |
|
|
Must be between 0 and 100 (inclusive). |
|
|
Must be less than 0 or greater than 100 (inclusive). |
Table 6-4 Common Date-Field Validations
|
Validation Rule |
What It Means |
|
|
Must be today’s date or later. |
|
|
Must be today’s date, later, or blank. |
|
|
Must be earlier than today’s date. |
|
|
Must be between January 1, 2000 and today (inclusive). |
Here’s how to enter a validation rule:
1. With the database file open, right-click the table you want to work with and choose Design View from the shortcut menu.
The table flips into Design view.
2. Click the name of the field you want to adjust.
3. Click the Validation Rule box.
The cursor blinks in the Validation Rule box.
4. Type the validation rule that matches your data.
For example, if you want to allow only numbers between 0 and 1,000 in the field, type >0 AND <1000.
5. Click in the Validation Text field.
The cursor blinks in the Validation Text box.
6. Type the message you’d like the user to see if he breaks the validation rule.
Keep it short and simple. For my example in Step 4, you might type Please enter a number greater than 0 and less than 1,000.
When you apply a validation rule to a field, watch out for these gotchas:
![]() When using
When using AND, both sides of the validation rule must be true before the rule is met.
![]() With
With OR, only one side of the rule needs to be true for the entire rule to be true.
![]() Be careful when combining
Be careful when combining >= and <=. Accidentally coming up with one that can’t be true (such as <= 0 AND >= 100) is too easy!
You can test your new validation rules against existing table data by clicking the Test Validation Rules button in the Tools group of the Ribbon’s Design tab. Just follow the prompts in the resulting message boxes (to save your table, for example), and you’ll know if your data likes the new rules!
Give Your Fingers a Mini Vacation by Default
Wouldn’t it be a dream come true if every time you entered an order, you didn’t have to type the current date in the Order Date field? Well, guess what? Access is all about making your dreams come true! (Your data-entry dreams, anyway.) It accomplishes this feat through the Default Value property. The Default Value property places the data that you specify for a field into that field every time a new record is inserted into the field’s table. Yes, it sounds too good to be true — but I assure you it is not!
Here’s how to enter a default value:
1. With the database file open, right-click the table you want to work with, and choose Design View from the shortcut menu.
The table flips into Design view.
2. Click the name of the field you want to adjust.
![]() 3. Click the Default Value box.
3. Click the Default Value box.
The cursor blinks in the Default Value box. The Builder button appears.
4. Type the data that you’d like to appear for that field when a new record is inserted.
For example, if you want the current date to appear in an Order Date field for each new record, type Date() in the Default Value text box. (See Figure 6-11.)
5. Click the View button on the Ribbon to switch to Datasheet view and then test your work.
Here’s a quick test: Add a new record; then scroll to the field that contains the default value you just set. Note the contents of the field.

Figure 6-11: The Default Value property set to return the current date with the Date() function.