
Chapter 16
Take Charge with Action Queries
In This Chapter
![]() Updating multiple records that match specific criteria
Updating multiple records that match specific criteria
![]() Adding records from one table into another table
Adding records from one table into another table
![]() Deleting multiple records that match specific criteria
Deleting multiple records that match specific criteria
Ever have to update multiple records in a table with the same information? How about copying data from a linked spreadsheet into an existing Access table? What about deleting a certain group of records from a table? If you answered yes to any of these questions, then you’ve come to the right place. Action queries perform a specific task on a group of records in a table, all in one fell swoop, so you don’t have to add or update each record manually. (Now, try to control your excitement! If you ever get into the situation where an action query is needed, I know you’ll thank me for writing this.)
The three most common action queries are
![]() Update: This query updates the value in a field for the records you select via the Criteria row. For example, if an employee keyed in the wrong order date of 11/2/2012 on 25 orders, an update query would allow you to easily update all 25 order dates to the correct date of 11/3/2012.
Update: This query updates the value in a field for the records you select via the Criteria row. For example, if an employee keyed in the wrong order date of 11/2/2012 on 25 orders, an update query would allow you to easily update all 25 order dates to the correct date of 11/3/2012.
![]() Append: Use this query type to add records from one table to another. For example, your credit card company gives you monthly expense transactions in an Excel spreadsheet, and you need to input the expenses into your Access database Expense table. You can link or import (see Chapter 8 for details) the spreadsheet into your Access database and then use an append query to add the records to your Expense table. An append query gives you control over what records you add from the spreadsheet to the Expense table. Importing directly to the Expense table will import every record from the spreadsheet.
Append: Use this query type to add records from one table to another. For example, your credit card company gives you monthly expense transactions in an Excel spreadsheet, and you need to input the expenses into your Access database Expense table. You can link or import (see Chapter 8 for details) the spreadsheet into your Access database and then use an append query to add the records to your Expense table. An append query gives you control over what records you add from the spreadsheet to the Expense table. Importing directly to the Expense table will import every record from the spreadsheet.
![]() Delete: If you’re in a destructive mood, use this query to delete groups of records from a table. Suppose you work for a company that has discontinued a product as of 12/1/12 — and customers have been notified that any order dated after 12/1 for delivery of the discontinued product will be deleted. Okay, they were warned; you can use a Delete query to eliminate all orders for the discontinued product that have delivery dates after 12/1/12.
Delete: If you’re in a destructive mood, use this query to delete groups of records from a table. Suppose you work for a company that has discontinued a product as of 12/1/12 — and customers have been notified that any order dated after 12/1 for delivery of the discontinued product will be deleted. Okay, they were warned; you can use a Delete query to eliminate all orders for the discontinued product that have delivery dates after 12/1/12.
 The action queries described in this chapter will alter data in your database PERMANENTLY. Although they’re beneficial when used correctly, they can wreak havoc if used incorrectly. The results of running an action query cannot be undone. Therefore, it’s wise to back up your data before you run any action query!
Easy Update
The Update query can replace the value in a field in a group of records with another value. To create an Update query, first you need to determine the table (and the field within it) in need of updating — and decide how you want to update that field. When you’ve figured that out, do this:
1. Select the Create tab on the Ribbon.
The Create buttons appear onscreen. Notice the Queries group toward the left side of the Ribbon.
2. Click the Query Design button from the Queries group on the Ribbon (see Figure 16-1).
A new query opens in Design view, and the Show Table dialog box pops up.
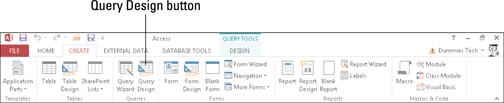
Figure 16-1: Click the Query Design button on the Ribbon.
3. Select the table that contains the field you’d like to update; then click the Add button.
The selected table is added to the top half of the Query Design window, as Figure 16-2 illustrates.
4. Click the Close button in the Show Table window.
The Show Table window closes.
5. From the Table field list, double-click the field name that the query will update along with any fields you’ll need to write criteria.
The fields are added to the bottom half of the Query Design window (see Figure 16-3).

Figure 16-2: Click the Add button to add the Orders table to the query.

Figure 16-3: The OrderDate and RequiredDate fields as added to the query.
6. Click the Design tab on the Ribbon.
The Ribbon displays the design commands, including the Query Type group.
7. Select the Update button from the Query Type group.
The Update To row appears on the query grid, as Figure 16-4 illustrates.
8. In the Update To row of the field you want updated, enter a value or expression to update the field.

Figure 16-4: Select the Update button on the Ribbon, and the Update To row appears.
The Update To row can contain a static value such as a date (12/1/2009), an expression such as Date()+10, or the name of a field such as [RequiredDate].
 If you’re not sure what you can enter in the Update To row, make sure the cursor is in the row and click the Builder button from the Design tab of the Ribbon. Expression Builder shows you your options and helps with syntax.
9. In the Criteria row, enter the criteria that will select the records you’d like updated.
The query in Figure 16-5 puts the required date in the ShippedDate field for those orders required on 5/30/2008 or 5/31/2008.
10. Click the Run button from the Ribbon’s Results group to run the query and update the records.
A message box (see Figure 16-6) appears, telling you how many records will be updated.
If you’re not sure what records you’ll update, change the query type to a select query and run it. If the resulting records are correct, switch back to an update query and you’ll run the update with confidence knowing what records you’re updating.

Figure 16-5: This query will update the ShippedDate field to the value of the RequiredDate field.
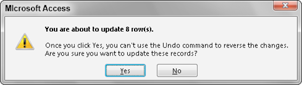
Figure 16-6: Click Yes to update your data.
11. Click Yes in the message box window to run the query and update your data.
Figure 16-7 shows the state of things before you run an update and Figure 16-8 shows what changes an update has produced.
Update queries will update the data you specify — but the update can’t be undone. Back up your data before you run Update queries — and use them with caution! Don’t say I didn’t warn you!

Figure 16-7: The ShippedDate field before running the Update query.

Figure 16-8: The ShippedDate field after running the update query.
Add Records in a Flash
Append queries add records from one table (called the source table) to another table (called the destination). A common use for an Append query is to add data from an external file (such as an imported or linked spreadsheet) to an existing Access table. To create an Append query, follow these steps:
1. Select the Create tab on the Ribbon.
The Create buttons appear on-screen. Notice the Queries group toward the left side of the Ribbon.
2. Click the Query Design button from the Queries group (as shown earlier in Figure 16-1).
A new query opens in Design view, and the Show Table dialog box pops up.
3. Select the table that contains the source data to be appended; then click the Add button.
The selected table is added to the top half of the Query Design window.
4. Click the Close button in the Show Table window.
The Show Table window closes.
5. From the Table field list, double-click the field names that contain the data to be added to the destination table.
The fields are added to the bottom half of the Query Design window (see Figure 16-9).

Figure 16-9: Selected fields for an Append query.
6. Click the Design tab on the Ribbon.
The Ribbon displays the Design buttons, including the buttons in the Query Type group.
7. Select the Append button from the Query Type group.
The Append dialog box appears, as Figure 16-10 illustrates.

Figure 16-10: Say hello to the Append dialog box.
8. Select the destination table from the Table Name drop-down list; then click OK to close the Append dialog box.
The Append To row appears in the query just above the Criteria row. If a source field name matches exactly a destination field name, the Append To row will pre-populate with each matching field name from the destination table.
If the source and destination field names do not match for a specific field, the Append To row will not pre-populate with a field name from the destination table. To fix this, click in the Append To row with a missing destination field name. A drop-down arrow appears to the right. Select the matching destination field from the drop-down list.
9. Write criteria if necessary to select just those records you want from the source table.
See Figure 16-11 for the completed Append query.
In most cases, the source and destination fields must be of the same data type. For example, you cannot append data from a text field to a number field.
10. Click the Run button from the Ribbon’s Results group to run the query and append the records from the source table to the destination table.
A message box appears, telling you how many records will be added.
When Append queries add records to the destination table, you cannot undo the results. Be sure to back up your database file before you run an Append query.
11. Click Yes in the message-box window to run the query and add the records.
If you run an Append query in error, you can take one of two actions:
![]() Delete the appended records from the destination table manually (they will be near the bottom) or via a Delete query (see next section).
Delete the appended records from the destination table manually (they will be near the bottom) or via a Delete query (see next section).
![]() Revert to your backup file, correct the problem, and try again.
Revert to your backup file, correct the problem, and try again.

Figure 16-11: This query appends all records that don’t contain “personal” in the Category field.
Quick Cleanup
The Delete query can clean up unwanted records in a hurry. Of the three action queries that have been discussed in this chapter, the Delete query is the most dangerous: It can wipe out all the data in your table in an instant. Pay special attention to the selection criteria you write for a Delete query so you’re sure you’ll delete only the correct records. To build a Delete query, follow these steps:
1. Select the Create tab on the Ribbon.
The Create buttons appear onscreen. Notice the Queries group toward the left side of the Ribbon.
2. Click the Query Design button from the Queries group (as shown previously in Figure 16-1).
A new query opens in Design view and the Show Table dialog box pops up.
3. Select the table that contains the source data to be deleted; then click the Add button.
The selected table is added to the top half of the Query Design window.
4. Click the Close button in the Show Table window.
The Show Table window closes.
5. From the Table field list, double-click the asterisk (*) at the top of the list and any individual field names you intend to use for criteria.
The fields will be added to the bottom half of the Query Design window.
6. Click the Design tab on the Ribbon.
The Ribbon displays the Design buttons, including the Query Type group.
7. Select the Delete button from the Query Type group.
The Delete row appears in the query grid, as pictured in Figure 16-12.
8. Write criteria if necessary to select just those records you want to delete from the table.
See Figure 16-13 for the completed Delete query.
If you don’t write any criteria, every record in the selected table will be deleted!
After you’re written your criteria, change the query back to a Select query to see which records will be deleted. If the Select query returns the records you wanted to delete, change the query back to a Delete query, run it, and you’ll know you deleted the right records. What a relief!

Figure 16-12: The Delete query designed.
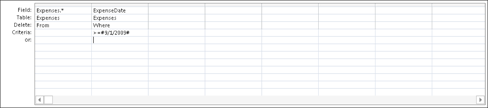
Figure 16-13: This query will delete all records dated on or after 9/1/2009.
9. Click the Run button from the Ribbon’s Results group to run the query and delete the records from the selected table.
A message box will appear, telling you how many records will be deleted.
A Delete query deletes records permanently from the selected table. You cannot undo the results of this query type. Back up your database file before running a Delete query!
10. Click Yes in the message box window to run the query and delete the records.