
Chapter 9
Importing and Exporting Data
In This Chapter
![]() Pulling data into Access
Pulling data into Access
![]() Deciding when to import and when to link data
Deciding when to import and when to link data
![]() Speaking in foreign data tongues
Speaking in foreign data tongues
![]() Pushing your comfortable data into the cold, cruel world
Pushing your comfortable data into the cold, cruel world
It would be nice if all computer software spoke the same language, but unfortunately this is not the case. Software applications have proprietary languages called file formats. Just as a person who speaks only English can’t easily communicate with one who speaks only Spanish, software of one file format cannot directly communicate with software of another file format.
If you’re a typical business user, you’ll come across a situation in which you need some data in your Access database, but it happens to be in another file format. Or you’ll get the question, “Can you put that data in a spreadsheet for me so I can play around with it?”
Do you get ready for tedious hours of data reentry? Not with Access! Access provides tools that speak the languages of other software applications. This chapter looks at these import and export capabilities of Access. If you work with Access and almost any other program, you need this chapter — because sometime soon, you will need to move data to and from Access.
 If you’d like to try the import and export techniques described in this chapter, download the sample files used in the chapter at
 www.dummies.com/go/access2016. There you’ll find the Access database used for the screenshots in the book and a sample spreadsheet to import.
 If you’re using databases of your own as guinea pigs, make copies of your databases before trying the techniques in this chapter.
Retrieving Data from Other Sources
Access includes two ways of grabbing data from other applications:
- Importing: This capability translates the data from a foreign format into the Access database file format — and then adds the translated data to an Access table. You can import in one of two ways:
- Create a new table in an Access database for the data. You might do this if you’re creating a new database and some of your data is already in spreadsheets.
- Append the data as new records at the end of an existing table. Perhaps you need to import monthly expense data into your expense reporting database from your credit card company and that data can be provided only in spreadsheet format.
- Linking: Build a temporary bridge between the external data and Access. The data remains at its original source — yet Access can manipulate it just as though it were residing in the source (usually an Access database). When a link is established, it remains until the link is deleted or the source file is moved or deleted.
When you link tables between two Access databases, you can’t edit the source table’s structure in the destination database (the database that contains the links). You must open the source database to edit the structure of a table linked to a destination database.
Translating file formats
Regardless of whether you import or link the data, Access understands only certain data formats.
 Always back up your data before importing, exporting, or mowing the lawn — er, trying anything that could do serious damage to the data. The “I should have backed up” lesson is one of the most painful to learn — and one of the most common. Make a copy of your database before trying the techniques in this chapter.
Tables 9-1 (spreadsheets), 9-2 (other file types), and 9-3 (databases) list the file formats that Access can understand. These tables cover the vast majority of data formats used on PCs all over the world.
Table 9-1 Compatible Spreadsheet File Formats
|
Program |
File Extension |
Versions |
Comments |
|
Excel |
.XLS, .XLSX, .XLSB, .XLSM |
3.0, 4.0, 5.0, 7.0/95, 8.0/97, 9.0/2000, 10.0/2002, 2003, 2007, 2010, 2013, 2016 |
Although Excel is a spreadsheet program, many people use it as a simple flat-file database manager. See Chapter 3 for more on flat-file databases. |
Table 9-2 Other Compatible File Formats
|
Program |
File Extension |
Versions |
Comments |
|
Text |
.TXT |
n/a |
Plain text, the “if all else fails” format; Access understands both delimited and fixed-width text files. |
|
XML |
.XML |
All |
XML (eXtensible Markup Language) stores and describes data. |
|
HTML |
.HTM, .HTML |
n/a |
The descriptive codes that make a web page a web page. |
|
Web Service |
n/a |
n/a |
Connects web-based applications over the Internet. |
|
SharePoint list |
n/a |
n/a |
Collaborative software using web-based data. |
Table 9-3 Compatible Database File Formats
|
Program |
File Extension |
Versions |
Comments |
|
Access |
.MDB, .ADP, .MDA, .MDE., .ADE, .ACCDB, .ACCDA, .ACCDE |
2.0, 7.0/95, 8.0/97, 9.0/2000, 10.0/2002, 2003, 2007, 2010, 2013, 2016 |
Although they share the same name, these versions use different file formats. |
|
ODBC |
n/a |
n/a |
Use ODBC (Open DataBase Connectivity) to connect to other databases, such as Oracle and SQL Server. |
|
Outlook/Exchange |
n/a |
n/a |
Link your Outlook or Exchange folder straight to an Access database. |
Here is some additional information on how to prepare the most common import file formats so that your import will go smoothly. I don’t mention prepping other database file formats because, typically, no preparation is needed. I’ll get to the step-by-step instructions on importing (see “Importing and linking”) and exporting (see “Hit the Road, Data”) later in this chapter.
Spreadsheets
When you import a spreadsheet file, each spreadsheet column becomes an Access table field:
-
The first row in the spreadsheet (the column headings) becomes the field names.
 If you want to use the first row for field names, you must check the First Row Contains Column Headings check box during the import process.
An ideal spreadsheet for import will have field names in Row 1.
-
Each following row becomes a record in the Access table.
An ideal spreadsheet for import will have data starting in Row 2.
When you import data from spreadsheets, watch for these quirks:
- Double-check spreadsheet data to be sure that it’s consistent and complete.
- Make sure that all entries in each spreadsheet column (field) are the same data type (numbers, text, or whatever).
- Make sure that the first ten rows of the spreadsheet contain data so Access can correctly recognize data types.
- Remove titles and blank rows from the top of the spreadsheet.
-
Make your spreadsheet column headings short and unique.
Shorten your spreadsheet column headings to the field names you’d like Access to use so you don’t get scolded during import about field name issues.
-
If you’re adding data to an existing Access table, make sure the spreadsheet columns are of the same number and in the same order as the Access table fields.
Your spreadsheet columns and table fields must line up exactly.
Text files
If you have difficulty importing a format (such as an Excel spreadsheet) into Access, you may be able to import the data as text. Text is the most widely recognized form of data known to man (or computer). Try these steps to import the data as text:
- Open the file with the existing software product (like Excel).
-
Use the existing product’s exporting tools or Save As command to export your data into a text file.
A delimited text file is preferred if the existing product supports this type of text file. A delimited file contains a marker character (such as a comma) to separate each field from the next so Access can easily understand where one field ends and another begins. - Import the text file into Access (as shown later in this chapter).
Importing and linking
Because Access offers two ways to get existing data in — linking and importing — a logical question comes up: Which method should you use? The method depends on the situation:
-
Link: If the data in the other program must remain in that program, link to the source.
If the data is in a SQL Server database that’s a permanent business fixture, it’s not going anywhere; link to the source.
- Import: If you want the database in which you’re placing the data to replace the source, then import. This is the option for you if you’re creating an Access database to replace an old spreadsheet that no longer meets your needs. Also import if the source data is supplied by an outside vendor in a format other than an Access format. For example, suppose you receive cash-register sales data from an outside vendor on a monthly basis in spreadsheet format. Access is a great tool for reporting, so you can import the data into Access and use its reporting tools to generate your reports.
The following section shows how to link and import data from the file formats discussed in the previous sections of this chapter.
Steps for importing
Here are the steps for importing or linking data sources to your Access database:
- Open the Access database that will hold the imported data.
-
Click the External Data tab on the Ribbon.
The Import & Link group of buttons appears on the Ribbon (see Figure 9-1).
Each button is connected to a wizard that walks you through the process:
- Common file formats such as Excel or Text (labeled as Text File) have their own specific buttons.
- You can find the less common file formats using the More button.
-
Click the button that matches your file format.
A Get External Data dialog box specific to the selected file format appears onscreen. (See Figure 9-2.)
-
Use the Browse button to select the data source that you want to import or link to Access.
Usually this is a file. It could also be a SharePoint site or an Outlook folder.
If typing filenames is not your thing, click the Browse button to locate the file. -
Select the method of data storage.
This is where you tell Access whether to import or link the data. You can link to all file formats except XML.
The sidebar “Storing data from external data sources” shows the common data storage options.
-
Follow the remaining steps in the Get External Data dialog box.
From this point forward, the steps depend on which data format you’re importing. Follow the prompts carefully. The worst that can happen is that you get an imported (or linked) table full of gibberish. If you do, check the format of the source file. For example, if the source is a text file and you get gibberish, you may need to confirm that the text file was saved as a delimited file (with a character — a comma, for example — placed between fields). It’s also possible that the source file isn’t in the correct format (for example, you may think it’s an Excel spreadsheet but it’s not).
If you expect to import or link to this type of file often, click the Save Import Steps check box. (The check box will be located on the last screen of the wizard.) After you check the box, you’ll be prompted for a name for your import, as shown in Figure 9-3.

Figure 9-1: Make sure that you choose the correct button for your file format.

Figure 9-2: The Get External Data – Excel Spreadsheet dialog box.
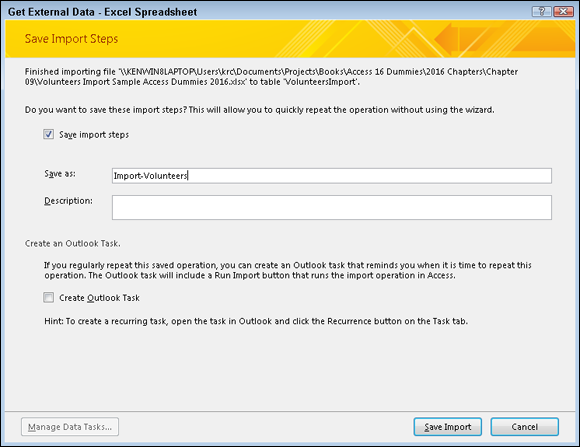
Figure 9-3: Saving the Volunteers import steps.
The External Data tab’s Import group on the Ribbon contains a button called Saved Imports. (Refer to Figure 9-1.) You can use this button to call up saved imports and run them as often as you like. (See Figure 9-4.) Data sources must remain in their original locations with their original names to rerun a saved import.

Figure 9-4: The Saved Imports tab of the Manage Data Tasks dialog box.
Troubleshooting
During the import or linking process, Access may have difficulties. If it does, you’ll know — either the import or linking process will take a noticeably long time to finish or Access will display an error message. This section describes some common problems that crop up during importing and linking — and how to fix these problems.
Slow imports and links
If importing is taking forever, Access is probably struggling with errors in the inbound data. Follow these steps to troubleshoot the problem:
-
Press Ctrl+Break to stop the import process.
If your device does not have a Break key, consult its documentation for the proper key sequence to implement the Break command. For example, on some laptops it’s the FN + F6 key, so to stop the import process, you’d press Ctrl+Fn+F6.
- Open the source file in its native application and check the data that’s being imported for problems, such as
- Corrupt data. The file you’re attempting to import may be unusable.
- Badly organized spreadsheet data. See the Spreadsheets section of Translating File Formats earlier in this chapter for tips on a properly organized spreadsheet.
- An invalid index. Sometimes database indexes become corrupt, making the data within the table with the corrupt index unusable. Access will usually holler at you when you open the source table that contains the invalid index. For more on indexes, see Chapter 5.
- Too much data. In this case, break the file into several smaller files.
- Make any necessary changes and then save the corrected source file.
- Start the import or linking process again, as outlined in the previous section of the chapter.
Bad data
If the imported table barely resembles the source, delete the imported table from Access, open the source file in its native program, and clean up the data before importing again.
Follow the tips in the earlier section, “Translating file formats,” to clean up your data.
Hit the Road, Data
Every Access object can be exported; the most common export tasks are exporting data in a table or query to another program (such as a spreadsheet) and exporting a report as a Portable Document Format (commonly known as a PDF). Therefore, this section concentrates on exporting table and query data to other file formats and exporting reports.
Exporting a table or query involves reorganizing the data it contains into a different format. As with importing, Access can translate the data into a variety of file formats, depending on your needs.
Because every Access object can be exported, the External Data tab on the Ribbon presents you with all the file formats in which the object can be exported. If you can’t export it to a certain format, that format’s button is disabled.
Export formats
Access exports to the same formats that it imports (as listed earlier in the chapter). Access also exports to PDF (Adobe Acrobat files), XPS (XML Paper Specification), Microsoft Word, and to an email attachment.
Exporting table or query data
The steps to exporting a table or query are simple:
-
With the database open, click the table or query that you want to export. All database objects are located in the Navigation pane.
The table or query name is highlighted.
-
Click the External Data tab on the Ribbon.
The Export button group appears on the Ribbon. (See Figure 9-5.) Note the following features of the Export button group:
- The common exporting tasks have their own buttons.
- The seldom-used formats are lumped together; you can get at them with the More button.
-
Click the button that matches the program to which you’ll export your data.
An Export dialog box (see Figure 9-6) customized to your format of choice appears.
-
Follow the steps in the Export dialog box to complete the export.
The Export dialog box displays the choices for your export file’s format:
- Every choice asks for a filename (including path) for your exported data.
- Some export processes also ask whether you want to open your new file after the export is complete.
This latter feature can prevent a frustrating search after you save the file.
-
Select the Save Export Steps check box if you know you’ll do this export again.
The check box is located on the last screen of the Export Wizard. After you check the box, you’ll be prompted for a name for your export.
The Ribbon contains a button called Saved Exports. (Refer to Figure 9-5.) Use this button if you want to make the frequent export of a table or query easier. Figure 9-7 shows a table exported from Access as it appears in Excel. When you run a saved export more than once, Access tells you that the destination file already exists

Figure 9-5: The Export button group.
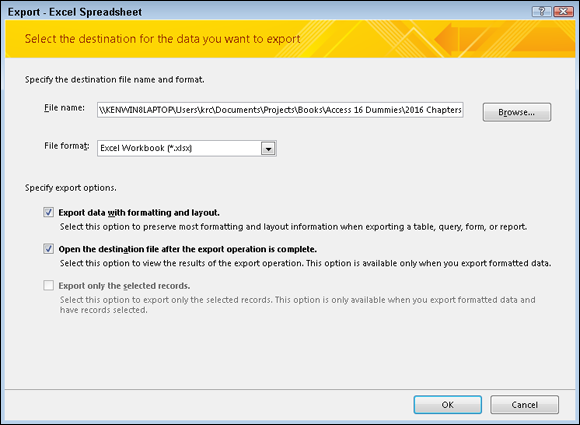
Figure 9-6: Step 1 of the Export – Excel Spreadsheet dialog box completed.
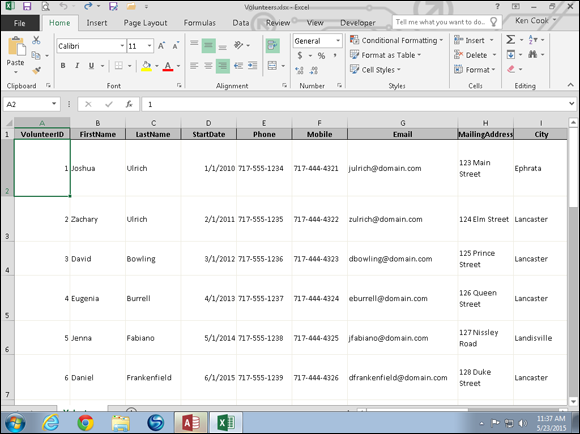
Figure 9-7: The exported Volunteers table in Excel, ready for anything.
Exporting a Report to PDF
Follow these steps to export a report to PDF:
-
With the database open, click the report that you want to export. All database objects are located in the Navigation pane.
The report name is highlighted.
-
Click the External Data tab on the Ribbon.
The Export button group appears on the Ribbon.
-
Click the PDF or XPS button in the Export group.
The Publish as PDF or XPS dialog box appears (see Figure 9-8).
- Browse to the folder you’d like to store the file in and type a file name in the File name box.
-
Click Publish.
The report is saved as a PDF to the folder and with the file name you specified.

Figure 9-8: Exporting the Events by Type report to PDF.