
Chapter 4
Sounds Like a Plan
In This Chapter
![]() Planning your database tables
Planning your database tables
![]() Building tables
Building tables
![]() Creating fields
Creating fields
![]() Setting data types
Setting data types
As a professional Access database developer, I’ve seen a lot of things over the years. And one of the most common is poor table design. Planning a database is like building a house; if you don’t get the foundation right, you’ll start to see cracks or worse! Same thing with an Access database. Access tables are like the foundation of your house. Design them right and all will go well. Design them wrong, and you’ll start to see those cracks as you get further into the project.
 Back in Chapter 1, we discussed planning out your database. In this chapter, we’ll dig deeper into how to turn that plan into the best possible table design.
Planning Your Database Tables
As you know, tables are made up of fields — the bits of information you want to store in your database. Hopefully, you put your list of fields together back in Chapter 1 and you broke them into logical groups. You did do that, didn’t you? You see, I keep harping on it because table design is the most important part to building a database but oftentimes, not given the attention it deserves. So, time to do the work, or if you already did, pull your field list out so we can get started!
Reviewing fields
Take a look at your field list and think about how you’ll use that data. For example, you might have Volunteer Name as one of your fields. Now, should that be one field or two? Well, if you’ll always refer to your volunteers by full name, like Ken Cook, then one field is fine. However, that seems unlikely. Suppose your database produces emails to volunteers. It’s unlikely you’ll want the email to begin with “Hi Ken Cook”. It would say “Hi Ken”. So, now you know that you need two fields, one for first and one for last name.
Address is another example. Do you want to group your volunteers by city on a report? If the answer is yes, you can’t lump the entire address in one field. You’ll need fields for street, city, state, and zip code. This gives you the most flexibility.
Take a good look at your field list and make sure you have each piece of information at the most granular level. You’ll thank yourself for taking time now to think this through. Once you have your volunteer field on two forms and five reports and it’s time to build that email functionality, if you have two fields (first name and last name), you’ll smile! If you have one field, you’ll frown because you have to split the name into two fields and change all the forms and reports that use that field to incorporate the two fields.
Determining data types
After you have a good field list, it’s time to think about the type of data each field will store. Will it store a date, a number, text, or perhaps just the choices of true or false? Setting data types correctly affects overall database size and performance. Next to each field, write down the type of data the field will store and the maximum size of that data.
Text data
Suppose a state field stores the two-letter state abbreviation for a volunteer’s state of residence. Access has a Long Text and Short Text data type. Long text stores up to 64,000 characters. Short text stores up to 255 characters and you can specify the exact number of characters using the Field Size property. I’m sure you’ve figured out which data type to choose but might want to know the reasons why.
If you choose Long Text for your state field, you’ll be reserving the capacity to store 64,000 characters in that field even though you’ll never store more than two. What a waste! This inflates the size of your database and over time degrades its performance. The larger the amount of data in a database, the slower it may perform over time. So, choose Short Text with a Field Size of 2 and you’ll be all set!
Now, the flipside of that is being too conservative. Back to our volunteer first and last name. If you specify 10 characters and a Short Text data type for the LastName field, you’re fine unless the volunteer has a last name that’s 11 characters long. Now, you’ve got a problem. Access won’t allow you to type an 11-character name in that field. You’ll have to edit the Field Size property for that field and increase the number to accommodate the longest possible name. So, choose wisely when setting data types.
Number data
The rules that apply to text apply to numbers, too. Pick the number field size that fits closest to the size of the number you’ll store in the field without going under. Table 4-1 shows the number field sizes and the maximum number and number of decimal places that the data type can hold.
Table 4-1 Number Field Sizes
|
Field Size |
Numbers It Can Store |
Signifcant Digits |
|
|
0-255 |
3 |
|
|
-32,768 to 32,767 |
5 |
|
|
-2,147,483,648 - 2,147,483,647 |
10 |
|
|
-3.4 x 1038 to +3.4 x 1038 |
7 |
|
|
-1.797 x 10308 to +1.797 x 10308 |
15 |
|
|
-9.999… x 1027 to +9.999… x 1027 |
29 |
 A significant digit is a non-zero number either to the left or right of the decimal place. So, 0.123 has three significant digits, 22.00013 has four significant digits, and 42 has two significant digits. A single field size will accept 0.1234567 but not 12.1234567 because the first number has seven significant digits and the second nine. The second number will appear in a field sized as single as 12.12346 (the 5 is rounded to a 6 and the 6 and 7 are dropped).
If the number is not a number that you’ll perform calculations with, use one of the text data types. A zip code is the classic example. Many zip codes begin with a zero. If you choose a number data type for your zip code field and type 08888 in your zip code field, you’ll get a nice surprise. Access removes the leading zero when you tab out of the field and 08888 becomes 8888. Thank you Access! Easy to fix. Just choose Small Text with a Field Size of 9 and you’re leading zero will stick around like it should.
 Assigning data type and size is not an exact science. If you’re not sure what to choose, bigger is better than smaller. Choose a type and size that will accommodate what you think is the largest possible entry for that field. If you choose 50 as the Field Size for your LastName field and the longest last name is only 40 characters, no big deal. But if you choose 10 and the longest last name is 40 characters, then you’ve got to go back and edit the field properties in the table, which, depending on where you are with the project, can be a big deal.
Grouping fields into tables
At this point, you’ve done some great work specifying each field and the data type and size for each field. Now it’s time to organize the fields into tables. This may seem easy. Just one table for everything, right? Wrong! There are some guiding principles when grouping fields into tables:
- Make sure the data is related. The data should share a common theme like volunteer contact information, events, or locations.
- Make sure the data does not repeat. If you find yourself entering the same volunteer into the Volunteers table two times because they have two addresses, you need a new table.
- Make sure related choices do not become field names. If you have three volunteer fields in your events table called Volunteer1, Volunteer2, and Volunteer3, then you’ve got a problem. Querying data like this is difficult. If you need to specify multiple volunteers for the same event, then you need a new table.
Take your list of fields and group them by subject. Then check for duplicates per points two and three in the previous list. When you’re done, you might have something like Figure 4-1.

Figure 4-1: Tables, fields, data types, and sizes.
What is normal?
The process of building tables so you don’t repeat data or repeat fields is called normalization. A normalized table follows the guiding principles outlined in the previous section. Figure 4-2 shows a table that is not normalized. Can you figure out why?
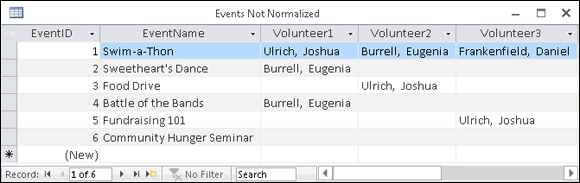
Figure 4-2: The sadly abnormal Events table.
Didn’t figure it out? OK, I’ll give you a hint. Suppose the Swim-a-thon requires a fourth volunteer? What would you do? Add a new field? That would fix the problem for now, but what happens if a fifth volunteer is needed? You can’t keep adding fields. The answer is to remove the volunteer series of fields and create a new table called EventVolunteers. This new table allows you to add as many volunteers as you need to each event.
If you know you could have two addresses per volunteer or ten volunteers per event, then you need a new table for addresses and another for event volunteers. This step is crucial to proper table design.
If the figures in this section make no sense, not to worry. Queries are covered in Part IV. I need to show you this so you understand how good table design saves time and effort!
Why? Because it becomes very difficult to get a list of events that Burrell volunteered for if you have ten volunteer fields. Figure 4-3 shows the query in Design view with the abnormal events table.

Figure 4-3: Getting Burrell’s events with abnormal table design.
Just imagine if there were ten volunteer fields! You’d have to type Burrell’s name ten times on ten different rows (see Figure 4-4). Also, notice how Burrell’s name shows in multiple columns along with names of other volunteers that you’re not interested in at the moment. If you had ten volunteer fields, you’d see a lot of names of other volunteers.

Figure 4-4: Burrell’s events with abnormal table design.
Now let’s look at the same query with normalized tables, as shown in Figures 4-5 and 4-6.

Figure 4-5: Getting Burrell’s events with normalized table design.
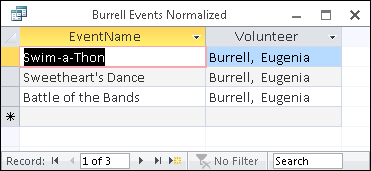
Figure 4-6: Burrell’s events with normalized table design.
If you compare Figure 4-4 to 4-6, you’ll see that Figure 4-6 returns the results we want without the extra names we don’t want. If you compare Figures 4-3 and 4-5, I think you’ll agree that Figure 4-5 is the easier query to write. Both queries return the same number of events, but the second one is easier to build and has cleaner results! This is why it’s so important that the table design is right the first time around. I can tell you from personal experience, getting design right the first time will save you a lot of aggravation!
Building Tables in Design View
Now that you’ve organized, you can build your tables. Here’s how to start:
- Click the Create tab on the Ribbon.
-
Click the Table Design button in the Tables group.
A new table appears in Design view ready for your new fields (see Figure 4-7). The Property Sheet and Field Properties appear as well. If you don’t see the Property Sheet, press F4 to open it.

Figure 4-7: The birth of a new table.
Creating fields
You can’t save a table unless it has at least one field. Because you’ve done the legwork of organizing your data into fields and tables up front (if you didn’t do this, see the section, “Planning Your Database Tables” earlier in this chapter), this part should be easy. These steps assume you have a table open in Design view.
- Click in the first blank row in the Field Name column.
-
Type your field name.
A field name can be a maximum of 64 characters.
Keep your field names short and descriptive of what they’ll store. You’ll sometimes need to type field names out when referring to them in queries or on forms and reports. Long field names mean more typing! Avoid using spaces in field names. Field names with spaces must be surrounded by square brackets ([]) that you’ll have to type. If your field name does not have a space and you need to type it out, Access will enter the square brackets for you. That Access is one awesome helper, don’t you think? -
In each subsequent blank row, type each field name that belongs with your new table.
This is shown in Figure 4-8.
-
Click File ⇒ Save (or press Ctrl+S) to save your new table.
Care to guess the maximum size of a table name? If you said 64, you’re a winner!
Figure 4-8: Fields entered in Table design.
Keep table names short and avoid using spaces in them for the same reasons I mention in the field name tip. Avoid special characters in field and table names; many of them aren’t allowed. Stick to letters, numbers, and underscores (_) and you won’t have any problems. Use underscores rather than spaces if you need to differentiate words in your names.
Setting data types
Once you have your field names entered, tell Access what data they will hold by choosing a data type. If you don’t know what a data type is or what to choose, see the sections, “Field Types and Uses” in Chapter 3 and “Determining data types” earlier in this chapter. Here are the data type steps:
-
Click in the Data Type column next to the new field, as shown in Figure 4-9.
A drop-down list appears with data type choices.
- Select a data type from the list.
-
Enter a field size on the Field Size property row in the Field Properties section of table design.
Not every data type needs a field size, but most do.
- Repeat Steps 2 and 3 for each field in the table.
- Save the table.

Figure 4-9: Choosing a data type and field size.
Take your time to build tables. Get it right the first time and you’ll save yourself a lot of aggravation down the road.