
Chapter 7. Importing and Exporting Data
In many cases, the data you want to analyze isn’t in the tool you want to use. This means that you’ll frequently need to import data from other applications into Access so that you can use Access’ tools, or, if you want to use a different tool to look at your Access data, you’ll need to export your data. There are a number of possible approaches for doing this.
In this chapter, you’ll learn how to import and export data using Access’ tools, how to write Access code to save or load data, and how to process data using XML files. You’ll also learn how to exchange data between Access and other Office tools (Excel, PowerPoint, and Outlook). Additional recipes detail sharing data with SQL Server, creating an RSS feed from Access, and more.
Creating an Import/Export Specification
Problem
I have to import the same information into my Access database on a regular basis. Having to specify all of the options each time I import the file can lead to mistakes, not to mention extra work. Is there a way to save the specifications I choose when I import or export a file?
Solution
You can store the information you specify while importing or exporting a file as an import/export specification. The specification becomes part of your Access database, which you can use each time you import or export a file.
To create an import/export specification, you simply use the appropriate Import or Export Wizard, and, after you’ve finished making all your choices, save the specification to the database. The next time you use the wizard, you can select the specification, and all of the settings will be restored, leaving you free to just press Finish to complete the import or export.
Tip
The instructions in this recipe apply to Access 2007. Creating import/ export specifications in earlier versions of Access is quite similar.
Let’s walk through an example. Choose the External Data command tab, then locate the Import gallery, and choose the Text File command. Access will display the window shown in Figure 7-1. Specify the name of the file to import by typing it or using the Browse button. Choose the way you want to store the data in the database, and then press OK to launch the Import Text Wizard.

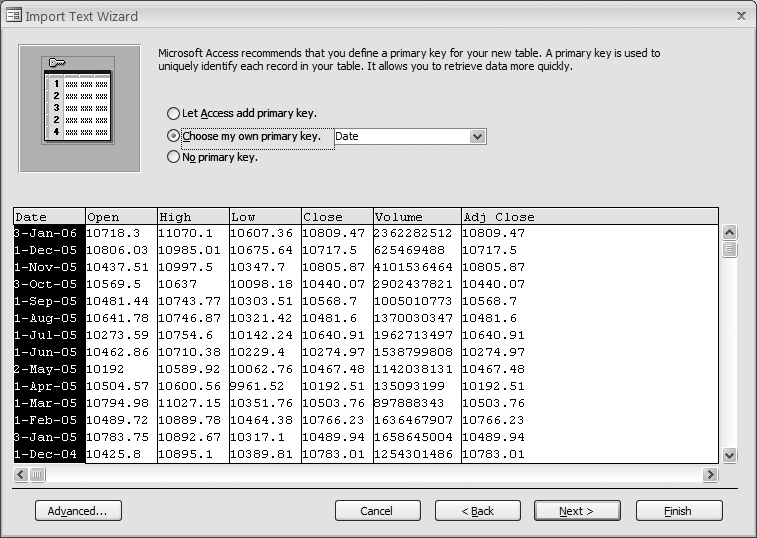
The Import Text Wizard (see Figure 7-2) allows you to choose how you want to import the text file.
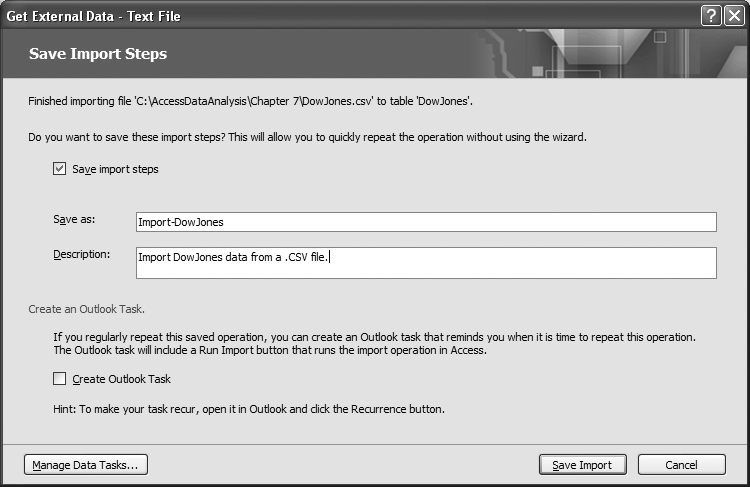
Once you’ve set all of the import options, press the Finish button to run the import. When the data has been imported, Access will prompt you to save the choices you’ve just made (Figure 7-3). Checking the “Save import steps” checkbox allows you to add the task to your list of Data Tasks. Enter a name and a description, then press the Save button.
Once the import steps have been saved, you can run them again by choosing the External Data command tab, and then by choosing the Saved Imports command from the Import gallery. This will end up displaying the Manage Data Tasks window (see Figure 7-4). Select the task you want to execute, and press the Run button.

Discussion
Sometimes it’s useful to save more detailed import/export information—for example, information about how individual fields should be treated. Information such as this can also be included in an import/export specification.
Let’s step back through the previous example. Once you’ve set all of the import options through the wizard, instead of clicking Finish to run the import, press the Advanced button to display the Import Specification dialog box (see Figure 7-5). This dialog box allows you to tweak settings beyond those you can set in the wizard. For example, you can change the way date and time information is imported, along with other things, such as how text fields are qualified, and how numbers are formatted.
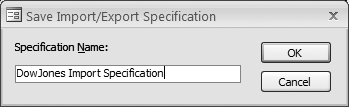
The Import/Export Specification dialog displays a summary of your settings. You can save these settings by pressing the Save As button. Then, you’ll be prompted to give your specification a name (as shown in Figure 7-6). Press OK to save the specification to your database.
Once you’ve saved your import/export specification, you can select it the next time you import or export a file. To access your saved import/export specifications, press the Advanced button in the Import or Export Wizard.
Tip
Using import/export specifications can simplify dealing with data that you import or export regularly, as you won’t have to specify the detailed field information each time you import or export the file. However, bear in mind that while all of the field information is saved in the specification, some of the other information you specified in the wizard—such as the name of the primary key, and the name of the table to be created—may not be saved. So, if you’re using an import/export specification, it’s a good idea to specify these options in the wizard before selecting the specification.

In the Import/Export Specification dialog box (shown in Figure 7-5), press the Specs button to display a list of import/export specifications in your database (see Figure 7-7).
Choose the specification you want to use and press Open. Then, press the Finish button to complete the import or export. You’ll find that all of the settings you chose when you created the specification will be replicated.
Unfortunately, you can’t browse the details of an import or export specification. The only way to see the results of the specification is to actually import or export a file. This can complicate matters if you wish to create a new database file. You can’t drag and drop the specifications to the new database because you can’t see them. However, you can import the specifications into your new database.

First, create a new, blank database. Choose the External Data command tab, then locate the Import gallery, and choose the Access command. This will display the Import Objects dialog box. Press the Options button to see the hidden portion of the dialog box (see Figure 7-8).
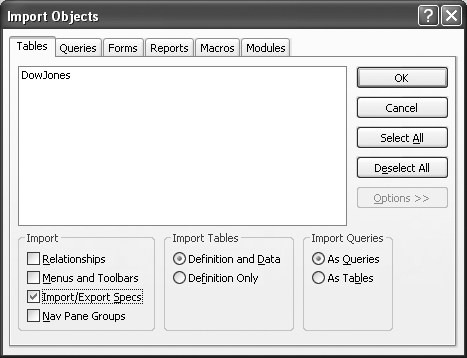
At the bottom of the dialog box are three sections: Import, Import Tables, and Import Queries. Check the Import/Export Specs box in the Import frame. If you only want to import the specifications, uncheck the Relationships box and press OK. Otherwise, review the rest of the information in the dialog box, and choose those items you want to import before pressing OK.
When the import is complete, your import/export specification will be ready to use in your new database.
Automating Imports and Exports
Problem
Is there a way to automate import and export processes so that my users don’t have to use the Import/Export Wizards?
Solution
Access provides a set of actions that you can use from a macro or a Visual Basic procedure to automate the transfer process. You can choose to transfer data to or from an Access database, a spreadsheet, a SQL Server database, or a text file.
Suppose you simply want to enable your users to transfer a table from one database to another. Create a macro, and select TransferDatabase as the action (see Figure 7-9). In the Action Arguments section, specify the transfer type, the database type, the database name, the type of object to be transferred, the source and destination, and whether you want to copy only the structure.
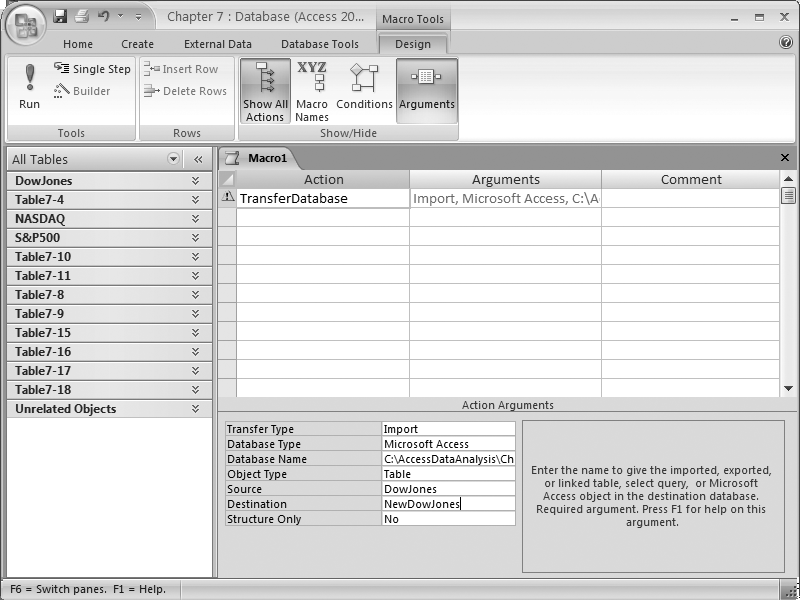
Running this macro transfers the selected material from one database to another. While this example transfers only a single table, you can transfer multiple items by adding multiple actions to the macro.
Tip
You can use the TransferDatabase action to transfer several different kinds of databases, including dBase, Paradox, and any OLE DB-compliant database. If you need to work with SQL Server, however, you should use the TransferSQLDatabase action.
Text files can be transferred using the TransferText action. Like the TransferDatabase action, the TransferText action relies on a set of arguments to control how it works (see Figure 7-10). You can import or export delimited data, fixed-width data, and HTML tables. You can also export data to Microsoft Word, or set up links to external data.

The TransferText action relies on import/export specifications (see Creating an Import/Export Specification) to determine how the data is transformed. Beyond choosing the import/export specification, all you need to do is specify the table you want to use, and the name of the file containing the data. The Transfer Type argument determines whether the table is the source of the data, or the destination for the data.
Discussion
Macros are one option, but, as mentioned earlier, you can also invoke these transfer actions through the Visual Basic DoCmd object. The following routine uses this technique to export a database table:
	Sub Example7_2()

	Dim fso As FileSystemObject

	Set fso = New FileSystemObject

	If fso.FileExists("C:AccessDataChapter7-2.csv") Then
	   fso.DeleteFile "C:AccessDataChapter7-2.csv"

	End If

	On Error Resume Next

	DoCmd.TransferText acExportDelim, "NASDAQ Import Specification", _
	    "NASDAQ", "C:AccessDataChapter7-2.csv"
	If Err.Number <> 0 Then
	   MsgBox "An Error occured during the transfer (" & Err.Description & ")"

	End If

	On Error GoTo 0

	End Sub
Tip
To use this approach, you’ll need to add a reference to the Microsoft Scripting Runtime library. See Exporting Data with the FileSystemObject for instructions on adding this reference.
This routine begins by deleting the output data file if it already exists. Then, it uses the DoCmd.TransferText method to export a table as a disk file. Note that the parameters are the same as those you would have entered as arguments to the macro.
Including the On Error Resume Next statement before starting the transfer forces Visual Basic to automatically execute the next statement, if it encounters an error during the transfer. Following the transfer, the routine checks the Err object to see whether an error occurred. If an error is detected, it displays a message box with a description of the error. Finally, On Error Go To 0 is used to resume normal error handling.
One advantage of using VBA code to process an import or export is that you can do a lot of interesting things before and after the transfer. For instance, if you wanted to keep a history of the last three exports, you could use statements like these to rename the destination file before executing the transfer:
	If fso.FileExists(BaseFile & "Backup2.csv") Then
	   fso.DeleteFile BaseFile & "Backup2.csv"
	End If

	fso.MoveFile BaseFile & "Backup1.csv", BaseFile & "Backup2.csv"
	fso.MoveFile BaseFile & ".csv", BaseFile & "Backup1.csv"
You can also modify any of the values passed to the TransferText method. For example, you can easily use different table names each time you import data.
Exporting Data with the FileSystemObject
Problem
Working with files (especially for text-oriented files) using normal VBA code can be challenging. The FileSystemObject—and its related objects—provide a simpler way to process external files.
Solution
By default, Access doesn’t load the library containing the FileSystemObject. So, the first step is to choose Tools → References from the Visual Basic Editor’s main menu to display the References dialog box. Scroll though the list of libraries until you find Microsoft Scripting Runtime (see Figure 7-11). Place a checkmark next to it, and press OK.

Despite its name, the Microsoft Scripting Runtime library contains only the FileSystemObject and its related objects. Once you’ve added a reference to this library, you can use the following routine to copy a series of rows from your database into a simple comma-separated values (CSV) text file:
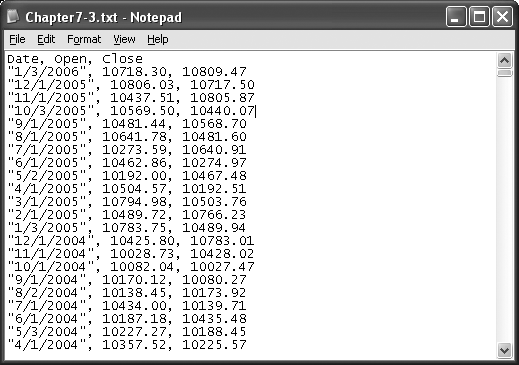
	Sub Example7_3()

	Dim fso AsFileSystemObject
	Dim txt As TextStream
	Dim rs As ADODB.Recordset
	Dim s As String

	Set fso = New FileSystemObject
	Set txt = fso.CreateTextFile("c:AccessDataChapter7-2.txt", True)

	Set rs = New ADODB.Recordset
	rs.ActiveConnection = CurrentProject.Connection
	rs.Open "Select Date, Open, Close From NASDAQ", , adOpenForwardOnly, adLockReadOnly

	txt.WriteLine "Date, Open, Close"
	Do While Not rs.EOF
	   s = """" & FormatDateTime(rs("Date"), vbShortDate) & """, "
	   s = s & FormatNumber(rs("Open"), 2, vbFalse, vbFalse, vbFalse) & ", "
	   s = s & FormatNumber(rs("Close"), 2, vbFalse, vbFalse, vbFalse)
	   txt.WriteLine s

	   rs.MoveNext

	Loop

	rs.Close
	txt.Close

	End Sub
The routine begins by declaring variables for the FileSystemObject, TextStream, and ADODB.Recordset. Next, a new instance of the FileSystemObject is created and used to create a new TextStream file. This object provides the method to write data to the external disk file.
With the external file ready for data, the routine opens a Recordset object that maps to one of the tables in the database. Then, before any data is processed, a single line of text containing the column headers is written out using the TextStream's WriteLine method. Next, a Do While loop is used to iterate through each row in the Recordset. Inside the loop, the routine creates a string that formats each field to output, followed by a comma. The WriteLine method is then used to output the string to the text file.
Finally, when all of the rows have been processed, the Recordset and TextStream objects are closed. The output generated by the routine is shown in Figure 7-12.
Discussion
The FileSystemObject family of objects provides an easy and powerful way for your Access application to interact with external files. While this example showed how to export data into a simple CSV text file, you can easily format the data any way you want.
In addition to a method for creating TextStream objects, the FileSystemObject contains a number of other methods that allow you to browse drives and folders on your computer, along with tools to copy and move files from one location to another.
The TextStream object includes methods to read and write character data. While you can choose to read your data by specifying the number of characters to be read, more than likely you’ll choose to use the ReadLine method, which reads all of the characters from the file until the first newline character is found, or the ReadAll method, which loads the entire file into a single string variable.
Importing Data with the FileSystemObject
Solution
You learned how to export information using the FileSystemObject in Exporting Data with the FileSystemObject, but the import process is a bit more challenging. When importing data, you don’t just have to read the file, you have to disassemble the file into each piece that goes into the database.
To keep this example simple, I’ll assume that the table into which the data will be imported exists and is empty. I’ll also assume that the data is properly formatted, and that there’s no need for error checking. You can easily add data-formatting and error-checking features if and when you need them.
Let’s assume that the data is structured as shown in Figure 7-13. The first line of the data contains the name of the table to be used. In this case, we will import the data into Table7-4.

The second line of the text file contains the names of the fields to be imported. The field names are separated by commas. Note that there is no comma following the last field name.
The data type for each field is found in the third line of the text file. These values don’t have to match up with the data types available in Access, as only the import program uses this information.
Following these three lines of information is the data. Each line of data represents one row in the table. The values are separated by commas, just like the field names and data types.
Once you’ve constructed your data file, you can use the following routine to read the file, parse it, and load the information into the database:
	Sub Example7_4()
	Dim fso AsFileSystemObject
	Dim txt As TextStream

	Dim rs As ADODB.Recordset
	Dim Fields() As String
	Dim Table As String
	Dim Types() As String

	Dim s As String
	Dim x() As String

	Dim i As Integer

	Set fso = New FileSystemObject
	Set txt = fso.OpenTextFile("c:AccessDataChapter7-4.txt", ForReading, False)

	'get table name
	Table = txt.ReadLine

	Set rs = New ADODB.Recordset
	rs.ActiveConnection = CurrentProject.Connection
	rs.Open Table, , adOpenDynamic, adLockOptimistic

	'get field names
	s = txt.ReadLine
	x = Split(s, ",")
	ReDim Fields(UBound(x))
	For i = 0 To UBound(x)
	  Fields(i) = GetString(x(i))

	Next i

	'get field types
	s = txt.ReadLine
	x = Split(s, ",")
	ReDim Types(UBound(x))

	For i = 0 To UBound(x)
	  Types(i) = GetString(x(i))

	Next i

	'load data
	Do While Not txt.AtEndOfStream
	  s = txt.ReadLine
	  x = Split(s, ",")
	  rs.AddNew
	  For i = 0 To UBound(Fields)
	    Select Case Types(i)

	    Case "Date"
	      rs.Fields(Fields(i)) = GetDate(x(i))

	    Case "Double"
	      rs.Fields(Fields(i)) = GetDouble(x(i))

	    Case "String"
	      rs.Fields(Fields(i)) = GetString(x(i))

	    End Select

	  Next i
	  rs.Update

	  Loop

	rs.Close
	txt.Close

	End Sub
While this routine is rather long, it’s pretty straightforward. It begins by declaring some variables that will be used later. Then, it opens the text file using the OpenTextStream method, and, using the ReadLine method, reads the first line of the file to get the name of the table.
The table is then opened using optimistic locking and a dynamic cursor. This allows us to add the new records to the database as they’re decoded.
The next block of code reads the second line of text from the file, and uses the Split function to break the single string into a string array whose elements represent the text between the commas (the first element contains the text before the first comma; the last element contains the text following the last comma).
Because the Split function returns all of the text apart from the commas, you may find that additional spaces that you may or may not want are included with the text. Rather than dealing with this issue here, I’ve created a separate function called GetString that cleans up the raw text (as described in the next section) and returns it; the result is saved in Fields.
The process used to get the names of the fields is then repeated to get the data types for each field, and the result is saved in the Types array.
We’re now ready to load the data. The next line of data from the file is read in, and the Split function is used to break it apart into a string array. Then, a new row is added to the database, and a For loop is used to process each individual field.
Based on the type of the field, one of the string conversion routines (GetDate, GetDouble, and GetString) is called to get the string value into the proper format. The result is then saved into the corresponding database field.
Once all of the fields have been processed, the Update method is used to save the new row to the database. When all of the data has been processed, the Recordset and TextStream objects are closed, and the routine ends.
Discussion
The GetDate and GetDouble functions are nearly identical: they merely call the appropriate conversion functions to convert the string read from the text file to the desired data format. In the case of the GetDouble function, the CDbl function is used. In the case of the GetDate function (shown here), the CDate function is used to convert the supplied value into a Date value:
	Function GetDate(val As String) As Date

	GetDate = CDate(val)

	End Function
While it would have been easy to call the CDate function directly in the appropriate Case clause in the Example7_4 routine, that probably isn’t a good idea. In reality, you might want to do something like this, which returns the current date whenever it has to process an invalid date:
	Function GetDate(val As String) As Date

	If IsDate(val) Then
	   GetDate = CDate(val)

	Else
	   GetDate = Now

	End If

	End Function
The GetString function, on the other hand, is slightly different. First, the Trim function is used to eliminate any extra spaces at the beginning and end of the string. Then, the routine examines the first character of the string, looking for a quotation mark. If it finds one, it looks at the last character in the string. If both are quotes, it throws them away, and returns the contents inside without any further processing. Otherwise, the value it returns is the trimmed string value. Here is the function:
	Function GetString(val As String) As String

	Dim r As String

	r = Trim(val)

	If Left(r, 1) = """" Then
	   If Right(r, 1) = """" Then
	     r = Mid(r, 2, Len(r) - 2)

	   End If

	End If

	GetString = r

	End Function
These conversion functions let you create data types that are processed differently by the import than normal data types. For instance, you may choose to create a GetField or GetTable function that automatically appends square brackets ([]) around field or table names to ensure that there is no confusion inside Access.
Likewise, you may wish to automatically convert some strings to all capital letters to simplify processing, or your data may contain Social Security numbers with dashes that need to be removed before you store them in your database.
Another obvious extension to this process would be to create a new table using the table name, field names, and data types. This is a relatively straightforward process using either DAO or ADOX (see Creating Tables Programmatically), and it’s something you may wish to consider if you choose to write your own import program.
Importing and Exporting Using XML
Problem
How do I save data from my database using an XML format? Also, how can I import XML-formatted data into my database?
Solution
To export an XML file, right-click on the name of the table or query you want to export, and choose Export from the context menu. Select the filename you want to use, and change the “Save as” type to XML. When you press the Export button, Access will display the Export XML dialog box (see Figure 7-14).
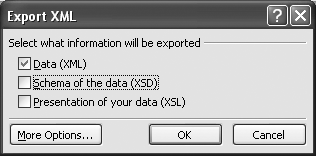
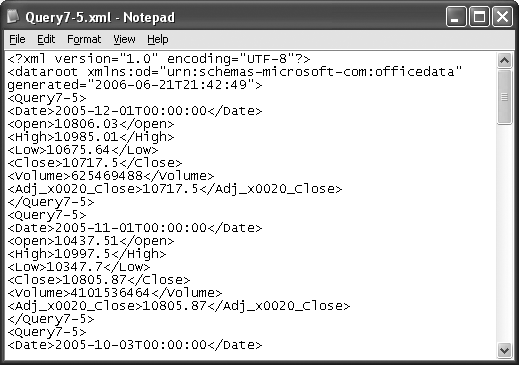
Make sure that only the Data (XML) checkbox is selected, and press OK to finish exporting your data. Access will generate a file similar to the one shown in Figure 7-15.
Tip
While Access normally saves only one table per file, if your Access database design includes Lookup fields, these tables will be exported as well.
To import an XML file, simply choose File → Get External Data → Import from Access’ main menu, and then select the file containing your data. The Import XML dialog box will be displayed, containing the structure of your data (see Figure 7-16). Press OK to load the data into your database.
Discussion
When you export a table or query to XML, you’ll see something like this (note that XML files can be opened and viewed with simple text editors such as Notepad):
	<?xml version="1.0" encoding="UTF-8"?>
	<dataroot xmlns:od="urn:schemas-microsoft-com:officedata"
	generated="2006-01-29T17:09:13">
	  <Query7-5>
	    <Date>2005-12-01T00:00:00</Date>
	    <Open>10806.03</Open>
	    <High>10985.01</High>
	    <Low>10675.64</Low>
	    <Close>10717.5</Close>
	    <Volume>625469488</Volume>
	    <Adj_x0020_Close>10717.5</Adj_x0020_Close>
	  </Query7-5>
	  <Query7-5>
	    <Date>2005-11-01T00:00:00</Date>
	    <Open>10437.51</Open>
	    <High>10997.5</High>
	    <Low>10347.7</Low>
	    <Close>10805.87</Close>
	    <Volume>4101536464</Volume>
	    <Adj_x0020_Close>10805.87</Adj_x0020_Close>
	  </Query7-5>
	</dataroot>

The first line indicates that this is an XML file. After this declaration, all XML data consists of pairs of tags, whose names are contained within less-than (<) and greater-than (>) signs. The opening tag differs from the closing tag, in that the closing tag includes a slash (/) character immediately following the less-than sign. For example, <Date> and </Date> represent a matching pair of XML tags.
Warning
The characters inside the tags are case-sensitive, so <Date> can’t be paired with </date>. An XML parser will treat them as two separate tags, and will probably generate an error message.
Each matching pair of tags is called a node. A node can contain other nodes, which makes for a very structured document. In the preceding example, the nodes are indented so that it’s easy to determine which tags are paired. Unfortunately, Access doesn’t bother with this indentation—but then again, you’ll probably rarely need to look at the XML files it generates.
Take a look at the topmost node in the file (<dataroot>). You’ll notice some additional information following the node’s name. These pieces of information are known as attributes, and they contain values that are associated with the node itself. Working with attributes is discussed further in Reading and Writing XML Attributes.
Inside the <dataroot> node is a pair of <Query7-5> nodes. These nodes represent a single row of data, exported from the Query7-5 table. Within the <Query7-5> node are a series of nodes representing the fields that make up the row. The tags are named after the fields, and the actual values for the fields are stored inside the nodes. For example, the <Date> node from the first row contains the date/time value 2005-12-01T00:00:00.
As long as you construct a file with the proper node names for your table and fields, you can easily import that data into Access, which will read the file and extract the table and field names directly from the nodes.
Generating XML Schemas
Problem
I like the idea of exporting data using XML, but I need to preserve more information about the structure of the data (such as the data types for each field and the primary key). Can Access supply this information?
Solution
If you need to include additional information in your exported data, begin the export of the table or query using the steps described in Importing and Exporting Using XML, but, when you reach the Export XML dialog box (look back to Figure 7-14), also check the box marked “Schema of the data (XSD)” before clicking OK. Access will automatically create a second file with the same filename as your XML file, but with .xsd as the file extension. This file contains the schema for the data you just exported.
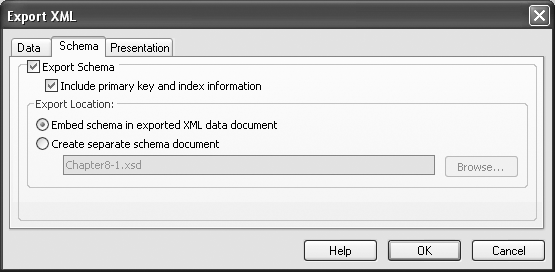
If you wish to combine the exported data and the schema definition, press the More Options button on the Export XML dialog box to see all of the options available when exporting data in XML format (see Figure 7-17). To embed the schema in the same file, select the Schema tab, and choose “Embed schema in exported XML data document.”
Note that Access will allow you to include information about any related tables when your table’s definition is exported. These tables must have a defined relationship: choose Tools → Relationship from the Access main menu (Datasheet → Relationships in Access 2007) to verify whether the relationship exists, and define it, if necessary.
Discussion
Microsoft’s tool for exporting XML is somewhat limited, in that it allows you to export only a single table at a time. However, you can easily write a little routine like this one that will export multiple pieces of information at once:
	Sub Example7_6()

	Dim AddData As AdditionalData

	Set AddData = CreateAdditionalData

	AddData.Add "S&P500"
	AddData.Add "DowJones"

	ExportXML acExportTable, "NASDAQ",_
	    "c:accessdatachapter7-6A.xml", , , , , acEmbedSchema, , AddData

	End Sub
Rather than starting at the top, let’s look first at the ExportXML statement toward the end of this routine. This statement does all the real work. acExportTable tells the statement to export the table. The next parameter is the DataSource, which contains the name of the table (in this case, NASDAQ).
I’ve omitted the SchemaTarget, PresentationTarget, and ImageTarget parameters, which would specify separate filenames for the XSD and XSLT information, and the path where any images would be stored. I’ve also omitted the Encoding argument, which would instruct Access to write the text in either UTF8 (the default) or UTF16.
The OtherFlags argument specifies acEmbedSchema in this example, but you can add other flags, such as acExcludePrimaryKeyAndIndexes, if you don’t want to export primary key and index information when you export a schema, and acRunFromServer, if you want Access to generate XSLT for a web server rather than for a client computer.
The next-to-last parameter, FilterCriteria, allows you to specify a filter so that the contents of the entire table are not processed. The final parameter, AdditionalData, is a reference to an AdditionalData object containing a collection of other tables to be exported.
This object was created at the beginning of the routine: the variable AddData was defined as AdditionalData, and the CreateAdditionalData function was used to create a new instance of the AdditionalData object. The Add method was then used to add the names of the tables to export to the object.
Using XSLT on Import or Export
Solution
XSLT (Extensible Stylesheet Language Transformations) is a powerful and complex language that you can use to transform your data, including both the values and the XML tags used. An XSLT transform (OK, I really mean “program,” but an XSLT program is unlike anything you might create in any other programming language) is written in XML.
Let’s assume that your XML data looks like this:
	<?xml version="1.0" encoding="UTF-8"?>
	<dataroot xmlns:od="urn:schemas-microsoft-com:officedata"
	generated="2006-01-30T22:11:30">
	  <Query7-7>
	    <Date>2005-12-01T00:00:00</Date>
	    <DowJonesClose>10717.5</DowJonesClose>
	    <NASDAQClose>2205.32</NASDAQClose>
	  </Query7-7>
	  <Query7-7>
	    <Date>2005-11-01T00:00:00</Date>
	    <DowJonesClose>10805.87</DowJonesClose>
	    <NASDAQClose>2232.82</NASDAQClose>
	  </Query7-7>
	</dataroot>
But, say the system to which you’re sending your data doesn’t like the format of the date. Instead, it wants dates to be formatted this way:
	<Date>
	  <Year2006</Year>
	  <Month>01</Month>
	  <Day>30</Day>
	</Date>
You can easily accomplish this change using this XSLT transform:
	<?xml version="1.0"?>
	<xsl:stylesheet version="1.0" xmlns:xsl="http://www.w3.org/1999/XSL/Transform">

	  <xsl:template match="/">
	    <StockInfo>
	      <xsl:apply-templates/>
	    </StockInfo>
	  </xsl:template>

	  <xsl:template match="Query7-7">
	    <Row>
	      <Date>
	        <Year><xsl:value-of select="substring(Date,1,4)"/></Year>
	        <Month><xsl:value-of select="substring(Date,6,2)"/></Month>
	        <Day><xsl:value-of select="substring(Date,9,2)"/></Day>
	      </Date>
	      <DowJones>
	        <xsl:value-of select="DowJonesClose"/>
	      </DowJones>
	      <NASDAQ>
	        <xsl:value-of select="NASDAQClose"/>
	      </NASDAQ>
	    </Row>
	  </xsl:template>

	</xsl:stylesheet>
The transform begins by specifying that it’s an XML file. The root node for this template declares that it’s an xsl:stylesheet. All of the elements that transform the data are nested inside this node.
The first element is an xsl:template. The match attribute instructs the processor to match the root node and follow the instructions inside. This node contains <StockInfo> and </StockInfo> tags. These are called literal result elements, and will be copied exactly as shown to the output file.
In between the <StockInfo> tags is another XSL node that instructs the processor to apply templates. This means that the processor will examine the rest of the document, looking for other templates that may match a supplied value. Any data generated by these templates will be inserted before the </StockInfo> tag.
The only other template in the transform looks for nodes that match Query7-7. In our input XML file, the <Query7-7> tag indicates the start of a new row of data. So, when a match occurs, the processor will display a formatted result built around a set of literal result elements that maps into our new row of data.
Inside the <Date> tag enclosed within the <Row> tags, you’ll see three separate tags that break out the date into year, month, and day. Because we can’t simply copy over the value of the old <Date> tag, we need to do a little string processing. This means extracting the first four characters of the date value for <Year>, the two characters beginning at position 6 for <Month>, and the two characters beginning at position 9 for <Day>.
The two remaining tags are <DowJones> and <NASDAQ>. When the <DowJones> element is processed, the xsl:value-of element indicates that the value of the <DowJonesClose> tag from the original XML document should be listed. The same is true for the <NASDAQ> tag. Applying the XSLT transform results in a new file that looks like this:
	<?xml version="1.0"?>
	<StockInfo>
	  <Row>
	    <Date>
	      <Year>2005</Year>
	      <Month>12</Month>
	      <Day>01</Day>
	    </Date>
	    <DowJones>10717.5</DowJones>
	    <NASDAQ>2205.32</NASDAQ>
	  </Row>
	  <Row>
	    <Date>
	      <Year>2005</Year>
	      <Month>11</Month>
	      <Day>01</Day>
	    </Date>
	    <DowJones>10805.87</DowJones>
	    <NASDAQ>2232.82</NASDAQ>
	  </Row>
	</StockInfo>
Discussion
While you can use a separate program to perform the transformation, Access includes the necessary tools for you to embed it in your application. The following routine will perform the export of the XML data and the transformation into its new form:
	Sub Example7_7()

	ExportXML acExportQuery, "Query7-7", "C:AccessDataChapter7-7.xml"
	TransformXML "C:AccessDataChapter7-7.xml", "C:AccessDataChapter7-7.xslt", _
	   "c:AccessDataChapter7-7Out.xml"

	End Sub
This routine calls the ExportXML method to export the results of a query into a disk file. Then the TransformXML method is called with three parameters: the names of the input file, the XSLT file, and the output file.
Tip
This recipe barely scratches the surface of how to use XSLT with Access. If you’re looking for more information about XSLT, you may want to refer to XSLT Cookbook, by Sal Mangano (O’Reilly).
One caution: Access 2003 is limited to version 1 of XSLT, meaning that the new features found in version 2 can’t be used with that version of Access. So, be careful if you are applying knowledge gained from general-purpose XSLT books. They should make it clear which features are available for version 1 and which require version 2.
Working with XML via the MSXML Parser
Problem
XML seems like a good solution for my problem, but none of Access’ tools can handle the type of data I need to display. How can I build my own XML documents?
Solution
Included with Access 2003 is an external library that you can add to your VBA programs. It provides a complete set of objects that allow you to build a tree structure that will eventually form your XML file.
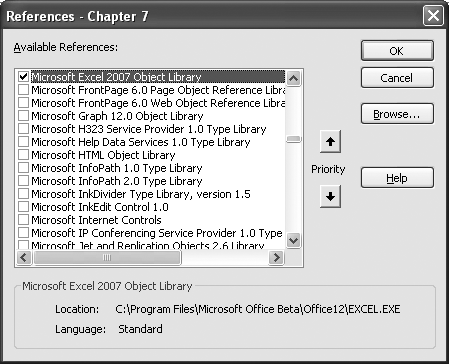
To use this library, you need to add it to your application. Choose Tools → References in the Visual Basic Editor to display the References dialog box (as shown in Figure 7-18), and select Microsoft XML, v5.0 from the list of references.

Tip
There are several versions of the Microsoft XML library. As long as you choose v3.0 or later, it really shouldn’t matter which version you use. I chose v5.0 because it’s installed along with Access 2003/2007.
The following routine uses two objects from the Microsoft XML library: the DOMDocument object, which provides the overall structure for the document, and the IXMLDOMElement object, which stores the information for a single node.
When working with the objects from this library, you use the New keyword to create an instance of the DOMDocument object, and then you use the appropriate Create method from the DOMDocument object to create any other objects you need. Once you’ve created an object, it’s in a state of limbo until you append it to the appropriate parent object. The act of appending one object to another is the way you create the tree structure that characterizes an XML document.
The following example creates an XML document based on the results of a Select statement. Note that several IXMLDOMElement objects are needed, as we can’t recycle one of the objects until it’s appended to its parent object:
	Sub Example7_8A()

	Dim rs As ADODB.Recordset
	Dim doc AsMSXML2.DOMDocument
	Dim root As MSXML2.IXMLDOMElement
	Dim row As MSXML2.IXMLDOMElement
	Dim fld As MSXML2.IXMLDOMElement
	Dim procinst As MSXML2.IXMLDOMProcessingInstruction

	Set doc = New MSXML2.DOMDocument
	Set procinst = doc.createProcessingInstruction("xml", _
	    "version=""1.0"" encoding='utf-8'")
	doc.appendChild procinst

	Set root = doc.createElement("Document")

	Set rs = New ADODB.Recordset
	rs.ActiveConnection = CurrentProject.Connection
	rs.Open "Select Top 5 [Date], [Close] From NASDAQ Order By Date Desc", , _
	   adOpenForwardOnly, adLockReadOnly

	Do While Not rs.EOF
	   Set row = doc.createElement("Row")

	   Set fld = doc.createElement("Date")
	   fld.Text = FormatDateTime(rs("Date"), vbShortDate)
	   row.appendChild fld

	   Set fld = doc.createElement("Close")
	   fld.Text = FormatNumber(rs("Close"))
	   row.appendChild fld

	   root.appendChild row

	   rs.MoveNext

	Loop

	rs.Close
	doc.appendChild root
	doc.Save "C:AccessDataChapter7-8.xml"

	End Sub
This routine begins by creating a new DOMDocument object and a new object that will be the document’s root. Then, it creates the XML header by using the createProcessingInstruction method and appending the results to the document.
Next, a Recordset object is created with the data to be converted to XML. In this case, a Select statement is used to retrieve the five most current rows from the table.
A new XML element that represents the first row is created, and within the Row element, a Date element is created. This element’s Text property is set to a formatted date/time value. (Remember that XML is a character-oriented language, so you can’t store binary information in XML unless you first convert it to a string.) The Date element is then appended to the Row element using the appendChild method. Next, this process is repeated for the Close element.
Once the Row element is complete, it’s appended to the root element, and we move on to the next row in the Recordset.
When all the rows in the Recordset have been processed, the root element is appended to the XML document itself. Note that only one element can be appended to the document, as XML allows only one root element per document.
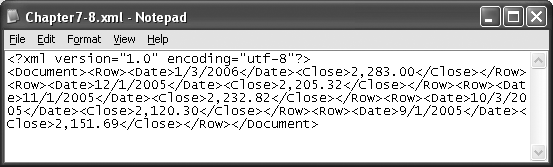
The final action is to save the document to disk. The Save method takes a single parameter, the name of the output file. If you open the resulting file with WordPad, you’ll see something like Figure 7-19.
Discussion
If you’re having trouble reading Figure 7-19, you’re obviously not a computer. By default, XML ignores spaces, carriage returns, and line feeds between nodes, so there’s really no need to preserve this information if a human isn’t going to be reading it. In fact, those extra characters can add up to quite a bit of space that you may not want when you’re dealing with larger XML documents. The following listing shows the same material in a form that’s much easier to read:
	<?xml version="1.0" encoding="utf-8"?>
	<Document>
	  <Row>
	    <Date>1/3/2006</Date>
	    <Close>2,283.00</Close>
	  </Row>
	  <Row>
	    <Date>12/1/2005</Date>
	    <Close>2,205.32</Close>
	  </Row>
	  <Row>
	    <Date>11/1/2005</Date>
	    <Close>2,232.82</Close>
	  </Row>
	  <Row>
	    <Date>10/3/2005</Date>
	    <Close>2,120.30</Close>
	  </Row>
	  <Row>
	    <Date>9/1/2005</Date>
	    <Close>2,151.69</Close>
	  </Row>
	</Document>
Microsoft’s XML library also includes facilities to load an XML document from a disk file, allowing you to parse your own XML documents. The following routine loads the XML file created earlier, parses it into its individual pieces, and loads them into a database table:
	Sub Example7_8B()

	Dim rs As ADODB.Recordset
	Dim doc AsMSXML2.DOMDocument
	Dim root As MSXML2.IXMLDOMElement
	Dim row As MSXML2.IXMLDOMElement
	Dim fld As MSXML2.IXMLDOMElement

	Set doc = New MSXML2.DOMDocument
	doc.Load "C:AccessDataChapter7-8.xml"
	Set root = doc.childNodes(0)

	Set rs = New ADODB.Recordset
	rs.ActiveConnection = CurrentProject.Connection
	rs.Open "[Table7-8]", , adOpenDynamic, adLockOptimistic

	For Each row In root.childNodes
	  rs.AddNew

	  For Each fld In row.childNodes
	    Select Case fld.nodeName

	    Case "Date"
	      rs("Date").Value = CDate(fld.Text)

	    Case "Close"
	      rs("Close").Value = CDbl(fld.Text)

	    End Select

	  Next fld

	  rs.Update

	Next row

	rs.Close

	End Sub
This routine begins by declaring the same variables used in the previous example. It then creates a new DOMDocument object, and calls the Load method to load in an XML file. The XML nodes contained in each element are found in the childNodes collection. Since the DOMDocument object contains a single child, which is the root of the XML document, the root variable is set to point to doc’s first child. The routine then opens a Recordset object to the table to be updated so it’s ready to process the XML data.
Because the data in the document is nested root → rows → fields, a nested pair of For loops can be set up to process all of the rows in the root and all of the fields in a row. Inside the outer For loop, we add a new row to the Recordset, process the fields, and then call Update. In the inner loop, we determine the name of the field by examining the nodeName property, and then convert the node’s Text value into the proper type and save it into the appropriate field in the Recordset object.
Reading and Writing XML Attributes
Solution
XML supports attributes, which are values that are stored inside the node’s tag, like this:
<Row Date="1/3/2006" Close="2,283.00" />
As you might expect, Microsoft’s XML library makes it easy to use attributes in your XML data. To illustrate their use, we’ll use the framework of the Example7_8A routine from Working with XML via the MSXML Parser. Handling the nodes was discussed in that recipe, so here I’ll simply focus on the differences in the routine, which appear inside the Do While loop.
The following code fragment begins by creating a new XML element that will hold the row’s data. The setAttribute method is then used to create two attributes with the specified names and values. Once the attributes are set, the row is appended to the root object, and the loop moves on to the next row:
	Do While Not rs.EOF
	   Set row = doc.createElement("Row")

	   row.setAttribute "Date", FormatDateTime(rs("Date"), vbShortDate)
	   row.setAttribute "Close", FormatNumber(rs("Close"))

	   root.appendChild row

	   rs.MoveNext

	Loop
Running the routine with this Do While loop in place of the original one creates an XML document that looks like this (I’ve added a little formatting to make it easier to read):
	<?xml version="1.0" encoding="utf-8"?>
	<Document>
	  <Row Date="1/3/2006" Close="2,283.00"/>
	  <Row Date="12/1/2005" Close="2,205.32"/>
	  <Row Date="11/1/2005" Close="2,232.82"/>
	  <Row Date="10/3/2005" Close="2,120.30"/>
	  <Row Date="9/1/2005" Close="2,151.69"/>
	</Document>
This document contains the same information as the one produced in the previous recipe, but it’s much more compact.
The code to read the XML file likewise differs only in the main processing loop. (To see the code in its entirety, look back at the Example7_8B routine in Working with XML via the MSXML Parser.) In the new version of the For loop, the getAttribute method retrieves the value of the attribute as a string, so a simple conversion is all that’s necessary to populate the value for the field:
	For Each row In root.childNodes
	  rs.AddNew

	  rs("Date").Value = CDate(row.getAttribute("Date"))
	  rs("Close").Value = CDbl(row.getAttribute("Close"))

	  rs.Update

	Next row
Discussion
Using attributes generally takes up less space in an XML file than using nested nodes, but you also lose flexibility in how you represent the data: you’re limited to a flat arrangement, where there is a one-to-one correspondence between the node and the attributes in the node. If your data is hierarchal in nature, you need to stick with nested nodes. However, you’re not limited to one approach or the other. You can use a mix of attributes and nested nodes to represent your data, which is what I frequently do when designing XML files for my own use.
Creating an RSS Feed
Solution
Really Simple Syndication (RSS) RSS is an XML-based format aimed at content distribution. It’s typically used to let people know about updates when content is added to a web site. RSS provides an easy way to package and distribute your most recent changes.
If you dig deep enough, you’ll find that an RSS feed is nothing but an XML file structured according to a specific set of rules. Unfortunately, there are many different sets of rules, some of which are compatible and some of which are not. I won’t debate the merits of one format over the other, but will simply use version 2, which is compatible with virtually all RSS tools.
In RSS, you typically create an XML document containing summary information about the blog or other Internet site for which you want to provide a content distribution feed. Here’s a sample RSS file. This represents the minimum you really need to put in the file:
	<?xml version="1.0" ?>
	<rss version="2.0">
	<channel>

	  <title>Blog title</title>
	  <link>Blog URL</link>
	  <description>Description of the Blog</description>

	  <item>
	    <title>article title</title>
	    <link>article link</link>
	    <description>Description of the article</description>
	    <pubDate>Thu, 2 Feb 2006 19:21:36 CST</pubDate>
	  </item>
	</channel>
	</rss>
The file begins with the normal XML header, followed by an <rss> tag. The <rss> tag indicates the version of RSS used in this document. Inside the <rss> tag is a <channel> tag, which contains the actual feed. In the case of a blog, this represents the core information about the blog itself.
Inside the <channel> tag, you need to include three main pieces of information: the feed’s title, which is contained inside the <title> tag; a description of the feed, which is stored inside the <description> tag; and a link to the blog, which is stored inside the <link> tag.
Following these tags are a set of one or more <item> tags. Each <item> tag represents a single article on the blog. Within each <item> tag are a <title> tag, a <link> tag, a <description> tag, and a <pubDate> (publication date) tag. (Yes, the D is capitalized inside the <pubDate> tag; recall that XML is case-sensitive.)
Generating the RSS feed document is merely a matter of using the techniques demonstrated in Working with XML via the MSXML Parser and Reading and Writing XML Attributes, as you can see in the following routine:
	Sub Example7_10()

	Dim rs As ADODB.Recordset
	Dim doc As MSXML2.DOMDocument
	Dim rss As MSXML2.IXMLDOMElement
	Dim channel As MSXML2.IXMLDOMElement
	Dim item As MSXML2.IXMLDOMElement
	Dim subitem As MSXML2.IXMLDOMElement
	Dim procinst As MSXML2.IXMLDOMProcessingInstruction

	Set doc = New MSXML2.DOMDocument
	Set procinst = doc.createProcessingInstruction("xml", _
	    "version=""1.0"" encoding='utf-8'")
	doc.appendChild procinst

	Set rss = doc.createElement("rss")
	rss.setAttribute "version", "2.0"

	Set channel = doc.createElement("channel")

	Set item = doc.createElement("title")
	item.Text = "Access World"
	channel.appendChild item

	Set item = doc.createElement("link")
	item.Text = " www.JustPC.com/AccessWorld.htm"
	channel.appendChild item

	Set item = doc.createElement("description")
	item.Text = "This is my blog about Microsoft Access."
	channel.appendChild item

	Set rs = New ADODB.Recordset
	rs.ActiveConnection = CurrentProject.Connection
	rs.Open "[Table7-10]", , adOpenForwardOnly, adLockReadOnly

	Do While Not rs.EOF
	   Set item = doc.createElement("item")

	   Set subitem = doc.createElement("title")
	   subitem.Text = rs("Title")
	   item.appendChild subitem

	   Set subitem = doc.createElement("link")
	   subitem.Text = rs("Link")
	   item.appendChild subitem

	   Set subitem = doc.createElement("description")
	   subitem.Text = rs("Description")
	   item.appendChild subitem

	   Set subitem = doc.createElement("pubDate")
	   subitem.Text = MakeDate(rs("PubDate"))
	   item.appendChild subitem

	   channel.appendChild item

	   rs.MoveNext

	Loop

	rs.Closerss.appendChild channel
	doc.appendChild rss
	doc.Save "C:AccessDataChapter7-10.xml"

	End Sub
This example begins by declaring a Recordset object, along with a group of XML objects (one for each major RSS node). Next, the routine creates a new DOMDocument object to hold the XML data, and an IXMLDOMElement object for the rss element. It sets the IXMLDOMElement object’s version attribute to 2.0. Then, it creates a channel element, to which it appends elements for the site’s title, link, and description nodes.
Once the header information is set up for the RSS feed, the individual items are added. These are extracted from the database using an ADODB Recordset. The current row for the Recordset contains the fields Title, Link, Description, and PubDate. Each field is stored in a new XML element object, which is then added to the item element object.
After all of the rows have been processed, the channel object is appended to the rss object, and the rss object is appended to the doc object. The results are then saved to a disk file for publication. The contents of the disk file look like this:
	<?xml version="1.0" encoding="utf-8"?>
	<rss version="2.0">
	  <channel>

	    <title>Access World</title>
	    <link>www.JustPC.com/AccessWorld.htm</link>
	    <description>This is my blog about Microsoft Access.</description>

	    <item>
	      <title>Archiving Access Automatically</title>
	      <link>http://www.JustPC.com/aaa</link>
	      <description>Archiving Access data.</description>
	      <pubDate>Sat, 1 Jul 2006 0:0:0 CST</pubDate>
	    </item>

	    <item>
	      <title>Building Better Building Blocks</title>
	      <link>http://www.JustPC.com/bbb</link>
	      <description>Creating reusable code.</description>
	      <pubDate>Tue, 1 Aug 2006 0:0:0 CST</pubDate>
	    </item>

	    <item>
	      <title>Creating Crafty Code</title>
	      <link>http://www.JustPC.com/ccc</link>
	      <description>Scripting with VBA.</description>
	      <pubDate>Fri, 1 Sep 2006 0:0:0 CST</pubDate>
	    </item>

	  </channel>
	</rss>
Discussion
There is a lot more to using RSS feeds than simply generating the XML file. For more information, check out Developing Feeds with RSS and Atom, by Ben Hammersley (O’Reilly). This book covers everything you need to know about creating and publishing your own feeds in much more depth than I can provide here. Just remember, you can create your own XML files from an Access database, and make your database a player in the RSS world.
Passing Parameters to SQL Server
Problem
Most of my data is stored in a SQL Server database. The DBA only allows me to access the database by using a stored procedure, but the stored procedures require parameters. How can I pass parameters to SQL Server to get the data I want?
Solution
Let’s assume that the following stored procedure exists on the SQL Server database. The stored procedure takes two parameters, @StartDate and @StopDate, both of which have a type of datetime:
	Select *
	From DowJones
	Where [Date] Between @StartDate And @StopDate
To call this procedure from an Access VBA script, you can use an ADO Command object to populate a Recordset object, like this:
	Dim rs As ADODB.Recordset
	Dim cmd As ADODB.Command

	Set cmd = New ADODB.Command
	cmd.ActiveConnection = "provider=sqloledb;Data Source=Athena;" & _
	    "Database=Access;Uid=sa;pwd="

	cmd.CommandText = "GetData"
	cmd.CommandType = adCmdStoredProc

	cmd.Parameters.Refresh

	cmd.Parameters("@StartDate").Value = CDate("1/1/2005")
	cmd.Parameters("@StopDate").Value = CDate("1/1/2006")

	Set rs = cmd.Execute
After creating a new instance of the Command object, you need to specify how to connect to your database. This value is known as a connection string, and it can be assigned to the Command object’s ActiveConnection property.
Next, specify the name of the stored procedure in CommandText, and indicate that this value refers to a stored procedure, not a table or a SQL statement. The Parameters. Refresh method instructs ADO to connect to the database to get the definitions of all the parameters. The results are saved in the Parameters collection.
Finally, you can specify the value for each parameter, and use the Execute method to create a new Recordset object populated with the results of the stored procedure.
Discussion
The Refresh method is a powerful tool because it is able to retrieve all the information you’d normally have to add manually in your program. Using the Refresh method forces your program to do extra work at runtime because it must communicate with the database server to retrieve each parameter’s information. However, this information is easy to add using the Command object’s CreateParameter method, as you can see in the following code fragment:
	Dim p As ADODB.Parameter

	Set p = cmd.CreateParameter("@StartDate", adDate, adParamInput, , _
	    CDate("1/1/2005"))
	cmd.Parameters.Append p
	Set p = cmd.CreateParameter("@StopDate", adDate, adParamInput, , _
	    CDate("1/1/2006"))
	cmd.Parameters.Append p
To use CreateParameter, you need to declare a variable of type ADODB.Parameter. This method take five values: the name of the parameter; the SQL Server data type; whether the parameter is used as input to the stored procedure, an output from the stored procedure, or both; the size of the data type, which is used only for character data (i.e., char, varchar, etc.); and the parameter’s value. Once the parameter is created, you then must add it to the Command object’s Parameters collection by using the Parameter.Append method.
Handling Returned Values from SQL Server Stored Procedures
Problem
The stored procedures I want to use in my SQL Server database return values through their parameters rather than returning Recordsets. How can I retrieve this information?
Solution
This SQL Server stored procedure takes one parameter (@Date) as an input value, and uses it to select two other values from the database (@Open and @Close):
	Select @Open=[Open], @Close=[Close]
	From DowJones
	Where [Date] = @Date
To use these values, you need to either define each parameter explicitly, as shown in the following code, or use the Refresh method discussed in Passing Parameters to SQL Server. Note that both the @Open and @Close parameters are defined as output parameters, meaning that SQL Server will return values for them. Also, you need not assign them initial values when you create them, as these values will be discarded when the data is returned. The following routine implements this:
	Sub Example7_12()

	Dim rs As ADODB.Recordset
	Dim cmd As ADODB.Command
	Dim p As ADODB.Parameter
	Set cmd = New ADODB.Command
	cmd.ActiveConnection = "provider=sqloledb;Data Source=Athena;" & _
	    "Database=Access;Uid=sa;pwd="

	cmd.CommandText = "FetchData"

	cmd.CommandType = adCmdStoredProc

	Set p = cmd.CreateParameter("@Date", adDate, adParamInput, , CDate("12/1/2005"))
	cmd.Parameters.Append p

	Set p = cmd.CreateParameter("@Open", adCurrency, adParamOutput)
	cmd.Parameters.Append p

	Set p = cmd.CreateParameter("@Close", adCurrency, adParamOutput)
	cmd.Parameters.Append p

	cmd.Execute

	MsgBox cmd.Parameters("@Open").Value

	End Sub
Because this stored procedure doesn’t return a Recordset object, you can simply use the Execute method, as shown. When the call completes, you can access the returned values through the Parameters collection, as was done here when using MsgBox to display the value for @Open.
Discussion
When you’re using stored procedures, the order of the parameters doesn’t matter. However, you do have to have the right number of parameters, and each parameter must have the correct data type; otherwise, SQL Server will return an error when you attempt to call it. This is a big advantage of the Command.Refresh method. Because the Refresh method returns all of the parameters with their correct types, you’ll always have the proper definitions.
Working with SQL Server Data Types
Problem
SQL Server and Access use different data types. How do I know which data types to use in Access?
Solution
Table 7-1 contains a list of normal Jet data types, the corresponding SQL Server data types, and the types of variables you would use in your VBA program.
|
Access (Jet) data type |
SQL Server data type |
Visual Basic data type |
Storage size |
|
Currency |
money |
Currency |
8 bytes |
|
Date/Time |
datetime, shortdatetime |
Date |
8 bytes |
|
Image |
image |
Byte Array |
1 byte per character |
|
Memo |
text |
String |
1 byte per character |
|
Number (Byte) |
tinyint |
Byte |
1 byte |
|
Number (Decimal) |
decimal |
Currency |
8 bytes |
|
Number (Double) |
double |
Double |
8 bytes |
|
Number (Integer) |
smallint |
Integer |
2 bytes |
|
Number (Long Integer) |
int |
Long |
4 bytes |
|
Number (Single) |
single |
Single |
4 bytes |
|
Text |
char, varchar, nchar, nvchar |
String |
1 byte per character |
|
Uniqueidentifier |
GUID |
String |
16 bytes |
|
Yes/No |
bit |
Boolean |
1 byte |
Discussion
SQL Server supports every data type available in Jet, and quite a few more. So, if you need to move data from a Jet database to a SQL Server database, you shouldn’t run into any problems.
Moving data from SQL Server to Jet is a little more complex, but it isn’t difficult if you keep a few things in mind:
Text fields in Jet are limited to 255 characters, while SQL Server can store strings of up to 8,192 characters. If you have a large SQL Server string, simply use a Memo field instead of a Text field to hold it.
SQL Server can store more precise time values in a datetime value than Jet can store in a Date/Time value. However, you’ll run into very few situations where you need to store Date/Time values with an accuracy down to a few milliseconds. If you do need that level of accuracy, you can easily create a SQL Server query to extract the detailed time information into a separate field and download both fields.
When dealing with data types supported by SQL Server, but not by Jet, such as decimal or bigint, first check to see whether the data stored in SQL Server actually requires the higher precision used in SQL Server. If not, use the equivalent Jet data type referenced in Table 7-1. If the extra precision is necessary, split the data value into two pieces as part of a SQL Server query, and store both pieces in your Jet database. If that isn’t practical, simply store the data as a string in Jet until you find an alternate way to handle the accuracy problem.
In practice, you’ll rarely run into situations where there are data type compatibly problems between SQL Server and Jet.
Handling Embedded Quotation Marks
Solution
One way to handle embedded quotation marks is to convert them to some other format. For example, the following routines convert all quotation marks into the string " and back again (a commonly used approach in web development), using the Replace function to handle the conversions:
	Function RemoveQuotes(s As String) As String

	RemoveQuotes = Replace(s, """", """)

	End Function

	Function RestoreQuotes(s As String) As String

	RestoreQuotes = Replace(s, """, """")

	End Function
These routines can be used to process data that you store in and retrieve from a database. For example, the following SELECT statement will retrieve a string of text from the database and restore the quotes:
	SELECT [Table7-14].Id, RestoreQuotes([Value]) AS NewValue
	FROM [Table7-14];
Discussion
The real issue is why you should care about embedded quotation marks in the first place. The answer is to protect yourself from SQL injection attacks. This type of attack occurs when someone enters data into an input field that is designed to allow that person to execute a SQL statement.
For example, consider the following statement:
SQLText = "Select * From MyData Where MyData = """ & UserField & """"
This query statement uses the data stored in the UserField field (or parameter). Now assume that this query ends up using this data for UserField:
123"; Delete From MyData;
This gives you the following query:
Select * From MyData Where MyData = "123"; Delete From MyData;"
You now have two legal SQL statements in a row, followed by a double quote. Executing this statement as part of an ADO Command object against a SQL Server database would delete all of the data from the table MyData. Obviously, this is a serious security concern.
If you had used the RemoveQuote function in the original statement, the query produced would look like this:
Select * From MyData Where MyData = "123"; Delete From MyData;"
This new statement would probably cause some sort of error, but because all of the quotes have been removed from the user’s input data, the attack would fail, and your database would remain safe.
Importing Appointments from the Outlook Calendar
Solution
To import your data, you’ll first need to build a table to hold the information. Table 7-2 lists the fields associated with Outlook’s calendar appointments that you’ll need to include in your table.
|
Field |
Data type |
|
Id |
AutoNumber |
|
Start |
Date/Time |
|
End |
Date/Time |
|
Subject |
Text(255) |
|
Location |
Text(255) |
|
Body |
Memo |
|
Duration |
Number(Long Integer) |
|
RequiredAttendees |
Text(255) |
|
OptionalAttendees |
Text(255) |
|
Resources |
Text(255) |
Next, you’ll need to add a reference to the Outlook Object Library (see Figure 7-2adding_the_outlook_object_library_to_your_application). To display the References dialog, choose Tools → References from the Visual Basic Editor’s main menu.

Finally, here is a routine that will do the work. It begins by declaring a bunch of variables needed to access Outlook’s data, plus an ADO Recordset object that will be used to save the information into Access:
	Sub Example7_15()

	Dim Outlook As Outlook.Application
	Dim namespace As Outlook.namespace
	Dim root As Outlook.MAPIFolder
	Dim cal As Outlook.MAPIFolder

	Dim item As Object
	Dim appt AsOutlook.AppointmentItem

	Dim rs As ADODB.Recordset

	Set Outlook = New Outlook.Application
	Set namespace = Outlook.GetNamespace("MAPI")
	Set root = namespace.Folders("Mailbox - Wayne S. Freeze")
	Set cal = root.Folders("Calendar")

	Set rs = New ADODB.Recordset
	rs.ActiveConnection = CurrentProject.Connection
	rs.Open "[Table7-15]", , adOpenDynamic, adLockOptimistic

	For Each item In cal.Items
	  If item.Class = olAppointment Then
	    Set appt = item

	    rs.AddNew
	    rs("Start") = appt.Start
	    rs("End") = appt.End
	    rs("Subject") = appt.Subject
	    rs("Location") = appt.Location
	    rs("Body") = appt.Body
	    rs("Duration") = appt.Duration
	    rs("RequiredAttendees") = appt.RequiredAttendees
	    rs("OptionalAttendees") = appt.OptionalAttendees
	    rs("Resources") = appt.Resources

	    rs.Update

	  End If

	Next item

	rs.Close

	End Sub
To get to Outlook’s data, you must create an instance of Outlook.Application. This essentially loads the Outlook program without showing its user interface, which gives you complete access to all of the data and functions available in Outlook.
Once Outlook is running, you use the GetNamespace method to return a Namespace object, which contains the data specific to your system. Using Namespace makes it possible to open the mailbox folder associated with your local user. In my case, it’s Mailbox - Wayne S.Freeze; check your system to make sure you have the right folder name. Once you have the root folder for your mailbox, you can use it to open the folder containing the calendar items.
The next three lines of code create a new instance of the ADO Recordset object and use it to open the table that will hold the imported data.
The data from the calendar folder can be accessed through the Items collection, so you can use a For Each statement to iterate through the entire collection. But because there is no guarantee that the items will be the correct data type, you’ll need to verify that each item contains the data you want before using it. The routine does this by verifying that the item’s Class property has a value of olAppointment.
Once you’re sure you have an appointment item, you can point the appt object variable to the same instance of the item object, and rely on Visual Basic’s IntelliSense to help you pick the appropriate property. Then, it’s merely a matter of copying the properties you want into the appropriate database fields, and saving the row to the database.
Discussion
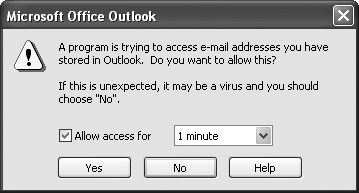
One of the downsides of using Outlook’s object model is that Outlook displays a dialog box (see Figure 7-21) whenever someone tries to access its data. This mechanism exists primarily to protect email data from viruses and trojans, but it also makes it more difficult for users to use their own data in other places.
Importing Emails from Outlook
Solution
The first step in the import process is to create a table in your Access database to hold the imported messages. Table 7-3 contains the list of fields associated with each message in Outlook.
|
Field |
Data type |
|
Id |
AutoNumber |
|
Importance |
Number(Long Integer) |
|
Message Class |
Text(255) |
|
Priority |
Number(Long Integer) |
|
Subject |
Text(255) |
|
From |
Text(255) |
|
Message To Me |
Yes/No |
|
Message CC To Me |
Yes/No |
|
Sender Name |
Text(255) |
|
CC |
Text(255) |
|
To |
Text(255) |
|
Received |
Date/Time |
|
Message Size |
Number(Long Integer) |
|
Body |
Memo |
|
Creation Time |
Date/Time |
|
Subject Prefix |
Text(255) |
|
Has Attachments |
Yes/No |
|
Normalized Subject |
Text(255) |
|
Object Type |
Number(Long Integer) |
|
Content Unread |
Number(Long Integer) |
After you’ve constructed your table, running this routine will load all of the messages from the specified inbox into your database. The routine begins by declaring two ADO Recordset objects and an ADO Field object:
	Sub LoadInbox(inboxName As String)

	Dim InTable As ADODB.Recordset
	Dim OutTable As ADODB.Recordset
	Dim fld As ADODB.Field

	Set InTable = New ADODB.Recordset
	InTable.ActiveConnection = "Provider=Microsoft.Jet.OLEDB.4.0;" & _
	    "Exchange 4.0;MAPILEVEL=Mailbox - " & inboxName & "|;Database=c:	emp;"

	InTable.Open "Select * From inbox", , adOpenDynamic, adLockReadOnly

	Set OutTable = New ADODB.Recordset
	OutTable.ActiveConnection = CurrentProject.Connection
	OutTable.Open "inbox", , adOpenDynamic, adLockOptimistic

	Do While Not InTable.EOF
	   OutTable.AddNew

	   For Each fld In InTable.Fields
	      OutTable.Fields(fld.Name) = fld.Value

	   Next fld

	   OutTable.Update
	   InTable.MoveNext

	Loop

	InTable.Close
	OutTable.Close

	End Sub
The InTable variable holds the data from Outlook. It uses a special connection string that specifies the name of the mailbox, along with some other parameters that are needed to talk to Outlook. Then, it opens the OutTable Recordset object, which points to a local table containing the fields listed in Table 7-3.
The remaining logic simply steps through the input table one row at a time, and, for each input row, adds a new output row. Then, it copies each field from the input table to the output table before calling Update to save the new output row. Finally, both tables are closed when all of the data has been processed.
Discussion
This routine simply copies every row and every field from the input table to the output table. This probably isn’t desirable in most situations, as it’s unlikely that you’ll want to copy every message in your inbox into the database.
However, once you have a complete copy of the data loaded into your program, you can use functions such as InStr or Mid to search the subject line or message body for particular words that mean the data is interesting. You can also discard any fields that aren’t important. You might even want to extract just the important content from certain messages, and throw away all of the other data.
Working with Outlook Contacts
Solution
The technique demonstrated in Importing Emails from Outlook can also be used to import your contact list. First, you’ll need to create an Access table to hold the imported data. Table 7-4 lists the fields to include.
|
Field |
Data type |
|
Id |
AutoNumber |
|
First |
Text(255) |
|
Last |
Text(255) |
|
Title |
Text(255) |
|
Company |
Text(255) |
|
Department |
Text(255) |
|
Office |
Text(255) |
|
Post Office Box |
Text(255) |
|
Address |
Text(255) |
|
City |
Text(255) |
|
State |
Text(255) |
|
Zip code |
Text(255) |
|
Country |
Text(255) |
|
Phone |
Text(255) |
|
Mobile Phone |
Text(255) |
|
Pager Phone |
Text(255) |
|
Home2 Phone |
Text(255) |
|
Assistant Phone Number |
Text(255) |
|
Fax Number |
Text(255) |
|
Telex Number |
Text(255) |
|
Display name |
Text(255) |
|
E-mail type |
Text(255) |
|
E-mail address |
Text(255) |
|
Alias |
Text(255) |
|
Assistant |
Text(255) |
|
Send Rich Text |
Yes/no |
|
Primary |
Text(255) |
Then you need some code to open an ADO Recordset object that can read the Outlook contacts table. Substitute the following code fragment into the routine found in Importing Emails from Outlook:
	Set InTable = New ADODB.Recordset
	InTable.ActiveConnection = "Provider=Microsoft.JET.OLEDB.4.0;" & _
	   "Exchange 4.0;MAPILEVEL=Outlook Address Book;PROFILE=Outlook;" & _
	   "TABLETYPE=1;DATABASE=c:	emp"
	InTable.Open "SELECT * FROM [Contacts]", , adOpenStatic, adLockReadOnly
The resulting routine will copy all of your contact information into your newly created table.
Discussion
Using ADO to access your Outlook folders avoids a lot of the problems encountered when using the normal Outlook objects. Because the process is read-only, you don’t run into the issue of the user being prompted each time the data is accessed; also, you have an easy way to extract the data you want through the use of Where clauses and programmed code.
On the other hand, navigating an Outlook folder can be a challenge. Many of the fields are dynamic, and while I’ve included sample table structures in these recipes, it’s probably a good idea to use some code like this to verify the table’s structure before you get started:
	Sub Example7_17B()

	Dim rs As ADODB.Recordset
	Dim fld As ADODB.Field

	Set rs = New ADODB.Recordset
	rs.ActiveConnection = "Provider=Microsoft.Jet.OLEDB.4.0;" & _
	   "Exchange 4.0;MAPILEVEL=Mailbox - Wayne S# Freeze|;Database=c:	emp;"

	rs.Open "Select * From inbox", , adOpenDynamic, adLockReadOnly

	Do While Not rs.EOF
	   For Each fld In rs.Fields
	      Debug.Print fld.Name & ": " & fld.Value

	   Next fld

	   rs.MoveNext

	Loop

	rs.Close

	End Sub
Data aside, the real trick to processing data via a database connection is the connection string. The connection string includes a few parameters specific to Outlook. The Exchange 4.0 parameter allows ADO to connect to Outlook/Exchange via a MAPI interface. The MAPILEVEL parameter indicates the name of the folder containing the Outlook folders you want to search. Not specifying a value (MAPILEVEL=;) means that the top-level folders will be made available. If you don’t know the name of your main folder, you can use code like this to get a list of all the folders:
	Sub Example7_17C()

	Dim cat As ADOX.Catalog
	Dim tbl As ADOX.Table

	Set cat = New ADOX.Catalog
	cat.ActiveConnection = "Provider=Microsoft.Jet.OLEDB.4.0;" & _
	  "Exchange 4.0;MAPILEVEL=;Database=c:	emp;"

	For Each tbl In cat.Tables
	   Debug.Print "FOLDERS:" & tbl.Name

	Next tbl

	End Sub
Finally, the Database parameter points to a temporary directory where the ADO drivers build a temporary file containing the available fields from the collection of folders. You can safely ignore this file, as the drivers will create a new version each time you open your Outlook folders.
Importing Data from Excel
Problem
Importing data from Excel is a straightforward task using the standard Office tools, but I want to process the information before storing it in my database.
Solution
One way you can import data from Excel is to use ADO and treat the Excel workbook as a database. Within the workbook, each worksheet is a table, and the first row can contain the field names. Data types are a little tricky, but, realistically, your VBA program can treat the data as strings. Excel will recognize the data according to its usual rules. Values that contain valid numbers will be treated as numbers, and the same goes for valid dates. All other values will be treated as strings.
The key to the import process is the ADO connection string. The following connection string uses the workbook C:AccessDataChapter7-18.xls. Setting the HDR field to Yes indicates that the first row of the worksheet contains the column headings. Setting the IMEX field to 1 specifies that values in columns containing a mixture of text and numbers should be treated as text:
	InTable.ActiveConnection = "Provider=Microsoft.Jet.OLEDB.4.0;" & _
	    "Data Source=C:AccessDataChapter7-18.xls;" & _
	    "Extended Properties=""Excel 8.0;HDR=Yes;IMEX=1"""
While this connection string grants you access to the workbook, you have to address the individual worksheets by their names, as you would if they were tables. However, you need to format the names properly in order for the database driver to locate the right worksheets. This means appending a dollar sign ($) to the end of the worksheet name and enclosing the entire string in brackets ([]). In other words, you would access Sheet1 as [Sheet1$].
You can then use the following code (based on the example in Importing Emails from Outlook) to copy data from Excel to Access:
	Sub Example7_18A()

	Dim InTable As ADODB.Recordset
	Dim OutTable As ADODB.Recordset
	Dim fld As ADODB.Field

	Set InTable = New ADODB.Recordset
	InTable.ActiveConnection = "Provider=Microsoft.Jet.OLEDB.4.0;" & _
	    "Data Source=C:AccessDataChapter7-18.xls;" & _
	    "Extended Properties=""Excel 8.0;HDR=Yes;"""
	InTable.Open "SELECT * FROM [Sheet1$]", , adOpenStatic, adLockReadOnly

	Set OutTable = New ADODB.Recordset
	OutTable.ActiveConnection = CurrentProject.Connection
	OutTable.Open "[Table7-18]", , adOpenDynamic, adLockOptimistic

	Do While Not InTable.EOF
	   OutTable.AddNew

	   For Each fld In InTable.Fields
	      OutTable.Fields(fld.Name).Value = fld.Value

	   Next fld

	   OutTable.Update
	   InTable.MoveNext

	Loop

	Set InTable = Nothing
	Set OutTable = Nothing

	End Sub
Discussion
You don’t have to use ADO to read data from Excel. However, ADO has the advantage of being faster than using Excel objects. Excel objects force the Excel application to be loaded in the background, consuming both memory and processor cycles. Also, each time you reference a piece of information inside Excel, you’re forced to make an expensive out-of-process call. On the other hand, ADO runs in the same process as Access, which saves a lot of resources when retrieving pieces of data.
However, from a practical viewpoint, unless you’re dealing with a lot of data, or you’re running this as part of a real-time application, there won’t be much of a performance difference. The logic to process the data isn’t that different either, as you can see in the following routine:
	Sub Example7_18B()

	Dim OutTable As ADODB.Recordset
	Dim i As Long

	Dim ex AsExcel.Application
	Dim wb As Excel.WorkBook
	Dim ws As Excel.WorkSheet

	Set ex = New Excel.Application
	Set wb = ex.Workbooks.Open("C:AccessDataChapter7-18.xls")
	Set ws = wb.Sheets("Sheet1")

	Set OutTable = New ADODB.Recordset
	OutTable.ActiveConnection = CurrentProject.Connection
	OutTable.Open "[Table7-18]", , adOpenDynamic, adLockOptimistic

	i = 2
	Do While ws.Cells(i, 1) <> ""
	   OutTable.AddNew

	   OutTable.Fields("Date") = ws.Cells(i, 1)
	   OutTable.Fields("Open") = ws.Cells(i, 2)
	   OutTable.Fields("High") = ws.Cells(i, 3)
	   OutTable.Fields("Low") = ws.Cells(i, 4)
	   OutTable.Fields("Close") = ws.Cells(i, 5)
	   OutTable.Fields("Volume") = ws.Cells(i, 6)
	   OutTable.Fields("Adj Close") = ws.Cells(i, 7)

	   OutTable.Update
	   i = i + 1

	Loop

	OutTable.Close
	Set OutTable = Nothing

	Set ws = Nothing
	wb.Close
	Set wb = Nothing
	Set ex = Nothing

	End Sub
The primary difference between this routine and the previous one is that it uses Excel objects explicitly. You can add the Excel Object Library to your application by choosing Tools → References in the Visual Basic Editor, and checking the box next to Microsoft Excel 11.0 Object Library, as shown in Figure 7-22. (Your version number may differ; don’t worry.)
The Excel.Application object is created to grant access to Excel’s functions. This object allows you to open the workbook where your data is stored, and to gain access to the particular worksheet containing your data.
Once you have the Worksheet object, the rest of the application revolves around using the Cell object to retrieve the particular piece of data you want, using the specified row and column values. Both the row and column numbers start with 1, so the normal Excel cell address of A1 is translated into Cell(1, 1), while cell A5 is Cell(5, 1), and cell C7 becomes Cell(7, 3). Note that since row 1 contains column headers, the data begins in row 2.
Access is smart enough to perform the proper type conversions between the Cell object and the Field object, so you don’t need to worry about handling type conversions explicitly.
Exporting Data to Excel
Solution
You can’t.
Because of a legal judgment, Microsoft was forced to disable the ability to interactively update data in an Excel workbook from Access.
The only supported option is to save your data in Access, start Excel, load your data, make your changes, and save it again. Finally, you can load your data in Access and resume working.
Discussion
While the judgment prevents the use of ADO to store data into Excel, you can use the Excel Object Library to store your data. Here’s an example that is similar to the one found in Importing Data from Excel, but that has been modified to save the data instead:
	Sub Example7_19()

	Dim InTable As ADODB.Recordset
	Dim i As Long

	Dim ex As Excel.Application
	Dim wb As Excel.WorkBook
	Dim ws As Excel.WorkSheet

	Set ex = New Excel.Application
	Set wb = ex.Workbooks.Add
	Set ws = wb.Sheets("Sheet1")

	Set InTable = New ADODB.Recordset
	InTable.ActiveConnection = CurrentProject.Connection
	InTable.Open "DowJones", , adOpenDynamic, adLockOptimistic

	ws.Cells(1, 1) = "Date"
	ws.Cells(1, 2) = "Open"
	ws.Cells(1, 3) = "High"
	ws.Cells(1, 4) = "Low"
	ws.Cells(1, 5) = "Close"
	ws.Cells(1, 6) = "Volume"
	ws.Cells(1, 7) = "Adj Close"

	i = 2
	Do While Not InTable.EOF

	   ws.Cells(i, 1) = FormatDateTime(InTable.Fields("Date"), vbShortDate)
	   ws.Cells(i, 2) = FormatNumber(InTable.Fields("Open"), 2)
	   ws.Cells(i, 3) = FormatNumber(InTable.Fields("High"), 2)
	   ws.Cells(i, 4) = FormatNumber(InTable.Fields("Low"), 2)
	   ws.Cells(i, 5) = FormatNumber(InTable.Fields("Close"), 2)
	   ws.Cells(i, 6) = FormatNumber(InTable.Fields("Volume"), 2)
	   ws.Cells(i, 7) = FormatNumber(InTable.Fields("Adj Close"), 2)

	   InTable.MoveNext
	   i = i + 1

	Loop

	InTable.Close
	Set InTable = Nothing

	Set ws = Nothing
	wb.Close True, "C:AccessDataChapter7-19.xls"
	Set wb = Nothing
	Set ex = Nothing

	End Sub
The routine first creates a new instance of the Excel application, then adds a new workbook to the Workbooks collection. The Worksheet object, ws, is then set to point to the worksheet labeled Sheet1 inside the new workbook.
Next, the column names for the data are saved in the first row of the worksheet. Then, inside the main loop, each field is copied from the database to the worksheet. The data is formatted as a string so that Excel can interpret it.
Once all of the data has been processed, the workbook is closed and saved using the specified filename. At this point, you’re ready to start Excel and begin using your data.
Talking to PowerPoint
Solution
While you can’t use ADO to access a table in PowerPoint, you can use the PowerPoint Object Library. Choose Tools → References from the main menu in Visual Basic Editor, and select the latest version of the PowerPoint Object Library (see Figure 7-23).
The following routine uses the object library to extract data from Access and create a PowerPoint presentation:

	Sub Example_20()

	Dim InTable As ADODB.Recordset

	Dim pp AsPowerPoint.Application
	Dim p As PowerPoint.Presentation
	Dim sl As PowerPoint.slide
	Dim sh As PowerPoint.Shape
	Dim i As Long

	Set pp = New PowerPoint.Application
	Set p = pp.Presentations.Add

	Set sl = p.Slides.Add(1, ppLayoutBlank)
	sl.Name = "Dow Top 5 Days by Volume"

	Set sh = sl.Shapes.AddLabel(msoTextOrientationHorizontal, 1, 10, 750, 75)
	sh.TextFrame.TextRange.Text = "Dow Top 5 Days by Volume"
	sh.TextFrame.TextRange.Font.Size = 48
	sh.TextFrame.TextRange.ParagraphFormat.Alignment = ppAlignCenter

	Set sh = sl.Shapes.AddTable(6, 4)

	With sh.Table.Cell(1, 1).Shape.TextFrame
	  .TextRange.Text = "Date"
	  .TextRange.ParagraphFormat.Alignment = ppAlignCenter

	End With

	With sh.Table.Cell(1, 2).Shape.TextFrame
	  .TextRange.Text = "High"
	  .TextRange.ParagraphFormat.Alignment = ppAlignCenter

	End With

	With sh.Table.Cell(1, 3).Shape.TextFrame
	  .TextRange.Text = "Low"
	  .TextRange.ParagraphFormat.Alignment = ppAlignCenter

	End With

	With sh.Table.Cell(1, 4).Shape.TextFrame
	  .TextRange.Text = "Volume"
	  .TextRange.ParagraphFormat.Alignment = ppAlignCenter

	End With

	Set InTable = New ADODB.Recordset
	InTable.ActiveConnection = CurrentProject.Connection
	InTable.Open "Select Top 5 Date, High, Low, Volume From DowJones Order " & _
	    "By Volume Desc", , adOpenDynamic, adLockOptimistic

	i = 2
	Do While Not InTable.EOF

	   With sh.Table.Cell(i, 1).Shape.TextFrame
	     .TextRange.Text = FormatDateTime(InTable.Fields("Date"), vbShortDate)
	     .TextRange.Font.Size = 18
	     .TextRange.ParagraphFormat.Alignment = ppAlignLeft

	   End With

	   With sh.Table.Cell(i, 2).Shape.TextFrame
	     .TextRange.Text = FormatNumber(InTable.Fields("High"), 2, _
	         vbFalse, vbFalse, vbTrue)
	     .TextRange.Font.Size = 18
	     .TextRange.ParagraphFormat.Alignment = ppAlignLeft

	   End With

	   With sh.Table.Cell(i, 3).Shape.TextFrame
	     .TextRange.Text = FormatNumber(InTable.Fields("Low"), 2, _
	         vbFalse, vbFalse, vbTrue)
	     .TextRange.Font.Size = 18
	     .TextRange.ParagraphFormat.Alignment = ppAlignLeft

	   End With

	   With sh.Table.Cell(i, 4).Shape.TextFrame
	     .TextRange.Text = FormatNumber(InTable.Fields("Volume") / 1000000, _
	         2, vbFalse, vbFalse, vbTrue)
	     .TextRange.Font.Size = 18
	     .TextRange.ParagraphFormat.Alignment = ppAlignLeft

	   End With

	   InTable.MoveNext
	   i = i + 1

	Loop

	p.SaveAs "c:AccessDataChapter7-20.ppt"

	pp.Quit

	End Sub
The routine begins by creating a new PowerPoint presentation, and then it adds the first slide and gives it a name in a label at the top. Next, it adds a table to the slide and sets the values for the column headers. It then runs a query that returns the data for the table. For each row returned, the data is formatted and stored in the appropriate cells in the table. Once all of the data has been processed, the table is saved. The final results can be seen in Figure 7-24.
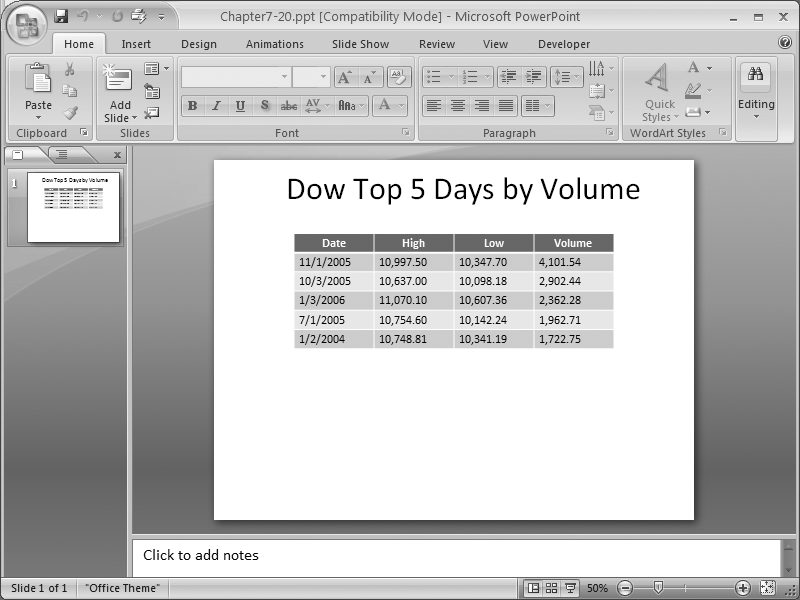
Note in the code that the Volume value in Access is divided by 1,000,000 when placed in the PowerPoint table. This provides a cleaner presentation of the Volume data in the slide. A thoughtful further step would be to go into PowerPoint and highlight that the Volume values are in millions.
Discussion
Using this technique to store your data in a PowerPoint slide may be overkill, as you can simply run a query in Access and paste the results directly into PowerPoint with a lot less effort. However, if you have a lot of tables in your presentation that need to be updated on a regular basis, you may want to employ this technique to minimize cutting-and-pasting errors.
Selecting Random Data
Solution
Sometimes you have too much data to analyze in detail. To make the data more manageable, you may want to choose a random sample.
One trick you can use is to make a copy of the table and assign a randomly generated number to each row. Then, you can pull out a random subset of your data based on those random values.
In theory, you can accomplish this with a SELECT statement like this:
	SELECT DowJones.Date, DowJones.Close, DowJones.Volume
	INTO [Table7-21]
	FROM DowJones
	WHERE Rnd() < .1;
However, this statement won’t work. Access is too smart—it assumes that the Rnd function generates the same value for each row, so it only evaluates the function once and assigns that value to every row. If the value happens to be below .1, it returns all records; if it’s above .1, it returns no records.
Instead, you need to use a statement like this one:
	SELECT DowJones.Date, DowJones.Close, DowJones.Volume
	INTO [Table7-21]
	FROM DowJones
	WHERE Rnd(DowJones.Volume) < .1;
In this statement, the value of Rnd changes for each row because it is evaluated once per row. This statement will select a random sample consisting of approximately 10 percent of your total data elements.
Discussion
When choosing a random subset of data using the random key concept, it’s very important that the random number be totally independent of any of the data in the row. If the random number is affected by the data in any way, it isn’t really random, so your selected data won’t be truly random either.
The Rnd function returns a random value greater than or equal to 0.0, but always less than 1.0. You can use this number as-is, or you can scale it by multiplying it by a constant and/or adding a constant to it. For instance, you can return a set of random integers between 1 and 100 inclusive by multiplying Rnd by 100, truncating the values beyond the decimal point, and adding 1. This can be accomplished using an expression like this:
Int(Rnd() * 100) + 1
The Rnd function takes an optional parameter. If its value is less than zero, the same random number will be returned each time. When you omit the parameter or supply a value greater than zero, the next random number in the sequence will be returned.
Passing a value of zero returns the most recently generated random number. Passing a negative value for the first call, and then omitting this parameter, or passing a positive number for the remaining calls, will generate a repeatable sequence of random numbers. The negative value you send is also called the seed value. Having a repeatable sequence of random numbers can be useful, especially when you want to run a program multiple times and get the exact same set of answers.
Another approach you might use to generate a random selection of data is to add a new field called RandomKey to your table, and then use an UPDATE statement like this one to populate the new field with random values:
	UPDATE [Table7-21A]
	SET NewTable.RandomKey = Rnd(NewTable.Volume);
Then you can create multiple Select statements like this one:
	Select *
	From [Table7-21A]
	Where RandomKey < .1
Using this approach, you can create multiple subsets of data of varying sizes, depending on the value you use to compare with the RandomKey field. Just make sure that RandomKey is either a Number(Single) or Number(Double) type, so that you don’t lose any accuracy when saving your random numbers.