
Chapter 8. Date and Time Calculations
Nearly every database that has ever existed has contained some sort of date and time data. Yet date and time data is often the most challenging type of data to analyze. While you can analyze date/time values mathematically, the results you get may not be what you expect. Sometimes, you need to do a little programming to get the information you want from your date/time data.
In this chapter, you’ll learn how to correctly perform mathematical operations using date/time values—for example, you’ll see how to compute the time elapsed between two date/time values, and how to compensate for holidays and weekends. You’ll also learn how to work with date/time values recorded in different time zones, and how to extract the components of a date/time value (such as the month, day, and year).
Counting Elapsed Time
Problem
I record the start and end times for tasks I perform at work, and I need to compute how much time I’ve spent on each task. How can I do this without getting out my calculator?
Solution
Access allows you to include VBA functions in calculated fields. The DateDiff function provides an easy way to subtract one date/time value from another and return the difference as a number measured in the units of your choice.
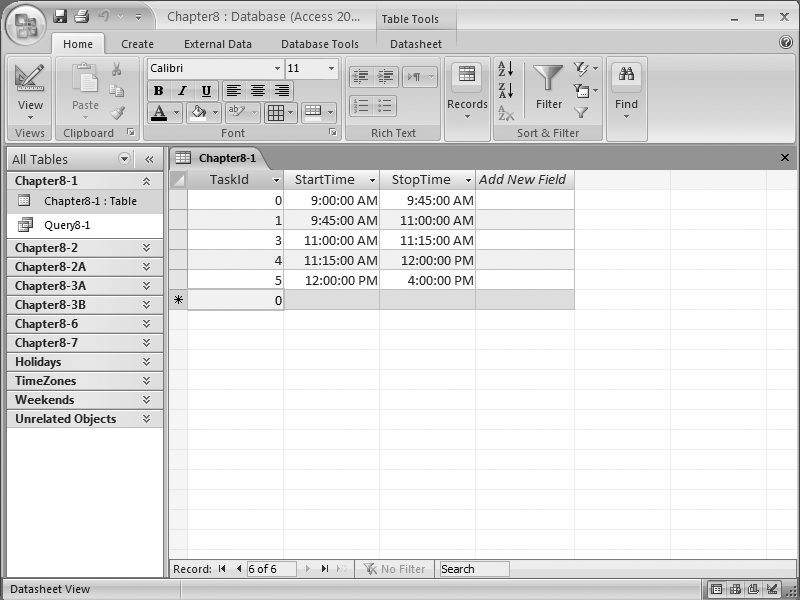
Suppose you have a table containing task identifiers along with start times and stop times for each task (see Figure 8-1), and you want to compute the number of minutes between the two date/time values.
As Figure 8-2 illustrates, you can use the Expression Builder tool to create an expression using the DateDiff function that will compute the values for you.

Or, if you’re more comfortable writing out the SQL by hand, you can create an expression that looks like this:
	SELECT [Chapter8-1].StartTime, [Chapter8-1].StopTime,DateDiff("n",[Chapter8-1]![StartTime],[Chapter8-1]![StopTime]) AS ElapsedTime
	FROM [Chapter8-1];
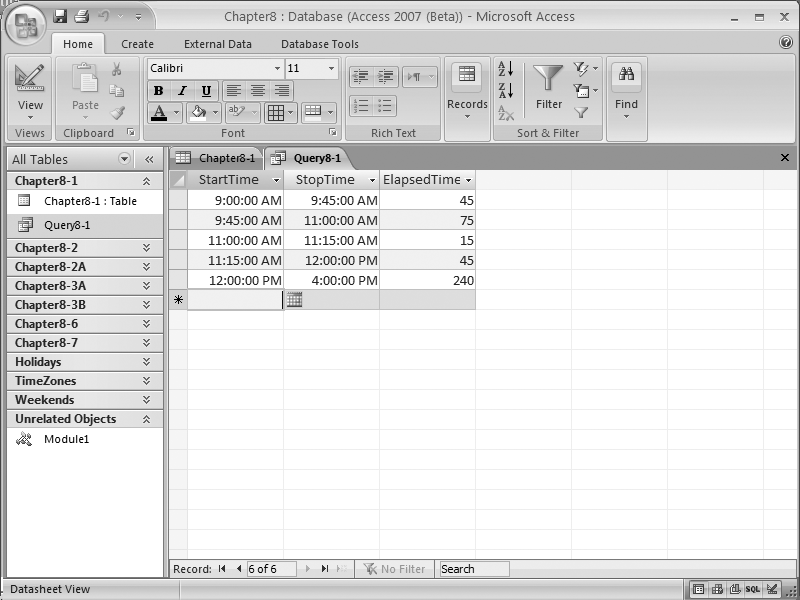
Running this query will generate a new column, ElapsedTime, containing the number of minutes between StartTime and StopTime (see Figure 8-3).
Discussion
The ability to use functions like DateDiff in a query means that you don’t always have to resort to writing a program to analyze your data. But, as with all programming tools, you need to understand how the function works to use it properly.
DateDiff takes a total of five arguments: interval, date1, date2, firstdayofweek, and firstweekofyear.
date1 and date2 are the two values to compare. If date1 occurs before date2, the value returned will be positive, while if date1 occurs after date2, a negative value will be returned.
interval determines the units of the return value (see Table 8-1). Note that the values d and y will produce identical results if you want to count the number of days between date1 and date2, and w and ww will return the number of weeks between date1 and date2. However, there’s a subtle difference in how the number of elapsed weeks is determined. When interval is w (weekday), DateDiff returns the number of weeks starting from that day of the week (i.e., if date1 falls on a Monday, DateDiff counts the number of Mondays until date2; date2 is counted if it also falls on a Monday, but date1 is not counted). If interval is ww (week), however, the DateDiff function returns the number of calendar weeks between the two dates—that is, it counts the number of Sundays between date1 and date2. DateDiff counts date2 if it falls on a Sunday, but not date1. Also, note that minutes are represented with n, since m is used for months.
|
Value |
Description | |
|
|
Returns the number of years between the date/time values | |
|
|
Returns the number of quarters (three-month intervals) between the date/time values | |
|
|
Returns the number of months between the date/time values | |
|
|
Returns the number of days between the date/time values | |
|
|
Returns the number of days between the date/time values | |
|
|
Returns the number of weeks between the date/time values | |
|
|
Returns the number of weeks between the date/time values | |
|
|
Returns the number of hours between the date/time values | |
|
|
Returns the number of minutes between the date/time values | |
|
|
Returns the number of seconds between the date/time values |
firstdayofweek and firstweekofyear are both optional parameters, and are important only if you use a nonstandard calendar. By default, firstdayofweek is Sunday. However, you can choose to use the system value based on the National Language Support (NLS) setting or any other day of the week you choose.
firstweekofyear defaults to the week containing 1 January, meaning that the first week will be numbered 1, and the following week will be numbered 2. However, you can override this setting by choosing to use the NLS setting, the first week that contains at least four days, or the first full week of the year.
Counting Elapsed Time with Exceptions
Problem
Can I use the DateDiff function to count intervals that aren’t contiguous? Specifically, I need to compute the number of working days between two dates, taking into account weekends and holidays.
Solution
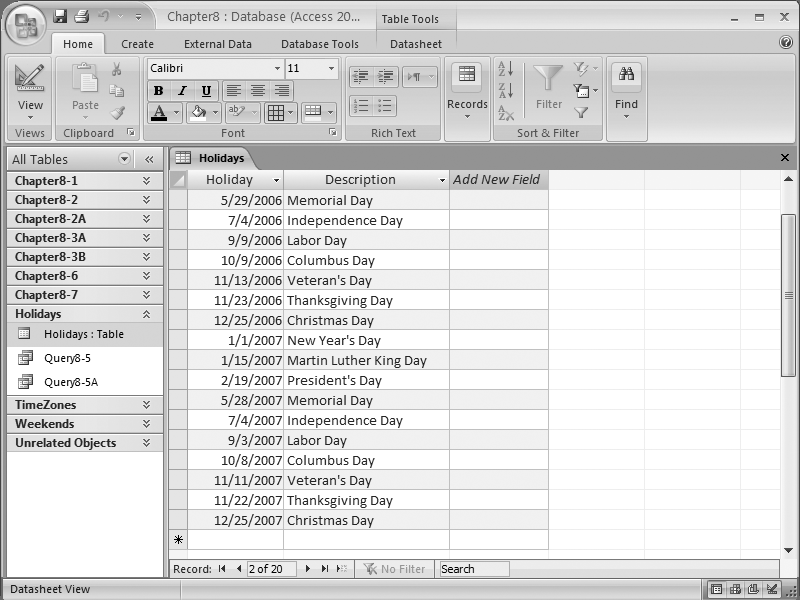
With a little creativity, you can easily compute the number of days between two date/time values, skipping any weekends and holidays that fall between them. First, you need to create a table containing the holidays you wish to subtract (like the one shown in Figure 8-4). Next, you’ll need to create a similar table containing weekend dates.
You can then compute the number of working days between any two dates by finding the total number of days between the dates and subtracting the number of holidays and weekend days. If you use this SQL statement, your results should look like the datasheet view shown in Figure 8-5:
	SELECT [Chapter8-2A].TaskId, [Chapter8-2A].StartDate, [Chapter8-2A].StopDate,
	DateDife("d",[StartDate],[StopDate]) AS Days,
	DateDife("d",[StartDate],[StopDate])
	-(Select count(*) From Holidays Where Holiday Between StartDate And StopDate)
	AS NoHolidays,
	DateDife("d",[StartDate],[StopDate])
	-(Select count(*) From Weekends Where Weekend Between StartDate And StopDate)
	AS NoWeekends,
	DateDife("d",[StartDate],[StopDate])
	-(Select count(*) From Weekends Where Weekend Between StartDate And StopDate)
	-(Select count(*) From Holidays Where Holiday Between StartDate And StopDate)
	AS NoWeekendsOrHolidays
	FROM [Chapter8-2A]
You can verify these results using the calendar shown in Table 8-2.
Discussion
This technique relies on SQL’s ability to execute a Select statement within a Select statement. The first nested Select statement uses the values in the StartDate and StopDate fields to identify the number of holidays that occur within the specified time period. Simply subtracting this value from the number of days between the two dates computed by the DateDife function returns the number of nonholiday days. The same approach is used with the Weekends table to determine the number of weekend days to subtract.
If you prefer, you can combine the Holidays and Weekends tables into one table listing all of the days to ignore when performing the calculation. If you do this, you’ll only need to execute one nested Select statement to get the desired value.
Working with Time Zones
Problem
Date/time values depend on two things: the location of the computer, and the location of the person changing the data on the computer. If both happen to be in the same place, there’s no problem. But if they aren’t, you may end up with values that can’t be compared with each other.
Solution
There are two solutions to this problem—both affect the overall design of the database. The first approach is to store all date/time values using a single time zone, and then to convert them to local time as necessary. The second approach is to capture the local time zone whenever a date/time value is entered into the database; then, when you need to compare values, you can convert them to a common time zone.
Regardless of which approach you choose, the first thing you’ll need is a table containing the information that will allow you to convert one time zone to another (see Figure 8-6). The important elements in this table are TimeZone, Location, and Offset.
The TimeZone field contains the standard abbreviations for the time zones. The values in this field are not unique, but the people that originally defined time zones did so in a way that would allow everyone to understand the appropriate time zone given their geographical location. Offset contains the number of hours that need to be added to Coordinated Universal Time, or UTC, to get the local time (for further details, see the Discussion section).
Assuming that all of the time values in your database are stored in UTC, the following SQL statement will convert these time values into Central Standard Time (CST):

	SELECT [Chapter8-3A].TaskId, [Chapter8-3A].StartTime,[Chapter8-3A].StopTime,
	StartTime+[Offset]/24 AS CSTStartTime,
	StopTime+[Offset]/24 AS CSTStopTime, [Offset]
	FROM [Chapter8-3A],TimeZones
	WHERE TimeZones.TimeZone="CST" And TimeZones.Location="North America";
The results are shown in Figure 8-7.
To compare time values, you must convert them all into a single time zone (usually UTC). You can accomplish this by merely reversing the offset formula and subtracting the Offset value from the local time, as illustrated in this SELECT statement:
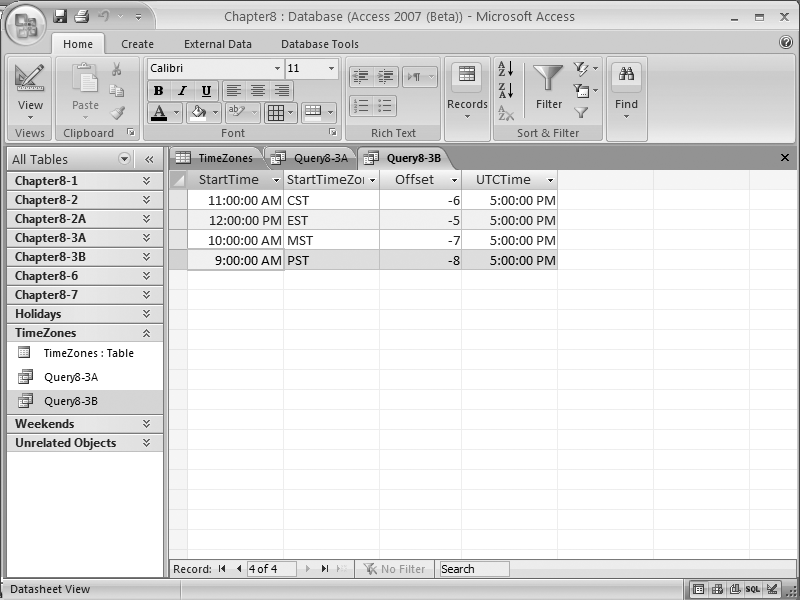
	SELECT [Chapter8-3B].StartTime, [Chapter8-3B].StartTimeZone, TimeZones.Offset,
	StartTime-Offset/24 AS UTCTime
	FROM [Chapter8-3B], TimeZones
	WHERE TimeZone=StartTimeZone and Location="North America";
The results are shown in Figure 8-8.

Discussion
There is a town in England known as Greenwich, whose longitude is zero degrees, zero minutes, and zero seconds. The time at this location is known as Greenwich Mean Time (GMT). It is also known as Zulu time, but most people now refer to this time as Coordinated Universal Time (UTC). This is the base time for all time zones in the world. In other words, all other time zones are measured relative to this zone. This relative measurement is known as the time offset.
The time offset can range from +12 to −12 hours, depending on the location of the time zone. To convert from UTC to your local time zone, merely add the offset value to the UTC time value. To convert your local time zone to UTC, subtract the offset value.
Tip
While the preceding discussion applies to UTC, you can pick any time zone as the “zero” time zone for your database and convert all values to or from that zone. This may seem like a poor solution, but remember that even big web sites like eBay that are based on Pacific Time don’t attempt to convert to your local time zone.
Working Around Leap Years
Problem
On some computer systems, doing calculations involving leap years can cause big problems. This is because some years include 29 February, while others do not.
Solution
This isn’t a problem in Access.
Discussion
The extra day is added to the month of February when the year is divisible by 4, except when the year ends in 00, in which case it isn’t added, except when the century is divisible by 4, in which case it is added. Confused? The year 2008 will have a 29 February, but the year 2100 will not; however, the year 2000 did have a 29 February.
The reason leap years are not a problem in Access is that all date/time values are stored using two parts. The first part is a positive or negative integer, where 0 means 30 December 1899, 1 means 31 December 1899, -1 means 29 December 1899, and so on.
Time values are stored as decimal values, where midnight = 0 and noon = 0.5. This means that 6 A.M. = .25 and 6 P.M. = .75. Another way to think of this value is the number of hours past midnight divided by 24.
This approach also applies to minutes and seconds. For instance, 12:01 A.M. would be stored internally as 0.0006944. To arrive at this value, just convert the minutes and seconds into fractional hours, and then divide by 24.
One nice thing about this technique for storing date and time information is that you can easily add a value containing a specified number of days, hours, etc., to this field to arrive at a new value.
Key to making this work is the ability to convert normal date and time expressions to and from this internal format. Fortunately, Microsoft includes a number of VBA functions that you can use (see Table 8-3).
Isolating the Day, Month, or Year
Problem
I need to be able to collect statistics on my data by day, month, or year. In other words, I need a way to extract only that part of a date/time value.
Solution
Access provides a number of VBA functions that allow you to extract various parts of a date, including Year, Month, Day, and Weekday. These functions can be incorporated into a SQL SELECT statement like this:
	SELECT Holidays.Holiday, Holidays.Description,
	Year([holiday]) AS [Year],
	Month([holiday]) AS [Month],
	Day([Holiday]) AS [Day],
	Weekday([holiday]) AS Weekday,
	MonthName(Month([holiday])) AS MonthName,WeekdayName(Weekday([holiday])) AS WeekdayName
	FROM Holidays;
You can see the results of this query in Figure 8-9.

Discussion
The Year, Month, Day, and Weekday functions each return an integer value with the requested information. These values in turn can be used as part of a more complex query that sorts and/or summarizes the data by these values.
Tip
To make your reports easier to understand, you may want to convert the numbers returned by the Month and Weekday functions into text values. You can do this with the MonthName and WeekdayName functions.
Another way to extract more detailed date information from a date/time value is to use the DatePart function. The DatePart function returns the same values that you can get from the Year, Month, Day, and Weekday functions, but it can also return the quarter, the day of the year, and the week of the year.
DatePart takes four arguments: interval, date, firstdayofweek, and firstweekofyear.
interval determines the units of the return value (see Table 8-4). date is the date/time value from which the value determined by interval will be extracted.
firstdayofweek and firstweekofyear are both optional parameters, and are important only if you use a nonstandard calendar. By default, firstdayofweek is Sunday. However, you can choose to use the system value based on the NLS setting, or any other day of the week you choose.
firstweekofyear defaults to the week containing 1 January, meaning that this week will be numbered 1, and the following week will be numbered 2. However, you can override this setting by choosing to use the NLS setting, the first week that contains at least four days, or the first full week of the year.
Figure 8-10 shows the results produced by these functions when the following query is run:
	SELECT Holiday, Description,
	DatePart("q", Holiday) as Quarter,
	DatePart("y", Holiday) as DayOfYear,
	atePart("ww", Holiday) as WeekOfYear
	FROM Holidays;
Isolating the Hour, Minute, or Second

Solution
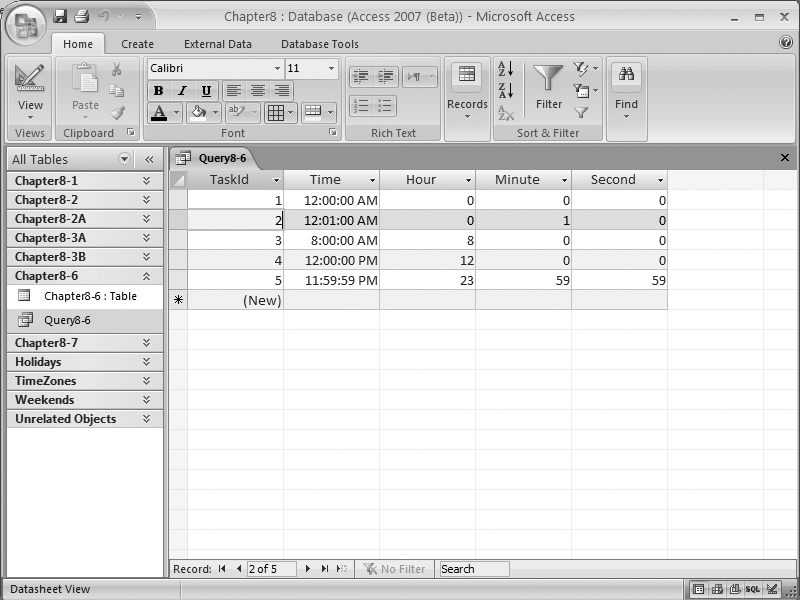
Like the Year, Month, Day, and Weekday functions described in Isolating the Day, Month, or Year, you can use the Hour, Minute, and Second VBA functions to extract those values from a date/time field. For example, the following SQL statement will generate the results in Figure 8-11:
	SELECT [Chapter8-6].TaskId, [Chapter8-6].Time,
	Hour([time]) AS [Hour],Minute([time]) AS [Minute],
	Second([time]) AS [Second]
	FROM [Chapter8-6];
Adding Time
Problem
Occasionally I want to analyze my data by selecting records around a particular date. For example, given a specific date, I might want to select all of the records in the range of seven days before that date to seven days after that date.
Solution
The DateAdd VBA function allows you to add date or time values to a specified date/ time value. Thus, you can generate new date/time values relative to that value.
Let’s assume that you have the data shown in Figure 8-12.
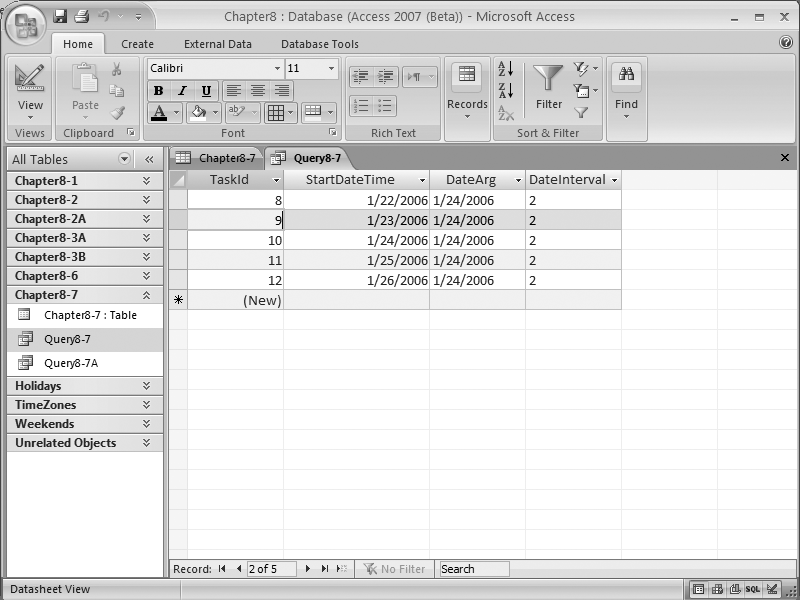
Running the following query prompts the user for two values (DateArg, which is the date around which the rows will be selected, and DateInterval, which is the offset from DateArg that determines the range of dates to be selected):

	SELECT [Chapter8-7].TaskId, [Chapter8-7].StartDateTime, DateArg,DateInterval
	FROM [Chapter8-7]
	WHERE [Chapter8-7].StartDateTime Between DateAdd("d",-DateInterval,DateArg)
	And DateAdd("d",DateInterval,DateArg);
If the user supplies values of 24 Jan 06 and 2 for DateArg and DateInterval, respectively, you should see the results shown in Figure 8-13.
Discussion
The DateAdd function gives you the ability to add many different types of offset values to compute a new date. In addition to days, you can add years, quarters, months, weeks, hours, minutes, and seconds to a date/time value.
The DateAdd function takes three arguments: interval, number, and date.
The interval argument determines the units of the number (an integer value) to be added to date (a date/time value). Possible values for interval are listed in Table 8-5. Negative values for number will result in a new value that is earlier than date, while positive values will result in a new value that is later than date.
|
Value |
Description | |
|
|
Adds the specified number of years to the date/time value | |
|
|
Adds the specified number of quarters to the date/time value | |
|
|
Adds the specified number of months to the date/time value | |
|
|
Adds the specified number of days to the date/time value (same as | |
|
|
Adds the specified number of days to the date/time value (same as | |
|
|
Adds the specified number of days to the date/time value (same as | |
|
|
Adds the specified number of weeks to the date/time value | |
|
|
Adds the specified number of hours to the date/time value | |
|
|
Adds the specified number of minutes to the date/time value | |
|
|